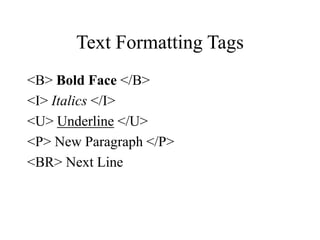
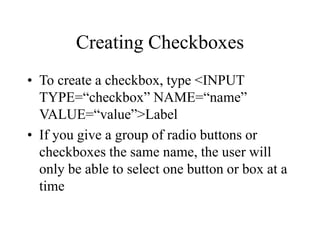
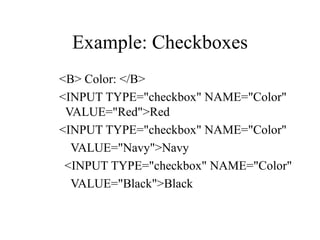
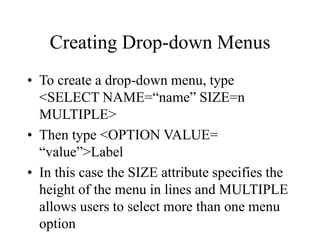
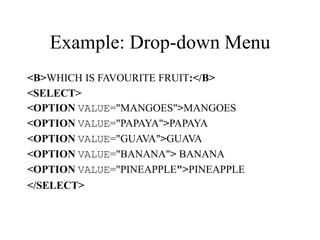
HTML is used to create web pages. It uses tags to define text formatting, images, links, and other page elements. Key HTML tags include <b> for bold text, <i> for italics, <img> to insert images, and <a> for links. Forms can be created using tags like <input> for text boxes and buttons, and <textarea> for comment boxes. Well-formatted HTML pages contain <html>, <head>, <title>, and <body> tags, and use additional tags like <h1> for main headings and <p> for paragraphs.
HTML is used to create web pages and contains tags that define text, images, and other content. Some key tags include:
<p> for paragraphs, <b> for bold text, <i> for italics, and <img> for images. Links between pages are created using the <a> tag along with the href attribute. Forms allow users to enter text, select options, and submit information using tags like <input> for text boxes and buttons, <select> for drop-down menus, and <textarea> for multiple lines of text. The <form> tag defines the form and includes attributes for submission handling.
This document provides an introduction to HTML and describes its basic tags and structures. It explains that HTML is used to create web pages and can include text, graphics, sound and video. It outlines common tags like headings, paragraphs, lists, links, images and tables. It also covers adding formatting to text, backgrounds, borders and inserting comments.
This document provides an introduction to HTML (Hypertext Markup Language) and its basic tags and structures. It discusses what HTML is, common tags like <b> and <i> for bold and italics, nested tags, the basic structure of an HTML page with <html>, <head>, <title>, and <body> tags. It also covers how to format text, add headings, comments, images and more using HTML tags.
Episode 14 - Basics of HTML for SalesforceJitendra Zaa
This document provides an agenda and overview for an introduction to HTML coding basics. It includes 3 sentences:
The document outlines an agenda to cover introduction to HTML tags, text formatting, headings, paragraphs, comments, images, links, lists, forms, tables, cascading style sheets (CSS), and various CSS properties. It provides examples of common HTML elements and tags as well as how to structure an HTML page and insert different types of content. The session will conclude with allowing time for questions and answers.
This document provides an introduction to HTML, including its purpose for creating web pages, basic terminology like tags and elements, how to create an HTML document, text formatting tags, section headings, special characters, and advantages and disadvantages of HTML. It explains how to set up the basic structure of an HTML document with the <html>, <head>, and <body> tags and describes various tags for formatting text, inserting images, and creating lists and links.
HTML is a markup language used to define the structure and layout of web pages. It uses tags to annotate text with information about headings, paragraphs, lists, links, and other elements. Common tags in HTML include <html> <head> and <body> to define overall page structure, as well as <h1>-<h6> for headings, <p> for paragraphs, and <a> for links. HTML documents are viewed in web browsers, which interpret the tags and display page elements accordingly.
HTML is a markup language used to structure and present content on the World Wide Web. It introduces common HTML elements like headings, paragraphs, lists, links, and images. The document discusses HTML tags for text formatting, headings, paragraphs, lines, and rules. It also covers creating an HTML file, saving it, and viewing it in a web browser to see the structured content.
This document discusses HTML text formatting tags. It provides examples of common text formatting tags like <b> for bold, <i> for italics, and <u> for underline. It also covers font tags like <font> for changing font attributes like size, type, and color. The document is intended to teach a class on HTML text formatting tags and previews that the next class will cover image, link, and list tags.
HTML is a markup language used to define the structure and layout of web pages. Key points:
- HTML uses tags like <h1> and <p> to mark up headings, paragraphs, and other elements. A web browser reads HTML tags to display web pages.
- Common HTML elements include headings, paragraphs, links, images, lists, and tables. CSS can be used to style and lay out HTML elements.
- HTML documents have a basic structure including <html>, <head>, and <body> tags where content is placed.
HTML and CSS are markup languages used to structure and style web pages. HTML is used to define the structure and semantics of content, while CSS handles the presentation and layout. Some key points covered include:
- HTML stands for Hypertext Markup Language and uses tags to structure content into headings, paragraphs, lists etc. CSS is used to specify rules that control the presentation and formatting of HTML elements.
- The box model is a fundamental concept in CSS that treats each HTML element as a box, including properties like margins, borders, padding and content.
- Common CSS selectors include element selectors, class selectors, ID selectors and pseudo-classes. The specificity of selectors determines which styles
The document describes various attributes for the HTML <input> element. It discusses attributes like value, readonly, disabled, size, maxlength, min, max, multiple, pattern, placeholder, required, step, autofocus, list, autocomplete that control the functionality and appearance of input fields. CSS can be used to style inputs by specifying properties for various input types. Styles can be defined internally, externally in CSS files, or inline for individual elements.
The document discusses HTML (Hypertext Markup Language). It provides an introduction to HTML, explaining that HTML is used to create documents for display on the World Wide Web and is made up of markup tags. It also outlines some of the basic HTML tags needed to create a simple HTML document, including <HTML>, <HEAD>, <BODY>, and common text formatting tags like <B> and <I>.
- HTML pages are text documents that use tags to provide structure and meaning to the content. Common tags include <h1> for main headings, <p> for paragraphs, and <img> for images.
- Links allow connecting between pages using the <a> tag and href attribute. Tables are made using <table>, <tr>, and <td> tags. Forms collect user input using controls like text fields and buttons.
HTML is the language used to create web pages. It uses tags to structure and format text, images, and other content. Some key HTML tags include <p> for paragraphs, <h1>-<h6> for headings, <b> for bold text, and <img> for images. Links allow users to navigate between pages using the <a> tag, while anchors enable navigation to specific parts of a page. Lists are created with the <ol> and <ul> tags for ordered and unordered lists.
This document provides an overview of HTML (Hypertext Markup Language) and how to create basic web pages. It discusses HTML tags like <html>, <head>, <body>, and other common tags. It also covers attributes, headings, paragraphs, line breaks, horizontal rules, text formatting, fonts, the <div> tag, and the <marquee> tag for scrolling text. The goal is to teach the fundamentals of using HTML to structure and style web page content.
HTML is used to design web pages and is not a programming language. It uses tags like <h1> and <p> to structure and style text content. Common tags are used to create headings, paragraphs, lists, links, and tables. Forms allow users to enter interactive content through elements like text boxes and buttons. Overall, HTML provides the building blocks for displaying structured documents on the web.
HTML tags, Tags, Empty tag, Container tag, Attributes, Structure of HTML document, Head section, body section, comment tags, Font tag, attribute of font tag, More tags on formatting, heading tags, paragraph tag, the paragraph attribute 'align', line break, horizontal tag, line break, background tag, text attribute, Marquee tag,
This document provides instructions on basic HTML tags for formatting text and adding images and links to a web page. Key tags covered include <html>, <head>, <body>, headings <h1>-<h6>, paragraphs <p>, line breaks <br>, bold <b>, italic <i>, underline <u>, fonts <font>, horizontal rules <hr>, backgrounds <body>, images <img>, and links <a>. The document contains examples of code for each tag discussed to demonstrate its proper usage in an HTML page.
This document provides an introduction to HTML (Hypertext Markup Language) and web page programming. It defines HTML as a markup language that uses tags to structure and present content on web pages. It describes some basic HTML tags like <html>, <head>, <title>, and <body> that provide the underlying framework and structure for web pages. It also covers other common tags for formatting text, inserting images, and setting attributes like color, size, and alignment. The document is intended as a classroom resource to teach the fundamentals of HTML and creating simple web pages.
HTML5: Introduction, Why HTML5? Formatting text by using tags, using lists and backgrounds, Creating hyperlinks and anchors. Style sheets, CSS formatting text using style sheets, formatting paragraphs using style sheets.
HTML is a markup language used to structure and present content on the web. It uses tags to mark elements like headings, paragraphs, lists, links, images and more. Forms allow collecting user input with different controls like text fields, checkboxes, radio buttons and more. Tables arrange data into rows and columns. Links connect pages together and frames divide pages into sections.
The document provides an introduction to HTML, including its objectives, tools, terminology, and how to create an HTML document. It discusses important HTML tags like <HTML>, <HEAD>, <BODY> and describes how to format text using tags like <B>, <I>, <FONT>. It also explains how to save and view an HTML file in a web browser.
The document provides an overview of CSS (Cascading Style Sheets) including its basic syntax and the three main methods for applying stylesheets: inline, internal, and external. It explains that CSS is used to control the layout and formatting of HTML elements and allows for consistent styling across multiple web pages. The key points covered are:
- CSS syntax uses selectors, properties, and values to style HTML elements
- Stylesheets can be defined internally within HTML, inline within elements, or externally in separate files
- External stylesheets are considered the best practice and allow linking CSS to HTML documents
The document provides an introduction and overview for an INFO 2106 Website Design and Management course. It outlines the agenda, including an introduction to the professor and Blackboard, as well as information on grading, academic dishonesty, and how to succeed in the course. It then covers the basics of HTML, including common tags like <p>, <ul>, <li>, and <a>. Examples are provided of how to create paragraphs, lists, links, and tables. It also discusses opening links in new windows, static vs dynamic websites, and important code snippets for building webpages.
The document discusses Cascading Style Sheets (CSS) and how they are used to control the layout and formatting of web pages. It covers the basic syntax of CSS code and the three main ways to apply stylesheets: internally, inline, and externally. Key points include that CSS separates structure and presentation, stylesheets allow consistent styling across pages, and the <link> tag is used to connect external CSS files to HTML documents.
A Guide to a Winning Interview June 2024Bruce Bennett
This webinar is an in-depth review of the interview process. Preparation is a key element to acing an interview. Learn the best approaches from the initial phone screen to the face-to-face meeting with the hiring manager. You will hear great answers to several standard questions, including the dreaded “Tell Me About Yourself”.
In the intricate tapestry of life, connections serve as the vibrant threads that weave together opportunities, experiences, and growth. Whether in personal or professional spheres, the ability to forge meaningful connections opens doors to a multitude of possibilities, propelling individuals toward success and fulfillment.
Eirini is an HR professional with strong passion for technology and semiconductors industry in particular. She started her career as a software recruiter in 2012, and developed an interest for business development, talent enablement and innovation which later got her setting up the concept of Software Community Management in ASML, and to Developer Relations today. She holds a bachelor degree in Lifelong Learning and an MBA specialised in Strategic Human Resources Management. She is a world citizen, having grown up in Greece, she studied and kickstarted her career in The Netherlands and can currently be found in Santa Clara, CA.
Learnings from Successful Jobs SearchersBruce Bennett
Are you interested to know what actions help in a job search? This webinar is the summary of several individuals who discussed their job search journey for others to follow. You will learn there are common actions that helped them succeed in their quest for gainful employment.
LinkedIn for Your Job Search June 17, 2024Bruce Bennett
This webinar helps you understand and navigate your way through LinkedIn. Topics covered include learning the many elements of your profile, populating your work experience history, and understanding why a profile is more than just a resume. You will be able to identify the different features available on LinkedIn and where to focus your attention. We will teach how to create a job search agent on LinkedIn and explore job applications on LinkedIn.
We recently hosted the much-anticipated Community Skill Builders Workshop during our June online meeting. This event was a culmination of six months of listening to your feedback and crafting solutions to better support your PMI journey. Here’s a look back at what happened and the exciting developments that emerged from our collaborative efforts.
A Gathering of Minds
We were thrilled to see a diverse group of attendees, including local certified PMI trainers and both new and experienced members eager to contribute their perspectives. The workshop was structured into three dynamic discussion sessions, each led by our dedicated membership advocates.
Key Takeaways and Future Directions
The insights and feedback gathered from these discussions were invaluable. Here are some of the key takeaways and the steps we are taking to address them:
• Enhanced Resource Accessibility: We are working on a new, user-friendly resource page that will make it easier for members to access training materials and real-world application guides.
• Structured Mentorship Program: Plans are underway to launch a mentorship program that will connect members with experienced professionals for guidance and support.
• Increased Networking Opportunities: Expect to see more frequent and varied networking events, both virtual and in-person, to help you build connections and foster a sense of community.
Moving Forward
We are committed to turning your feedback into actionable solutions that enhance your PMI journey. This workshop was just the beginning. By actively participating and sharing your experiences, you have helped shape the future of our Chapter’s offerings.
Thank you to everyone who attended and contributed to the success of the Community Skill Builders Workshop. Your engagement and enthusiasm are what make our Chapter strong and vibrant. Stay tuned for updates on the new initiatives and opportunities to get involved. Together, we are building a community that supports and empowers each other on our PMI journeys.
Stay connected, stay engaged, and let’s continue to grow together!
About PMI Silver Spring Chapter
We are a branch of the Project Management Institute. We offer a platform for project management professionals in Silver Spring, MD, and the DC/Baltimore metro area. Monthly meetings facilitate networking, knowledge sharing, and professional development. For more, visit pmissc.org.
Khushi Saini, An Intern from The Sparks Foundationkhushisaini0924
This is my first task as an Talent Acquisition(Human resources) Intern in The Sparks Foundation on Recruitment, article and posts.
I invitr everyone to look into my work and provide me a quick feedback.
2. What is HTML?
• HTML, otherwise known as HyperText
Markup Language, is the language used to
create Web pages
• Using HTML, you can create a Web page
with text, graphics, sound, and video
3. Tags
• The essence of HTML programming is tags
• A tag is a keyword enclosed by angle
brackets ( Example: <I> )
• There are opening and closing tags for
many but not all tags; The affected text is
between the two tags
4. More Tags...
• The opening and closing tags use the same
command except the closing tag contains
and additional forward slash /
• For example, the expression <B>
Warning </B> would cause the word
‘Warning’ to appear in bold face on a Web
page
5. Nested Tags
• Whenever you have HTML tags within
other HTML tags, you must close the
nearest tag first
• Example:
<H1> <I> The Nation </I> </H1>
6. Structure of a Web Page
• All Web pages share a
common structure
• All Web pages should
contain a pair of
<HTML>, <HEAD>,
<TITLE>, and
<BODY> tags
<HTML>
<HEAD>
<TITLE> Example </TITLE>
</HEAD>
<BODY>
This is where you would include
the text and images on your Web
page.
</BODY>
</HTML>
7. The <TITLE> Tag
• Choose the title of your Web page carefully;
The title of a Web page determines its
ranking in certain search engines
• The title will also appear on Favorite lists,
History lists, and Bookmark lists to identify
your page
8. Text Formatting
• Manipulating text in HTML can be tricky;
Oftentimes, what you see is NOT what you
get
• For instance, special HTML tags are needed
to create paragraphs, move to the next line,
and create headings
9. Text Formatting Tags
<B> Bold Face </B>
<I> Italics </I>
<U> Underline </U>
<P> New Paragraph </P>
<BR> Next Line
10. Changing the Font
• The expression <FONT FACE = “fontname”>
… </FONT> can be used to change the font of
the enclosed text
• To change the size of text use the
expression <FONT SIZE=n> …. </FONT>
where n is a number between 1 and 7
11. Changing the Font
• To change the color, use <FONT
COLOR=“red”>…. </FONT>; The color
can also be defined using hexadecimal
representation ( Example: #ffffff )
• These attributes can be combined to change the
font, size, and color of the text all at once; For
example, <FONT SIZE=4 FACE=“Courier”
COLOR=“red”> …. </FONT>
12. Headings
• Web pages are typically organized into
sections with headings; To create a heading
use the expression <Hn>….</Hn> where n
is a number between 1 and 7
• In this case, the 1 corresponds to the largest
size heading while the 7 corresponds to the
smallest size
13. Aligning Text
• The ALIGN attribute can be inserted in the
<P> and <Hn> tags to right justify, center,
or left justify the text
• For example, <H1 ALIGN=CENTER> The
New York Times </H1> would create a
centered heading of the largest size
14. Comment Statements
• Comment statements are notes in the HTML
code that explain the important features of
the code
• The comments do not appear on the Web
page itself but are a useful reference to the
author of the page and other programmers
• To create a comment statement use the
<!-- …. --> tags
15. The Infamous Blink Tag
• It is possible to make text blink using the
<BLINK> … </BLINK> tag
• However, it is best to use this feature at
most sparingly or not at all; What seems
like a good idea to a Web designer can
become very annoying to a Web user
• The <BLINK> tag is not supported by
Internet Explorer
16. Page Formatting
• To define the background color, use the
BGCOLOR attribute in the <BODY> tag
• To define the text color, use the TEXT
attribute in the <BODY> tag
• To define the size of the text, type
<BASEFONT SIZE=n>
18. Inserting Images
• Type <IMG SRC = “image.ext”>, where
image.ext indicates the location of the
image file
• The WIDTH=n and HEIGHT=n attributes
can be used to adjust the size of an image
• The attribute BORDER=n can be used to
add a border n pixels thick around the
image
19. Alternate Text
• Some browsers don’t support images. In
this case, the ALT attribute can be used to
create text that appears instead of the image.
• Example:
<IMG SRC=“satellite.jpg” ALT = “Picture
of satellite”>
20. Links
• A link lets you move from one page to
another, play movies and sound, send email,
download files, and more….
• A link has three parts: a destination, a
label, and a target
• To create a link type
<A HREF=“page.html”> label </A>
21. Anatomy of a Link
<A HREF=“page.html”> label </A>
• In the above link, “page.html” is the
destination. The destination specifies the
address of the Web page or file the user will
access when he/she clicks on the link.
• The label is the text that will appear
underlined or highlighted on the page
22. Example: Links
• To create a link to CNN, I would type:
<A HREF=“http://www.cnn.com”>CNN</A>
• To create a link to MIT, I would type:
<A HREF=“http://www.mit.edu”>MIT</A>
23. Changing the Color of Links
• The LINK, VLINK, and ALINK attributes
can be inserted in the <BODY> tag to
define the color of a link
– LINK defines the color of links that have not
been visited
– VLINK defines the color of links that have
already been visited
– ALINK defines the color of a link when a user
clicks on it
24. Using Links to Send Email
• To create a link to an email address, type
<A HREF=“mailto:email_address”>
Label</A>
• For example, to create a link to send email
to myself, I would type: <A HREF=“mailto:
ktdunn@mit.edu”>email Katie Dunn</A>
25. Anchors
• Anchors enable a user to jump to a specific
place on a Web site
• Two steps are necessary to create an anchor.
First you must create the anchor itself. Then
you must create a link to the anchor from
another point in the document.
26. Anchors
• To create the anchor itself, type <A
NAME=“anchor name”>label</A> at the
point in the Web page where you want the
user to jump to
• To create the link, type <A HREF=“#anchor
name”>label</A> at the point in the text
where you want the link to appear
28. Ordered Lists
• Ordered lists are a list
of numbered items.
• To create an ordered
list, type:
<OL>
<LI> This is step one.
<LI> This is step two.
<LI> This is step three.
</OL>
Here’s how it would
look on the Web:
29. More Ordered Lists….
• The TYPE=x attribute allows you to change
the the kind of symbol that appears in the
list.
– A is for capital letters
– a is for lowercase letters
– I is for capital roman numerals
– i is for lowercase roman numerals
30. Unordered Lists
• An unordered list is a
list of bulleted items
• To create an unordered
list, type:
<UL>
<LI> First item in list
<LI> Second item in list
<LI> Third item in list
</UL>
Here’s how it would
look on the Web:
31. More Unordered Lists...
• The TYPE=shape attribute allows you to
change the type of bullet that appears
– circle corresponds to an empty round bullet
– square corresponds to a square bullet
– disc corresponds to a solid round bullet; this is
the default value
32. Forms
What are forms?
• An HTML form is an area of the document that
allows users to enter information into fields.
• A form may be used to collect personal
information, opinions in polls, user preferences
and other kinds of information.
33. Forms
• There are two basic components of a Web
form: the shell, the part that the user fills
out, and the script which processes the
information
• HTML tags are used to create the form
shell. Using HTML you can create text
boxes, radio buttons, checkboxes, drop-
down menus, and more...
35. The Form Shell
• A form shell has three important parts:
– the <FORM> tag, which includes the address
of the script which will process the form
– the form elements, like text boxes and radio
buttons
– the submit button which triggers the script to
send the entered information to the server
36. Creating the Shell
• To create a form shell, type <FORM
METHOD=POST ACTION=“script_url”>
where “script_url” is the address of the
script
• Create the form elements
• End with a closing </FORM> tag
37. Creating Text Boxes
• To create a text box, type <INPUT
TYPE=“text” NAME=“name”
VALUE=“value” SIZE=n
MAXLENGTH=n>
• The NAME, VALUE, SIZE, and
MAXLENGTH attributes are optional
38. Text Box Attributes
• The NAME attribute is used to identify the
text box to the processing script
• The VALUE attribute is used to specify the
text that will initially appear in the text box
• The SIZE attribute is used to define the size
of the box in characters
• The MAXLENGTH attribute is used to
define the maximum number of characters
that can be typed in the box
39. Example: Text Box
First Name: <INPUT
TYPE="text"
NAME="FirstName"
VALUE="First Name"
SIZE=20>
<BR><BR>
Last Name: <INPUT
TYPE="text"
NAME="LastName"
VALUE="Last Name"
SIZE=20>
<BR><BR>
• Here’s how it would
look on the Web:
40. Creating Larger Text Areas
• To create larger text areas, type
<TEXTAREA NAME=“name” ROWS=n1
COLS=n2 WRAP> Default Text
</TEXTAREA>, where n1 is the height of
the text box in rows and n2 is the width of
the text box in characters
• The WRAP attribute causes the cursor to
move automatically to the next line as the
user types
42. Creating Radio Buttons
• To create a radio button, type <INPUT
TYPE=“radio” NAME=“name”
VALUE=“data”>Label, where “data” is the
text that will be sent to the server if the
button is checked and “Label” is the text
that identifies the button to the user
44. Creating Checkboxes
• To create a checkbox, type <INPUT
TYPE=“checkbox” NAME=“name”
VALUE=“value”>Label
• If you give a group of radio buttons or
checkboxes the same name, the user will
only be able to select one button or box at a
time
46. Creating Drop-down Menus
• To create a drop-down menu, type
<SELECT NAME=“name” SIZE=n
MULTIPLE>
• Then type <OPTION VALUE=
“value”>Label
• In this case the SIZE attribute specifies the
height of the menu in lines and MULTIPLE
allows users to select more than one menu
option
48. Creating a Submit Button
• To create a submit button, type <INPUT
TYPE=“submit”>
• If you would like the button to say
something other than submit, use the
VALUE attribute
• For example, <INPUT TYPE=“submit”
VALUE=“Buy Now!”> would create a
button that says “Buy Now!”
49. Creating a Reset Button
• To create a reset button, type <INPUT
TYPE=“reset”>
• The VALUE attribute can be used in the
same way to change the text that appears on
the button
50. Tables
• Tables can be used to display rows and
columns of data, create multi-column text,
captions for images, and sidebars
• The <TABLE> tag is used to create a table;
the <TR> tag defines the beginning of a row
while the <TD> tag defines the beginning of
a cell
51. Adding a Border
• The BORDER=n attribute allows you to
add a border n pixels thick around the table
• To make a solid border color, use the
BORDERCOLOR=“color” attribute
• To make a shaded colored border, use
BODERCOLORDARK=“color” and
BORDERCOLORLIGHT=“color”
52. Creating Simple Table
<TABLE BORDER=10>
<TR>
<TD>One</TD>
<TD>Two</TD>
</TR>
<TR>
<TD>Three</TD>
<TD>Four</TD>
</TR>
</TABLE>
• Here’s how it would
look on the Web:
53. Adjusting the Width
• When a Web browser displays a table, it
often adds extra space. To eliminate this
space use the WIDTH =n attribute in the
<TABLE> and <TD> tags
• Keep in mind - a cell cannot be smaller than
its contents, and if you make a table wider
than the browser window, users will not be
able to see parts of it.
54. Centering a Table
• There are two ways to center a table
– Type <TABLE ALIGN=CENTER>
– Enclose the <TABLE> tags in opening and
closing <CENTER> tags
55. Wrapping Text around a Table
• It is possible to wrap text around a table. This
technique is often used to keep images and
captions together within an article.
• To wrap text around a table, type <TABLE
ALIGN = LEFT> to align the table to the left
while the text flows to the right.
• Create the table using the <TR>, <TD>, and
</TABLE> tags as you normally would
56. Adding Space around a Table
• To add space around a table, use the
HSPACE=n and VSPACE=n attributes in
the <TABLE> tag
• Example:
<TABLE HSPACE=20 VSPACE=20>
57. Spanning Cells Across Columns
• It is often necessary to span one cell across
many columns. For example, you would use
this technique to span a headline across the
columns of a newspaper article.
• To span a cell across many columns, type
<TD COLSPAN=n>, where n is the number
of columns to be spanned
58. Spanning Cells Across Rows
• To span a cell across many rows, type <TD
ROWSPAN=n>, where n is the number of
rows
59. Aligning Cell Content
• By default, a cell’s content are aligned
horizontally to the left and and vertically in
the middle.
• Use VALIGN=direction to change the
vertical alignment, where “direction” is top,
middle, bottom, or baseline
• Use ALIGN=direction to change the
horizontal alignment where “direction” is
left, center, or right
60. Controlling Cell Spacing
• Cell spacing is the space between cells
while cell padding is the space around the
contents of a cell
• To control both types of spacing, use the
CELLSPACING =n and
CELLPADDING=n attributes in the
<TABLE> tag
61. Nesting Tables
• Create the inner table
• Create the outer table and determine which cell of
the outer table will hold the inner table
• Test both tables separately to make sure they work
• Copy the inner table into the cell of the outer table
• Don’t nest too many tables. If you find yourself
doing that, find an easier way to lay out your Web
page
62. Changing a Cell’s Color
• To change a cell’s color, add the
BGCOLOR=“color” attribute to the <TD>
tag
• Example:
<TD BGCOLOR=“blue”>
63. Dividing Your Table into Column
Groups
• You can divide your table into two kinds of
column groups: structural and non-
structural.
• Structural column groups control where
dividing lines are drawn; Non-structural
groups do not
• Both let you format an entire column of
cells at once
64. Column Groups
• To create structural column groups, type
<COLGROUP SPAN=n> after the <TABLE> tag,
where n is the number of columns in the group
• To create non-structural column groups, type
<COL SPAN=n>, where n is the number of
columns in the group
65. Dividing Table into Horizontal
Sections
• You can also create a horizontal section
consisting of one or more rows. This allows
you to format the rows all at once
• To create a horizontal section, type
<THEAD>, <TBODY>, or <TFOOT>
before the first <TR> tag of the section
• Netscape does not support these tags
66. Controlling Line Breaks
• Unless you specify otherwise a browser will
divide the lines in a cell as it sees fit.
• The NOWRAP attribute placed within the
<TD> tag forces the browser to keep all the
text in a cell on one line
• Example:
– <TD NOWRAP>Washington, D.C.
67. Parting Words….
• If you can imagine a way to lay out your
page, chances are it is possible using HTML
• When in doubt, use an HTML reference