Downloaded 212 times


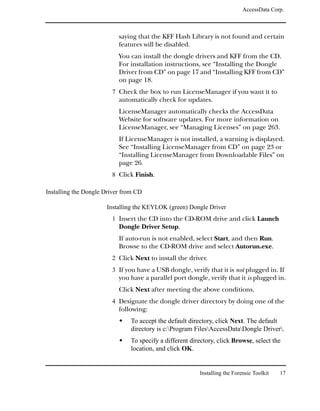


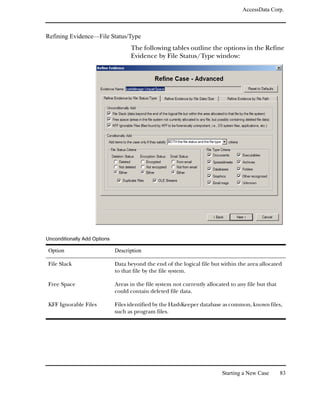


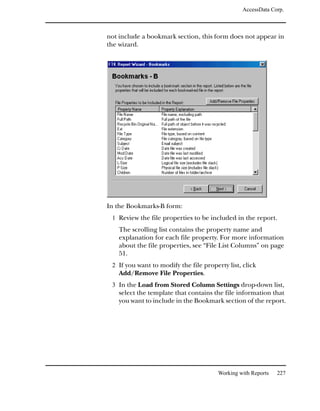
![AccessData Corp.
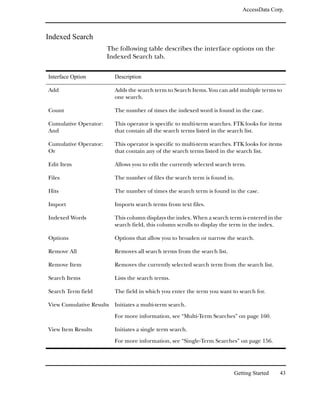
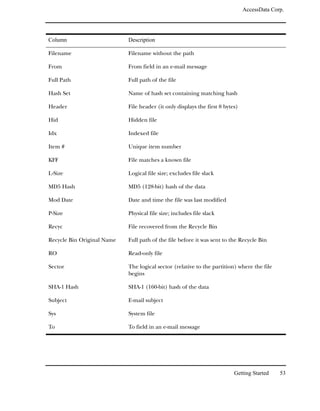
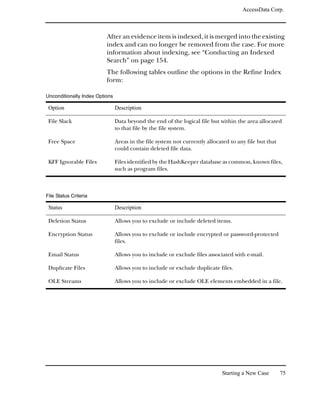
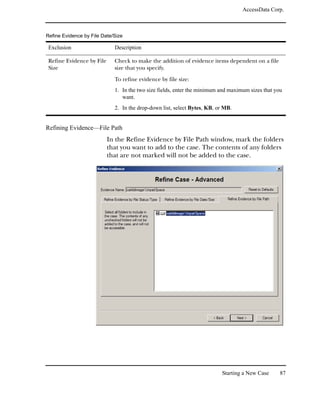
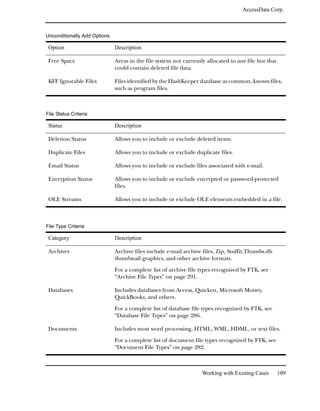
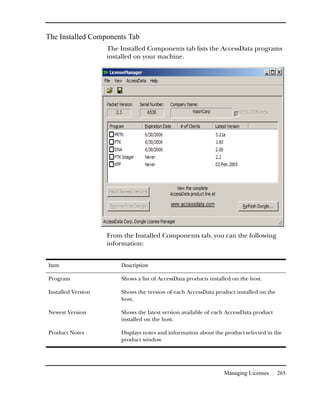
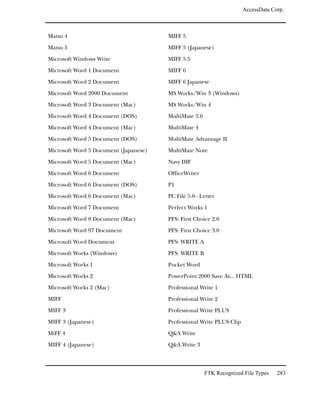
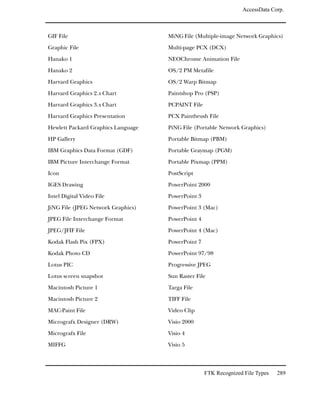
Searching for Internet Keywords
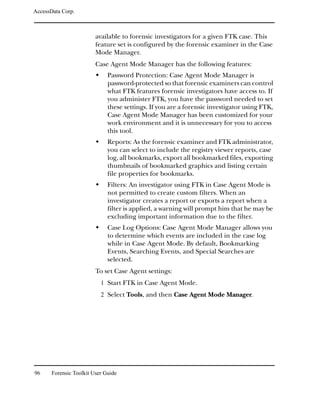
The Internet keyword search finds Internet keywords, such as
http, www, com, net, and org. You can search for both URL and e-
mail related strings.
Important: Evidence items must be indexed before you can perform an
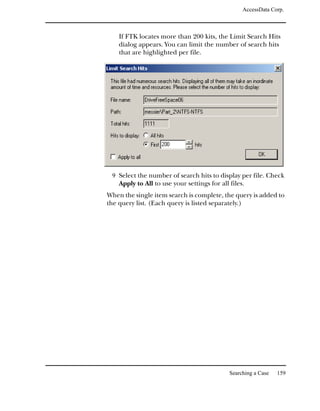
Internet keyword search.
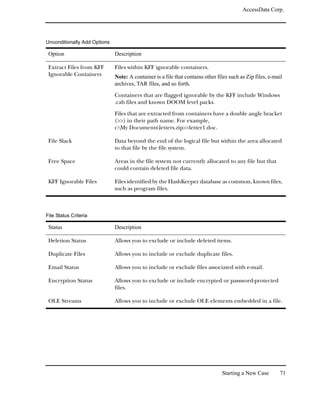
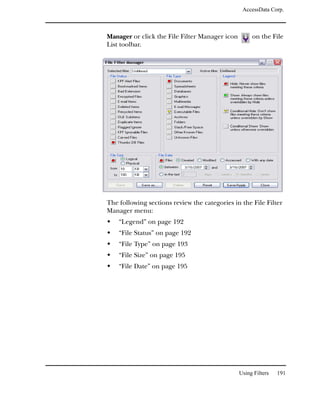
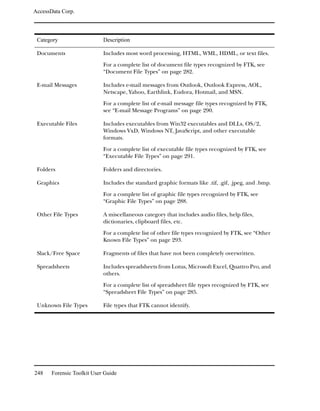
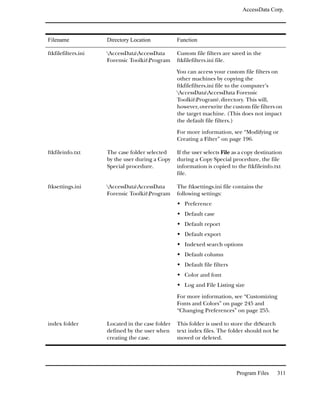
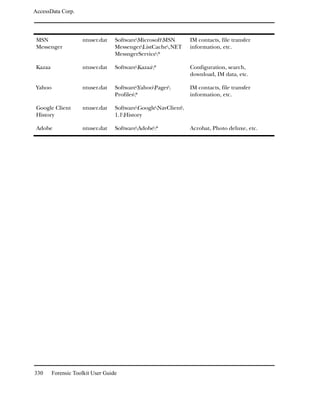
The following table outlines the URL search options:
URL Option Description
http://... Searches for text that starts with http://.
www. ... Searches for text that starts with www.
... .com Searches for text that ends with .com.
... .org Searches for text that ends with .org.
... .net Searches for text that ends with .net.
... .[empty field] Searches for text that ends with the domain
name that you enter in the box.
The following table outlines the e-mail address search
options:
E-mail Address Option Description
...@... .com Searches for e-mail address that ends
with.com.
...@... .org Searches for e-mail address that ends with
.org.
...@... .net Searches for e-mail address that ends with
.net.
...@... .[empty field] Searches for e-mail address that ends with
the domain name that you enter in the box.
Advanced Searching 177](https://image.slidesharecdn.com/ftk1-80manual-110721160233-phpapp02/85/Ftk-1-80-manual-190-320.jpg)
![AccessData Corp.
Versions of FTK before 1.80 used an index granularity of 4
characters when indexing unknown file types. FTK 1.80 can be
set to use an index granularity of 3 or 2 characters for
unknown file types. Lowering the index granularity will
sometimes make it possible for FTK to carve more .bmp, .png,
and .emf files, at the cost of increased pre-processing time. To
lower the index granularity, change the value of the
IndexGranularity entry in the [Global] section of the
FtkSettings.0.ini file to 3 or 2.
Note: Make any change to the .ini file while FTK is closed. If FTK is open
when a change is made, closing FTK will rewrite the old setting to the file and
the change will not be saved.
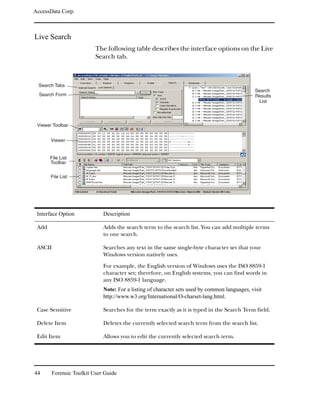
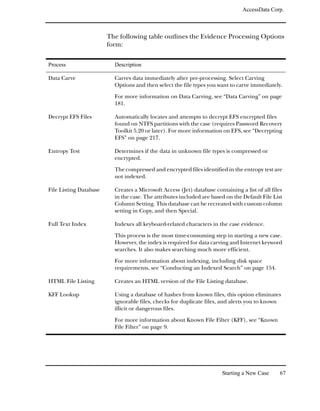
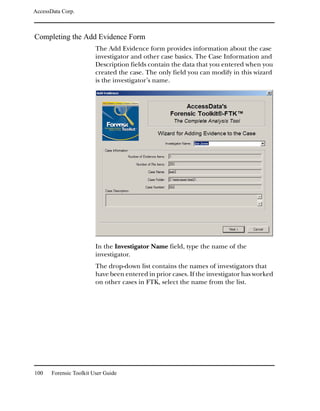
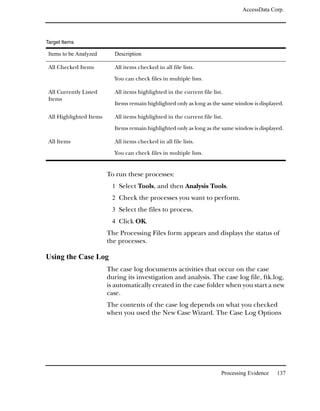
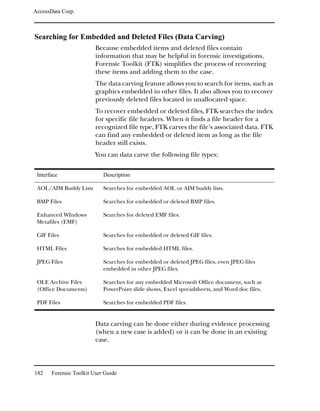
Data Carving Files During Evidence Processing in a New Case
You can select to data carve when a case is added by selecting
Data Carve in the Process to Perform Screen during the New
Case Wizard. FTK carves data immediately after pre-
processing. Select Carving Options and then select the file
types you want to carve immediately.
Important: Full-text indexing must be enabled in order to the Data Carve
option.
For more information, see “Selecting Evidence Processes” on
page 65.
When you select to data carve when creating a new case, FTK
creates a cache for the carved data. If data is located, the cache
is saved.
To access the cache:
1 Select Tools, and then Data Carving.
2 Check the file types to carve.
You can click Select All or Select None to speed up the
selection process.
3 Click OK.
Data Carving 183](https://image.slidesharecdn.com/ftk1-80manual-110721160233-phpapp02/85/Ftk-1-80-manual-196-320.jpg)


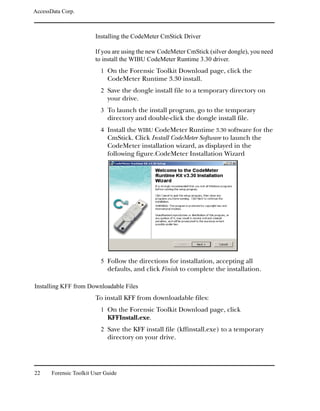
![AccessData Corp.
Change the default directory for RSRs.
To Change RSR settings in the FtkSettings.0.ini file, do the
following:
1 Close FTK.
2 Browse to the Program FilesAccessDataAccessData
Forensic Toolkit 1.80.0ProgramFtkSettings.0.ini
(configuration) file.
3 Open the file with a text editor.
4 Scroll to the [Global] section near the end of the file.
5 Change the settings:
To Do this
Select the Registry Change PreprocessRegistryFiles=0 to
Reports check box by PreprocessRegistryFiles=1
default in the Evidence
Processing Options
form.
Add Registry Summary Change AddRegistryReportsToCase=0 to
Reports as evidence AddRegistryReportsToCase=1
items to every case.
Change the default Change RVRSRDirectory= to
location for RSRs. RVRSRDirectory=[default directory path]
6 Save and close the FtkSettings.0.ini file.
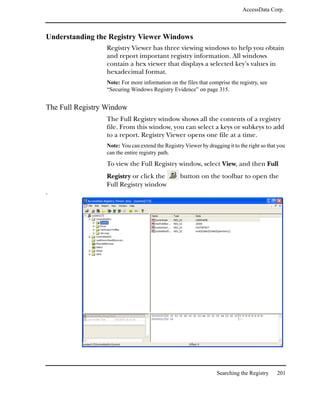
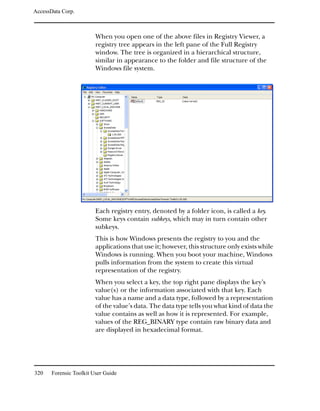
Searching for Specific Data
Registry Viewer lets you perform live searches for specific
information in a registry file.
Note: Registry Viewer performs searches in the currently open window.
Therefore, if you want to search the entire registry file, you must search from
the Full Registry window. Likewise, if you want to search only in common
areas, you must search from the Common Areas window, and so forth.
To search for specific data:
Searching the Registry 211](https://image.slidesharecdn.com/ftk1-80manual-110721160233-phpapp02/85/Ftk-1-80-manual-224-320.jpg)


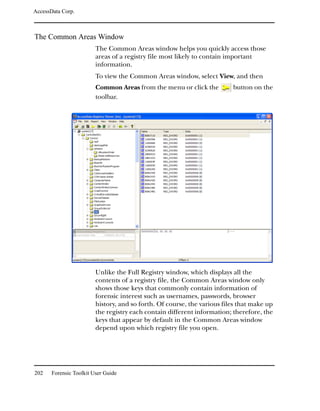
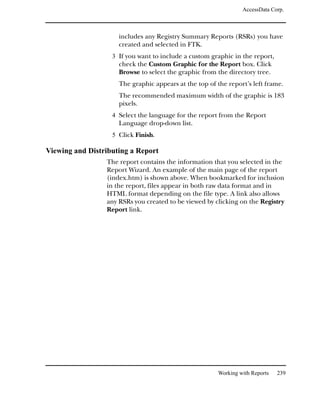
![AccessData Corp.
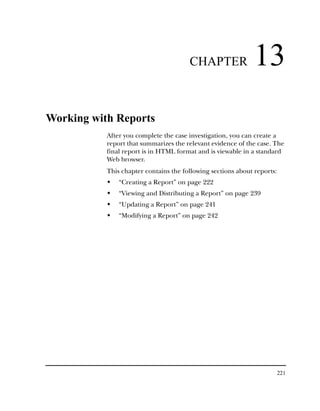
Viewing the Decrypted Files in FTK
The decrypted information is displayed in the Explore
window. The decrypted file is displayed as a subitem below the
encrypted file, the metadata is displayed, and the full path
name is displayed, including a note that shows that the file is
decrypted.
For example, if you have a decrypted file named Jupiter
Statistics.xls, then Jupiter Statistics[decrypted].xls is listed as a
child of Jupiter Statistics.xls in the File List.
Decrypting EFS 219](https://image.slidesharecdn.com/ftk1-80manual-110721160233-phpapp02/85/Ftk-1-80-manual-232-320.jpg)


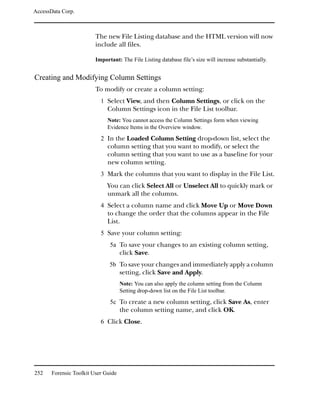
![AccessData Corp.
You can create and apply column settings by clicking on the
following icons on the File List toolbar, shown below:
Create Column Settings
Select Column Settings
Note: You can apply a different column setting in each window.
The column setting “Preprocessing File Listing Database
Column Setting” is available when you select the File Listing
Database option from the Processes to Perform dialog in the
evidence wizard. With this setting, you can modify your
columns and then return to your default set.
To return to the default set of values, delete the entry from the
column settings manager, and restart FTK. The Default File
List Column Settings entry is applied again.
Modifying the File Listing Database
The Microsoft Access (Jet) database containing a list of only
actual files in the case, or files that existed on the original hard
drive as files: documents, zip files, executables, logs, etc.
You can expand the File Listing database to contain all files in
the case, or those items parsed and extracted such as the
contents of a zip file, or the messages from an email archive, or
OLE streams that are part of Office docs; anything that didn't
have it's own entry in Windows Explorer.
To increase the files listed in the File Listing database, you
must shut down the FTK program, and then edit the
FtkSettings.0.ini file:
1 Open the FtkSettings.0.ini file, and find the [Global]
section.
2 In the [Global] section, find the PreprocessListsAllFiles
key, and then set the value from 0 to 1.
3 Save the changes, and restart FTK.
Customizing FTK 251](https://image.slidesharecdn.com/ftk1-80manual-110721160233-phpapp02/85/Ftk-1-80-manual-264-320.jpg)
![AccessData Corp.
Option Description
Special Searches Events related to data carving or Internet keyword searches
performed during the case.
Creating a Mini Log
You can create a log file with fewer entries than the more
comprehensive FTK.log file. This smaller log contains:
Added Bookmarks FTK Version
Addition to Bookmarks Internet Keyword Search
Case Closings Investigator’s Name
Case Loadings KFF Databases
Case Path List Bookmarked Files
Case Start List Bookmarked Terms
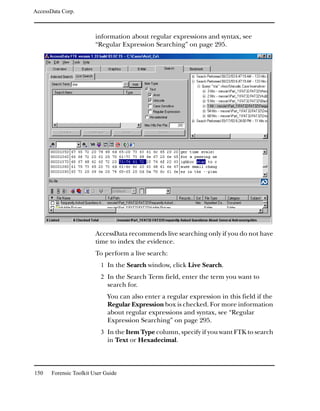
Case Title List Search Terms
Data CarveExported Files Live Search Terms
Deleted Bookmarks Search Terms
Examiner’s Name
To create a mini log file, you must shut down the FTK
program, and then edit the FtkSettings.0.ini file:
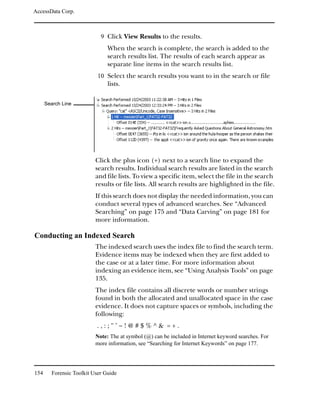
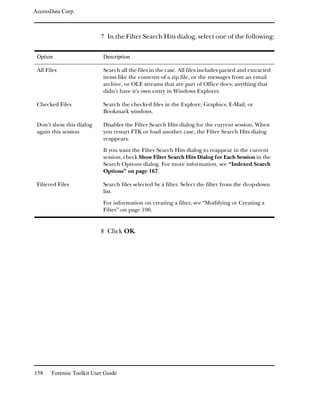
1 Open the FtkSettings.0.ini file, and find the [Global]
section.
2 In the [Global] section, find the CreateMiniLog key, and
then set the value from 0 to 1.
3 Save the changes, and restart FTK.
The new mini log will be generated with the regular FTK log,
and saved in the same directory.
258 Forensic Toolkit User Guide](https://image.slidesharecdn.com/ftk1-80manual-110721160233-phpapp02/85/Ftk-1-80-manual-271-320.jpg)


![AccessData Corp.
The search engine searches left to right. So in searching the
regular expression dress, the search engine opens each file and
scans its contents line by line, looking for a d, followed by an r,
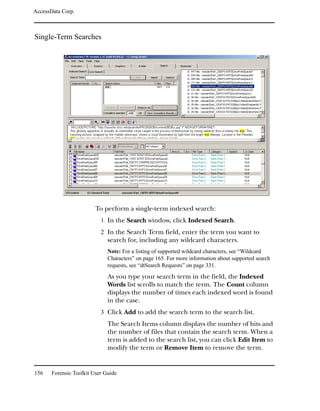
followed by an e, and so on.
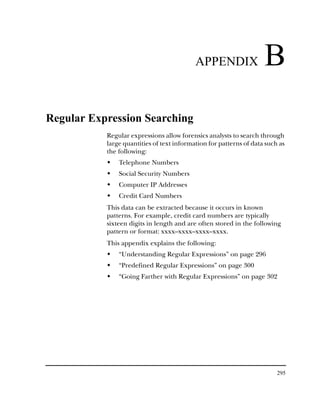
Complex Regular Expressions—Visa and MasterCard Numbers
Operators allow regular expressions to search patterns of data
rather than specific values. For example, the operators in the
following expression enables the FTK's search engine to find
all Visa and MasterCard credit card numbers in case evidence
files:
<((dddd)[– ]){3}dddd>
Without the use of operators, the search engine could look for
only one credit card number at a time.
Note: The credit card expression discussion in this section is included in FTK
and is used here primarily for the explanation of advanced regular expressions.
The following table identifies the components in the Visa and
MasterCard regular expression:
Component Example
Operands d, –, spacebar space
Operators d, , <, ( ), [ ], {3}, >
Sub-Expressions (dddd), ((dddd)[– ])
Value Any sequence of sixteen decimal digits that is
delimited by three hyphens and bound on both
sides by non-word characters (xxxx–xxxx–
xxxx–xxxx).
As the regular expression search engine evaluates an
expression in left-to-right order, the first operand it
encounters is the backslash less-than combination (<). This
combination is also known as the begin-a-word operator. This
operator tells the search engine that the first character in any
Regular Expression Searching 297](https://image.slidesharecdn.com/ftk1-80manual-110721160233-phpapp02/85/Ftk-1-80-manual-310-320.jpg)
![AccessData Corp.
search hit immediately follows a non-word character such as
white space or other word delimiter.
Tip: A precise definition of non-word characters and constituent-word
characters in regular expressions is difficult to find. Consequently,
experimentation by FTK users may be the best way to determine if the forward
slash less-than (<) and forward slash greater-than (>) operators help find the
data patterns relevant to a specific searching task. The hyphen and the period
are examples of valid delimiters or non-word characters.
The begin-a-word operator illustrates one of two uses of the
backslash character (), often called the escape character: the
modification of operands and the modification of operators.
On its own, the left angle bracket (<) would be evaluated as an
operand, requiring the search engine to look next for a left
angle bracket character. However, when the escape character
immediately precedes the (<), the two characters are
interpreted together as the begin-a-word operator by the
search engine. When an escape character precedes a hyphen
(–) character, which is normally considered to be an operator,
the two characters ( –) require the search engine to look next
for a hyphen character and not apply the hyphen operator
(the meaning of the hyphen operator is discussed below).
The next operator is the parentheses ( ). The parentheses
group together a sub-expression, that is, a sequence of
characters that must be treated as a group and not as
individual operands.
The next operator is the d. This operator, which is another
instance of an operand being modified by the escape
character, is interpreted by the search engine to mean that the
next character in search hits found may be any decimal digit
character from 0–9.
The square brackets ([ ]) indicate that the next character in
the sequence must be one of the characters listed between the
brackets or escaped characters. In the case of the credit card
expression, the backslash-hyphen-spacebar space ([-spacebar
space]) means that the four decimal digits must be followed by
a hyphen or a spacebar space.
298 Forensic Toolkit User Guide](https://image.slidesharecdn.com/ftk1-80manual-110721160233-phpapp02/85/Ftk-1-80-manual-311-320.jpg)
![AccessData Corp.
Next, the {3} means that the preceding sub-expression must
repeat three times, back to back. The number in the curly
brackets ({ }) can be any positive number.
Finally, the forward slash greater-than combination ( >), also
know as the end-a-word operator, means that the preceding
expression must be followed by a non-word character.
Other Variations on the Same Expression
Sometimes there are ways to search for the same data using
different expressions. It should be noted that there is no one-
to-one correspondence between the expression and the
pattern it is supposed to find. Thus the preceding credit card
regular expression is not the only way to search for Visa or
MasterCard credit card numbers. Because some regular
expression operators have related meanings, there is more
than one way to compose a regular expression to find a specific
pattern of text. For instance, the following regular expression
has the same meaning as the preceding credit card expression:
<((dddd)(–| )){3}dddd>
The difference here is the use of the pipe, ( | ) or union
operator. The union operator means that the next character to
match is either the left operand (the hyphen) or the right
operand (the spacebar space). The similar meaning of the
pipe ( | ) and square bracket ([ ]) operators give both
expressions equivalent functions.
In addition to the previous two examples, the credit card
regular expression could be composed as follows:
<dddd(–| )dddd(–| )dddd(–| )dddd>
This expression explicitly states each element of the data
pattern, whereas the {3} operator in the first two examples
provides a type of mathematical shorthand for more succinct
regular expressions.
Regular Expression Searching 299](https://image.slidesharecdn.com/ftk1-80manual-110721160233-phpapp02/85/Ftk-1-80-manual-312-320.jpg)
![AccessData Corp.
Predefined Regular Expressions
FTK provides the following predefined regular expressions:
U.S. Social Security Numbers
U.S. Phone Numbers
U.K. Phone Numbers
IP Addresses
Visa and MasterCard Numbers
The Social Security Number, U.S. Phone Number, and IP
Address expressions are discussed in the following sections.
Note: The U.K. Phone Number expression is similar enough to the U.S. Phone
Number that it does not warrant a separate discussion.
Social Security Number
The regular expression for Social Security numbers follows a
relatively simple pattern:
<ddd[– ]dd[– ]dddd>
This expression reads as follows: find a sequence of text that
begins with three decimal digits, followed by a hyphen or
spacebar space. This sequence is followed by two more decimal
digits and a hyphen or spacebar space, followed by four more
decimal digits. This entire sequence must be bounded on both
ends by non-word characters.
U.S. Phone Number
The regular expression for U.S. phone numbers is more
complex:
((<1[–. ])?((|<)ddd[).–/ ] ?)?<ddd[.– ]dddd>
This expression demonstrates that regular expressions can be
used to find more complex data patterns than simple credit
card and Social Security number patterns.
The first part of the above expression,
((<1[–. ])?((|<)ddd[).–/ ] ?)?,
means, in effect, that an area code may or may not precede the
300 Forensic Toolkit User Guide](https://image.slidesharecdn.com/ftk1-80manual-110721160233-phpapp02/85/Ftk-1-80-manual-313-320.jpg)
![AccessData Corp.
seven digit phone number. This meaning is achieved through
the use of the question mark (?) operator. This operator
requires that the sub-expression immediately to its left appear
exactly zero or one times in any search hits. Therefore, the
U.S. Phone Number expression finds telephone numbers with
or without area codes.
This expression also indicates that if an area code is present, a
number one (1) may or may not precede the area code. This
meaning is achieved through the sub-expression (<1[–. ])?,
which says that if there is a “1” before the area code, it will
follow a non-word character and be separated from the area
code by a delimiter (period, hyphen, or spacebar space).
The next sub-expression, ((|<)ddd[).–/ ] ?, specifies how
the area code must appear in any search hits. The (|<)
requires that the area code begin with a left parenthesis or
other delimiter. (Note that the left parenthesis is, of necessity,
escaped.) The initial delimiter is followed by three decimal
digits, then another delimiter—namely, a right parenthesis, a
period, a hyphen, a forward slash, or a spacebar space. Lastly,
the question mark ( ? ) means that there may or may not be
one spacebar space after the final delimiter.
The latter portion of this expression, <ddd[.– ]dddd>,
requests a seven-digit phone number with a delimiter (period,
hyphen, or spacebar space) between the third and fourth
decimal digit characters. Note that typically, the period is an
operator. It means that the next character in the pattern can
be any valid character. To specify an actual period (.), the
character must be escaped ( .). The backslash period
combination is included in the expression to catch phone
numbers delimited by a period character.
Regular Expression Searching 301](https://image.slidesharecdn.com/ftk1-80manual-110721160233-phpapp02/85/Ftk-1-80-manual-314-320.jpg)
![AccessData Corp.
IP Address
An IP address is a 32-bit value that uniquely identifies a
computer on a TCP/IP network, including the Internet.
Currently, all IP addresses are represented by a numeric
sequence of four fields separated by the period character. Each
field can contain any number from 0 to 255. The following
regular expression locates IP addresses:
<[1-2]?[0-9]?[0-9].[1-2]?[0-9]?[0-9].[1-2]?[0-9]?[0-9].[1-
2]?[0-9]?[0-9]>
The IP Address expression requires the search engine to find
a sequence of data with four fields separated by periods (.).
The data sequence must also be bound on both sides by non-
word characters.
Note that the square brackets ([ ]) still behave as a set
operator, meaning that the next character in the sequence can
be any one of the values specified in the square brackets ([ ]).
Also note that the hyphen (–) is not escaped; it is an operator
that expresses ranges of characters.
Each field in an IP address can contain up to three characters.
Reading the expression left to right, the first character, if
present, must be a 1 or a 2. The second character, if present,
can be any value 0–9. The square brackets ([ ]) indicate the
possible range of characters and the question mark (?)
indicates that the value is optional; that is, it may or may not be
present. The third character is required; therefore, there is no
question mark. However, the value can still be any number 0–9.
Going Farther with Regular Expressions
You can begin building your own regular expressions by
experimenting with the default expressions in FTK. You can
modify the default expressions to fine-tune your data searches
or to create your own expressions.
302 Forensic Toolkit User Guide](https://image.slidesharecdn.com/ftk1-80manual-110721160233-phpapp02/85/Ftk-1-80-manual-315-320.jpg)
![AccessData Corp.
Locating More Information on Regular Expressions
The World Wide Web contains many other reference materials
and tutorials for regular expression searching. For example,
the Website http://www.regular-expressions.info/ provides a
regular expression for finding e-mail addresses. Keep in mind,
however, that there is some variation among the search
engines. Some of them differ in expression syntax, i.e., in the
way that they form and use operands and operators.
Tip: Regular expression operators are often referred to as metacharacters in the
regular expression literature.
http://www.boost.org/libs/regex/syntax.htm#syntax for a
definitive reference on the syntax employed by Regex++, the
regular expression search engine bundled with FTK.
Note: The regular expression search engine used by FTK is called Regex++. It
was created by Dr. John Maddock, a contributor to www.boost.org.
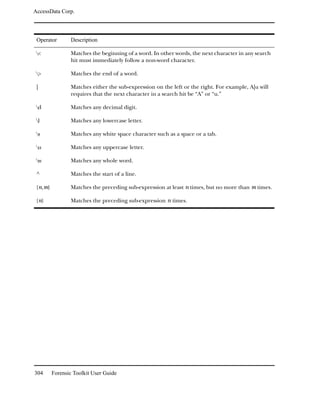
Common Operators
The following is a list of common operators:
Operator Description
+ Matches the preceding sub-expression one or more times. For example, “ba+” will
find all instances of “ba,” “baa,” “baaa,” and so forth; but it will not find “b.”
$ Matches the end of a line.
* Matches the preceding sub-expression zero or more times. For example, “ba*” will
find all instances of “b,” “ba,” “baa,” “baaa,” and so forth.
? Matches the preceding sub-expression zero or one times.
[] Matches any single value within the square brackets. For example, “ab[xyz]” will
find “abx,” “aby,” and “abz.”
A hyphen (-) specifies ranges of characters with the brackets. For example, “ab[0-
3]” will find “ab0,” “ab1,” “ab2,” and “ab3.” You can also specify case specific ranges
such as [a-r], or [B-M].
[^ftk] Matches any character except those bound by the [^ and the].
Regular Expression Searching 303](https://image.slidesharecdn.com/ftk1-80manual-110721160233-phpapp02/85/Ftk-1-80-manual-316-320.jpg)
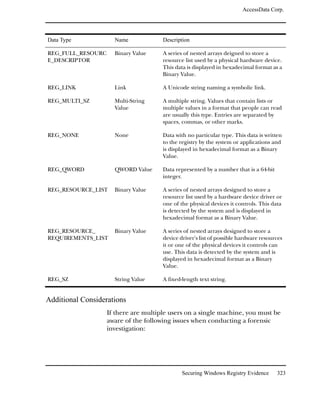
![AccessData Corp.
FAT 12, 16, and 32
When parsing FAT directories, FTK identifies deleted files by
their names. In a deleted file, the first character of the 8.3
filename is replaced by the hex character 0xE5.
The file's directory entry provides the files's starting cluster (C)
and size. From the size of the file and the starting cluster, FTK
computes the total number of clusters (N) occupied by the file.
FTK then examines the File Allocation Table (FAT) and counts
the number of unallocated clusters starting at C (U). FTK then
assigns the recovered file [min (N, U)] clusters starting at C.
If the deleted file was fragmented, the recovered file is likely to
be incorrect and incomplete because the information that is
needed to find subsequent fragments was wiped from the FAT
system when the file was deleted.
FTK uses the long filename (LFN) entries, if present, to
recover the first letter of the deleted file's short filename. If the
LFN entries are incomplete or absent, FTK uses an
exclamation mark (“!”) as the first letter of the filename.
FTK does not search the volume free space for deleted
directories that have been orphaned. An orphaned directory is
a directory whose parent directory or whose entry in its parent
directory has been overwritten.
NTFS
FTK examines the Master File Table (MFT) to find files that
are marked deleted because the allocation byte in a record
header indicates a deleted file or folder. FTK then recovers the
file’s data using the MFT record’s data attribute extent list if
the data is non-resident.
If the deleted file's parent directory exists, the recovered file is
shown in the directory where it originally existed. Deleted files
whose parent directories were deleted are shown in their
proper place as long as their parent directory's MFT entry has
not been recycled.
306 Forensic Toolkit User Guide](https://image.slidesharecdn.com/ftk1-80manual-110721160233-phpapp02/85/Ftk-1-80-manual-319-320.jpg)


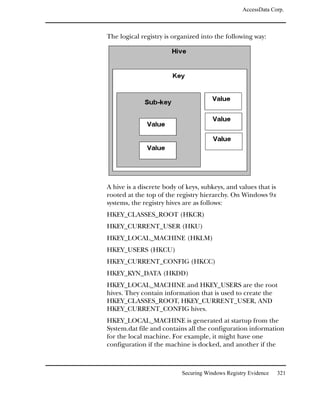


This document contains legal notices and disclaimers from AccessData Corp. regarding their software products. AccessData makes no warranties and disclaims any liability. They reserve the right to change their software and documentation without notice. Export of the software is subject to applicable laws and regulations. Copyright is claimed for the publication and no part may be reproduced without permission. The document provides version information and contact details for AccessData Corp.