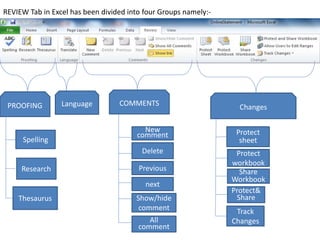
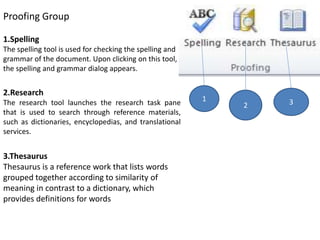
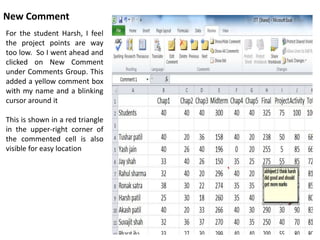
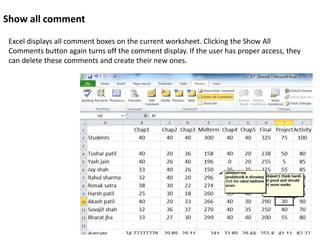
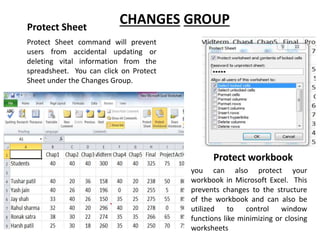
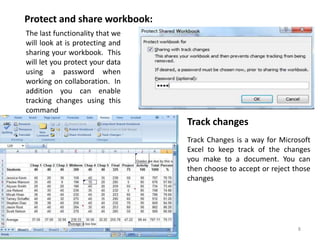
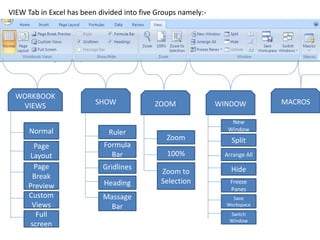
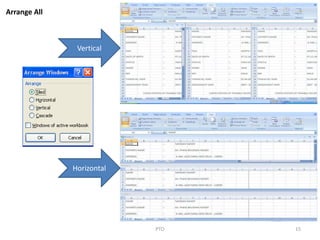
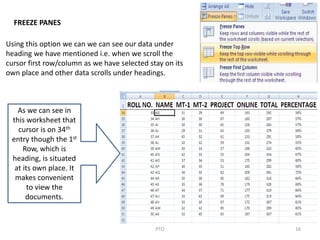
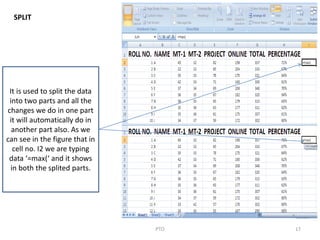
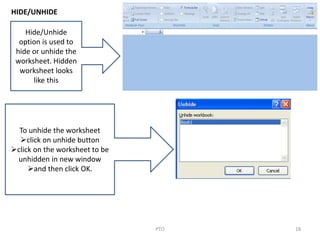
MS EXCEL 2010
REVIEW & VIEW TAB
REG NO-WRO0563356Abhijeet choudhary
REVIEW Tab in Excel has been divided into four Groups namely:-
PROOFING
Spelling
Research
Thesaurus
Language
All
comment
Changes
Protect
sheet
Protect
workbook
Share
Workbook
Protect&
Share
Track
Changes
COMMENTS
New
comment
Delete
Previous
next
Show/hide
comment
Proofing Group
1.Spelling
The spelling tool is used for checking the spelling and
grammar of the document. Upon clicking on this tool,
the spelling and grammar dialog appears.
2.Research
The research tool launches the research task pane
that is used to search through reference materials,
such as dictionaries, encyclopedias, and translational
services.
3.Thesaurus
Thesaurus is a reference work that lists words
grouped together according to similarity of
meaning in contrast to a dictionary, which
provides definitions for words
1
2 3
PTO 4
TRANSLATE GROUP
The Translate command can be
quite handy if you happen to
work in a multilingual
environment. Let us say that
you would like to change the
word average from English to
Arabic. You can click on
translate command which will
bring up a new dialog box
which I have expanded here so
you can see the options a little
bit better. Notice that not only
did it suggests the word but
was able to show the word in
Arabic as well
New Comment
For the student Harsh, I feel
the project points are way
too low. So I went ahead and
clicked on New Comment
under Comments Group. This
added a yellow comment box
with my name and a blinking
cursor around it
This is shown in a red triangle
in the upper-right corner of
the commented cell is also
visible for easy location
PTO 6
Excel displays all comment boxes on the current worksheet. Clicking the Show All
Comments button again turns off the comment display. If the user has proper access, they
can delete these comments and create their new ones.
Show all comment
Protect Sheet command will prevent
users from accidental updating or
deleting vital information from the
spreadsheet. You can click on Protect
Sheet under the Changes Group.
CHANGES GROUP
you can also protect your
workbook in Microsoft Excel. This
prevents changes to the structure
of the workbook and can also be
utilized to control window
functions like minimizing or closing
worksheets
Protect Sheet
Protect workbook
PTO 8
The last functionality that we
will look at is protecting and
sharing your workbook. This
will let you protect your data
using a password when
working on collaboration. In
addition you can enable
tracking changes using this
command
Protect and share workbook:
Track changes
Track Changes is a way for Microsoft
Excel to keep track of the changes
you make to a document. You can
then choose to accept or reject those
changes
VIEW Tab in Excel has been divided into five Groups namely:-
MACROS
WORKBOOK
VIEWS
Normal
Page
Layout
Page
Break
Preview
Custom
Views
Full
screen
SHOW
Ruler
Formula
Bar
Gridlines
Heading
Massage
Bar
ZOOM
Zoom
100%
Zoom to
Selection
WINDOW
New
Window
Split
Arrange All
Hide
Freeze
Panes
Save
Workspace
Switch
Window
Workbook Views
1.Normal
Normal View is used to view the worksheet in
normal working mode, this mode is enabled
by default in the worksheet.
10PTO
1 2 5
4
3
2. Page layout
Page layout view is used to view the worksheet in
page layout view i.e. this option allow to view
worksheet in page format at the time of printing.
Steps to enable page layout view
Go to View Menu
Click on Page Layout
3. Page Break Preview
Page Break Preview allow users to view only the
page which contains data. Although the other
rows and column are not being hidden but to
show in gray color.
To enable Page Break Preview
Click on View Tab
Click on Page Break Preview
4. Custom View
Custom Views allow us to see directly the content
which has already been added in custom views .
5. Full Screen
Full Screen option allow users to the worksheet in
full screen mode i.e. menu bar and ribbon are
being hidden and worksheet is explored to whole
screen.
To enable Full Screen
Click on View Tab
Click on Full Screen
SHOW/HIDE
It is used to show or hide
 Formula Bar
 Ruler
 Heading
 Gridlines
 Massage Bar
11PTO
To show or hide
check or
uncheck the
button
Formula Bar is used to show or hide Formula Bar(Function Bar)
Headings is used to show or hide heading (the line used to address a particular cell)
Gridlines is used to show or hide gridlines in a particular sheet(lines which separates cells)
 Ruler is used to show or hide Ruler when page layout preview is on.
Massage Bar is used to show or hide massage bar (appears only when the document
poses potential security risk
12PTO
1
2
3
1. By clicking on Zoom button this
window opens, we can select
desired zoom level. In custom
option we can manually enter
zoom level between 10 to 400
percent. If we enter less than
10 or more than 400 then it
shows this error massage
2. By clicking on this button we can directly shape sheet on 100 percent zoom whether
previously document was below this zoom level or above this zoom level.
ZOOM
13PTO
3. This button is used to zoom the selected area
Steps:-
Select the cell(s) to be zoomed
Click on zoom to selection
Automatically it adjust the zoom level
14PTO
3 2 1 5 4
6 7
Window
1. New Window is used to open a new
virtual window or copy of the same window
2. Arrange All is used to arrange all the
opened window on the screen.
3. Freeze Panes is used to freeze the top row
or column while the worksheet scrolls.
4. Split is used to split the data temporarily.
It is similar to opening a new window.
5. Hide or Unhide is used to hide/unhide the
entire worksheet.
6. Save workplace is used to save the current
position we are working.
7. Switch window is used to window switching
among the window we have opened.
This option is used to view
the window side by side
This option is used to scroll
the cursor simultaneously
This option is used to view
in horizontal from vertical
15PTO
Arrange All
Vertical
Horizontal
16PTO
FREEZE PANES
Using this option we can we can see our data under
heading we have mentioned i.e. when we scroll the
cursor first row/column as we have selected stay on its
own place and other data scrolls under headings.
As we can see in
this worksheet that
cursor is on 34th
entry though the 1st
Row, which is
heading, is situated
at its own place. It
makes convenient
to view the
documents.
17PTO
SPLIT
It is used to split the data
into two parts and all the
changes we do in one part
it will automatically do in
another part also. As we
can see in the figure that in
cell no. I2 we are typing
data ‘=max(‘ and it shows
in both the splited parts.
18PTO
HIDE/UNHIDE
Hide/Unhide
option is used to
hide or unhide the
worksheet. Hidden
worksheet looks
like this
To unhide the worksheet
click on unhide button
click on the worksheet to be
unhidden in new window
and then click OK.
19PTO
SAVE WORKPLACE
Save workplace is used to save
the current working condition
on which we are working so
that we can again open the file
on current position we are
working.
Steps:-
Click on save workplace
New window is opened
Define the name of the file
Click on save
The logo of the
saved workplace
files looks like-
Switch window is
used to switch the
window we have
opened in excel
through the option
New window
20PTO
MACROS
Macro is used to record the steps, option we have
selected, formula we have applied etc. and to run
it quickly after recording by using macro or by
creating shortcut using macro so that whenever
we need that steps to be repeated we just use the
shortcut keys we have created .
Steps to enable Macro:-
Go to macro option
Click on record macro
Define name in the macro box
Click OK
To stop macro:-
Go to macro
option
Click on stop
recording
21
THE END

Excel review and view tab

  • 1.
    MS EXCEL 2010 REVIEW& VIEW TAB REG NO-WRO0563356Abhijeet choudhary
  • 2.
    REVIEW Tab inExcel has been divided into four Groups namely:- PROOFING Spelling Research Thesaurus Language All comment Changes Protect sheet Protect workbook Share Workbook Protect& Share Track Changes COMMENTS New comment Delete Previous next Show/hide comment
  • 3.
    Proofing Group 1.Spelling The spellingtool is used for checking the spelling and grammar of the document. Upon clicking on this tool, the spelling and grammar dialog appears. 2.Research The research tool launches the research task pane that is used to search through reference materials, such as dictionaries, encyclopedias, and translational services. 3.Thesaurus Thesaurus is a reference work that lists words grouped together according to similarity of meaning in contrast to a dictionary, which provides definitions for words 1 2 3
  • 4.
    PTO 4 TRANSLATE GROUP TheTranslate command can be quite handy if you happen to work in a multilingual environment. Let us say that you would like to change the word average from English to Arabic. You can click on translate command which will bring up a new dialog box which I have expanded here so you can see the options a little bit better. Notice that not only did it suggests the word but was able to show the word in Arabic as well
  • 5.
    New Comment For thestudent Harsh, I feel the project points are way too low. So I went ahead and clicked on New Comment under Comments Group. This added a yellow comment box with my name and a blinking cursor around it This is shown in a red triangle in the upper-right corner of the commented cell is also visible for easy location
  • 6.
    PTO 6 Excel displaysall comment boxes on the current worksheet. Clicking the Show All Comments button again turns off the comment display. If the user has proper access, they can delete these comments and create their new ones. Show all comment
  • 7.
    Protect Sheet commandwill prevent users from accidental updating or deleting vital information from the spreadsheet. You can click on Protect Sheet under the Changes Group. CHANGES GROUP you can also protect your workbook in Microsoft Excel. This prevents changes to the structure of the workbook and can also be utilized to control window functions like minimizing or closing worksheets Protect Sheet Protect workbook
  • 8.
    PTO 8 The lastfunctionality that we will look at is protecting and sharing your workbook. This will let you protect your data using a password when working on collaboration. In addition you can enable tracking changes using this command Protect and share workbook: Track changes Track Changes is a way for Microsoft Excel to keep track of the changes you make to a document. You can then choose to accept or reject those changes
  • 9.
    VIEW Tab inExcel has been divided into five Groups namely:- MACROS WORKBOOK VIEWS Normal Page Layout Page Break Preview Custom Views Full screen SHOW Ruler Formula Bar Gridlines Heading Massage Bar ZOOM Zoom 100% Zoom to Selection WINDOW New Window Split Arrange All Hide Freeze Panes Save Workspace Switch Window
  • 10.
    Workbook Views 1.Normal Normal Viewis used to view the worksheet in normal working mode, this mode is enabled by default in the worksheet. 10PTO 1 2 5 4 3 2. Page layout Page layout view is used to view the worksheet in page layout view i.e. this option allow to view worksheet in page format at the time of printing. Steps to enable page layout view Go to View Menu Click on Page Layout 3. Page Break Preview Page Break Preview allow users to view only the page which contains data. Although the other rows and column are not being hidden but to show in gray color. To enable Page Break Preview Click on View Tab Click on Page Break Preview 4. Custom View Custom Views allow us to see directly the content which has already been added in custom views . 5. Full Screen Full Screen option allow users to the worksheet in full screen mode i.e. menu bar and ribbon are being hidden and worksheet is explored to whole screen. To enable Full Screen Click on View Tab Click on Full Screen
  • 11.
    SHOW/HIDE It is usedto show or hide  Formula Bar  Ruler  Heading  Gridlines  Massage Bar 11PTO To show or hide check or uncheck the button Formula Bar is used to show or hide Formula Bar(Function Bar) Headings is used to show or hide heading (the line used to address a particular cell) Gridlines is used to show or hide gridlines in a particular sheet(lines which separates cells)  Ruler is used to show or hide Ruler when page layout preview is on. Massage Bar is used to show or hide massage bar (appears only when the document poses potential security risk
  • 12.
    12PTO 1 2 3 1. By clickingon Zoom button this window opens, we can select desired zoom level. In custom option we can manually enter zoom level between 10 to 400 percent. If we enter less than 10 or more than 400 then it shows this error massage 2. By clicking on this button we can directly shape sheet on 100 percent zoom whether previously document was below this zoom level or above this zoom level. ZOOM
  • 13.
    13PTO 3. This buttonis used to zoom the selected area Steps:- Select the cell(s) to be zoomed Click on zoom to selection Automatically it adjust the zoom level
  • 14.
    14PTO 3 2 15 4 6 7 Window 1. New Window is used to open a new virtual window or copy of the same window 2. Arrange All is used to arrange all the opened window on the screen. 3. Freeze Panes is used to freeze the top row or column while the worksheet scrolls. 4. Split is used to split the data temporarily. It is similar to opening a new window. 5. Hide or Unhide is used to hide/unhide the entire worksheet. 6. Save workplace is used to save the current position we are working. 7. Switch window is used to window switching among the window we have opened. This option is used to view the window side by side This option is used to scroll the cursor simultaneously This option is used to view in horizontal from vertical
  • 15.
  • 16.
    16PTO FREEZE PANES Using thisoption we can we can see our data under heading we have mentioned i.e. when we scroll the cursor first row/column as we have selected stay on its own place and other data scrolls under headings. As we can see in this worksheet that cursor is on 34th entry though the 1st Row, which is heading, is situated at its own place. It makes convenient to view the documents.
  • 17.
    17PTO SPLIT It is usedto split the data into two parts and all the changes we do in one part it will automatically do in another part also. As we can see in the figure that in cell no. I2 we are typing data ‘=max(‘ and it shows in both the splited parts.
  • 18.
    18PTO HIDE/UNHIDE Hide/Unhide option is usedto hide or unhide the worksheet. Hidden worksheet looks like this To unhide the worksheet click on unhide button click on the worksheet to be unhidden in new window and then click OK.
  • 19.
    19PTO SAVE WORKPLACE Save workplaceis used to save the current working condition on which we are working so that we can again open the file on current position we are working. Steps:- Click on save workplace New window is opened Define the name of the file Click on save The logo of the saved workplace files looks like- Switch window is used to switch the window we have opened in excel through the option New window
  • 20.
    20PTO MACROS Macro is usedto record the steps, option we have selected, formula we have applied etc. and to run it quickly after recording by using macro or by creating shortcut using macro so that whenever we need that steps to be repeated we just use the shortcut keys we have created . Steps to enable Macro:- Go to macro option Click on record macro Define name in the macro box Click OK To stop macro:- Go to macro option Click on stop recording
  • 21.