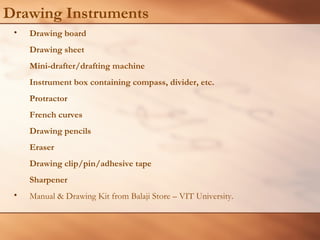
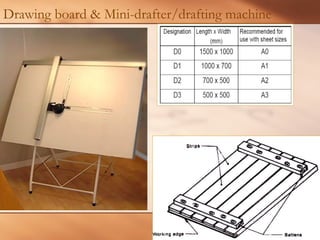
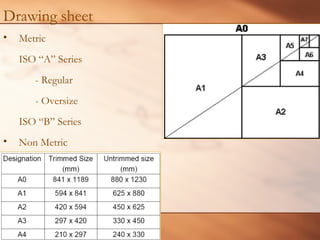
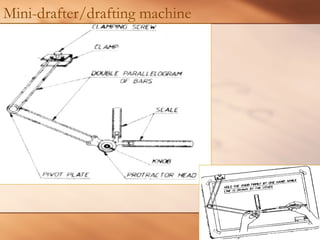
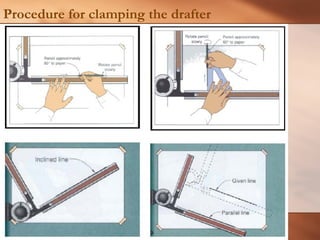
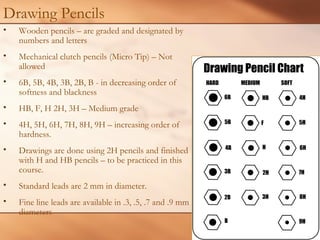
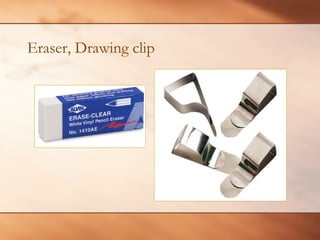
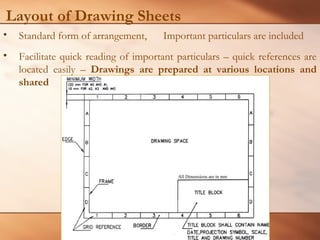
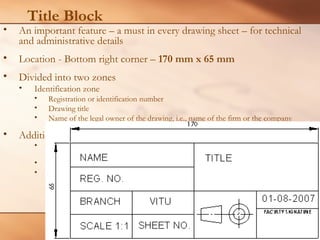
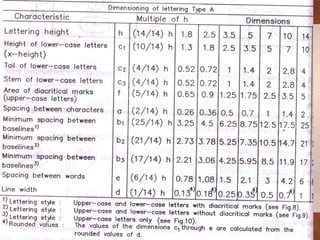
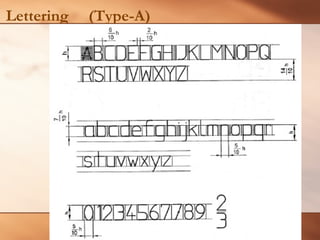
Drawing Instruments
• Drawing board
Drawing sheet
Mini-drafter/drafting machine
Instrument box containing compass, divider, etc.
Protractor
French curves
Drawing pencils
Eraser
Drawing clip/pin/adhesive tape
Sharpener
• Manual & Drawing Kit from Balaji Store – VIT University.
Drawing board & Mini-drafter/drafting machine
Drawing sheet
• Metric
ISO “A” Series
- Regular
- Oversize
ISO “B” Series
• Non Metric
Mini-drafter/drafting machine
Procedure for clamping the drafter
• Set the protractor head with
reference mark indexing zero
degree, then fix the clamp of the
mini-drafter at the top left corner
either along the top horizontal
edge of the board or along the left
vertical edge of the board.
• With the drawing sheet placed
underneath the scales of the
minidrafter, fix the drawing sheet
to the drawing board with the
scales of the mini-drafter aligned
either with the vertical or the
horizontal borderlines of the
drawing sheet.
Procedure for clamping the drafter
Drawing Pencils
• Wooden pencils – are graded and designated by
numbers and letters
• Mechanical clutch pencils (Micro Tip) – Not
allowed
• 6B, 5B, 4B, 3B, 2B, B - in decreasing order of
softness and blackness
• HB, F, H 2H, 3H – Medium grade
• 4H, 5H, 6H, 7H, 8H, 9H – increasing order of
hardness.
• Drawings are done using 2H pencils and finished
with H and HB pencils – to be practiced in this
course.
• Standard leads are 2 mm in diameter.
• Fine line leads are available in .3, .5, .7 and .9 mm
diameters
Eraser, Drawing clip
Scale
• Full Scale 1 : 1
• Reduced Scale 1 : 100
1 mm of Drawing 100 mm of real
• Enlarged scale 100 : 1
• 1:2, 5, 10, 20, 50, 100, 200, 500, 1000
Layout of Drawing Sheets
• Standard form of arrangement, Important particulars are included
• Facilitate quick reading of important particulars – quick references are
located easily – Drawings are prepared at various locations and
shared
Title Block
• An important feature – a must in every drawing sheet – for technical
and administrative details
• Location - Bottom right corner – 170 mm x 65 mm
• Divided into two zones
• Identification zone
• Registration or identification number
• Drawing title
• Name of the legal owner of the drawing, i.e., name of the firm or the company
• Additional information zone
• Indicative items –symbol indicating the system of projection, main scale of
drawing, etc.
• Technical items – method of indicating surface texture, geometric tolerances, etc.
• Administrative items
Lettering
• Writing of titles, sub-titles, dimensions, scale and other
details on a drawing is called lettering.
• It should be clear, legible and uniform
• It should be simple, so it can be done with freehand
with speed
• Drawing instruments should not be used
Lettering
• SINGLE STROKE LETTERS
• The thickness of the line is obtained by single stroke of the
pencil
• The lines of the inclined letter are drawn at an inclination of
about 75° from horizontal.
• The standard heights for lettering are 2.5, 3.5, 5, 7, 10, 14
and 20 mm.
• The width of the letters is equal to the height in most cases.
• Different for type A and type B lettering.
• In lettering ‘A’ Type the height of the capital letter is directed into 14 parts.
Lettering
Lettering (Type-A)
Lettering (Type-A)
Note:
The width of letters are selected suitably and are
varying from 0.4h to 0.6h expect for letters M,W and I
The ratio of height to width for most of the CAPITAL
letters is taken as nearly 14:10 and in case of M and
W the ratio can be taken approximately as 14:12.For I
the ratio as 14:6
Lettering (Type-A)

Egl lettering

  • 1.
    Drawing Instruments • Drawingboard Drawing sheet Mini-drafter/drafting machine Instrument box containing compass, divider, etc. Protractor French curves Drawing pencils Eraser Drawing clip/pin/adhesive tape Sharpener • Manual & Drawing Kit from Balaji Store – VIT University.
  • 2.
    Drawing board &Mini-drafter/drafting machine
  • 3.
    Drawing sheet • Metric ISO“A” Series - Regular - Oversize ISO “B” Series • Non Metric
  • 4.
  • 5.
    Procedure for clampingthe drafter • Set the protractor head with reference mark indexing zero degree, then fix the clamp of the mini-drafter at the top left corner either along the top horizontal edge of the board or along the left vertical edge of the board. • With the drawing sheet placed underneath the scales of the minidrafter, fix the drawing sheet to the drawing board with the scales of the mini-drafter aligned either with the vertical or the horizontal borderlines of the drawing sheet.
  • 6.
  • 7.
    Drawing Pencils • Woodenpencils – are graded and designated by numbers and letters • Mechanical clutch pencils (Micro Tip) – Not allowed • 6B, 5B, 4B, 3B, 2B, B - in decreasing order of softness and blackness • HB, F, H 2H, 3H – Medium grade • 4H, 5H, 6H, 7H, 8H, 9H – increasing order of hardness. • Drawings are done using 2H pencils and finished with H and HB pencils – to be practiced in this course. • Standard leads are 2 mm in diameter. • Fine line leads are available in .3, .5, .7 and .9 mm diameters
  • 8.
  • 9.
    Scale • Full Scale1 : 1 • Reduced Scale 1 : 100 1 mm of Drawing 100 mm of real • Enlarged scale 100 : 1 • 1:2, 5, 10, 20, 50, 100, 200, 500, 1000
  • 10.
    Layout of DrawingSheets • Standard form of arrangement, Important particulars are included • Facilitate quick reading of important particulars – quick references are located easily – Drawings are prepared at various locations and shared
  • 11.
    Title Block • Animportant feature – a must in every drawing sheet – for technical and administrative details • Location - Bottom right corner – 170 mm x 65 mm • Divided into two zones • Identification zone • Registration or identification number • Drawing title • Name of the legal owner of the drawing, i.e., name of the firm or the company • Additional information zone • Indicative items –symbol indicating the system of projection, main scale of drawing, etc. • Technical items – method of indicating surface texture, geometric tolerances, etc. • Administrative items
  • 12.
    Lettering • Writing oftitles, sub-titles, dimensions, scale and other details on a drawing is called lettering. • It should be clear, legible and uniform • It should be simple, so it can be done with freehand with speed • Drawing instruments should not be used
  • 13.
    Lettering • SINGLE STROKELETTERS • The thickness of the line is obtained by single stroke of the pencil • The lines of the inclined letter are drawn at an inclination of about 75° from horizontal. • The standard heights for lettering are 2.5, 3.5, 5, 7, 10, 14 and 20 mm. • The width of the letters is equal to the height in most cases. • Different for type A and type B lettering. • In lettering ‘A’ Type the height of the capital letter is directed into 14 parts.
  • 14.
  • 15.
  • 16.
    Lettering (Type-A) Note: The widthof letters are selected suitably and are varying from 0.4h to 0.6h expect for letters M,W and I The ratio of height to width for most of the CAPITAL letters is taken as nearly 14:10 and in case of M and W the ratio can be taken approximately as 14:12.For I the ratio as 14:6
  • 17.