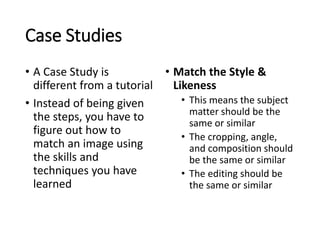
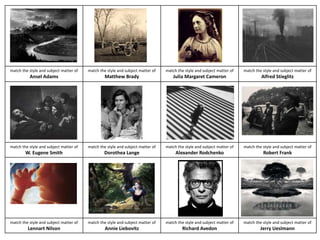
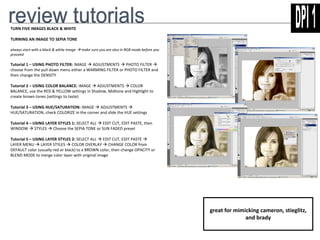
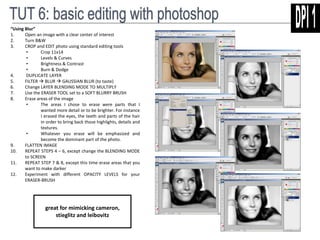
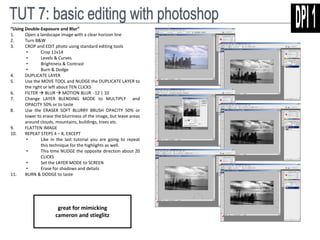
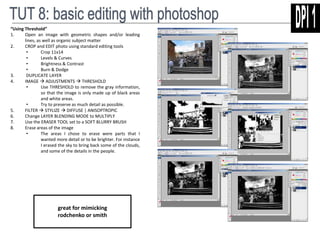
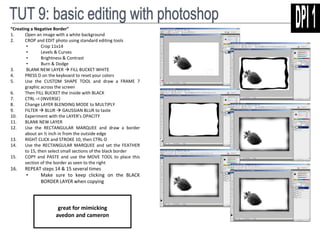
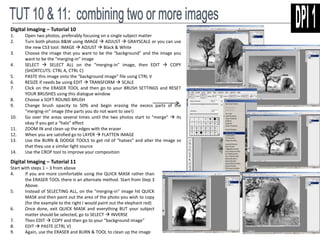
Instructions 
• Complete 12 case studies – one for each photographer 
• Use only YOUR OWN PHOTOS (from any past project) 
• Use the tutorials to help (optional – not for a grade)
Case Studies 
• A Case Study is 
different from a tutorial 
• Instead of being given 
the steps, you have to 
figure out how to 
match an image using 
the skills and 
techniques you have 
learned 
• Match the Style & 
Likeness 
• This means the subject 
matter should be the 
same or similar 
• The cropping, angle, 
and composition should 
be the same or similar 
• The editing should be 
the same or similar
match the style and subject matter of 
Ansel Adams 
match the style and subject matter of 
Matthew Brady 
match the style and subject matter of 
Julia Margaret Cameron 
match the style and subject matter of 
Alfred Stieglitz 
match the style and subject matter of 
W. Eugene Smith 
match the style and subject matter of 
Dorothea Lange 
match the style and subject matter of 
Alexander Rodchenko 
match the style and subject matter of 
Robert Frank 
match the style and subject matter of 
Lennart Nilson 
match the style and subject matter of 
Annie Liebovitz 
match the style and subject matter of 
Richard Avedon 
match the style and subject matter of 
Jerry Ueslmann
Tips on “Matching” 
Artist Subject and Style Editing 
Adams • Landscapes, nature 
• Rule of thirds, perspective 
• Black and white 
• High contrast 
Brady • Photojournalism: people, places and events 
• Rule of thirds, perspective tension 
• Sepia tone 
• Soft blurs and focuses 
Cameron • Portraits 
• S-curves, center of interest, framing 
• Sepia tone 
• Soft blurs, vignette, negative border 
Stieglitz • Pictorialism (painting-like), fine art 
• Perspective, rule of thirds 
• Black and white 
• Low contrast, soft blurs, vignettes 
Smith • Photojournalism 
• Framing, rule of thirds, tension 
• Black and white 
• Contrast to create tension 
Lange • Industrial photographer 
• Framing, rule of thirds, perspective, tension 
• Black and white 
• High contrast 
Rodchenko • Avante-garde (artistic, unique, strange) 
• Tension, framing, perspective 
• Black and white 
• Emphasize shapes and patterns 
Frank • Realist (everyday life) 
• Tension, framing, rule of thirds, center of interest 
• Black and white 
• Low contrast, discolored 
Nilsson • Scientific (macro and micro) 
• Rule of thirds, framing 
• Vibrant color 
• Strong highlights/spotlights 
Liebovitz • Commercial (print magazines) 
• S-curves, rule of thirds, center of interest 
• Vibrant colors – almost unreal 
• Blurs and vignettes 
Avedon • Fashion 
• S-curves, center of interest, rule of thirds 
• Black and white 
• Negative border and vignettes 
Ueslmann • Surrealism 
• Rule of thirds, tension 
• Black and white 
• Combine more than one photo
Tutorials 
• These are step-by-step 
lessons 
• These are optional 
• These may help you 
accomplish the case 
studies
TURN FIVE IMAGES BLACK & WHITE 
TURNING AN IMAGE TO SEPIA TONE 
always start with a black & white image make sure you are also in RGB mode before you 
proceed 
Tutorial 1 – USING PHOTO FILTER: IMAGE  ADJUSTMENTS  PHOTO FILTER  
choose from the pull down menu either a WARMING FILTER or PHOTO FILTER and 
then change the DENSITY 
Tutorial 2 – USING COLOR BALANCE: IMAGE  ADJUSTMENTS  COLOR 
BALANCE, use the RED & YELLOW settings in Shadow, Midtone and Highlight to 
create brown tones (settings to taste) 
Tutorial 3 – USING HUE/SATURATION: IMAGE  ADJUSTMENTS  
HUE/SATURATION, check COLORIZE in the corner and slide the HUE settings 
Tutorial 4 – USING LAYER STYLES 1: SELECT ALL  EDIT CUT, EDIT PASTE, then 
WINDOW  STYLES  Choose the SEPIA TONE or SUN FADED preset 
Tutorial 5 – USING LAYER STYLES 2: SELECT ALL  EDIT CUT, EDIT PASTE  
LAYER MENU  LAYER STYLES  COLOR OVERLAY  CHANGE COLOR from 
DEFAULT color (usually red or black) to a BROWN color, then change OPACITY or 
BLEND MODE to merge color layer with original image 
great for mimicking cameron, stieglitz, 
and brady
“Using Blur” 
1. Open an image with a clear center of interest 
2. Turn B&W 
3. CROP and EDIT photo using standard editing tools 
• Crop 11x14 
• Levels & Curves 
• Brightness & Contrast 
• Burn & Dodge 
4. DUPLICATE LAYER 
5. FILTER  BLUR  GAUSSIAN BLUR (to taste) 
6. Change LAYER BLENDING MODE TO MULTIPLY 
7. Use the ERASER TOOL set to a SOFT BLURRY BRUSH 
8. Erase areas of the image 
• The areas I chose to erase were parts that I 
wanted more detail or to be brighter. For instance 
I erased the eyes, the teeth and parts of the hair 
in order to bring back those highlights, details and 
textures. 
• Whatever you erase will be emphasized and 
become the dominant part of the photo. 
9. FLATTEN IMAGE 
10. REPEAT STEPS 4 – 6, except change the BLENDING MODE 
to SCREEN 
11. REPEAT STEP 7 & 8, except this time erase areas that you 
want to make darker 
12. Experiment with different OPACITY LEVELS for your 
ERASER-BRUSH 
great for mimicking cameron, 
stieglitz and leibovitz
“Using Double-Exposure and Blur” 
1. Open a landscape image with a clear horizon line 
2. Turn B&W 
3. CROP and EDIT photo using standard editing tools 
• Crop 11x14 
• Levels & Curves 
• Brightness & Contrast 
• Burn & Dodge 
4. DUPLICATE LAYER 
5. Use the MOVE TOOL and NUDGE the DUPLICATE LAYER to 
the right or left about TEN CLICKS 
6. FILTER  BLUR  MOTION BLUR -12 | 10 
7. Change LAYER BLENDING MODE to MULTIPLY and 
OPACITY 50% or to taste 
8. Use the ERASER SOFT BLURRY BRUSH OPACITY 50% or 
lower to erase the blurriness of the image, but leave areas 
around clouds, mountains, buildings, trees etc. 
9. FLATTEN IMAGE 
10. REPEAT STEPS 4 – 8, EXCEPT 
• Like in the last tutorial you are going to repeat 
this technique for the highlights as well. 
• This time NUDGE the opposite direction about 20 
CLICKS 
• Set the LAYER MODE to SCREEN 
• Erase for shadows and details 
11. BURN & DODGE to taste 
great for mimicking 
cameron and stieglitz
“Using Threshold” 
1. Open an image with geometric shapes and/or leading 
lines, as well as organic subject matter 
2. CROP and EDIT photo using standard editing tools 
• Crop 11x14 
• Levels & Curves 
• Brightness & Contrast 
• Burn & Dodge 
3. DUPLICATE LAYER 
4. IMAGE  ADJUSTMENTS  THRESHOLD 
• Use THRESHOLD to remove the gray information, 
so that the image is only made up of black areas 
and white areas. 
• Try to preserve as much detail as possible. 
5. FILTER  STYLIZE  DIFFUSE | ANISOPTROPIC 
6. Change LAYER BLENDING MODE to MULTIPLY 
7. Use the ERASER TOOL set to a SOFT BLURRY BRUSH 
8. Erase areas of the image 
• The areas I chose to erase were parts that I 
wanted more detail or to be brighter. For instance 
I erased the sky to bring back some of the clouds, 
and some of the details in the people. 
great for mimicking 
rodchenko or smith
“Creating a Negative Border” 
1. Open an image with a white background 
2. CROP and EDIT photo using standard editing tools 
• Crop 11x14 
• Levels & Curves 
• Brightness & Contrast 
• Burn & Dodge 
3. BLANK NEW LAYER  FILL BUCKET WHITE 
4. PRESS D on the keyboard to reset your colors 
5. Use the CUSTOM SHAPE TOOL and draw a FRAME 7 
graphic across the screen 
6. Then FILL BUCKET the inside with BLACK 
7. CTRL –I (INVERSE) 
8. Change LAYER BLENDING MODE to MULTIPLY 
9. FILTER  BLUR  GAUSSIAN BLUR to taste 
10. Experiment with the LAYER’s OPACITY 
11. BLANK NEW LAYER 
12. Use the RECTANGULAR MARQUEE and draw a border 
about an ½ inch in from the outside edge 
13. RIGHT CLICK and STROKE 10, then CTRL-D 
14. Use the RECTANGULAR MARQUEE and set the FEATHER 
to 15, then select small sections of the black border 
15. COPY and PASTE and use the MOVE TOOL to place this 
section of the border as seen to the right 
16. REPEAT steps 14 & 15 several times 
• Make sure to keep clicking on the BLACK 
BORDER LAYER when copying 
great for mimicking 
avedon and cameron
Digital Imaging – Tutorial 10 
1. Open two photos, preferably focusing on a single subject matter 
2. Turn both photos B&W using IMAGE  ADJUST  GRAYSCALE or you can use 
the new CS3 tool: IMAGE  ADJUST  Black & White 
3. Choose the image that you want to be the “background” and the image you 
want to be the “merging-in” image 
4. SELECT  SELECT ALL on the “merging-in” image, then EDIT  COPY 
(SHORTCUTS: CTRL A, CTRL C) 
5. PASTE this image onto the “background image” file using CTRL V 
6. RESIZE if needs be using EDIT  TRANSFORM  SCALE 
7. Click on the ERASER TOOL and then go to your BRUSH SETTINGS and RESET 
YOUR BRUSHES using this dialogue window 
8. Choose a SOFT ROUND BRUSH 
9. Change brush opacity to 50% and begin erasing the excess parts of the 
“merging-in” image (the parts you do not want to see!) 
10. Go over the areas several times until the two photos start to “merge”  its 
okay if you get a “halo” effect 
11. ZOOM IN and clean up the edges with the eraser 
12. When you are satisfied go to LAYER  FLATTEN IMAGE 
13. Use the BURN & DODGE TOOLS to get rid of “haloes” and alter the image so 
that they use a similar light source 
14. Use the CROP tool to improve your composition 
Digital Imaging – Tutorial 11 
Start with steps 1 – 3 from above 
4. If you are more comfortable using the QUICK MASK rather than 
the ERASER TOOL there is an alternate method. Start from Step 3 
Above. 
5. Instead of SELECTING ALL, on the “merging-in” image hit QUICK 
MASK and then paint out the area of the photo you wish to copy 
(for the example to the right I would paint out the elephant red) 
6. Once done, exit QUICK MASK and everything BUT your subject 
matter should be selected, go to SELECT  INVERSE 
7. Then EDIT  COPY and then go to your “background image” 
8. EDIT  PASTE (CTRL V) 
9. Again, use the ERASER and BURN & TOOL to clean up the image

Case Studies - Masters

  • 1.
    Instructions • Complete12 case studies – one for each photographer • Use only YOUR OWN PHOTOS (from any past project) • Use the tutorials to help (optional – not for a grade)
  • 2.
    Case Studies •A Case Study is different from a tutorial • Instead of being given the steps, you have to figure out how to match an image using the skills and techniques you have learned • Match the Style & Likeness • This means the subject matter should be the same or similar • The cropping, angle, and composition should be the same or similar • The editing should be the same or similar
  • 3.
    match the styleand subject matter of Ansel Adams match the style and subject matter of Matthew Brady match the style and subject matter of Julia Margaret Cameron match the style and subject matter of Alfred Stieglitz match the style and subject matter of W. Eugene Smith match the style and subject matter of Dorothea Lange match the style and subject matter of Alexander Rodchenko match the style and subject matter of Robert Frank match the style and subject matter of Lennart Nilson match the style and subject matter of Annie Liebovitz match the style and subject matter of Richard Avedon match the style and subject matter of Jerry Ueslmann
  • 4.
    Tips on “Matching” Artist Subject and Style Editing Adams • Landscapes, nature • Rule of thirds, perspective • Black and white • High contrast Brady • Photojournalism: people, places and events • Rule of thirds, perspective tension • Sepia tone • Soft blurs and focuses Cameron • Portraits • S-curves, center of interest, framing • Sepia tone • Soft blurs, vignette, negative border Stieglitz • Pictorialism (painting-like), fine art • Perspective, rule of thirds • Black and white • Low contrast, soft blurs, vignettes Smith • Photojournalism • Framing, rule of thirds, tension • Black and white • Contrast to create tension Lange • Industrial photographer • Framing, rule of thirds, perspective, tension • Black and white • High contrast Rodchenko • Avante-garde (artistic, unique, strange) • Tension, framing, perspective • Black and white • Emphasize shapes and patterns Frank • Realist (everyday life) • Tension, framing, rule of thirds, center of interest • Black and white • Low contrast, discolored Nilsson • Scientific (macro and micro) • Rule of thirds, framing • Vibrant color • Strong highlights/spotlights Liebovitz • Commercial (print magazines) • S-curves, rule of thirds, center of interest • Vibrant colors – almost unreal • Blurs and vignettes Avedon • Fashion • S-curves, center of interest, rule of thirds • Black and white • Negative border and vignettes Ueslmann • Surrealism • Rule of thirds, tension • Black and white • Combine more than one photo
  • 5.
    Tutorials • Theseare step-by-step lessons • These are optional • These may help you accomplish the case studies
  • 6.
    TURN FIVE IMAGESBLACK & WHITE TURNING AN IMAGE TO SEPIA TONE always start with a black & white image make sure you are also in RGB mode before you proceed Tutorial 1 – USING PHOTO FILTER: IMAGE  ADJUSTMENTS  PHOTO FILTER  choose from the pull down menu either a WARMING FILTER or PHOTO FILTER and then change the DENSITY Tutorial 2 – USING COLOR BALANCE: IMAGE  ADJUSTMENTS  COLOR BALANCE, use the RED & YELLOW settings in Shadow, Midtone and Highlight to create brown tones (settings to taste) Tutorial 3 – USING HUE/SATURATION: IMAGE  ADJUSTMENTS  HUE/SATURATION, check COLORIZE in the corner and slide the HUE settings Tutorial 4 – USING LAYER STYLES 1: SELECT ALL  EDIT CUT, EDIT PASTE, then WINDOW  STYLES  Choose the SEPIA TONE or SUN FADED preset Tutorial 5 – USING LAYER STYLES 2: SELECT ALL  EDIT CUT, EDIT PASTE  LAYER MENU  LAYER STYLES  COLOR OVERLAY  CHANGE COLOR from DEFAULT color (usually red or black) to a BROWN color, then change OPACITY or BLEND MODE to merge color layer with original image great for mimicking cameron, stieglitz, and brady
  • 7.
    “Using Blur” 1.Open an image with a clear center of interest 2. Turn B&W 3. CROP and EDIT photo using standard editing tools • Crop 11x14 • Levels & Curves • Brightness & Contrast • Burn & Dodge 4. DUPLICATE LAYER 5. FILTER  BLUR  GAUSSIAN BLUR (to taste) 6. Change LAYER BLENDING MODE TO MULTIPLY 7. Use the ERASER TOOL set to a SOFT BLURRY BRUSH 8. Erase areas of the image • The areas I chose to erase were parts that I wanted more detail or to be brighter. For instance I erased the eyes, the teeth and parts of the hair in order to bring back those highlights, details and textures. • Whatever you erase will be emphasized and become the dominant part of the photo. 9. FLATTEN IMAGE 10. REPEAT STEPS 4 – 6, except change the BLENDING MODE to SCREEN 11. REPEAT STEP 7 & 8, except this time erase areas that you want to make darker 12. Experiment with different OPACITY LEVELS for your ERASER-BRUSH great for mimicking cameron, stieglitz and leibovitz
  • 8.
    “Using Double-Exposure andBlur” 1. Open a landscape image with a clear horizon line 2. Turn B&W 3. CROP and EDIT photo using standard editing tools • Crop 11x14 • Levels & Curves • Brightness & Contrast • Burn & Dodge 4. DUPLICATE LAYER 5. Use the MOVE TOOL and NUDGE the DUPLICATE LAYER to the right or left about TEN CLICKS 6. FILTER  BLUR  MOTION BLUR -12 | 10 7. Change LAYER BLENDING MODE to MULTIPLY and OPACITY 50% or to taste 8. Use the ERASER SOFT BLURRY BRUSH OPACITY 50% or lower to erase the blurriness of the image, but leave areas around clouds, mountains, buildings, trees etc. 9. FLATTEN IMAGE 10. REPEAT STEPS 4 – 8, EXCEPT • Like in the last tutorial you are going to repeat this technique for the highlights as well. • This time NUDGE the opposite direction about 20 CLICKS • Set the LAYER MODE to SCREEN • Erase for shadows and details 11. BURN & DODGE to taste great for mimicking cameron and stieglitz
  • 9.
    “Using Threshold” 1.Open an image with geometric shapes and/or leading lines, as well as organic subject matter 2. CROP and EDIT photo using standard editing tools • Crop 11x14 • Levels & Curves • Brightness & Contrast • Burn & Dodge 3. DUPLICATE LAYER 4. IMAGE  ADJUSTMENTS  THRESHOLD • Use THRESHOLD to remove the gray information, so that the image is only made up of black areas and white areas. • Try to preserve as much detail as possible. 5. FILTER  STYLIZE  DIFFUSE | ANISOPTROPIC 6. Change LAYER BLENDING MODE to MULTIPLY 7. Use the ERASER TOOL set to a SOFT BLURRY BRUSH 8. Erase areas of the image • The areas I chose to erase were parts that I wanted more detail or to be brighter. For instance I erased the sky to bring back some of the clouds, and some of the details in the people. great for mimicking rodchenko or smith
  • 10.
    “Creating a NegativeBorder” 1. Open an image with a white background 2. CROP and EDIT photo using standard editing tools • Crop 11x14 • Levels & Curves • Brightness & Contrast • Burn & Dodge 3. BLANK NEW LAYER  FILL BUCKET WHITE 4. PRESS D on the keyboard to reset your colors 5. Use the CUSTOM SHAPE TOOL and draw a FRAME 7 graphic across the screen 6. Then FILL BUCKET the inside with BLACK 7. CTRL –I (INVERSE) 8. Change LAYER BLENDING MODE to MULTIPLY 9. FILTER  BLUR  GAUSSIAN BLUR to taste 10. Experiment with the LAYER’s OPACITY 11. BLANK NEW LAYER 12. Use the RECTANGULAR MARQUEE and draw a border about an ½ inch in from the outside edge 13. RIGHT CLICK and STROKE 10, then CTRL-D 14. Use the RECTANGULAR MARQUEE and set the FEATHER to 15, then select small sections of the black border 15. COPY and PASTE and use the MOVE TOOL to place this section of the border as seen to the right 16. REPEAT steps 14 & 15 several times • Make sure to keep clicking on the BLACK BORDER LAYER when copying great for mimicking avedon and cameron
  • 11.
    Digital Imaging –Tutorial 10 1. Open two photos, preferably focusing on a single subject matter 2. Turn both photos B&W using IMAGE  ADJUST  GRAYSCALE or you can use the new CS3 tool: IMAGE  ADJUST  Black & White 3. Choose the image that you want to be the “background” and the image you want to be the “merging-in” image 4. SELECT  SELECT ALL on the “merging-in” image, then EDIT  COPY (SHORTCUTS: CTRL A, CTRL C) 5. PASTE this image onto the “background image” file using CTRL V 6. RESIZE if needs be using EDIT  TRANSFORM  SCALE 7. Click on the ERASER TOOL and then go to your BRUSH SETTINGS and RESET YOUR BRUSHES using this dialogue window 8. Choose a SOFT ROUND BRUSH 9. Change brush opacity to 50% and begin erasing the excess parts of the “merging-in” image (the parts you do not want to see!) 10. Go over the areas several times until the two photos start to “merge”  its okay if you get a “halo” effect 11. ZOOM IN and clean up the edges with the eraser 12. When you are satisfied go to LAYER  FLATTEN IMAGE 13. Use the BURN & DODGE TOOLS to get rid of “haloes” and alter the image so that they use a similar light source 14. Use the CROP tool to improve your composition Digital Imaging – Tutorial 11 Start with steps 1 – 3 from above 4. If you are more comfortable using the QUICK MASK rather than the ERASER TOOL there is an alternate method. Start from Step 3 Above. 5. Instead of SELECTING ALL, on the “merging-in” image hit QUICK MASK and then paint out the area of the photo you wish to copy (for the example to the right I would paint out the elephant red) 6. Once done, exit QUICK MASK and everything BUT your subject matter should be selected, go to SELECT  INVERSE 7. Then EDIT  COPY and then go to your “background image” 8. EDIT  PASTE (CTRL V) 9. Again, use the ERASER and BURN & TOOL to clean up the image