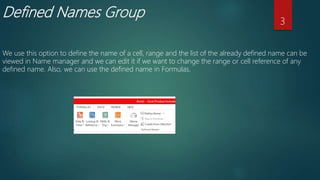
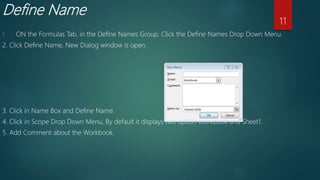
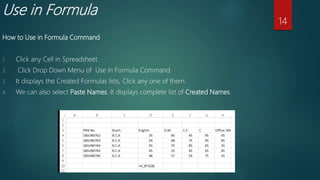
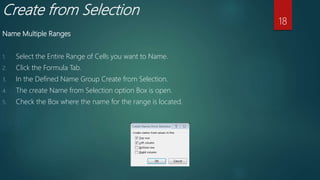
Name : Dinesh Kumavat
Branch : B.C.A
PRN No. : 18SUN0762
Course : Office 365
Topic : Defined Names Group
Guided BY : Prof. Apurva Bhavsar
1
Index
Defined Name
1. Name Manager
2. Define Name
3. Use in Formula
4. Create from Selection
2
Defined Names Group
We use this option to define the name of a cell, range and the list of the already defined name can be
viewed in Name manager and we can edit it if we want to change the range or cell reference of any
defined name. Also, we can use the defined name in Formulas.
3
Names Manager
On the Ribbon, go to Formulas > Defined Names > Name Manager. You can then create New Name,
edit, delete, and find all the names used in the workbook.
How to Create New Name OR Define New Name
1. Go to the Formulas Tab Click Name Manager or press Control F3.
2. Name Manager Dialog Window is open.
4
Name Manager
3. Click New Button then New Name Dialog Box Window is open.
5
Name Manager
4. Type your Name in Name Box and select Scope Complete Workbook OR Sheets.
5.In the Scope Drop Down set the Name Scope (Workbook by default
6. Click in the Comment Box and write your Comment.
7.Click Refers to and select Cell Range.
8. Click OK or press Enter Key.
6
Name Manager
9.Your Name is Created and it’s
In Name Manager Dialog Box
Window.
7
Name Manager
How to Edit Defined Name
1. Click Edit Button in Name Manager Dialog Box Window and select your Name which you want Edit.
2. Edit Name Dialog Box Window is open.
3. You Can Edit your Name, Comment and Cell Value and you can’t be Edit your Scope.
4. Press Enter Key or Click Ok.
8
Name Manager
How to Delete Defined Name
1. Click Name Manager, Name Manager Dialog Box window is open then select Name which you want
Delete.
2. One Dialog Box is open Click OK.
9
Name Manager
3. Your Name is Deleted.
10
Define Name
1. ON the Formulas Tab, in the Define Names Group, Click the Define Names Drop Down Menu.
2. Click Define Name, New Dialog window is open.
3. Click in Name Box and Define Name.
4. Click in Scope Drop Down Menu, By default it displays two option Workbook and Sheet1.
5. Add Comment about the Workbook.
11
Define Names
6. Click Refers > select Cells Range and press Enter Key or click Ok.
7. Your Name is Create and it Show in Name Manger.
12
Define Names
Apply Names
1. Click any cell in Spreadsheet and Enter Formula.
2. On the Ribbon, Go to the Formulas, Click Drop Down Menu of Define Name and Select Apply
Name.
3. It displays complete list of created Names, Select
Names and press Enter Key or Click Ok.
13
Use in Formula
How to Use in Formula Command
1. Click any Cell in Spreadsheet
2. Click Drop Down Menu of Use in Formula Command.
3. It displays the Created Formulas lists, Click any one of them.
4. We can also select Paste Names. It displays complete list of Created Names.
14
Use in Formula
5.Select the Cell and Enter the Value and Press Enter.
6. Result display in Selected Cell.
15
Create from Selection
Create Single Range
1. Select the Cell Range which you want.
2. Click the Formula Tab.
3. In the Defined Name Group Click Create from Selection.
4. The create from Selection option Box is open.
5. Check the Box where the name for the range is located.
16
Create From Selection
6. You can check this by clicking the Name Manager Command.
17
Create from Selection
Name Multiple Ranges
1. Select the Entire Range of Cells you want to Name.
2. Click the Formula Tab.
3. In the Defined Name Group Create from Selection.
4. The create Name from Selection option Box is open.
5. Check the Box where the name for the range is located.
18
Create From Selection
6. You can check this by clicking the Name Manager Command.
19
20

Defined Names Group (Formula Tab Excel)

  • 1.
    Name : DineshKumavat Branch : B.C.A PRN No. : 18SUN0762 Course : Office 365 Topic : Defined Names Group Guided BY : Prof. Apurva Bhavsar 1
  • 2.
    Index Defined Name 1. NameManager 2. Define Name 3. Use in Formula 4. Create from Selection 2
  • 3.
    Defined Names Group Weuse this option to define the name of a cell, range and the list of the already defined name can be viewed in Name manager and we can edit it if we want to change the range or cell reference of any defined name. Also, we can use the defined name in Formulas. 3
  • 4.
    Names Manager On theRibbon, go to Formulas > Defined Names > Name Manager. You can then create New Name, edit, delete, and find all the names used in the workbook. How to Create New Name OR Define New Name 1. Go to the Formulas Tab Click Name Manager or press Control F3. 2. Name Manager Dialog Window is open. 4
  • 5.
    Name Manager 3. ClickNew Button then New Name Dialog Box Window is open. 5
  • 6.
    Name Manager 4. Typeyour Name in Name Box and select Scope Complete Workbook OR Sheets. 5.In the Scope Drop Down set the Name Scope (Workbook by default 6. Click in the Comment Box and write your Comment. 7.Click Refers to and select Cell Range. 8. Click OK or press Enter Key. 6
  • 7.
    Name Manager 9.Your Nameis Created and it’s In Name Manager Dialog Box Window. 7
  • 8.
    Name Manager How toEdit Defined Name 1. Click Edit Button in Name Manager Dialog Box Window and select your Name which you want Edit. 2. Edit Name Dialog Box Window is open. 3. You Can Edit your Name, Comment and Cell Value and you can’t be Edit your Scope. 4. Press Enter Key or Click Ok. 8
  • 9.
    Name Manager How toDelete Defined Name 1. Click Name Manager, Name Manager Dialog Box window is open then select Name which you want Delete. 2. One Dialog Box is open Click OK. 9
  • 10.
    Name Manager 3. YourName is Deleted. 10
  • 11.
    Define Name 1. ONthe Formulas Tab, in the Define Names Group, Click the Define Names Drop Down Menu. 2. Click Define Name, New Dialog window is open. 3. Click in Name Box and Define Name. 4. Click in Scope Drop Down Menu, By default it displays two option Workbook and Sheet1. 5. Add Comment about the Workbook. 11
  • 12.
    Define Names 6. ClickRefers > select Cells Range and press Enter Key or click Ok. 7. Your Name is Create and it Show in Name Manger. 12
  • 13.
    Define Names Apply Names 1.Click any cell in Spreadsheet and Enter Formula. 2. On the Ribbon, Go to the Formulas, Click Drop Down Menu of Define Name and Select Apply Name. 3. It displays complete list of created Names, Select Names and press Enter Key or Click Ok. 13
  • 14.
    Use in Formula Howto Use in Formula Command 1. Click any Cell in Spreadsheet 2. Click Drop Down Menu of Use in Formula Command. 3. It displays the Created Formulas lists, Click any one of them. 4. We can also select Paste Names. It displays complete list of Created Names. 14
  • 15.
    Use in Formula 5.Selectthe Cell and Enter the Value and Press Enter. 6. Result display in Selected Cell. 15
  • 16.
    Create from Selection CreateSingle Range 1. Select the Cell Range which you want. 2. Click the Formula Tab. 3. In the Defined Name Group Click Create from Selection. 4. The create from Selection option Box is open. 5. Check the Box where the name for the range is located. 16
  • 17.
    Create From Selection 6.You can check this by clicking the Name Manager Command. 17
  • 18.
    Create from Selection NameMultiple Ranges 1. Select the Entire Range of Cells you want to Name. 2. Click the Formula Tab. 3. In the Defined Name Group Create from Selection. 4. The create Name from Selection option Box is open. 5. Check the Box where the name for the range is located. 18
  • 19.
    Create From Selection 6.You can check this by clicking the Name Manager Command. 19
  • 20.