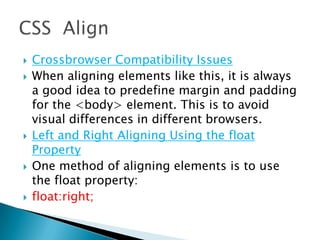
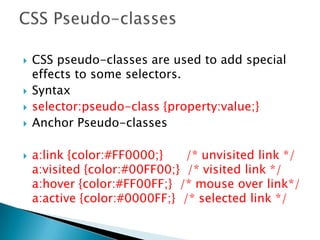
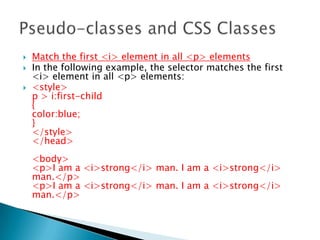
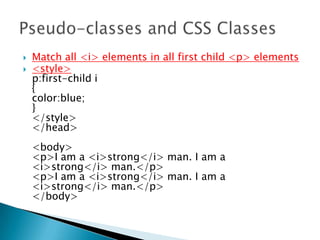
 Styles define how to display HTML elements
 Styles were added to HTML 4.0 to solve a
problem
 External Style Sheets can save a lot of work
 External Style Sheets are stored in CSS files
 The id selector is used to specify a style for a
single, unique element.
 The id selector uses the id attribute of the HTML
element, and is defined with a "#".
 The class selector is used to specify a style for a
group of elements. Unlike the id selector, the
class selector is most often used on several
elements.
 The class selector uses the HTML class attribute,
and is defined with a "."
 CSS background properties are used to define
the background effects of an element.
 CSS properties used for background effects:
 background-color
 background-image
 background-repeat
 background-attachment
 background-position
 Background Color
 body {background-color:#b0c4de;}
 Background Image:
 body {background-image:url('paper.gif');}
 Text Color
 The color property is used to set the color of
the text.
 body {color:blue;}
h1 {color:#00ff00;}
h2 {color:rgb(255,0,0);}
 direction :Specifies the text direction/writing direction
 letter-spacing: Increases or decreases the space between
characters in a text
 line-height: Sets the line height
 text-align: Specifies the horizontal alignment of text
 text-decoration: Specifies the decoration added to text
 text-indent: Specifies the indentation of the first line in a
text-block
 text-shadow: Specifies the shadow effect added
to text
 text-transform: Controls the capitalization of
text
 vertical-align: Sets the vertical alignment of an
element
 white-space: Specifies how white-space inside an
element is handled
 word-spacing: Increases or decreases the space
between words in a text
 CSS font properties define the font family,
boldness, size, and the style of a text.
 In CSS, there are two types of font family names:
 generic family - a group of font families with a
similar look (like "Serif" or "Monospace")
 font family - a specific font family (like "Times
New Roman" or "Arial")
 p{font-family:"Times New Roman", Times, serif;}
 Font Style
The font-style property is mostly used to
specify italic text.
 This property has three values:
 normal - The text is shown normally
 italic - The text is shown in italics
 oblique - The text is "leaning" (oblique is very
similar to italic, but less supported)
 p.normal {font-style:normal;}
 Font Size
 The font-size property sets the size of the text.
 Set Font Size With Pixels
 Setting the text size with pixels gives you full
control over the text size:
 h1 {font-size:40px;}
 Set Font Size With Em
 h1 {font-size:2.5em;} /* 40px/16=2.5em */
 Styling Links
 Links can be styled with any CSS property (e.g.
color, font-family, background, etc.).
 In addition, links can be styled differently
depending on what state they are in.
 The four links states are:
 a:link - a normal, unvisited link
 a:visited - a link the user has visited
 a:hover - a link when the user mouses over it
 a:active - a link the moment it is clicked
 a:link {color:blue;}
 Text Decoration
 The text-decoration property is mostly used
to remove underlines from links:
 Example
 a:link {text-decoration:none;}
a:visited {text-decoration:none;}
a:hover {text-decoration:underline;}
a:active {text-decoration:underline;}
 Background Color:
 The background-color property specifies the
background color for links:
 Example
 a:link {background-color:#B2FF99;}
a:visited {background-color:#FFFF85;}
a:hover {background-color:#FF704D;}
a:active {background-color:#FF704D;}
 Set different list item markers for ordered lists
 ol.c {list-style-type: upper-roman;}
ol.d {list-style-type: lower-alpha;}
 Set different list item markers for unordered lists
 ul.a {list-style-type: circle;}
ul.b {list-style-type: square;}
 Set an image as the list item marker
 ul
{
list-style-image: url(‘image.gif');
}
 The look of an HTML table can be greatly
improved with CSS.
 Table Borders
 To specify table borders in CSS, use the
border property.
 table, th, td
{
border: 1px solid black;
}
 Table Width and Height
 Width and height of a table is defined by the width and height
properties.
 The example below sets the width of the table to 100%, and
the height of the th elements to 50px:
 table
{
width:100%;
}
th
{
height:50px;
}
 Table Text Alignment
 The text in a table is aligned with the text-
align and vertical-align properties.
 The text-align property sets the horizontal
alignment, like left, right, or center:
 td
{
text-align:right;
}
 The vertical-align property sets the vertical
alignment, like top, bottom, or middle:
 Example
 td
{
height:50px;
vertical-align:bottom;
}
 Table Padding
 To control the space between the border and
content in a table, use the padding property
on td and th elements:
 Example
 td
{
padding:15px;
}
 Table Color
 The example below specifies the color of the borders,
and the text and background color of th elements:
 Example
 table, td, th
{
border:1px solid green;
}
th
{
background-color:green;
color:white;
}
 All HTML elements can be considered as
boxes. In CSS, the term "box model" is used
when talking about design and layout.
 The CSS box model is essentially a box that
wraps around HTML elements, and it consists
of: margins, borders, padding, and the actual
content.
 The box model allows us to place a border
around elements and space elements in
relation to other elements.
 Margin - Clears an area around the border.
The margin does not have a background
color, it is completely transparent
 Border - A border that goes around the
padding and content. The border is affected
by the background color of the box
 Padding - Clears an area around the content.
The padding is affected by the background
color of the box
 Content - The content of the box, where text
and images appear
 Border Style
 The border-style property specifies what kind
of border to display.
 dotted: Defines a dotted border
 dashed: Defines a dashed border
 solid: Defines a solid border
 double: Defines two borders. The width of the
two borders are the same as the border-
width value
 groove: Defines a 3D grooved border. The
effect depends on the border-color value
 ridge: Defines a 3D ridged border. The effect
depends on the border-color value
 inset: Defines a 3D inset border. The effect
depends on the border-color value
 outset: Defines a 3D outset border. The effect
depends on the border-color value
 Border Width
 The border-width property is used to set the
width of the border.
 The width is set in pixels, or by using one of
the three pre-defined values: thin, medium,
or thick.
 border-width:5px;
 border-width:medium;
 Border Color
 The border-color property is used to set the
color of the border. The color can be set by:
 name - specify a color name, like "red"
 RGB - specify a RGB value, like "rgb(255,0,0)"
 Hex - specify a hex value, like "#ff0000"
 You can also set the border color to
"transparent".
 border-color:red;
 border-color:#98bf21;
 Border - Individual sides
 In CSS it is possible to specify different
borders for different sides:
 Example
 p
{
border-top-style:dotted;
border-right-style:solid;
border-bottom-style:dotted;
border-left-style:solid;
}



 The border-style property can have from
one to four values.
 border-style:dotted solid double dashed;
◦ top border is dotted
◦ right border is solid
◦ bottom border is double
◦ left border is dashed
 border-style:dotted solid double;
◦ top border is dotted
◦ right and left borders are solid
◦ bottom border is double
 border-style:dotted solid;
◦ top and bottom borders are dotted
◦ right and left borders are solid
 border-style:dotted;
◦ all four borders are dotted
 The border property is a shorthand for the
following individual border properties:
 border-width
 border-style (required)
 border-color
 border:5px solid red;
 An outline is a line that is drawn around elements
(outside the borders) to make the element "stand
out".
 The outline properties specify the style, color, and
width of an outline.
 CSS outline Property

Example
 Set the outline around an element:
 p
{
outline:#00FF00 dotted thick;
}
 outline-color: Sets the color of an outline
 Values possible: color_name, hex_number
rgb_number
 outline-style: Sets the style of an outline
 Values possible: none
dotted
dashed
solid…
 outline-width: Sets the width of an outline
 Values Possible: thin, medium, thick
 The margin clears an area around an element
(outside the border). The margin does not
have a background color, and is completely
transparent.
 The top, right, bottom, and left margin can
be changed independently using separate
properties. A shorthand margin property can
also be used, to change all margins at once.
 Values:
 auto: The browser calculates a margin
 length: Specifies a margin in px, pt, cm, etc.
Default value is 0px
 %: Specifies a margin in percent of the width of
the containing element
 Inherit: Specifies that the margin should be
inherited from the parent element
 Margin - Individual sides
 margin-top:100px;
margin-bottom:100px;
margin-right:50px;
margin-left:50px;
 Margin - Shorthand property
 The shorthand property for all the margin
properties is "margin":
 margin:100px 50px;
 The CSS padding properties define the space
between the element border and the element
content.
 The padding clears an area around the content
(inside the border) of an element. The padding is
affected by the background color of the element.
 Values:
 length : Defines a fixed padding (in pixels, pt,
em, etc.)
 %: Defines a padding in % of the containing
element
 Padding - Individual sides
 In CSS, it is possible to specify different padding
for different sides:
 padding-top:25px;

padding-bottom:25px;
padding-right:50px;
padding-left:50px;
 Shorthand property:
 padding:25px 50px;
 Grouping Selectors
 In style sheets there are often elements with
the same style.
 To minimize the code, you can group
selectors.
 Separate each selector with a comma.
 h1,h2,p
{
color:green;
}
 It is possible to apply a style for a selector within
 p
{
color:blue;
text-align:center;
}
.marked
{
background-color:red;
}
.marked p
{
color:white;
} a selector.
 The CSS dimension properties allow you to
control the height and width of an element.
 Properties:
 Height:Sets the height of an elementauto
Values: length,%,inherit
 max-height:Sets the maximum height of an
element
 max-widthSets the maximum width of an
element
 min-height: Sets the minimum height of an
element
 min-width: Sets the minimum width of an
element
 Width: Sets the width of an element
 The display property specifies if/how an
element is displayed, and the visibility
property specifies if an element should be
visible or hidden.

Hiding an Element - display:none or
visibility:hidden
 h1.hidden {visibility:hidden;}
 display:none hides an element, and it will not
take up any space. The element will be
hidden, and the page will be displayed as if
the element is not there:
 h1.hidden {display:none;}
 Fixed Positioning
 An element with fixed position is positioned
relative to the browser window.
 It will not move even if the window is scrolled:
 Example
 p.pos_fixed
{
position:fixed;
top:30px;
right:5px;
}
 Relative Positioning
 A relative positioned element is positioned
relative to its normal position.
 h2.pos_left
{
position:relative;
left:-20px;
}
h2.pos_right
{
position:relative;
left:20px;
}
 Absolute Positioning
 An absolute position element is positioned
relative to the first parent element that has a
position other than static. If no such element is
found, the containing block is <html>:
 Example
 h2
{
position:absolute;
left:100px;
top:150px;
}
 Center Aligning Using the margin Property
 Block elements can be aligned by setting the
left and right margins to "auto".
 .center
{
margin-left:auto;
margin-right:auto;
width:70%;
background-color:#b0e0e6;
}
 Left and Right Aligning Using the position
Property
 One method of aligning elements is to use
absolute positioning:
 Example
 .right
{
position:absolute;
right:0px;
width:300px;
background-color:#b0e0e6;
}
 Crossbrowser Compatibility Issues
 When aligning elements like this, it is always
a good idea to predefine margin and padding
for the <body> element. This is to avoid
visual differences in different browsers.
 Left and Right Aligning Using the float
Property
 One method of aligning elements is to use
the float property:
 float:right;
 CSS pseudo-classes are used to add special
effects to some selectors.
 Syntax
 selector:pseudo-class {property:value;}
 Anchor Pseudo-classes
 a:link {color:#FF0000;} /* unvisited link */
a:visited {color:#00FF00;} /* visited link */
a:hover {color:#FF00FF;} /* mouse over link*/
a:active {color:#0000FF;} /* selected link */
 Pseudo-classes can be combined with CSS
classes:
 a.red:visited {color:#FF0000;}
 Match the first <p> element
 p:first-child
{
color:blue;
}
</style>
</head>
<body>
<p>I am a strong man.</p>
 Match the first <i> element in all <p> elements
 In the following example, the selector matches the first
<i> element in all <p> elements:
 <style>
p > i:first-child
{
color:blue;
}
</style>
</head>
<body>
<p>I am a <i>strong</i> man. I am a <i>strong</i>
man.</p>
<p>I am a <i>strong</i> man. I am a <i>strong</i>
man.</p>
 Match all <i> elements in all first child <p> elements
 <style>
p:first-child i
{
color:blue;
}
</style>
</head>
<body>
<p>I am a <i>strong</i> man. I am a
<i>strong</i> man.</p>
<p>I am a <i>strong</i> man. I am a
<i>strong</i> man.</p>
</body>
 CSS pseudo-elements are used to add special
effects to some selectors.
 The :first-line Pseudo-element
 The "first-line" pseudo-element is used to
add a special style to the first line of a text.
 p:first-line
{
color:#ff0000;
font-variant:small-caps;
}
 The :first-letter Pseudo-element
 The "first-letter" pseudo-element is used to
add a special style to the first letter of a text:
 p:first-letter
{
color:#ff0000;
font-size:xx-large;
}
 CSS - The :before Pseudo-element
 The ":before" pseudo-element can be used to
insert some content before the content of an
element.
 h1:before
{
content:url(smiley.gif);
}
 <ul>
<li><a href="default.asp">Home</a></li>
<li><a href="news.asp">News</a></li>
<li><a href="contact.asp">Contact</a></li>
<li><a href="about.asp">About</a></li>
</ul>
 To remove bullets and margins:
 ul
{
list-style-type:none;
margin:0;
padding:0;
}
 Image Sprites
 An image sprite is a collection of images put
into a single image.
 A web page with many images can take a
long time to load and generates multiple
server requests.
 Using image sprites will reduce the number of
server requests and save bandwidth.
 With CSS3, you can create rounded borders,
add shadow to boxes, and use an image as a
border - without using a design program, like
Photoshop.
 3 types:
 border-radius
 box-shadow
 border-image
 CSS3 Rounded Corners:
 In CSS3, the border-radius property is used
to create rounded corners:
 div
{
border:2px solid;
border-radius:25px;
}
 CSS3 Box Shadow
 In CSS3, the box-shadow property is used to
add shadow to boxes:
 box-shadow: h-shadow v-shadow blur
spread color inset;
 box-shadow: 10px 10px 5px #888888;
 CSS3 Border Image:
 With the CSS3 border-image property you can
use an image to create a border
 Syntax
 border-image: source slice width outset
repeat ;
 CSS3 Text Shadow
 In CSS3, the text-shadow property applies
shadow to text.
 Syntax:
 text-shadow: h-shadow v-shadow blur color
;
 CSS3 Word Wrapping:
 If a word is too long to fit within an area, it
expands outside.
 Allow long words to be able to break and
wrap onto the next line.
 Syntax
 word-wrap: normal|break-word;
 With CSS3, web designers can use whatever font he/she
likes.
 <style>
@font-face
{
font-family: myFirstFont;
src: url(sansation_light.woff);
}
div
{
font-family:myFirstFont;
}
</style>

 A transform is an effect that lets an element
change shape, size and position.
 translate()
 rotate()
 scale()
 skew()
 matrix()
 The translate() Method :
 With the translate() method, the element moves
from its current position, depending on the
parameters given for the left (X-axis) and the top
(Y-axis) position.
 transform:translate(50px,100px);
 -ms-transform:translate(50px,100px); /* IE 9 */
 -webkit-transform:translate(50px,100px); /*
Safari and Chrome */
 The rotate() Method
 With the rotate() method, the element rotates
clockwise at a given degree. Negative values
are allowed and rotates the element counter-
clockwise.
 transform: rotate(30deg);
-ms-transform: rotate(30deg); /* IE 9 */
-webkit-transform: rotate(30deg); /* Safari
and Chrome */
 The scale() Method
 With the scale() method, the element
increases or decreases the size, depending on
the parameters given for the width (X-axis)
and the height (Y-axis):

transform: scale(2,4);
-ms-transform: scale(2,4); /* IE 9 */
-webkit-transform: scale(2,4); /* Safari and
Chrome */
 The skew() Method
 With the skew() method, the element turns in
a given angle, depending on the parameters
given for the horizontal (X-axis) and the
vertical (Y-axis) lines:
 transform: skew(30deg,20deg);
-ms-transform: skew(30deg,20deg); /* IE 9
*/
-webkit-transform: skew(30deg,20deg); /*
Safari and Chrome */
 The matrix() Method
 The matrix() method combines all of the 2D
transform methods into one.
 The matrix method take six parameters,
containing mathematic functions, which
allows you to: rotate, scale, move (translate),
and skew elements.
 How to rotate a div element 30 degrees,
using the matrix method:
 div
{
transform:matrix(0.866,0.5,-0.5,0.866,0,0);
-ms-transform:matrix(0.866,0.5,-
0.5,0.866,0,0); /* IE 9 */
-webkit-transform:matrix(0.866,0.5,-
0.5,0.866,0,0); /* Safari and Chrome */
}
 The rotateX() Method
 transform: rotateX(120deg);
-webkit-transform: rotateX(120deg); /* Safari
and Chrome */
 The rotateY() Method
 transform: rotateY(130deg);
-webkit-transform: rotateY(130deg); /* Safari
and Chrome */
 The transition property is a shorthand
property for the four transition properties:
 transition-property, transition-duration,
transition-timing-function, and transition-
delay.
 transition: property duration timing-function
delay;

 transition-propertySpecifies the name of the
CSS property the transition effect is for
 transition-durationSpecifies how many
seconds or milliseconds the transition effect
takes to complete
 transition-timing-functionSpecifies the speed
curve of the transition effect
 transition-delayDefines when the transition
effect will start
 CSS3 @keyframes Rule:
 The @keyframes rule is where the animation
is created. Specify a CSS style inside the
@keyframes rule and the animation will
gradually change from the current style to the
new style.
 @keyframes myfirst
{
from {background: red;}
to {background: yellow;}
}
@-webkit-keyframes myfirst /* Safari and
Chrome */
{
from {background: red;}
to {background: yellow;}
}
 column-count
 column-gap
 column-rule

-moz-column-count:3; /* Firefox */
-webkit-column-count:3; /* Safari and
Chrome */
column-count:3;
column-gap:40px;
 column-rule:3px outset #ff00ff;
 resize
 box-sizing
 outline-offset
 CSS Resize:
 div
{
resize:both;
overflow:auto;
}
 CSS3 Box Sizing
 The box-sizing property allows you to define
certain elements to fit an area in a certain
way:
 div
{
box-sizing:border-box;
-moz-box-sizing:border-box; /* Firefox */
width:50%;
float:left;
}
 CSS3 Outline Offset
 The outline-offset property offsets an outline,
and draws it beyond the border edge.
 Outlines differ from borders in two ways:
 Outlines do not take up space
 Outlines may be non-rectangular
 div
{
border:2px solid black;
outline:2px solid red;
outline-offset:15px;
}
 CSS3 Outline Offset
 The outline-offset property offsets an outline,
and draws it beyond the border edge.
 Outlines differ from borders in two ways:
 Outlines do not take up space
 Outlines may be non-rectangular
 div
{
border:2px solid black;
outline:2px solid red;
outline-offset:15px;
}
Css

Css

  • 2.
     Styles definehow to display HTML elements  Styles were added to HTML 4.0 to solve a problem  External Style Sheets can save a lot of work  External Style Sheets are stored in CSS files
  • 4.
     The idselector is used to specify a style for a single, unique element.  The id selector uses the id attribute of the HTML element, and is defined with a "#".  The class selector is used to specify a style for a group of elements. Unlike the id selector, the class selector is most often used on several elements.  The class selector uses the HTML class attribute, and is defined with a "."
  • 5.
     CSS backgroundproperties are used to define the background effects of an element.  CSS properties used for background effects:  background-color  background-image  background-repeat  background-attachment  background-position
  • 6.
     Background Color body {background-color:#b0c4de;}  Background Image:  body {background-image:url('paper.gif');}
  • 7.
     Text Color The color property is used to set the color of the text.  body {color:blue;} h1 {color:#00ff00;} h2 {color:rgb(255,0,0);}
  • 8.
     direction :Specifiesthe text direction/writing direction  letter-spacing: Increases or decreases the space between characters in a text  line-height: Sets the line height  text-align: Specifies the horizontal alignment of text  text-decoration: Specifies the decoration added to text  text-indent: Specifies the indentation of the first line in a text-block
  • 9.
     text-shadow: Specifiesthe shadow effect added to text  text-transform: Controls the capitalization of text  vertical-align: Sets the vertical alignment of an element  white-space: Specifies how white-space inside an element is handled  word-spacing: Increases or decreases the space between words in a text
  • 10.
     CSS fontproperties define the font family, boldness, size, and the style of a text.  In CSS, there are two types of font family names:  generic family - a group of font families with a similar look (like "Serif" or "Monospace")  font family - a specific font family (like "Times New Roman" or "Arial")  p{font-family:"Times New Roman", Times, serif;}
  • 11.
     Font Style Thefont-style property is mostly used to specify italic text.  This property has three values:  normal - The text is shown normally  italic - The text is shown in italics  oblique - The text is "leaning" (oblique is very similar to italic, but less supported)  p.normal {font-style:normal;}
  • 12.
     Font Size The font-size property sets the size of the text.  Set Font Size With Pixels  Setting the text size with pixels gives you full control over the text size:  h1 {font-size:40px;}  Set Font Size With Em  h1 {font-size:2.5em;} /* 40px/16=2.5em */
  • 13.
     Styling Links Links can be styled with any CSS property (e.g. color, font-family, background, etc.).  In addition, links can be styled differently depending on what state they are in.  The four links states are:  a:link - a normal, unvisited link  a:visited - a link the user has visited  a:hover - a link when the user mouses over it  a:active - a link the moment it is clicked  a:link {color:blue;}
  • 14.
     Text Decoration The text-decoration property is mostly used to remove underlines from links:  Example  a:link {text-decoration:none;} a:visited {text-decoration:none;} a:hover {text-decoration:underline;} a:active {text-decoration:underline;}
  • 15.
     Background Color: The background-color property specifies the background color for links:  Example  a:link {background-color:#B2FF99;} a:visited {background-color:#FFFF85;} a:hover {background-color:#FF704D;} a:active {background-color:#FF704D;}
  • 16.
     Set differentlist item markers for ordered lists  ol.c {list-style-type: upper-roman;} ol.d {list-style-type: lower-alpha;}  Set different list item markers for unordered lists  ul.a {list-style-type: circle;} ul.b {list-style-type: square;}  Set an image as the list item marker  ul { list-style-image: url(‘image.gif'); }
  • 17.
     The lookof an HTML table can be greatly improved with CSS.  Table Borders  To specify table borders in CSS, use the border property.  table, th, td { border: 1px solid black; }
  • 18.
     Table Widthand Height  Width and height of a table is defined by the width and height properties.  The example below sets the width of the table to 100%, and the height of the th elements to 50px:  table { width:100%; } th { height:50px; }
  • 19.
     Table TextAlignment  The text in a table is aligned with the text- align and vertical-align properties.  The text-align property sets the horizontal alignment, like left, right, or center:  td { text-align:right; }
  • 20.
     The vertical-alignproperty sets the vertical alignment, like top, bottom, or middle:  Example  td { height:50px; vertical-align:bottom; }
  • 21.
     Table Padding To control the space between the border and content in a table, use the padding property on td and th elements:  Example  td { padding:15px; }
  • 22.
     Table Color The example below specifies the color of the borders, and the text and background color of th elements:  Example  table, td, th { border:1px solid green; } th { background-color:green; color:white; }
  • 23.
     All HTMLelements can be considered as boxes. In CSS, the term "box model" is used when talking about design and layout.  The CSS box model is essentially a box that wraps around HTML elements, and it consists of: margins, borders, padding, and the actual content.  The box model allows us to place a border around elements and space elements in relation to other elements.
  • 25.
     Margin -Clears an area around the border. The margin does not have a background color, it is completely transparent  Border - A border that goes around the padding and content. The border is affected by the background color of the box  Padding - Clears an area around the content. The padding is affected by the background color of the box  Content - The content of the box, where text and images appear
  • 26.
     Border Style The border-style property specifies what kind of border to display.  dotted: Defines a dotted border  dashed: Defines a dashed border  solid: Defines a solid border  double: Defines two borders. The width of the two borders are the same as the border- width value
  • 27.
     groove: Definesa 3D grooved border. The effect depends on the border-color value  ridge: Defines a 3D ridged border. The effect depends on the border-color value  inset: Defines a 3D inset border. The effect depends on the border-color value  outset: Defines a 3D outset border. The effect depends on the border-color value
  • 29.
     Border Width The border-width property is used to set the width of the border.  The width is set in pixels, or by using one of the three pre-defined values: thin, medium, or thick.  border-width:5px;  border-width:medium;
  • 30.
     Border Color The border-color property is used to set the color of the border. The color can be set by:  name - specify a color name, like "red"  RGB - specify a RGB value, like "rgb(255,0,0)"  Hex - specify a hex value, like "#ff0000"  You can also set the border color to "transparent".  border-color:red;  border-color:#98bf21;
  • 31.
     Border -Individual sides  In CSS it is possible to specify different borders for different sides:  Example  p { border-top-style:dotted; border-right-style:solid; border-bottom-style:dotted; border-left-style:solid; }   
  • 32.
     The border-styleproperty can have from one to four values.  border-style:dotted solid double dashed; ◦ top border is dotted ◦ right border is solid ◦ bottom border is double ◦ left border is dashed  border-style:dotted solid double; ◦ top border is dotted ◦ right and left borders are solid ◦ bottom border is double
  • 33.
     border-style:dotted solid; ◦top and bottom borders are dotted ◦ right and left borders are solid  border-style:dotted; ◦ all four borders are dotted  The border property is a shorthand for the following individual border properties:  border-width  border-style (required)  border-color  border:5px solid red;
  • 34.
     An outlineis a line that is drawn around elements (outside the borders) to make the element "stand out".  The outline properties specify the style, color, and width of an outline.  CSS outline Property  Example  Set the outline around an element:  p { outline:#00FF00 dotted thick; }
  • 35.
     outline-color: Setsthe color of an outline  Values possible: color_name, hex_number rgb_number  outline-style: Sets the style of an outline  Values possible: none dotted dashed solid…  outline-width: Sets the width of an outline  Values Possible: thin, medium, thick
  • 36.
     The marginclears an area around an element (outside the border). The margin does not have a background color, and is completely transparent.  The top, right, bottom, and left margin can be changed independently using separate properties. A shorthand margin property can also be used, to change all margins at once.
  • 37.
     Values:  auto:The browser calculates a margin  length: Specifies a margin in px, pt, cm, etc. Default value is 0px  %: Specifies a margin in percent of the width of the containing element  Inherit: Specifies that the margin should be inherited from the parent element
  • 38.
     Margin -Individual sides  margin-top:100px; margin-bottom:100px; margin-right:50px; margin-left:50px;  Margin - Shorthand property  The shorthand property for all the margin properties is "margin":  margin:100px 50px;
  • 39.
     The CSSpadding properties define the space between the element border and the element content.  The padding clears an area around the content (inside the border) of an element. The padding is affected by the background color of the element.  Values:  length : Defines a fixed padding (in pixels, pt, em, etc.)  %: Defines a padding in % of the containing element
  • 40.
     Padding -Individual sides  In CSS, it is possible to specify different padding for different sides:  padding-top:25px;  padding-bottom:25px; padding-right:50px; padding-left:50px;  Shorthand property:  padding:25px 50px;
  • 41.
     Grouping Selectors In style sheets there are often elements with the same style.  To minimize the code, you can group selectors.  Separate each selector with a comma.  h1,h2,p { color:green; }
  • 42.
     It ispossible to apply a style for a selector within  p { color:blue; text-align:center; } .marked { background-color:red; } .marked p { color:white; } a selector.
  • 43.
     The CSSdimension properties allow you to control the height and width of an element.  Properties:  Height:Sets the height of an elementauto Values: length,%,inherit  max-height:Sets the maximum height of an element  max-widthSets the maximum width of an element
  • 44.
     min-height: Setsthe minimum height of an element  min-width: Sets the minimum width of an element  Width: Sets the width of an element
  • 45.
     The displayproperty specifies if/how an element is displayed, and the visibility property specifies if an element should be visible or hidden.  Hiding an Element - display:none or visibility:hidden  h1.hidden {visibility:hidden;}
  • 46.
     display:none hidesan element, and it will not take up any space. The element will be hidden, and the page will be displayed as if the element is not there:  h1.hidden {display:none;}
  • 47.
     Fixed Positioning An element with fixed position is positioned relative to the browser window.  It will not move even if the window is scrolled:  Example  p.pos_fixed { position:fixed; top:30px; right:5px; }
  • 48.
     Relative Positioning A relative positioned element is positioned relative to its normal position.  h2.pos_left { position:relative; left:-20px; } h2.pos_right { position:relative; left:20px; }
  • 49.
     Absolute Positioning An absolute position element is positioned relative to the first parent element that has a position other than static. If no such element is found, the containing block is <html>:  Example  h2 { position:absolute; left:100px; top:150px; }
  • 50.
     Center AligningUsing the margin Property  Block elements can be aligned by setting the left and right margins to "auto".  .center { margin-left:auto; margin-right:auto; width:70%; background-color:#b0e0e6; }
  • 51.
     Left andRight Aligning Using the position Property  One method of aligning elements is to use absolute positioning:  Example  .right { position:absolute; right:0px; width:300px; background-color:#b0e0e6; }
  • 52.
     Crossbrowser CompatibilityIssues  When aligning elements like this, it is always a good idea to predefine margin and padding for the <body> element. This is to avoid visual differences in different browsers.  Left and Right Aligning Using the float Property  One method of aligning elements is to use the float property:  float:right;
  • 53.
     CSS pseudo-classesare used to add special effects to some selectors.  Syntax  selector:pseudo-class {property:value;}  Anchor Pseudo-classes  a:link {color:#FF0000;} /* unvisited link */ a:visited {color:#00FF00;} /* visited link */ a:hover {color:#FF00FF;} /* mouse over link*/ a:active {color:#0000FF;} /* selected link */
  • 54.
     Pseudo-classes canbe combined with CSS classes:  a.red:visited {color:#FF0000;}  Match the first <p> element  p:first-child { color:blue; } </style> </head> <body> <p>I am a strong man.</p> <p>I am a strong man.</p>
  • 55.
     Match thefirst <i> element in all <p> elements  In the following example, the selector matches the first <i> element in all <p> elements:  <style> p > i:first-child { color:blue; } </style> </head> <body> <p>I am a <i>strong</i> man. I am a <i>strong</i> man.</p> <p>I am a <i>strong</i> man. I am a <i>strong</i> man.</p>
  • 56.
     Match all<i> elements in all first child <p> elements  <style> p:first-child i { color:blue; } </style> </head> <body> <p>I am a <i>strong</i> man. I am a <i>strong</i> man.</p> <p>I am a <i>strong</i> man. I am a <i>strong</i> man.</p> </body>
  • 57.
     CSS pseudo-elementsare used to add special effects to some selectors.  The :first-line Pseudo-element  The "first-line" pseudo-element is used to add a special style to the first line of a text.  p:first-line { color:#ff0000; font-variant:small-caps; }
  • 58.
     The :first-letterPseudo-element  The "first-letter" pseudo-element is used to add a special style to the first letter of a text:  p:first-letter { color:#ff0000; font-size:xx-large; }
  • 59.
     CSS -The :before Pseudo-element  The ":before" pseudo-element can be used to insert some content before the content of an element.  h1:before { content:url(smiley.gif); }
  • 61.
     <ul> <li><a href="default.asp">Home</a></li> <li><ahref="news.asp">News</a></li> <li><a href="contact.asp">Contact</a></li> <li><a href="about.asp">About</a></li> </ul>  To remove bullets and margins:  ul { list-style-type:none; margin:0; padding:0; }
  • 64.
     Image Sprites An image sprite is a collection of images put into a single image.  A web page with many images can take a long time to load and generates multiple server requests.  Using image sprites will reduce the number of server requests and save bandwidth.
  • 66.
     With CSS3,you can create rounded borders, add shadow to boxes, and use an image as a border - without using a design program, like Photoshop.  3 types:  border-radius  box-shadow  border-image
  • 67.
     CSS3 RoundedCorners:  In CSS3, the border-radius property is used to create rounded corners:  div { border:2px solid; border-radius:25px; }
  • 68.
     CSS3 BoxShadow  In CSS3, the box-shadow property is used to add shadow to boxes:  box-shadow: h-shadow v-shadow blur spread color inset;  box-shadow: 10px 10px 5px #888888;
  • 69.
     CSS3 BorderImage:  With the CSS3 border-image property you can use an image to create a border  Syntax  border-image: source slice width outset repeat ;
  • 70.
     CSS3 TextShadow  In CSS3, the text-shadow property applies shadow to text.  Syntax:  text-shadow: h-shadow v-shadow blur color ;
  • 71.
     CSS3 WordWrapping:  If a word is too long to fit within an area, it expands outside.  Allow long words to be able to break and wrap onto the next line.  Syntax  word-wrap: normal|break-word;
  • 72.
     With CSS3,web designers can use whatever font he/she likes.  <style> @font-face { font-family: myFirstFont; src: url(sansation_light.woff); } div { font-family:myFirstFont; } </style> 
  • 73.
     A transformis an effect that lets an element change shape, size and position.  translate()  rotate()  scale()  skew()  matrix()
  • 74.
     The translate()Method :  With the translate() method, the element moves from its current position, depending on the parameters given for the left (X-axis) and the top (Y-axis) position.  transform:translate(50px,100px);  -ms-transform:translate(50px,100px); /* IE 9 */  -webkit-transform:translate(50px,100px); /* Safari and Chrome */
  • 75.
     The rotate()Method  With the rotate() method, the element rotates clockwise at a given degree. Negative values are allowed and rotates the element counter- clockwise.  transform: rotate(30deg); -ms-transform: rotate(30deg); /* IE 9 */ -webkit-transform: rotate(30deg); /* Safari and Chrome */
  • 76.
     The scale()Method  With the scale() method, the element increases or decreases the size, depending on the parameters given for the width (X-axis) and the height (Y-axis):  transform: scale(2,4); -ms-transform: scale(2,4); /* IE 9 */ -webkit-transform: scale(2,4); /* Safari and Chrome */
  • 77.
     The skew()Method  With the skew() method, the element turns in a given angle, depending on the parameters given for the horizontal (X-axis) and the vertical (Y-axis) lines:  transform: skew(30deg,20deg); -ms-transform: skew(30deg,20deg); /* IE 9 */ -webkit-transform: skew(30deg,20deg); /* Safari and Chrome */
  • 78.
     The matrix()Method  The matrix() method combines all of the 2D transform methods into one.  The matrix method take six parameters, containing mathematic functions, which allows you to: rotate, scale, move (translate), and skew elements.
  • 79.
     How torotate a div element 30 degrees, using the matrix method:  div { transform:matrix(0.866,0.5,-0.5,0.866,0,0); -ms-transform:matrix(0.866,0.5,- 0.5,0.866,0,0); /* IE 9 */ -webkit-transform:matrix(0.866,0.5,- 0.5,0.866,0,0); /* Safari and Chrome */ }
  • 80.
     The rotateX()Method  transform: rotateX(120deg); -webkit-transform: rotateX(120deg); /* Safari and Chrome */  The rotateY() Method  transform: rotateY(130deg); -webkit-transform: rotateY(130deg); /* Safari and Chrome */
  • 81.
     The transitionproperty is a shorthand property for the four transition properties:  transition-property, transition-duration, transition-timing-function, and transition- delay.  transition: property duration timing-function delay; 
  • 82.
     transition-propertySpecifies thename of the CSS property the transition effect is for  transition-durationSpecifies how many seconds or milliseconds the transition effect takes to complete  transition-timing-functionSpecifies the speed curve of the transition effect  transition-delayDefines when the transition effect will start
  • 83.
     CSS3 @keyframesRule:  The @keyframes rule is where the animation is created. Specify a CSS style inside the @keyframes rule and the animation will gradually change from the current style to the new style.
  • 84.
     @keyframes myfirst { from{background: red;} to {background: yellow;} } @-webkit-keyframes myfirst /* Safari and Chrome */ { from {background: red;} to {background: yellow;} }
  • 85.
     column-count  column-gap column-rule  -moz-column-count:3; /* Firefox */ -webkit-column-count:3; /* Safari and Chrome */ column-count:3; column-gap:40px;  column-rule:3px outset #ff00ff;
  • 86.
     resize  box-sizing outline-offset  CSS Resize:  div { resize:both; overflow:auto; }
  • 87.
     CSS3 BoxSizing  The box-sizing property allows you to define certain elements to fit an area in a certain way:  div { box-sizing:border-box; -moz-box-sizing:border-box; /* Firefox */ width:50%; float:left; }
  • 88.
     CSS3 OutlineOffset  The outline-offset property offsets an outline, and draws it beyond the border edge.  Outlines differ from borders in two ways:  Outlines do not take up space  Outlines may be non-rectangular  div { border:2px solid black; outline:2px solid red; outline-offset:15px; }
  • 89.
     CSS3 OutlineOffset  The outline-offset property offsets an outline, and draws it beyond the border edge.  Outlines differ from borders in two ways:  Outlines do not take up space  Outlines may be non-rectangular  div { border:2px solid black; outline:2px solid red; outline-offset:15px; }