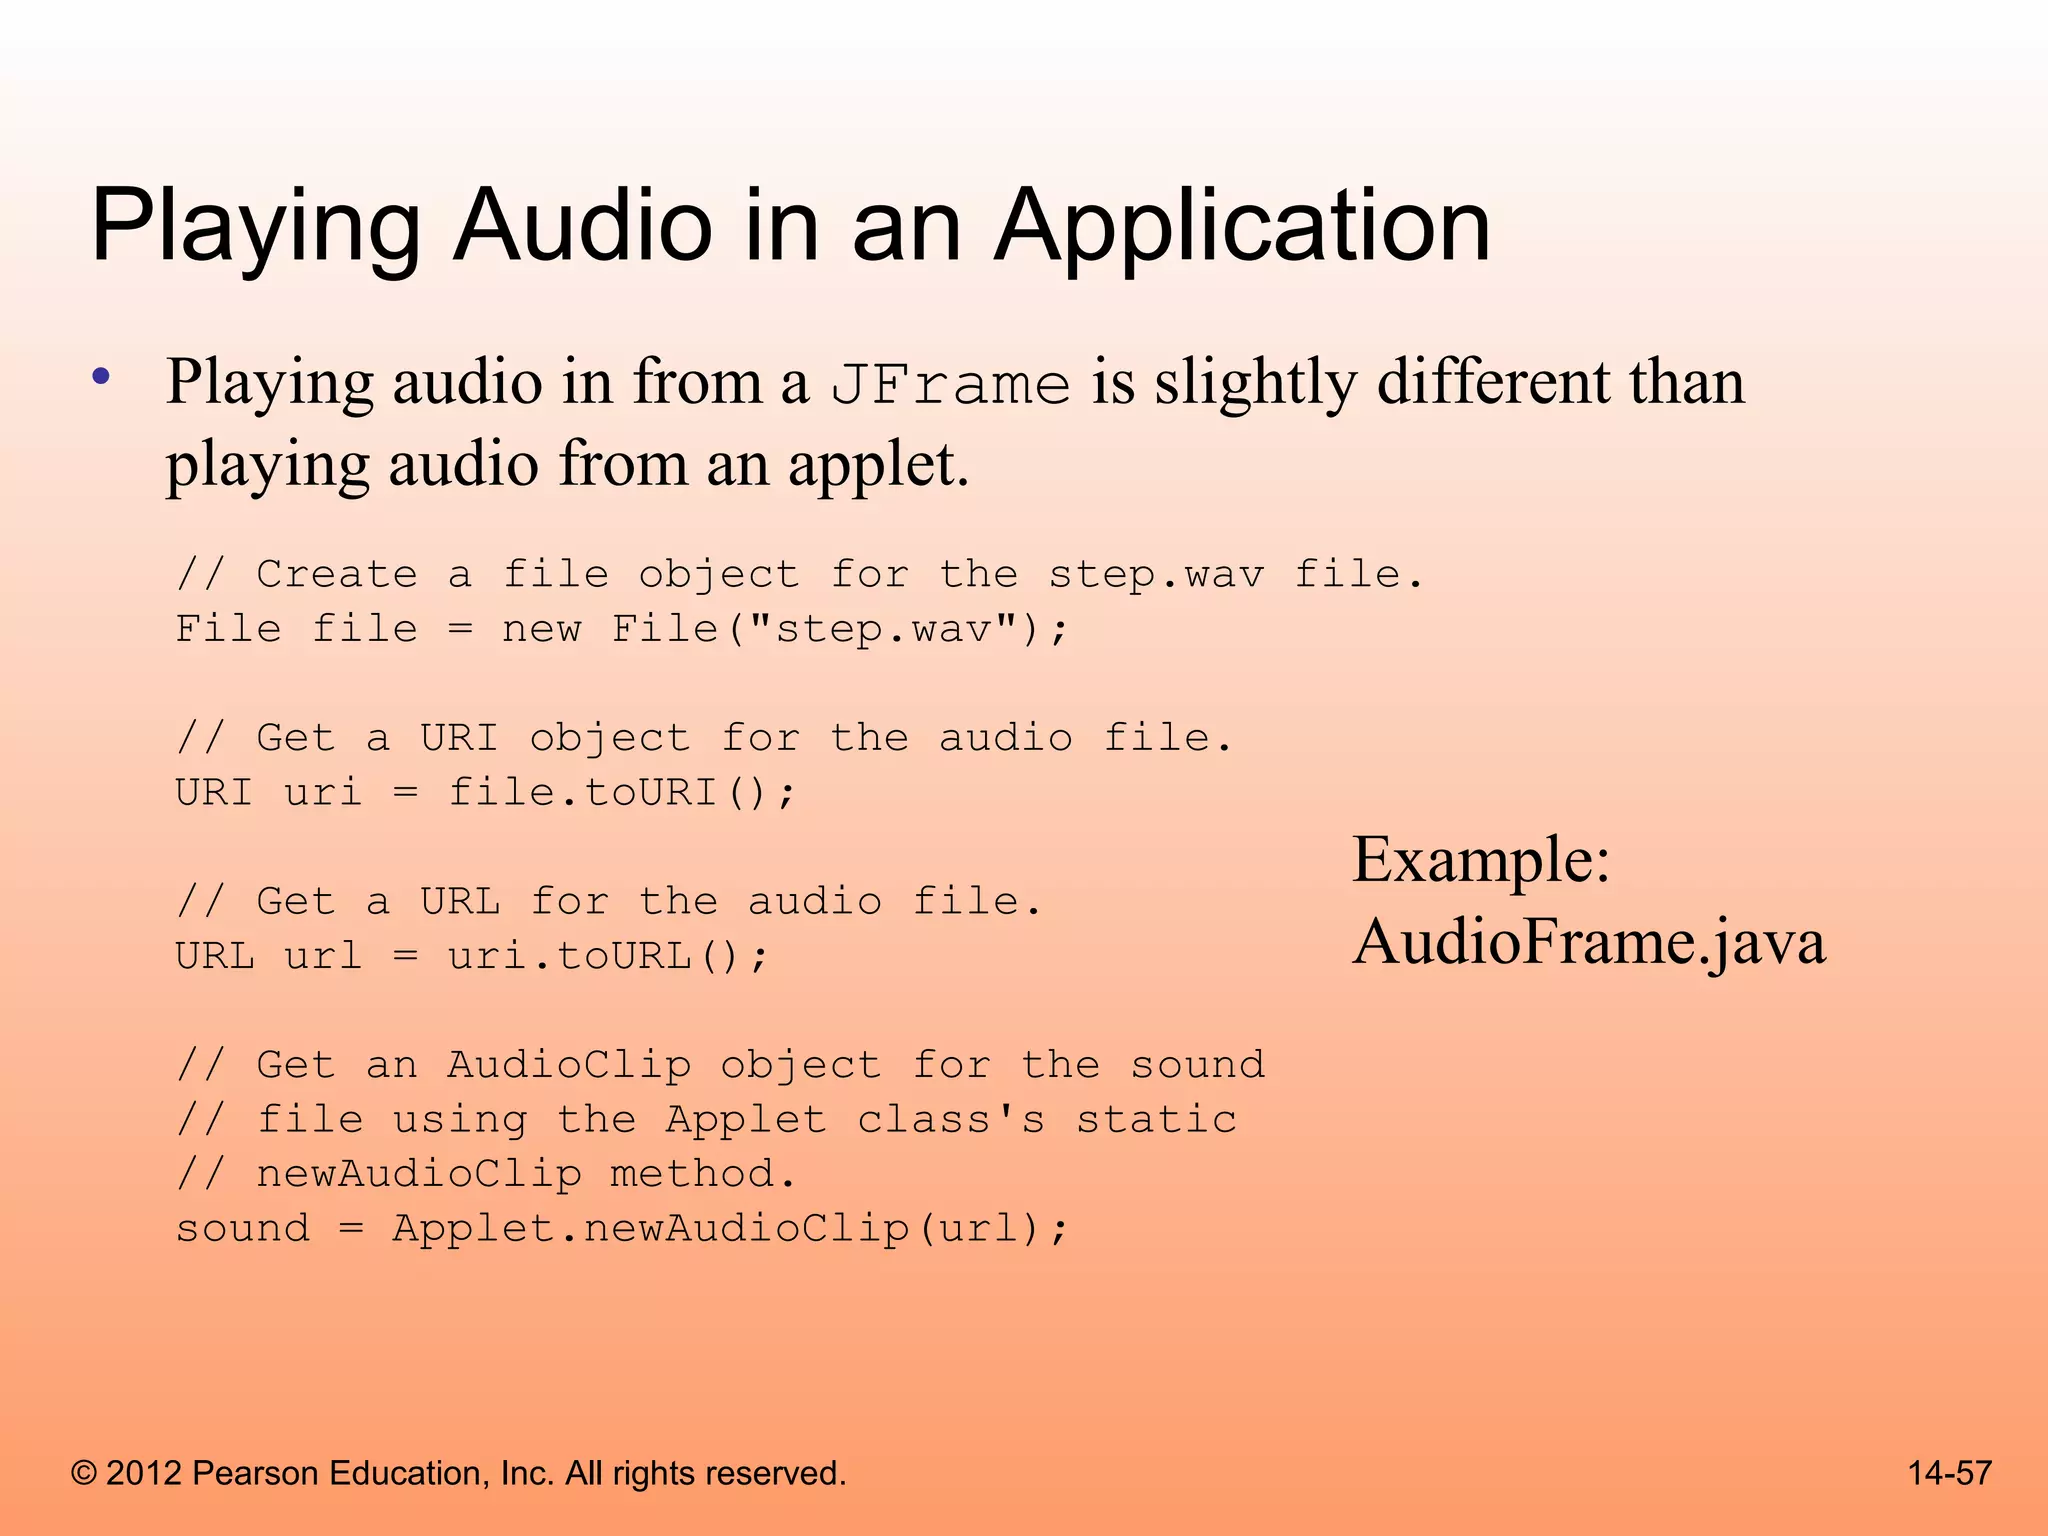
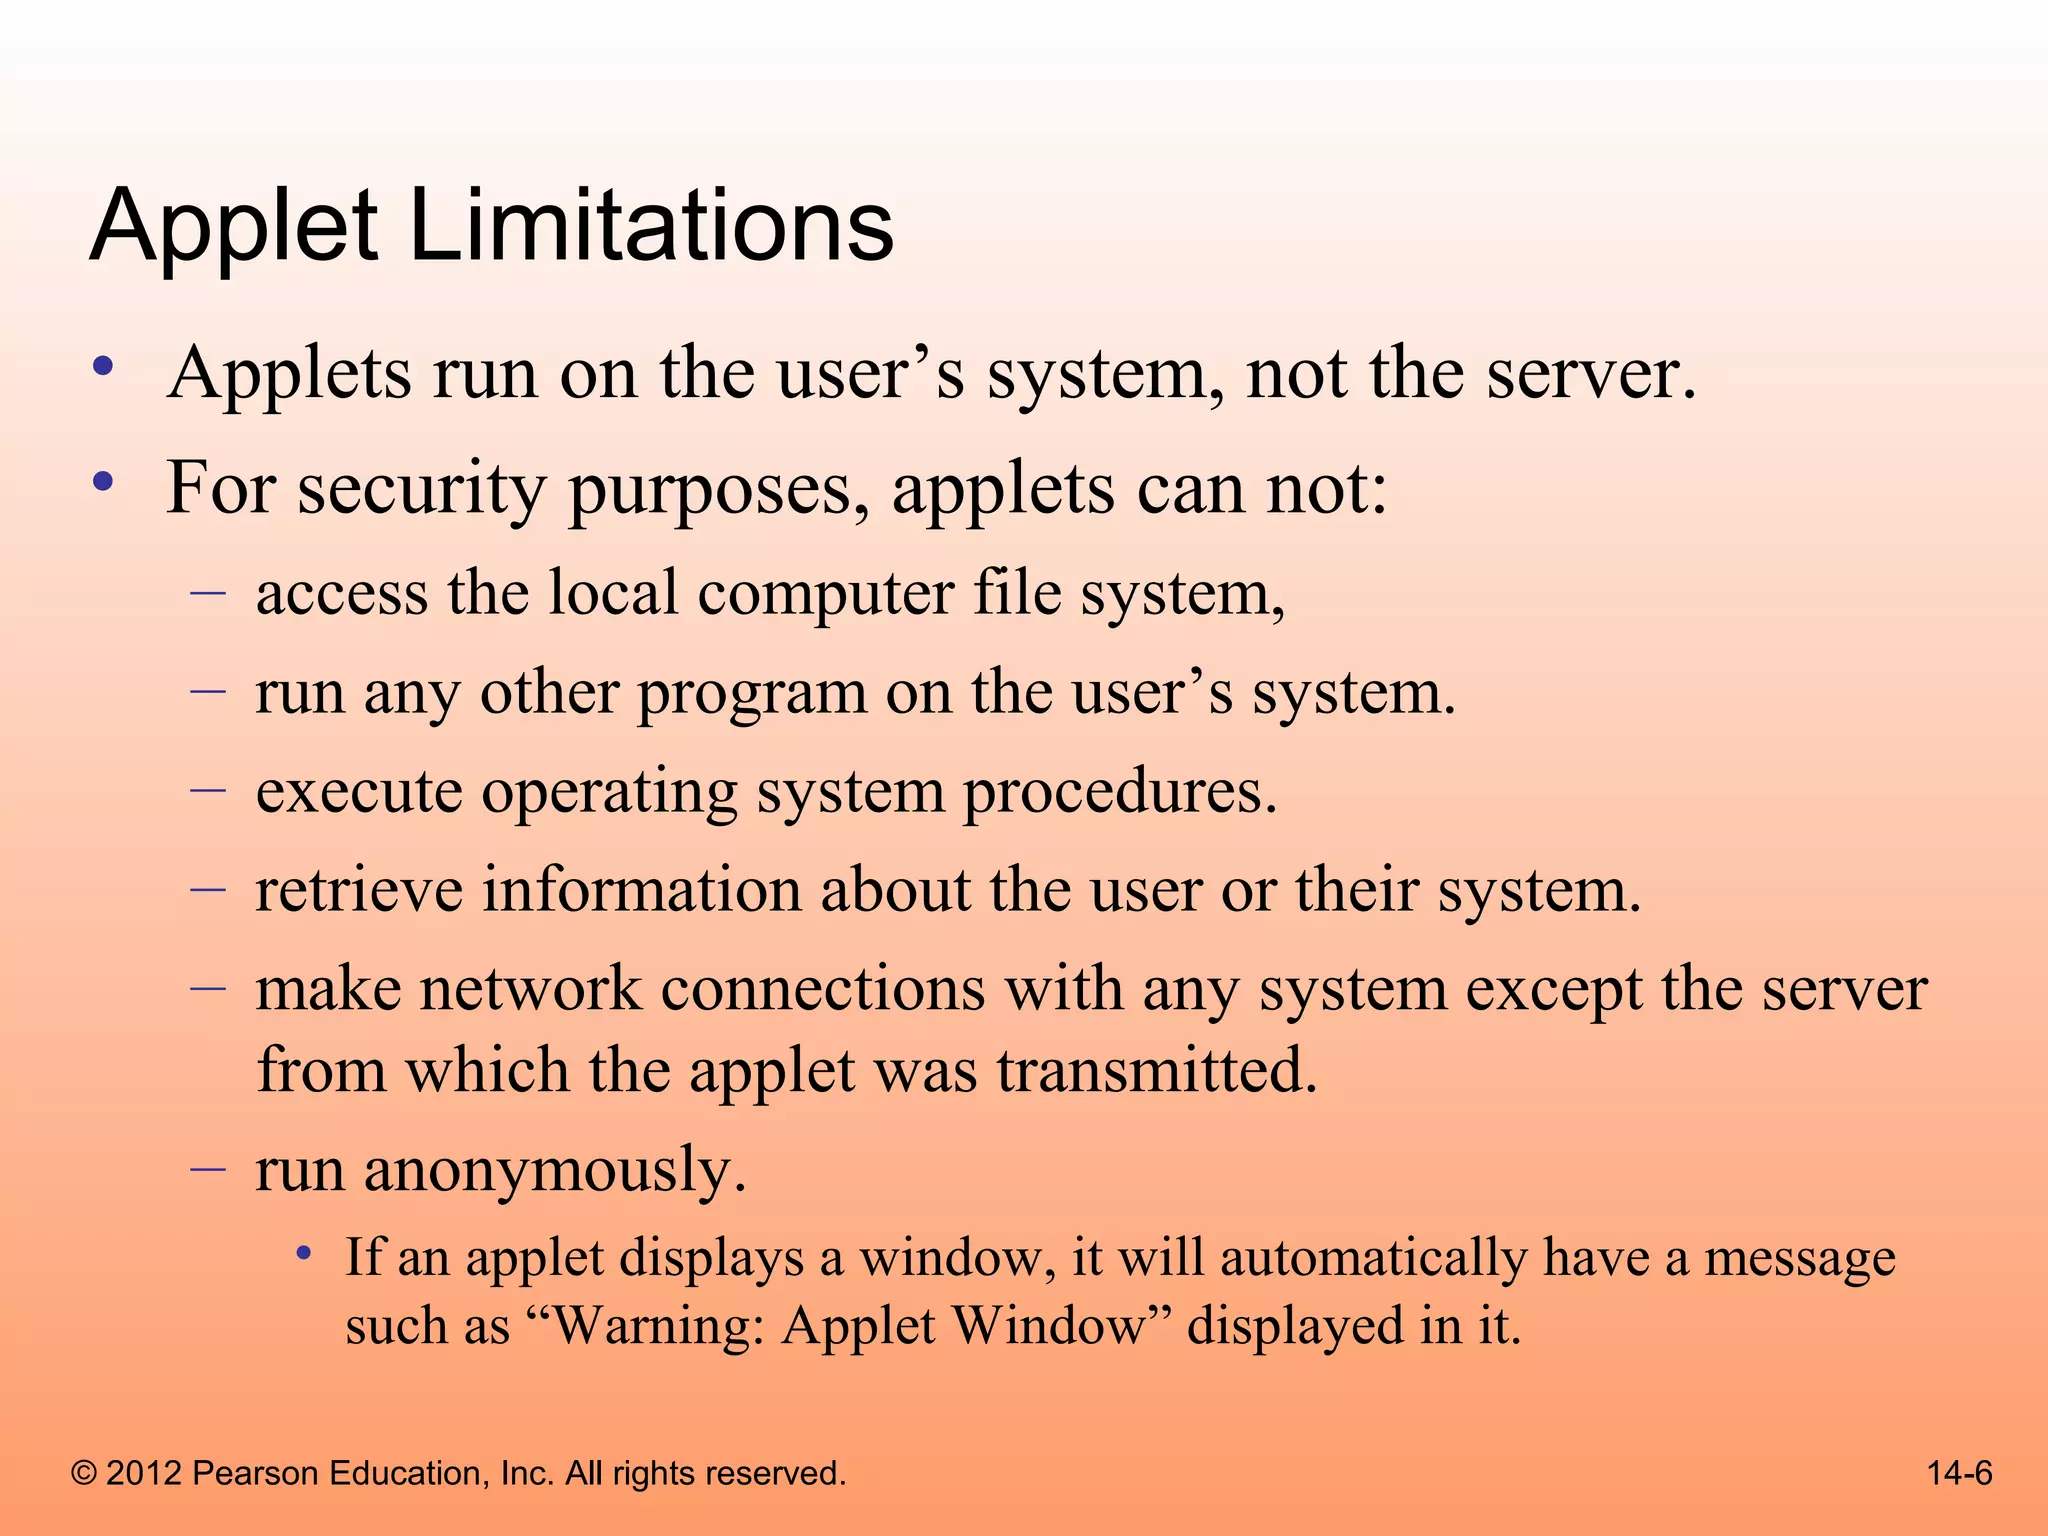
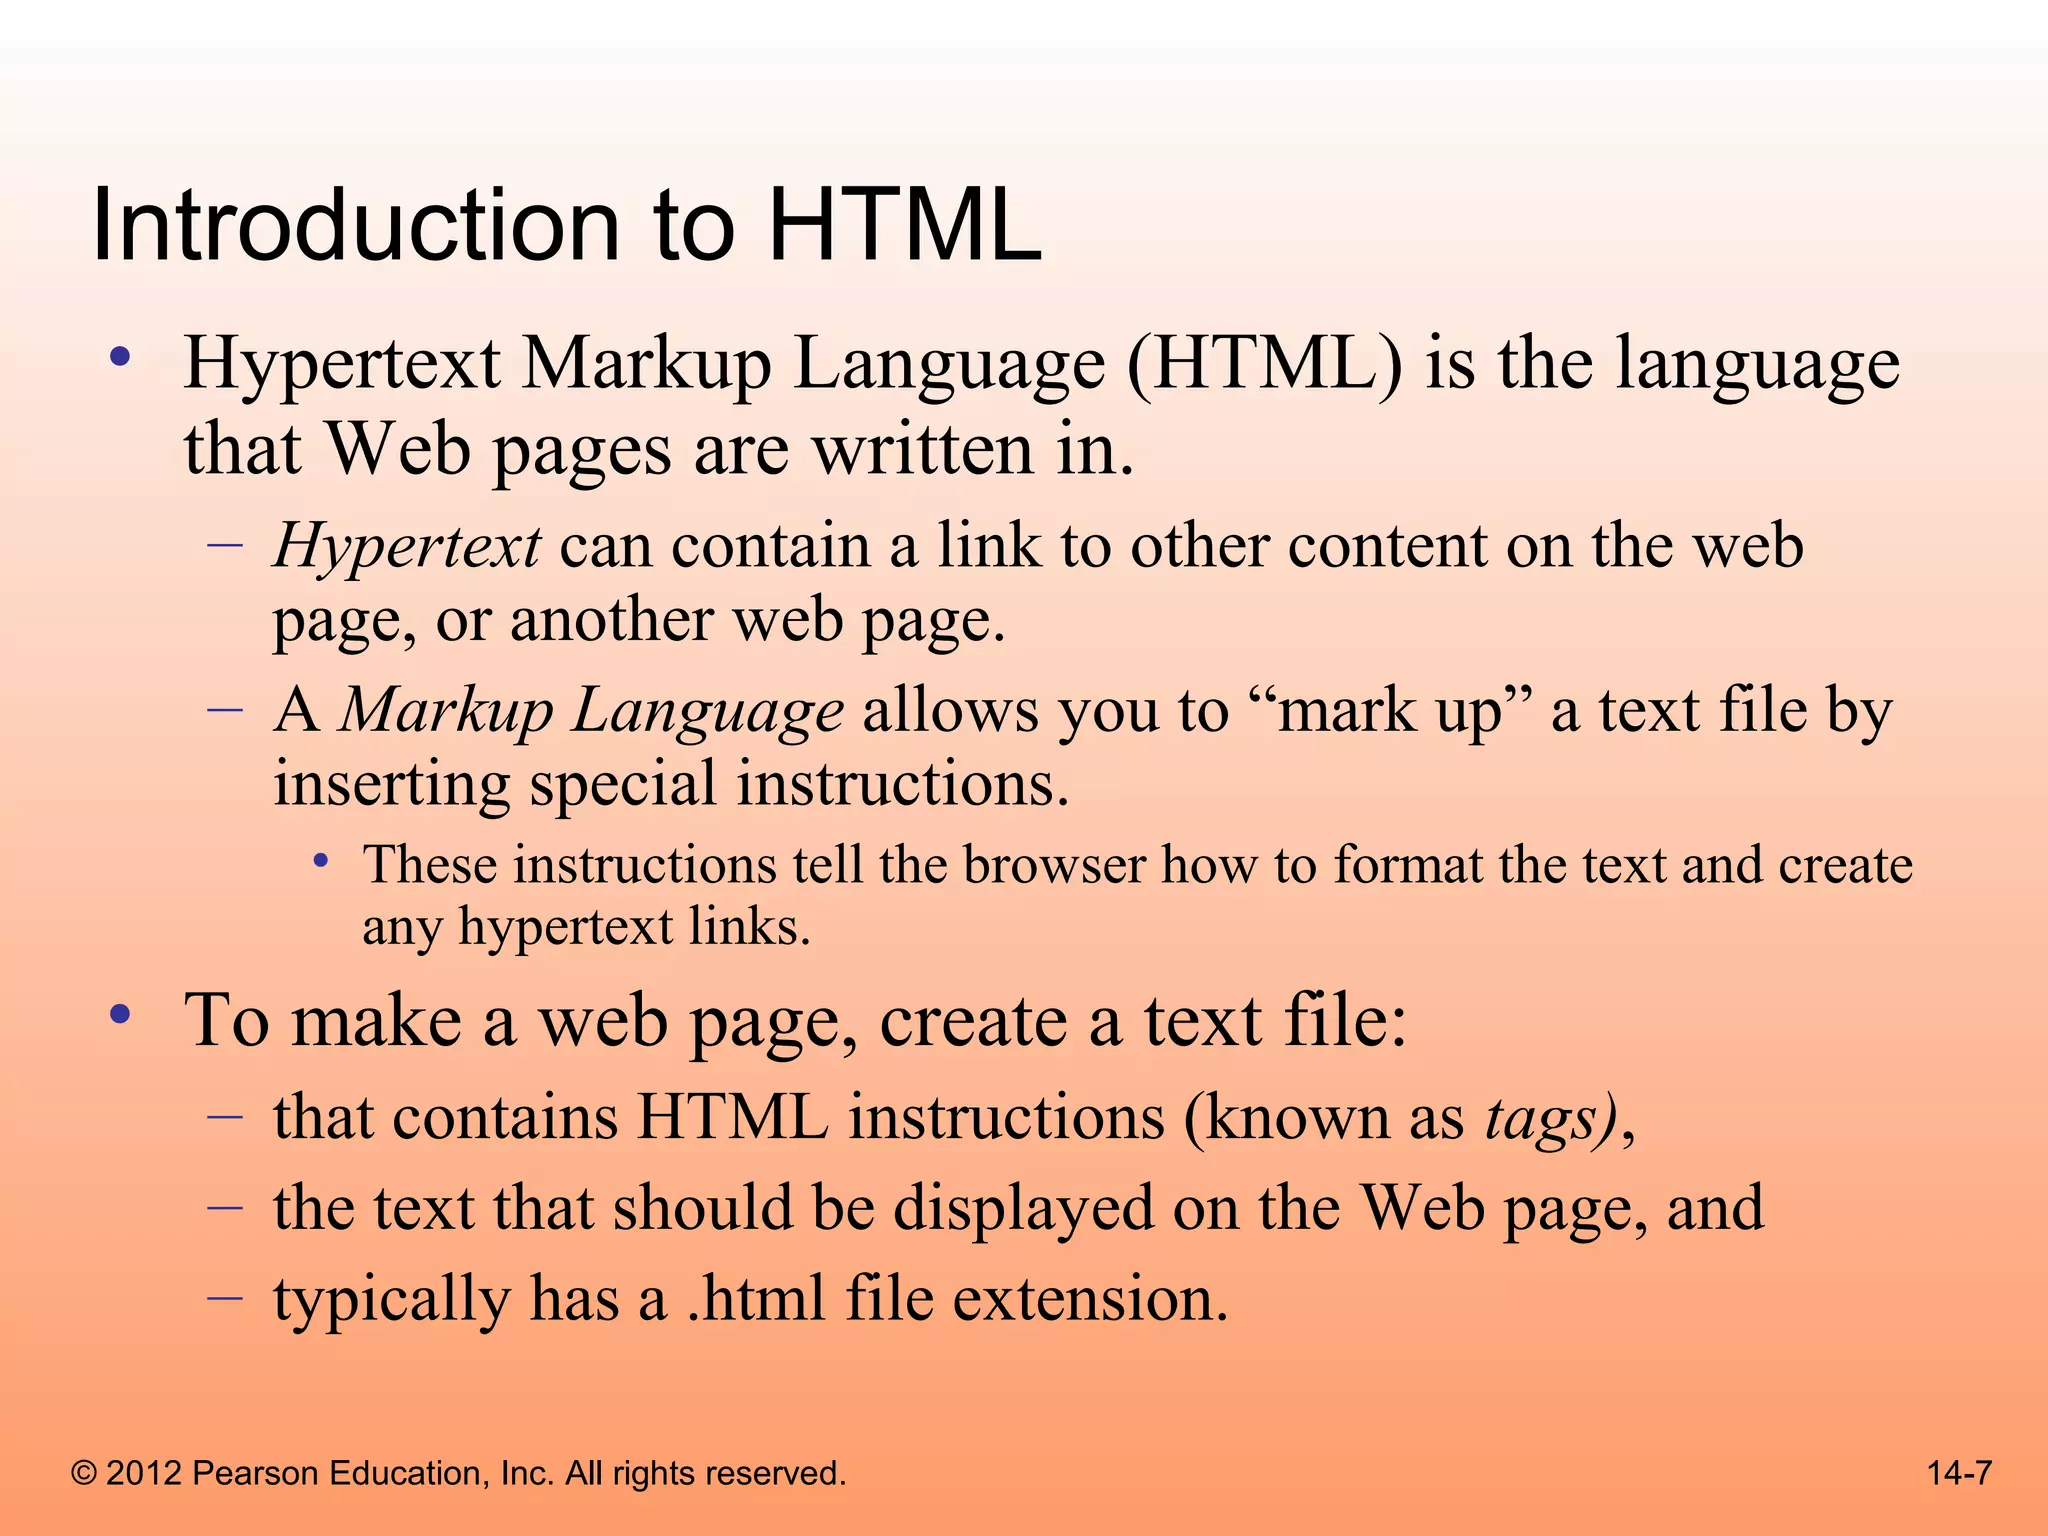
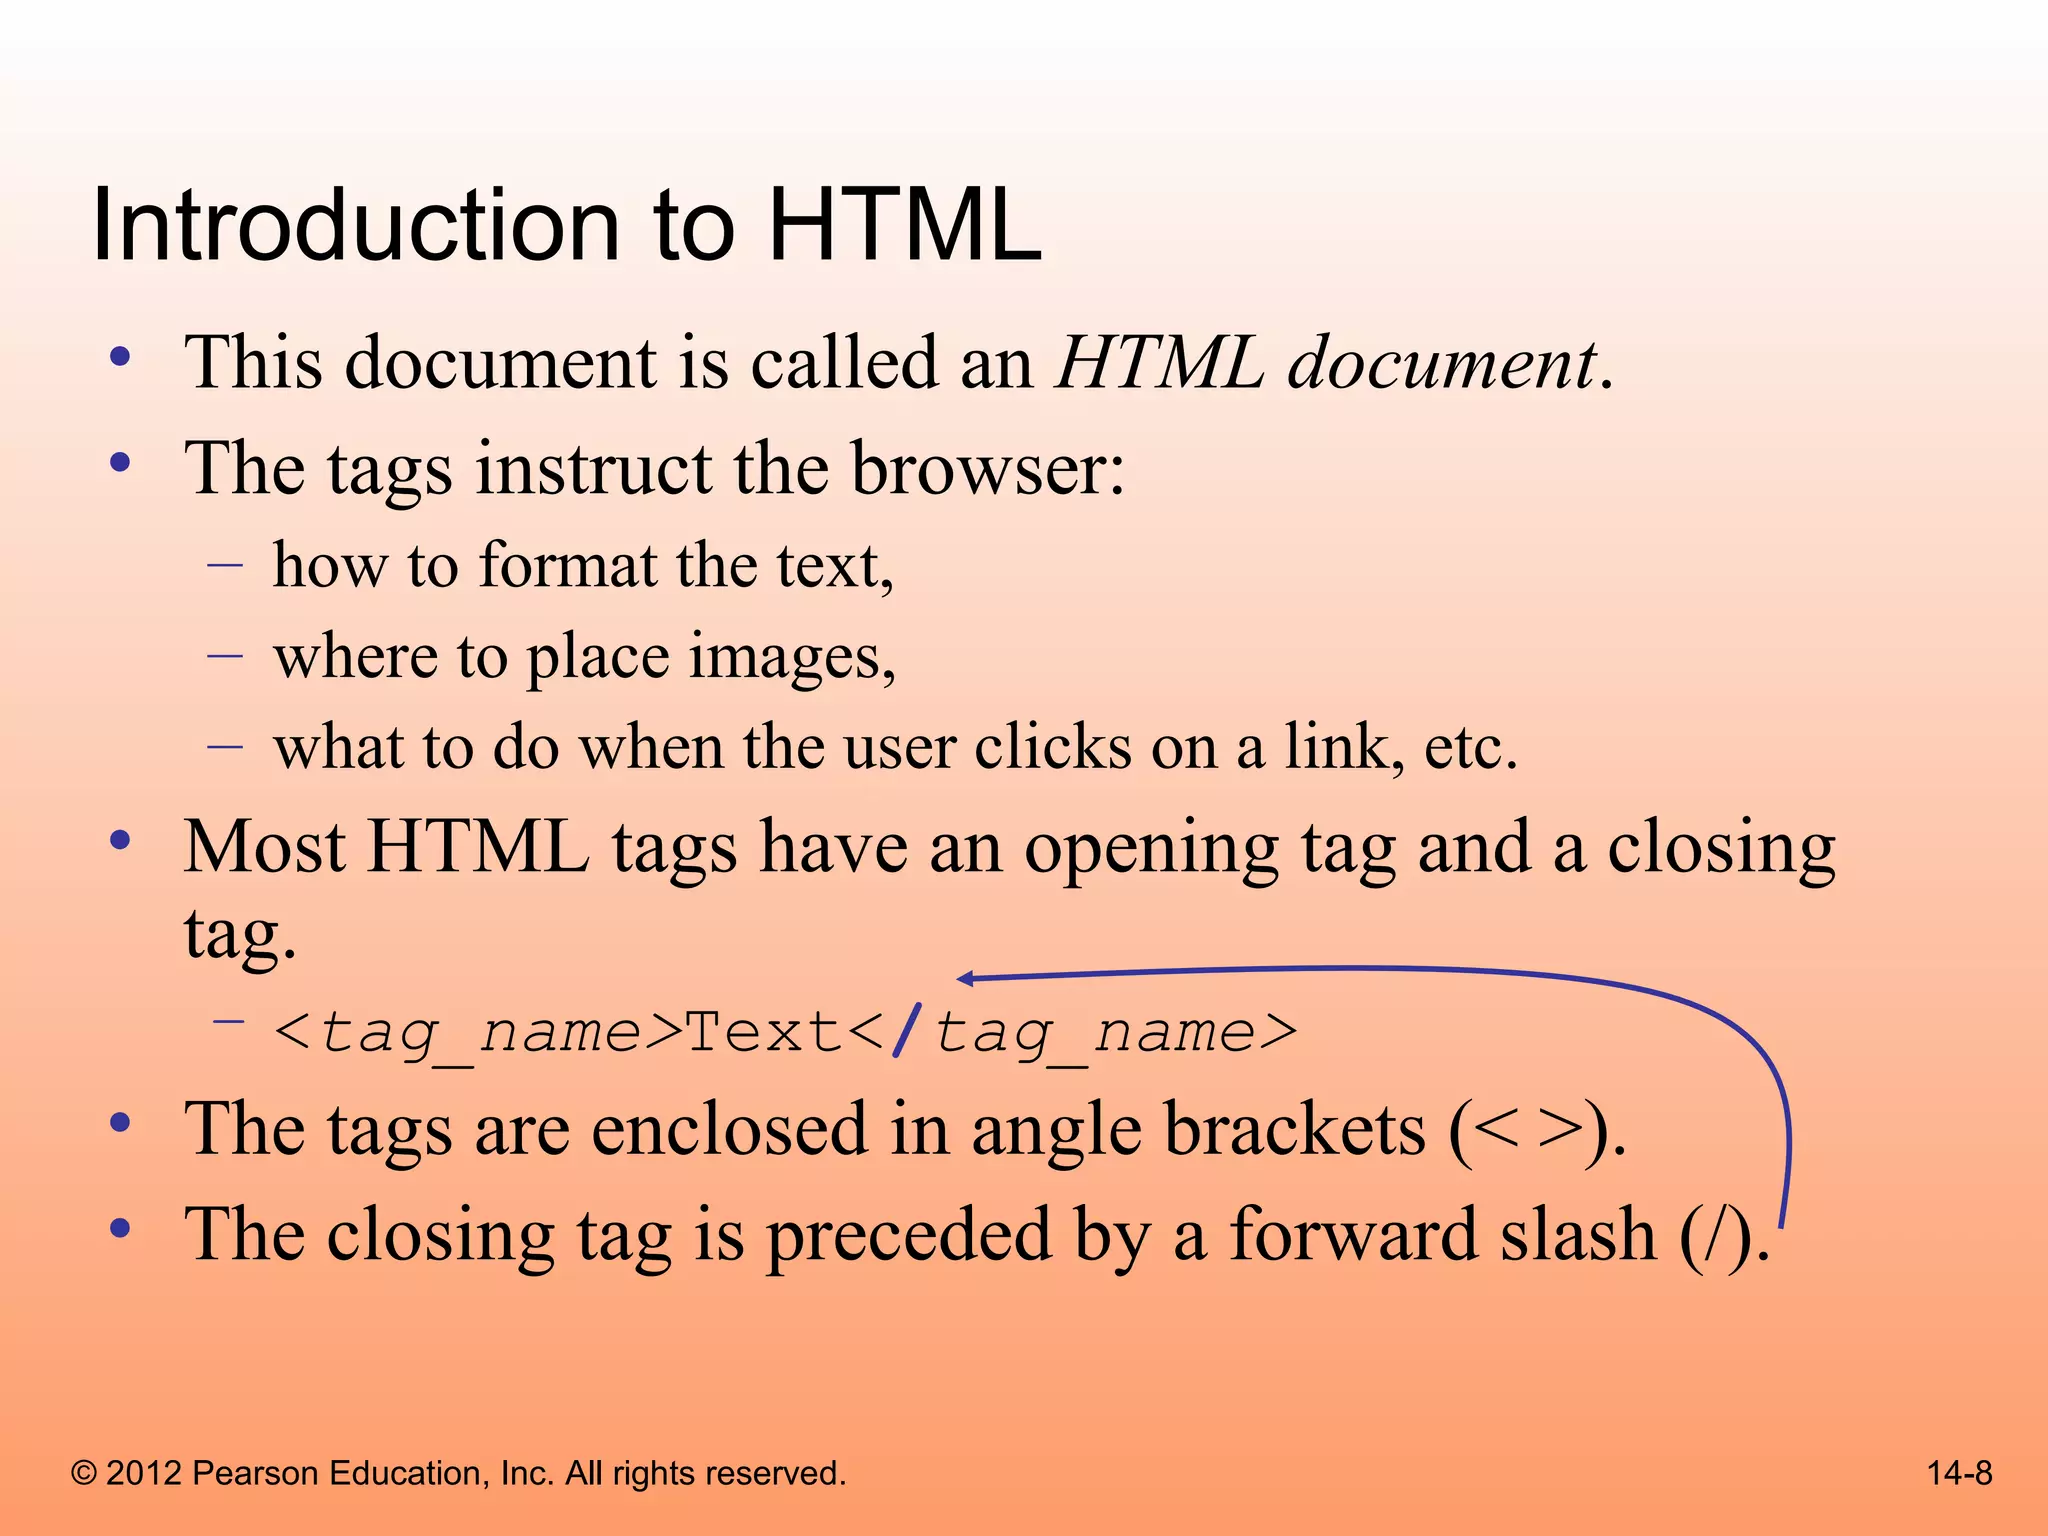
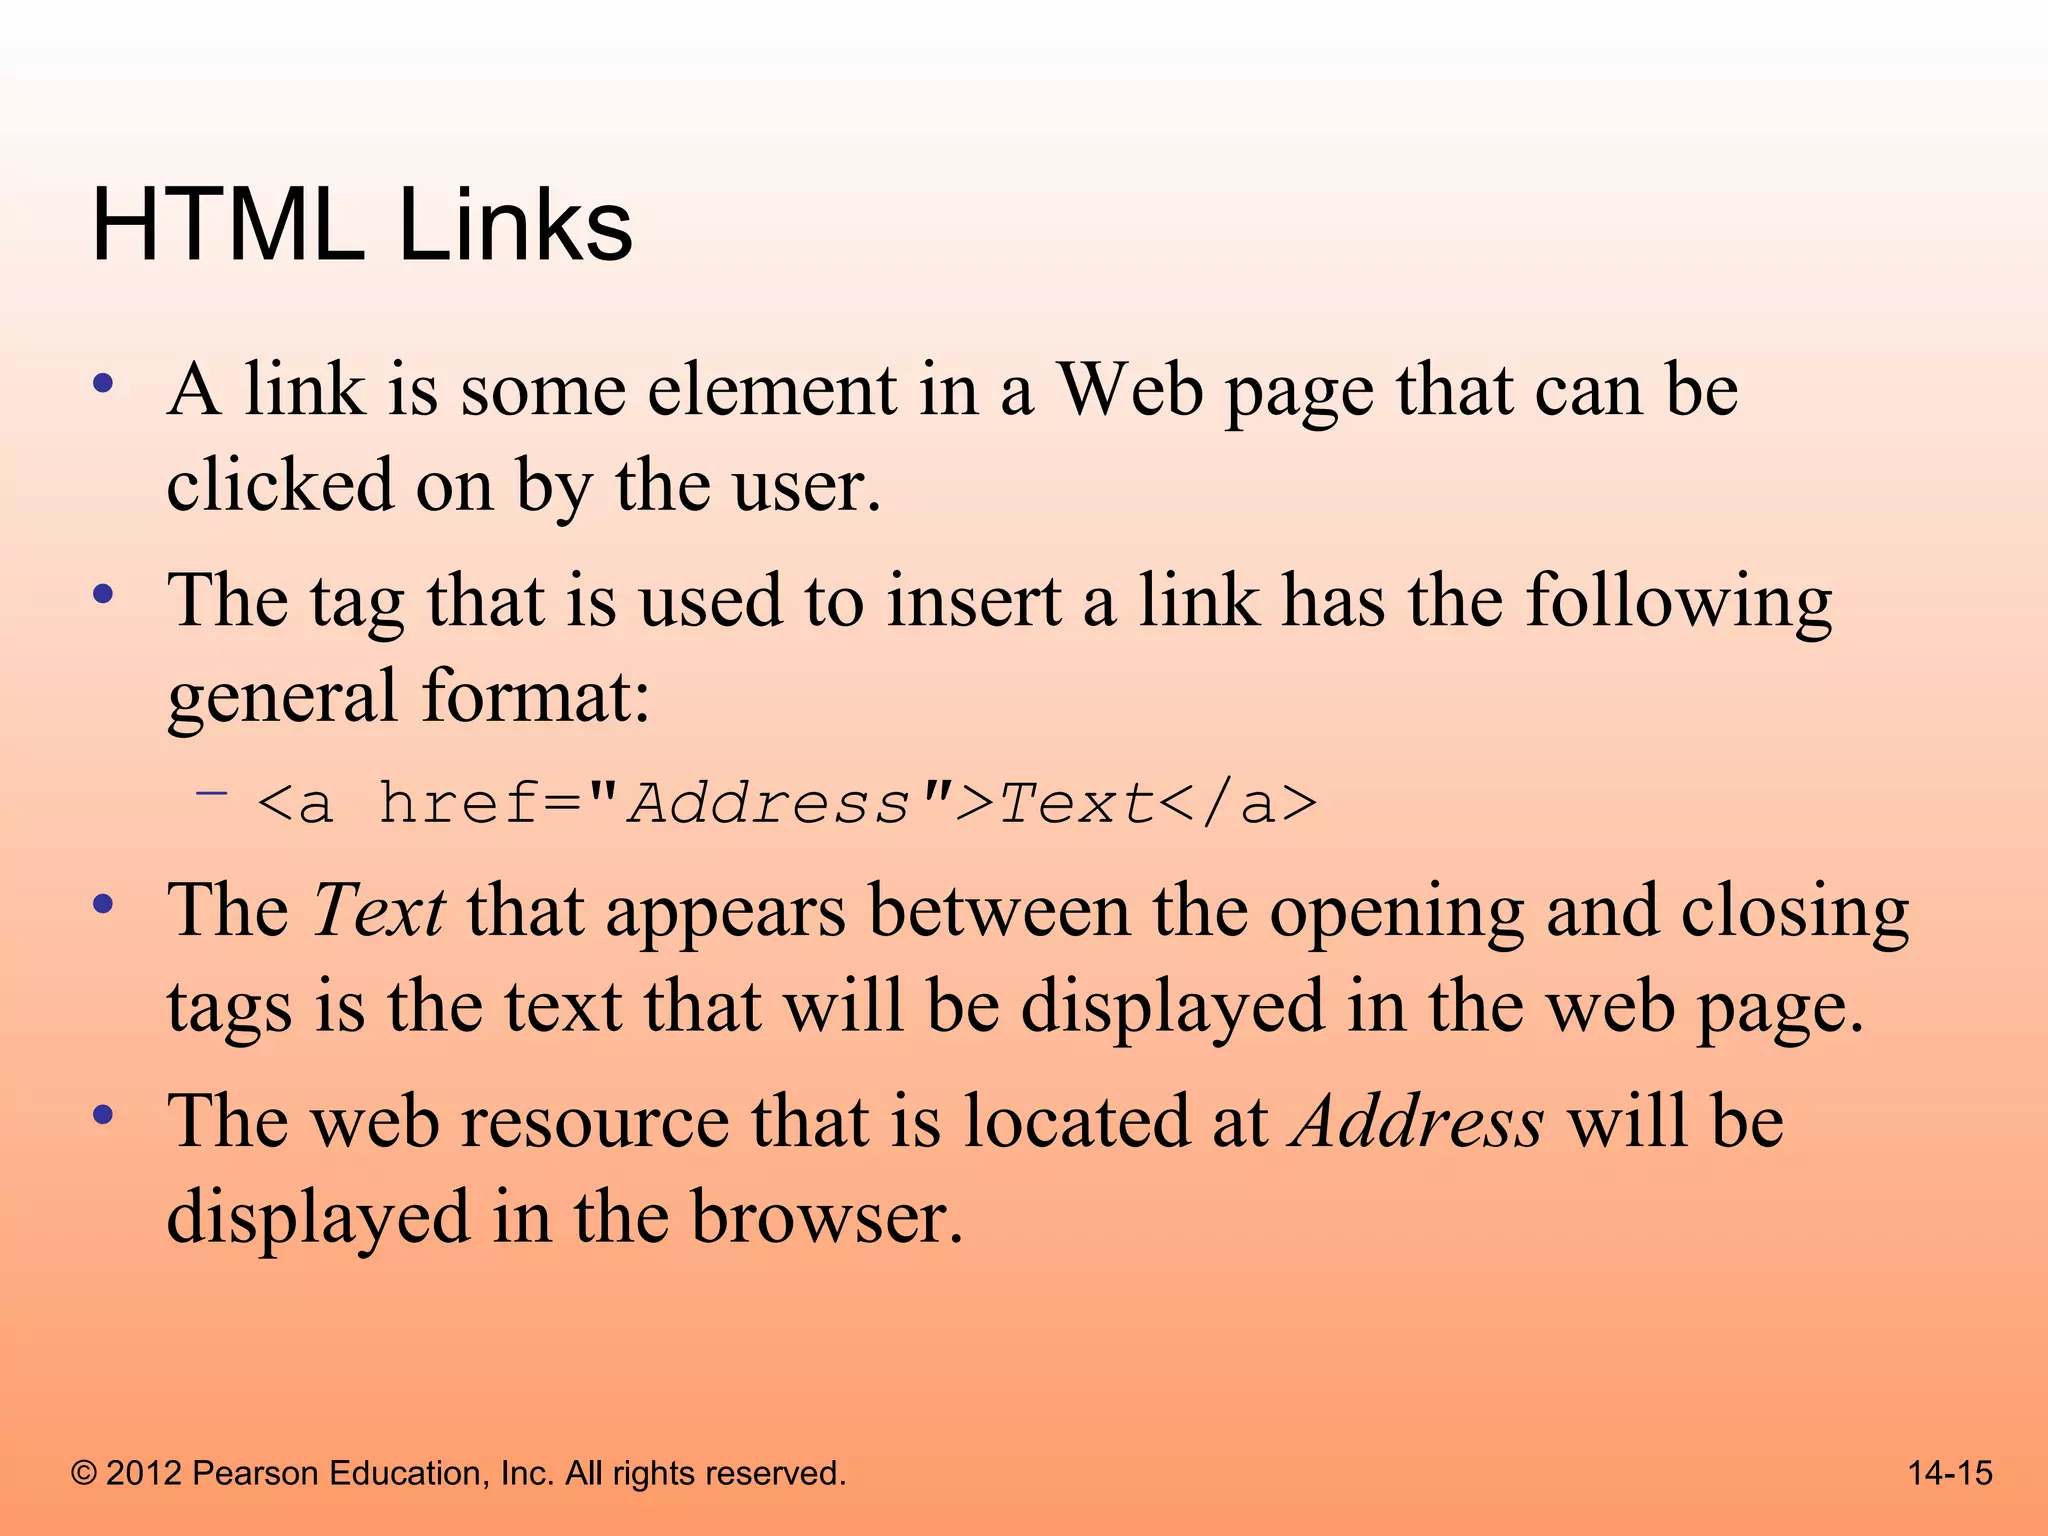
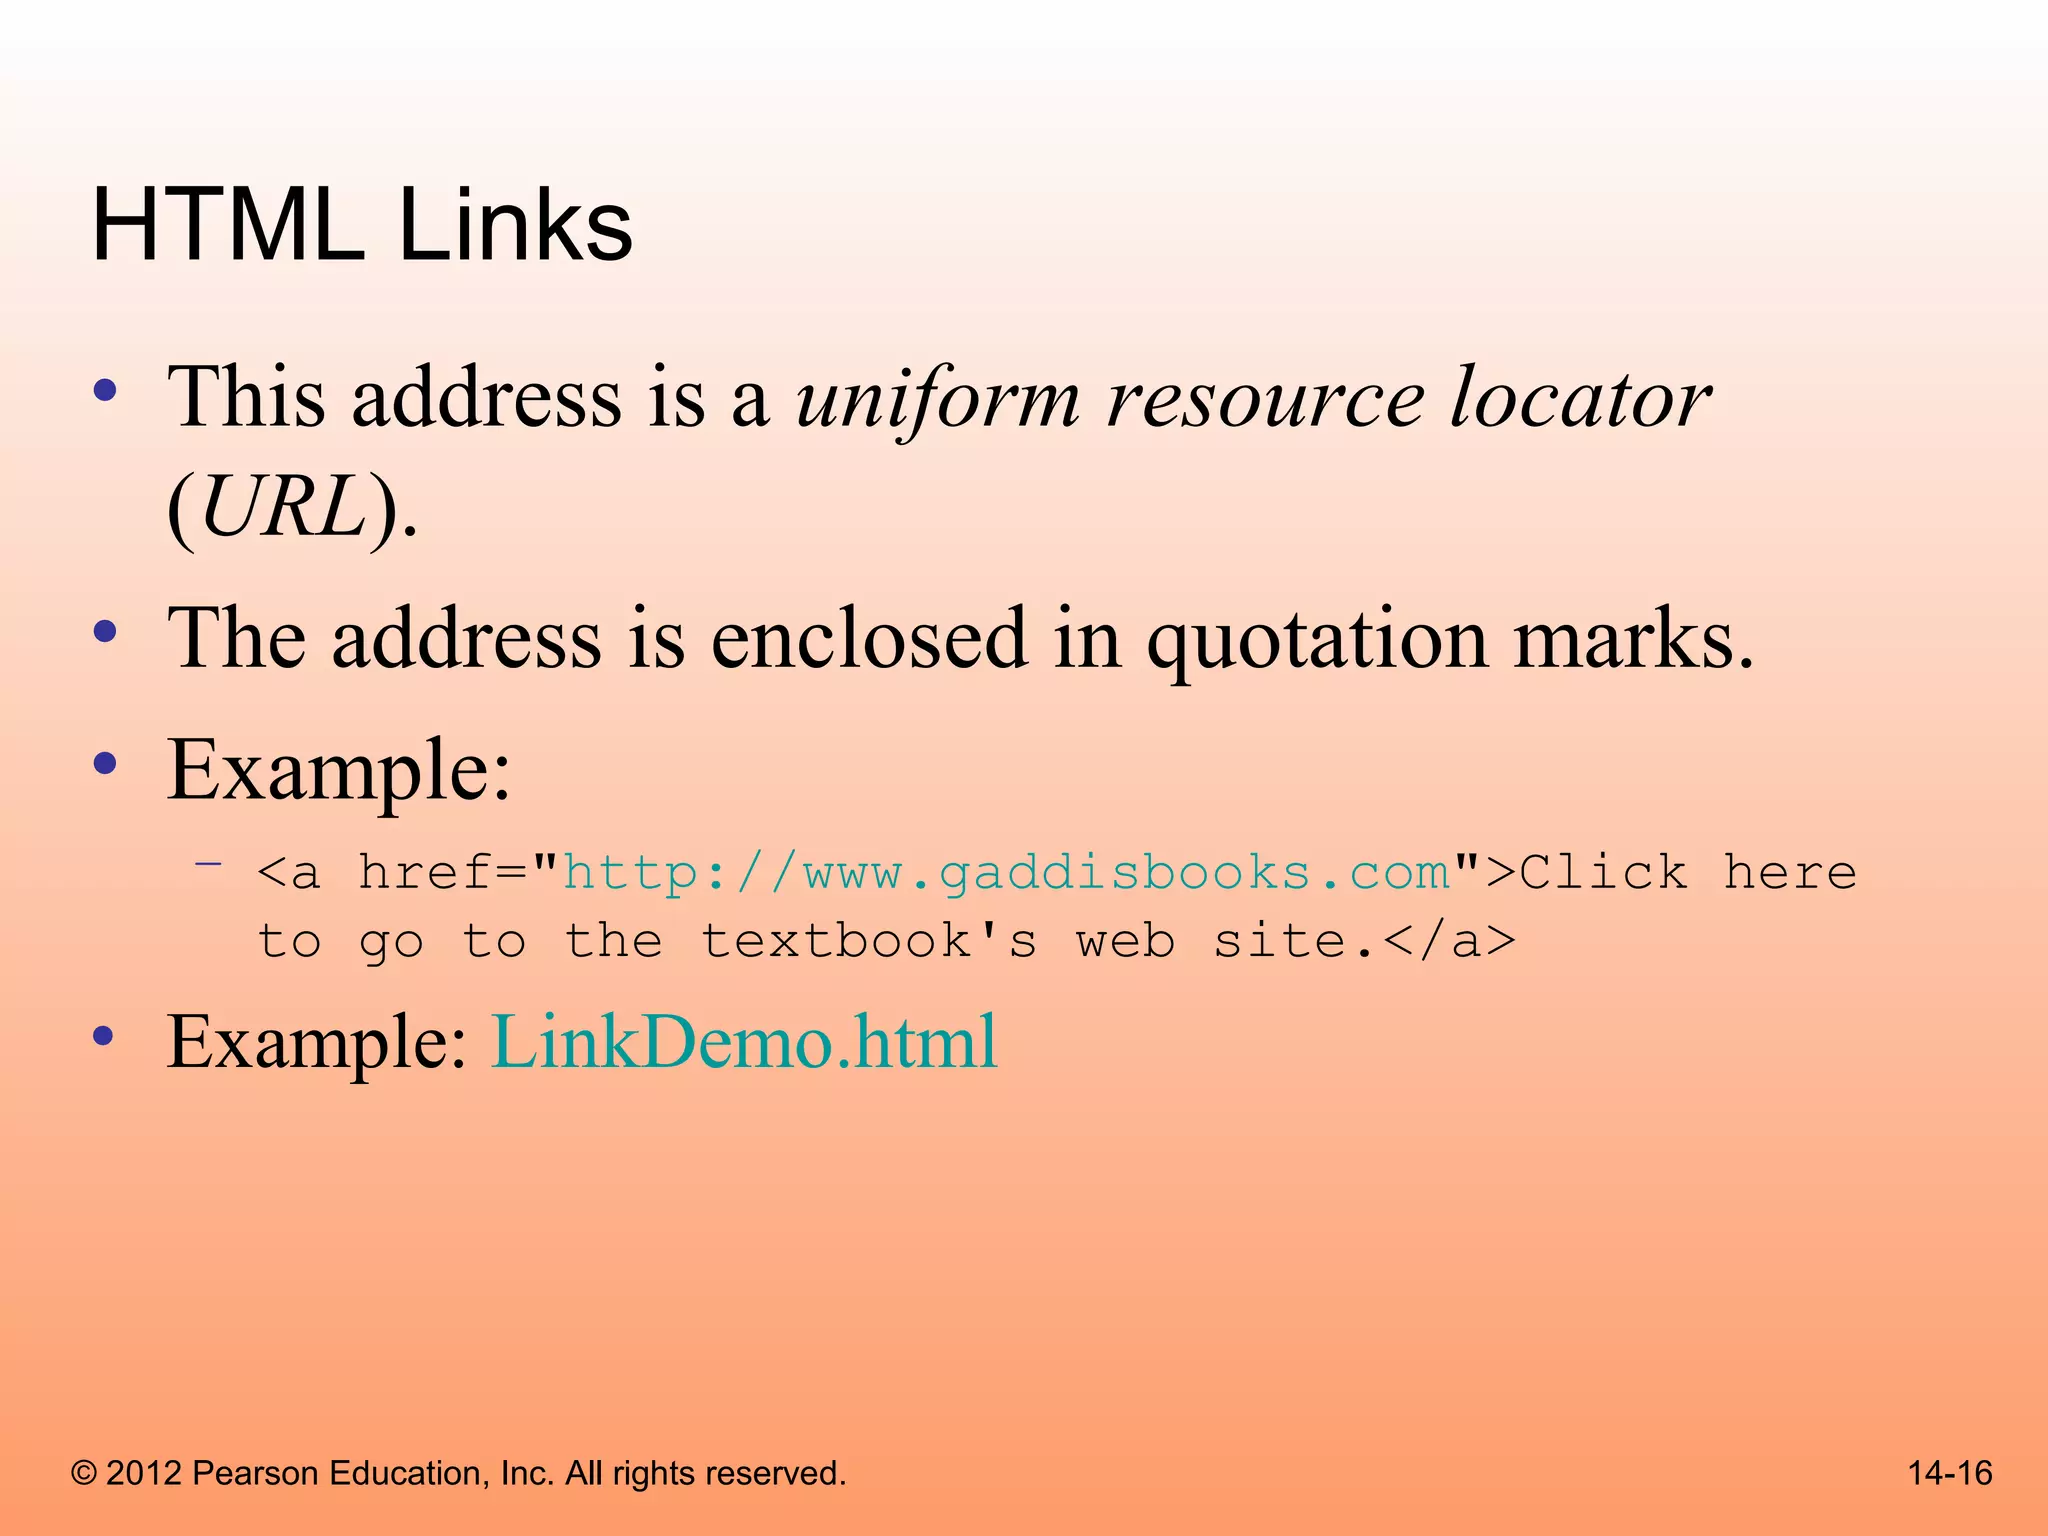
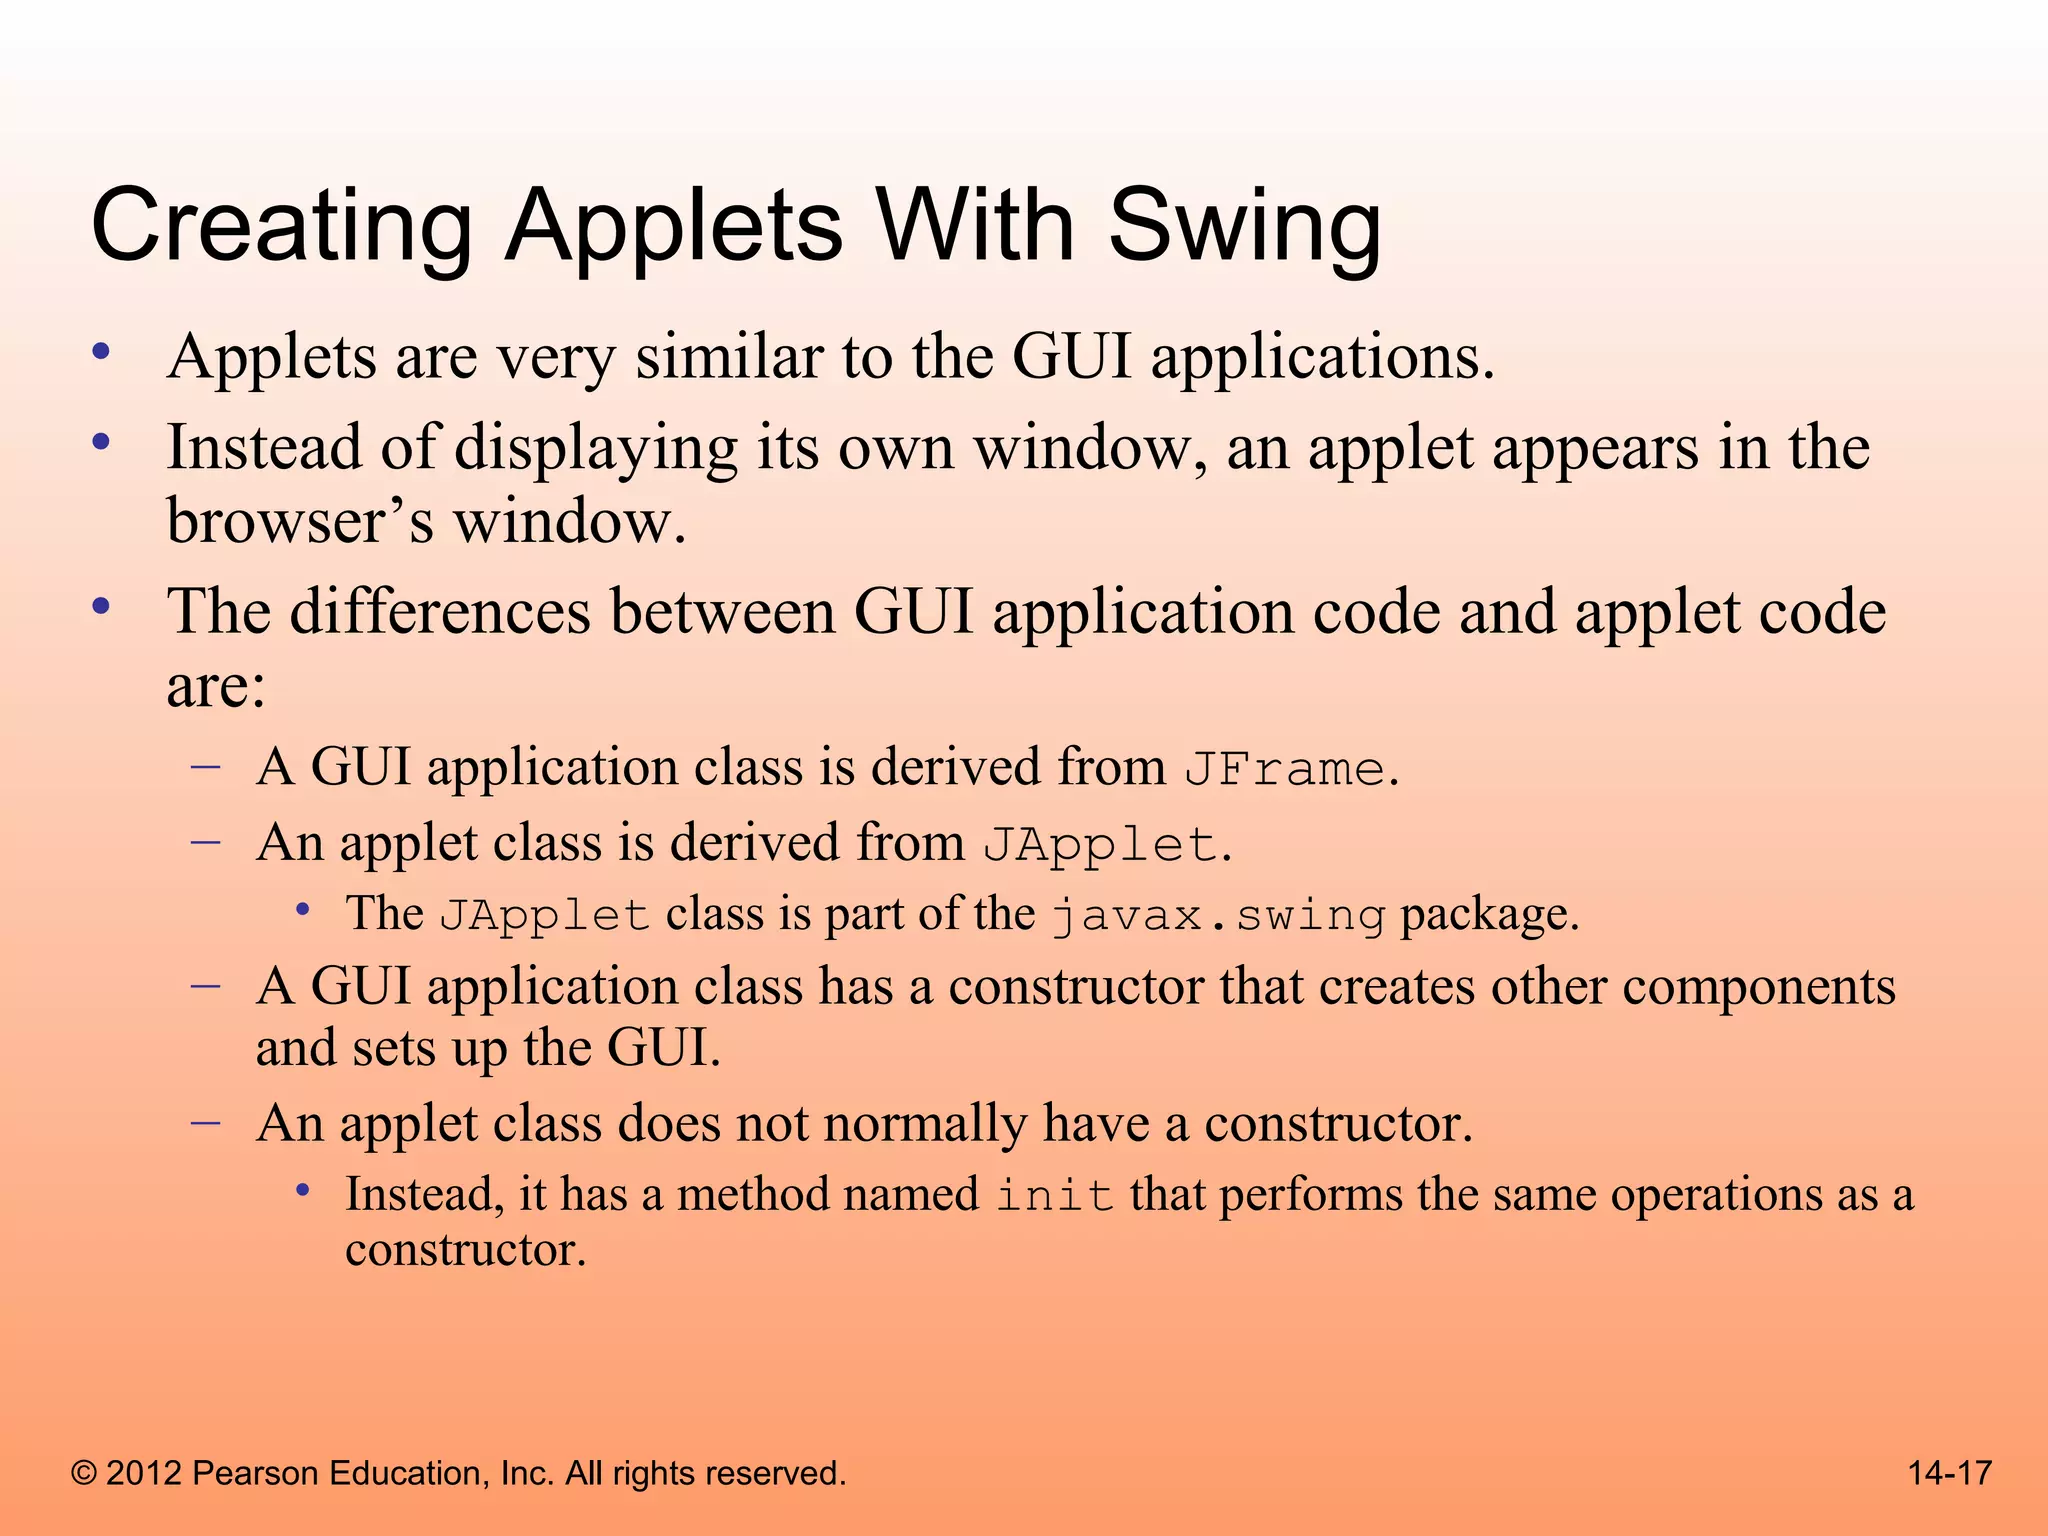
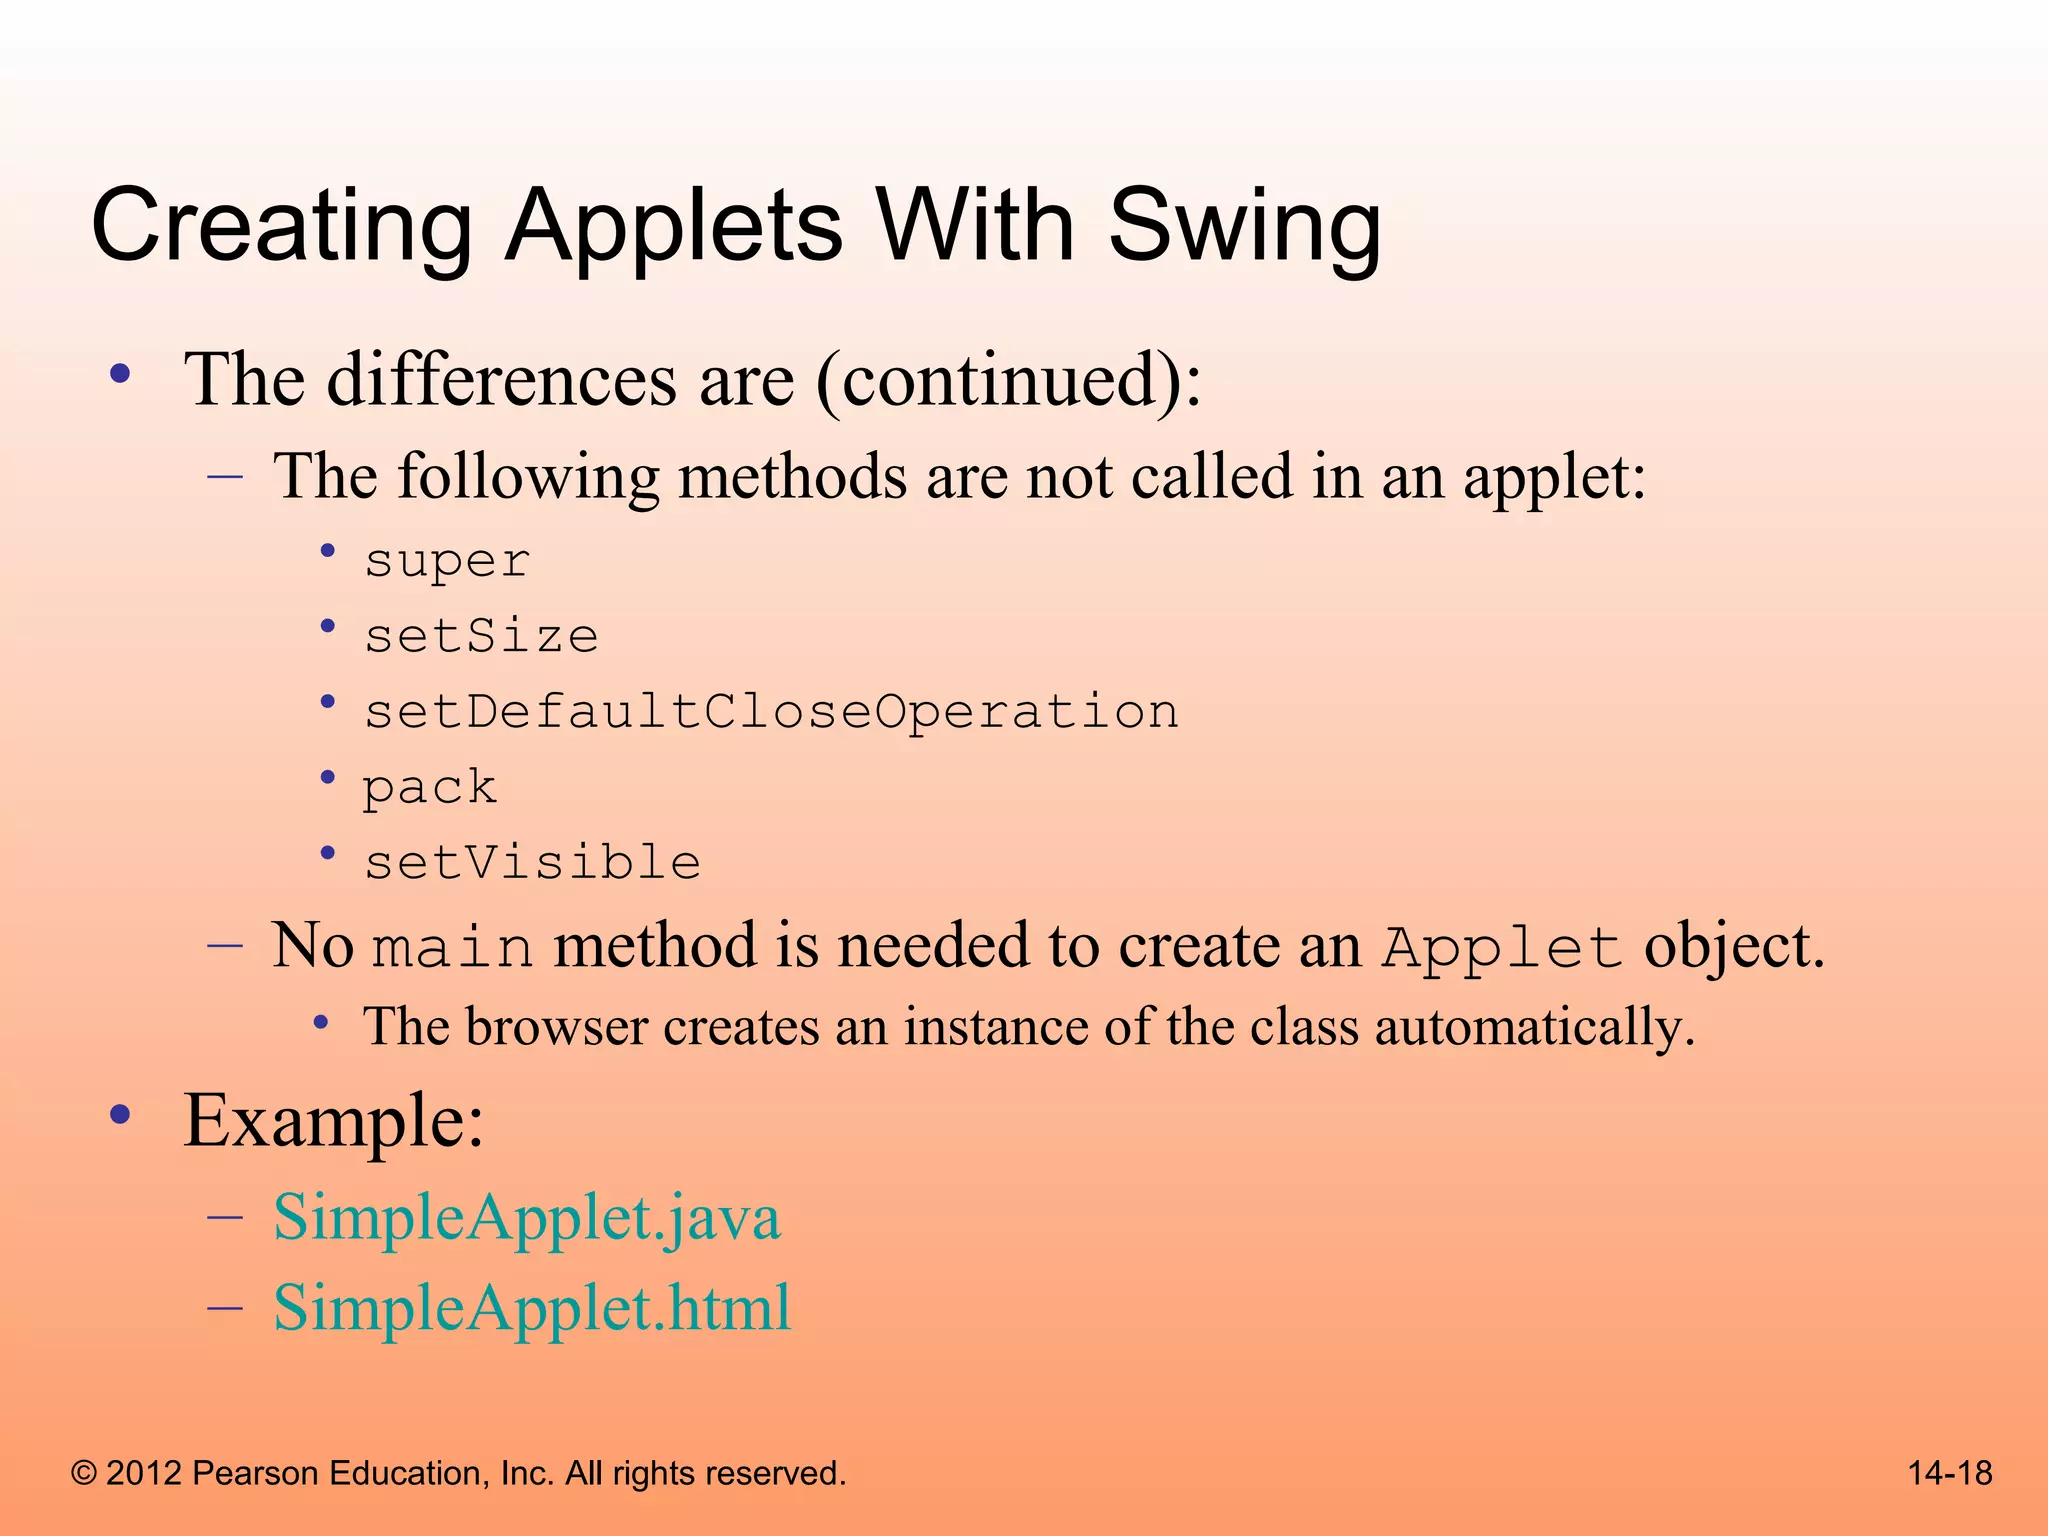
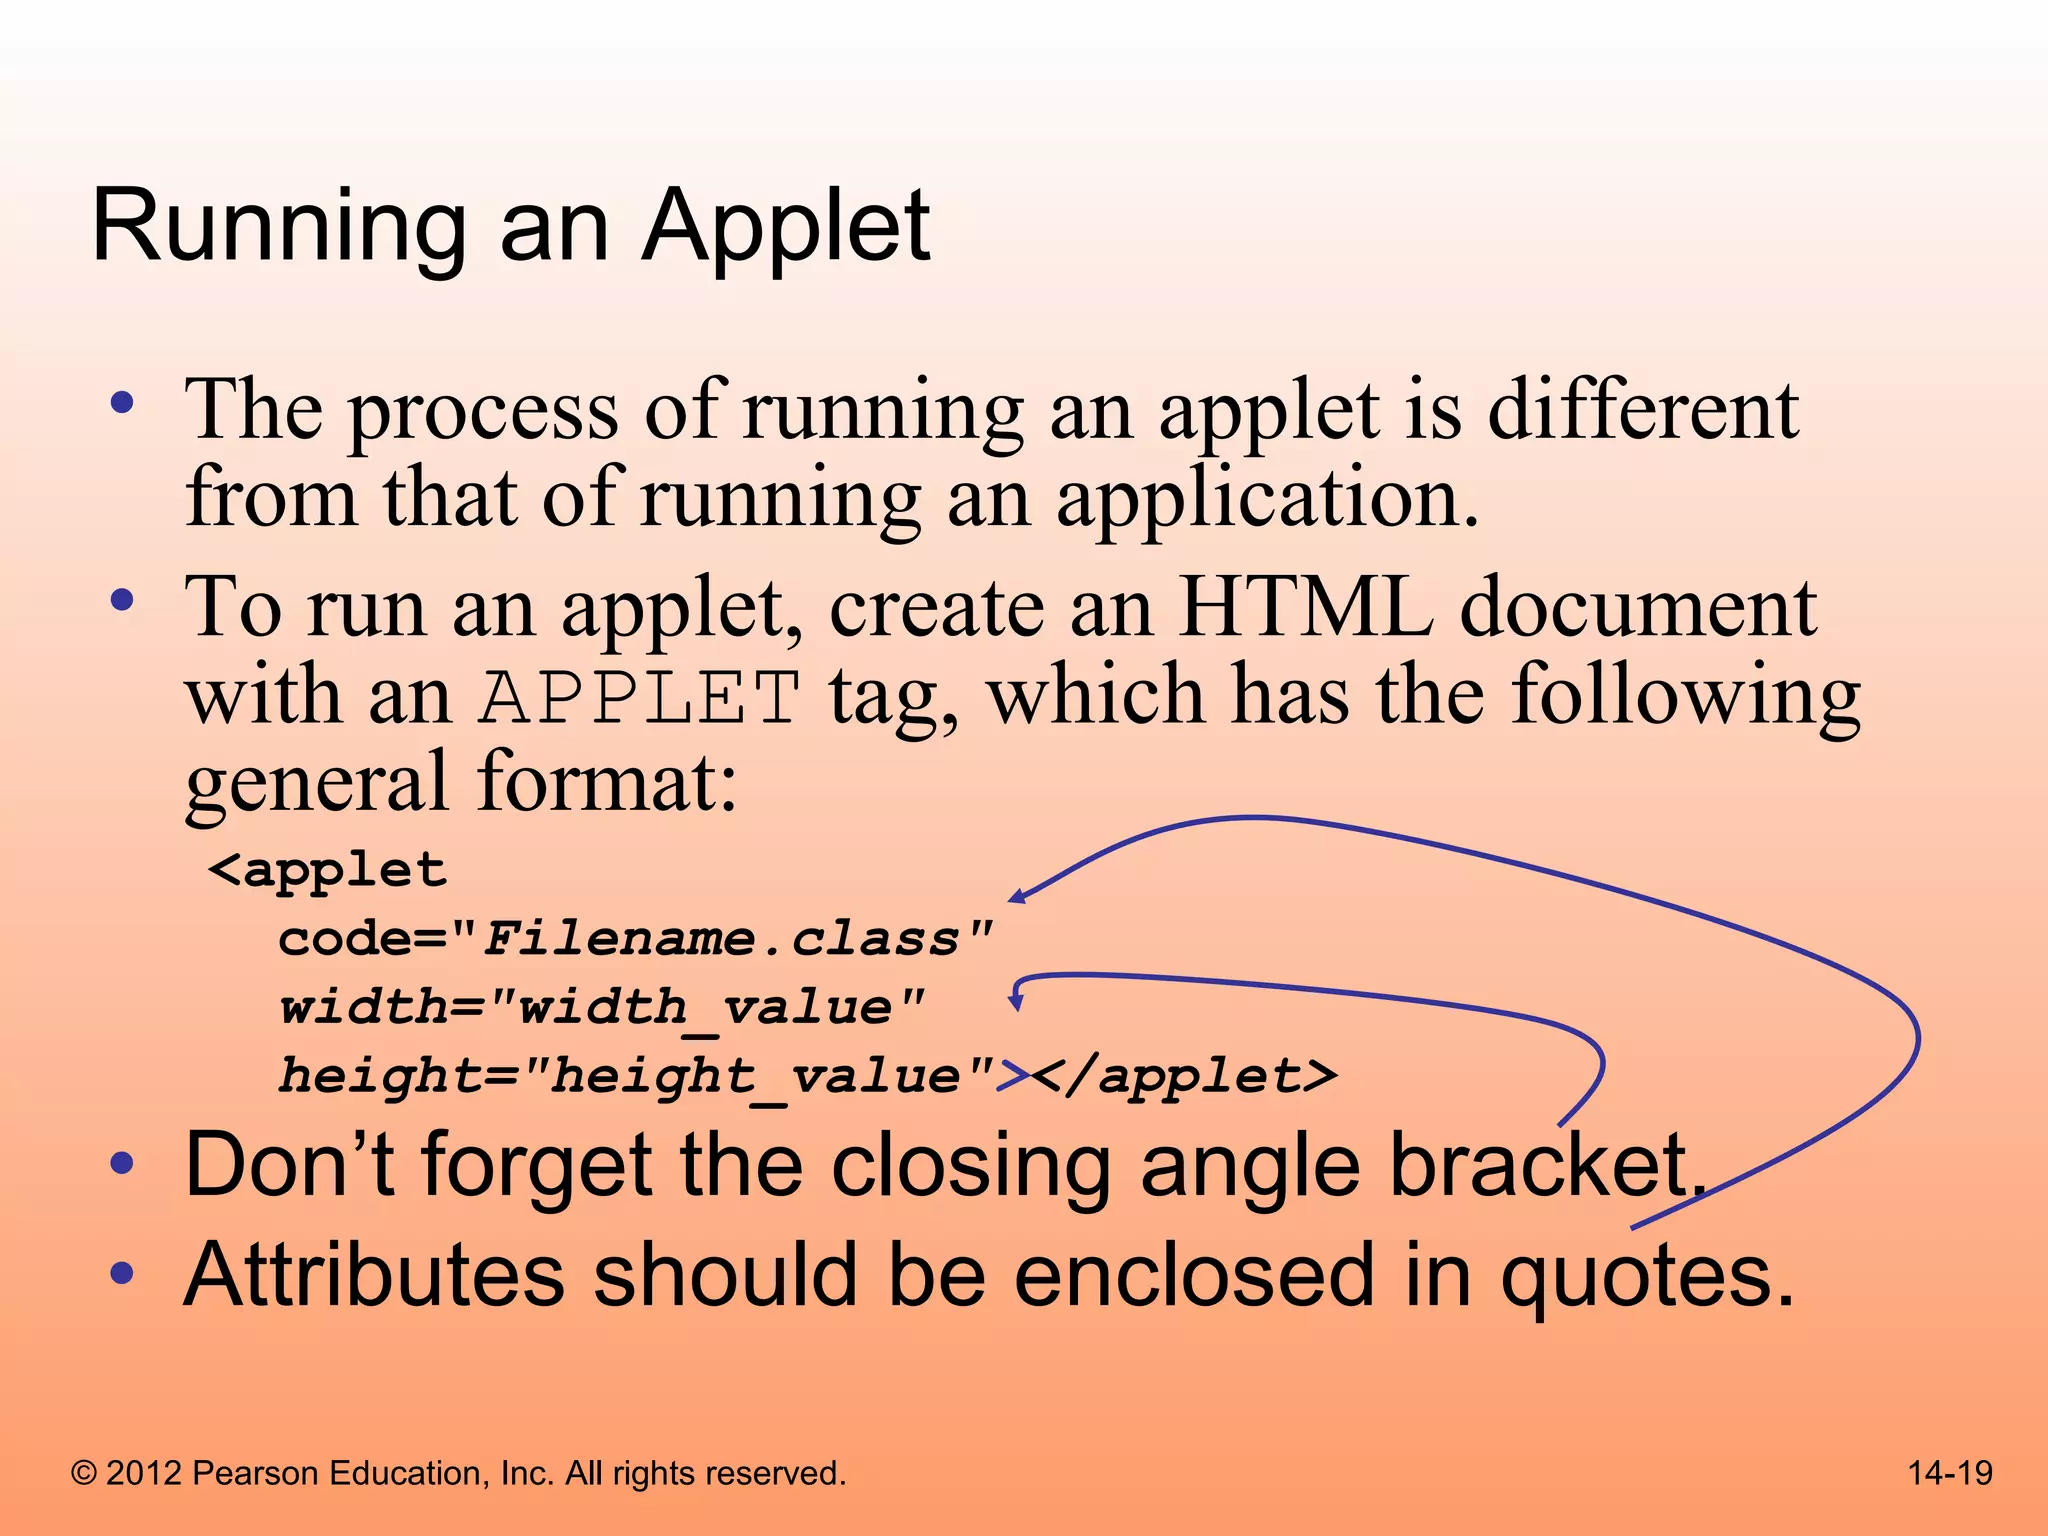
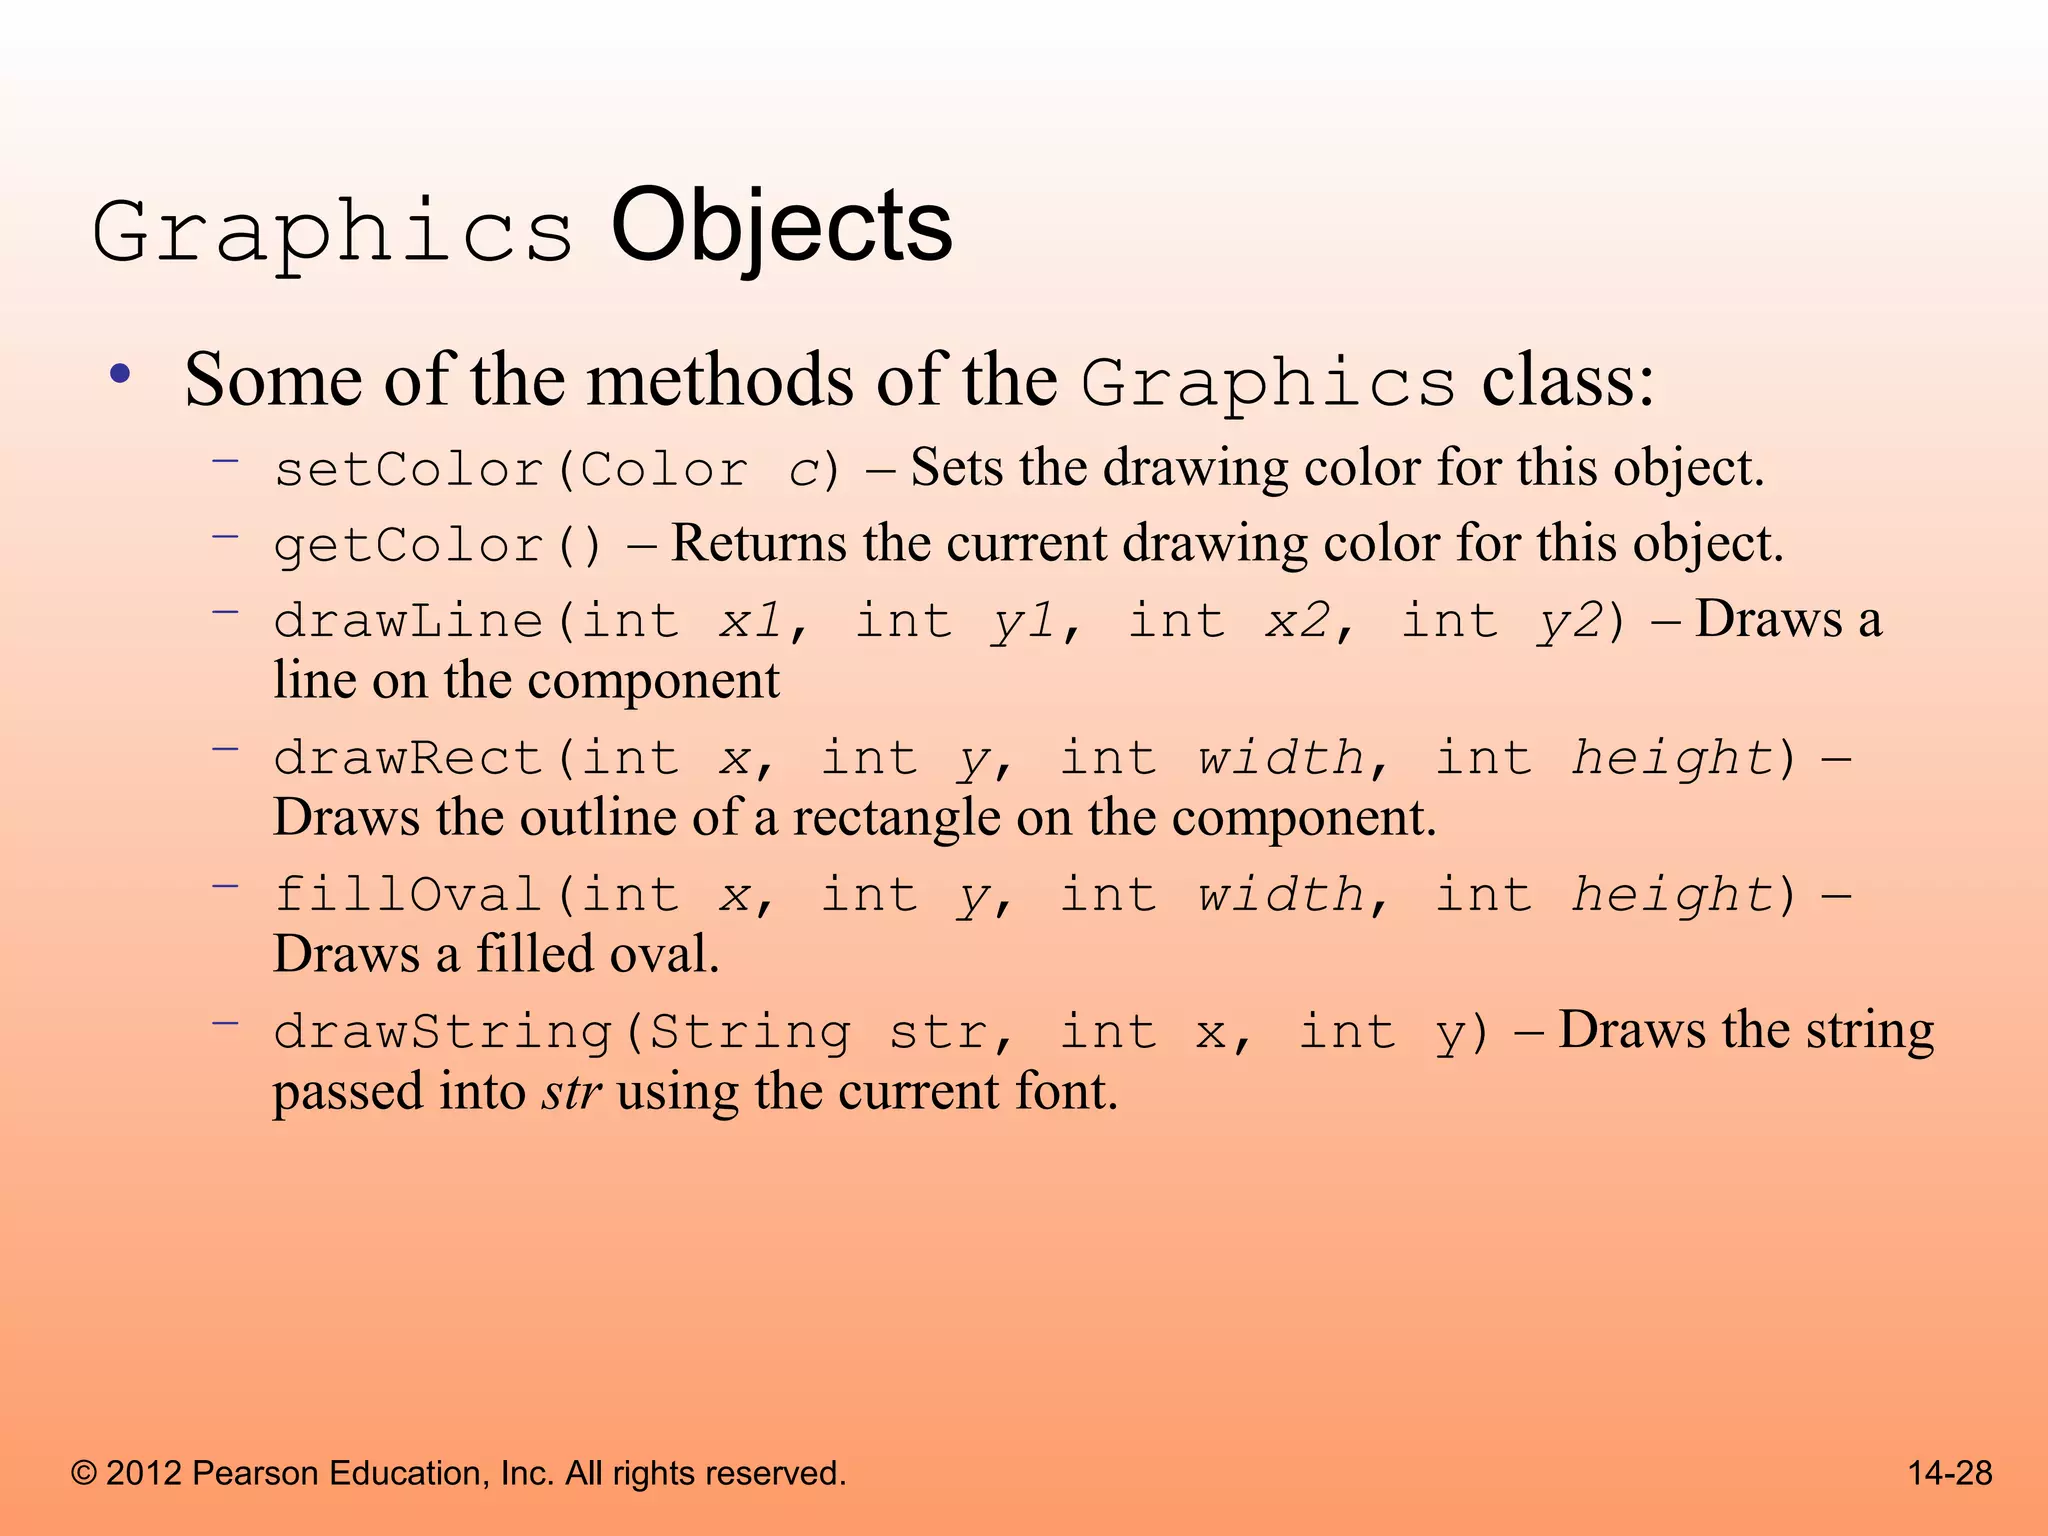
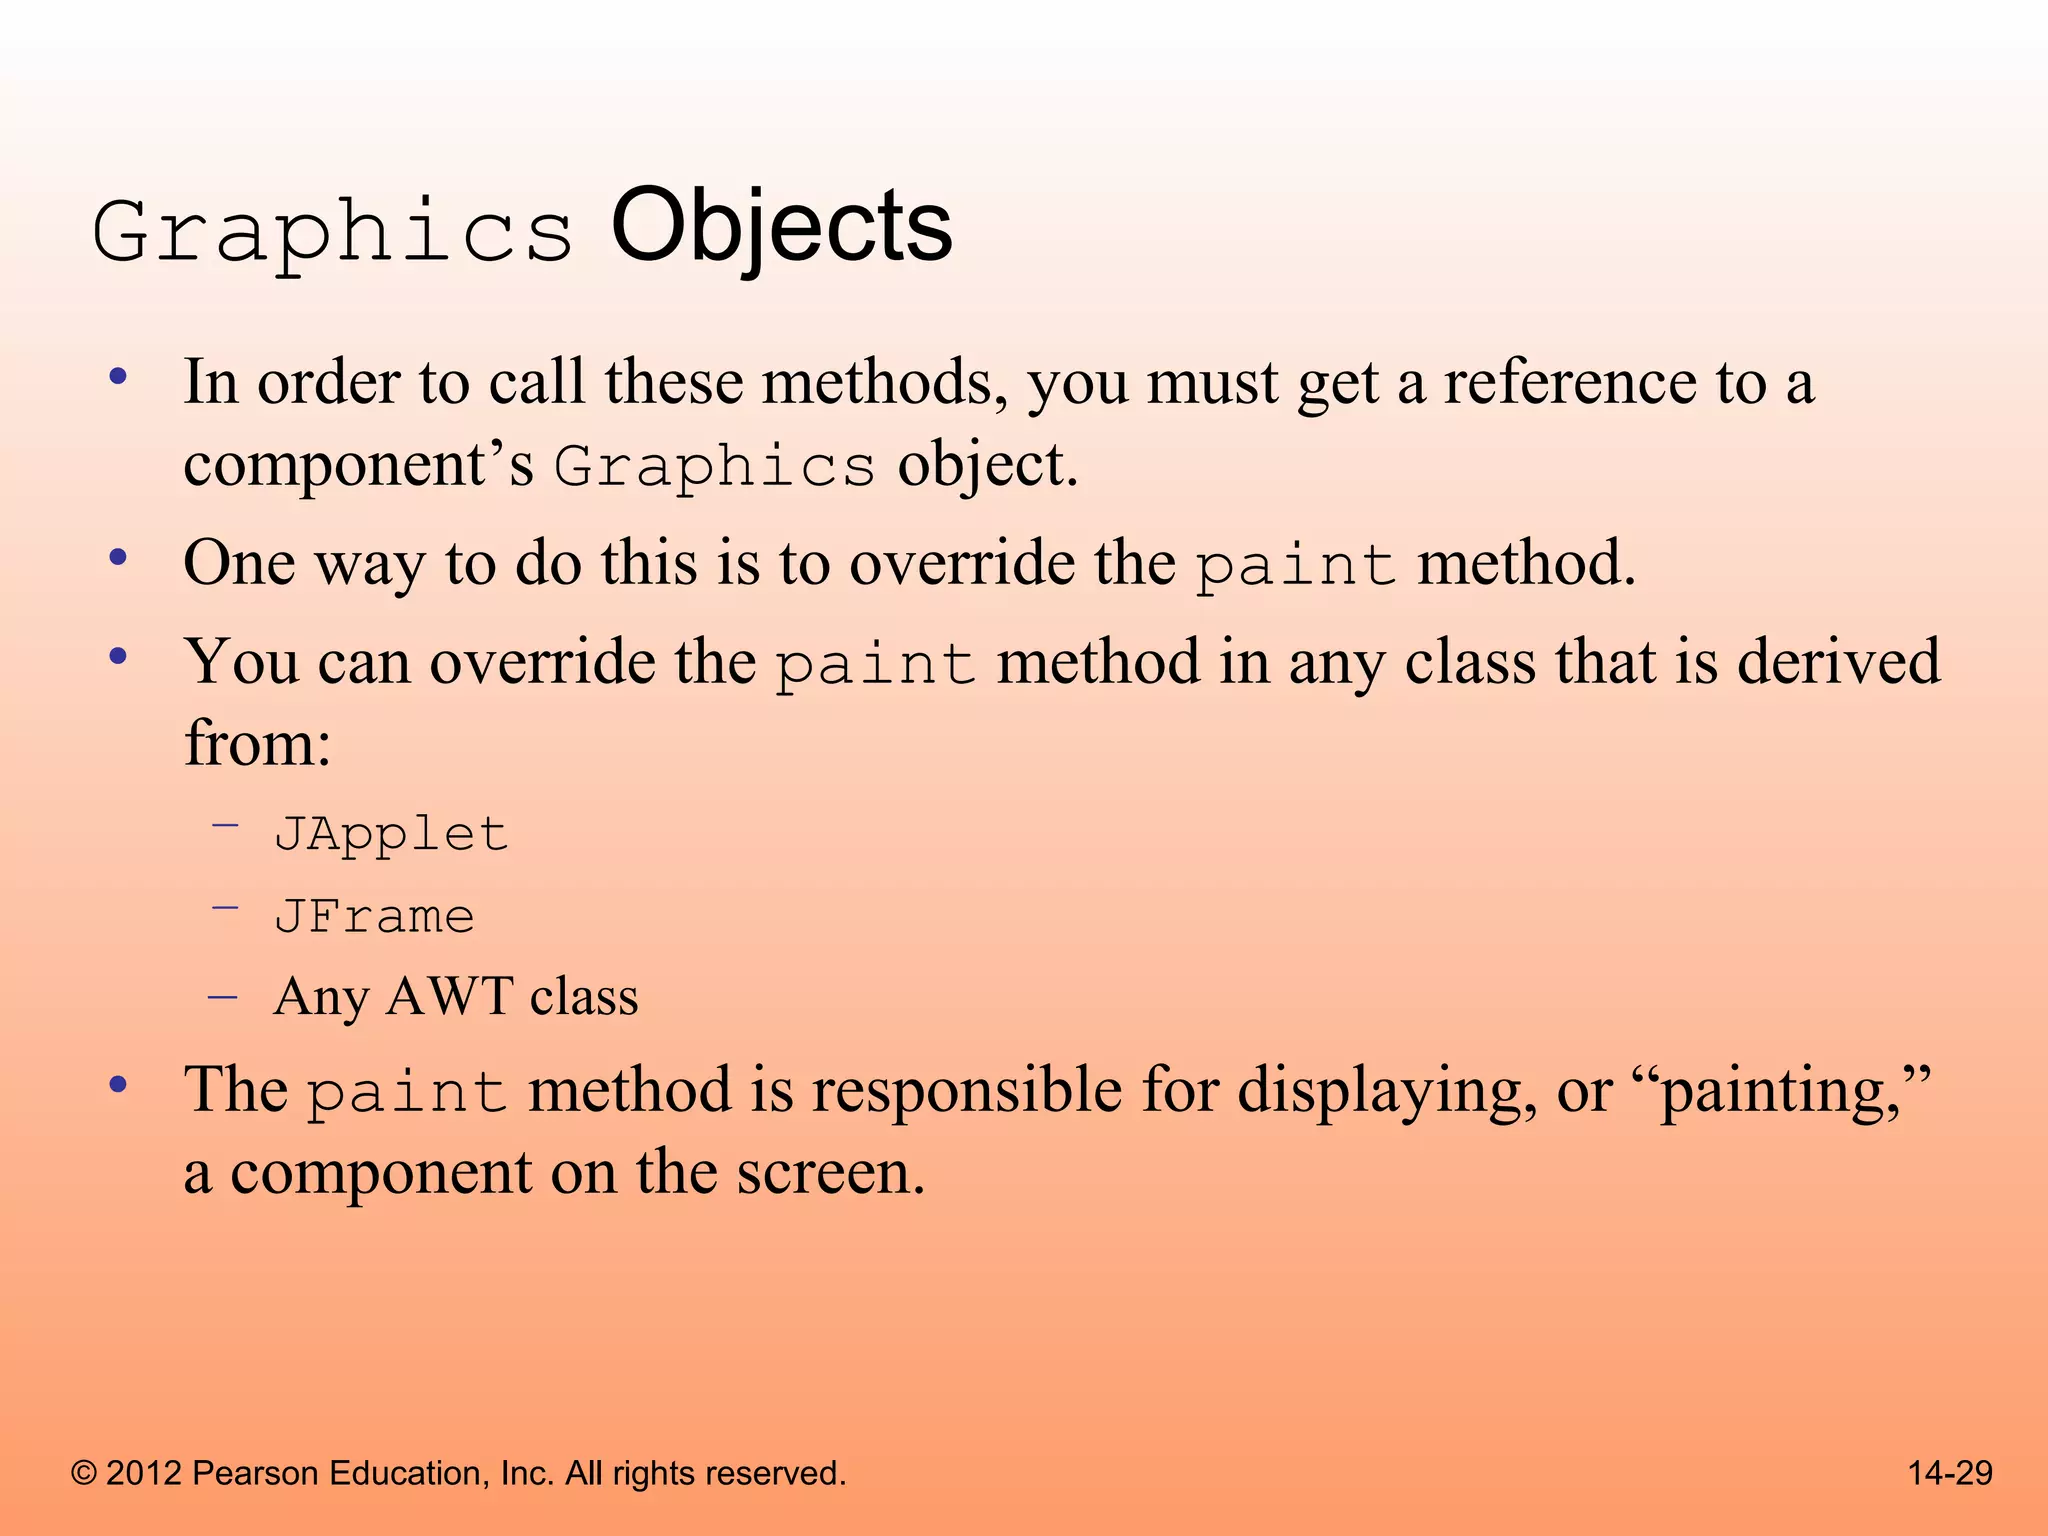
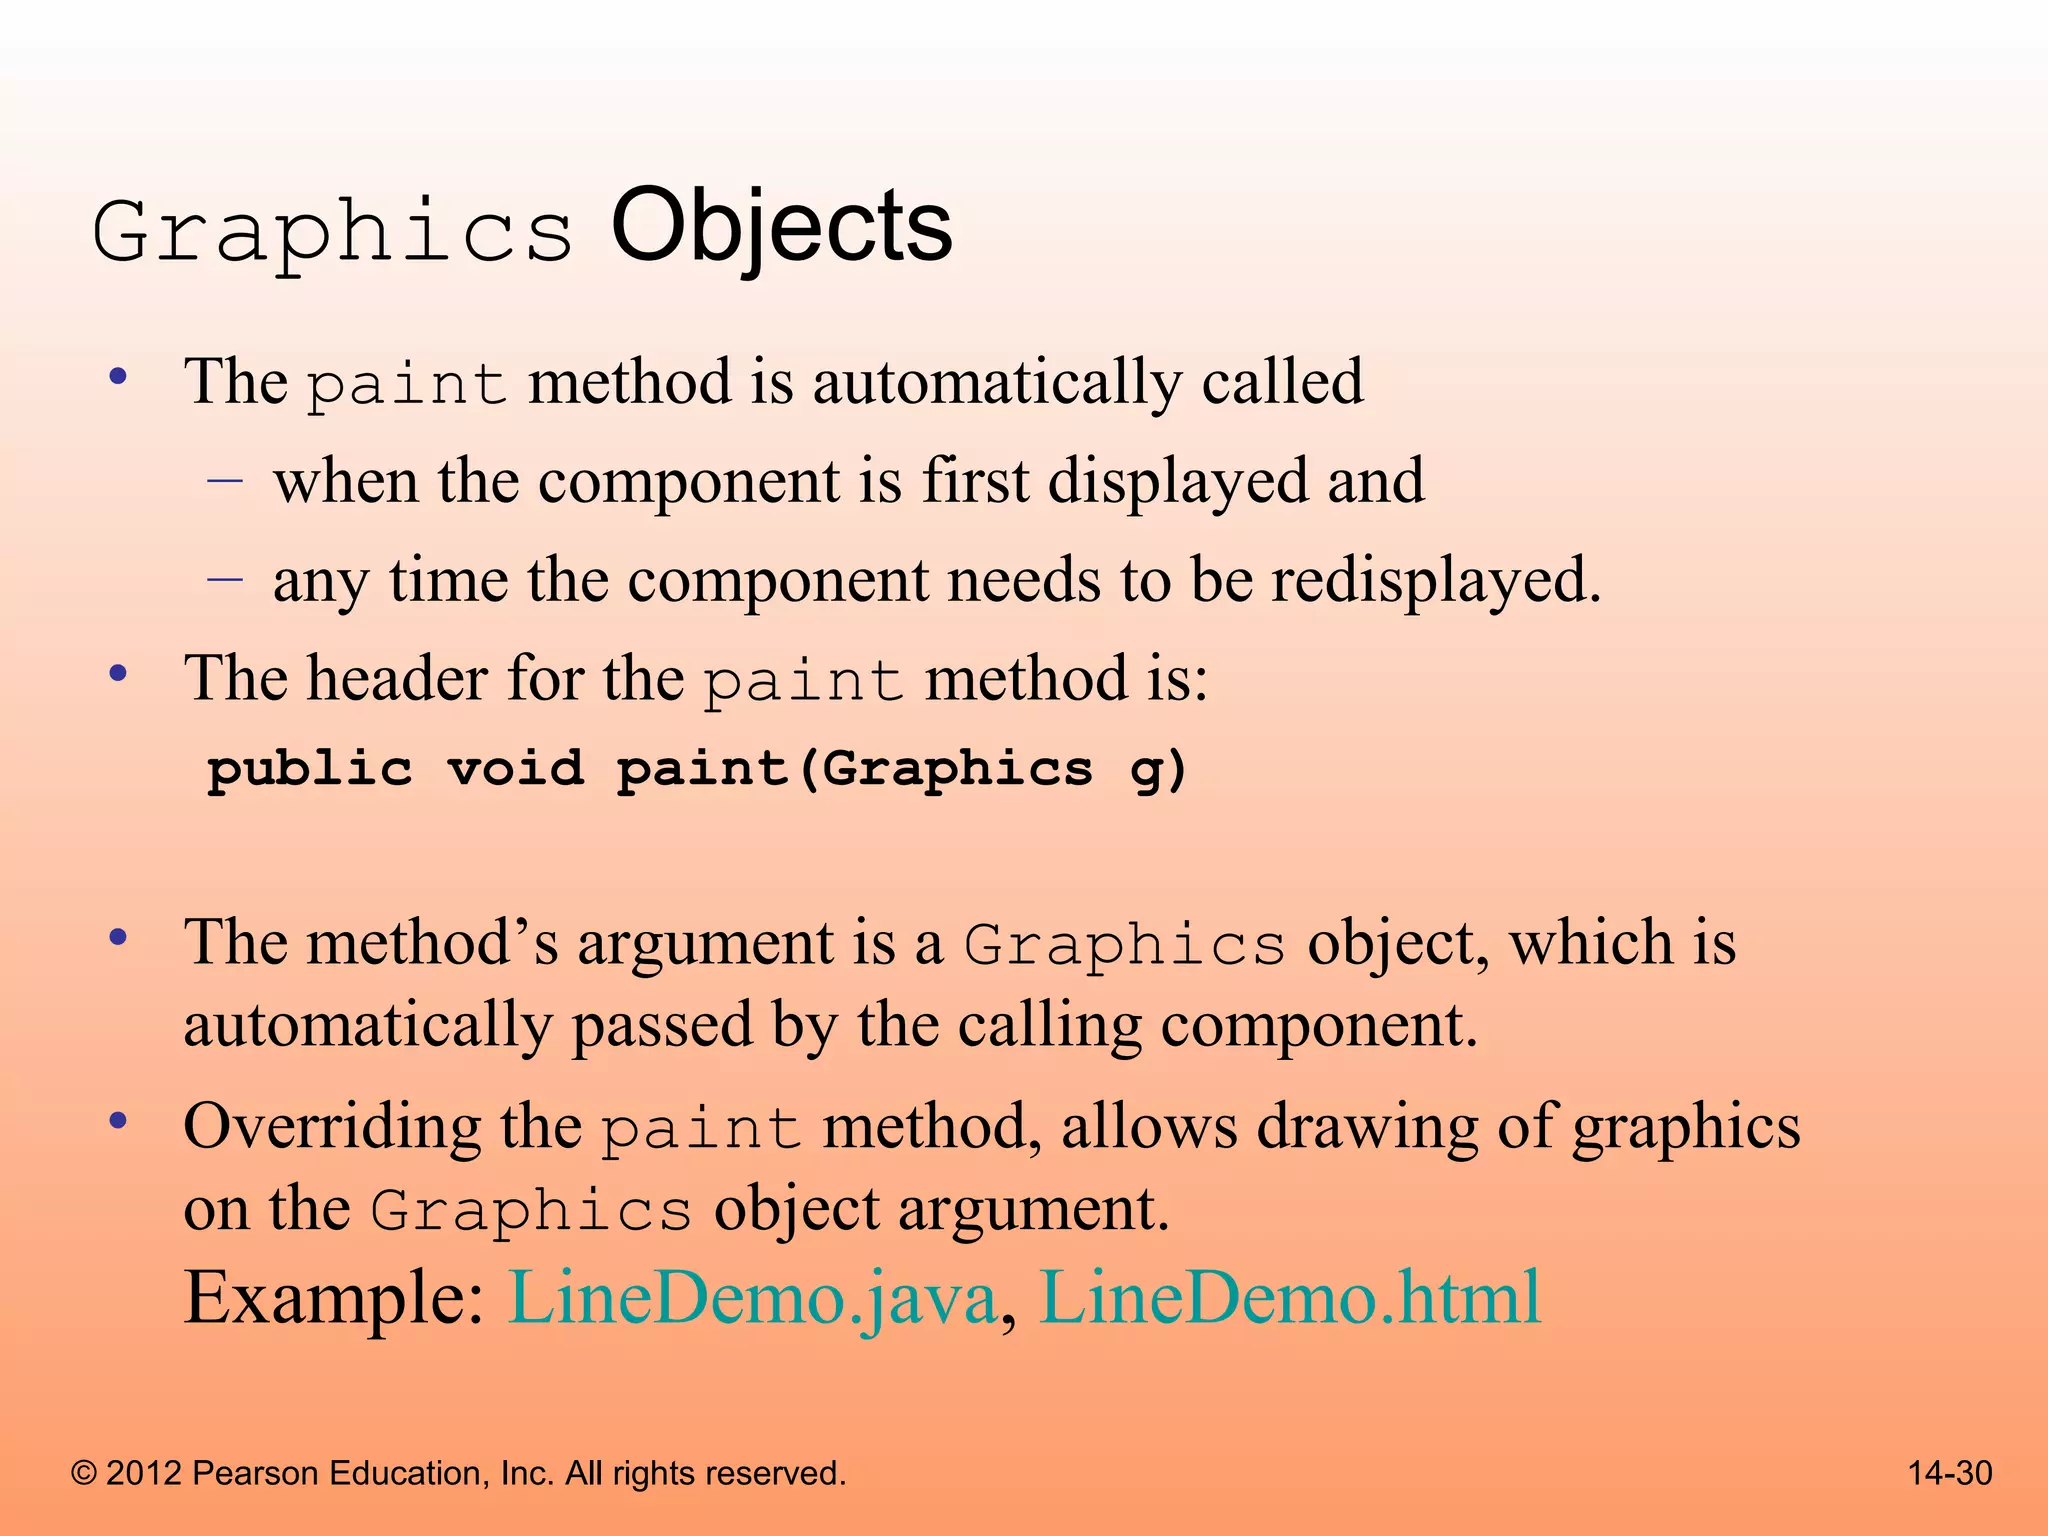
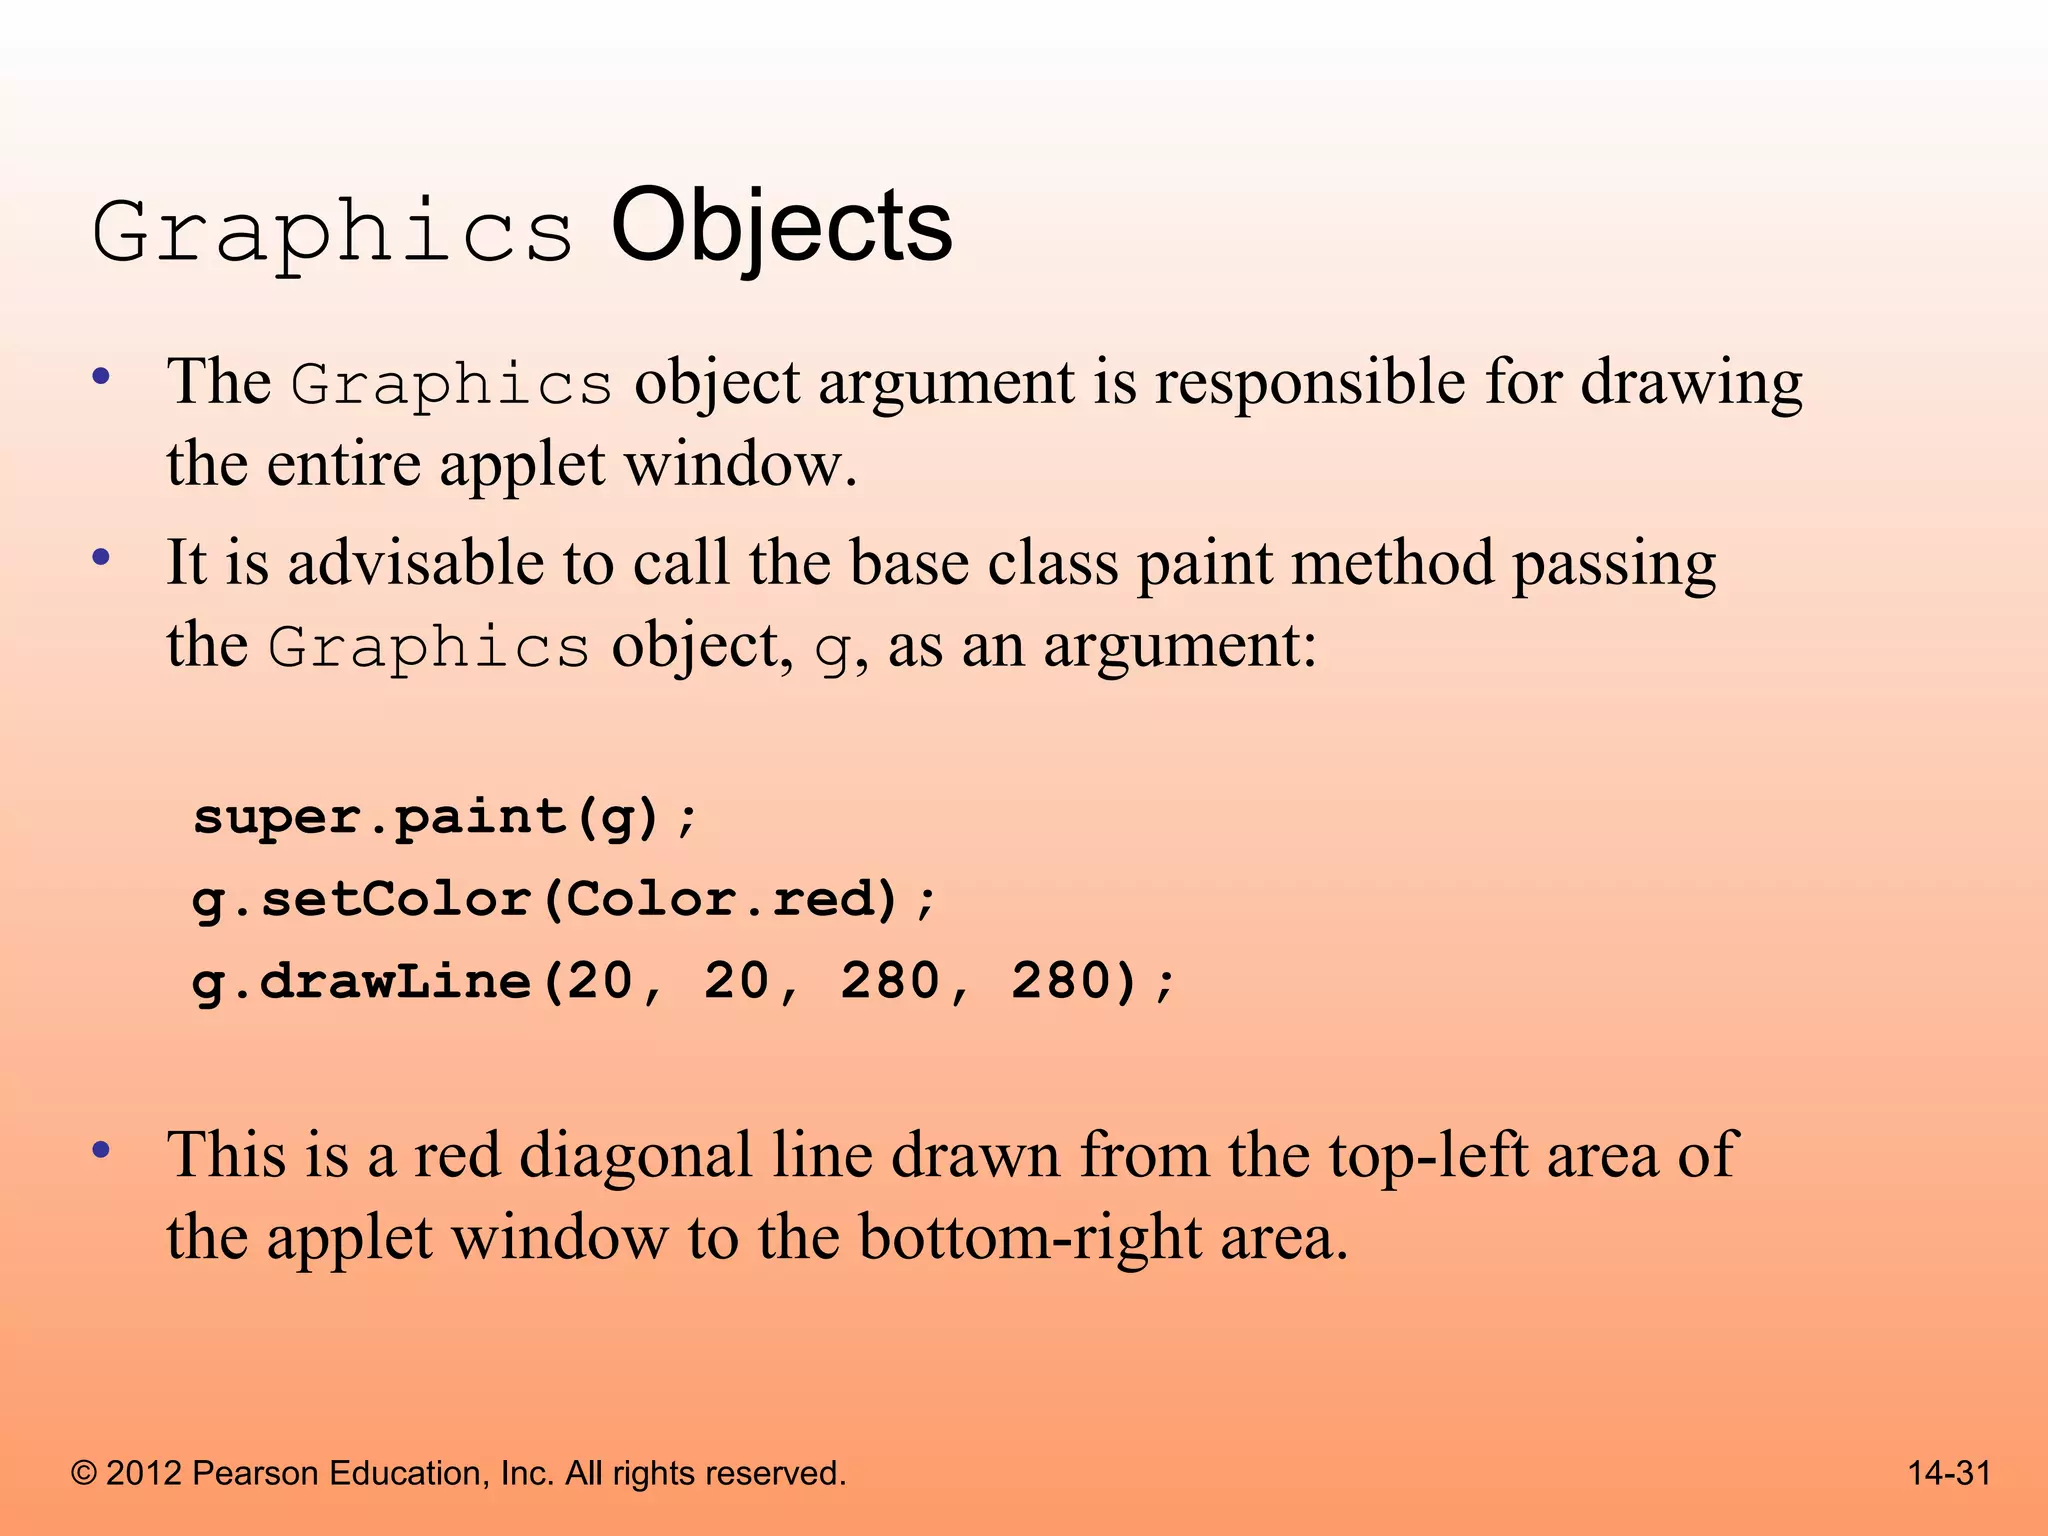
© 2012 Pearson Education, Inc. All rights reserved.

                                            Chapter 14:
                                          Applets and More

                         Starting Out with Java:
              From Control Structures through Data Structures

                                                  Second Edition

                         by Tony Gaddis and Godfrey Muganda
Chapter Topics
  Chapter 14 discusses the following main topics:
        – Introduction to Applets
        – A Brief Introduction to HTML
        – Creating Applets with Swing
        – Using AWT for Portability
        – Drawing Shapes
        – Handling Mouse and Key Events
        – Timer Objects
        – Playing Audio


© 2012 Pearson Education, Inc. All rights reserved.   14-2
Introduction to Applets
  • There are two types of programs you can create with
    Java:
        – applications
        – applets.
  • An application is a stand-alone program that runs on
    your computer.
  • Applets are Java programs that are usually part of a
    Web site.
  • If a user opens the Web site with a Java-enabled
    browser, the applet is executed inside the browser
    window.

© 2012 Pearson Education, Inc. All rights reserved.        14-3
Introduction to Applets
 • It appears to the user that the applet is part of the Web
   site.
 • Applets are stored on a Web server along with the
   site’s Web pages.
 • Applets associated with a viewed web page are
   transmitted to the user’s system.
 • Once the applets are transmitted, the user’s system
   executes them.
 • Applets can be used to extend the capabilities of a
   Web page.

© 2012 Pearson Education, Inc. All rights reserved.            14-4
Introduction to Applets
 • Web pages are normally written in Hypertext
   Markup Language (HTML).
 • HTML is static content; whereas, applets are
   dynamic.
 • An applet does not have to be on a web server
   in order to be executed.
       – They can be stored on the local computer.


© 2012 Pearson Education, Inc. All rights reserved.   14-5
Applet Limitations
 • Applets run on the user’s system, not the server.
 • For security purposes, applets can not:
       – access the local computer file system,
       – run any other program on the user’s system.
       – execute operating system procedures.
       – retrieve information about the user or their system.
       – make network connections with any system except the server
         from which the applet was transmitted.
       – run anonymously.
              • If an applet displays a window, it will automatically have a message
                such as “Warning: Applet Window” displayed in it.

© 2012 Pearson Education, Inc. All rights reserved.                                    14-6
Introduction to HTML
  • Hypertext Markup Language (HTML) is the language
    that Web pages are written in.
        – Hypertext can contain a link to other content on the web
          page, or another web page.
        – A Markup Language allows you to “mark up” a text file by
          inserting special instructions.
               • These instructions tell the browser how to format the text and create
                 any hypertext links.
  • To make a web page, create a text file:
        – that contains HTML instructions (known as tags),
        – the text that should be displayed on the Web page, and
        – typically has a .html file extension.

© 2012 Pearson Education, Inc. All rights reserved.                                      14-7
Introduction to HTML
  • This document is called an HTML document.
  • The tags instruct the browser:
        – how to format the text,
        – where to place images,
        – what to do when the user clicks on a link, etc.
  • Most HTML tags have an opening tag and a closing
    tag.
        – <tag_name>Text</tag_name>
  • The tags are enclosed in angle brackets (< >).
  • The closing tag is preceded by a forward slash (/).

© 2012 Pearson Education, Inc. All rights reserved.         14-8
Document Structure Tags
 • The <html></html> tag marks the
   beginning and ending of an HTML document.
 • The tag <head></head> marks the
   document head, a section containing
   information about the document.
 • The document head contains the <title>
   </title> tag, which is contains the title of
   the document.
 • Example: BasicWebPage1.html

© 2012 Pearson Education, Inc. All rights reserved.   14-9
Document Structure Tags
 • After the document head comes the
   <body></body> tag.
 • The document body contains all of the tags and
   text that produce output in the browser.
 • Example: BasicWebPage2.html


© 2012 Pearson Education, Inc. All rights reserved.   14-10
Text Formatting Tags
 • There are many HTML tags that you can use to change
   the appearance of text.
 • For example, there are six different header tags.
       – <h1></h1> through <h6></h6>
 • A level one header appears in boldface, and is much
   larger than regular text.
 • A level two header also appears in boldface, but is
   smaller than a level one header.
 • This pattern continues with the other header tags.

© 2012 Pearson Education, Inc. All rights reserved.      14-11
Text Formatting Tags
  • Many tags allow an align attribute to be used to
    modify where the text shows on the web page:
        – <h1 align="center">Text</h1>
        – <h1 align="left">Text</h1>
        – <h1 align="right">Text</h1>
  • An old way of centering text is to use the
    <center></center> tag to center a line of text.
  • You can display text:
        – in boldface <b></b>, and italics <i></i> .
  • Example: BasicWebPage3.html

© 2012 Pearson Education, Inc. All rights reserved.    14-12
Breaks in Text
 • The <br /> tag causes a line break to appear at the
   point in the text where it is inserted.

 • Browsers usually ignore the newline characters that are
   created when you press the Enter key.

 • The <p /> tag causes a paragraph break.
       – A paragraph break typically inserts more space into the text
         than a line break.


© 2012 Pearson Education, Inc. All rights reserved.                     14-13
Breaks in Text
 • The <hr /> tag causes a horizontal rule to
   appear at the point in the text where it is
   inserted.
 • A horizontal rule is a thin, horizontal line that is
   drawn across the web page.
 • Example: BasicWebPage4.html


© 2012 Pearson Education, Inc. All rights reserved.   14-14
HTML Links
 • A link is some element in a Web page that can be
   clicked on by the user.
 • The tag that is used to insert a link has the following
   general format:
       – <a href="Address">Text</a>
 • The Text that appears between the opening and closing
   tags is the text that will be displayed in the web page.
 • The web resource that is located at Address will be
   displayed in the browser.


© 2012 Pearson Education, Inc. All rights reserved.          14-15
HTML Links
 • This address is a uniform resource locator
   (URL).
 • The address is enclosed in quotation marks.
 • Example:
       – <a href="http://www.gaddisbooks.com">Click here
         to go to the textbook's web site.</a>
 • Example: LinkDemo.html


© 2012 Pearson Education, Inc. All rights reserved.        14-16
Creating Applets With Swing
 • Applets are very similar to the GUI applications.
 • Instead of displaying its own window, an applet appears in the
   browser’s window.
 • The differences between GUI application code and applet code
   are:
       – A GUI application class is derived from JFrame.
       – An applet class is derived from JApplet.
              • The JApplet class is part of the javax.swing package.
       – A GUI application class has a constructor that creates other components
         and sets up the GUI.
       – An applet class does not normally have a constructor.
              • Instead, it has a method named init that performs the same operations as a
                constructor.


© 2012 Pearson Education, Inc. All rights reserved.                                      14-17
Creating Applets With Swing
  • The differences are (continued):
        – The following methods are not called in an applet:
               •   super
               •   setSize
               •   setDefaultCloseOperation
               •   pack
               •   setVisible
        – No main method is needed to create an Applet object.
               • The browser creates an instance of the class automatically.
  • Example:
        – SimpleApplet.java
        – SimpleApplet.html

© 2012 Pearson Education, Inc. All rights reserved.                            14-18
Running an Applet
  • The process of running an applet is different
    from that of running an application.
  • To run an applet, create an HTML document
    with an APPLET tag, which has the following
    general format:
        <applet
          code="Filename.class"
          width="width_value"
          height="height_value"></applet>
  • Don’t forget the closing angle bracket.
  • Attributes should be enclosed in quotes.
© 2012 Pearson Education, Inc. All rights reserved.   14-19
Running an Applet
 • Filename.class is the compiled bytecode of the applet,
   not the .java file.
 • You can optionally specify a path along with the file
   name.
 • If you specify only the file name, it is assumed that the
   file is in the same directory as the HTML
 • The browser:
       – loads specified byte code, and
       – executes it in an area that is the size specified by the
         width_value and height_value.


© 2012 Pearson Education, Inc. All rights reserved.                 14-20
Using appletviewer
 • The appletviewer program loads and executes an applet
   without the need for a Web browser.
 • When running the program, specify the name of an HTML
   document as a command line argument.

       appletviewer SimpleApplet.html

 • This command executes any applet referenced by an APPLET
   tag in the file SimpleApplet.html.
 • If the document has more than one APPLET tag, it will
   execute each applet in a separate window.

© 2012 Pearson Education, Inc. All rights reserved.           14-21
Applet Event Handling
 • Events in applets are handled with event
   listeners exactly as they are in GUI
   applications.
 • Example:
       – TempConverter.java
       – TempConverter.html


© 2012 Pearson Education, Inc. All rights reserved.   14-22
Using AWT for Portability
 • AWT is the original library that has been part of Java
   since its earliest version.
 • Swing is an improved library that was introduced with
   Java 2.
 • Some browsers do not directly support the Swing
   classes in applets.
 • These browsers require a plug-in to run swing applets.
 • This plug-in is automatically installed on a computer
   when the Java SDK is installed.

© 2012 Pearson Education, Inc. All rights reserved.         14-23
Using AWT for Portability
  • Other people running applets might not have the
    required plug-in.
  • The AWT classes can be used instead of the Swing
    classes for the components in the applet.
  • The AWT component classes:
        – there is a corresponding AWT class for each of the Swing
          classes covered so far.
        – The names of the AWT classes names do not start with the
          letter J.
  • Example:
        – AWTTempConverter.java, TempConverter.html

© 2012 Pearson Education, Inc. All rights reserved.                  14-24
Drawing Shapes
 • Components have an associated Graphics
   object that may be used to draw lines and
   shapes.
 • Java allows drawing of lines and graphical
   shapes such as rectangles, ovals, and arcs.
 • Frame or panels can become a canvas for your
   drawings.


© 2012 Pearson Education, Inc. All rights reserved.   14-25
XY Coordinates
  • The location of each pixel in a component is identified with an X
    coordinate and a Y coordinate.
  • The coordinates are usually written in the form
    (X, Y).
  • Unlike Cartesian coordinates, the upper-left corner of a drawing
    area (0, 0).
  • The X coordinates increase from left to right, and the Y
    coordinates increase from top to bottom.
  • When drawing a line or shape on a component, you must
    indicate its position using X and Y coordinates.


© 2012 Pearson Education, Inc. All rights reserved.                14-26
Graphics Objects
 • Each component has an internal object that is
   derived from the Graphics class, which is
   part of the java.awt package.
 • This object has numerous methods for drawing
   graphical shapes on the surface of the
   component.


© 2012 Pearson Education, Inc. All rights reserved.   14-27
Graphics Objects
  • Some of the methods of the Graphics class:
        – setColor(Color c) – Sets the drawing color for this object.
        – getColor() – Returns the current drawing color for this object.
        – drawLine(int x1, int y1, int x2, int y2) – Draws a
          line on the component
        – drawRect(int x, int y, int width, int height) –
          Draws the outline of a rectangle on the component.
        – fillOval(int x, int y, int width, int height) –
          Draws a filled oval.
        – drawString(String str, int x, int y) – Draws the string
          passed into str using the current font.


© 2012 Pearson Education, Inc. All rights reserved.                    14-28
Graphics Objects
  • In order to call these methods, you must get a reference to a
    component’s Graphics object.
  • One way to do this is to override the paint method.
  • You can override the paint method in any class that is derived
    from:
        – JApplet
        – JFrame
        – Any AWT class
  • The paint method is responsible for displaying, or “painting,”
    a component on the screen.


© 2012 Pearson Education, Inc. All rights reserved.              14-29
Graphics Objects
  • The paint method is automatically called
     – when the component is first displayed and
     – any time the component needs to be redisplayed.
  • The header for the paint method is:
        public void paint(Graphics g)


  • The method’s argument is a Graphics object, which is
    automatically passed by the calling component.
  • Overriding the paint method, allows drawing of graphics
    on the Graphics object argument.
       Example: LineDemo.java, LineDemo.html

© 2012 Pearson Education, Inc. All rights reserved.           14-30
Graphics Objects
 • The Graphics object argument is responsible for drawing
   the entire applet window.
 • It is advisable to call the base class paint method passing
   the Graphics object, g, as an argument:

       super.paint(g);
       g.setColor(Color.red);
       g.drawLine(20, 20, 280, 280);


 • This is a red diagonal line drawn from the top-left area of
   the applet window to the bottom-right area.


© 2012 Pearson Education, Inc. All rights reserved.              14-31
Rectangles
 • Rectangles can be drawn or filled.

              g.drawRect(10, 10, 50, 50);
              g.fillRect(10, 10, 50, 50);


 • The fillRect and drawRect take four integers as
   parameters:
       drawRect(int x, int y, int width, int height)


 • Example:
       – RectangleDemo.java
       – RectangleDemo.html

© 2012 Pearson Education, Inc. All rights reserved.    14-32
Ovals and Bounding Rectangles
 • Ovals are created by drawing the oval inside of a “bounding
   rectangle”.
 • This rectangle is invisible to the viewer of the Graphics
   object.
       g.fillOval(x, y, width, height);

                                                      Width

Example:
   OvalDemo.java (x,y)
   OvalDemo.html                                              Height


© 2012 Pearson Education, Inc. All rights reserved.                    14-33
Arcs
   • Arcs are drawn from the 90 degree position
     counterclockwise and can be filled or unfilled
                g.drawArc(0, 20, 120, 120, 0, 90);
                g.fillArc(0, 20, 120, 120, 0, 90);
   • The fillArc and drawArc take six integers as parameters:
          drawArc(int x, int y, int width, int height, int
            start, int end)
   • Example:
      – ArcDemo.java
      – ArcDemo.html


© 2012 Pearson Education, Inc. All rights reserved.             14-34
Polygons
  • Polygons are drawn using arrays of integers representing x,
    y coordinates
       int[]xCoords={60,100,140,140,100,60,20,20};
       int[]yCoords={20,20,60,100,140,140,100,60};


© 2012 Pearson Education, Inc. All rights reserved.               14-35
Polygons
  • The fillPolygon and drawPolygon use the
    arrays as parameters:
  • Example:
        – PolygonDemo.java
        – PolygonDemo.html


© 2012 Pearson Education, Inc. All rights reserved.   14-36
The repaint Method
 • We do not call a component’s paint method.
 • It is automatically called when the component must be
   redisplayed.
 • We can force the application or applet to call the
   paint method.

       repaint();


 • The repaint method clears the surface of the
   component and then calls the paint method.
© 2012 Pearson Education, Inc. All rights reserved.        14-37
Drawing on Panels
 • To draw on a panel, get a reference to the panel’s Graphics
   object and use that object’s methods.
 • The resulting graphics are drawn only on the panel.
 • Getting a reference to a JPanel component’s Graphics
   object is similar to previous examples.
 • Instead of overriding the JPanel object’s paint method,
   override its paintComponent method.
 • This is true for all Swing components except JApplet and
   JFrame.


© 2012 Pearson Education, Inc. All rights reserved.              14-38
Drawing on Panels
 • The paintComponent method serves the same purpose as
   the paint method.
 • When it is called, the component’s Graphics object is
   passed as an argument.

       public void paintComponent(Graphics g)

 • When overriding this method, first call the base class’s
   paintComponent method.

       super.paintComponent(g);

© 2012 Pearson Education, Inc. All rights reserved.           14-39
Drawing on Panels
 • After this you can call any of the Graphics object’s
   methods to draw on the component.
 • Example:
       – GraphicsWindow.java,
       – DrawingPanel.java,
       – GraphicsWindow.html


© 2012 Pearson Education, Inc. All rights reserved.       14-40
Handling Mouse Events
  • The mouse generates two types of events:
        – mouse events and mouse motion events.
  • Any component derived from the Component
    class can handle events generated by the mouse.
  • To handle mouse events you create:
        – a mouse listener class and/or
        – a mouse motion listener class.


© 2012 Pearson Education, Inc. All rights reserved.   14-41
Handling Mouse Events
 • A mouse listener class can respond to any of the follow
   events:
       – The mouse button is pressed.
       – The mouse button is released.
       – The mouse button is clicked on (pressed, then released
         without moving the mouse).
       – The mouse cursor enters a component’s screen space.
       – The mouse cursor exits a component’s screen space.
 • A mouse listener class must implement the
   MouseListener interface.


© 2012 Pearson Education, Inc. All rights reserved.               14-42
Mouse Listener Methods
 • public void mousePressed(MouseEvent e)
       – called if the mouse button is pressed over the component.
 • public void mouseClicked(MouseEvent e)
       – called if the mouse is pressed and released over the component without
         moving the mouse.
 • public void mouseReleased(MouseEvent e)
       – called when the mouse button is released.
 • public void mouseEntered(MouseEvent e)
       – called when the mouse cursor enters the screen area of the component.
 • public void mouseExited(MouseEvent e)
       – This method is called when the mouse cursor leaves the screen area of the
         component.


© 2012 Pearson Education, Inc. All rights reserved.                                  14-43
Mouse Events
  • The MouseEvent object contains data about the
    mouse event.
  • getX and getY are two common methods of the
    MouseEvent class.
  • They return the X and Y coordinates of the mouse
    cursor when the event occurs.
  • Once a mouse listener class is created, it can be
    registered with a component using the
    addMouseListener method


© 2012 Pearson Education, Inc. All rights reserved.     14-44
Mouse Motion Events
 • The appropriate methods in the mouse listener class are
   automatically called when their corresponding mouse
   events occur.
 • A mouse motion listener class can respond to the
   following events:
       – The mouse is dragged
       – The mouse moved.
 • A mouse motion listener class must implement the
   MouseMotionListener interface and it’s methods.


© 2012 Pearson Education, Inc. All rights reserved.      14-45
Mouse Motion Listener Methods
 • public void mouseDragged(MouseEvent e)
       – called when a dragging operation begins over the component.
              • The mousePressed method is always called just before this method.

 • public void mouseMoved(MouseEvent e)
    – called when the mouse cursor is over the component and it is moved.

 • Example:
       – MouseEvents.java
       – MouseEvents.html


© 2012 Pearson Education, Inc. All rights reserved.                                 14-46
Using Adapter Classes
 • The mouse listener class must implement all of the
   methods required by the interfaces they implement.
 • If any of the methods are omitted, a compiler error
   results.
 • The MouseAdapter and MouseMotionAdapter
   classes provide empty implementations of the methods.
 • They can serve as base classes for mouse listener and
   mouse motion listener classes.
 • Examples: DrawBoxes.java, DrawBoxes.html, DrawBoxes2.java,
   DrawBoxes2.html


© 2012 Pearson Education, Inc. All rights reserved.        14-47
Timer Objects
 • Timer objects automatically generate action events at regular
   time intervals.
 • This is useful when you want a program to:
       – perform an operation at certain times or
       – after an amount of time has passed.
 • Timer objects are created from the Timer class.
 • The general format of the Timer class’s constructor:

       Timer(int delay, ActionListener listener)


© 2012 Pearson Education, Inc. All rights reserved.                14-48
Timer Objects
 • The delay parameter is the amount of time between
   action events in milliseconds.
 • The the listener parameter is a reference to an
   action listener to be registered with the Timer object.
       – Passing null will cause no action listener to be registered.
       – the Timer object’s addActionListener method can
         register an action listener after the object’s creation.


© 2012 Pearson Education, Inc. All rights reserved.                     14-49
Timer Object Methods
 • void addActionListener (ActionListener listener)
       – Registers the object referenced by listener as an action listener.
 • int getDelay()
       – Returns the current time delay in milliseconds.
 • boolean isRunning()
       – Returns true if the Timer object is running.
 • void setDelay(int delay)
       – Sets the time delay in milliseconds.
 • void start()
       – Starts the Timer object.
 • void stop()
       – Stops the Timer object.


© 2012 Pearson Education, Inc. All rights reserved.                           14-50
Timer Object Methods
 • An application can use a Timer object to
   automatically execute code at regular time intervals.
 • Example:
       – BouncingBall.java
       – BouncingBall.html


© 2012 Pearson Education, Inc. All rights reserved.        14-51
Playing Audio
 • Java programs can play audio that is stored in a variety sound
   file formats.
       –    .aif or .aiff (Macintosh Audio File)
       –    .au (Sun Audio File)
       –    .mid or .rmi (MIDI File)
       –    .wav (Windows Wave File)
 • One way to play an audio file is to use the Applet class’s
   play method.
 • One version of this method is:

       – void play(URL baseLocation, String fileName)


© 2012 Pearson Education, Inc. All rights reserved.                 14-52
Playing Audio
  • The argument passed to baseLocation is a URL
    object that specifies the location of the file.
  • The argument passed to fileName is and name of the
    file.
  • The sound that is recorded in the file is played one time.
  • The getDocumentBase or getCodeBase methods
    can get a URL object for the first argument.


© 2012 Pearson Education, Inc. All rights reserved.        14-53
Playing Audio
  • The getDocumentBase method returns a URL object
    containing the location of the HTML file that invoked the applet.
        play(getDocumentBase(), "mysound.wav");


  • The getCodeBase method returns a URL object containing
    the location of the applet’s .class file.
        play(getCodeBase(), "mysound.wav");


  • If the sound file specified by the arguments to the play method
    cannot be found, no sound will be played.


© 2012 Pearson Education, Inc. All rights reserved.                   14-54
Using an AudioClip Object
  • The Applet class’s play method:
        – loads a sound file,
        – plays it one time, and
        – releases it for garbage collection.
  • If you need to load a sound file to be played multiple
    times, use an AudioClip object.
  • An AudioClip object is an object that implements the
    AuidoClip interface.


© 2012 Pearson Education, Inc. All rights reserved.     14-55
Using an AudioClip Object
  • The AudioClip interface specifies the following three
    methods:
        – play – plays a sound one time.
        – loop – repeatedly plays a sound.
        – stop – causes a sound to stop playing.
  • The Applet class’s getAudioClip method can be used to
    create an AudioClip object:

        AudioClip getAudioClip(URL baseLocation,
                               String fileName)

  • The method returns an AudioClip object that can be used to
    play the sound file.
  • Example: AudioDemo2.java, AudioDemo2.html

© 2012 Pearson Education, Inc. All rights reserved.              14-56
Playing Audio in an Application
 • Playing audio in from a JFrame is slightly different than
   playing audio from an applet.
      // Create a file object for the step.wav file.
      File file = new File("step.wav");

      // Get a URI object for the audio file.
      URI uri = file.toURI();

      // Get a URL for the audio file.
                                                      Example:
      URL url = uri.toURL();                          AudioFrame.java
      // Get an AudioClip object for the sound
      // file using the Applet class's static
      // newAudioClip method.
      sound = Applet.newAudioClip(url);


© 2012 Pearson Education, Inc. All rights reserved.                     14-57

Cso gaddis java_chapter14

  • 1.
    © 2012 PearsonEducation, Inc. All rights reserved. Chapter 14: Applets and More Starting Out with Java: From Control Structures through Data Structures Second Edition by Tony Gaddis and Godfrey Muganda
  • 2.
    Chapter Topics Chapter 14 discusses the following main topics: – Introduction to Applets – A Brief Introduction to HTML – Creating Applets with Swing – Using AWT for Portability – Drawing Shapes – Handling Mouse and Key Events – Timer Objects – Playing Audio © 2012 Pearson Education, Inc. All rights reserved. 14-2
  • 3.
    Introduction to Applets • There are two types of programs you can create with Java: – applications – applets. • An application is a stand-alone program that runs on your computer. • Applets are Java programs that are usually part of a Web site. • If a user opens the Web site with a Java-enabled browser, the applet is executed inside the browser window. © 2012 Pearson Education, Inc. All rights reserved. 14-3
  • 4.
    Introduction to Applets • It appears to the user that the applet is part of the Web site. • Applets are stored on a Web server along with the site’s Web pages. • Applets associated with a viewed web page are transmitted to the user’s system. • Once the applets are transmitted, the user’s system executes them. • Applets can be used to extend the capabilities of a Web page. © 2012 Pearson Education, Inc. All rights reserved. 14-4
  • 5.
    Introduction to Applets • Web pages are normally written in Hypertext Markup Language (HTML). • HTML is static content; whereas, applets are dynamic. • An applet does not have to be on a web server in order to be executed. – They can be stored on the local computer. © 2012 Pearson Education, Inc. All rights reserved. 14-5
  • 6.
    Applet Limitations •Applets run on the user’s system, not the server. • For security purposes, applets can not: – access the local computer file system, – run any other program on the user’s system. – execute operating system procedures. – retrieve information about the user or their system. – make network connections with any system except the server from which the applet was transmitted. – run anonymously. • If an applet displays a window, it will automatically have a message such as “Warning: Applet Window” displayed in it. © 2012 Pearson Education, Inc. All rights reserved. 14-6
  • 7.
    Introduction to HTML • Hypertext Markup Language (HTML) is the language that Web pages are written in. – Hypertext can contain a link to other content on the web page, or another web page. – A Markup Language allows you to “mark up” a text file by inserting special instructions. • These instructions tell the browser how to format the text and create any hypertext links. • To make a web page, create a text file: – that contains HTML instructions (known as tags), – the text that should be displayed on the Web page, and – typically has a .html file extension. © 2012 Pearson Education, Inc. All rights reserved. 14-7
  • 8.
    Introduction to HTML • This document is called an HTML document. • The tags instruct the browser: – how to format the text, – where to place images, – what to do when the user clicks on a link, etc. • Most HTML tags have an opening tag and a closing tag. – <tag_name>Text</tag_name> • The tags are enclosed in angle brackets (< >). • The closing tag is preceded by a forward slash (/). © 2012 Pearson Education, Inc. All rights reserved. 14-8
  • 9.
    Document Structure Tags • The <html></html> tag marks the beginning and ending of an HTML document. • The tag <head></head> marks the document head, a section containing information about the document. • The document head contains the <title> </title> tag, which is contains the title of the document. • Example: BasicWebPage1.html © 2012 Pearson Education, Inc. All rights reserved. 14-9
  • 10.
    Document Structure Tags • After the document head comes the <body></body> tag. • The document body contains all of the tags and text that produce output in the browser. • Example: BasicWebPage2.html © 2012 Pearson Education, Inc. All rights reserved. 14-10
  • 11.
    Text Formatting Tags • There are many HTML tags that you can use to change the appearance of text. • For example, there are six different header tags. – <h1></h1> through <h6></h6> • A level one header appears in boldface, and is much larger than regular text. • A level two header also appears in boldface, but is smaller than a level one header. • This pattern continues with the other header tags. © 2012 Pearson Education, Inc. All rights reserved. 14-11
  • 12.
    Text Formatting Tags • Many tags allow an align attribute to be used to modify where the text shows on the web page: – <h1 align="center">Text</h1> – <h1 align="left">Text</h1> – <h1 align="right">Text</h1> • An old way of centering text is to use the <center></center> tag to center a line of text. • You can display text: – in boldface <b></b>, and italics <i></i> . • Example: BasicWebPage3.html © 2012 Pearson Education, Inc. All rights reserved. 14-12
  • 13.
    Breaks in Text • The <br /> tag causes a line break to appear at the point in the text where it is inserted. • Browsers usually ignore the newline characters that are created when you press the Enter key. • The <p /> tag causes a paragraph break. – A paragraph break typically inserts more space into the text than a line break. © 2012 Pearson Education, Inc. All rights reserved. 14-13
  • 14.
    Breaks in Text • The <hr /> tag causes a horizontal rule to appear at the point in the text where it is inserted. • A horizontal rule is a thin, horizontal line that is drawn across the web page. • Example: BasicWebPage4.html © 2012 Pearson Education, Inc. All rights reserved. 14-14
  • 15.
    HTML Links •A link is some element in a Web page that can be clicked on by the user. • The tag that is used to insert a link has the following general format: – <a href="Address">Text</a> • The Text that appears between the opening and closing tags is the text that will be displayed in the web page. • The web resource that is located at Address will be displayed in the browser. © 2012 Pearson Education, Inc. All rights reserved. 14-15
  • 16.
    HTML Links •This address is a uniform resource locator (URL). • The address is enclosed in quotation marks. • Example: – <a href="http://www.gaddisbooks.com">Click here to go to the textbook's web site.</a> • Example: LinkDemo.html © 2012 Pearson Education, Inc. All rights reserved. 14-16
  • 17.
    Creating Applets WithSwing • Applets are very similar to the GUI applications. • Instead of displaying its own window, an applet appears in the browser’s window. • The differences between GUI application code and applet code are: – A GUI application class is derived from JFrame. – An applet class is derived from JApplet. • The JApplet class is part of the javax.swing package. – A GUI application class has a constructor that creates other components and sets up the GUI. – An applet class does not normally have a constructor. • Instead, it has a method named init that performs the same operations as a constructor. © 2012 Pearson Education, Inc. All rights reserved. 14-17
  • 18.
    Creating Applets WithSwing • The differences are (continued): – The following methods are not called in an applet: • super • setSize • setDefaultCloseOperation • pack • setVisible – No main method is needed to create an Applet object. • The browser creates an instance of the class automatically. • Example: – SimpleApplet.java – SimpleApplet.html © 2012 Pearson Education, Inc. All rights reserved. 14-18
  • 19.
    Running an Applet • The process of running an applet is different from that of running an application. • To run an applet, create an HTML document with an APPLET tag, which has the following general format: <applet code="Filename.class" width="width_value" height="height_value"></applet> • Don’t forget the closing angle bracket. • Attributes should be enclosed in quotes. © 2012 Pearson Education, Inc. All rights reserved. 14-19
  • 20.
    Running an Applet • Filename.class is the compiled bytecode of the applet, not the .java file. • You can optionally specify a path along with the file name. • If you specify only the file name, it is assumed that the file is in the same directory as the HTML • The browser: – loads specified byte code, and – executes it in an area that is the size specified by the width_value and height_value. © 2012 Pearson Education, Inc. All rights reserved. 14-20
  • 21.
    Using appletviewer •The appletviewer program loads and executes an applet without the need for a Web browser. • When running the program, specify the name of an HTML document as a command line argument. appletviewer SimpleApplet.html • This command executes any applet referenced by an APPLET tag in the file SimpleApplet.html. • If the document has more than one APPLET tag, it will execute each applet in a separate window. © 2012 Pearson Education, Inc. All rights reserved. 14-21
  • 22.
    Applet Event Handling • Events in applets are handled with event listeners exactly as they are in GUI applications. • Example: – TempConverter.java – TempConverter.html © 2012 Pearson Education, Inc. All rights reserved. 14-22
  • 23.
    Using AWT forPortability • AWT is the original library that has been part of Java since its earliest version. • Swing is an improved library that was introduced with Java 2. • Some browsers do not directly support the Swing classes in applets. • These browsers require a plug-in to run swing applets. • This plug-in is automatically installed on a computer when the Java SDK is installed. © 2012 Pearson Education, Inc. All rights reserved. 14-23
  • 24.
    Using AWT forPortability • Other people running applets might not have the required plug-in. • The AWT classes can be used instead of the Swing classes for the components in the applet. • The AWT component classes: – there is a corresponding AWT class for each of the Swing classes covered so far. – The names of the AWT classes names do not start with the letter J. • Example: – AWTTempConverter.java, TempConverter.html © 2012 Pearson Education, Inc. All rights reserved. 14-24
  • 25.
    Drawing Shapes •Components have an associated Graphics object that may be used to draw lines and shapes. • Java allows drawing of lines and graphical shapes such as rectangles, ovals, and arcs. • Frame or panels can become a canvas for your drawings. © 2012 Pearson Education, Inc. All rights reserved. 14-25
  • 26.
    XY Coordinates • The location of each pixel in a component is identified with an X coordinate and a Y coordinate. • The coordinates are usually written in the form (X, Y). • Unlike Cartesian coordinates, the upper-left corner of a drawing area (0, 0). • The X coordinates increase from left to right, and the Y coordinates increase from top to bottom. • When drawing a line or shape on a component, you must indicate its position using X and Y coordinates. © 2012 Pearson Education, Inc. All rights reserved. 14-26
  • 27.
    Graphics Objects •Each component has an internal object that is derived from the Graphics class, which is part of the java.awt package. • This object has numerous methods for drawing graphical shapes on the surface of the component. © 2012 Pearson Education, Inc. All rights reserved. 14-27
  • 28.
    Graphics Objects • Some of the methods of the Graphics class: – setColor(Color c) – Sets the drawing color for this object. – getColor() – Returns the current drawing color for this object. – drawLine(int x1, int y1, int x2, int y2) – Draws a line on the component – drawRect(int x, int y, int width, int height) – Draws the outline of a rectangle on the component. – fillOval(int x, int y, int width, int height) – Draws a filled oval. – drawString(String str, int x, int y) – Draws the string passed into str using the current font. © 2012 Pearson Education, Inc. All rights reserved. 14-28
  • 29.
    Graphics Objects • In order to call these methods, you must get a reference to a component’s Graphics object. • One way to do this is to override the paint method. • You can override the paint method in any class that is derived from: – JApplet – JFrame – Any AWT class • The paint method is responsible for displaying, or “painting,” a component on the screen. © 2012 Pearson Education, Inc. All rights reserved. 14-29
  • 30.
    Graphics Objects • The paint method is automatically called – when the component is first displayed and – any time the component needs to be redisplayed. • The header for the paint method is: public void paint(Graphics g) • The method’s argument is a Graphics object, which is automatically passed by the calling component. • Overriding the paint method, allows drawing of graphics on the Graphics object argument. Example: LineDemo.java, LineDemo.html © 2012 Pearson Education, Inc. All rights reserved. 14-30
  • 31.
    Graphics Objects •The Graphics object argument is responsible for drawing the entire applet window. • It is advisable to call the base class paint method passing the Graphics object, g, as an argument: super.paint(g); g.setColor(Color.red); g.drawLine(20, 20, 280, 280); • This is a red diagonal line drawn from the top-left area of the applet window to the bottom-right area. © 2012 Pearson Education, Inc. All rights reserved. 14-31
  • 32.
    Rectangles • Rectanglescan be drawn or filled. g.drawRect(10, 10, 50, 50); g.fillRect(10, 10, 50, 50); • The fillRect and drawRect take four integers as parameters: drawRect(int x, int y, int width, int height) • Example: – RectangleDemo.java – RectangleDemo.html © 2012 Pearson Education, Inc. All rights reserved. 14-32
  • 33.
    Ovals and BoundingRectangles • Ovals are created by drawing the oval inside of a “bounding rectangle”. • This rectangle is invisible to the viewer of the Graphics object. g.fillOval(x, y, width, height); Width Example: OvalDemo.java (x,y) OvalDemo.html Height © 2012 Pearson Education, Inc. All rights reserved. 14-33
  • 34.
    Arcs • Arcs are drawn from the 90 degree position counterclockwise and can be filled or unfilled g.drawArc(0, 20, 120, 120, 0, 90); g.fillArc(0, 20, 120, 120, 0, 90); • The fillArc and drawArc take six integers as parameters: drawArc(int x, int y, int width, int height, int start, int end) • Example: – ArcDemo.java – ArcDemo.html © 2012 Pearson Education, Inc. All rights reserved. 14-34
  • 35.
    Polygons •Polygons are drawn using arrays of integers representing x, y coordinates int[]xCoords={60,100,140,140,100,60,20,20}; int[]yCoords={20,20,60,100,140,140,100,60}; © 2012 Pearson Education, Inc. All rights reserved. 14-35
  • 36.
    Polygons •The fillPolygon and drawPolygon use the arrays as parameters: • Example: – PolygonDemo.java – PolygonDemo.html © 2012 Pearson Education, Inc. All rights reserved. 14-36
  • 37.
    The repaint Method • We do not call a component’s paint method. • It is automatically called when the component must be redisplayed. • We can force the application or applet to call the paint method. repaint(); • The repaint method clears the surface of the component and then calls the paint method. © 2012 Pearson Education, Inc. All rights reserved. 14-37
  • 38.
    Drawing on Panels • To draw on a panel, get a reference to the panel’s Graphics object and use that object’s methods. • The resulting graphics are drawn only on the panel. • Getting a reference to a JPanel component’s Graphics object is similar to previous examples. • Instead of overriding the JPanel object’s paint method, override its paintComponent method. • This is true for all Swing components except JApplet and JFrame. © 2012 Pearson Education, Inc. All rights reserved. 14-38
  • 39.
    Drawing on Panels • The paintComponent method serves the same purpose as the paint method. • When it is called, the component’s Graphics object is passed as an argument. public void paintComponent(Graphics g) • When overriding this method, first call the base class’s paintComponent method. super.paintComponent(g); © 2012 Pearson Education, Inc. All rights reserved. 14-39
  • 40.
    Drawing on Panels • After this you can call any of the Graphics object’s methods to draw on the component. • Example: – GraphicsWindow.java, – DrawingPanel.java, – GraphicsWindow.html © 2012 Pearson Education, Inc. All rights reserved. 14-40
  • 41.
    Handling Mouse Events • The mouse generates two types of events: – mouse events and mouse motion events. • Any component derived from the Component class can handle events generated by the mouse. • To handle mouse events you create: – a mouse listener class and/or – a mouse motion listener class. © 2012 Pearson Education, Inc. All rights reserved. 14-41
  • 42.
    Handling Mouse Events • A mouse listener class can respond to any of the follow events: – The mouse button is pressed. – The mouse button is released. – The mouse button is clicked on (pressed, then released without moving the mouse). – The mouse cursor enters a component’s screen space. – The mouse cursor exits a component’s screen space. • A mouse listener class must implement the MouseListener interface. © 2012 Pearson Education, Inc. All rights reserved. 14-42
  • 43.
    Mouse Listener Methods • public void mousePressed(MouseEvent e) – called if the mouse button is pressed over the component. • public void mouseClicked(MouseEvent e) – called if the mouse is pressed and released over the component without moving the mouse. • public void mouseReleased(MouseEvent e) – called when the mouse button is released. • public void mouseEntered(MouseEvent e) – called when the mouse cursor enters the screen area of the component. • public void mouseExited(MouseEvent e) – This method is called when the mouse cursor leaves the screen area of the component. © 2012 Pearson Education, Inc. All rights reserved. 14-43
  • 44.
    Mouse Events • The MouseEvent object contains data about the mouse event. • getX and getY are two common methods of the MouseEvent class. • They return the X and Y coordinates of the mouse cursor when the event occurs. • Once a mouse listener class is created, it can be registered with a component using the addMouseListener method © 2012 Pearson Education, Inc. All rights reserved. 14-44
  • 45.
    Mouse Motion Events • The appropriate methods in the mouse listener class are automatically called when their corresponding mouse events occur. • A mouse motion listener class can respond to the following events: – The mouse is dragged – The mouse moved. • A mouse motion listener class must implement the MouseMotionListener interface and it’s methods. © 2012 Pearson Education, Inc. All rights reserved. 14-45
  • 46.
    Mouse Motion ListenerMethods • public void mouseDragged(MouseEvent e) – called when a dragging operation begins over the component. • The mousePressed method is always called just before this method. • public void mouseMoved(MouseEvent e) – called when the mouse cursor is over the component and it is moved. • Example: – MouseEvents.java – MouseEvents.html © 2012 Pearson Education, Inc. All rights reserved. 14-46
  • 47.
    Using Adapter Classes • The mouse listener class must implement all of the methods required by the interfaces they implement. • If any of the methods are omitted, a compiler error results. • The MouseAdapter and MouseMotionAdapter classes provide empty implementations of the methods. • They can serve as base classes for mouse listener and mouse motion listener classes. • Examples: DrawBoxes.java, DrawBoxes.html, DrawBoxes2.java, DrawBoxes2.html © 2012 Pearson Education, Inc. All rights reserved. 14-47
  • 48.
    Timer Objects •Timer objects automatically generate action events at regular time intervals. • This is useful when you want a program to: – perform an operation at certain times or – after an amount of time has passed. • Timer objects are created from the Timer class. • The general format of the Timer class’s constructor: Timer(int delay, ActionListener listener) © 2012 Pearson Education, Inc. All rights reserved. 14-48
  • 49.
    Timer Objects •The delay parameter is the amount of time between action events in milliseconds. • The the listener parameter is a reference to an action listener to be registered with the Timer object. – Passing null will cause no action listener to be registered. – the Timer object’s addActionListener method can register an action listener after the object’s creation. © 2012 Pearson Education, Inc. All rights reserved. 14-49
  • 50.
    Timer Object Methods • void addActionListener (ActionListener listener) – Registers the object referenced by listener as an action listener. • int getDelay() – Returns the current time delay in milliseconds. • boolean isRunning() – Returns true if the Timer object is running. • void setDelay(int delay) – Sets the time delay in milliseconds. • void start() – Starts the Timer object. • void stop() – Stops the Timer object. © 2012 Pearson Education, Inc. All rights reserved. 14-50
  • 51.
    Timer Object Methods • An application can use a Timer object to automatically execute code at regular time intervals. • Example: – BouncingBall.java – BouncingBall.html © 2012 Pearson Education, Inc. All rights reserved. 14-51
  • 52.
    Playing Audio •Java programs can play audio that is stored in a variety sound file formats. – .aif or .aiff (Macintosh Audio File) – .au (Sun Audio File) – .mid or .rmi (MIDI File) – .wav (Windows Wave File) • One way to play an audio file is to use the Applet class’s play method. • One version of this method is: – void play(URL baseLocation, String fileName) © 2012 Pearson Education, Inc. All rights reserved. 14-52
  • 53.
    Playing Audio • The argument passed to baseLocation is a URL object that specifies the location of the file. • The argument passed to fileName is and name of the file. • The sound that is recorded in the file is played one time. • The getDocumentBase or getCodeBase methods can get a URL object for the first argument. © 2012 Pearson Education, Inc. All rights reserved. 14-53
  • 54.
    Playing Audio • The getDocumentBase method returns a URL object containing the location of the HTML file that invoked the applet. play(getDocumentBase(), "mysound.wav"); • The getCodeBase method returns a URL object containing the location of the applet’s .class file. play(getCodeBase(), "mysound.wav"); • If the sound file specified by the arguments to the play method cannot be found, no sound will be played. © 2012 Pearson Education, Inc. All rights reserved. 14-54
  • 55.
    Using an AudioClipObject • The Applet class’s play method: – loads a sound file, – plays it one time, and – releases it for garbage collection. • If you need to load a sound file to be played multiple times, use an AudioClip object. • An AudioClip object is an object that implements the AuidoClip interface. © 2012 Pearson Education, Inc. All rights reserved. 14-55
  • 56.
    Using an AudioClipObject • The AudioClip interface specifies the following three methods: – play – plays a sound one time. – loop – repeatedly plays a sound. – stop – causes a sound to stop playing. • The Applet class’s getAudioClip method can be used to create an AudioClip object: AudioClip getAudioClip(URL baseLocation, String fileName) • The method returns an AudioClip object that can be used to play the sound file. • Example: AudioDemo2.java, AudioDemo2.html © 2012 Pearson Education, Inc. All rights reserved. 14-56
  • 57.
    Playing Audio inan Application • Playing audio in from a JFrame is slightly different than playing audio from an applet. // Create a file object for the step.wav file. File file = new File("step.wav"); // Get a URI object for the audio file. URI uri = file.toURI(); // Get a URL for the audio file. Example: URL url = uri.toURL(); AudioFrame.java // Get an AudioClip object for the sound // file using the Applet class's static // newAudioClip method. sound = Applet.newAudioClip(url); © 2012 Pearson Education, Inc. All rights reserved. 14-57