Controlling the visibility in a Revit family
•
0 likes•1,252 views

Controlling the visibility in a Revit family

Recommended
Recommended
More Related Content
What's hot
What's hot (20)
Similar to Controlling the visibility in a Revit family
Similar to Controlling the visibility in a Revit family (20)
More from Wojciech Klepacki
Recently uploaded
Recently uploaded (20)
Controlling the visibility in a Revit family
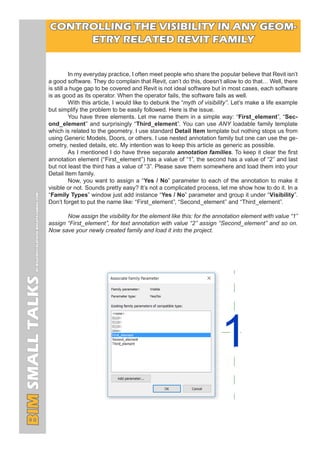
- 1. CONTROLLING THE VISIBILITY IN ANY GEOM- ETRY RELATED REVIT FAMILY In my everyday practice, I often meet people who share the popular believe that Revit isn’t a good software. They do complain that Revit, can’t do this, doesn’t allow to do that… Well, there is still a huge gap to be covered and Revit is not ideal software but in most cases, each software is as good as its operator. When the operator fails, the software fails as well. With this article, I would like to debunk the “myth of visibility”. Let’s make a life example but simplify the problem to be easily followed. Here is the issue. You have three elements. Let me name them in a simple way: “First_element”, “Sec- ond_element” and surprisingly “Third_element”. You can use ANY loadable family template which is related to the geometry. I use standard Detail Item template but nothing stops us from using Generic Models, Doors, or others. I use nested annotation family but one can use the ge- ometry, nested details, etc. My intention was to keep this article as generic as possible. As I mentioned I do have three separate annotation families. To keep it clear the first annotation element (“First_element”) has a value of “1”, the second has a value of “2” and last but not least the third has a value of “3”. Please save them somewhere and load them into your Detail Item family. Now, you want to assign a “Yes / No” parameter to each of the annotation to make it visible or not. Sounds pretty easy? It’s not a complicated process, let me show how to do it. In a “Family Types” window just add instance “Yes / No” parameter and group it under “Visibility”. Don’t forget to put the name like: “First_element”, “Second_element” and “Third_element”. Now assign the visibility for the element like this: for the annotation element with value “1” assign “First_element”, for text annotation with value “2” assign “Second_element” and so on. Now save your newly created family and load it into the project. BIMSMALLTALKSBYWOJCIECHKLEPACKIWKLEPA@GMAIL.COM
- 2. BIMSMALLTALKSBYWOJCIECHKLEPACKIWKLEPA@GMAIL.COM What an unpleasant surprise we have there… all three elements are visible! You can easily fix it unchecking the visibility in a property window but when you uncheck all of them everything disappears… Hmm… that’s not what we call an intelligent solution. My intention was to have only one element visible. If I accidently select more than one element visibility or all of them or none, I expect Revit to warn me about that something went wrong. Now it’s good time to introduce Boolean logic. On very basic, entry level simple “IF” statement works like this: IF something is TRUE, then do TRUE, otherwise, do FALSE. In Revit World we use a convention to put it work: If(something=true, true, false) where “something” is a name of a variable. In Revit families, variable is known under the name of the parameter. Nobody knows why, but in Revit when dealing with visibility parameters we have to miss “If” at the begging. I have my own conspiracy theory for that :) There are some additional Boolean statements you can use: “OR”, “AND” and “NOT”. You can combine them into one more complex formula to achieve the result you want. This is our next step to take. I’m a big fan of space program so let me quote Neil Armstrong: “That’s one small step for man, one giant leap for mankind”.
- 3. BIMSMALLTALKSBYWOJCIECHKLEPACKIWKLEPA@GMAIL.COM Please open the “Family Types” window and create three new instance “Yes / No” pa- rameters and group them under “Constraints”. Name them: “EL_01”, “EL_02” and “EL_03”. Now this is the tricky part. Please assign formula for “EL_O1”: and(First_element, and(not(Second_element), not(Third_element))) For parameter “EL_02” please assign: and(Second_element, and(not(First_element), not(Third_element))) And for the parameter “El_03” please assign: and(Third_element, and(not(First_element), not(Second_element))) WoW! But what the hell does it mean? Well, let me explain you on the first example. and(First_element, and(not(Second_element), not(Third_element))) This formula means: Please make it TRUE when “First_element” is ticked but “Second_element” and “Third_ element” are not ticked. Make it TRUE means “thick the box” in this case make the ele- ment visible. Please take your time and analyse the formulas for “EL_02” and “EL_03”. After five min- utes up to five hours later everything should be clear. Now please make one more parameter. Name it “Error”. Sounds sinister, doesn’t it? It should be instance “Yes / No” parameter, grouped under “Construction”. Now please assign the formula for this parameter: and(not(El_01), not(El_02), not(El_03)) It means: When all of the parameters “EL_01”, “EL_02” and “EL_03” are FALSE please make ele- ment visible with “Error” visibility assigned.
- 4. CONTROLLING THE VISIBILITY IN ANY GEOM- ETRY RELATED REVIT FAMILY Now please close the window and: 1. Select element with value “1” and assign “EL_01” visibility parameter 2. Select element with value “2” and assign “EL_02” visibility parameter 3. Select element with value “3” and assign “EL_03” visibility parameter 4. Create new text element with “Error” value and assign “Error” visibility parameter. Please save the family, load into the project environment, override the one you have and test it. Hopefully, it works well… BIMSMALLTALKSBYWOJCIECHKLEPACKIWKLEPA@GMAIL.COM