Create a camera view by room
•
0 likes•212 views

During the coordination process in Navisworks, having a camera placed in every room would be one of the most welcome features.

Recommended
More Related Content
Recently uploaded
Recently uploaded (20)
Featured
Featured (20)
Create a camera view by room
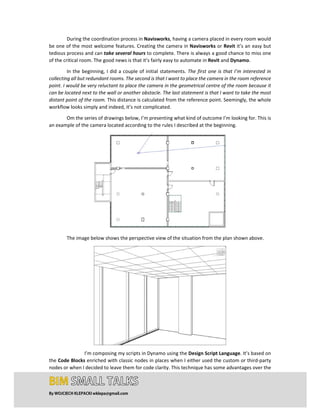
- 1. By WOJCIECH KLEPACKI wklepa@gmail.com During the coordination process in Navisworks, having a camera placed in every room would be one of the most welcome features. Creating the camera in Navisworks or Revit it’s an easy but tedious process and can take several hours to complete. There is always a good chance to miss one of the critical room. The good news is that it’s fairly easy to automate in Revit and Dynamo. In the beginning, I did a couple of initial statements. The first one is that I’m interested in collecting all but redundant rooms. The second is that I want to place the camera in the room reference point. I would be very reluctant to place the camera in the geometrical centre of the room because it can be located next to the wall or another obstacle. The last statement is that I want to take the most distant point of the room. This distance is calculated from the reference point. Seemingly, the whole workflow looks simply and indeed, it’s not complicated. Om the series of drawings below, I’m presenting what kind of outcome I’m looking for. This is an example of the camera located according to the rules I described at the beginning. The image below shows the perspective view of the situation from the plan shown above. I’m composing my scripts in Dynamo using the Design Script Language. It’s based on the Code Blocks enriched with classic nodes in places when I either used the custom or third‐party nodes or when I decided to leave them for code clarity. This technique has some advantages over the
- 2. By WOJCIECH KLEPACKI wklepa@gmail.com classic method. It’s a matter of a good practice to plug watch nodes to monitor the outcome in the critical locations. On the snippet below, I’m showing the overall look of the script. The script is divided into the logical parts, doing roughly serious of connected tasks, thereabouts. At the beginning of the process, I’m starting to collect all the rooms in a project. The code below does it exactly in a beautifully simple yet effective way: Now, it comes the time to clear all the redundant room, extract some room associated parameter values I will need later in a workflow. I’m interested in knowing are there any rooms in a model that not meeting the condition. Typing the condition, I mean not closed or redundant. This is simple operation realised by FilterByBoolMask function. Rooms in a scope are on a sublist with index 0 of the main list. The redundant rooms are on sublist with index 1. Therefore, it’s easy to pull them from the recess.
- 3. By WOJCIECH KLEPACKI wklepa@gmail.com I’m always interested what impact my scripting decisions may have on the process. This is the reason I’m using the Watch node in critical places to examine the results. Take a moment to look at the image below. As I mentioned, it’s very convenient to know what rooms don’t meet the criteria. Now, comes the time to do the serious task. I decided to put most of the script into one Code Block. There is a good reason for this. When you read my explanation, you will find out that all the processes in the block are acting together. Every next operation is a direct and logical consequence of the operation(s) performed before. Writing the script this way gives an opportunity to keep the code clear and as compact as possible. The block basically takes three inputs: rooms, room numbers and room names. Subsequently, it extracts the room boundaries and, this is an important step, takes only the exterior lines in the count. I’m doing this using GetItemAtIndex function applied on the third level of the list (@‐3<1> method). Afterwards, I’m pulling the start points from the listed curves and extracting room reference locations. The next point is a compulsory step because the node which creates the camera views needs bounding boxes to work correctly. I’m extracting the cardinal points from room coordinates. Therefore, it’s absolutely necessary to have room limits set correctly. There is a nice script in my collection doing this, but this is a story to tell on another occasion. Going back to the topic, have to connect room location point with all room corners to calculate the most distant point. I have to perform this operation for every single room and I have to do it well. Luckily, the Dynamo does it in a simple way using the robust MaximumItem function. Please, pay attention that MaximumItem function returns vector lengths. Meanwhile, I want to have a list of points finally. Now it’s a matter of a good workflow to compare the lists to extract only the points I mentioned in the sentence before. Once the problem is sorted I can calculate the camera eye and target position. This is a trivial operation, the only trick is, I’m adding 1800mm to the Z coordinate value for both eye and target position. In case you are not happy with this value you are free to experiment once you complete your own script. At the end of the block, I’m remapping some values and combining room numbers with room names into one value. This is only because I want to identify the camera views somehow in a Revit project browser. The camera names will popup same manner in Navisworks once the model is exported.
- 4. By WOJCIECH KLEPACKI wklepa@gmail.com Now comes the time to let the formal job. The sequence of nodes shown below sets and crops the views in Revit. I believe in data analysing; therefore, I want my critical data to be exported to Excel spreadsheet to examine them later.
- 5. By WOJCIECH KLEPACKI wklepa@gmail.com The image below shows the exemplary results of the exporting process. This concludes the lesson or speaking less formally, that’s all folks.