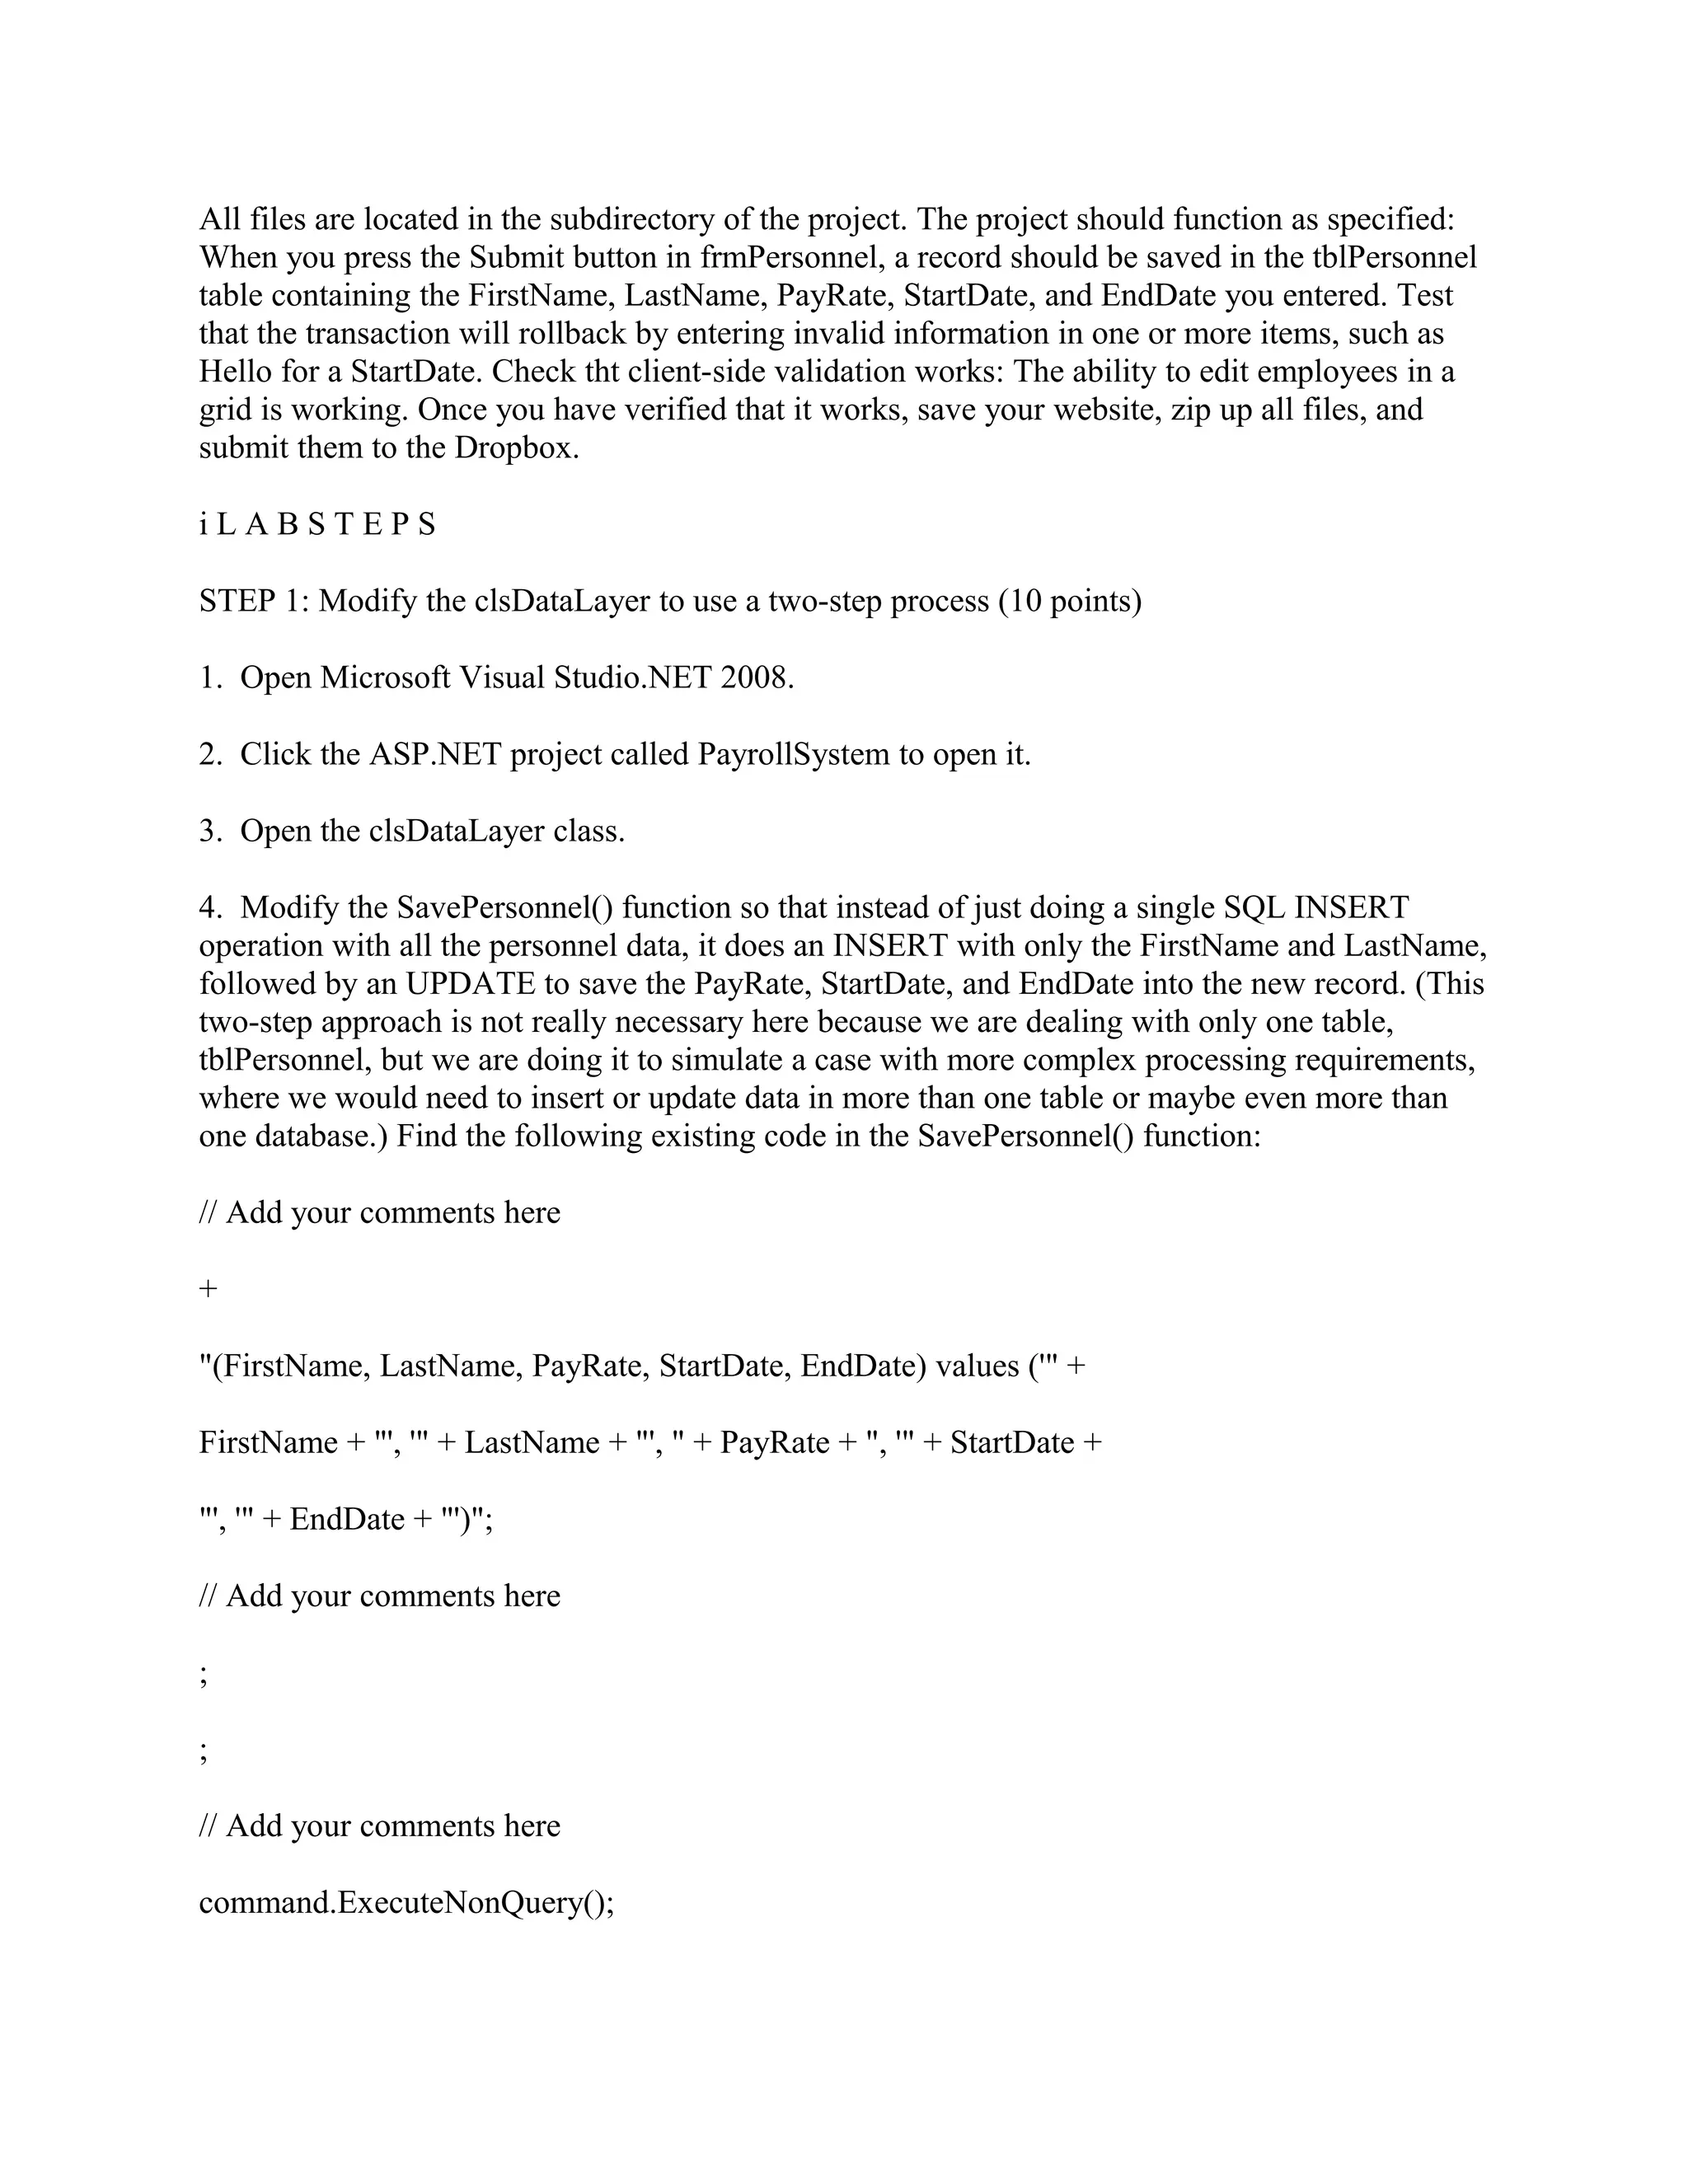
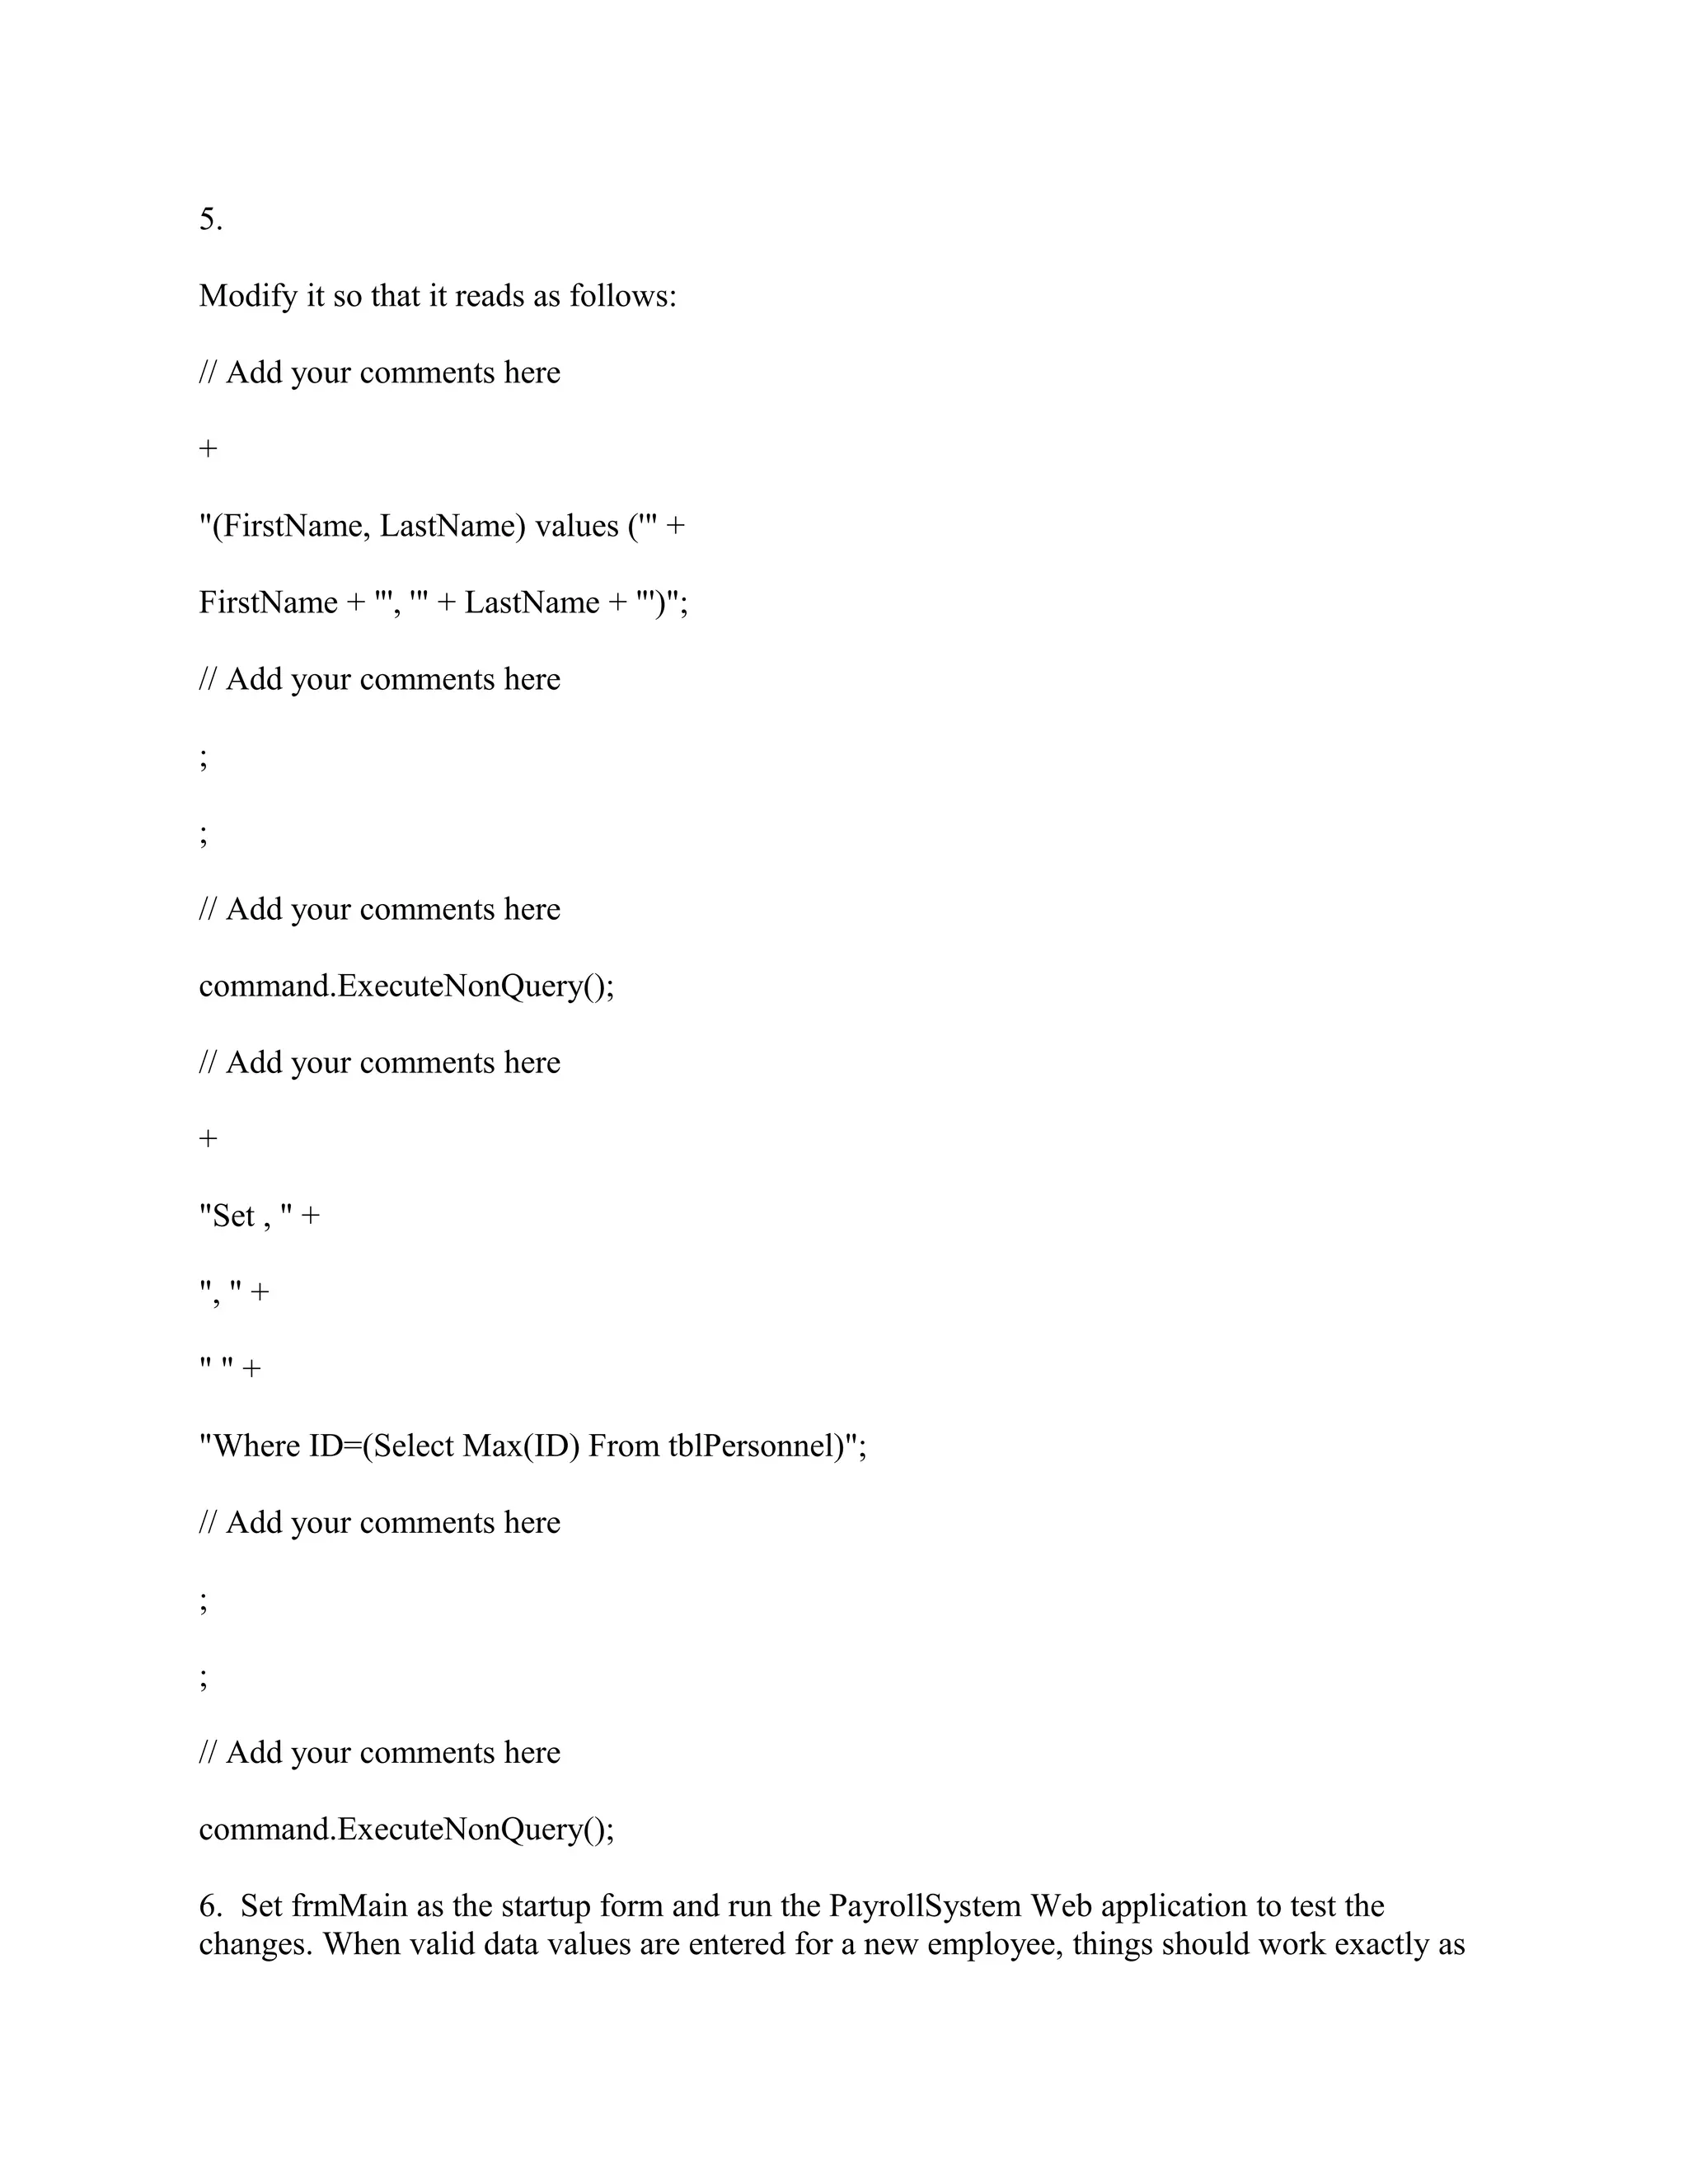
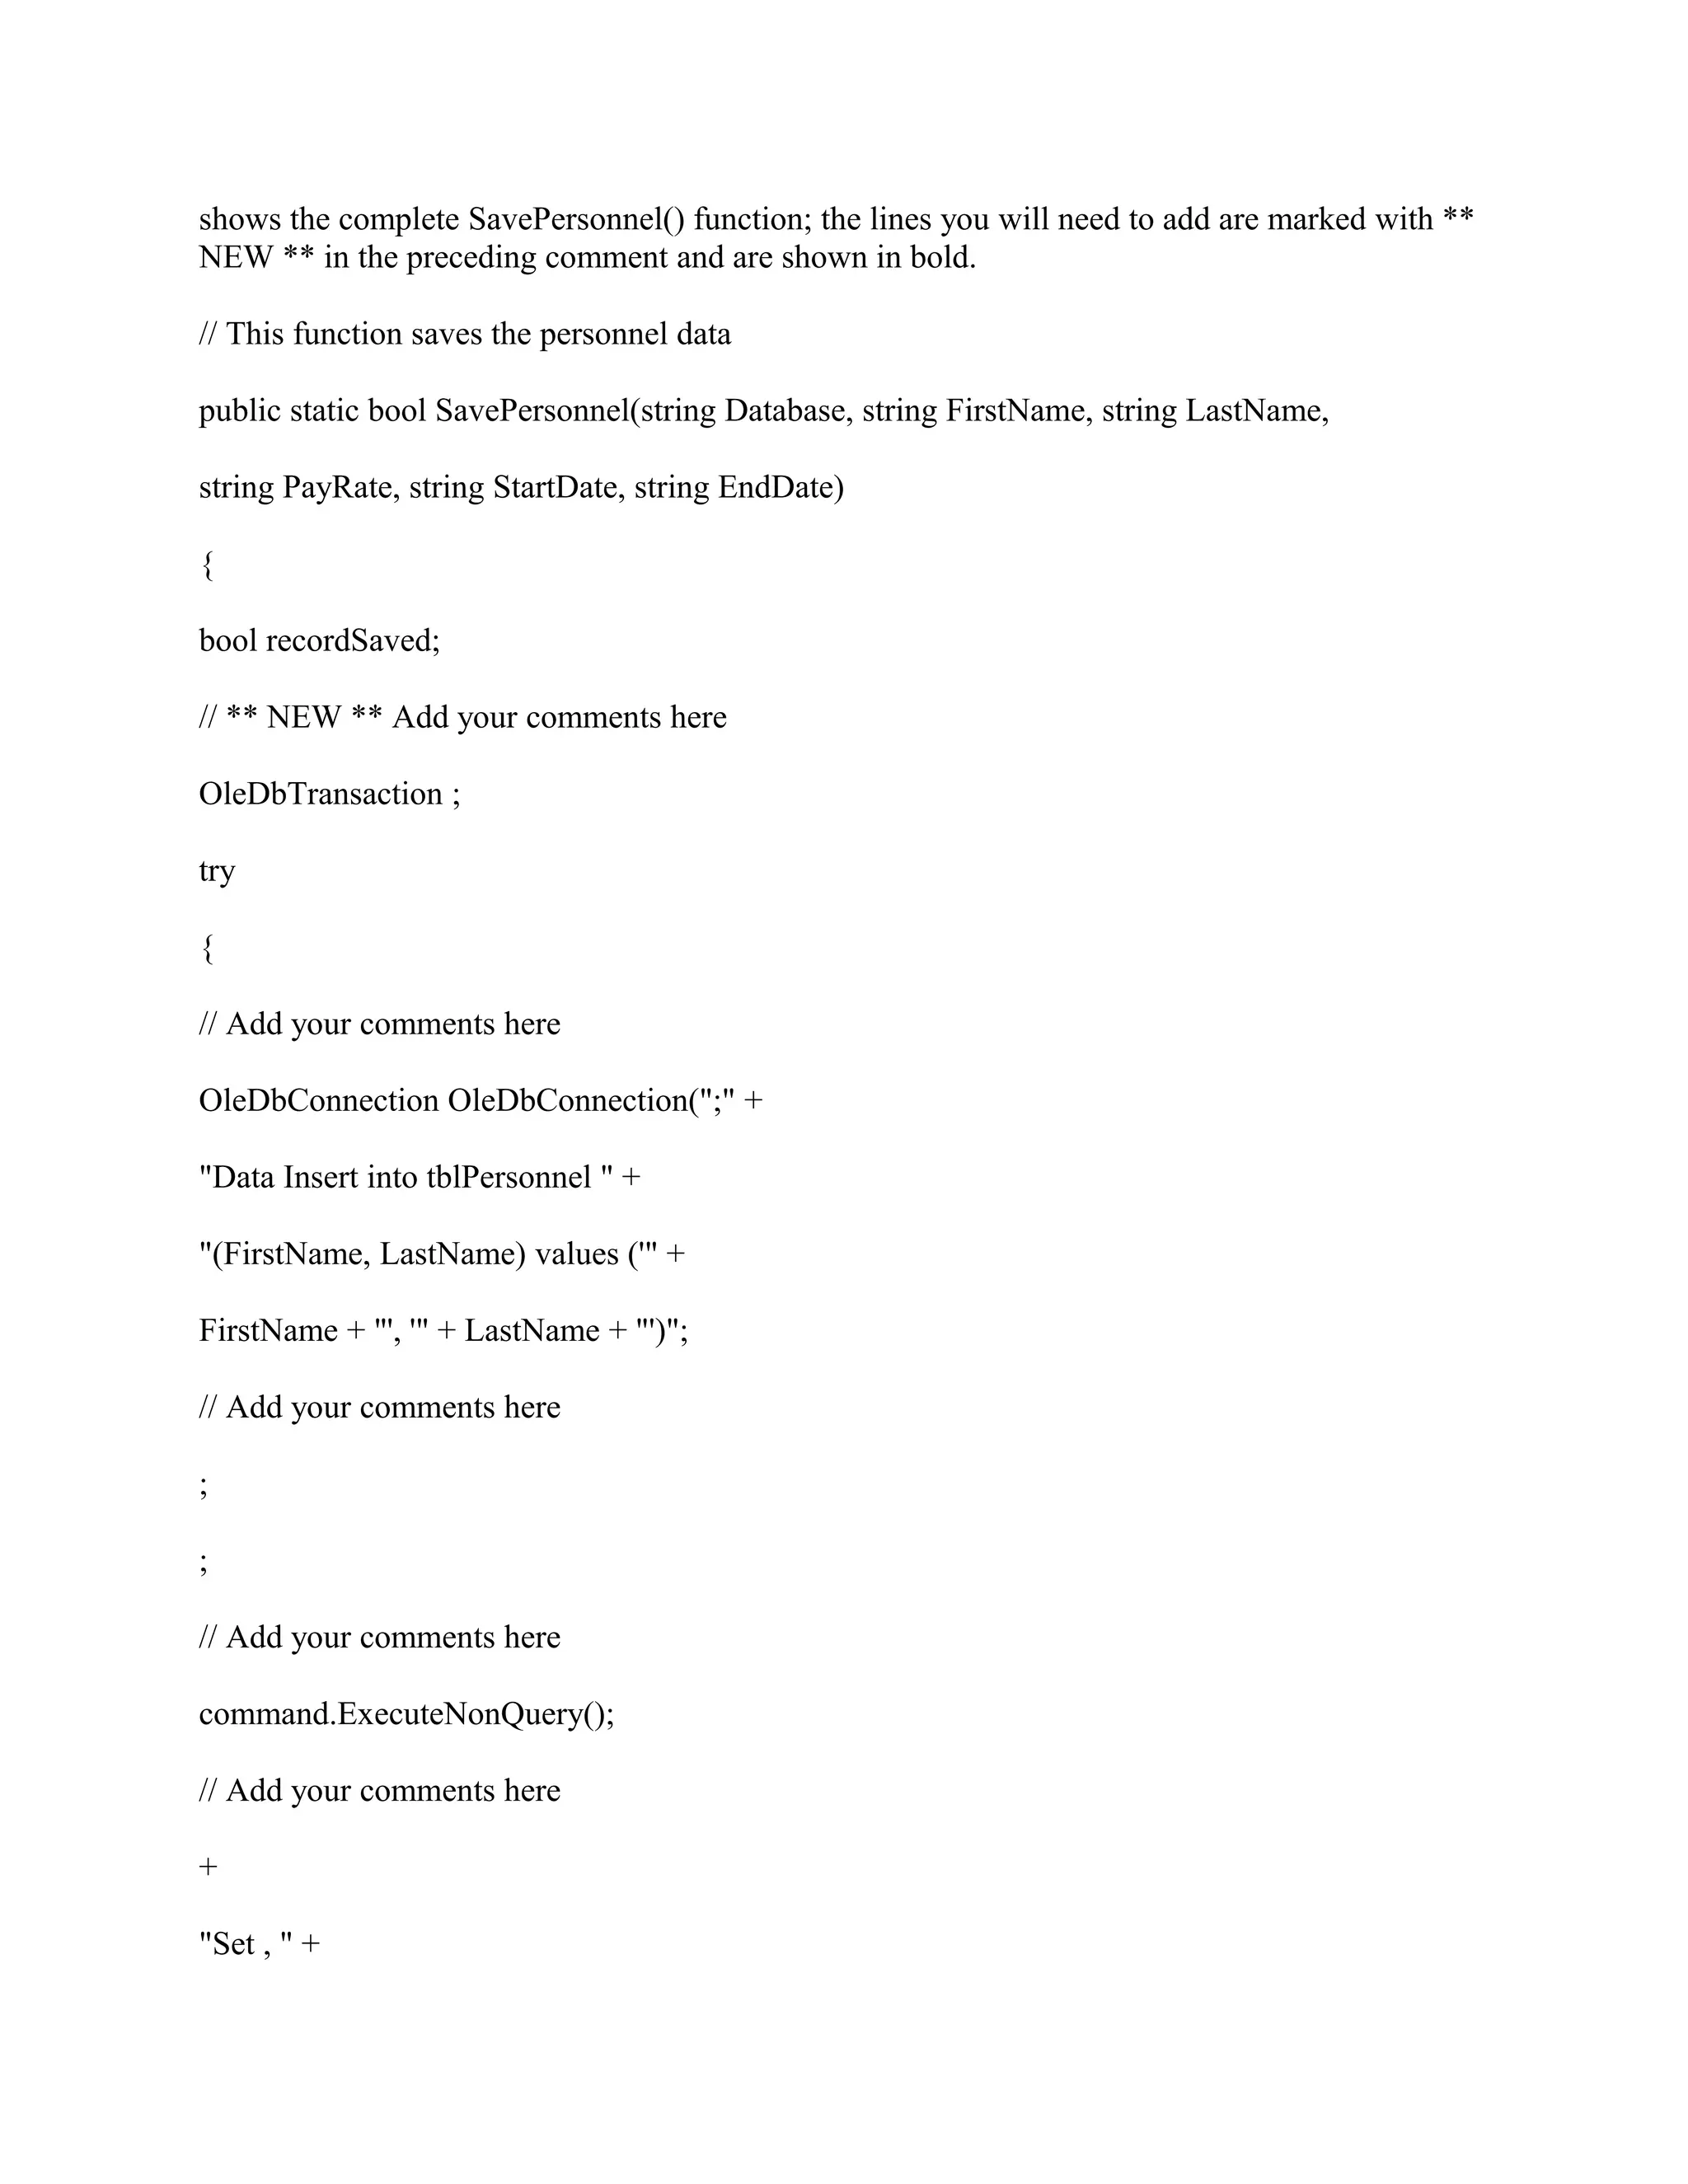
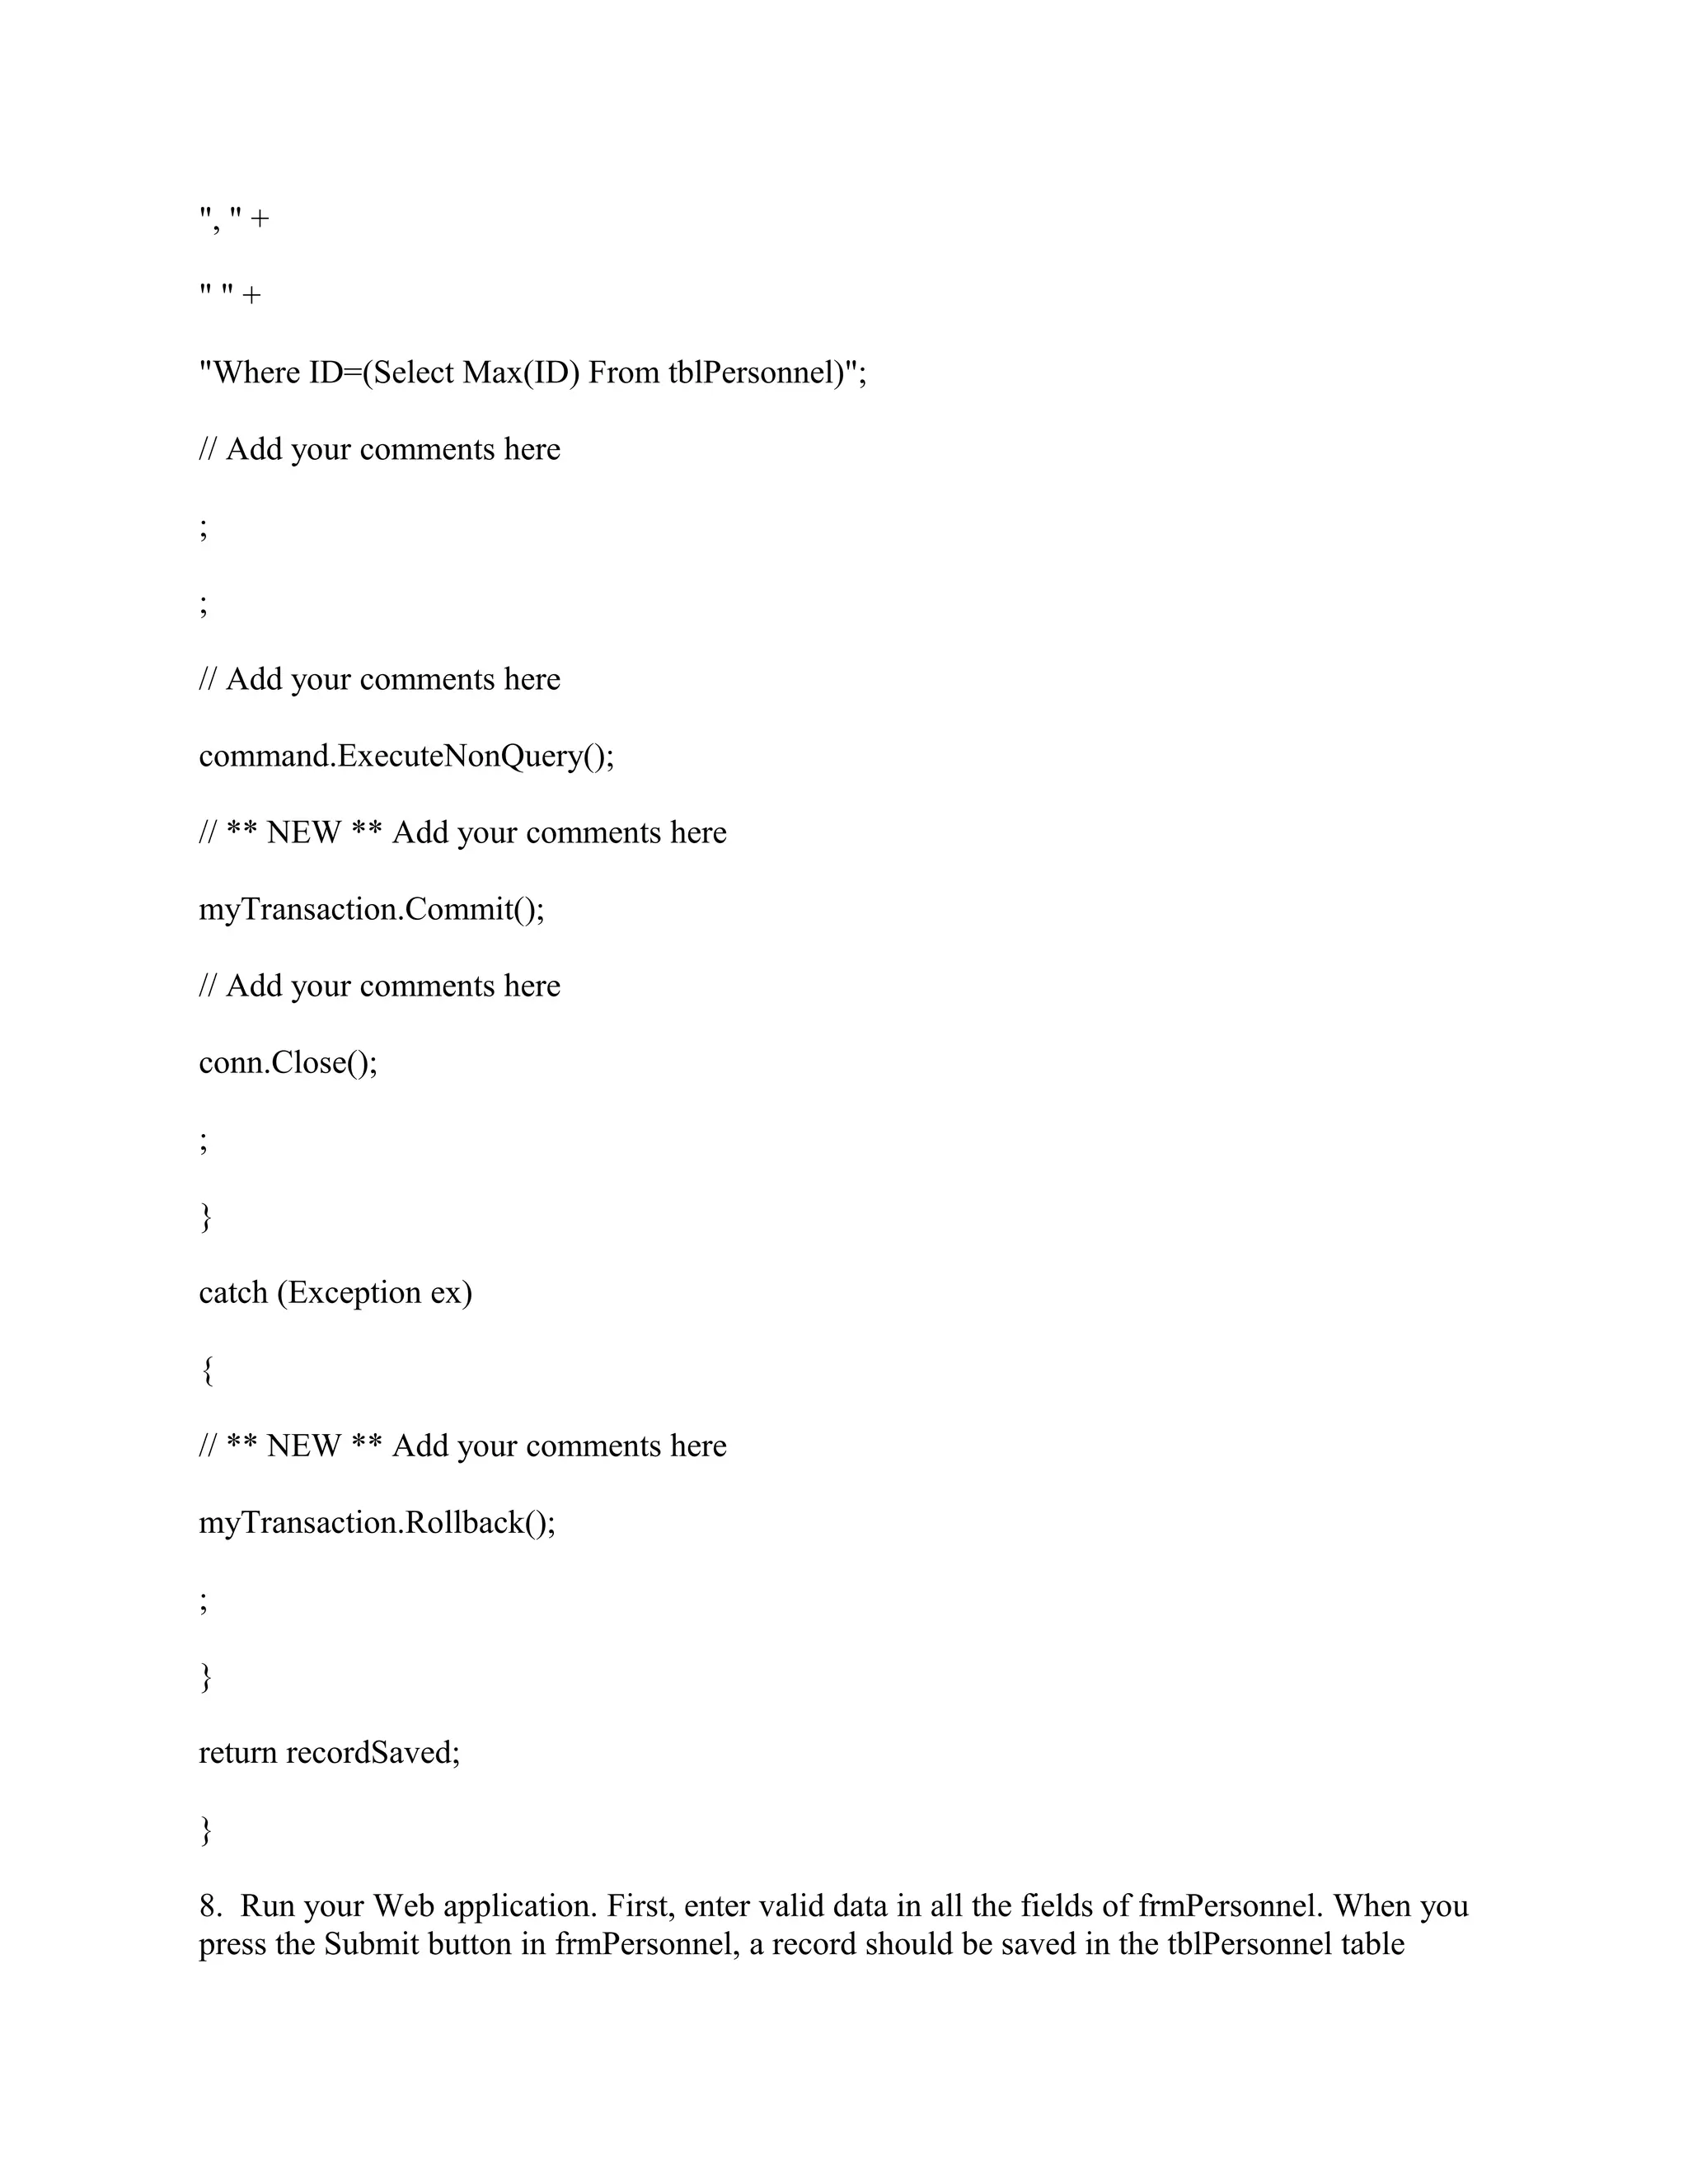
This document provides instructions for completing iLab 5 of CIS407A, which involves adding transaction processing to a web application that saves personnel data. Students are asked to:
1. Modify the application to save records in two steps using transactions, to simulate a more complex scenario.
2. Add error handling using transactions - records should only be committed if both the insert and update steps succeed, otherwise the transaction should rollback.
3. Add client-side validation controls to validate data before it is submitted.
4. Add a new page to allow editing/deleting existing records using a SQL data source and grid view.
Students are provided detailed steps and screenshots to guide them through modifying the application's
More Enhancements to Grails:
Topics covered:
Grails Plugins
Resources
Restful API
Integration Tests
What’s new in grails 2.0
What’s new in grails 2.1
What’s new in grails 2.2
How to upgrade plugins
More Enhancements to Grails:
Topics covered:
Grails Plugins
Resources
Restful API
Integration Tests
What’s new in grails 2.0
What’s new in grails 2.1
What’s new in grails 2.2
How to upgrade plugins
Merrill's Journey to CI-CD and Continuous Testing by Ashish MukherjeeSauce Labs
Merrill was faced with the challenge of transforming product delivery to push new features or fixes to production every day without sacrificing on testing and validating quality before introducing changes. They achieved this by implementing an automated testing framework and automating regression testing suite of 600+ scenarios that could run automatically and in parallel across platforms/browsers using Sauce Labs, which helped them be a gating decision for go live into Production. In this SauceCon 2019 presentation, Ashish discusses how to achieve maximum parallelism of the automated scenarios, how to use API calls for the fastest test data setup and teardown, and how Merrill used those to keep tests atomic and autonomous.
Techtic Solutions prepared a list of laravel eloquent tips and tricks to help laravel developers. We listed Laravel tips and tricks like XorY methods, Model boot() method, Model properties: timestamps, appends, etc. if you want to hire a certified Laravel developer for developing secure, high performance and faster web applications then Techtic is one of the most trusted Laravel development company with 10+ years of web development experience. For more info. Call us +1 201.793.8324 or visit at https://www.techtic.com/laravel-development-company/
Test Coverage for Your WP REST API ProjectPantheon
Are you writing full test coverage for your endpoints as you go? If not, you absolutely need to be, for two primary reasons: security and reliability. If you aren’t writing test coverage for your endpoints, sorry Charlie—your endpoints are probably insecure, and probably behave unexpectedly for clients.
This tutorial is everything you need to get started.
CRUD is a advanced demo to show how the CrossUI to handle CRUD (create, read, update, delete) interactions with the back-end ( database ).
[CrossUI Front-End Builder enables developers to Create Responsive HTML5 Apps Without Coding. Prototype, develop and package the exactly same code into Web Apps, Native Desktop Apps, as well as Mobile Apps. Not only prototypes but live front-end that interacts with back-end web services, with no coding]
3 Simple Steps to follow to Create React JS ComponentsSurendra kumar
Today in this article, i will discuss about how to create react js components, but before we start to create components,
let’s have an idea about what is components and why it is required.
https://goo.gl/9rARN5
Validating forms (and more) with the HTML5 pattern attributecliener
In the past, validating forms in the client has typically required doing some heavy lifting with JavaScript. But you may not know HTML5 changes all that. Browsers now check that the content of an input match its type (and we've got new types like email, url and number to make that even more useful). But, what you might not know about is the pattern attribute, which lets us use regular expressions directly in HTML to specify what format the user's input should have.
In this session, Chris Lienert will look at some of the common regex patterns you can use to validate user input, coupled with some of the many tricks he's learned to help users complete those forms we all love to hate.
This is part 1 of 3STEP 1 Modify the clsDataLayer to Use a Two-St.docxabhi353063
This is part 1 of 3
STEP 1: Modify the clsDataLayer to Use a Two-Step Process
1. Open Microsoft Visual Studio.NET.
2. Click the ASP.NET project called
PayrollSystem
to open it.
3. Open the
clsDataLayer
class.
4. Modify the
SavePersonnel
() function so that instead of just doing a single
SQL INSERT
operation with all of the personnel data, it does an
INSERT
with only the FirstName and LastName, followed by an
UPDATE
to save the PayRate, StartDate, and EndDate into the new record. (This two-step approach is not really necessary here because we are dealing with only one table, tblPersonnel, but we are doing it to simulate a case with more complex processing requirements, in which we would need to insert or update data in more than one table or maybe even more than one database.)
Find the following existing code in the SavePersonnel() function:
// Add your comments here
strSQL
=
"Insert into tblPersonnel "
+
"(FirstName, LastName, PayRate, StartDate, EndDate) values ('"
+
FirstName
+
"', '"
+
LastName
+
"', "
+
PayRate
+
", '"
+
StartDate
+
"', '"
+
EndDate
+
"')"
;
// Add your comments here
command
.
CommandType
=
CommandType
.
Text
;
command
.
CommandText
=
strSQL
;
// Add your comments here
command
.
ExecuteNonQuery
();
Modify it so that it reads as follows:
// Add your comments here
strSQL
=
"Insert into tblPersonnel "
+
"(FirstName, LastName) values ('"
+
FirstName
+
"', '"
+
LastName
+
"')"
;
// Add your comments here
command
.
CommandType
=
CommandType
.
Text
;
command
.
CommandText
=
strSQL
;
// Add your comments here
command
.
ExecuteNonQuery
();
// Add your comments here
strSQL
=
"Update tblPersonnel "
+
"Set PayRate="
+
PayRate
+
", "
+
"StartDate='"
+
StartDate
+
"', "
+
"EndDate='"
+
EndDate
+
"' "
+
"Where ID=(Select Max(ID) From tblPersonnel)"
;
// Add your comments here
command
.
CommandType
=
CommandType
.
Text
;
command
.
CommandText
=
strSQL
;
// Add your comments here
command
.
ExecuteNonQuery
();
5. Set
frmMain
as the startup form and run the PayrollSystem Web application to test the changes. When valid data values are entered for a new employee, things should work exactly as they did previously. To test it, enter valid data for a new employee in frmPersonnel and click Submit. The frmPersonnelVerified form should be displayed with the entered data values and a message that the record was saved successfully. Click the View Personnel button and check that the new personnel record was indeed saved to the database and that all entered data values, including the PayRate, StartDate, and EndDate, were stored correctly. Close the browser window.
Now run the PayrollSystem Web application again, but this time, enter some invalid data (a nonnumeric value) in the PayRate field to cause an error, like this:
6. Now, when you click Submit, the frmPersonnelVerified form should display a message indicatin ...
Previous weeks work has been uploaded as well as any other pieces ne.docxkeilenettie
Previous weeks work has been uploaded as well as any other pieces needed.
Deliverables
All files are located in the subdirectory of the project. The project should function as specified: When you visit the Personnel form page (frmPersonnel.aspx), a record should be saved in the tblUserActivity table with the IP address, form name accessed (frmPersonnel), and the date accessed. When you click the View Activity button, you should see at least one record with this information. When the user goes to the frmPersonnel web form and enters data, the following business rules are to be enforced.
Fields may not be empty or filled with spaces. If any field is empty, turn that field background color to yellow and add to/create an error message to be shown in the error label.
The end date must be greater than the start date. If the end date is less than the start date turn both date fields yellow and add to/create an error message to be shown in the error label.
If all fields validate properly, then the session state items should be set properly and the user should see the frmPersonnelVerified form with all the values displayed. You will also add a new item to frmMain that will take the user to the new frmUserActivity form you added. Add the proper link and a hyperlinked image to allow the user to select this new option. Once you have verified that everything works, save your website, zip up all files, and submit it.
STEP 1: Step Title
1. Open Microsoft Visual Studio.NET.
2. Open the PayrollSystem website by clicking on it in the Recent Projects list, or by pulling down the File menu, selecting Open Website, navigating to the folder where you previously saved the PayrollSystem, and clicking Open.
3. Download the PayrollSystem_DB.accdb file from the Files section and save it on your local computer. (Note: your operating system may lock or block the file. Once you have copied it locally, right click on the file and select Properties and then Unblock if available). Then add it to the PayrollSystem website as follows: In Visual Studio, in the
Solution
Explorer click Website, Add Existing Item, then navigate to the PayrollSystem_DB.accdb file you downloaded, and click the Add button.
Make sure you select file types, which include *.accdb, *.accdb, etc. Otherwise, you will not be able to see the database file to select.
4. Now we need to create a new connection to the PayrollSystem_DB.accdb. To begin, click View Server Explorer.
5. When the Server Explorer toolbox appears, click the Connect to Database button.
6. When the Add Connection dialog appears, click the Change button. In the Change Data Source dialog, select MS Access Database File; Uncheck Always use this Selection; then click OK.
Press Continue to get the following screen.
7. Click the Browse button to navigate to the PayrollSystem_DB.accdb file in your website folder, then click Open. (NOTE: Be sure you select the PayrollSystem_DB.accdb file in your PayrollSystem website folder ...
Open microsoft visual studio/tutorialoutletMitchinson
FOR MORE CLASSES VISIT
tutorialoutletdotcom
1. Open Microsoft Visual Studio.NET.
2. Open the PayrollSystem website by clicking on it in the Recent Projects list, or by pulling down the File menu, selecting Open Website, navigating to the folder where you previously saved the PayrollSystem, and clicking Open.
CIS407AWk2iLabDefault.aspx Greetings and Salutations.docxclarebernice
CIS407AWk2iLab/Default.aspx
Greetings and Salutations. I will master ASP.NET in this course.
CIS407AWk2iLab/Default.aspx.cs
using System;
using System.Collections.Generic;
using System.Linq;
using System.Web;
using System.Web.UI;
using System.Web.UI.WebControls;
public partial class _Default : System.Web.UI.Page
{
protected void Page_Load(object sender, EventArgs e)
{
}
}
CIS407AWk2iLab/frmMain.aspx
Academy of Computing and Information Technology
Annual Salary Calculator
Personnel
CIS407AWk2iLab/frmMain.aspx.cs
using System;
using System.Collections.Generic;
using System.Linq;
using System.Web;
using System.Web.UI;
using System.Web.UI.WebControls;
public partial class frmMain : System.Web.UI.Page
{
protected void Page_Load(object sender, EventArgs e)
{
}
}
CIS407AWk2iLab/frmPersonnel.aspx
Academy of Computing and Information Technology
CIS407AWk2iLab/frmPersonnel.aspx.cs
using System;
using System.Collections.Generic;
using System.Linq;
using System.Web;
using System.Web.UI;
using System.Web.UI.WebControls;
public partial class frmPersonnel : System.Web.UI.Page
{
protected void Page_Load(object sender, EventArgs e)
{
}
protected void TextBox2_TextChanged(object sender, EventArgs e)
{
}
protected void Button1_Click(object sender, EventArgs e)
{
}
}
CIS407AWk2iLab/frmPersonnelVerified.aspx
Academy of Computing and Information Technology
CIS407AWk2iLab/frmPersonnelVerified.aspx.cs
using System;
using System.Collections.Generic;
using System.Linq;
using System.Web;
using System.Web.UI;
using System.Web.UI.WebControls;
public partial class frmPersonnelVerified : System.Web.UI.Page
{
protected void Page_Load(object sender, EventArgs e)
{
txtVerifiedInfo.Text = Request["txtFirstName"] +
"\n" + Request["txtLastName"] +
"\n" + Request["txtPayRate"] +
"\n" + Request["txtStartDate"] +
"\n" + Request["txtEndDate"];
}
}
CIS407AWk2iLab/frmSalaryCalculator.aspx
Academy of Computing and Information Technology
CIS407AWk2iLab/frmSalaryCalculator.aspx.cs
using System;
using Syste ...
need help completing week 6 ilab.. i will upload what I currently ha.docxniraj57
need help completing week 6 ilab.. i will upload what I currently have if you know the material please let me know. what the person to add on to what I currently have started.
iLab 6 of 7: Login and Security Levels (30 Points)
Submit your assignment to the Dropbox located on the silver tab at the top of this page.
(See Syllabus "Due Dates for Assignments & Exams" for due dates.)
i L A B O V E R V I E W
Scenario/Summary
In this week's lab, we will create a login form, validate a user based on their login name and password, and allow them to access the system or not. We will assign a session variable to determine the level of security the user has and allow certain functions to be displayed or not displayed in the existing frmPersonnel form depending on the assigned security level. (NOTE: In some cases the instructions for this lab will be less specific than in earlier labs, because you are expected to apply what you have learned in earlier weeks. Refer to the detailed instructions in previous weeks' labs if you need to do so.)
Instructions for Week 6 iLab: Login and Security Levels
Click on the link above to view the tutorial.
Please watch this tutorial before beginning the iLab.
The tutorial has audio.
Deliverables
When you try to log in, if you use User Name = Mickey and Password = Mouse, the frmMain form should open with all links visible. If you use User Name = Minnie and Password = Mouse, the frmMain form should open with only the Salary Calculator, View Personnel, and Search options should be available. You will have a new option called Manage Users that will allow you to add new users and remove or update existing users. Once you have verified that it works, save your website, zip up all files, and submit in the Dropbox.
Note on database connections: We are using a SQLDataSource control for the Edit employees feature we added. You should be using the connection string stored in the web.config file for your database connection for this control. Rather than creating a new connection each time, just use this connection. If you change the folder where your website is (e.g., you copy each week's work to a new location), you will need to update the web.config. The advantage of using the database connection in the web.config is that you only have to set the configuration in one location.
Before starting this week's lab, make sure everything is working and that all database connections are properly configured.
i L A B S T E P S
STEP 1: Login Form (10 points)
Open Microsoft Visual Studio.NET 2008.
Click the ASP.NET website named PayrollSystem to open it.
Create a new web form named frmLogin.
Drop a login control onto the form.
Set the properties of the login control as follows:
PROPERTY
VALUE
DestinationPageUrl
frmMain.aspx
TitleText
Please enter your UserName and Password in order to log into the system
Add the
Cool
Biz
Productions
, Inc.
logo to the frmLogin form. Do not hylerlink the logo.
Highlight everything in the form, then c.
Lab StepsSTEP 1 Login Form1. In order to do this lab, we need.docxsmile790243
Lab Steps
STEP 1: Login Form
1. In order to do this lab, we need to assign a primary key to the tblUserLogin table. This will allow us to modify the user login table from our Manage Users form that we will create later. Go to Windows Explorer and open the PayrollSystem_DB.accdb. Set the UserID as the Primary key and save the table. Close the database.
2. Open Microsoft Visual Studio.NET.
3. Click the ASP.NET website named PayrollSystem to open it.
4. Create a new Web form named frmLogin.
5. Add the ACIT logo to the top of the frmLogin page. Do not hyperlink the logo.
6. Under the login controls, you will see Login. Drop the Login control onto the form. Set the properties of the login control as follows:
Property
Value
DestinationPageUrl
frmMain.aspx
TitleText
Please enter your UserName and Password in order to log in to the system.
7. Highlight everything in the form, then click Format, Justify, Center. Save your work.
8. Go to the
Solution
Explorer, right-click on frmLogin, and left-click on Set As Start Page.
Then run the website to check if the Web form appears correctly.
If you receive an error, add the following code to the web.config file right above the </configuration> line:
<appSettings>
<add key="ValidationSettings:UnobtrusiveValidationMode" value="None" />
</appSettings>
STEP 2: Login Check
9. Create a new DataSet called dsUser. Use the table tblUserLogin as the database table for this dataset. Do this in the same way that you added datasets in the previous labs.
10. Open the clsDataLayer and add the following function:
// This function verifies a user in the tblUser table
public static dsUser VerifyUser(string Database, string UserName, string UserPassword)
{
// Add your comments here
dsUser DS;
OleDbConnection sqlConn;
OleDbDataAdapter sqlDA;
// Add your comments here
sqlConn = new OleDbConnection("PROVIDER=Microsoft.ACE.OLEDB.12.0;" +
"Data Source=" + Database);
// Add your comments here
sqlDA = new OleDbDataAdapter("Select SecurityLevel from tblUserLogin " +
"where UserName like '" + UserName + "' " +
"and UserPassword like '" + UserPassword + "'", sqlConn);
// Add your comments here
DS = new dsUser();
// Add your comments here
sqlDA.Fill(DS.tblUserLogin);
// Add your comments here
return DS;
}
11. Double-click on the login control that you added. Add the following code to the login control Authenticate event handler:
// Add your comments here
dsUser dsUserLogin;
// Add your comments here
string SecurityLevel;
// Add your comments here
dsUserLogin = clsDataLayer.VerifyUser(Server.MapPath("PayrollSystem_DB.accdb"),
Login1.UserName, Login1.Password);
// Add your comments here
if (dsUserLogin.tblUserLogin.Count < 1)
{
e.Authenticated = false;
return;
}
// Add your comments here
SecurityLevel = dsUserLogin.tblUserLogin[0].SecurityLevel.ToString();
// Add your comments here
switch (SecurityLevel)
{
case "A":
// Add your comments here
e.Authenticated = true;
Session["SecurityLevel"] = "A";
break;
case "U":
// Add your comments ...
Cis407 a ilab 5 web application development devry university
1. CIS407A iLab 5 Web Application
Development Devry University
Click this link to get the tutorial:
http://homeworkfox.com/tutorials/general-
questions/6227/cis407a-ilab-5-web-application-development-
devry-university/
iLab 5 of 7: Transaction Processing (30 Points)
Submit your assignment to the Dropbox located on the silver tab at the top of this page.
(See "Due Dates for Assignments & Exams" in the Syllabus for due dates.)
iLABOVERVIEW
Scenario/Summary
This week, we will use the .NET OleDbTransaction functions to either commit a set of changes
to the database, if all of them were done correctly, or to roll back all of the changes if there was
an error in any one of them. We will first modify the code we created last week so that it saves
personnel data in the database in two steps; first by inserting a personnel record for a new
employee, and then by updating that record to fill in the start and end dates. This two-step
approach is not really needed in this simple case, but we will use it to simulate a more complex
database transaction that would have to be done in multiple steps, such as one involving more
than one table or even more than one database. We will then see what happens when there is an
error in the second operation (the update), allowing a record to be created containing incomplete
information--not a good result! We will fix the problem by wrapping both operations (the insert
and the update) into a single transaction that will be committed (made permanent) only if both
operations succeed or that will be rolled back (undone) if either operation fails. We will also add
client-side validation using the ASP.Net validation controls, and we will allow the user an easy
way to edit all employees.
Instructions for Week 5 iLab: "Transaction Processing"
Click on the link above to view the tutorial.
Please watch this tutorial before beginning the iLab.
The tutorial has audio.
Deliverables
2. All files are located in the subdirectory of the project. The project should function as specified:
When you press the Submit button in frmPersonnel, a record should be saved in the tblPersonnel
table containing the FirstName, LastName, PayRate, StartDate, and EndDate you entered. Test
that the transaction will rollback by entering invalid information in one or more items, such as
Hello for a StartDate. Check tht client-side validation works: The ability to edit employees in a
grid is working. Once you have verified that it works, save your website, zip up all files, and
submit them to the Dropbox.
iLABSTEPS
STEP 1: Modify the clsDataLayer to use a two-step process (10 points)
1. Open Microsoft Visual Studio.NET 2008.
2. Click the ASP.NET project called PayrollSystem to open it.
3. Open the clsDataLayer class.
4. Modify the SavePersonnel() function so that instead of just doing a single SQL INSERT
operation with all the personnel data, it does an INSERT with only the FirstName and LastName,
followed by an UPDATE to save the PayRate, StartDate, and EndDate into the new record. (This
two-step approach is not really necessary here because we are dealing with only one table,
tblPersonnel, but we are doing it to simulate a case with more complex processing requirements,
where we would need to insert or update data in more than one table or maybe even more than
one database.) Find the following existing code in the SavePersonnel() function:
// Add your comments here
+
"(FirstName, LastName, PayRate, StartDate, EndDate) values ('" +
FirstName + "', '" + LastName + "', " + PayRate + ", '" + StartDate +
"', '" + EndDate + "')";
// Add your comments here
;
;
// Add your comments here
command.ExecuteNonQuery();
3. 5.
Modify it so that it reads as follows:
// Add your comments here
+
"(FirstName, LastName) values ('" +
FirstName + "', '" + LastName + "')";
// Add your comments here
;
;
// Add your comments here
command.ExecuteNonQuery();
// Add your comments here
+
"Set , " +
", " +
""+
"Where ID=(Select Max(ID) From tblPersonnel)";
// Add your comments here
;
;
// Add your comments here
command.ExecuteNonQuery();
6. Set frmMain as the startup form and run the PayrollSystem Web application to test the
changes. When valid data values are entered for a new employee, things should work exactly as
4. they did before. To test this, enter valid data for a new employee in frmPersonnel and click
Submit. The frmPersonnelVerified form should be displayed with the entered data values and a
message that the record was saved successfully. Click the View Personnel button and check that
the new personnel record was indeed saved to the database and that all the entered data values,
including the PayRate, StartDate, and EndDate, were stored correctly. Close the browser
window.
7. Now run the PayrollSystem Web application again, but this time enter some invalid data (a
nonnumeric value) in the PayRate field to cause an error, like this:
Click on image to enlarge.
8.
Click here for text description of this image.
9. Now when you click Submit, the frmPersonnelVerified form should display a message
indicating the record was not saved:
Click on image to enlarge.
10.
Click here for text description of this image.
11. However, when you click on the View Personnel button to display the personnel records,
you should see that an incomplete personnel record was in fact created, with missing values for
the PayRate, StartDate and EndDate fields:
Click on image to enlarge.
12.
Click here for text description of this image.
13. This occurred because the Insert statement succeeded but the following Update statement
did not. We do not want to allow this to happen because we end up with incomplete or incorrect
data in the database. If the Update statement fails, we want the Insert statement to be rolled back,
or undone, so that we end up with no record at all. We will fix this by adding transaction code in
the next step.
STEP 2: Add transaction code (10 points)
7. In the clsDataLayer.cls class file, add code to the SavePersonnel() function to create a
transaction object. Begin the transaction, commit the transaction if all database operations are
successful, and roll back the transaction if any database operation fails. The following listing
5. shows the complete SavePersonnel() function; the lines you will need to add are marked with **
NEW ** in the preceding comment and are shown in bold.
// This function saves the personnel data
public static bool SavePersonnel(string Database, string FirstName, string LastName,
string PayRate, string StartDate, string EndDate)
{
bool recordSaved;
// ** NEW ** Add your comments here
OleDbTransaction ;
try
{
// Add your comments here
OleDbConnection OleDbConnection(";" +
"Data Insert into tblPersonnel " +
"(FirstName, LastName) values ('" +
FirstName + "', '" + LastName + "')";
// Add your comments here
;
;
// Add your comments here
command.ExecuteNonQuery();
// Add your comments here
+
"Set , " +
6. ", " +
""+
"Where ID=(Select Max(ID) From tblPersonnel)";
// Add your comments here
;
;
// Add your comments here
command.ExecuteNonQuery();
// ** NEW ** Add your comments here
myTransaction.Commit();
// Add your comments here
conn.Close();
;
}
catch (Exception ex)
{
// ** NEW ** Add your comments here
myTransaction.Rollback();
;
}
return recordSaved;
}
8. Run your Web application. First, enter valid data in all the fields of frmPersonnel. When you
press the Submit button in frmPersonnel, a record should be saved in the tblPersonnel table
7. containing the FirstName, LastName, PayRate, StartDate, and EndDate. With valid data entered
in all the items, the "successfully saved" message should appear indicating that the transaction
was committed.
Click on image to enlarge.
9.
Click here for text description of this image.
10. Click the View Personnel button and verify that the new record was in fact added to the
database table correctly.
Click on image to enlarge.
11.
Click here for text description of this image.
12. Now close the browser, run the Web application again, and this time test that the transaction
will roll back after entering incorrect information. On the frmPersonnel form, enter invalid data
for PayRate and click Submit. The "not saved" message should appear, which indicates that the
transaction was rolled back.
Click on image to enlarge.
13.
Click here for text description of this image.
14. Click the View Personnel button and verify that this time, as desired, an incomplete record
was not added to the database table.
Click on image to enlarge.
15.
Click here for text description of this image.
16. You have seen how we used the try/catch block to catch an unexpected error. You may have
noticed that if you enter bad data for the dates, an exception is thrown. Go back to the validation
code you added in the frmPersonnel code and add a try/catch with logic to prevent an invalid
date from causing a server error.
17. In the Week 3 and Week 5 labs, you learned how to validate code once the page was posted
back to the server. There is some validation that must be done on the server because it requires
8. server resources such as the database. Some validation can also be done on the client. If you can
do validation on the client it saves a round trip to the server, which will improve performance. In
this approach, we will check values before the page is submitted to the server for processing.
Normally, there is a combination of server and client validation used in a web application.
ASP.Net includes validation controls which will use JavaScript on the client to perform
validation. You will find these controls in the Validation group in the toolbox.
18. Add validation controls to the frmPersonnel form as follows: For the first and last name,
make sure each field has data in it. Use the RequiredFieldValidator for this. Add the control to
the right of the text box you are validating. The location of the validator control is where the
error message (if there is one) will appear for the control you link the validator to. You will be
adding one validator control for each text box you want to validate. Remember to set the
ControlToValidate and ErrorMessage properties on the validator control. Making this change
eliminates the need for the server-side check you were doing previously. Use a regular
expression validator to check that the start and end date are in the correct format.
Click on image to enlarge.
19.
Click here for text description of this image.
20. Remove the View Personnel and Cancel buttons from the frmPersonnel form as they will
cause a Postback and invoke the client-side editing you just added. The user is able to get to the
View Personnel from the main form and from the personnel verification screen, so there is no
need for these buttons now.
21. Because you have entered data in this lab that is invalid and those partial records are in the
database, you will need to add the ability to remove or update data. Add a new main form option
called Edit Employees. Add the link and image for this. This option will take the user to a new
form called frmEditPersonnel.
frmMain with links added
22.
Click here for text description of this image.
23. Add the new form frmEditPersonnel. On frmEditPersonnel, add the CoolBiz log at the top of
the form. Add a label that says "Edit Employees." Add a GridView control with an ID of
grdEditPersonnel.
24. You will now add a SQLDataSource to the page. You will be using a databound grid for this
form unlike the previous grids, in which you added as unbound (in the designer).
9. 25. Add a new SQLDataSource control to the frmEditPersonnel in the design view. This is not a
visible control; that is, it will only appear in design view but the user will never see it. Note: If
you change the folder name or location of your database, you will need to reconfigure the data
source (right-click on the data source control and select the "Configure Data Source" option.
26. There is a small > indicator in the design view of the SQL Data Source control you added if
the configuration menu is collapsed (press it to open the menu), or there is a < with the menu
displayed. From the data source menu, select "Configure Data Source."
27. Press the New Connection button and select the database.
28. Press the Next button.
29. When asked if you want to save the connection in the application configuration file, check
the Yes check box and press Next.
30. Select the tblPersonnel table.
31. Select all columns (you can use the * for this).
32. Press the Advanced button and check the Generate Insert, Update, and Delete option and
press the OK button.
33. Press the Next button.
34. Press the Test Query button and make sure everything works as it is supposed to. If it does
not repeat the above steps to make sure you did everything properly. Press the Finish button.
7. Click on the grid you added in the design view and expand the properties menu (the little > in
the upper right of the control). Choose the data source you just added. On the GridView tasks
menu, select Edit columns. Add an Edit, Update, and Cancel Command field. Add a Delete
Command field. Press OK. You can now test the grid, which is a fully functioning Update and
Delete grid. Try it out!
Click on image to enlarge.
8.
Click here for text description of this image.
9. Hints:
Make sure you reestablish your database connection if you copied the files from a previous lab.
In order to keep the validation controls from causing wrapping, you may want to increase the
Panel width.
10. A regular expression for mm/dd/yyyy is this:
^(0[1-9]|1[012])[- /.](0[1-9]|[12][0-9]|3[01])[- /.](19|20)dd$
Experiment with the editable grid and command buttons for different display styles.
STEP 3: Test and submit (10 points)
29. Once you have verified that everything works as it is supposed to, save your project, zip up
all files, and submit in the Dropbox.