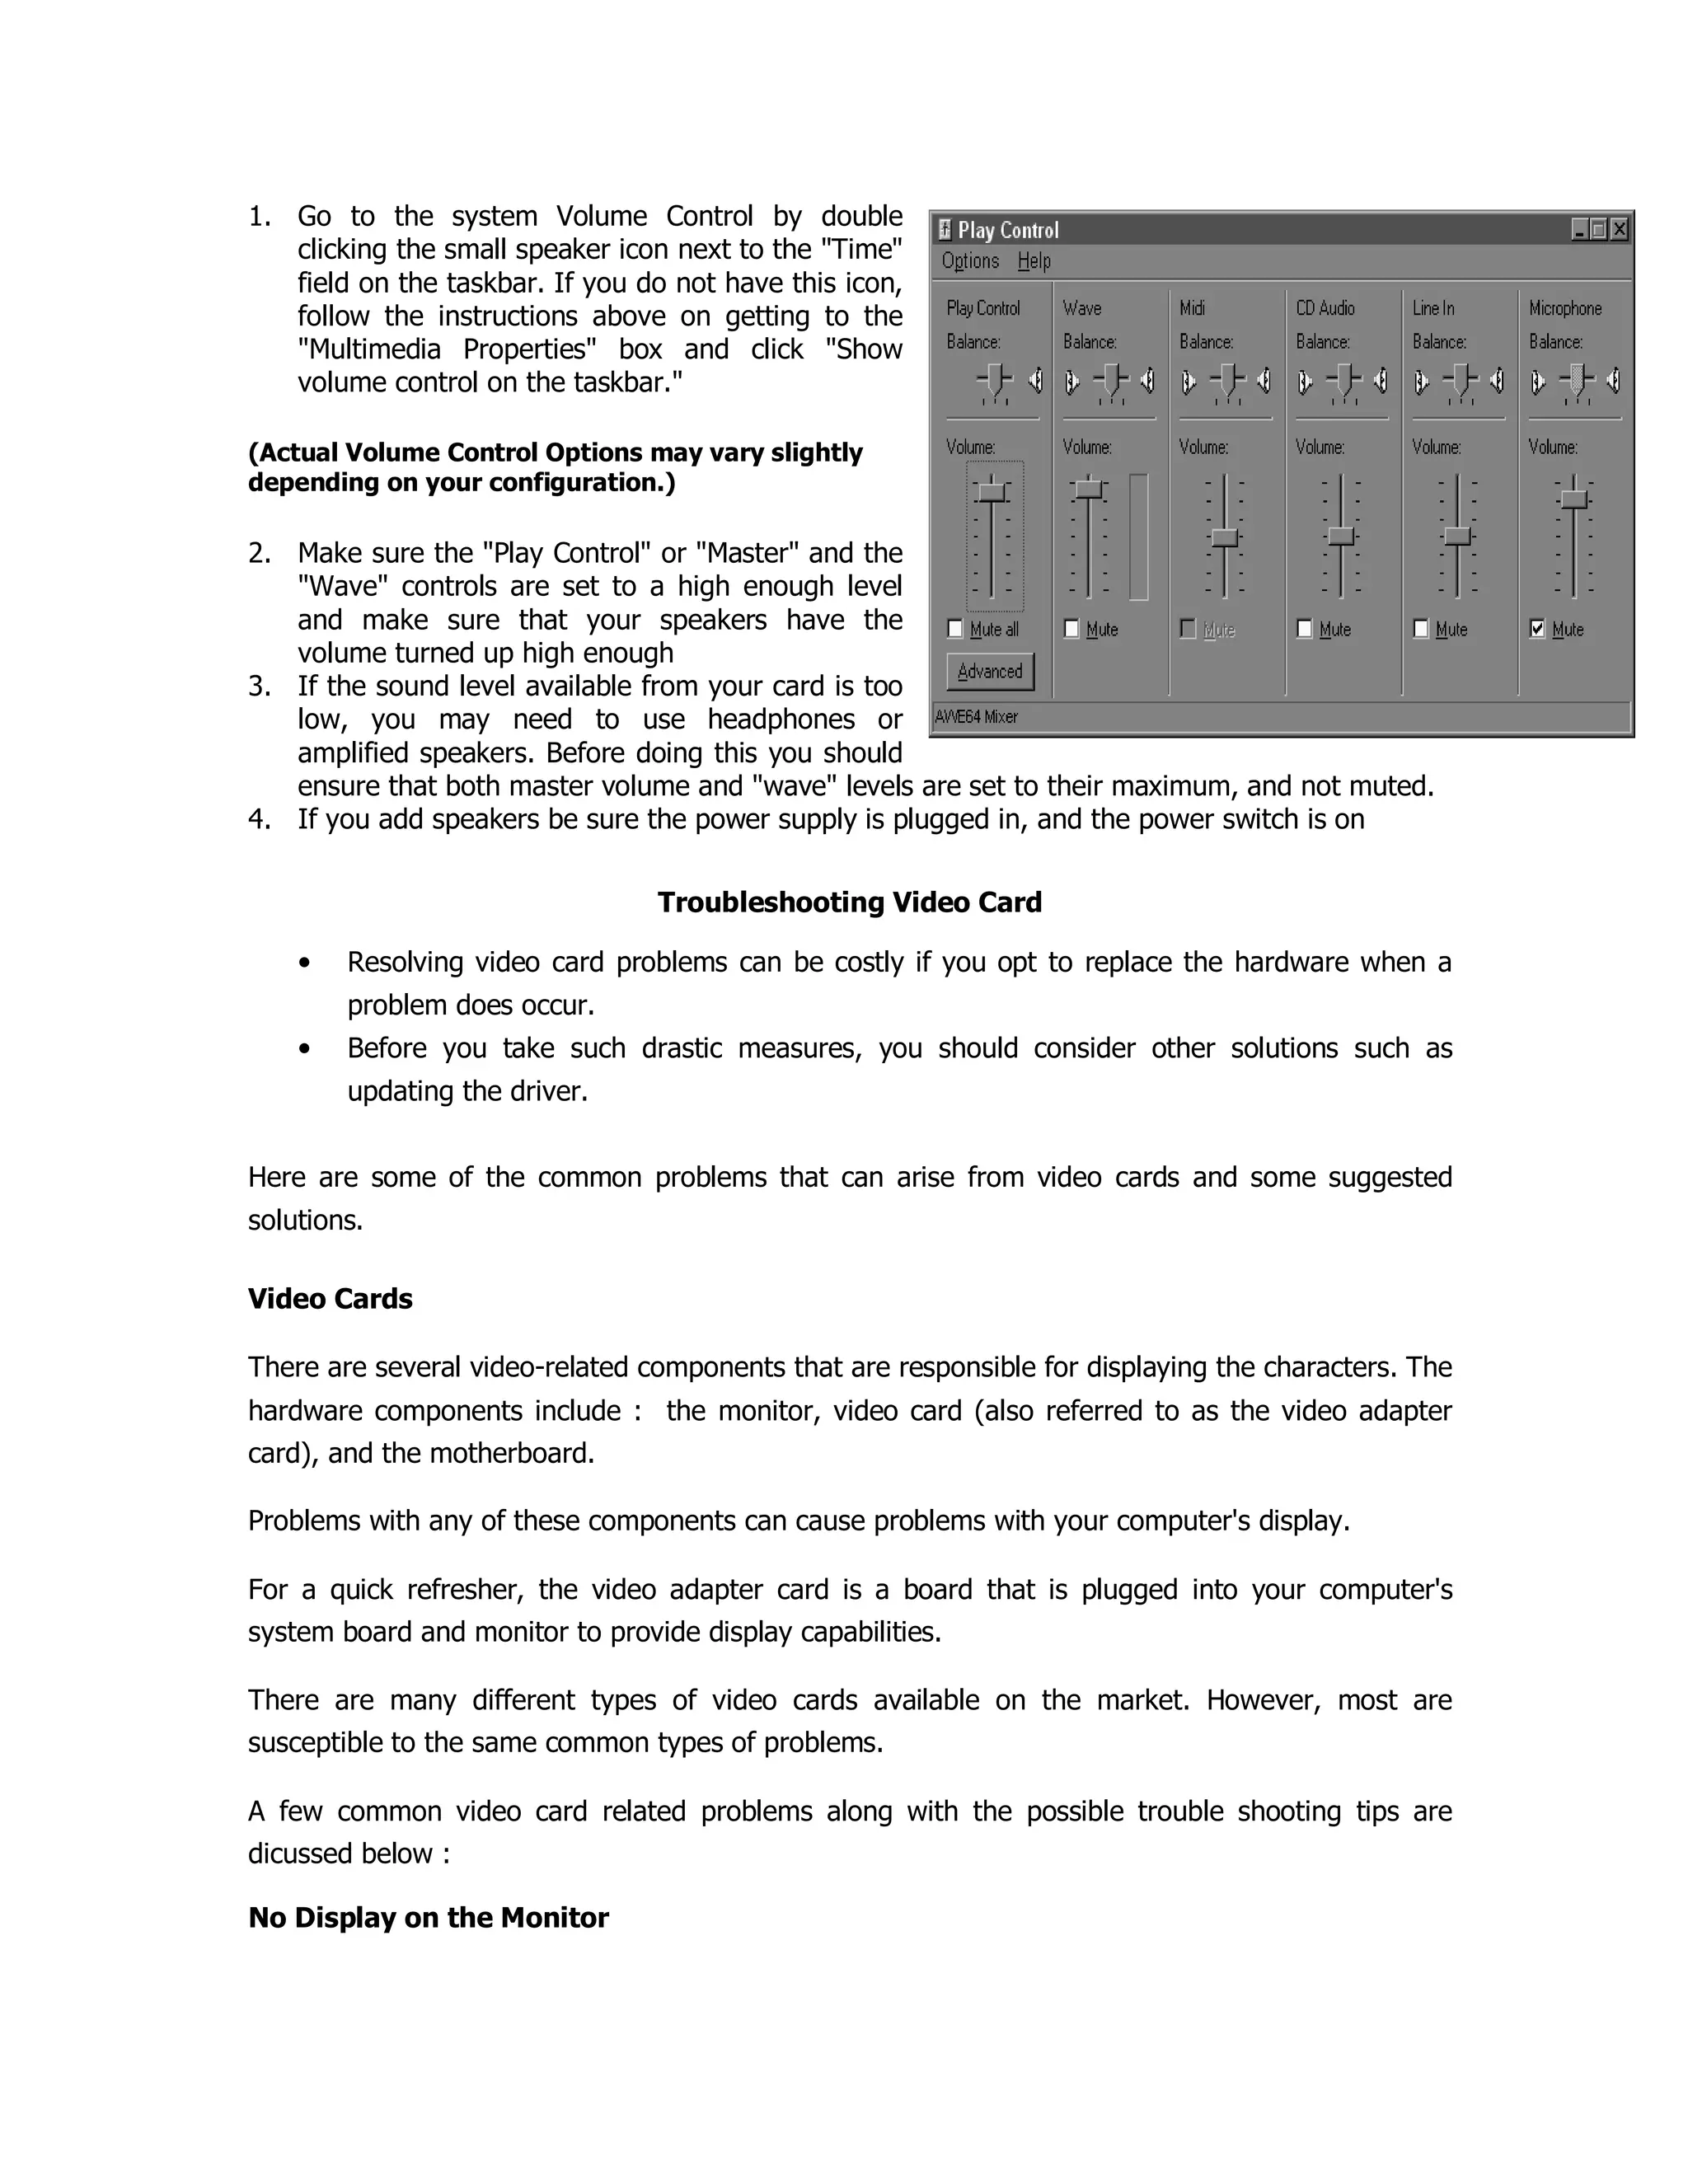
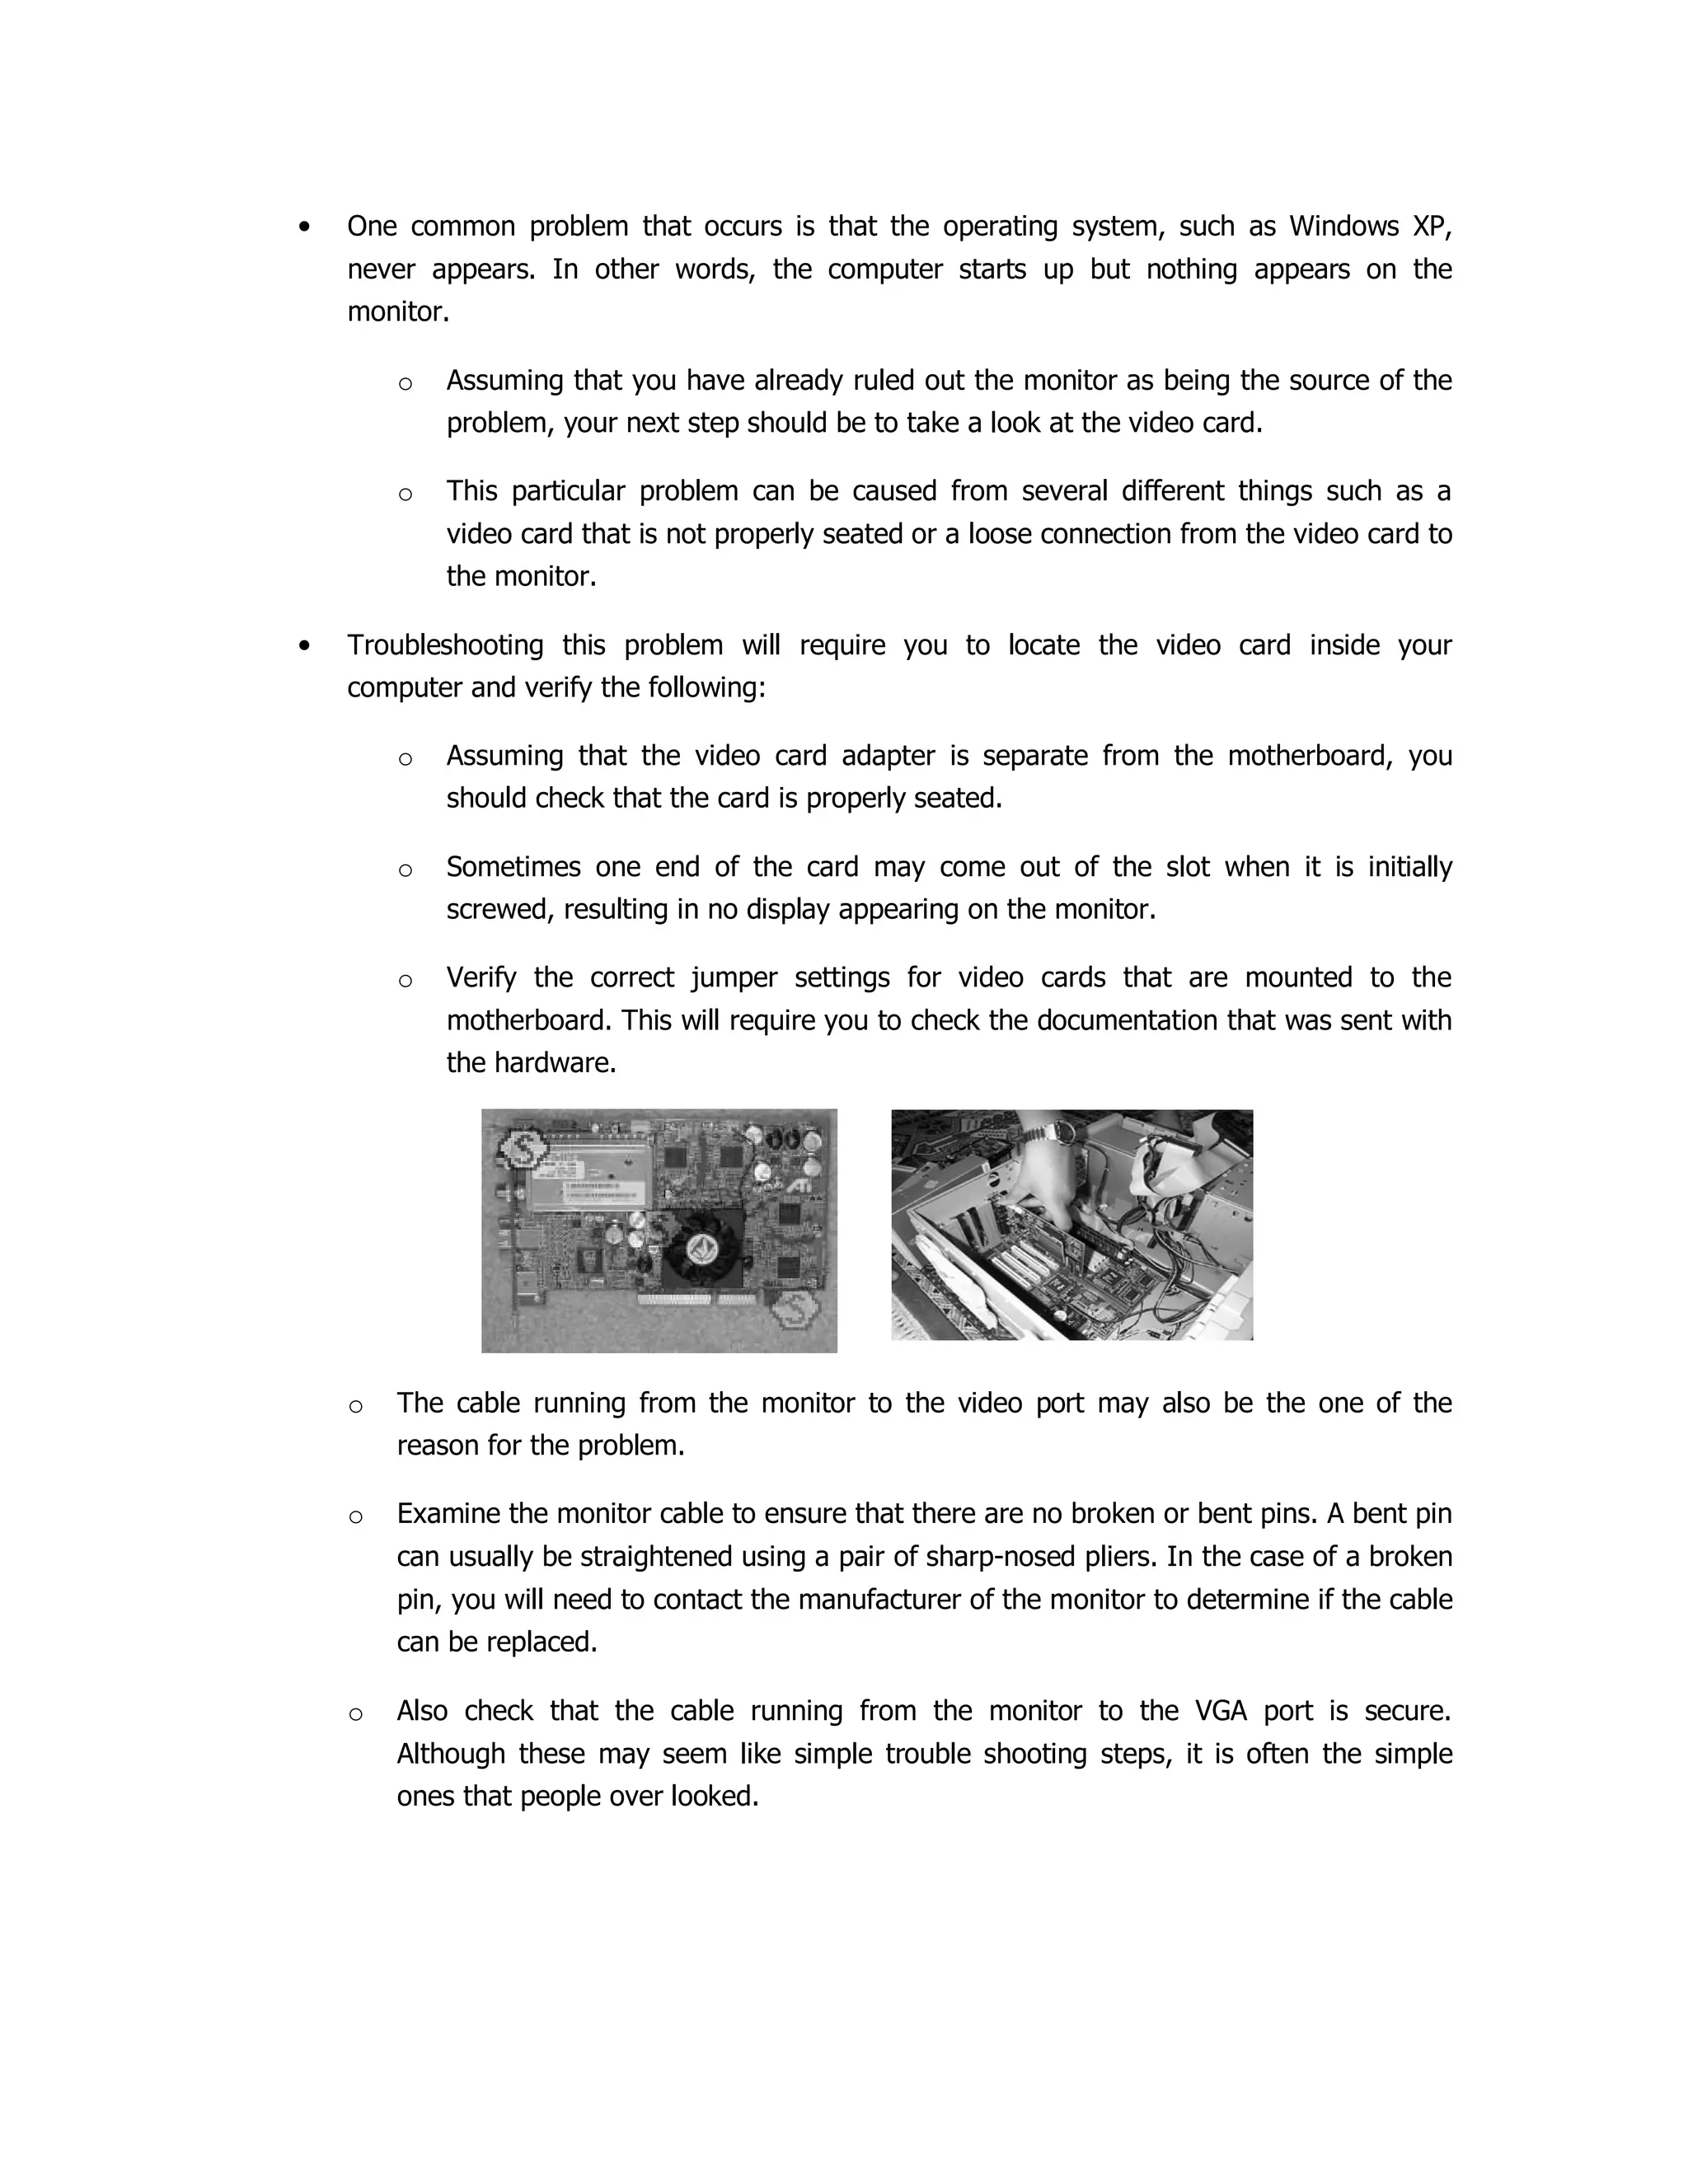
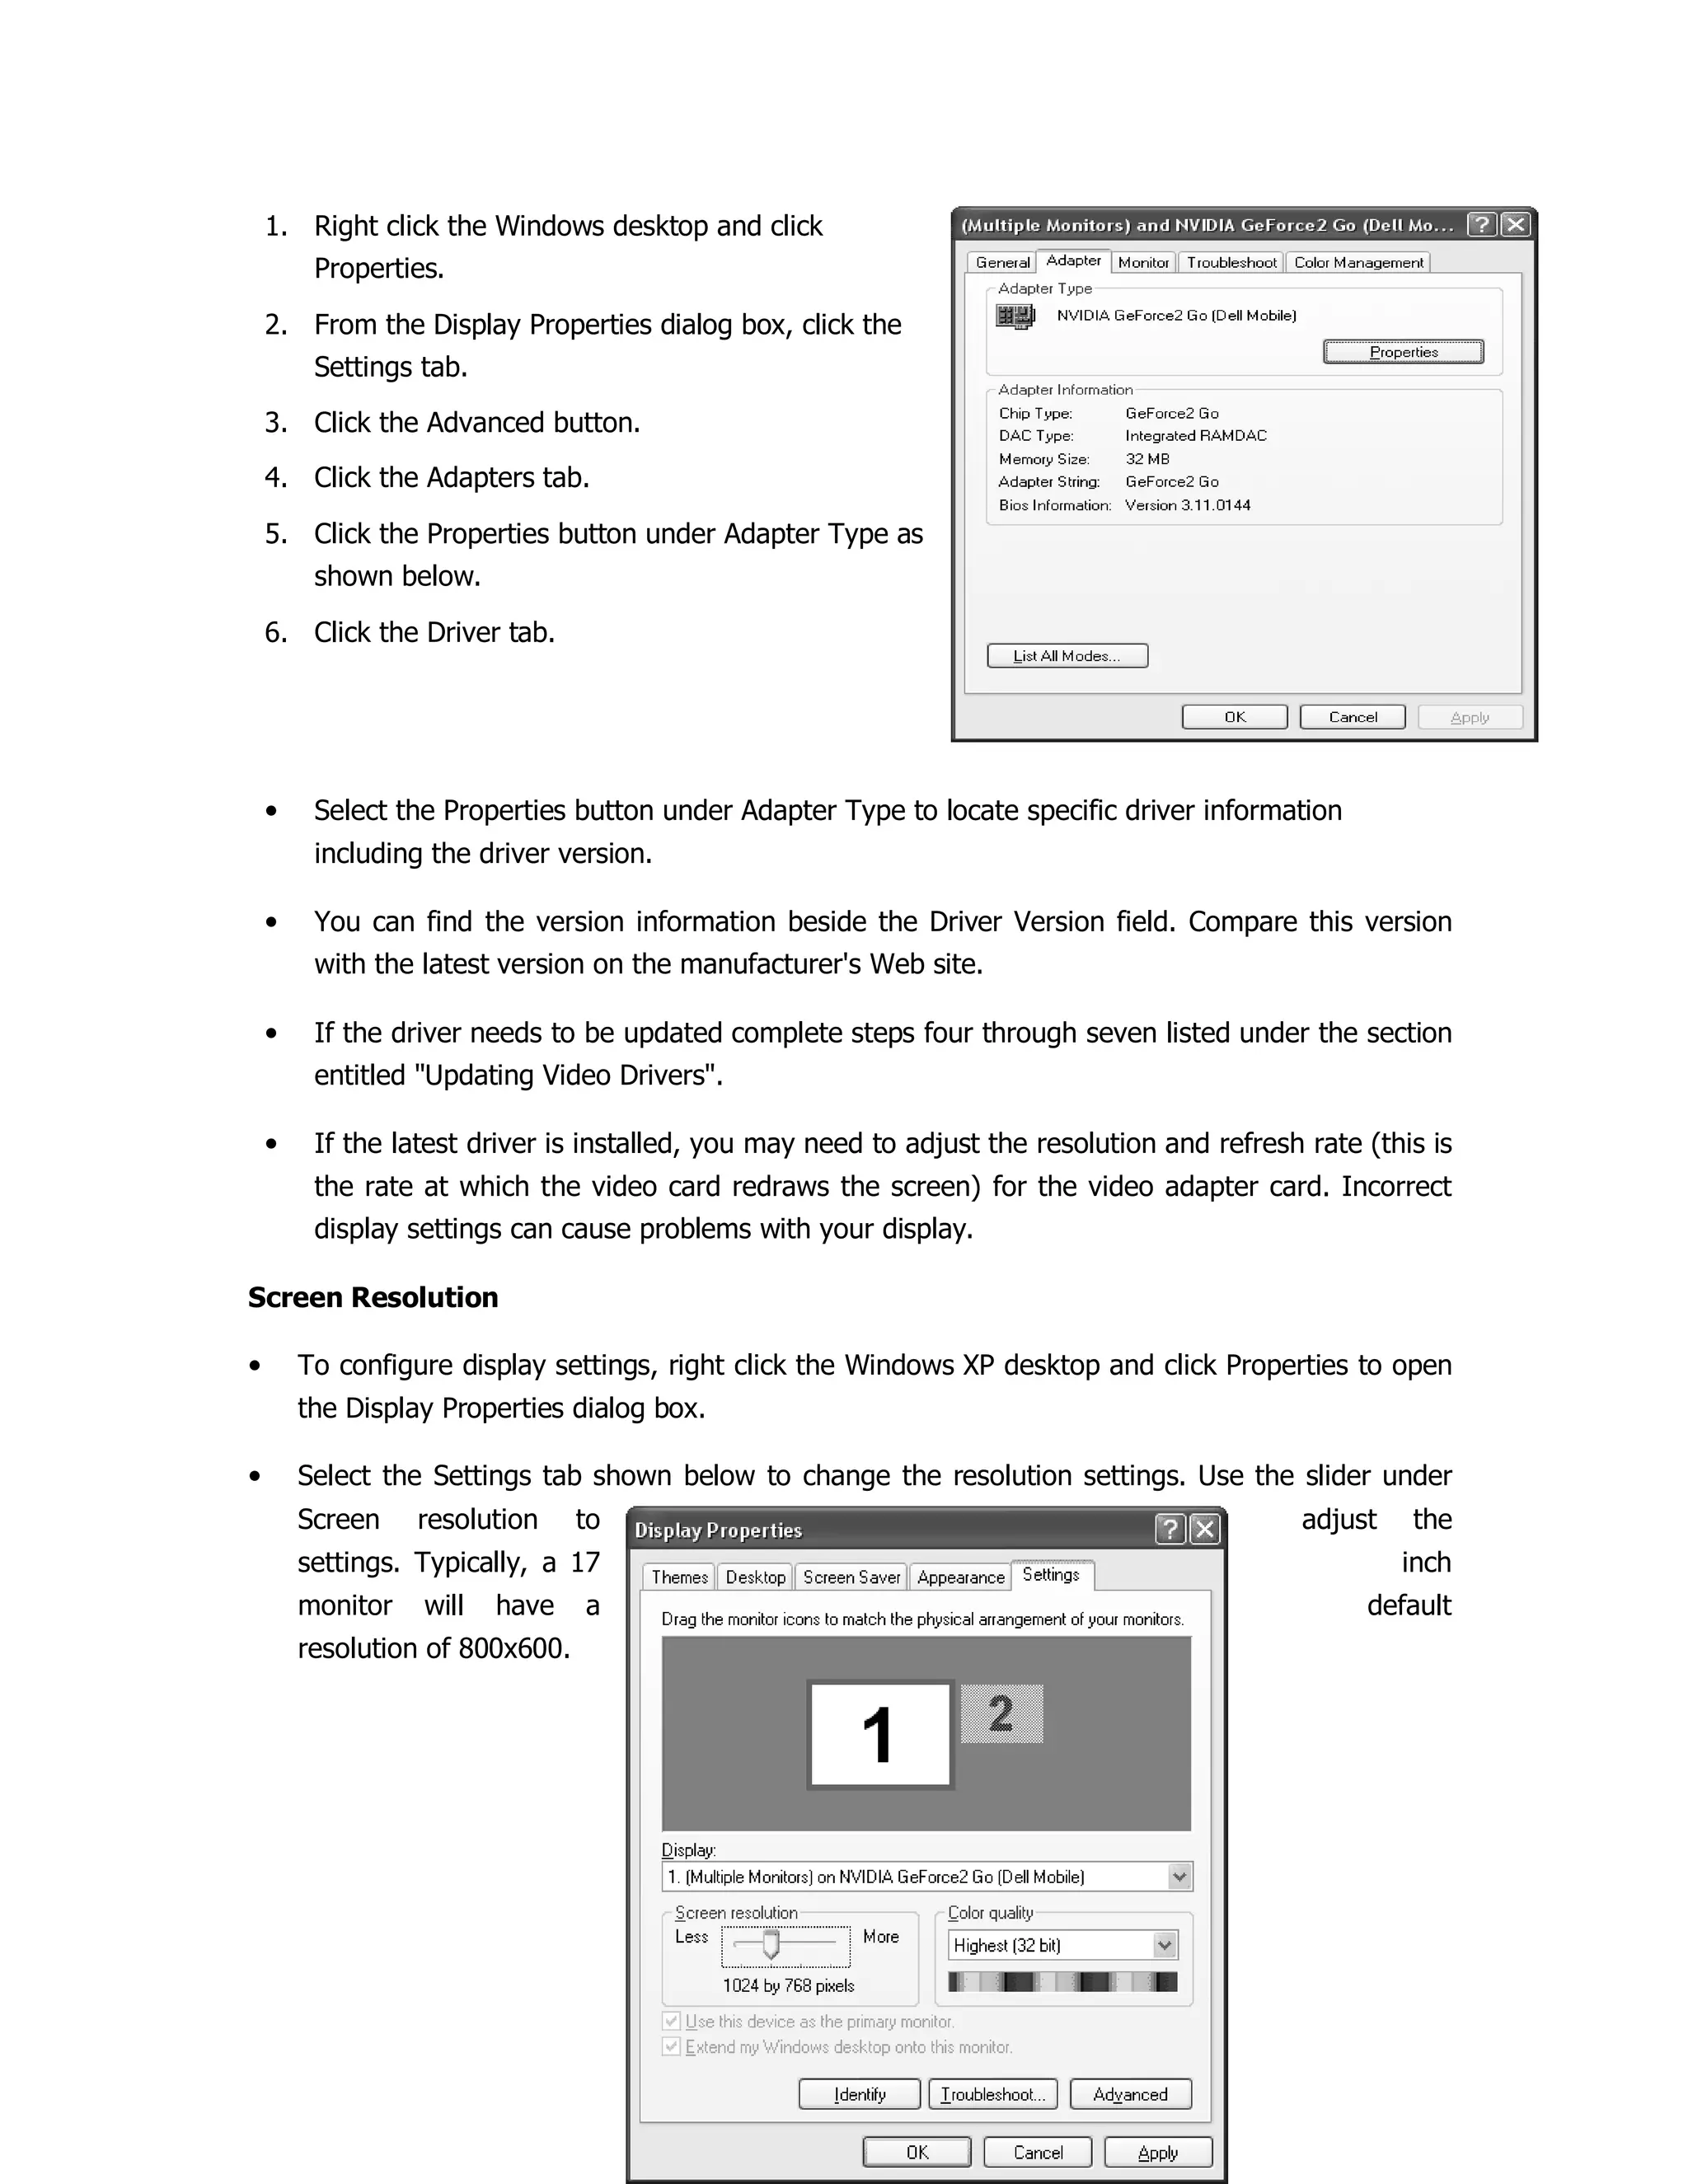
This document provides guidance on basic hardware troubleshooting and maintenance. It discusses important internal computer components like the CPU, motherboard, memory, storage devices, and input/output cards. It emphasizes safety precautions like using an antistatic wrist strap and powering off the computer before handling internal parts. The document also provides tips for cleaning external surfaces and internal components to prevent the buildup of dust. Specific instructions are given for cleaning items like the monitor screen, keyboard, mouse, and disk drives.
1. Preventive maintenance involves planned inspection, detection, and correction of equipment issues before they cause failures or major defects in order to extend equipment life.
2. It aims to keep equipment working properly, get equipment working again after minor issues, and replace worn components before failure to improve reliability.
3. Benefits include protecting assets, improving reliability, decreasing replacement costs, reducing downtime, and minimizing injuries. Regular maintenance is recommended every 3-6 months depending on equipment use and environment.
This document provides a checklist of preventative maintenance tasks to perform on a PC on a daily, weekly, monthly, yearly, and as-needed basis. It recommends daily tasks like running anti-malware scans and emptying the recycle bin. Weekly tasks include using disk cleanup utilities and updating anti-virus software. Monthly tasks involve disk defragmenting, backing up and restoring files, and cleaning hardware. Yearly tasks cover cleaning interior components and checking power supplies. It also lists tasks to perform after any hardware or software changes are made.
This chapter discusses maintaining a PC, including performing backups, protecting against viruses/malware, and troubleshooting. Topics covered include organizing the hard drive, creating backup plans and disks, using antivirus software, building a toolkit, and fundamental troubleshooting approaches like making backups before making changes and systematically isolating problems.
This document provides tips for maintaining various computer components. It discusses cleaning keyboards, mice, and printers to improve performance and print quality. It also covers adding RAM to increase computer speed and usability, as well as using ergonomic keyboards and wireless accessories. The document concludes with information on disk defragmentation, temporary files, and maintenance tasks that should be handled by professionals.
The document provides tips for basic computer maintenance including cleaning monitors, wires, CPUs, and other components. It recommends using surge protectors, opening and closing disk drives carefully, and cleaning keyboards, mice, and other inputs gently. The document also gives advice on installing software, protecting against viruses by avoiding suspicious emails and disks, using antivirus software and firewalls, and backing up data. General troubleshooting tips include checking power sources and restarting if the computer freezes or crashes.
This document provides tips for basic computer maintenance including cleaning and cooling your computer, deleting temporary files, running scandisk, backing up your data, defragmenting your hard drive, running error checking, uninstalling software, emptying your recycle bin and deleted emails, and reinstalling your operating system. It also offers tips for dealing with viruses, updating Windows, and resolving common computer issues.
This document provides guidance on performing preventative maintenance on a computer to improve performance and extend its lifespan. It recommends cleaning the external components like the monitor, keyboard, and mouse regularly, as dust can accumulate quickly. Internally, it suggests using the Disk Cleanup and Disk Defragmenter tools periodically to free up hard drive space and optimize file placement. It also stresses the importance of installing operating system and software updates, scanning for viruses regularly, and backing up files in case of hardware failure or malware infection. Regular maintenance through cleaning, optimization, and backup is presented as an effective way to care for a computer over time.
This document outlines standards and objectives for a computer maintenance and repair certification exam. It covers topics like hardware components, operating systems, installation, configuration, and troubleshooting. The exam focuses on entry-level IT skills like identifying parts, installing upgrades, using diagnostic tools, and solving common issues. It aims to teach competency in maintaining, optimizing, and repairing personal computers and operating systems.
Section 1 And 2 Classification Slideshowguest7a613a
This document classifies different components and types of computers. It separates devices into categories of memory storage, input, output, and processing. It then further divides computers based on their primary functions such as personal computers, workstations, servers, clients, and more specialized devices. The document also separates software into applications and system types. It concludes with a statement expressing confusion over the amount of information.
Computer repair and maintenance involves hardware and software repair. Common hardware issues include RAM failure, power problems, hard disk failure, processor failure, motherboard failure, and VGA failure. Cloning a system involves purchasing computer parts like a casing, motherboard, power supply, hard drive, and assembling them to make a complete computer. Formatting a disk and reinstalling Windows 7 involves entering the BIOS, booting from the Windows 7 DVD, selecting installation options, creating a user account, and setting up the network connection. BIOS is software that controls basic computer hardware functions and is stored on the motherboard chip.
This document provides tips for maintaining a healthy PC, including updating software like browsers regularly, performing disk maintenance through defragmentation and cleanup, backing up important data, using antivirus and firewall software to protect against malware and hackers, and basic cleaning of hardware components. Key areas covered are software, hard drive, networking, and hardware maintenance.
While a lot is been speculated in the domain of IoT and Artificial Intelligence but CRM will continue to evolve and play a significant and imperative role in the domain of business. The coming year promises new opportunities as well as new competitive threats so you need to be armored to face it in the best possible way. A
This document discusses the key components of a computer system including input, output, processing, storage, and networking devices. It provides details on common computer hardware such as the monitor, motherboard, CPU, RAM, expansion cards, power supply, disk drives, and input devices. It also covers software types including operating systems and applications. Memory and storage measurements and technologies are defined. The roles of components like graphics cards, motherboards, CPUs and memory are explained. Output devices such as printers and speakers are also outlined. Networking methods for connecting computers are described.
The document discusses various methods for optimizing computer performance, including checking and fixing bad sectors on the hard drive, deleting unnecessary temporary files, closing unnecessary startup programs, using disk cleanup and defragmenter utilities, viewing the event log, increasing RAM, and using Task Manager to end unnecessary tasks and processes.
The document discusses troubleshooting techniques for computer systems. It covers:
- The process of troubleshooting involves observing symptoms, analyzing them, diagnosing faults, and rectifying issues.
- Symptoms can include program errors, hardware failures, and stability problems. Faults can be permanent or intermittent.
- Troubleshooting requires understanding the computer's architecture, organization, engineering layout, and potential environmental factors.
- A variety of tools are used including logic probes, pulsers, oscilloscopes, and diagnostic programs. The goal is to methodically determine if the issue is hardware or software related.
- Systematic troubleshooting is more effective than ad hoc methods and requires carefully observing symptoms, analyzing relationships between symptoms, and
This document provides information on common computer problems and tips for troubleshooting them. It begins by listing the top 10 problems, such as a dead system, blank screen, beeping during boot up, and error messages. It then provides tips for issues like hardware problems caused by static electricity, dust, and lack of software/system updates. Fundamental rules of problem solving emphasize starting simply and systematically. The document also defines computer threats like viruses, Trojan horses, and worms, and protective software like firewalls and discusses strategies for buying new hardware and software.
Exploring Computer Fundamentals and Microsoft WindowsMariel Obnasca
This document provides an overview of computer fundamentals and components. It defines a computer and describes how it works by accepting data as input, processing it, and producing output. It then explains the basic components of a computer system including hardware, software, and people. Finally, it discusses the Microsoft Windows operating system and how it serves as an interface between users and the computer system.
Computer is an electronic device that processes data. It has two main parts: hardware and software. Hardware refers to the physical components like the CPU, monitor, keyboard, and printer. Software refers to programs like Windows and Microsoft Office that cannot be touched. Software is divided into system software, which controls the computer, and application software, which users interact with directly.
The document provides an introduction to computers including definitions of a computer and the main reasons people use computers. It then describes the basic parts of a desktop computer system including the system unit, storage devices like the hard disk drive and CD/DVD drives, other input/output devices like the mouse, keyboard, monitor, and printer. It explains the differences between laptop and desktop computers and provides details on taking proper care of computer equipment.
The document describes the major hardware and software components that make up a computer system. It explains that hardware refers to the physical parts like the processor, memory, input/output devices, and storage devices. The CPU or processor is the central component that interprets and executes instructions. Other hardware includes the computer case, monitor, video card, keyboard, mouse, drives, hard disk, RAM, printer, and networking components. The document also introduces software programs like the operating system which provides instructions to the CPU and allows users to interact with the computer and its components.
This document defines and describes the major internal and external hardware components of a computer system. It discusses the internal components including the motherboard, processor, RAM, hard disk drive, CD-ROM drive, power supply, graphics card, solid state drive, and fan. It also discusses the external components, which include the monitor, keyboard, mouse, computer casing, and printer. For each component, it provides a brief explanation of its function within the computer system.
Chapter seven trouble and repair computer manualMik Endale
This document provides guidance on preventative maintenance and troubleshooting for computer systems. It outlines scheduled maintenance tasks that should be performed weekly, monthly, and annually such as virus scanning, disk cleanup, backups, and component checks. Common computer problems are described such as a non-booting system, blue screen errors, missing files, and device issues. Suggested troubleshooting steps are provided for each problem type such as checking connections, updating drivers, reinstalling software, and restoring the system. Beep code meanings are listed for IBM-based motherboards.
This document provides an overview of the basic parts and functions of a computer. It explains that a computer consists of an input unit (keyboard, mouse), processing unit (CPU), memory (RAM, ROM), storage devices (hard drive, flash drive), and output units (monitor, printer). It describes the role of each component and how information is entered, processed, stored and displayed on a computer. Key components like the motherboard, power supply and networking cards are also outlined. The document concludes by explaining binary code and how bytes, kilobytes and gigabytes are used to measure digital information storage.
A computer has four main functions: input, processing, output, and storage. It has five key components that enable these functions: the central processing unit (CPU), memory, input units, output units, and storage. The CPU contains the control unit which directs the flow of data and signals, and the arithmetic logic unit which performs basic math and logic operations.
This document provides an overview of computer basics, including definitions, components, and classifications. It defines a computer as an electronic device that can interpret and execute programs for input, output, computation, and other operations. The document then discusses the basic operations of computers including input, output, storage, and processing. It also covers computer system capabilities, how computers are used, and classifications of computers such as microcomputers, minicomputers, mainframes, and supercomputers. The document concludes with sections on computer hardware including input devices like keyboards and mice, and output devices like monitors and printers. It also discusses computer software types like application and system software.
The CD-ROM included with the book contains several resources to help study for CompTIA A+ certification exams, including 8 practice exams, an eBook copy of the guide, exam objectives, freeware programs discussed in the book, and a video sample from LearnKey. It requires Windows 98 or higher and 50MB of space. To access the materials, the Total Tester software must be installed from the CD-ROM and provides simulations of the A+ exams. Additional support resources are available on websites or by contacting the listed support emails.
This document provides an overview of information policy and related concepts. It discusses government information, freedom of information, public information, information privacy, and information security. It defines key terms like information policy, public policy, and policy making. The document also examines the content of policies and provides examples of types of policies for libraries and information centers, including collection development policies. Finally, it outlines the steps in formulating a policy.
This document discusses patents and intellectual property. It covers basic patent law, the patent system, types of patents including utility patents, design patents and plant patents. It discusses requirements for patents including that inventions must be novel, useful and non-obvious. It provides examples of patented inventions and discusses patent law in the United States. It also discusses patents for software and intellectual property rights as they relate to software.
The document provides an overview of intellectual property law and policy concepts, including the different types of law (statutory, case, administrative), intellectual property, and the role of the World Intellectual Property Organization (WIPO). It defines intellectual property, outlines the categories of industrial property and copyright, and explains that WIPO helps establish international standards to protect intellectual property rights and resolve disputes involving intellectual property.
This document proposes a new 3D password authentication scheme that combines multiple existing authentication methods into a 3D virtual environment to provide stronger security. It describes how a 3D password would be composed of a sequence of actions and interactions with various objects in the virtual world. This increases the complexity of guessing passwords compared to traditional text-based passwords. The document also analyzes the potential password key space, security advantages, and applications of the 3D password scheme for critical systems that require strong authentication.
The document provides instructions for a hacking game in 13 steps. It begins by introducing the game and necessary software called Artmoney. It then lists the steps, which include playing and pausing the game, opening Artmoney, and performing unspecified actions within the game and Artmoney software. The full instructions are copyrighted and not described in detail.
This document discusses national and international information policy. It covers several key areas:
1) The importance of developing a national information policy to harness information and technology for economic growth and quality of life. Several Asian and Pacific countries have already done this.
2) The main requirements of a national information policy including coordination, avoiding duplication, and ensuring market forces don't limit access.
3) The key areas an information policy should address including connectivity, content, and competencies. It discusses strategies for each area.
This document discusses basic trademark law and concepts. It covers definitions of trademarks, purposes of trademarks such as distinguishing goods and services and indicating quality and origin. It discusses trademark acts and how trademarks are protected by law. It also discusses allowed uses of others' trademarks, such as using trademarks as fans or critics with certain limitations to avoid infringement. The document provides detailed information on trademark law principles in 3 sentences or less.
The document discusses information policy and data rights in Ethiopia. It outlines Ethiopia's national information policy, which was formulated in 1990 to address issues of inaccessibility and poor handling of information. It also discusses Ethiopia's Copyright Act, policy paper, initiatives including the Ethiopian Telecommunications Agency and Cyber Ethiopia, and current lack of legislation around data rights, cyber security, and information security.
Ethernet is a widely used shared access network technology where multiple nodes share the same physical link. It uses CSMA/CD (Carrier Sense Multiple Access with Collision Detection) as its media access control protocol. When a node has a packet to transmit, it first listens to ensure the link is idle before transmitting. If a collision is detected during transmission, the node stops transmitting and performs exponential backoff before retransmitting. This helps ensure fair access among nodes. Fast Ethernet and Gigabit Ethernet were later developed to provide higher bandwidths up to 1Gbps while maintaining compatibility with Ethernet's CSMA/CD protocol.
This document outlines the objectives covered on the CompTIA Network+ certification exam. It details the purpose of the exam as validating the knowledge and skills required to implement network architectures with basic security. The exam focuses on configuring, maintaining, and troubleshooting network devices using common tools. It also covers networking concepts like IP addressing, routing, switching, common protocols, and troubleshooting methodologies.
Regular cleaning and maintenance is important to prevent overheating and ensure proper functioning of a PC. Key steps include cleaning dust from vents, fans and components with compressed air; wiping down the case, keyboard and monitor; checking power protection devices; and running diagnostic and optimization utilities. Annual cleaning of the interior and exterior is typically sufficient, but high-dust environments may require more frequent cleaning. Proper grounding and avoiding touching components is important when opening the case.
The document provides steps for building a personal computer (PC). It includes:
1. Purchasing components like the case, motherboard, CPU, RAM, power supply, hard drive, optical drive, and other parts.
2. Preparing the case and motherboard by cleaning, configuring settings, and installing the motherboard into the case.
3. Installing the CPU, RAM, hard drive, optical drive and connecting power cables.
4. Connecting the video card and ensuring proper cooling for components.
Samsung Series 7 Spin Notebook 13.3 Manual / User Guidemanualsheet
The user manual provides instructions for basic operations of the Samsung laptop such as turning the computer on and off, unlocking the screen, using Windows, and adjusting settings. It describes the computer components and ports. It also includes troubleshooting information and specifications.
This document provides an overview of a session on becoming a power user. The session covers topics like maintaining and optimizing computers, upgrading hardware, troubleshooting problems, backup and security, and tips for Windows, Office, and productivity tools. The document includes detailed sections on maintaining computers through updates, cleaning temporary files, defragmenting, and security scans. It also discusses optimizing performance by uninstalling unused software, indexing, and background tasks. Troubleshooting is demonstrated through various scenarios like boot issues, printing problems, and internet connectivity. Backup is emphasized as critical due to high hard drive failure rates.
The document provides solutions to 20 common computer problems. For each problem, it lists the steps to troubleshoot and resolve the issue. The problems covered include slow computer speed, system shutting down after short time, printer issues, audio and video playback errors, unresponsive keyboard and mouse, and more. Troubleshooting steps involve checking connections, updating drivers and software, cleaning hardware, and restarting the computer and individual programs.
The Samsung Notebook M 11.6" (NP110S1K-K01US) User Manual PDF / User Guidemanualsheet
1) The document provides instructions and information about operating a Samsung laptop, including turning the computer on and off, unlocking the screen, using Windows, keyboard, touchpad, memory cards, external displays, wireless LAN, applications, settings and upgrades, troubleshooting, specifications, safety, and regulatory information.
2) Sections include getting started, basics, applications, settings and upgrade, troubleshooting, appendix.
3) The manual describes the laptop features and functions to ensure safe and proper use, with instructional icons, copyright information, and trademarks.
1) Do not place computers in direct sunlight or near air conditioners to avoid temperature extremes as high heat can damage components.
2) Clean the interior of computer cases every 3-6 months with a soft brush or compressed air to remove dust, which can cause overheating.
3) Take care when removing or installing internal computer components and do not use excessive force to avoid damaging parts.
Samsung Notebook 3 15.6" (NP300E5K-L04US) User Manual PDF and Troubleshootin...manualsheet
1. The document provides a user manual for a Samsung laptop, covering topics like getting started, basics of using the keyboard, touchpad, external displays, and wired and wireless internet connections.
2. It includes sections on applications, settings and upgrades, troubleshooting, specifications, safety information and regulatory compliance.
3. The manual provides instructions and descriptions to help users understand and utilize the various features and components of the Samsung laptop.
Samsung Notebook 5 (NP500R5L-M03US) user manual PDF / User Guide manualsheet
This user manual provides instructions and information about the features and functions of a Samsung laptop computer. It includes sections on getting started, basics of using Windows and the keyboard/touchpad, as well as applications, settings, troubleshooting, specifications and safety information. The document provides an overview of turning the computer on/off, unlocking the screen, using Windows help and the control panel. It also describes the keyboard layout and hot keys, touchpad gestures and configuration.
Samsung Notebook 9 pro 15.6" manual PDF and Troubleshooting / User Guidemanualsheet
This document is the user manual for a Samsung laptop computer. It provides information about basic computer components like the keyboard, touchpad, ports and buttons. It includes sections on powering on/off the computer, using the touch screen, connecting external displays and accessories. The manual also covers adjusting settings like volume and brightness, performing backups and recovery, specifications and safety guidelines.
lesson 3; inspect and test the configured cs and network handoutslorbz
1. The document provides safety tips for inspecting and testing computer systems and networks, including wearing proper protective equipment, disconnecting power sources before opening covers, and reporting any accidents.
2. Common network error messages are described along with potential solutions, such as checking that the network adapter is securely connected, renewing the DHCP lease on the router, and verifying wireless network settings and signal strength.
3. Steps for upgrading computer components like memory, video cards, hard drives, and processors are outlined to improve performance, along with tips for speeding up an existing computer through tasks like defragmenting and cleaning up storage.
The document discusses various components of a computer system including hardware components like the system unit, motherboard, CPU, memory, ports, and expansion slots. It also discusses software components like operating systems and applications. Additionally, it covers computer assembly and disassembly procedures, input/output devices, storage devices, and printers. Various ports, connectors, and safety procedures related to working with computer hardware are also summarized. The document provides information about the core internal and external parts that make up a basic computer system.
This document provides guidelines for maintaining a Compaq notebook computer. It discusses maintaining software through updates, installing operating systems, and using virus protection and backup utilities. It also offers tips for maintaining hardware, such as cleaning the keyboard, display, and touchpad. The document provides instructions for preparing the notebook for shipping or travel.
The document provides information on the key components of a personal computer including the power supply, processor, memory, bus, disks, input/output channels, and display. It describes the function of each component and how they connect and interact with each other. It also discusses common hardware issues that can occur and methods for troubleshooting and repairing PCs.
This document discusses computer peripherals and safety procedures for working with computers. It begins by defining a peripheral as a device connected to but not part of the core computer system. Peripherals are categorized as input, output, or storage devices. The core computer elements are identified as the central processing unit, power supply, motherboard, and computer case. Examples of internal and external peripherals are provided. The document concludes with general safety guidelines for preventing injuries and equipment damage while working with computers.
The document provides 10 reasons why PCs crash:
1. Hardware conflicts, such as two devices using the same interrupt request channel number.
2. Bad or incompatible RAM that can cause fatal errors.
3. Improper BIOS settings, such as incorrect CAS latency settings, that can destabilize the system.
4. Hard disk drive issues like fragmentation that impact performance.
Hardware conflicts, bad RAM, and issues with BIOS settings, drivers, viruses, and faulty software are among the most common causes of the blue screen of death in Windows systems. Hardware conflicts can occur when two devices share the same interrupt request channel number. Bad RAM issues may be caused by mixing different RAM chip speeds or types. BIOS setting errors like incorrect CAS latency values can also trigger crashes. Outdated drivers, viruses, and improperly installed software are frequent sources of instability that result in the blue screen. Regular maintenance like updating drivers, scanning for viruses, and uninstalling software can help prevent crashes.
The document lists 10 common reasons why PCs crash and provides tips to address each issue. The top reasons are hardware conflicts that can be checked in Device Manager, faulty RAM that may need reseating or replacing, and outdated BIOS settings like incorrect CAS latency values that should be optimized. Viruses, fragmented hard drives, outdated software/drivers, overheating CPUs, and unstable power supplies are also potential culprits addressed in the tips.
Similar to Computer fundamentals and troubleshooting (20)
Best Ways to loose weight by Keto diet Deliciously sunil kumar
The document provides information about the ketogenic diet, including:
- The ketogenic diet involves eating high amounts of fats and proteins and low amounts of carbs to induce a state of ketosis where the body burns fats instead of carbs for energy.
- Benefits of the keto diet include increased HDL cholesterol, reduced risk of diabetes, lowered blood pressure, and reduced risk of gum disease.
- Foods to eat on the keto diet include meat, fish, eggs, dairy, oils, nuts and low-carb vegetables. Foods to avoid are grains, high-carb fruits, milk and artificial sweeteners.
- Two breakfast recipe examples are provided: egg salad and keto
This document provides tips and strategies for eating better to lose weight in a healthy and sustainable way. It recommends filling half your plate with fruits and vegetables at meals for nutrition. It also suggests including protein at meals to feel full between meals. While some carbs are okay, watch portion sizes and choose whole grains. Planning meals and snacks in advance can help make healthier choices when hungry or tired. Eating regular meals instead of skipping helps maintain weight loss.
This document provides an overview of key concepts related to saving, investment, and financial planning. It begins by defining savings and investment, and how investing differs from savings. It discusses the importance of starting to invest early and investing regularly. The document then covers various investment options and factors to consider when investing like risk tolerance and returns. It also defines important financial terms like interest rates, inflation, and time value of money. Overall, the document provides a basic introduction to concepts important for smart saving and investment.
how to invest in shares with only ₹ 5000sunil kumar
You do not need a large amount of money to start investing in the stock market. With just Rs. 5000, you can begin investing by opening a trading account with a registered broker. It is important to do research to select a reputable broker and understand how to use the online trading platform. The key is starting small and gradually gaining experience in analyzing stocks and market behavior.
This document is a hyperlink to the website Pingmyurl.com. It includes an image that links to Pingmyurl.com and displays their logo. The image acts as an advertisement and links to the website to check URLs and web pages.
The document describes the objectives covered in the CompTIA A+ 220-802 certification exam. It outlines the four domains that make up the exam: Operating Systems (33% of exam), Security (22%), Mobile Devices (9%), and Troubleshooting (36%). For each domain, it provides examples of the types of tasks, skills, and knowledge candidates should have in order to pass the exam, such as installing and configuring operating systems, using command line tools, and performing preventative maintenance on PCs.
This document provides exam objectives for the CompTIA A+ 220-801 certification exam. It outlines the exam domains and weightings, which include PC hardware at 40%, networking at 27%, laptops at 11%, printers at 11%, and operational procedures at 11%. The objectives cover topics such as hardware components, operating systems, security, troubleshooting, and networking. The document is intended to guide study for the CompTIA A+ 220-801 exam.
The document compares the properties of linear and SMPS power supplies. Linear power supplies are large, heavy, and have low operating costs but produce low noise. SMPS power supplies are smaller, lighter, and have higher operating costs but produce more noise. The document then describes the components and operation of a typical SMPS circuit, including the rectifier, filter capacitors, switching transistor, driver circuitry, transformers, rectifier diodes, and output filter components. It notes that a driver circuit is needed between the PWM IC and switching transistor due to the low output of the PWM IC.
This document discusses different types of CD disks including audio CDs, CD-ROMs, CD-Rs, and CD-RWs. It describes their uses and capabilities. Audio CDs can store up to 74 minutes of music. CD-ROMs can store data, databases, and other files but cannot be rewritten. CD-Rs can only be written once but are useful for backups. CD-RWs can be erased and rewritten, allowing data to be transferred between systems. The document also provides technical details about CD layer structures and how CD drives work.
The document discusses memory technologies and the memory hierarchy. It describes RAM technologies like SRAM and DRAM, how DRAM is organized into rows and columns, and how enhanced DRAM technologies provide faster access. It also discusses non-volatile memories like ROM, disk storage technologies including geometry, capacity calculations, and access times that are thousands of times slower than RAM.
The document discusses key aspects of the IEEE 802.11 wireless networking standard, including:
- The 802.11 standard aims to specify wireless connectivity for fixed, portable, and mobile devices within a local area.
- It includes amendments for various physical layer specifications and frequencies, as well as security improvements.
- The standard supports both infrastructure and ad-hoc network models using technologies like Wi-Fi, and defines frame formats and media access control procedures.
Computers can be classified into four main categories based on their processing power and size: micro computers which use a microprocessor as the CPU, mini computers which are larger than micros but smaller than mainframes, mainframe computers which are the largest and most powerful, and super computers which are the fastest and most advanced systems currently available for processing large amounts of data and performing complex calculations.
The OSI model defines 7 layers of standards for networking and operating systems involved in networking functions. The 7 layers are: application, presentation, session, transport, network, data link, and physical. Each layer has a specific role, with the highest layers dealing with application and user issues and lower layers dealing with physical network connections and transmission of raw data.
This document describes the architecture and instruction set of a custom digital signal processor (DSP). The DSP contains a signal processing controller (SPC) that fetches and executes instructions. It has two multiplier-accumulator-RAM (MAR) units - one for real parts and one for imaginary parts - to perform complex arithmetic operations on digital signals. The SPC uses registers to address locations in the MARs and store complex numbers by separating the real and imaginary parts. Assembly code examples show how instructions implement operations like complex multiplication by manipulating data in the MARs.
The document is a slide presentation that provides an introduction to the Domain Name System (DNS). It discusses key concepts such as:
- DNS provides a mapping between domain names that are easy for humans to remember (e.g. www.example.com) and IP addresses that computers use to locate services.
- The DNS database is distributed across multiple name servers around the world to provide reliability and scalability. Changes propagate according to timing parameters.
- Name servers include authoritative servers that store official data for a zone, and recursive servers that handle lookups on behalf of clients and cache results.
- The domain name space is hierarchical with delegation of subdomains, and zones define administrative boundaries for domain data.
This document discusses a Yahoo zero-day vulnerability from a code point of view. It covers bug bounty programs, remote code execution vulnerabilities like those using eval(), and provides a live example tool called WebPwn3r and demo videos. The document is authored by Ebrahim Hegazy, a cyber security analyst at Q-CERT, and is published on April 12, 2014 by the OWASP Foundation under an open license.
Cisco Packet Tracer is a network simulation software that allows users to design, configure, and test networks virtually. It provides benefits for both instructors and students by making networking concepts more visual and hands-on. Key features include simulating network devices and protocols, visualizing network traffic, authoring activities, and enabling multi-user collaboration. Packet Tracer supports Cisco Networking Academy curricula and the latest version adds enhancements like improved wireless security and VOIP support.
Seo and digital marketing expert freelancersunil kumar
Srinivas Sarakadam is a digital marketing expert with over 11 years of experience in SEO, social media marketing, PPC, and other online marketing strategies. He has worked with over 132 clients across many industries, helping them increase their online visibility, traffic, and reputation. Some of his specializations include SEO, social media marketing, PPC, content marketing, and reputation management. Testimonials from previous clients praise his technical skills and abilities to boost websites in search engine rankings and social media presence.
This document is the HTML code for a website called Goglogo that allows users to create customized Google-style search engines. The HTML contains metadata, CSS styles, and code for the website layout including a header with navigation links, logo, search box form, footer, and embedded content like ads and analytics scripts. It provides a free tool for users to design their own personalized search engine interface for fun.
The document outlines a 13 step process for recovering deleted data through software tuning and adjustments. Each step is briefly labeled but no other details are provided about the specific processes or techniques involved in the data recovery method. The document is copyrighted and sourced from HackingTeacher.com.
In the rapidly evolving landscape of technologies, XML continues to play a vital role in structuring, storing, and transporting data across diverse systems. The recent advancements in artificial intelligence (AI) present new methodologies for enhancing XML development workflows, introducing efficiency, automation, and intelligent capabilities. This presentation will outline the scope and perspective of utilizing AI in XML development. The potential benefits and the possible pitfalls will be highlighted, providing a balanced view of the subject.
We will explore the capabilities of AI in understanding XML markup languages and autonomously creating structured XML content. Additionally, we will examine the capacity of AI to enrich plain text with appropriate XML markup. Practical examples and methodological guidelines will be provided to elucidate how AI can be effectively prompted to interpret and generate accurate XML markup.
Further emphasis will be placed on the role of AI in developing XSLT, or schemas such as XSD and Schematron. We will address the techniques and strategies adopted to create prompts for generating code, explaining code, or refactoring the code, and the results achieved.
The discussion will extend to how AI can be used to transform XML content. In particular, the focus will be on the use of AI XPath extension functions in XSLT, Schematron, Schematron Quick Fixes, or for XML content refactoring.
The presentation aims to deliver a comprehensive overview of AI usage in XML development, providing attendees with the necessary knowledge to make informed decisions. Whether you’re at the early stages of adopting AI or considering integrating it in advanced XML development, this presentation will cover all levels of expertise.
By highlighting the potential advantages and challenges of integrating AI with XML development tools and languages, the presentation seeks to inspire thoughtful conversation around the future of XML development. We’ll not only delve into the technical aspects of AI-powered XML development but also discuss practical implications and possible future directions.
Unlock the Future of Search with MongoDB Atlas_ Vector Search Unleashed.pdfMalak Abu Hammad
Discover how MongoDB Atlas and vector search technology can revolutionize your application's search capabilities. This comprehensive presentation covers:
* What is Vector Search?
* Importance and benefits of vector search
* Practical use cases across various industries
* Step-by-step implementation guide
* Live demos with code snippets
* Enhancing LLM capabilities with vector search
* Best practices and optimization strategies
Perfect for developers, AI enthusiasts, and tech leaders. Learn how to leverage MongoDB Atlas to deliver highly relevant, context-aware search results, transforming your data retrieval process. Stay ahead in tech innovation and maximize the potential of your applications.
#MongoDB #VectorSearch #AI #SemanticSearch #TechInnovation #DataScience #LLM #MachineLearning #SearchTechnology
Programming Foundation Models with DSPy - Meetup SlidesZilliz
Prompting language models is hard, while programming language models is easy. In this talk, I will discuss the state-of-the-art framework DSPy for programming foundation models with its powerful optimizers and runtime constraint system.
For the full video of this presentation, please visit: https://www.edge-ai-vision.com/2024/06/building-and-scaling-ai-applications-with-the-nx-ai-manager-a-presentation-from-network-optix/
Robin van Emden, Senior Director of Data Science at Network Optix, presents the “Building and Scaling AI Applications with the Nx AI Manager,” tutorial at the May 2024 Embedded Vision Summit.
In this presentation, van Emden covers the basics of scaling edge AI solutions using the Nx tool kit. He emphasizes the process of developing AI models and deploying them globally. He also showcases the conversion of AI models and the creation of effective edge AI pipelines, with a focus on pre-processing, model conversion, selecting the appropriate inference engine for the target hardware and post-processing.
van Emden shows how Nx can simplify the developer’s life and facilitate a rapid transition from concept to production-ready applications.He provides valuable insights into developing scalable and efficient edge AI solutions, with a strong focus on practical implementation.
GraphSummit Singapore | The Future of Agility: Supercharging Digital Transfor...Neo4j
Leonard Jayamohan, Partner & Generative AI Lead, Deloitte
This keynote will reveal how Deloitte leverages Neo4j’s graph power for groundbreaking digital twin solutions, achieving a staggering 100x performance boost. Discover the essential role knowledge graphs play in successful generative AI implementations. Plus, get an exclusive look at an innovative Neo4j + Generative AI solution Deloitte is developing in-house.
Let's Integrate MuleSoft RPA, COMPOSER, APM with AWS IDP along with Slackshyamraj55
Discover the seamless integration of RPA (Robotic Process Automation), COMPOSER, and APM with AWS IDP enhanced with Slack notifications. Explore how these technologies converge to streamline workflows, optimize performance, and ensure secure access, all while leveraging the power of AWS IDP and real-time communication via Slack notifications.
Goodbye Windows 11: Make Way for Nitrux Linux 3.5.0!SOFTTECHHUB
As the digital landscape continually evolves, operating systems play a critical role in shaping user experiences and productivity. The launch of Nitrux Linux 3.5.0 marks a significant milestone, offering a robust alternative to traditional systems such as Windows 11. This article delves into the essence of Nitrux Linux 3.5.0, exploring its unique features, advantages, and how it stands as a compelling choice for both casual users and tech enthusiasts.
Removing Uninteresting Bytes in Software FuzzingAftab Hussain
Imagine a world where software fuzzing, the process of mutating bytes in test seeds to uncover hidden and erroneous program behaviors, becomes faster and more effective. A lot depends on the initial seeds, which can significantly dictate the trajectory of a fuzzing campaign, particularly in terms of how long it takes to uncover interesting behaviour in your code. We introduce DIAR, a technique designed to speedup fuzzing campaigns by pinpointing and eliminating those uninteresting bytes in the seeds. Picture this: instead of wasting valuable resources on meaningless mutations in large, bloated seeds, DIAR removes the unnecessary bytes, streamlining the entire process.
In this work, we equipped AFL, a popular fuzzer, with DIAR and examined two critical Linux libraries -- Libxml's xmllint, a tool for parsing xml documents, and Binutil's readelf, an essential debugging and security analysis command-line tool used to display detailed information about ELF (Executable and Linkable Format). Our preliminary results show that AFL+DIAR does not only discover new paths more quickly but also achieves higher coverage overall. This work thus showcases how starting with lean and optimized seeds can lead to faster, more comprehensive fuzzing campaigns -- and DIAR helps you find such seeds.
- These are slides of the talk given at IEEE International Conference on Software Testing Verification and Validation Workshop, ICSTW 2022.
AI 101: An Introduction to the Basics and Impact of Artificial IntelligenceIndexBug
Imagine a world where machines not only perform tasks but also learn, adapt, and make decisions. This is the promise of Artificial Intelligence (AI), a technology that's not just enhancing our lives but revolutionizing entire industries.
Sudheer Mechineni, Head of Application Frameworks, Standard Chartered Bank
Discover how Standard Chartered Bank harnessed the power of Neo4j to transform complex data access challenges into a dynamic, scalable graph database solution. This keynote will cover their journey from initial adoption to deploying a fully automated, enterprise-grade causal cluster, highlighting key strategies for modelling organisational changes and ensuring robust disaster recovery. Learn how these innovations have not only enhanced Standard Chartered Bank’s data infrastructure but also positioned them as pioneers in the banking sector’s adoption of graph technology.
“An Outlook of the Ongoing and Future Relationship between Blockchain Technologies and Process-aware Information Systems.” Invited talk at the joint workshop on Blockchain for Information Systems (BC4IS) and Blockchain for Trusted Data Sharing (B4TDS), co-located with with the 36th International Conference on Advanced Information Systems Engineering (CAiSE), 3 June 2024, Limassol, Cyprus.
Building Production Ready Search Pipelines with Spark and MilvusZilliz
Spark is the widely used ETL tool for processing, indexing and ingesting data to serving stack for search. Milvus is the production-ready open-source vector database. In this talk we will show how to use Spark to process unstructured data to extract vector representations, and push the vectors to Milvus vector database for search serving.
Maruthi Prithivirajan, Head of ASEAN & IN Solution Architecture, Neo4j
Get an inside look at the latest Neo4j innovations that enable relationship-driven intelligence at scale. Learn more about the newest cloud integrations and product enhancements that make Neo4j an essential choice for developers building apps with interconnected data and generative AI.
GraphSummit Singapore | The Art of the Possible with Graph - Q2 2024Neo4j
Neha Bajwa, Vice President of Product Marketing, Neo4j
Join us as we explore breakthrough innovations enabled by interconnected data and AI. Discover firsthand how organizations use relationships in data to uncover contextual insights and solve our most pressing challenges – from optimizing supply chains, detecting fraud, and improving customer experiences to accelerating drug discoveries.
1. Table of Contents
1. General dos and Don’ts about the Computer
2. Important internal devices of CPU
3. Flash Memory & Cache Memory
4. Trouble shooting of Sound and Video Card
5. Troubleshooting Device Manager Issues in Win XP
6. Printers
7. UPS
8. Virus and its threats
9. How to secure Web browsers?
a. Internet Explorer
b. Firefox
10. Frequently Asked Questions - FAQ’s
2. Basic Hardware Tips
The troubleshooting tips provided here are to primarily solve an existing problem, not to create a
new one.
In case performing a certain action makes you uncomfortable, call in someone with more
expertise. And if you do decide to proceed with any of our Advanced Steps, please be careful
before proceeding.
Points to remember while troubleshooting
• Prior to opening your computer's case, check to see if the machine's warranty is still valid.
If so, send it back to the manufacturer for repair, as digging around inside the case can
void the warranty.
• You may also try calling your PC's manufacturer for tech support, especially if you've
already paid for it. Often, tech support can provide quick fixes or will replace faulty
components that are still under warranty. Many manufacturers offer online chat, email
support, and other options in addition to phone support.
• Take the appropriate safety measures, before making any hardware adjustments –
o First, purchase an antistatic wrist strap and mat. Static electricity can severely
damage your computer's internal components.
o Keep the computer plugged into the wall but the power switch turned off when
working with its internal components.
o Remember to hold on to the metal part of the computer's case when handling any
electrical parts.
• Before you reseat, remove, or replace any internal components, arm yourself with a
working knowledge of computer components, what they do, and how they interact with
one another.
• Location of the computers core internal components (hard disk drive, processor, RAM,
graphics card, etc.) vary from machine to machine, therefore knowledge of the same is
necessary.
• Hardware, BIOS (basic input-output system, built-in software that controls the keyboard,
mouse, display, and other hardware and functions), firmware, and other software tools
vary by manufacturer.
• Keep all of your computer documentation, driver CDs, and warranty information in a safe
place. Be sure to use your computer’s manuals before changing any settings.
3. Unit -1
General Do’s and Don'ts
Do:
Always shut down your computer properly
Do regular Scan disk to check the hard disk surface for damage
Defragment the hard drive periodically
Delete all files and programs you no longer need from your computer
Use an anti-virus program to prevent a virus on you computer
Back up data to floppy disks or zip disks to ensure you have a copy
Don't:
Do not eat around the computer
Do not drink around the computer
Do not use magnets around a computer
Taking Care of disks
Do:
Delete all files you no longer need from your disk
Use an anti virus program to scan for viruses on a disk
Do not try to erase and record information on a disk by write-protecting it
Don’t:
Do not use magnets around a disk
Do not separate the disk
Do not remove the disk while it is in use
Do not store in extremely hot or cold locations
Do not spill liquids on the disk
By completing this module, you will be able to understand and learn the following
How to maintain the Computers cleanly
How to take care of the disks
Materials used for Computer cleaning
Cleaning the case & other Plastic materials
Cleaning the key board and Mouse
4. Cleaning Hardware
Follow instructions in the manual or in help files that came with the computer or other
hardware devices
Before cleaning anything, unplug it from the electrical wall socket
When to clean a computer
Computers do not need to be cleaned too often if they are kept in a clean environment
Clean the computer when it looks dirty or when a device (like a mouse) does not work
right
The two things that need the most cleaning are the screen and mouse
Materials needed for cleaning a computer
Most cleaning materials can be found in a home or any store
o soft lint-free cloth’s
o soapy water - a drop or two of dishwashing detergent in a gallon of water
o cotton swabs
o eraser
o water spray bottle to hold the soapy water
o used fabric softener cloth
You may have to buy the following at a computer or office supply store
o floppy disk drive cleaner kit
o CD-ROM drive cleaner kit
o compressed air
Cleaning the case and other plastic surfaces
Use a damp lint-free cloth to clean the case
o Spray the water on the cloth. NEVER SPRAY WATER ON A COMPUTER OR
OTHER ELECTRICAL DEVICES!
o Wipe the surfaces with the damp cloth
For more difficult marks use the eraser. An ink eraser works best
For cracks and tight places, use a slightly damp cotton swab
Cleaning a monitor's screen
Wipe the screen with the damp lint-free cloth
Use a dry cloth to dry the screen
Use fabric softener cloth to help remove static charges on the screen
o static charges attract dust to the screen
o a fabric softener cloth has anti-static chemicals on it
o wipe the screen very lightly with the used fabric softener cloth
o Do not use a fresh fabric softener cloth. It will leave streaks.
Cleaning the keyboard
Use a slightly damp cotton swab to clean in-between the keys
Wipe the outside of the keyboard with a damp cloth
5. Use compressed air to remove paper pieces and dust from under the keys
Do not take a keyboard apart to clean it! You may not get it back together again
Cleaning a mouse
Clean the outside of the mouse with a damp cloth
To clean the inside of the mouse
o Take the mouse apart
turn the mouse upside down
rotate the retaining ring until it comes free
turn the mouse right-side up and catch the ring and ball in your hand
o Use damp cotton swabs to clean the rollers inside the mouse. Be sure to rotate the
rollers to get all of the dirt off them
o Wash the ball in warm soapy water. Wipe dry with a lint-free cloth
o Blow out the inside of the mouse to remove any dust
o Put the mouse back together after it has dried
Inside the computer's case
The inside of the computer rarely has to be cleaned and it is not recommended that this be
done
If you must clean inside your computer follow the following precautions
o Be very careful. You can easily damage the computer or hurt yourself
o Do not touch the chips or other electrical components
o Use a vacuum cleaner to remove dust carefully
o Use compressed air or the blower option on a vacuum cleaner to blow out dust and
other particles
Floppy disk drives and other drives with removable media
Follow the instructions on the cleaning kit
Do not clean your drives too often, especially the floppy disk drive. The cleaning disk is
slightly abrasive and can wear down the drivers read/write heads
6. Ideal PC CONFIGURATION
S No Item For Normal
Office
applications
For
Developers
For TV, Video
Conference
For
Multimedia
Development
1
Processor Intel or AMD
basic level
processors
Intel or AMD
Dual core
Processors
Intel or AMD
Dual Core
Processor
Intel or AMD
Core 2 or
Quadra
processors
2
Processor
Speed
1.6 GHz onwards 2.0 Ghz
onwards
2.4 Ghz
onwards
3Ghz
3 System Bus 800 MHz FSB 800 Mhz FSB 800 Mhz FSB 1024 MHz FSB
4
Standard
Memory and
Type
400 Mhz and 1
GB Standard
Memory
800 Mhz and 1
GB Standard
Memory
800 Mhz and 1
GB Standard
Memory
800 Mhz and 2
GB Standard
Memory
5
Hard Disk 120 GB SATA 160 GB SATA 160 GB SATA 2X160 GB
SATA
6
Display Integrated with
mother board
AGP card AGP card with
64 MB RAM
AGP with 256
MB RAM
7 Sound Card - Integrated Stereophonic Stereophonic
8 NIC If networked 10/100 MBps 10/100 Mbps 10/100 Mbps
9
Keyboard,
Mouse, USB
Devices
As per need As per need As per need As per need
By completing this module, you will be able to understand Ideal configuration for the various
purposes.
7. Unit - II
Important internal devices of CPU
Main parts of the computer:
Mother BoardProcessor System Fan
Net work
Card
By completing this module, you will be able to understand and learn the following
Important parts of CPU
Mother Board and its components
Memory – RAM & ROM
Sound card , Video Card and Net work card
Installing Storage device
CD - Drive
Floppy Drive
Sound Card
Graphics Card
Connecting
Cards
RAM
Mother BoardProcessor System Fan
Net work
Card
8. Processor:
The processor is the main part of the computer. The greater the number
of GHz the faster the speed of Personal Computer (PC) and the more
expensive the processor will be. The processor is also known as the CPU
or Central Processing Unit.
Mother Board:
• If the processor is the main part of the computer and the RAM is the memory, then the
motherboard is the backbone of the computer.
• This is the circuit board that contains the slots and sockets that everything else plugs into.
• Many motherboards now come with onboard sound, eliminating the need for a sound
card, video, networking ports and USB ports.
• Several different types of slots can be found on your board. It is important to know what
these are for, as the number of them on your motherboard will affect the number of hard
disks, memory chips, graphics cards, optical cards, modems, network cards, sound cards.
Note: Diagram of a motherboard. Note that the location of these components vary,
depending on your motherboard.
9. AGP slot: This is for the graphics card; you only need one AGP slot.
DIMM slot: This is for your memory. There are several different types of memory. 2 slots =
good, 4 slots = better.
PCI slot: This is for cards like sound card, network card, modem etc. These slots will be the ones
you use most often, so make sure that mother board have plenty - at least four.
CPU socket: Make sure that the socket type is right for the processor you have chosen and the
case chosen.
Back panel of CPU:
There will also be a number of ports on the edge of your motherboard, which will form part of the
back panel of your PC.
In the example on the right there are PS/2 ports for connecting keyboard and mouse, a parallel
port for a printer or scanner, serial ports that will rarely be used, a couple of LAN ports, four USB
ports and a sound port. More and more devices like printers and scanners are connecting the
computer using USB.
10. Memory
RAM-Random Access Memory:
• Memory is also known as RAM. The more memory you add to a
computer in theory the faster it will be.
ROM - Read-Only Memory
• It is an integrated-circuit memory chip that contains configuration data.
• ROM is commonly called firmware because its programming is fully embedded into the
ROM chip.
• ROM is hardware and software in one, as data is fully incorporated at the ROM chip's
manufacture, data stored can neither be erased nor replaced.
• ROM gives permanent and secure data storage. However, if a mistake is made in
manufacture, a ROM chip becomes unusable / useless.
• The most expensive stage of ROM manufacture, therefore, is creating the template. If a
template is readily available, duplicating the ROM chip is very easy and affordable.
• A ROM chip is also non volatile so data stored in it is not lost when power is turned off.
RAM versus ROM
RAM ROM
• provides the user random access to
stored data
• provides only short-term memory, since
data stored in RAM is lost when power
is turned off
• RAM's data can frequently and speedily
be altered and changed at will
• provides the user random access to
stored data
• Provides long-term storage, since
data is permanently etched into the
ROM chip.
• ROM cannot be reconfigured at all
11. Sound Card:
• Responsible for any noise that comes out of your PC
(apart from the whirring of fans and spinning drives).
Most motherboards now come with built in sound
chips.
Video Card:
• A video card also referred to as a graphics accelerator card,
display adapter, graphics card, and numerous other terms.
• It is an item of personal computer hardware whose function is to
generate and output images to a display.
• It operates on similar principles as a sound card or other
peripheral devices.
Network Card:
• A network card, network adapter, LAN Adapter or NIC
(network interface card) is a piece of computer hardware
designed to allow computers to communicate over a
computer network.
Installing RAM
12. Inserting Sound and Graphics card
Storage Device
• A Hard drive is the main storage area of the computer. All
software is likely to be stored on it along with all the files.
• A hard drive works in a similar method to the floppy disk,
data is stored by magnetizing sections of the disk creating a
one, or not magnetizing sections creating a zero.
Steps in –‘Inserting the Hard Disk’:
• Place hard disk drive into the HDD mounting slot of
the case;
• Ensure the IDE/ATA connector is facing outwards.
• Screw the HDD to the case using screws provided
with the HDD or the ATX case.
• Insert the ATA 66 cable into the ATA connector of the
HDD.
• Make sure the pin 1 on the cable is connected to pin 1
on the HDD connector. Pin 1 is the red or pink strip on
the edge of an ATA cable.
• Most new IDE/ATA cables are designed so that it will
only go in one way which will correspond to pin 1.
13. • Push the power cable into the power connector as shown. The power cable is designed to
go in one way, so you shouldn't have any problems.
• Connect the other end of the ATA 66 cable to the primary ATA
socket of your motherboard as shown.
• Ensure the pin 1 on the cable connects to the pin 1 on the ATA
socket.
Steps in – ‘Installation of CD-ROM / DVD-ROM
• Connect the IDE cable to the drives IDE connector.
• Make sure the pin 1 on the cable is connected to pin 1 on the drives IDE connector. Pin
1 is the red or pink strip on the edge of an IDE cable.
• Connect the other end of the IDE cable to the IDE socket on your motherboard as
shown below. Ensure sure you connect the cable to pin 1.
• The IDE socket could be your primary or secondary socket depending which socket you
choose. If your HDD is on the primary IDE socket and your secondary IDE socket is
free, then it is better to use your secondary IDE socket for the CD/DVD-ROM.
Optical drive:
• An optical drive is a collective term for CD drives, DVD
drives, CD RW burners and DVD burners.
• All of these devices read information from an optical disk
which is different from the magnetic media like floppy disks.
14. Unit- III
Flash Memory & Cache Memory
• Flash memory is non-volatile computer memory that can be electrically erased and
reprogrammed.
• It is a technology that is primarily used in memory cards and USB flash drives (thumb
drives, handy drive, memory stick, flash stick, jump drive, "Cap N' Go") for general
storage and transfer of data between computers and other digital products.
• It is a specific type of EEPROM (Electrically Erasable Programmable Read-Only Memory)
that is erased and programmed in large blocks.
• The application examples include: PDAs (personal digital assistants) and laptop
computers, digital audio players, digital cameras and mobile phones.
• It has also gained popularity in the game console market, where it is often used instead of
EEPROMs or battery-powered SRAM for game save data.
• Flash memory is non-volatile, which means that it does not need power to maintain the
information stored in the chip.
• Flash memory offers fast read access times (although not as fast as volatile DRAM
memory used for main memory in PCs) and better kinetic shock resistance than hard
disks.
Popular flash memory devices
Memory Stick: A Memory Stick is an IC (Integrated Circuit) which is
stored in a compact and rugged plastic enclosure.
Memory Sticks are designed to store data and to enable the transfer of
data between devices equipped with Memory Stick slots.
By completing module you will be able to understand about the flash Memory
and important types of flash memories available in the market
Cache memory and it’s importance
15. Compact Flash: A Compact Flash card is an IC (Integrated Circuit) which is
stored in a compact and rugged plastic enclosure.
Compact Flash cards are designed to store data and to enable the transfer of
data between devices equipped with Compact Flash slots. Current Compact
Flash capacities range up to 8GB.
SD Card: A SD Card (Secure Digital Card) is an IC (Integrated Circuit)
which is stored in a compact and rugged plastic enclosure.
SD Cards are designed to store data and to enable the transfer of data
between devices equipped with SD Card slots.
Current SD Card capacities range up to 16 GB.
Multimedia Card (MMC): A MultiMediaCard (MMC) is an IC (Integrated
Circuit) which is stored in a compact and rugged plastic enclosure.
Multi Media Cards (MMC) are designed to store data and to enable the
transfer of data between devices equipped with MultiMediaCard (MMC) slots.
Current MultiMediaCard (MMC) capacities range up to 2GB.
Cache Memory
• Cache Memory is a special high speed mechanism. It can be either a reserved part of
main memory or an independent high speed storage device.
• In Personal Computers, There are two types of caching are commonly used are memory
caching and disk caching.
• A memory cache, sometimes called a cache store or RAM cache, is a portion of memory
made of high-speed static RAM (SRAM) instead of the slower and cheaper dynamic RAM
(DRAM) used for Main Memory.
• Memory caching is effective because most programs access the same data or instructions
over and over. By keeping as much of this information as possible in SRAM, the computer
avoids accessing the slower DRAM.
• Some memory caches are built into the architecture of microprocessors.
16. • Disk caching works under the same principle as memory caching, but instead of using
high-speed SRAM, a disk cache uses conventional main memory.
• The most recently accessed data from the disk is stored in a memory buffer. When a
program needs to access data from the disk, it first checks the disk cache to see if the
data is there.
• Disk caching can dramatically improve the performance of applications, because accessing
a byte of data in RAM can be thousands of times faster than accessing a byte on a hard
disk.
For example, Internet connection is the slowest link in computer. So the browser
(Internet Explorer, Netscape, Opera, etc.) uses the hard disk to store HTML
pages, putting them into a special folder on the disk.
The first time you ask for an HTML page, the browser renders it and a copy of it is
also stored on your disk. The next time, on your request to access this page, your
browser checks if the date of the file on the Internet is newer than the one
cached.
If the date is the same, your browser uses the one on your hard disk instead of
downloading it from Internet. In this case, the smaller but faster memory system
is your hard disk and the larger and slower one is the Internet.
• There are other caches like page cache, L1 cache, L2 Cache, virtual memory.
L2 Cache: If there is some special memory bank in the motherboard which is small but
very fast and two times faster than the main memory access. That's called a level 2 cache
or an L2 cache.
L1 cache: If there is smaller but faster memory system directly into the microprocessor's
chip and this memory will be accessed at the speed of the microprocessor and not the
speed of the memory bus, That's an L1 cache.
If the question that “ why can’t we make all memories at the same speed in such away that there
is no need of cache memory?” is rised
The answer would be : “ Yes, memories can be all made at the same speed. But it’s too
expensive. To reduce the charges, we have to use a small memory for cache.”
17. Unit - IV
Sound & Video Card Troubleshooting
Sound card trouble shooting
I. Making sure that you have a card and drivers for the installation
• First, be sure that you have a sound card installed on your system and have speakers or
headphones connected to it.
• The sound card is usually a card in the back of your machine, although some newer
machines have them installed on the motherboard.
• Check that the wire from your speakers or headphones is connected to the "Speaker Out"
or " Spk Out" slot on the back of you machine.
Once you have checked these connections and you know that you have a sound card and
headphones or speakers, follow this guide:
Check that you have the drivers for the card installed:
1. In Windows 95/98/NT, go to "Start" - > "Settings" - >
"Control Panel" and double click the "Multimedia" icon.
This should bring up the "Multimedia Properties" box
2. On the Audio tab, you should see two areas: Playback and
Recording. If these are greyed out and have "None" listed
under preferred device for these sections, then your
sound card drivers have not been installed
3. If you have a device listed here, such as "AWE64 Wave
Out" or "Sound Blaster 16" then your drivers are installed.
Make sure to check the "Show volume control on the
taskbar" option
By completing this module you will be able to understand and learn about the trouble
shooting of Sound and Video card in the system.
18. If you do not have drivers installed.
1. Consult your sound card documentation or follow this basic
guide on how to install drivers for your sound card.
2. You will need the disk or CDROM that was given to you
along with your sound card initially
3. Switch to the "Devices" tab of the Multimedia Properties box
4. Click "Add."
5. Choose "Unlisted or Updated Driver" and
click "OK."
6. Enter the path to the disk or CDROM that came with the Sound Card and hit "OK."
7. Select your card and click "OK"
8. Your machine may need to reboot
II. Checking Sound Levels and Speaker Volume
Once you know you have a card and drivers installed,
check the volume and make sure it is at an audible level.
19. 1. Go to the system Volume Control by double
clicking the small speaker icon next to the "Time"
field on the taskbar. If you do not have this icon,
follow the instructions above on getting to the
"Multimedia Properties" box and click "Show
volume control on the taskbar."
(Actual Volume Control Options may vary slightly
depending on your configuration.)
2. Make sure the "Play Control" or "Master" and the
"Wave" controls are set to a high enough level
and make sure that your speakers have the
volume turned up high enough
3. If the sound level available from your card is too
low, you may need to use headphones or
amplified speakers. Before doing this you should
ensure that both master volume and "wave" levels are set to their maximum, and not muted.
4. If you add speakers be sure the power supply is plugged in, and the power switch is on
Troubleshooting Video Card
• Resolving video card problems can be costly if you opt to replace the hardware when a
problem does occur.
• Before you take such drastic measures, you should consider other solutions such as
updating the driver.
Here are some of the common problems that can arise from video cards and some suggested
solutions.
Video Cards
There are several video-related components that are responsible for displaying the characters. The
hardware components include : the monitor, video card (also referred to as the video adapter
card), and the motherboard.
Problems with any of these components can cause problems with your computer's display.
For a quick refresher, the video adapter card is a board that is plugged into your computer's
system board and monitor to provide display capabilities.
There are many different types of video cards available on the market. However, most are
susceptible to the same common types of problems.
A few common video card related problems along with the possible trouble shooting tips are
dicussed below :
No Display on the Monitor
20. • One common problem that occurs is that the operating system, such as Windows XP,
never appears. In other words, the computer starts up but nothing appears on the
monitor.
o Assuming that you have already ruled out the monitor as being the source of the
problem, your next step should be to take a look at the video card.
o This particular problem can be caused from several different things such as a
video card that is not properly seated or a loose connection from the video card to
the monitor.
• Troubleshooting this problem will require you to locate the video card inside your
computer and verify the following:
o Assuming that the video card adapter is separate from the motherboard, you
should check that the card is properly seated.
o Sometimes one end of the card may come out of the slot when it is initially
screwed, resulting in no display appearing on the monitor.
o Verify the correct jumper settings for video cards that are mounted to the
motherboard. This will require you to check the documentation that was sent with
the hardware.
o The cable running from the monitor to the video port may also be the one of the
reason for the problem.
o Examine the monitor cable to ensure that there are no broken or bent pins. A bent pin
can usually be straightened using a pair of sharp-nosed pliers. In the case of a broken
pin, you will need to contact the manufacturer of the monitor to determine if the cable
can be replaced.
o Also check that the cable running from the monitor to the VGA port is secure.
Although these may seem like simple trouble shooting steps, it is often the simple
ones that people over looked.
21. Operating System does not appear
• If the contents of the start up process appear on the monitor but the display is blank after
it is complete, this would indicate that there is an operating system video related problem.
o For example, an incorrect video driver may have been installed such as one that is
not compatible with the operating system.
• Trouble shooting this problem in Windows XP
o you will have to start the computer in Safe Mode by pressing [F8] when the
Starting Windows message appears.
o From the boot menu select the Safe Mode option. This will force Windows XP
to start using the standard VGA driver, instead of the video driver that is used
when the operating system is started normally.
o Once the computer is started in Safe Mode, you can install the correct video driver
using Device Manager. These steps are outlined in detail under the heading
"Updating Video Drivers" later in the article.
o The video problem discussed above can also be the result of over clocking. This is
a popular method used to get more performance out of a hardware component
such as a video card adapter. however, it can result in display problems.
The problem can once again be resolved by starting Windows XP is Safe
Mode and configure the video card to operate at its default speed.
Poor Display
A poor display on a monitor can mean a number of different things like -
• Images may appear to be fuzzy.
• Text that appears on the screen may be distorted and difficult to read.
• The monitor may flicker.
A poor display can also lead to other problems such as head aches and sore eyes. Therefore, this
is definitely a problem that you are going to want to correct as soon as possible.
A poor display can be caused by a number of different things. You should first verify that the
latest driver for the video adapter has been installed. You can determine which driver version is
currently installed in Windows XP by completing the steps outlined below:
22. 1. Right click the Windows desktop and click
Properties.
2. From the Display Properties dialog box, click the
Settings tab.
3. Click the Advanced button.
4. Click the Adapters tab.
5. Click the Properties button under Adapter Type as
shown below.
6. Click the Driver tab.
• Select the Properties button under Adapter Type to locate specific driver information
including the driver version.
• You can find the version information beside the Driver Version field. Compare this version
with the latest version on the manufacturer's Web site.
• If the driver needs to be updated complete steps four through seven listed under the section
entitled "Updating Video Drivers".
• If the latest driver is installed, you may need to adjust the resolution and refresh rate (this is
the rate at which the video card redraws the screen) for the video adapter card. Incorrect
display settings can cause problems with your display.
Screen Resolution
• To configure display settings, right click the Windows XP desktop and click Properties to open
the Display Properties dialog box.
• Select the Settings tab shown below to change the resolution settings. Use the slider under
Screen resolution to adjust the
settings. Typically, a 17 inch
monitor will have a default
resolution of 800x600.
23. Use the Settings tab from the Display Properties dialog box to change the resolution.
• If you are unable to select the desired resolution that should be supported by the video card,
you will need to again check that the operating system has correctly identified the card.
• In Windows XP, you can use Device Manager to make sure the card has been properly
detected. If the card has not been properly identified, you will once again need to check the
driver.
• It is usually recommended that you use the drivers supplied by the manufacturer instead of
the drivers included with Windows.
• The screen resolution may also be limited if the wrong monitor is selected.
• To check the monitor selection, once again open the Display Properties dialog box and select
the Settings tab. Click the Advanced button and select the Monitor tab.
• In case the monitor listed is not correct, you will need to update the driver for the monitor.
Refresh Rate
• In case the problem still persists after adjusting the resolution, your next step should be to
adjust the refresh rate.
• Lower refresh rates tend to cause flickering so it is important to verify this setting.
• You can adjust the refresh rate using the Settings tab from the Display Properties dialog box.
• Once again, select the Settings tab and click the advanced button.
• Select the Monitor tab as shown below. Use the drop down arrow to adjust the refresh rate to
about 70 MHZ. Remember that a higher refresh rate will reduce the amount of flickering.
• As with the screen resolution, if you are unable to select the desired refresh rate, go back to
the video driver to make sure the latest one is installed.
24. Use the Monitor tab to adjust the refresh rate
Note: It is important to verify that the monitor supports the screen resolution and refresh rate
configured in the Display Properties dialog box. The documentation or manual that came with your
monitor should identify the values that are supported.
Problems Displaying Videos or Animations
Problems with videos and animations are usually attributed to a display adapter driver that does
not support DirectDraw.
• If videos and animations are not correctly displayed on the monitor, your first step should
be to determine if the video card adapter driver supports DirectDraw.
• This can be accomplished using the DirectX Diagnostic Tool.
o From the Run command type DxDiag.exe and click OK.
o From the Display tab, click the Test DirectDraw button.
o Windows XP will perform a series of tests.
o If your display does not pass each of the tests, you will need to update the video
adapter.
• If updating the video adapter driver does not solve the problem, verify that your video
card is indeed supported by the operating system installed on your computer.
25. • If you are running Windows, you can check the Hardware Compatibility List (HCL) to
determine if the video card adapter is supported.
Updating Video Drivers
This is one of the most common problems with video cards.
• Faulty or incorrect video drivers can result in such things as operating system instability,
video subsystem problems, and so on
• Most video cards are provided with drivers on a
floppy disk or a CD-ROM
• One may use the drivers that usually come along
with the hardware or visit the manufacturer's Web
site to obtain a more recent one
• The drivers should come with a text file outlining the
installation process
• The first step in updating the driver is to identify the
make and model of your video card
• In Windows XP, you can see a list of all the hardware
components within Device Manager
• The video card should be listed under Display
Adapters as shown
• In case it is has not been recognized by Windows XP, it may be listed under Unknown
Devices. Double click on the video adapter listed to identify the make and model. This
information can be used to retrieve the latest driver from the manufacturer's Web site
Device Manager will list the Display Adapter installed
in the computer
If you are running Windows XP, you can update a device
driver using the steps listed below:
1. Right click My Computer and click Properties.
2. From the Hardware tab, click Device Manager.
26. 3. Within Device Manager, double-click the video adapter listed under Display Adapters.
4. Click Update Driver as shown below to open the Hardware Update Wizard.
5. Accept the default option, Install the Software Automatically. Choose the Install from a List
or Specific Location option if you have the updated driver so you can indicate the file
location. Click Next.
6. Windows searches for an updated driver and instructs you if an updated driver has been
found.
7. Click Finish once the updated driver has been installed.
From the Driver tab, click the Update Driver button
• The majority of video adapter card problems can be solved by ensuring that the correct
driver is installed and that the display settings are properly configured based on the
capabilities of your hardware.
• In case you are unable to resolve the problem using the recommendations described as
given above, chances are the manufacturer of your video adapter card already has a
solution.
Unit -V
Troubleshooting Device Manager Issues in Win XP
Device Manager is an OS feature that lets you view and change the properties of all devices
attached to your computer.
When you use Device Manager, you can:
Determine if the hardware on your computer is working properly
Change hardware configuration settings
Identify the device drivers that are loaded for each device and obtain information about each
device driver
Change advanced settings and properties for devices
Install updated device drivers
Disable, enable, and uninstall devices
Reinstall the previous version of a driver
Identify device conflicts and manually configure resource settings
By completing this module you will be able to understand and learn the trouble
shooting the device manager.
27. Print a summary of the devices that are installed on your computer
Typically, Device Manager is used to check the status of computer hardware and update device
drivers on the computer.
If you are an advanced user, and you have a thorough understanding of computer hardware, you
can use Device Manager's diagnostic features to resolve device conflicts, and change resource
settings.
To access Device Manager, use any of the following methods:
Click Start, and then click Control Panel
Click Performance and Maintenance, and then click System
Click the Hardware tab, and then click Device Manager
Or
Click Start; click Run, and then type "devmgmt.msc" (without the quotation marks).
Or
Right-click My Computer, clicks Manage, and then clicks Device Manager.
Or
Right-click My Computer, click Properties, click the Hardware tab, and then click Device
Manager
You can view the Details tab to see the following device information:
NOTE: Not all of these properties will be populated for a given device. In other words, although
all of these properties are listed, some may not contain information when viewing a particular
device.
Troubleshooting Device Conflicts in the Device Manager
28. Troubleshooting Information
If there is a problem with a device, it is listed in the hardware tree. Also, the problem
device has a symbol that indicates the type of problem
A black exclamation point (!) on a yellow field indicates the device is in a problem state.
Note that a device that is in a problem state can be functioning
A problem code explaining the problem is displayed for the device
A red "X" indicates a disabled device. A disabled device is a device that is physically
present in the computer and is consuming resources, but does not have a protected-mode
driver loaded
A blue "i" on a white field on a device resource in Computer properties indicates that the
Use automatic settings feature is not selected for the device and that the resource was
manually selected. Note that this does not indicate a problem or disabled state.
A green question mark "?" in Device Manager Means that a compatible driver for this device is
installed, indicating the possibility that all of the functionality may not be available. Note that this
applies only to Windows Millennium Edition (Me).
NOTE: Some sound cards and video adapters do not report all of the resources that they use to
Windows. This can cause Device Manager to show only one device in conflict, or no conflicts at all.
This can be verified by disabling the sound card, or by using the standard VGA video driver to see
if the conflict is resolved.
Note that this is a known problem with S3 video adapters and 16-bit Sound Blaster sound cards,
or those sound cards that are using Sound Blaster emulation for Sound Blaster compatibility.
When you double click a specific device in Device Manager, you see a property sheet. The
property sheet has a General tab.
NOTE: Some devices may have other tabs besides the General tab. Not all property sheets have
the same tabs; some devices may have a Resources tab, Driver tab, and Settings tab, or some
combination of these.
At the top of the property sheet, there is a description of the device. When you click the
Resources tab, the window in the middle of the tab indicates which resource types are available
for the selected device.
The list box at the bottom contains a Conflicting device list. This list indicates a conflict with an
error code.
Note the Use automatic settings check box. If Windows successfully detects a device, this
check box is selected, and the device should function correctly. However, if the resource settings
are based on Basic Configuration <n> (where <n> is any number from 0 to 9), it may be
necessary to change the configuration by selecting a different basic configuration from the list. If
the particular configuration you want for the device is not listed as a basic configuration, it may be
possible to click the Change Setting button to manually adjust the resource values.
For example, to edit the Input/Output Range setting:
29. Click the Use automatic settings check box to clear it.
Click Change Setting.
Click the appropriate I/O range for the device
NOTE: To disable a device in Device Manager, right-click the device, and then click Disable.
If the issue continues to occur, you may need to contact the manufacturer of your computer or
motherboard to inquire about how to obtain and install a BIOS update for your computer.
UNIT - VI
General troubleshooting tips for printers
It is not possible to describe all of the steps one might take to fix every make, model, and type of
printer. However in many cases, following these simple set of procedures, and a logical approach
may save your time or money.
1. Refer the User Manual
• Read the manual thoroughly and follow the steps to connect the printer to PC
o In general, the printers are having connectivity with parallel port of PC and nowadays
the USB connectivity is also available with the printer.
o Also we can connect the printers in the network if they are coming with RJ 45
connectors.
2. Check the manufacturer's web site
• Suppose if you have missed somewhere the user manual of printer, you may access the
concerned manufacturer’s web site for the details of the printer.
3. Check the plug at Power outlet
Ensure the printer is plugged into a live outlet. If it is plugged into a surge protector,
make sure it is on.
4. What if the power is on but there is no print out?
By completing this module you will be able to understand and learn how to manage
general printer problems, that we normally face.
30. Make sure that the power is on and there is no error lights (LEDs) lit.
If there are error lights, refer to the user manual/manufacturer's web site.
You should hear the print mechanism initialize when power is applied and most printers
have at least one light which will be illuminated when it is on.
5. Check whether it is online or not.
Online means, most of the printers are connected directly to the PC. Please check whether
the connectivity between PC and printer as per user manual or not.
6. In case it is beeping , try to find out the reason for it.
Most printers will beep once or twice during or after initialization. If it beeps more than
that or beeps constantly, it is an indication that something is wrong. Most of the printers
will beep when out of paper or out of ink.
7. Check wether you are able to give a test-print.
Most printers have a built-in diagnostics program which can be very useful for
troubleshooting problems and test-printing without a computer. They are usually initiated
by pressing a button or two while turning on the printer. Check your user manual.
If the printer test-prints OK, you don’t have any problem with print mechanism of the
printer. Then you may check the connectivity of the printer.
8. Check wether it has ink or toner
Check wether the ink or toner of the printer is there .
In case it is there check if it is properly filled or not.
Check if the heads of the toners are clean or not. One must have to clean them
periodically.
9. Check wether it has enough paper for printing purpose
Be sure the paper is installed correctly and there is enough of it. Most printers have a
paper-out detector. On most dot matrix printers it is a photo diode. If form-fed paper is
not aligned correctly (usually on the left side) the diode won't see it.
10. Check whether the printer is jammed?
• Paper jams are frequently the reason for malfunction in many printers. Always read the
manual on how to clear a jam.
o Don't be in a rush with your printer as you can easily damage a printer or even get hurt, if
you do not follow instructions in the user manual.
o Don't move a print head unless the instructions direct it. You can damage the belt, etc.
• Turn the power off & unplug it, before you start doing something .
31. o Laser printers have some very fine wires to remove static charges from the paper near the
fuser mechanism which will break if you are not very careful. Also, the fuser itself can be
very hot (it fuses/melts toner to the paper).
11. Check wether the RAM is sufficient
The printer memory could be full and not getting prints and prints may be stuck in print
queue. Turn-off the printer, wait a few seconds and turn it back on.
12. Check whether the software (print drivers) installed or not
We have to check the correct device drivers (software) of the printer installed in OS.
Refer installation steps in windows, DOS, Linux in to user manual or vendors web site
13. Check the printer connectivity with right port in BIOS settings
Check Cable connectivity with printers Check the following points -
a) The pins of DB25 connector are properly connected or not
b) Check the various connectivity’s of either side (e.g USB, DB25 etc)
c) Many printers now require an IEEE 1284 and Bi-Directional. USB cables shouldn’t be
longer than 15 feet.
d) Check for bent pins. Try another cable.
Is there something else connected to the printer port?
Disconnect it and uninstall the device drivers for it.
UNIT - VII
Uninterrupted Power Supply (UPS)
UPS is an electronic device that continues to supply electric power to the load for certain periods
of time during a loss of main power from electricity board or when the power fluctuates from
normal limits.
The generic standard for UPS system defines the limits on the amplitude and duration of deviation
of the output voltage acceptable for switching power supply loads.
To make a power supply uninterruptable, we need energy storing backup for the period of time in
the form of battery, an AC-DC Charger, and AC-DC Inverter.
By completing this module you will be able to understand various types of UPSs
available in the market.
32. Types of UPS
• Stand By UPS
• Inline UPS
• Online UPS
Stand by UPS includes a transfer switch that switches the load to the battery /inverter, in case
the primary AC Power source fails. The transfer time typically is 1-5 ms and the power to the load
will be interrupted.
Inline UPS also called as line interactive UPS which under normal condition smoothes and to
some degree regulates the input AC voltage by a filter and a tap changing transformer.
The bidirectional inverter/charger is always connected to the output of the UPS and uses a portion
of AC power to keep battery charged. When the power fails, the transfer switch from AC to
Battery and provides output power.
Online UPS always delivers all or at least a portion of the output power through its inverter even
under normal conditions. There are two types of online convertors 1) Double conversion and 2)
Delta Conversion.
1) Double Conversion Online UPS is continuously processing the whole power through
series connected AC-DC rectifier /charger and DC-AC inverter.
2) Delta Conversion UPS includes an additional “Delta Convertor” that delivers a portion of
the output power directly to the load and provides the power
UNIT - VIII
Virus
Virus and its threats
A virus is a computer program which can copy itself or infect the system without the
knowledge of the user.
A virus can spread from one system to the other system, whenever a file with virus in an
infected system is accessed from another system.
Some viruses may cause damage to the system by infecting the files, deleting the files,
formatting the hard disk etc.
To protect the system from virus one should have knowledge of each program or a file
they download into their computer. Since it is difficult, we can use anti-virus software
which can help the system by protecting it from virus.
By completing this you will be able to understand viruses and its threats
33. Tips and tools to prevent virus into the system
Keep anti-virus software up-to-date and make sure that it is working properly
Scan the files with anti-virus software before you download it from the Internet and
execute it
Be careful while exchanging the files between the systems through disks or through
network .While using the disk make sure that it is write protected, so that it prevents
from accidental deletion and changes made to the files on the disk
While using Microsoft office make sure that macro virus protection option is enabled
Note: A Macro virus is a computer virus that infects Microsoft word and similar application by
inserting some undesirable text into the documents or by making some changes to the
documents
Take backup of the files which you feel important .This will help you in recovering the file
when it is completely affected by virus
Scan the system with anti-virus software daily and keep your operating system up to date
with all the latest patches
Some viruses start executing as soon as they appear on the Outlook Express preview
pane. So disable that option
Beware of the latest virus threats which may help you in detecting them and take the
appropriate action to avoid it
List of anti virus tools available for preventing virus in to the system are given below:
AVG free , Quick Heal, Avira Anti virus , Cleanwin Anti virus,cleaner4.2, AVG Internet security, Bit
defender free edition, Bit defender anti virus 2008, Avast 4 Home edition, McAfee Avert Stinger
3.8.0, CalmWin (open source) free anti virus.
UNIT- IX
Tips to deal with a few common PC problems
1) Problem: Computer does not Power up / start up
Initial Steps:
Make sure that the PC's power cable is plugged firmly into a wall socket or power strip
and that the power strip is on
Try plugging the PC or the power strip into another wall socket
Ensure that the power cable is firmly connected to the PC's power-supply outlet
34. Check to see that the power supply is switched to the "on" position
Make sure that the power supply is switched to the voltage appropriate to your region
Attach a working power cable to the PC's power supply and plug it in
Unplug all external devices from the PC -- including a CD drive or digital camera -- except
the monitor. If the computer powers on without the devices, add the peripherals back in
one at a time until you can identify the problem device
Unplug all external devices from the PC -- including a CD drive or digital camera -- except
the monitor. If the computer powers on without the devices, add the peripherals back in
one at a time until you can identify the problem device
If none of these steps solves the problem, check to see if your computer is still under warranty
and send it back to the manufacturer. If the warranty has expired and you are comfortable doing
so, proceed to the Advanced Steps below. Otherwise, talk to your volunteer consultant.
Advanced Steps:
Unplug the computer and open the PC's case. Verify that the power supply is connected to
the motherboard
Make sure that all internal cables are connected and that all of the PCI expansion cards
and RAM chips are tightly seated
Examine the motherboard for noticeable signs of damage, such as cracks or burns. If you
see problems, there's a good chance you'll need a new motherboard or a new computer.
Consult a technician for further advice
Remove the RAM and PCI cards and unplug your hard drive(s).
Depending on your drive, you'll see either a wide, flat, gray IDE
cable; a thinner red Serial ATA (SATA) cable; or a round gray or
black SCSI cable. Plug in the power cable. If the computer turns
on, begin plugging in additional cables and modules until you
identify the faulty component
Replace your power supply with a known working one or a with new one.
If none of these steps work, your motherboard or processor is likely fried. Consider taking
it to a repair shop or replacing the computer altogether
Procedure to replace power Supply:
• Turn off your computer and all the peripherals (such as your monitor, printer, modem, and
scanner).
35. • Unplug your PC and all the peripherals from their outlets. After that, unplug all peripherals
from the back of the computer.
• Move to a well-lit, static-free area, such as a tile floor or a kitchen table. Remove the
computer case or panels to expose the interior of your PC. The power supply is enclosed in a
metal box located in the corner of your computer case.
2) Problem: Computer Powers up/ starts off, but Monitor is blank.
Initial Steps:
Ensure that your computer can boot normally and that all of the usual power lights are on
Make sure that the monitor is plugged firmly into a working wall socket or power strip and
that the power strip is on
Try plugging the PC or power strip into another wall socket
Verify that the monitor's power button is switched to the "on" position
Make sure the monitor's brightness and contrast controls are properly adjusted (check
your monitor's manual for information on how to do this)
Check to see that the monitor cable is plugged firmly into the back of the display and that
the pinned end is tightly screwed into the computer's video output on the back of the case
Remove the existing cable and replace it with a known working monitor cable. Connect it
to the display and to the computer
Obtain a working monitor and hook it up to your PC. If this display works, contact a
technician or buy a new monitor. If the monitor does not work, your video card may not
be working and you'll need to open the desktop's case
If none of these steps solves the problem, check to see if your computer is still under warranty
and find out how to send it back. If the warranty has expired, unplug the computer, open up the
PC's case, and proceed to the Advanced Steps below.
Advanced Steps:
Examine the video card for noticeable damage. If you spot defects or burnt components,
you'll likely need a new video card
Reseat the video card.
Inspect the RAM and all drive cables to make sure they are all tightly seated and
connected. If you find loose components or connections, tighten them.
If your display is still not working, contact a repair shop or consider replacing the video
card (or try swapping in a compatible card). To replace the card yourself.
3) Problem: Computer won't Boot From Hard Drive (not able to get to Windows Splash
Screen)?
36. Initial Steps:
Make sure that there is no bootable media in your floppy or CD drive
Listen to make sure your hard drive is spinning. If you don't hear or feel motion, or if you
don't see an error message on the screen, proceed to the advanced steps given below:
Remove all external drives or devices and try restarting the computer
If you receive a series of beeps or error messages, write them down, as they could be
instrumental in diagnosing your problem. Beep codes vary by manufacturer, so consult
your BIOS documentation for more in-depth info on what those beeps mean. Otherwise,
proceed as follows
Enter your computer's BIOS (access key varies by machine; usually you'll need to push
the F1 or Delete key as the computer boots) and write down the current settings before
proceeding further
Keep an eye out for any built-in diagnostic tools; you might be able to find an error by
using these
If no diagnostic tools exist, go to the BIOS's hard drive section and make sure it's
configured as "Auto."
If the BIOS has an auto detect feature, run it to make sure that it can actually detect your
hard drive
If your BIOS has an optimized default option, try loading it and rebooting
If the BIOS has a failsafe default option, try loading it and rebooting
Attempt to enter your PC in Safe Mode. (As your computer boots, quickly press the F8
key.) If you can get in, run Windows' built-in diagnostic tool to check your drive for bad
sectors and file system errors
While still in Safe Mode, scan your computer for viruses, Trojans, spyware, and other
threats that could be causing problems
If none of these steps solves the problem, check to see if your computer is still under
warranty and find out how to send it back.
If the warranty has expired, unplug the computer, open up the PC's case, and proceed to
the Advanced Steps.
Advanced Steps:
Make sure that the hard drive is firmly connected to both the power supply and the
motherboard
Reseat the video card
37. Clear the CMOS by resetting the jumper on the motherboard. Before you do so, consult
the motherboard or computer's documentation and be very careful while handling these
components
If your computer has more than one stick of RAM, remove them all and try adding them
back, starting with the slot closest to the processor. If the PC boots with one and not the
other, you likely have a faulty stick of RAM
Make sure that the correct hard drive is set as the primary (master) drive and that the
proper cable is connected. (See the back of the hard drive to set master and slave
settings
Replace the hard drive cable(s) with known working ones.
Remove the PC's main power supply and replace it with a known working one.
If none of this works you may want to take the drive in for service or replace it altogether. If at all
possible, back up your data first.
4) Problem: Windows won't Boot (After BIOS POST has been completed) orPC crashes.
Initial Steps
Make sure that there isn't a disk in your floppy or CD drive
Remove external drives or devices
Enter the Windows Advanced Options menu by pressing the F8 key during the BIOS's
Power-On Self Test (POST). Select the option for "Last Known Good Configuration." (Note:
if this works, you will lose any recently installed software or newly created files.)
Enter the Windows Advanced Options menu, boot into Safe Mode with networking, and
perform a system restore
While in Safe Mode run your antivirus and anti-spyware programs. Remove any detected
threats
If that fails, attempt to back up your data using back-up software, burn files to a CD, or
consult a professional. You may eventually have to reformat your hard drive and reinstall
Windows
Advanced Steps:
Enter the Windows Advanced Options menu and choose the option that enables the
bootlog.
Restart, then boot into Safe Mode to compare the new bootlog and the original one. If
you get error messages that certain drivers aren't loading correctly, write those down, and
update or remove the faulty devices via Windows' Device Manager. You can then reinstall
the drivers manually or ask Windows to locate a driver for the device
Insert your Windows Emergency Startup disk or the original CD-ROM and go to the
Recovery Console. From there, you can attempt to restore the master boot record, the
38. first logical sector on your hard drive where the BIOS loads a program to boot your
computer
5) Problem: The PC does not boot, the power and HDD LED does not come on, and
there is no display on monitor.
Check that your main power cable is plugged into the ATX power supply.
Make sure you have connected the ATX power connector to the motherboard.
Check if the cable for the power switch at front of the PC is connected to the correct pins
on the motherboard.
6) Problem: The power LED comes on but the PC does not boot, there is no display on
monitor.
Check if the processor is firmly into the socket. Check CPU jumpers to verify if CPU
frequency is correctly set.
7) Problem: The PC does not boot, but is beeping.
Different BIOS manufacturers use various number of beeps to indicate faults with various
hardware. In an Award BIOS motherboard you will get following kinds of beeps:
1 long 2 short: Graphics card is not securely into place, or faulty.
1 long 3 short: Graphics card is not securely into place, or faulty video memory.
Continuous beeps: No memory, or memory not securely into place, or could be faulty.
Continuous high/low beeps: No CPU, or CPU not securely into place, or could be faulty.
Please refer to your motherboard manual to confirm what the beeps are trying to tell you.
8) Problem: The PC boots but the CPU speed is incorrect.
The CPU frequency jumper setting is incorrect. Refer to your motherboard manual to set
it correctly.
9) Problem: The HDD is not being detected by the BIOS.
Check if you connected the IDE cable to the motherboard correctly.
Check wether the pin 1 on the IDE cable connected to pin 1 on the IDE sockets on both
motherboard connector and HDD connector.
39. Check if the HDD jumper is set to master and any other device sharing the same cable is
set to slave.
10) Problem: Cannot access my CD/DVD-ROM in DOS mode, hence cannot install
Windows.
This is because the CD/DVD-ROM device driver is not installed.
Install the manufacturer supplied device driver.
If you do not have a device driver disk, you can use the windows boot disk which will
provide access to your CD/DVD-ROM, so that you can install Windows.