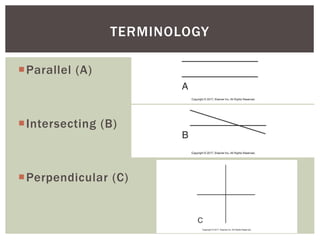
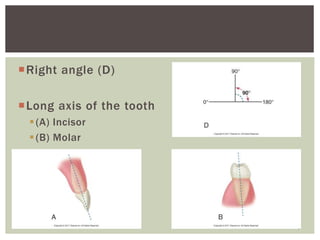
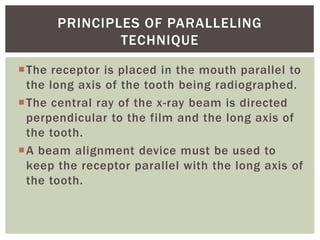
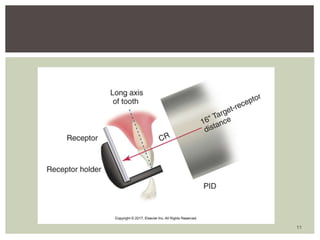
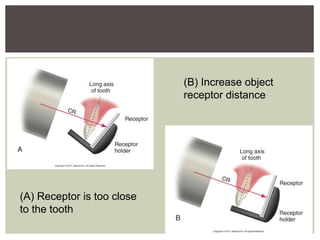
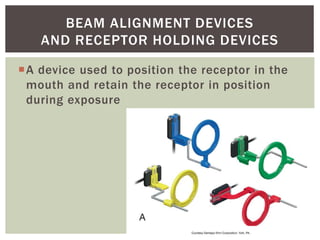
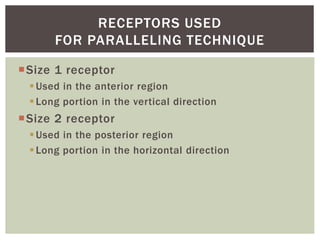
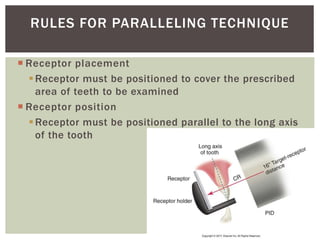
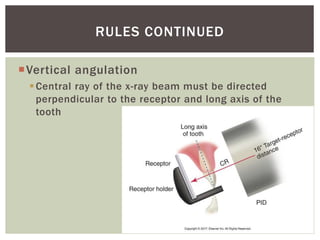
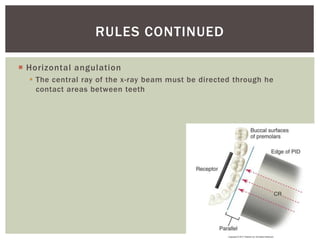
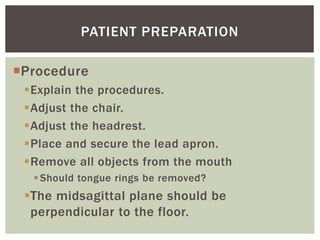
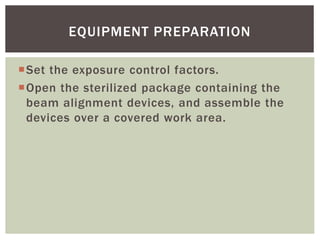
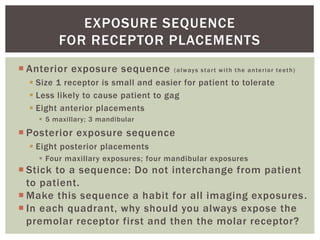
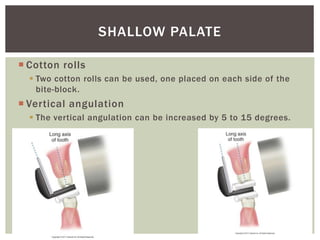
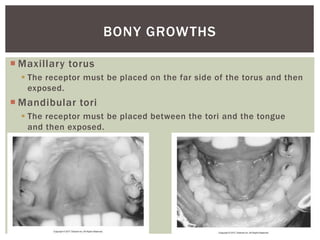
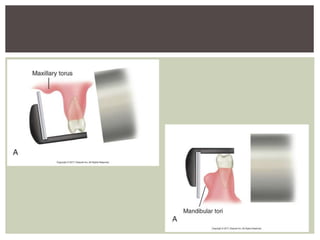
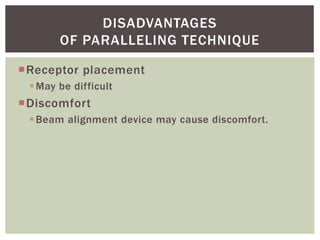
Paralleling Technique
Chapter 17
1
1. Define the key terms associated with the paralleling
technique.
2. State the basic principle of the paralleling technique
and illustrate the placement of the receptor, beam
alignment device, position-indicating device (PID), and
central ray.
3. Discuss how object-receptor distance affects the image
and how target-receptor distance is used to
compensate for such changes.
2
LEARNING OBJECTIVES
LESSON 17.1: PARALLELING TECHNIQUE
4. Describe why a beam alignment device is necessary
with the paralleling technique.
5. List the beam alignment devices that can be used with
the paralleling technique.
6. Identify and label the parts of the Rinn XCP
instruments.
7. Describe the different sizes of receptors used with the
paralleling technique and how each receptor is placed
in the bite-block.
3
LEARNING OBJECTIVES
LESSON 17.1: PARALLELING TECHNIQUE
(CONT.)
8. State the five basic rules of the paralleling technique.
9. Describe the patient and equipment preparations that
are necessary before using the paralleling technique.
10. Discuss the exposure sequence for 15 periapical
receptor placements using the paralleling technique;
describe each of the 15 periapical receptor placements
recommended for use with the Rinn XCP instruments.
4
LEARNING OBJECTIVES
LESSON 17.1: PARALLELING TECHNIQUE
(CONT.)
11. Summarize the guidelines for periapical receptor
positioning.
12. Explain the modifications in the paralleling technique
that are used for a patient with a shallow palate, bony
growths, or a sensitive premolar region.
13. List the advantages and disadvantages of the
paralleling technique.
5
LEARNING OBJECTIVES
LESSON 17.1: PARALLELING TECHNIQUE
(CONT.)
Purpose
To present basic concepts and to describe patient
preparation, equipment preparation, and receptor
placement procedures used in the paralleling
technique
6
INTRODUCTION
Paralleling technique is also known as:
Extension cone paralleling technique
Right-angle technique
Long-cone technique
Paralleling technique is one method that can be used
to expose periapical and bite-wing image receptors.
7
BASIC CONCEPTS
Parallel (A)
Intersecting (B)
Perpendicular (C)
8
TERMINOLOGY
Right angle (D)
Long axis of the tooth
(A) Incisor
(B) Molar
9
The receptor is placed in the mouth parallel to
the long axis of the tooth being radiographed.
The central ray of the x-ray beam is directed
perpendicular to the film and the long axis of
the tooth.
A beam alignment device must be used to
keep the receptor parallel with the long axis of
the tooth.
10
PRINCIPLES OF PARALLELING
TECHNIQUE
11
Object-receptor distance
Must be increased to keep the receptor
parallel with the long axis of the tooth
Target-receptor distance
Must be increased to ensure that only the
most parallel rays will be directed at the tooth
Rules must be followed to obtain
accurate images.
12
PRINCIPLES OF PARALLELING
TECHNIQUE (CONT.)
13
(A) Receptor is too close
to the tooth
(B) Increase object
receptor distance
A device used to position the receptor in the
mouth and retain the receptor in position
during exposure
14
BEAM ALIGNMENT DEVICES
AND RECEPTOR HOLDING DEVICES
Examples of commercially available intraoral
beam alignment devices
Rinn XCP Extension Cone Paralleling System
Rinn XCP-ORA One Ring & Arm Positioning System
Rinn XCP-DS FIT Universal Sensor Holder
Rinn Flip-Ray System
Rinn Snap-A-Ray Holder
Stabe Bite-block
15
BEAM ALIGNMENT DEVICES
AND RECEPTOR HOLDING DEVICES (CONT.)
Size 1 receptor
Used in the anterior region
Long portion in the vertical direction
Size 2 receptor
Used in the posterior region
Long portion in the horizontal direction
16
RECEPTORS USED
FOR PARALLELING TECHNIQUE
 Receptor placement
Receptor must be positioned to cover the prescribed
area of teeth to be examined
 Receptor position
Receptor must be positioned parallel to the long axis
of the tooth
17
RULES FOR PARALLELING TECHNIQUE
Vertical angulation
Central ray of the x-ray beam must be directed
perpendicular to the receptor and long axis of the
tooth
18
RULES CONTINUED
 Horizontal angulation
 The central ray of the x-ray beam must be directed through he
contact areas between teeth
19
RULES CONTINUED
Film receptor exposure
The x-ray beam must be centered on the receptor to
ensure that all areas are exposed
 Failure results in cone-cut
20
RULES CONTINUED
Patient preparation
Equipment preparation
Exposure sequence for receptor placements
Receptor placement for paralleling technique
21
STEP-BY-STEP PROCEDURES
Procedure
Explain the procedures.
Adjust the chair.
Adjust the headrest.
Place and secure the lead apron.
Remove all objects from the mouth
Should tongue rings be removed?
The midsagittal plane should be
perpendicular to the floor.
22
PATIENT PREPARATION
Set the exposure control factors.
Open the sterilized package containing the
beam alignment devices, and assemble the
devices over a covered work area.
23
EQUIPMENT PREPARATION
 Anterior exposure sequence (always start with the anterior teeth)
 Size 1 receptor is small and easier for patient to tolerate
 Less likely to cause patient to gag
 Eight anterior placements
 5 maxillary; 3 mandibular
 Posterior exposure sequence
 Eight posterior placements
 Four maxillary exposures; four mandibular exposures
 Stick to a sequence: Do not interchange from patient
to patient.
 Make this sequence a habit for all imaging exposures.
 In each quadrant, why should you always expose the
premolar receptor first and then the molar receptor?24
EXPOSURE SEQUENCE
FOR RECEPTOR PLACEMENTS
The specific area where the receptor must be
positioned before exposure
Dictated by teeth and surrounding structures
Specific placements described in the chapter are
for 15-receptor periapical series using size 1
receptors for anterior exposures and size 2
receptors for posterior exposures. (How many
Pa’s are in our paralleling FMX?)
Have the PID close to the patient so positioning
of the ring will be quick.
Remind patient to hold still during exposure. 25
RECEPTOR PLACEMENT
FOR PARALLELING TECHNIQUE
It is very important for the dental radiographer
to be competent in dealing with these types of
situations.
Using cotton rolls and changing the vertical
angulation and the location of the receptor
placement will assist the radiographer in
taking a dental image of diagnostic quality.
Shallow palate
Bony growths
Mandibular premolar region
26
MODIFICATIONS IN PARALLELING TECHNIQUE
 Cotton rolls
 Two cotton rolls can be used, one placed on each side of the
bite-block.
 Vertical angulation
 The vertical angulation can be increased by 5 to 15 degrees.
27
SHALLOW PALATE
 Maxillary torus
 The receptor must be placed on the far side of the torus and then
exposed.
 Mandibular tori
 The receptor must be placed between the tori and the tongue
and then exposed.
28
BONY GROWTHS
29
Receptor placement
The receptor must be
placed under the tongue.
Film
The lower edge of the film
can be gently softened to
prevent discomfort.
30
MANDIBULAR PREMOLAR REGION
Accuracy
The image is free of distortion.
Simplicity
It eliminates the need to determine horizontal and
vertical angulation.
It eliminates chances of dimensional distortion.
Duplication
Comparison of serial images has great validity.
*The primary advantage of the paralleling
technique is that it produces an image
without dimensional distortion*
31
ADVANTAGES
OF PARALLELING TECHNIQUE
Receptor placement
May be difficult
Discomfort
Beam alignment device may cause discomfort.
32
DISADVANTAGES
OF PARALLELING TECHNIQUE
33
QUESTIONS?

Chapter 17: Paralleling

  • 1.
  • 2.
    1. Define thekey terms associated with the paralleling technique. 2. State the basic principle of the paralleling technique and illustrate the placement of the receptor, beam alignment device, position-indicating device (PID), and central ray. 3. Discuss how object-receptor distance affects the image and how target-receptor distance is used to compensate for such changes. 2 LEARNING OBJECTIVES LESSON 17.1: PARALLELING TECHNIQUE
  • 3.
    4. Describe whya beam alignment device is necessary with the paralleling technique. 5. List the beam alignment devices that can be used with the paralleling technique. 6. Identify and label the parts of the Rinn XCP instruments. 7. Describe the different sizes of receptors used with the paralleling technique and how each receptor is placed in the bite-block. 3 LEARNING OBJECTIVES LESSON 17.1: PARALLELING TECHNIQUE (CONT.)
  • 4.
    8. State thefive basic rules of the paralleling technique. 9. Describe the patient and equipment preparations that are necessary before using the paralleling technique. 10. Discuss the exposure sequence for 15 periapical receptor placements using the paralleling technique; describe each of the 15 periapical receptor placements recommended for use with the Rinn XCP instruments. 4 LEARNING OBJECTIVES LESSON 17.1: PARALLELING TECHNIQUE (CONT.)
  • 5.
    11. Summarize theguidelines for periapical receptor positioning. 12. Explain the modifications in the paralleling technique that are used for a patient with a shallow palate, bony growths, or a sensitive premolar region. 13. List the advantages and disadvantages of the paralleling technique. 5 LEARNING OBJECTIVES LESSON 17.1: PARALLELING TECHNIQUE (CONT.)
  • 6.
    Purpose To present basicconcepts and to describe patient preparation, equipment preparation, and receptor placement procedures used in the paralleling technique 6 INTRODUCTION
  • 7.
    Paralleling technique isalso known as: Extension cone paralleling technique Right-angle technique Long-cone technique Paralleling technique is one method that can be used to expose periapical and bite-wing image receptors. 7 BASIC CONCEPTS
  • 8.
  • 9.
    Right angle (D) Longaxis of the tooth (A) Incisor (B) Molar 9
  • 10.
    The receptor isplaced in the mouth parallel to the long axis of the tooth being radiographed. The central ray of the x-ray beam is directed perpendicular to the film and the long axis of the tooth. A beam alignment device must be used to keep the receptor parallel with the long axis of the tooth. 10 PRINCIPLES OF PARALLELING TECHNIQUE
  • 11.
  • 12.
    Object-receptor distance Must beincreased to keep the receptor parallel with the long axis of the tooth Target-receptor distance Must be increased to ensure that only the most parallel rays will be directed at the tooth Rules must be followed to obtain accurate images. 12 PRINCIPLES OF PARALLELING TECHNIQUE (CONT.)
  • 13.
    13 (A) Receptor istoo close to the tooth (B) Increase object receptor distance
  • 14.
    A device usedto position the receptor in the mouth and retain the receptor in position during exposure 14 BEAM ALIGNMENT DEVICES AND RECEPTOR HOLDING DEVICES
  • 15.
    Examples of commerciallyavailable intraoral beam alignment devices Rinn XCP Extension Cone Paralleling System Rinn XCP-ORA One Ring & Arm Positioning System Rinn XCP-DS FIT Universal Sensor Holder Rinn Flip-Ray System Rinn Snap-A-Ray Holder Stabe Bite-block 15 BEAM ALIGNMENT DEVICES AND RECEPTOR HOLDING DEVICES (CONT.)
  • 16.
    Size 1 receptor Usedin the anterior region Long portion in the vertical direction Size 2 receptor Used in the posterior region Long portion in the horizontal direction 16 RECEPTORS USED FOR PARALLELING TECHNIQUE
  • 17.
     Receptor placement Receptormust be positioned to cover the prescribed area of teeth to be examined  Receptor position Receptor must be positioned parallel to the long axis of the tooth 17 RULES FOR PARALLELING TECHNIQUE
  • 18.
    Vertical angulation Central rayof the x-ray beam must be directed perpendicular to the receptor and long axis of the tooth 18 RULES CONTINUED
  • 19.
     Horizontal angulation The central ray of the x-ray beam must be directed through he contact areas between teeth 19 RULES CONTINUED
  • 20.
    Film receptor exposure Thex-ray beam must be centered on the receptor to ensure that all areas are exposed  Failure results in cone-cut 20 RULES CONTINUED
  • 21.
    Patient preparation Equipment preparation Exposuresequence for receptor placements Receptor placement for paralleling technique 21 STEP-BY-STEP PROCEDURES
  • 22.
    Procedure Explain the procedures. Adjustthe chair. Adjust the headrest. Place and secure the lead apron. Remove all objects from the mouth Should tongue rings be removed? The midsagittal plane should be perpendicular to the floor. 22 PATIENT PREPARATION
  • 23.
    Set the exposurecontrol factors. Open the sterilized package containing the beam alignment devices, and assemble the devices over a covered work area. 23 EQUIPMENT PREPARATION
  • 24.
     Anterior exposuresequence (always start with the anterior teeth)  Size 1 receptor is small and easier for patient to tolerate  Less likely to cause patient to gag  Eight anterior placements  5 maxillary; 3 mandibular  Posterior exposure sequence  Eight posterior placements  Four maxillary exposures; four mandibular exposures  Stick to a sequence: Do not interchange from patient to patient.  Make this sequence a habit for all imaging exposures.  In each quadrant, why should you always expose the premolar receptor first and then the molar receptor?24 EXPOSURE SEQUENCE FOR RECEPTOR PLACEMENTS
  • 25.
    The specific areawhere the receptor must be positioned before exposure Dictated by teeth and surrounding structures Specific placements described in the chapter are for 15-receptor periapical series using size 1 receptors for anterior exposures and size 2 receptors for posterior exposures. (How many Pa’s are in our paralleling FMX?) Have the PID close to the patient so positioning of the ring will be quick. Remind patient to hold still during exposure. 25 RECEPTOR PLACEMENT FOR PARALLELING TECHNIQUE
  • 26.
    It is veryimportant for the dental radiographer to be competent in dealing with these types of situations. Using cotton rolls and changing the vertical angulation and the location of the receptor placement will assist the radiographer in taking a dental image of diagnostic quality. Shallow palate Bony growths Mandibular premolar region 26 MODIFICATIONS IN PARALLELING TECHNIQUE
  • 27.
     Cotton rolls Two cotton rolls can be used, one placed on each side of the bite-block.  Vertical angulation  The vertical angulation can be increased by 5 to 15 degrees. 27 SHALLOW PALATE
  • 28.
     Maxillary torus The receptor must be placed on the far side of the torus and then exposed.  Mandibular tori  The receptor must be placed between the tori and the tongue and then exposed. 28 BONY GROWTHS
  • 29.
  • 30.
    Receptor placement The receptormust be placed under the tongue. Film The lower edge of the film can be gently softened to prevent discomfort. 30 MANDIBULAR PREMOLAR REGION
  • 31.
    Accuracy The image isfree of distortion. Simplicity It eliminates the need to determine horizontal and vertical angulation. It eliminates chances of dimensional distortion. Duplication Comparison of serial images has great validity. *The primary advantage of the paralleling technique is that it produces an image without dimensional distortion* 31 ADVANTAGES OF PARALLELING TECHNIQUE
  • 32.
    Receptor placement May bedifficult Discomfort Beam alignment device may cause discomfort. 32 DISADVANTAGES OF PARALLELING TECHNIQUE
  • 33.

Editor's Notes

  • #7 This chapter also describes modifications of this technique that can be used in patients with certain anatomic conditions, outlines the advantages and disadvantages of the paralleling technique, and reviews helpful hints.
  • #8 Paralleling technique is one method that can be used to expose periapical and bite-wing image receptors.
  • #9 An understanding of these basic terms is necessary before learning the paralleling technique. Refer students to Figures 17-1 and 17-2.
  • #11 Refer students to Figure 17-3.
  • #13 Rules must be followed to obtain accurate images. Refer students to Figure 17-4.
  • #15 Paralleling technique requires the use of a beam alignment instrument or a receptor holding device to position the receptor parallel to the long axis of the tooth.
  • #16 How do film holders reduce exposure? (In two ways: by preventing cone cuts, thus reducing retakes; and by allowing the film to be held in place without the aid of the patient’s finger in the field of radiation.) What does XCP stand for? (Extension-cone paralleling) What is the advantage of using the Stabe bite-block? (It is disposable and does not need to be sterilized.)
  • #17 Always ask the dentist what size receptors to use and how many anterior exposures to take.
  • #18 Images may not be of diagnostic quality if these tips are not followed. Refer students to Figure 17-7.
  • #22 Before exposing any receptors using the paralleling technique, infection control procedures must be completed.
  • #23 The midsagittal plane should be perpendicular to the floor. Should tongue rings or studs be removed? (Yes) Refer students to Procedure 17-1.
  • #24 Refer students to Procedure 17-2.
  • #25 Always begin with the anterior teeth. Stick to a sequence: Do not interchange from patient to patient. Make this sequence a habit for all imaging exposures. Refer students to Tables 17-1 and 17-2, as well as Figure 17-10. In each quadrant, why should you always expose the premolar receptor first and then the molar receptor? (Premolar placements are easier for the patient to tolerate; premolar placements are less likely to evoke the gag reflex.)
  • #26 Have the PID close to the patient so positioning of the ring will be quick. Remind patient to hold still during exposure. Refer students to Boxes 17-1 through 17-3, Figures 17-11 through 17-20, and Procedures 17-3 through 17-10.
  • #27 It is very important for the dental radiographer to be competent in dealing with these types of situations. Using cotton rolls and changing the vertical angulation and the location of the receptor placement will assist the radiographer in taking a dental image of diagnostic quality.
  • #28 Refer students to Figures 17-21 and 17-22.
  • #29 Refer students to Figures 17-23 through 17-26.
  • #31 Dental supply companies sell special sticky foam that can wrap around the edges of the film so that it won’t cut the patient’s tissue. Refer students to Figure 17-27.
  • #32 The primary advantage of the paralleling technique is that it produces an image without dimensional distortion.
  • #33 Difficulties may be encountered with the pediatric patient or with adults.