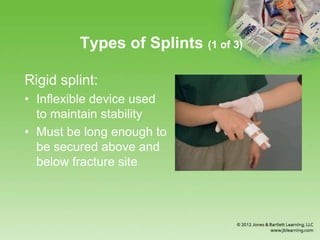
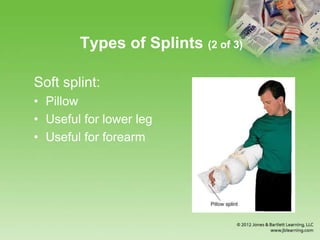
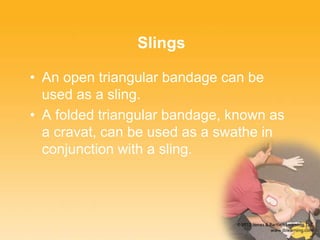
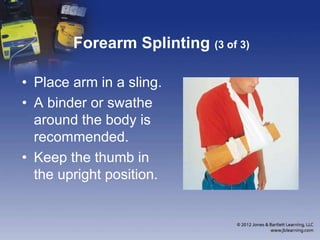
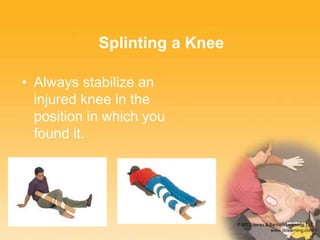
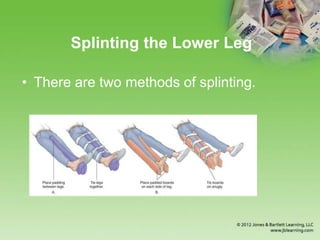
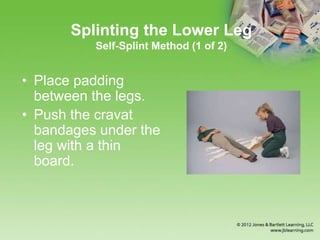
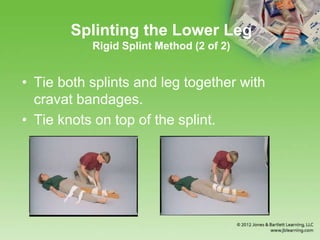
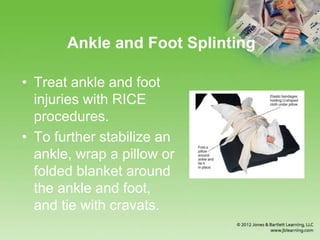
Chapter 16
Splinting Extremities
• Injured extremities should be stabilized
by splinting the extremity in the position
in which it was found.
• To stabilize means to minimize further
injury by holding a body part to prevent
movement.
• All fractures should be stabilized before
a victim is moved.
Reasons for Splinting
• Reduce pain.
• Prevent damage to muscles, nerves, and
blood vessels.
• Prevent a closed fracture from becoming an
open fracture.
• Reduce bleeding and swelling.
• Prevent a fractured bone from moving into
soft tissues.
Types of Splints (1 of 3)
Rigid splint:
• Inflexible device used
to maintain stability
• Must be long enough to
be secured above and
below fracture site
Types of Splints (2 of 3)
Soft splint:
• Pillow
• Useful for lower leg
• Useful for forearm
Types of Splints (3 of 3)
Self-splint, or
anatomic splint:
• Uses the body
• Injured extremity tied
to an uninjured part
To Apply a Splint (1 of 4)
• All fractures and dislocations should be
stabilized before the victim is moved.
• Cover open wounds with sterile dressing.
• Check circulation, sensation, and movement
(CSM).
• If pulses are absent:
• Gently line up a fracture or dislocation.
• Do not force anything into position.
• Warn the victim.
To Apply a Splint (2 of 4)
• Use the rule of thirds.
• If the injury is located in the upper or lower third
of a bone:
• Assume the nearest joint is injured.
• Extend the splint above and below the joint.
• If the injury is located in the middle third:
• Stabilize the joints above and below the fracture.
• Place an injured arm in a sling and swathe.
To Apply a Splint (3 of 4)
• If two first aiders are present:
• One should support the injury site.
• The other does the splinting.
• When possible, place splint materials on
both sides of the injured part.
• With rigid splints, use extra padding.
To Apply a Splint (4 of 4)
• Apply splints firmly, but do not restrict
blood flow.
• Check CSM.
• Use RICE (rest, ice, compression, and
elevation).
• Elevate.
• Do not apply ice packs if pulse is absent.
Splinting Guidelines (1 of 3)
Possible spinal injuries take precedence.
•Tell the victim not to move.
•Place rolled blankets on each side of neck
and torso.
•It is usually best to wait for emergency
medical services (EMS) personnel.
Splinting Guidelines (2 of 3)
• Seek medical care for:
• Extremity without a pulse
• Open fracture
• Dislocation
• Joint injury with moderate or severe swelling
• Deformity, tenderness, or swelling over the
bone
Splinting Guidelines (3 of 3)
• Seek medical care for (cont’d):
• Victims unable to walk or bear weight
• Snaps, crackles, or pops
• Hot, tender, swollen, or painful injured areas,
especially a joint
• Uncertainty whether a bone was broken
• Lack of rapid improvement
Slings
• An open triangular bandage can be
used as a sling.
• A folded triangular bandage, known as
a cravat, can be used as a swathe in
conjunction with a sling.
Applying a Sling to Upper Arm,
Forearm, or Hand/Wrist (1 of 4)
• Hold victim’s arm slightly
away from chest with
wrist and hand slightly
higher than tip of elbow.
• Place a triangular
bandage between
forearm and chest.
• Pull upper end of
bandage over uninjured
shoulder.
Applying a Sling to Upper Arm,
Forearm, or Hand/Wrist (2 of 4)
• Bring the lower end
of the bandage over
the forearm.
Applying a Sling to Upper Arm,
Forearm, or Hand/Wrist (3 of 4)
• Bring end of bandage
around neck to the
uninjured side.
• Tie the other end at
the hollow above the
clavicle.
• Secure point of the
bandage at the elbow.
Applying a Sling to Upper Arm,
Forearm, or Hand/Wrist (4 of 4)
• Place a swathe around
the upper arm and body.
• Thumb-up position
• Place padding
underneath both knots.
• Adjust the sling.
• Only the fingers should
be exposed.
Applying a Sling to Clavicle/Shoulder
(1 of 3)
• Hold arm away from
the chest.
• Place bandage
between forearm and
chest.
• Pull the upper end
over the uninjured
shoulder.
• Bring other end over
the forearm.
Applying a Sling to Clavicle/Shoulder
(2 of 3)
• Continue bringing
the lower end of the
bandage around
the victim’s back.
Applying a Sling to Clavicle/Shoulder
(3 of 3)
• Place a swathe around the chest and
forearm.
• Center should be placed over forearm.
• Thumb-up position, slightly above elbow
When Bandages or Other Resources
Are Unavailable (1 of 2)
• Place the hand
inside a buttoned
jacket.
• Use a belt, necktie,
etc. around the
neck and injured
arm.
When Bandages or Other Resources
Are Unavailable (2 of 2)
• Pin the sleeve of
the shirt or jacket
to the clothing.
• Turn up lower
edge of victim’s
jacket or shirt over
injured arm.
Shoulder and Upper Arm Sling (1 of 2)
• Support injured arm
away from the chest.
• Place bandage
between forearm and
the chest.
• Pull upper end over the
uninjured shoulder.
Shoulder and Upper-Arm Sling (2 of 2)
• Bring lower end of
bandage over forearm,
under armpit, and around
the back.
• Tie ends.
• Check pulse and nail
color.
• The hand should be in a
thumb-up position.
Humerus Splinting (1 of 2)
Stabilize with a rigid
splint.
• Place the injured arm
across the chest.
• If available, tie a rigid
splint to outside of
arm.
Humerus Splinting (2 of 2)
• Loop a cravat or strap around wrist and
neck.
• Secure the arm to the chest with a swathe.
Splinting an Elbow in the
Bent Position (1 of 2)
• Place a rigid splint
from the upper arm
to the wrist.
• Tie a rigid splint
onto the arm with
cravat bandages.
Splinting an Elbow in the
Bent Position (2 of 2)
• Place the arm in a
sling.
• Check CSM.
Splinting an Elbow in the
Straight Position (1 of 2)
• Place a rigid splint
along the inside of
the arm from the
hand to the armpit.
Splinting an Elbow in the
Straight Position (2 of 2)
• Secure with a roller bandage or several
cravat bandages.
• Check CSM.
Forearm Splinting (1 of 3)
• Use one rigid splint from palm past the
elbow.
• Use a second rigid splint on opposite
side of arm.
Forearm Splinting (2 of 3)
• Place splints on both
sides of forearm.
• Secure with a cravat
or roller bandage.
Forearm Splinting (3 of 3)
• Place arm in a sling.
• A binder or swathe
around the body is
recommended.
• Keep the thumb in
the upright position.
Wrist, Hand, and Finger Splinting
(1 of 2)
• Three methods:
• Place a rolled pair
of socks or a roller
bandage in palm.
• Attach a rigid splint.
Wrist, Hand, and Finger Splinting
(2 of 2)
• Three methods
(cont’d):
• Mold a pillow
around hand and
forearm.
• Tie with cravats or
roller bandage.
• Buddy tape fingers
together.
Pelvis and Hip Splinting
• Stabilize victim in
position found.
• Treat for shock.
• Do not lift legs.
• Wait for EMS.
• Use a long backboard.
Femur Splinting (1 of 2)
• Best splinted with a traction splint
• Two methods:
• Place a folded blanket between victim’s legs.
• Tie the injured leg to the uninjured leg with several
cravats or bandages.
Femur Splinting (2 of 2)
• Two methods (cont’d):
• Place one board
between the victim’s
legs.
• Place another board
along the victim’s side.
• The boards must be well
padded.
• Tie the boards to the leg
and body securely.
Splinting a Knee
• Always stabilize an
injured knee in the
position in which you
found it.
Splinting a Knee in the
Straight Position (1 of 3)
• Lift the injured leg and place a rigid splint
under the leg that extends from the buttocks
to beyond the foot.
Splinting a Knee in the
Straight Position (2 of 3)
• Place cravat bandages under the rigid
splint.
• Place soft padding under the knee and
ankle.
Splinting a Knee in the
Straight Position (3 of 3)
• Tie the cravat bandages.
• Do not tie the knots over the injured
area.
Splinting a Knee in the Bent Position
(1 of 2)
• Place a rigid splint
against injured leg.
• Tie a cravat bandage
around the splint and
lower leg.
Splinting a Knee in the Bent Position
(2 of 2)
• Tie a cravat
bandage around
the splint and thigh.
• Tie knots over the
splint.
Splinting the Lower Leg
• There are two methods of splinting.
Splinting the Lower Leg
Self-Splint Method (1 of 2)
• Place padding
between the legs.
• Push the cravat
bandages under the
leg with a thin
board.
Splinting the Lower Leg
Self-Splint Method (2 of 2)
• Tie the legs together.
• Tie knots between the legs, over the
padding.
Splinting the Lower Leg
Rigid Splint Method (1 of 2)
• Place one rigid
splint on the outside
and another inside.
• Push the cravat
bandages under the
leg with a thin
board.
Splinting the Lower Leg
Rigid Splint Method (2 of 2)
• Tie both splints and leg together with
cravat bandages.
• Tie knots on top of the splint.
Ankle and Foot Splinting
• Treat ankle and foot
injuries with RICE
procedures.
• To further stabilize an
ankle, wrap a pillow or
folded blanket around
the ankle and foot,
and tie with cravats.

Chapter 16 Splinting Extremeties

  • 1.
  • 2.
    Splinting Extremities • Injuredextremities should be stabilized by splinting the extremity in the position in which it was found. • To stabilize means to minimize further injury by holding a body part to prevent movement. • All fractures should be stabilized before a victim is moved.
  • 3.
    Reasons for Splinting •Reduce pain. • Prevent damage to muscles, nerves, and blood vessels. • Prevent a closed fracture from becoming an open fracture. • Reduce bleeding and swelling. • Prevent a fractured bone from moving into soft tissues.
  • 4.
    Types of Splints(1 of 3) Rigid splint: • Inflexible device used to maintain stability • Must be long enough to be secured above and below fracture site
  • 5.
    Types of Splints(2 of 3) Soft splint: • Pillow • Useful for lower leg • Useful for forearm
  • 6.
    Types of Splints(3 of 3) Self-splint, or anatomic splint: • Uses the body • Injured extremity tied to an uninjured part
  • 7.
    To Apply aSplint (1 of 4) • All fractures and dislocations should be stabilized before the victim is moved. • Cover open wounds with sterile dressing. • Check circulation, sensation, and movement (CSM). • If pulses are absent: • Gently line up a fracture or dislocation. • Do not force anything into position. • Warn the victim.
  • 8.
    To Apply aSplint (2 of 4) • Use the rule of thirds. • If the injury is located in the upper or lower third of a bone: • Assume the nearest joint is injured. • Extend the splint above and below the joint. • If the injury is located in the middle third: • Stabilize the joints above and below the fracture. • Place an injured arm in a sling and swathe.
  • 9.
    To Apply aSplint (3 of 4) • If two first aiders are present: • One should support the injury site. • The other does the splinting. • When possible, place splint materials on both sides of the injured part. • With rigid splints, use extra padding.
  • 10.
    To Apply aSplint (4 of 4) • Apply splints firmly, but do not restrict blood flow. • Check CSM. • Use RICE (rest, ice, compression, and elevation). • Elevate. • Do not apply ice packs if pulse is absent.
  • 11.
    Splinting Guidelines (1of 3) Possible spinal injuries take precedence. •Tell the victim not to move. •Place rolled blankets on each side of neck and torso. •It is usually best to wait for emergency medical services (EMS) personnel.
  • 12.
    Splinting Guidelines (2of 3) • Seek medical care for: • Extremity without a pulse • Open fracture • Dislocation • Joint injury with moderate or severe swelling • Deformity, tenderness, or swelling over the bone
  • 13.
    Splinting Guidelines (3of 3) • Seek medical care for (cont’d): • Victims unable to walk or bear weight • Snaps, crackles, or pops • Hot, tender, swollen, or painful injured areas, especially a joint • Uncertainty whether a bone was broken • Lack of rapid improvement
  • 14.
    Slings • An opentriangular bandage can be used as a sling. • A folded triangular bandage, known as a cravat, can be used as a swathe in conjunction with a sling.
  • 15.
    Applying a Slingto Upper Arm, Forearm, or Hand/Wrist (1 of 4) • Hold victim’s arm slightly away from chest with wrist and hand slightly higher than tip of elbow. • Place a triangular bandage between forearm and chest. • Pull upper end of bandage over uninjured shoulder.
  • 16.
    Applying a Slingto Upper Arm, Forearm, or Hand/Wrist (2 of 4) • Bring the lower end of the bandage over the forearm.
  • 17.
    Applying a Slingto Upper Arm, Forearm, or Hand/Wrist (3 of 4) • Bring end of bandage around neck to the uninjured side. • Tie the other end at the hollow above the clavicle. • Secure point of the bandage at the elbow.
  • 18.
    Applying a Slingto Upper Arm, Forearm, or Hand/Wrist (4 of 4) • Place a swathe around the upper arm and body. • Thumb-up position • Place padding underneath both knots. • Adjust the sling. • Only the fingers should be exposed.
  • 19.
    Applying a Slingto Clavicle/Shoulder (1 of 3) • Hold arm away from the chest. • Place bandage between forearm and chest. • Pull the upper end over the uninjured shoulder. • Bring other end over the forearm.
  • 20.
    Applying a Slingto Clavicle/Shoulder (2 of 3) • Continue bringing the lower end of the bandage around the victim’s back.
  • 21.
    Applying a Slingto Clavicle/Shoulder (3 of 3) • Place a swathe around the chest and forearm. • Center should be placed over forearm. • Thumb-up position, slightly above elbow
  • 22.
    When Bandages orOther Resources Are Unavailable (1 of 2) • Place the hand inside a buttoned jacket. • Use a belt, necktie, etc. around the neck and injured arm.
  • 23.
    When Bandages orOther Resources Are Unavailable (2 of 2) • Pin the sleeve of the shirt or jacket to the clothing. • Turn up lower edge of victim’s jacket or shirt over injured arm.
  • 24.
    Shoulder and UpperArm Sling (1 of 2) • Support injured arm away from the chest. • Place bandage between forearm and the chest. • Pull upper end over the uninjured shoulder.
  • 25.
    Shoulder and Upper-ArmSling (2 of 2) • Bring lower end of bandage over forearm, under armpit, and around the back. • Tie ends. • Check pulse and nail color. • The hand should be in a thumb-up position.
  • 26.
    Humerus Splinting (1of 2) Stabilize with a rigid splint. • Place the injured arm across the chest. • If available, tie a rigid splint to outside of arm.
  • 27.
    Humerus Splinting (2of 2) • Loop a cravat or strap around wrist and neck. • Secure the arm to the chest with a swathe.
  • 28.
    Splinting an Elbowin the Bent Position (1 of 2) • Place a rigid splint from the upper arm to the wrist. • Tie a rigid splint onto the arm with cravat bandages.
  • 29.
    Splinting an Elbowin the Bent Position (2 of 2) • Place the arm in a sling. • Check CSM.
  • 30.
    Splinting an Elbowin the Straight Position (1 of 2) • Place a rigid splint along the inside of the arm from the hand to the armpit.
  • 31.
    Splinting an Elbowin the Straight Position (2 of 2) • Secure with a roller bandage or several cravat bandages. • Check CSM.
  • 32.
    Forearm Splinting (1of 3) • Use one rigid splint from palm past the elbow. • Use a second rigid splint on opposite side of arm.
  • 33.
    Forearm Splinting (2of 3) • Place splints on both sides of forearm. • Secure with a cravat or roller bandage.
  • 34.
    Forearm Splinting (3of 3) • Place arm in a sling. • A binder or swathe around the body is recommended. • Keep the thumb in the upright position.
  • 35.
    Wrist, Hand, andFinger Splinting (1 of 2) • Three methods: • Place a rolled pair of socks or a roller bandage in palm. • Attach a rigid splint.
  • 36.
    Wrist, Hand, andFinger Splinting (2 of 2) • Three methods (cont’d): • Mold a pillow around hand and forearm. • Tie with cravats or roller bandage. • Buddy tape fingers together.
  • 37.
    Pelvis and HipSplinting • Stabilize victim in position found. • Treat for shock. • Do not lift legs. • Wait for EMS. • Use a long backboard.
  • 38.
    Femur Splinting (1of 2) • Best splinted with a traction splint • Two methods: • Place a folded blanket between victim’s legs. • Tie the injured leg to the uninjured leg with several cravats or bandages.
  • 39.
    Femur Splinting (2of 2) • Two methods (cont’d): • Place one board between the victim’s legs. • Place another board along the victim’s side. • The boards must be well padded. • Tie the boards to the leg and body securely.
  • 40.
    Splinting a Knee •Always stabilize an injured knee in the position in which you found it.
  • 41.
    Splinting a Kneein the Straight Position (1 of 3) • Lift the injured leg and place a rigid splint under the leg that extends from the buttocks to beyond the foot.
  • 42.
    Splinting a Kneein the Straight Position (2 of 3) • Place cravat bandages under the rigid splint. • Place soft padding under the knee and ankle.
  • 43.
    Splinting a Kneein the Straight Position (3 of 3) • Tie the cravat bandages. • Do not tie the knots over the injured area.
  • 44.
    Splinting a Kneein the Bent Position (1 of 2) • Place a rigid splint against injured leg. • Tie a cravat bandage around the splint and lower leg.
  • 45.
    Splinting a Kneein the Bent Position (2 of 2) • Tie a cravat bandage around the splint and thigh. • Tie knots over the splint.
  • 46.
    Splinting the LowerLeg • There are two methods of splinting.
  • 47.
    Splinting the LowerLeg Self-Splint Method (1 of 2) • Place padding between the legs. • Push the cravat bandages under the leg with a thin board.
  • 48.
    Splinting the LowerLeg Self-Splint Method (2 of 2) • Tie the legs together. • Tie knots between the legs, over the padding.
  • 49.
    Splinting the LowerLeg Rigid Splint Method (1 of 2) • Place one rigid splint on the outside and another inside. • Push the cravat bandages under the leg with a thin board.
  • 50.
    Splinting the LowerLeg Rigid Splint Method (2 of 2) • Tie both splints and leg together with cravat bandages. • Tie knots on top of the splint.
  • 51.
    Ankle and FootSplinting • Treat ankle and foot injuries with RICE procedures. • To further stabilize an ankle, wrap a pillow or folded blanket around the ankle and foot, and tie with cravats.