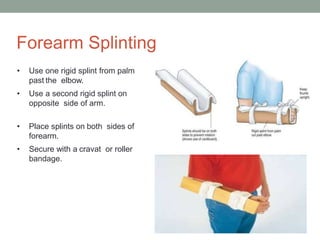
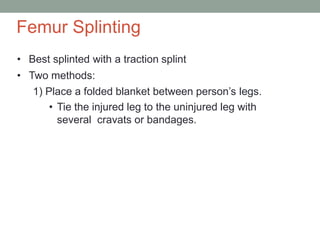
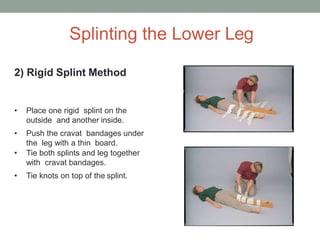
SPLINTING IN SPORTS
-Dr. Krupal Modi(MPT)
-30/8/2018
TOPICS TO BE COVERED
• INTRODUCTION
• DEFINITION
• TYPES OF SPLINTS
• APPLICATION OF SPLINTS:
UPPER EXTREMITY
LOWER EXTREMITY
Why Do We Splint?
• During acute injury, to Reduce pain.
• Prevent damage to muscles, nerves, and blood
vessels.
• Prevent a closed fracture from becoming an open
fracture.
• Reduce bleeding and swelling.
• Prevent a fractured bone from moving into soft
tissues.
INTRODUCTION
• Immobilization of an injured extremity begins at the scene
of the accident.
• According to Advanced Trauma Life Support guidelines,
the injured extremity must be aligned and immobilized
after the appropriate management of any life-threatening
problems.
• Prehospital immobilization of fractures is invaluable for
pain control, prevention of soft tissue injury, prevention of
any new or further injury to neurovascular structures, and
management of edema.
• External immobilization with splinting or casting is often
the definitive management of injured extremities in the
Emergency Department.
• Splints are commonly used for the immobilization of upper
and lower extremity injuries. A splint is a hard bandage
that is not circumferential and prevents movement of
the fracture site.
• Splints have the distinct advantage of being quick, easy to
apply, and they are designed to accommodate postinjury
swelling.
DEFINITION
• The major Disadvantages of splints are that they provide
slightly less rigid immobilization than casting and require a
Physician visit within a few days to be replaced with a cast.
• Splints can be ready-made or can be made from basic
materials.
• For example, a person could use branches, boards, layers of
cardboard, or a foam sleeping pad. Wrapping materials for the
splint can include large hankerchief, climbing webbing, torn
shirts, pants, or other pieces of clothing. These materials
should be wrapped completely around the splinted extremity to
secure the splint but should not be so tight as to block
circulation.
• Unless the person who is injured is in a dangerous setting
(for example, in the middle of a road), all injuries should
be splinted before the person is moved to minimize
further injury.
• A basic rule of splinting is that the joint above and
below the broken bone should be immobilized to
protect the fracture site.
• For example, if the lower leg is broken, the splint should
immobilize both the ankle and the knee.
• Pulses and sensation should be checked below the splint
at least once per hour. If the person complains of
tightness, tingling, or numbness, the wrapping material
should be released completely, and the splint should be
rewrapped more loosely.
Types of Splints
1) Rigid splint:
• Inflexible device used to maintain stability
• Must be long enough to be secured above and below
fracture site
2) Soft splint:
• Pillow
• Useful for lower leg
• Useful for forearm
3) Self-splint, or anatomic splint:
• Uses the body
• Injured extremity tied to an
uninjured part.
Slings
• An open triangular bandage can be used as a sling.
• A folded triangular bandage, known as a cravat, can be
used as a swathe in conjunction with a sling.
Applying a Sling to Upper Arm,
Forearm, or Hand/Wrist
Step-1: Hold injured athlets’s arm slightly
away from chest with wrist and hand
slightly higher than tip of elbow.
• Place a triangular bandage between
forearm and chest.
• Pull upper end of bandage over
uninjured shoulder.
Step-2: Bring the lower end of the
bandage over the forearm.
Applying a Sling to Upper Arm,
Forearm, or Hand/Wrist
Step-3: Bring end of bandage around neck to the
uninjured side,
• Tie the other end at the hollow above the
clavicle.
• Secure point of the bandage at the elbow.
• Step-4: Place a swathe around the upper arm and
body.
• Thumb-up position
• Place padding underneath both knots.
• Adjust the sling.
• Only the fingers should be exposed.
Applying a Sling to Clavicle/Shoulder
Step-1: Hold arm away from the chest.
• Place bandage between forearm and chest.
• Pull the upper end over the uninjured
shoulder.
• Bring other end over the forearm.
• Step-2: Continue bringing the lower end of the
bandage around the athlets’s back.
Applying a Sling to
Clavicle/Shoulder
Step-3: Place a swathe around the chest and forearm.
• Center should be placed over forearm.
• Thumb-up position, slightly above elbow.
When Bandages or Other
Resources Are Unavailable
• Place the hand
inside a buttoned
jacket.
• Use a belt, necktie,
etc. around the neck
and injured arm.
When Bandages or Other
Resources Are Unavailable
• Pin the sleeve of the
shirt or jacket to the
clothing.
• Turn up lower edge of
person’s jacket or shirt
over injured arm.
Humerus Splinting
Step-1:Stabilize with a rigid
splint.
• Place the injured arm across
the chest.
• If available, tie a rigid splint to
outside of arm.
Step-2: Loop a cravat or
strap around wrist and neck.
• Secure the arm to the chest
with a swathe.
Splinting an Elbow in the Bent
Position
• Place a rigid splint from the
upper arm to the wrist.
• Tie a rigid splint onto the
arm with cravat bandages.
• Place the arm in a sling.
• Check CSM
(circulation,sensation,movement).
Splinting an Elbow in the
Straight Position
Step-1: Place a rigid splint along the
inside of the arm from the hand to the
armpit.
Step-2: Secure with a roller bandage or
several cravat bandages.
Check CSM.
Forearm Splinting
• Use one rigid splint from palm
past the elbow.
• Use a second rigid splint on
opposite side of arm.
• Place splints on both sides of
forearm.
• Secure with a cravat or roller
bandage.
Forearm Splinting
• Place arm in a sling.
• A binder or swathe around the
body is recommended.
• Keep the thumb in the upright
position.
Wrist, Hand, and Finger Splinting
1) Place a rolled pair of
socks or a roller bandage in
palm. Attach a rigid splint.
2) Mold a pillow around
hand and forearm.Tie with
cravats or roller bandage.
3) Buddy tape fingers
together.
Gutter Splint
• Gutter splints are
used for:
• Phalangeal fractures
• Metacarpal fractures
• Two types: radial and
ulnar
Pelvis and Hip Splinting
• Stabilize the person in position he is found.
• Treat for shock.
• Do not lift legs.
• Wait for Emergency medical sevices.
• Use a long backboard.
Femur Splinting
• Best splinted with a traction splint
• Two methods:
1) Place a folded blanket between person’s legs.
• Tie the injured leg to the uninjured leg with
several cravats or bandages.
Femur Splinting
• Two methods (cont’d):
2) Place one board
between the person’s
legs.
• Place another board
along the person’s side.
• The boards must be well
padded.
• Tie the boards to the leg
and body securely.
Splinting a Knee
Always stabilize an injured knee
in the position in which you
found it.
Splinting a Knee in the
Straight Position :
Step-1: Lift the injured leg
and place a rigid splint
under the leg that extends
from the buttocks to
beyond the foot.
Splinting a Knee in the
Straight Position
Step-2: Place cravat bandages under
the rigid splint.
• Place soft padding under the knee
and ankle.
• Step-3: Tie the cravat bandages.
• Do not tie the knots over the
injured area.
Splinting a Knee in the Bent
Position
• Place a rigid splint against injured
leg.
• Tie a cravat bandage around the splint
and lower leg.
• Tie a cravat bandage around the splint
and thigh.
• Tie knots over the splint.
Splinting the Lower Leg
There are two methods of splinting.
1) Self-Splint Method
Step-1: Place padding
between the legs.
• Push the cravat bandages
under the leg with a thin
board.
Splinting the Lower Leg
• Step-2: Tie the legs together.
• Tie knots between the legs,
over the padding.
Splinting the Lower Leg
2) Rigid Splint Method
• Place one rigid splint on the
outside and another inside.
• Push the cravat bandages under
the leg with a thin board.
• Tie both splints and leg together
with cravat bandages.
• Tie knots on top of the splint.
Posterior Leg Splint
• This splint is used
for:
• Distal leg fractures
• Ankle fractures
• Tarsal fractures
• Metatarsal fractures
Stirrup Splint
• To prevent inversion
or eversion of the
ankle
• Immobilizes the ankle
for fractures near the
ankle
• Apply from below the
knee and wrap
around the ankle
Ankle and Foot Splinting
• Treat ankle and foot injuries with
RICE procedures.
• To further stabilize an ankle, wrap a
pillow or folded blanket around the
ankle and foot, and tie with cravats.
Buddy taping of toes
• Secure the fractured
toe to the adjacent
toe with adhesive
strips
• Sheet wadding
between toes
prevents maceration
Splinting in sports

Splinting in sports

  • 1.
    SPLINTING IN SPORTS -Dr.Krupal Modi(MPT) -30/8/2018
  • 2.
    TOPICS TO BECOVERED • INTRODUCTION • DEFINITION • TYPES OF SPLINTS • APPLICATION OF SPLINTS: UPPER EXTREMITY LOWER EXTREMITY
  • 3.
    Why Do WeSplint? • During acute injury, to Reduce pain. • Prevent damage to muscles, nerves, and blood vessels. • Prevent a closed fracture from becoming an open fracture. • Reduce bleeding and swelling. • Prevent a fractured bone from moving into soft tissues.
  • 4.
    INTRODUCTION • Immobilization ofan injured extremity begins at the scene of the accident. • According to Advanced Trauma Life Support guidelines, the injured extremity must be aligned and immobilized after the appropriate management of any life-threatening problems. • Prehospital immobilization of fractures is invaluable for pain control, prevention of soft tissue injury, prevention of any new or further injury to neurovascular structures, and management of edema.
  • 5.
    • External immobilizationwith splinting or casting is often the definitive management of injured extremities in the Emergency Department. • Splints are commonly used for the immobilization of upper and lower extremity injuries. A splint is a hard bandage that is not circumferential and prevents movement of the fracture site. • Splints have the distinct advantage of being quick, easy to apply, and they are designed to accommodate postinjury swelling. DEFINITION
  • 6.
    • The majorDisadvantages of splints are that they provide slightly less rigid immobilization than casting and require a Physician visit within a few days to be replaced with a cast. • Splints can be ready-made or can be made from basic materials. • For example, a person could use branches, boards, layers of cardboard, or a foam sleeping pad. Wrapping materials for the splint can include large hankerchief, climbing webbing, torn shirts, pants, or other pieces of clothing. These materials should be wrapped completely around the splinted extremity to secure the splint but should not be so tight as to block circulation.
  • 7.
    • Unless theperson who is injured is in a dangerous setting (for example, in the middle of a road), all injuries should be splinted before the person is moved to minimize further injury.
  • 8.
    • A basicrule of splinting is that the joint above and below the broken bone should be immobilized to protect the fracture site. • For example, if the lower leg is broken, the splint should immobilize both the ankle and the knee. • Pulses and sensation should be checked below the splint at least once per hour. If the person complains of tightness, tingling, or numbness, the wrapping material should be released completely, and the splint should be rewrapped more loosely.
  • 9.
    Types of Splints 1)Rigid splint: • Inflexible device used to maintain stability • Must be long enough to be secured above and below fracture site
  • 10.
    2) Soft splint: •Pillow • Useful for lower leg • Useful for forearm 3) Self-splint, or anatomic splint: • Uses the body • Injured extremity tied to an uninjured part.
  • 11.
    Slings • An opentriangular bandage can be used as a sling. • A folded triangular bandage, known as a cravat, can be used as a swathe in conjunction with a sling.
  • 12.
    Applying a Slingto Upper Arm, Forearm, or Hand/Wrist Step-1: Hold injured athlets’s arm slightly away from chest with wrist and hand slightly higher than tip of elbow. • Place a triangular bandage between forearm and chest. • Pull upper end of bandage over uninjured shoulder. Step-2: Bring the lower end of the bandage over the forearm.
  • 13.
    Applying a Slingto Upper Arm, Forearm, or Hand/Wrist Step-3: Bring end of bandage around neck to the uninjured side, • Tie the other end at the hollow above the clavicle. • Secure point of the bandage at the elbow. • Step-4: Place a swathe around the upper arm and body. • Thumb-up position • Place padding underneath both knots. • Adjust the sling. • Only the fingers should be exposed.
  • 14.
    Applying a Slingto Clavicle/Shoulder Step-1: Hold arm away from the chest. • Place bandage between forearm and chest. • Pull the upper end over the uninjured shoulder. • Bring other end over the forearm. • Step-2: Continue bringing the lower end of the bandage around the athlets’s back.
  • 15.
    Applying a Slingto Clavicle/Shoulder Step-3: Place a swathe around the chest and forearm. • Center should be placed over forearm. • Thumb-up position, slightly above elbow.
  • 16.
    When Bandages orOther Resources Are Unavailable • Place the hand inside a buttoned jacket. • Use a belt, necktie, etc. around the neck and injured arm.
  • 17.
    When Bandages orOther Resources Are Unavailable • Pin the sleeve of the shirt or jacket to the clothing. • Turn up lower edge of person’s jacket or shirt over injured arm.
  • 18.
    Humerus Splinting Step-1:Stabilize witha rigid splint. • Place the injured arm across the chest. • If available, tie a rigid splint to outside of arm. Step-2: Loop a cravat or strap around wrist and neck. • Secure the arm to the chest with a swathe.
  • 19.
    Splinting an Elbowin the Bent Position • Place a rigid splint from the upper arm to the wrist. • Tie a rigid splint onto the arm with cravat bandages. • Place the arm in a sling. • Check CSM (circulation,sensation,movement).
  • 20.
    Splinting an Elbowin the Straight Position Step-1: Place a rigid splint along the inside of the arm from the hand to the armpit. Step-2: Secure with a roller bandage or several cravat bandages. Check CSM.
  • 21.
    Forearm Splinting • Useone rigid splint from palm past the elbow. • Use a second rigid splint on opposite side of arm. • Place splints on both sides of forearm. • Secure with a cravat or roller bandage.
  • 22.
    Forearm Splinting • Placearm in a sling. • A binder or swathe around the body is recommended. • Keep the thumb in the upright position.
  • 23.
    Wrist, Hand, andFinger Splinting 1) Place a rolled pair of socks or a roller bandage in palm. Attach a rigid splint. 2) Mold a pillow around hand and forearm.Tie with cravats or roller bandage. 3) Buddy tape fingers together.
  • 24.
    Gutter Splint • Guttersplints are used for: • Phalangeal fractures • Metacarpal fractures • Two types: radial and ulnar
  • 25.
    Pelvis and HipSplinting • Stabilize the person in position he is found. • Treat for shock. • Do not lift legs. • Wait for Emergency medical sevices. • Use a long backboard.
  • 26.
    Femur Splinting • Bestsplinted with a traction splint • Two methods: 1) Place a folded blanket between person’s legs. • Tie the injured leg to the uninjured leg with several cravats or bandages.
  • 27.
    Femur Splinting • Twomethods (cont’d): 2) Place one board between the person’s legs. • Place another board along the person’s side. • The boards must be well padded. • Tie the boards to the leg and body securely.
  • 28.
    Splinting a Knee Alwaysstabilize an injured knee in the position in which you found it. Splinting a Knee in the Straight Position : Step-1: Lift the injured leg and place a rigid splint under the leg that extends from the buttocks to beyond the foot.
  • 29.
    Splinting a Kneein the Straight Position Step-2: Place cravat bandages under the rigid splint. • Place soft padding under the knee and ankle. • Step-3: Tie the cravat bandages. • Do not tie the knots over the injured area.
  • 30.
    Splinting a Kneein the Bent Position • Place a rigid splint against injured leg. • Tie a cravat bandage around the splint and lower leg. • Tie a cravat bandage around the splint and thigh. • Tie knots over the splint.
  • 31.
    Splinting the LowerLeg There are two methods of splinting. 1) Self-Splint Method Step-1: Place padding between the legs. • Push the cravat bandages under the leg with a thin board.
  • 32.
    Splinting the LowerLeg • Step-2: Tie the legs together. • Tie knots between the legs, over the padding.
  • 33.
    Splinting the LowerLeg 2) Rigid Splint Method • Place one rigid splint on the outside and another inside. • Push the cravat bandages under the leg with a thin board. • Tie both splints and leg together with cravat bandages. • Tie knots on top of the splint.
  • 34.
    Posterior Leg Splint •This splint is used for: • Distal leg fractures • Ankle fractures • Tarsal fractures • Metatarsal fractures
  • 35.
    Stirrup Splint • Toprevent inversion or eversion of the ankle • Immobilizes the ankle for fractures near the ankle • Apply from below the knee and wrap around the ankle
  • 36.
    Ankle and FootSplinting • Treat ankle and foot injuries with RICE procedures. • To further stabilize an ankle, wrap a pillow or folded blanket around the ankle and foot, and tie with cravats.
  • 37.
    Buddy taping oftoes • Secure the fractured toe to the adjacent toe with adhesive strips • Sheet wadding between toes prevents maceration