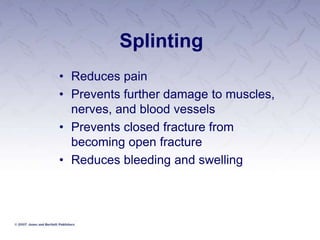
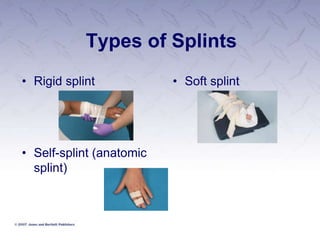
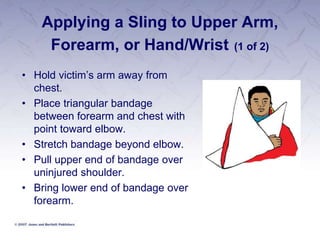
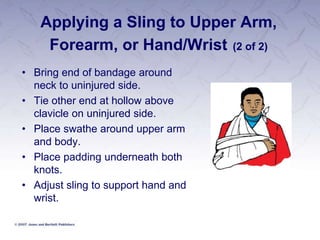
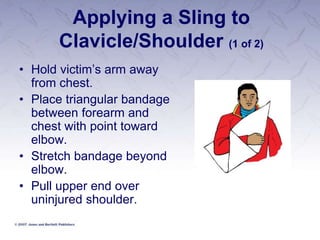
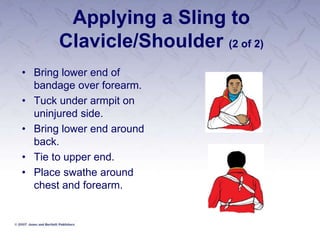
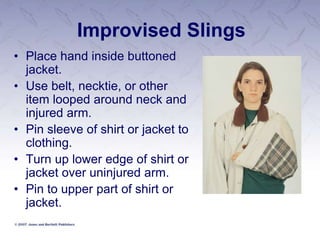
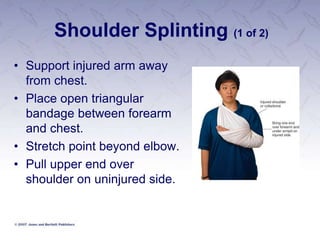
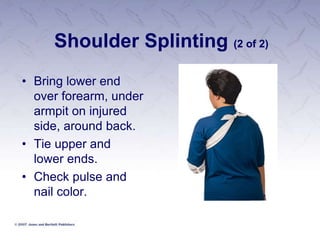
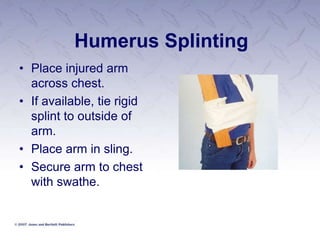
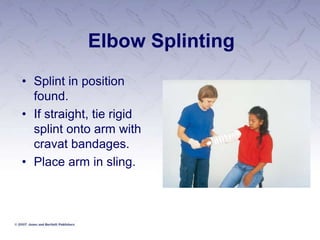
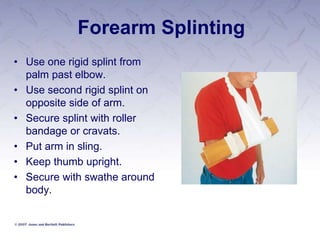
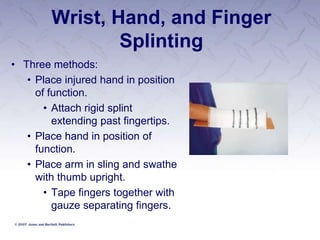
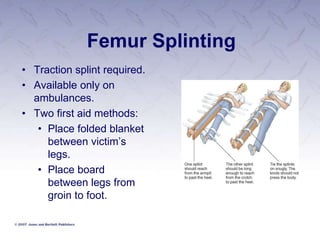
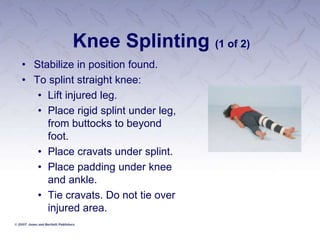
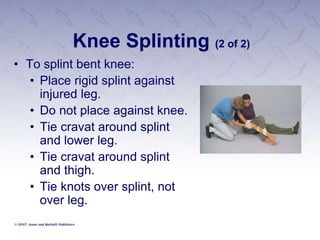
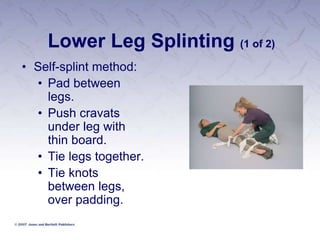
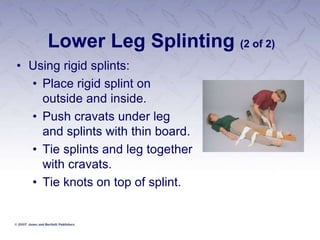
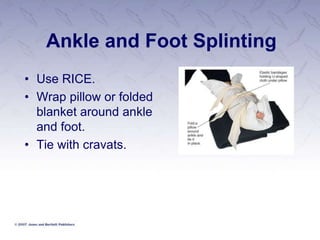
Splinting Extremities
Splinting
• Reduces pain
• Prevents further damage to muscles,
nerves, and blood vessels
• Prevents closed fracture from
becoming open fracture
• Reduces bleeding and swelling
Types of Splints
• Rigid splint
• Self-splint (anatomic
splint)
• Soft splint
Splinting Guidelines (1 of 3)
• Cover open wounds with dry dressing before
applying splint.
• Splint only if it won’t cause further pain.
• Splint in position found.
• Warn victim of pain.
• Use splint that will extend beyond joints above
and below injury.
• Apply firmly, but do not affect circulation.
Splinting Guidelines (2 of 3)
• When possible, splint on both sides of injury.
• Elevate extremity after splinting.
• Apply ice pack.
• If possible spine injury, victim should not move.
• Stabilize spine with rolled blankets on each
side of neck and torso.
Splinting Guidelines (3 of 3)
• Seek medical care if:
• Extremity has no pulse
• Open fracture
• Dislocation
• Swollen, hot, tender, or painful joint
• Deformity, tenderness, swelling over bone
• Victim unable to walk
• Snap, crackle, pop was heard
• Uncertain whether bone was broken
• Lack of rapid improvement
Slings
• Open triangular bandage
= sling
• Folded triangular bandage
= cravat/swathe
Applying a Sling to Upper Arm,
Forearm, or Hand/Wrist (1 of 2)
• Hold victim’s arm away from
chest.
• Place triangular bandage
between forearm and chest with
point toward elbow.
• Stretch bandage beyond elbow.
• Pull upper end of bandage over
uninjured shoulder.
• Bring lower end of bandage over
forearm.
Applying a Sling to Upper Arm,
Forearm, or Hand/Wrist (2 of 2)
• Bring end of bandage around
neck to uninjured side.
• Tie other end at hollow above
clavicle on uninjured side.
• Place swathe around upper arm
and body.
• Place padding underneath both
knots.
• Adjust sling to support hand and
wrist.
Applying a Sling to
Clavicle/Shoulder (1 of 2)
• Hold victim’s arm away
from chest.
• Place triangular bandage
between forearm and
chest with point toward
elbow.
• Stretch bandage beyond
elbow.
• Pull upper end over
uninjured shoulder.
Applying a Sling to
Clavicle/Shoulder (2 of 2)
• Bring lower end of
bandage over forearm.
• Tuck under armpit on
uninjured side.
• Bring lower end around
back.
• Tie to upper end.
• Place swathe around
chest and forearm.
Improvised Slings
• Place hand inside buttoned
jacket.
• Use belt, necktie, or other
item looped around neck and
injured arm.
• Pin sleeve of shirt or jacket to
clothing.
• Turn up lower edge of shirt or
jacket over uninjured arm.
• Pin to upper part of shirt or
jacket.
Shoulder Splinting (1 of 2)
• Support injured arm away
from chest.
• Place open triangular
bandage between forearm
and chest.
• Stretch point beyond elbow.
• Pull upper end over
shoulder on uninjured side.
Shoulder Splinting (2 of 2)
• Bring lower end
over forearm, under
armpit on injured
side, around back.
• Tie upper and
lower ends.
• Check pulse and
nail color.
Humerus Splinting
• Place injured arm
across chest.
• If available, tie rigid
splint to outside of
arm.
• Place arm in sling.
• Secure arm to chest
with swathe.
Elbow Splinting
• Splint in position
found.
• If straight, tie rigid
splint onto arm with
cravat bandages.
• Place arm in sling.
Forearm Splinting
• Use one rigid splint from
palm past elbow.
• Use second rigid splint on
opposite side of arm.
• Secure splint with roller
bandage or cravats.
• Put arm in sling.
• Keep thumb upright.
• Secure with swathe around
body.
Wrist, Hand, and Finger
Splinting
• Three methods:
• Place injured hand in position
of function.
• Attach rigid splint
extending past fingertips.
• Place hand in position of
function.
• Place arm in sling and swathe
with thumb upright.
• Tape fingers together with
gauze separating fingers.
Pelvis and Hip Splinting
• Stabilize victim in position
found.
• Treat for shock.
• Do not lift legs.
• Wait for EMS.
Femur Splinting
• Traction splint required.
• Available only on
ambulances.
• Two first aid methods:
• Place folded blanket
between victim’s
legs.
• Place board
between legs from
groin to foot.
Knee Splinting (1 of 2)
• Stabilize in position found.
• To splint straight knee:
• Lift injured leg.
• Place rigid splint under leg,
from buttocks to beyond
foot.
• Place cravats under splint.
• Place padding under knee
and ankle.
• Tie cravats. Do not tie over
injured area.
Knee Splinting (2 of 2)
• To splint bent knee:
• Place rigid splint against
injured leg.
• Do not place against knee.
• Tie cravat around splint
and lower leg.
• Tie cravat around splint
and thigh.
• Tie knots over splint, not
over leg.
Lower Leg Splinting (1 of 2)
• Self-splint method:
• Pad between
legs.
• Push cravats
under leg with
thin board.
• Tie legs together.
• Tie knots
between legs,
over padding.
Lower Leg Splinting (2 of 2)
• Using rigid splints:
• Place rigid splint on
outside and inside.
• Push cravats under leg
and splints with thin board.
• Tie splints and leg together
with cravats.
• Tie knots on top of splint.
Ankle and Foot Splinting
• Use RICE.
• Wrap pillow or folded
blanket around ankle
and foot.
• Tie with cravats.

Splinting #6.ppt

  • 1.
  • 2.
    Splinting • Reduces pain •Prevents further damage to muscles, nerves, and blood vessels • Prevents closed fracture from becoming open fracture • Reduces bleeding and swelling
  • 3.
    Types of Splints •Rigid splint • Self-splint (anatomic splint) • Soft splint
  • 4.
    Splinting Guidelines (1of 3) • Cover open wounds with dry dressing before applying splint. • Splint only if it won’t cause further pain. • Splint in position found. • Warn victim of pain. • Use splint that will extend beyond joints above and below injury. • Apply firmly, but do not affect circulation.
  • 5.
    Splinting Guidelines (2of 3) • When possible, splint on both sides of injury. • Elevate extremity after splinting. • Apply ice pack. • If possible spine injury, victim should not move. • Stabilize spine with rolled blankets on each side of neck and torso.
  • 6.
    Splinting Guidelines (3of 3) • Seek medical care if: • Extremity has no pulse • Open fracture • Dislocation • Swollen, hot, tender, or painful joint • Deformity, tenderness, swelling over bone • Victim unable to walk • Snap, crackle, pop was heard • Uncertain whether bone was broken • Lack of rapid improvement
  • 7.
    Slings • Open triangularbandage = sling • Folded triangular bandage = cravat/swathe
  • 8.
    Applying a Slingto Upper Arm, Forearm, or Hand/Wrist (1 of 2) • Hold victim’s arm away from chest. • Place triangular bandage between forearm and chest with point toward elbow. • Stretch bandage beyond elbow. • Pull upper end of bandage over uninjured shoulder. • Bring lower end of bandage over forearm.
  • 9.
    Applying a Slingto Upper Arm, Forearm, or Hand/Wrist (2 of 2) • Bring end of bandage around neck to uninjured side. • Tie other end at hollow above clavicle on uninjured side. • Place swathe around upper arm and body. • Place padding underneath both knots. • Adjust sling to support hand and wrist.
  • 10.
    Applying a Slingto Clavicle/Shoulder (1 of 2) • Hold victim’s arm away from chest. • Place triangular bandage between forearm and chest with point toward elbow. • Stretch bandage beyond elbow. • Pull upper end over uninjured shoulder.
  • 11.
    Applying a Slingto Clavicle/Shoulder (2 of 2) • Bring lower end of bandage over forearm. • Tuck under armpit on uninjured side. • Bring lower end around back. • Tie to upper end. • Place swathe around chest and forearm.
  • 12.
    Improvised Slings • Placehand inside buttoned jacket. • Use belt, necktie, or other item looped around neck and injured arm. • Pin sleeve of shirt or jacket to clothing. • Turn up lower edge of shirt or jacket over uninjured arm. • Pin to upper part of shirt or jacket.
  • 13.
    Shoulder Splinting (1of 2) • Support injured arm away from chest. • Place open triangular bandage between forearm and chest. • Stretch point beyond elbow. • Pull upper end over shoulder on uninjured side.
  • 14.
    Shoulder Splinting (2of 2) • Bring lower end over forearm, under armpit on injured side, around back. • Tie upper and lower ends. • Check pulse and nail color.
  • 15.
    Humerus Splinting • Placeinjured arm across chest. • If available, tie rigid splint to outside of arm. • Place arm in sling. • Secure arm to chest with swathe.
  • 16.
    Elbow Splinting • Splintin position found. • If straight, tie rigid splint onto arm with cravat bandages. • Place arm in sling.
  • 17.
    Forearm Splinting • Useone rigid splint from palm past elbow. • Use second rigid splint on opposite side of arm. • Secure splint with roller bandage or cravats. • Put arm in sling. • Keep thumb upright. • Secure with swathe around body.
  • 18.
    Wrist, Hand, andFinger Splinting • Three methods: • Place injured hand in position of function. • Attach rigid splint extending past fingertips. • Place hand in position of function. • Place arm in sling and swathe with thumb upright. • Tape fingers together with gauze separating fingers.
  • 19.
    Pelvis and HipSplinting • Stabilize victim in position found. • Treat for shock. • Do not lift legs. • Wait for EMS.
  • 20.
    Femur Splinting • Tractionsplint required. • Available only on ambulances. • Two first aid methods: • Place folded blanket between victim’s legs. • Place board between legs from groin to foot.
  • 21.
    Knee Splinting (1of 2) • Stabilize in position found. • To splint straight knee: • Lift injured leg. • Place rigid splint under leg, from buttocks to beyond foot. • Place cravats under splint. • Place padding under knee and ankle. • Tie cravats. Do not tie over injured area.
  • 22.
    Knee Splinting (2of 2) • To splint bent knee: • Place rigid splint against injured leg. • Do not place against knee. • Tie cravat around splint and lower leg. • Tie cravat around splint and thigh. • Tie knots over splint, not over leg.
  • 23.
    Lower Leg Splinting(1 of 2) • Self-splint method: • Pad between legs. • Push cravats under leg with thin board. • Tie legs together. • Tie knots between legs, over padding.
  • 24.
    Lower Leg Splinting(2 of 2) • Using rigid splints: • Place rigid splint on outside and inside. • Push cravats under leg and splints with thin board. • Tie splints and leg together with cravats. • Tie knots on top of splint.
  • 25.
    Ankle and FootSplinting • Use RICE. • Wrap pillow or folded blanket around ankle and foot. • Tie with cravats.