This document outlines the procedure for determining the California Bearing Ratio (CBR) of soils in a laboratory setting. The CBR is a measure of how much load a soil can support before failing. The procedure involves compacting soil specimens using static or dynamic methods, soaking them for 96 hours, and then penetrating the specimens with a piston at a rate of 1.25mm/min while measuring the load. The CBR is calculated based on the load-penetration curve and indicates the soil's strength and ability to support pavement structures.
This presentation is of Penetration Test for Bitumen. Penetration test measures the hardness or softness of bitumen by measuring the depth in tenths of a millimeter to which a standard loaded needle will penetrate vertically in 5 seconds.
There are different grades of Bitumen used for the civil (especially for roads works) work. This presentation consists of the aim, significance, about the apparatus used procedure, noting the reading, Bis recommendation values and IRC recommendation values, precautions,
For full course visit our website
https://www.machenlink.com/course/soil-mehcanics/
Description
Determine the unit weight of natural soil in place.
Stages
Determination of sand filling the cone
Determination bulk unit weight of sand
Determination bulk unit weight of natural soil
Procedure
Determining the weight of sand filling the cone
Sand passing through a 600µ sieve and retained over 300µ sieve is used.
Pouring cylinder attached over pouring cone is placed over level ground and completely filled with sand and weighed
The weight of sand + cylinder before pouring =푤_1
Now place the cylinder on the glass plate and open the shutter allow the sand to run out. Weigh the sand collected on the glass plate. This is the weight of sand filling pouring cone.
The weight of sand in pouring cone =푤_푐표푛푒
The weight of sand + cylinder after pouring on the glass =푤_2
The weight of sand in pouring cone =푤_푐표푛푒=푤_1−푤_2
Determination of bulk unit weight of sand
Determine the volume of the calibrated container (V)
Filled the pouring cylinder with weight 푤_1 again. Now placed over calibrating container and open the shutter, permit the sand to run into calibrating cylinder. When no further movement of sand is seen, close the shutter. Remove the pouring cylinder and weigh it.
The weight of sand + cylinder after pouring into calibrated cylinder =푤_3
The weight of sand filling calibrated cylinder (푤_푐푐 )=푤_1−(푤_푐표푛푒+푤_3 ")"
Determination of bulk unit weight of natural soil
Exposed about 45 cm square area of the soil and trim it down to a level surface.
Keep the metal tray on the level surface and excavate a circular hole of 10 cm diameter and 15 cm depth.
The weight of excavated soil =푤^′
Remove the tray, and placed the sand pouring cylinder over the hole, the cylinder should have sand of weight 푤_1.
Open the shutter and permit the sand to run into the hole. Close the shutter when no movement of the sand seen.
Remove the cylinder and weigh the sand pouring cylinder.
The weight of sand +cylinder after pouring into hole =푤_4
The weight of sand in the hole 〖(푤〗_ℎ표푙푒)=푤_1−(푤_4+푤_푐표푛푒)
For full course visit our website :
https://www.machenlink.com/course/foundation-engineering/
Follow #MachenLink
Facebook: https://www.facebook.com/machenLink/
Linkedin: https://www.linkedin.com/company/machenlink/
Twitter: https://twitter.com/MachenLink
DETERMINATION OF UNCONFINED COMPRESSIVE STRENGTH OF SOILJaptyesh Singh
DETERMINATION OF UNCONFINED COMPRESSIVE STRENGTH OF SOIL in Foundation Engineering
INTRODUCTION
TERMINOLOGY
APPARATUS
SOIL SPECIMEN & ITS TYPES
THEORY
RELEVANCE OF THE EXPERIMENT
PROCEDURE
VIDEO
OBSERVATION
DISCUSSION
REMARKS
To determine the grade of given bitumen. The penetration test is used as a measure of consistency. Higher values of penetration indicate softer consistency.
PLATE LOAD TEST
PRESUMPTIVE SAFE BEARING CACACITY
PLATE LOAD TEST APPARATUS / EQUIPMENT
PLATE LOAD TEST PROCEDURE
CALCULATION OF BEARING CAPACITY FROM PLATE LOAD TEST
For vedo link
Https://youtu.be/BUMd7CKcBV8
Bearing capacity of shallow foundations by abhishek sharma ABHISHEK SHARMA
elements you should know about bearing capacity of shallow foundations are included in it. various indian standards are also used. Bearing capacity theories by various researchers are also included. numericals from GATE CE and ESE CE are also included.
Sieve analysis
Atterberg limit test (liquid limit & Plastic limit)
Compaction test (Standard and modified proctor test)
California bearing ratio test (CBR)
Sheet1Moisture content analysis final resultsGroupValue of m3 (g)A.docxbjohn46
Sheet1Moisture content analysis final resultsGroupValue of m3 (g)A21.459B25 kPa34.35950 kPa18.771C19.282D17.816E23.651F26.148GTBCH28.664
LEEDS BECKETT UNIVERSITY
CIVIL ENGINEERING
GEOTECHNICAL ENGINEERING: APPLICATION & THEORY (BEng)
Laboratory Experiment:
Undrained triaxial compression test (without pore water pressure measurement) BS
1377: Part 7: 1990.
Object of Experiment:
To determine the undrained shear strength of a soil using the triaxial compression test.
Theory/Apparatus:
The apparatus consists of a cell, which is filled with water under pressure; the
specimen is loaded vertically, via a proving ring to measure load.
Triaxial Cell
The vertical load on the specimen is increased until failure occurs, the vertical strain
being recorded at the same time using a dial gauge. The test is repeated on different
specimens from the same soil, using different values of cell pressure.
254
Stresses on specimen in Triaxial Cell
Cell Pressure Deviator Stress =P/A 1=3+P/A
1 = major principal stress
3 = minor principal stress
Therefore, P/A = (1-3) =Deviator stress
The deviator stress is the load on the specimen, P, divided by the cross sectional area
of the specimen. However, as the sample is compressed during the test, the cross
sectional area will increase. Therefore, in calculating the deviator stress an allowance
for the change in area must be considered.
For the calculation of deviator stress, it is assumed that the volume of the specimen
remains constant and that the sample will deform as a cylinder, e.g.
100%
o
X
Strain
L
1 3
P
Deviator stress
A
where P = vertical load, which is measured by a proving ring (kN)
A = Area calculated using the following method;
( ) )o o o oVolume V A L AL A L X
255
1
o o
o
V A
or A or A
L X
Method:
1. Extrude the sample from the tube and trim to size - soil sample of 38mm
diameter and 76mm long.
2. Sleeve the sample with the rubber membrane.
3. Put the sample on the pedestal at the bottom of the cell and seal with the
rubber ring. Place the loading cap on top of the sample and seal with rubber
ring, before securing top drainage tube.
4. Mount the cell over the sample and fill as per the
Flooding Triaxial Cell checklist.
5. Set-up the test with the Clisp Studio assistant, and complete the
Pressurising Triaxial Cell checklist before running the test stages.
6. When test stages are complete, end the test via Clip Studio and complete the
Draining Triaxial Cell checklist.
Results and Calculations:
• Sketch the failure mode of each sample.
• Calculate the moisture content of the soil as per Appendix A.
• Calculate the results as follows:
(i) For each sample tested:
• Find the failure strain (either the final value or.
Geotechnical Engineering A (BSc)Coursework No 2 - Shear bo.docxhanneloremccaffery
Geotechnical Engineering A (BSc)
Coursework No 2 - Shear box test
Level 5
Group: B
Submitted to: Dr. Martin Pritchard
Submission Deadline: 7th of April 2016
Name: Rui Dorey
Student ID: 77149818
Contents
Abstract 3
Introduction 3
Experimental procedure 4
Calculations and results 4
Discussion 11
Conclusion 11
References 11
Appendix I 11
Appendix II 11
Appendix III 11
Abstract
On the shear box experiment for geotechnical module, the goal was to determine the displacement of sample of sand and also to calculated the angle of shear resistance . According to The direct shear box test BS 1377; Part 7 1990: 4 and 5 the group B has performed the experiment. In addition, the shear box test was performed on typical standard test conditions. However, the hanger on this test has suffered from four different vertical loads which were: 15, 25, 35 and 45 kg of mass. As result, on this experiment the shear stress of the four tests has increased simultaneously as the load of the test has increased, so the higher the load means the higher the shear stress and the effective normal stress. On the other hand by using the best line in order to determine the apparent cohesion on this test it was possible to see that the result of cohesion was 0 and the angle derived was: =48.76.
Introduction
On the direct shear box test BS 1377; Part 7 1990: 4 and 5, the aim is to calculate and determine the volumetric displacement of a sand and the shear resistance angle. Moreover on this experiment , the shear strength of the soil in this case the sand can be defined by being the maximum shear stress that is applied at any direction. However, when the soil tested reaches the point failure means that the soil reached the maximum yield stress. Moreover, the soil shear strength is given by the frictional resistance (F) which is derived from “inter-particle forces, (N)” and in this case the pore water has no shear strength. Besides, the formula that is used to calculated the shear strength in shear box test which involves the total normal stress, apparent cohesion (C) and shear resistance angle(φ) is: tf = σntanφ BS 1377; Part 7 1990: 4 and 5. The sample used in the direct shear box is resulted by shear during the plane and it is divided by upward and downward pieces when it is applied a horizontal load on the upper piece when the downward piece is positioned. The proving ring usually helps to apply the load and consequently the shear created by the sample normally is readable straight away and also the shear stress (t) is a result of a division of a shear by the plan area of the box, BS 1377; Part 7 1990: 4 and 5.
In order to get accurate results, this test has to be repeated many times with different normal loads by using the sample with different specimens. After plotting ...
Soil Mechanics
This is a process to calculate for the cohesion of soil. It is used in designing structures directly contact with the ground specifically the footing and foundations. Geotechnical engineering topics
Richard's aventures in two entangled wonderlandsRichard Gill
Since the loophole-free Bell experiments of 2020 and the Nobel prizes in physics of 2022, critics of Bell's work have retreated to the fortress of super-determinism. Now, super-determinism is a derogatory word - it just means "determinism". Palmer, Hance and Hossenfelder argue that quantum mechanics and determinism are not incompatible, using a sophisticated mathematical construction based on a subtle thinning of allowed states and measurements in quantum mechanics, such that what is left appears to make Bell's argument fail, without altering the empirical predictions of quantum mechanics. I think however that it is a smoke screen, and the slogan "lost in math" comes to my mind. I will discuss some other recent disproofs of Bell's theorem using the language of causality based on causal graphs. Causal thinking is also central to law and justice. I will mention surprising connections to my work on serial killer nurse cases, in particular the Dutch case of Lucia de Berk and the current UK case of Lucy Letby.
THE IMPORTANCE OF MARTIAN ATMOSPHERE SAMPLE RETURN.Sérgio Sacani
The return of a sample of near-surface atmosphere from Mars would facilitate answers to several first-order science questions surrounding the formation and evolution of the planet. One of the important aspects of terrestrial planet formation in general is the role that primary atmospheres played in influencing the chemistry and structure of the planets and their antecedents. Studies of the martian atmosphere can be used to investigate the role of a primary atmosphere in its history. Atmosphere samples would also inform our understanding of the near-surface chemistry of the planet, and ultimately the prospects for life. High-precision isotopic analyses of constituent gases are needed to address these questions, requiring that the analyses are made on returned samples rather than in situ.
This presentation explores a brief idea about the structural and functional attributes of nucleotides, the structure and function of genetic materials along with the impact of UV rays and pH upon them.
Slide 1: Title Slide
Extrachromosomal Inheritance
Slide 2: Introduction to Extrachromosomal Inheritance
Definition: Extrachromosomal inheritance refers to the transmission of genetic material that is not found within the nucleus.
Key Components: Involves genes located in mitochondria, chloroplasts, and plasmids.
Slide 3: Mitochondrial Inheritance
Mitochondria: Organelles responsible for energy production.
Mitochondrial DNA (mtDNA): Circular DNA molecule found in mitochondria.
Inheritance Pattern: Maternally inherited, meaning it is passed from mothers to all their offspring.
Diseases: Examples include Leber’s hereditary optic neuropathy (LHON) and mitochondrial myopathy.
Slide 4: Chloroplast Inheritance
Chloroplasts: Organelles responsible for photosynthesis in plants.
Chloroplast DNA (cpDNA): Circular DNA molecule found in chloroplasts.
Inheritance Pattern: Often maternally inherited in most plants, but can vary in some species.
Examples: Variegation in plants, where leaf color patterns are determined by chloroplast DNA.
Slide 5: Plasmid Inheritance
Plasmids: Small, circular DNA molecules found in bacteria and some eukaryotes.
Features: Can carry antibiotic resistance genes and can be transferred between cells through processes like conjugation.
Significance: Important in biotechnology for gene cloning and genetic engineering.
Slide 6: Mechanisms of Extrachromosomal Inheritance
Non-Mendelian Patterns: Do not follow Mendel’s laws of inheritance.
Cytoplasmic Segregation: During cell division, organelles like mitochondria and chloroplasts are randomly distributed to daughter cells.
Heteroplasmy: Presence of more than one type of organellar genome within a cell, leading to variation in expression.
Slide 7: Examples of Extrachromosomal Inheritance
Four O’clock Plant (Mirabilis jalapa): Shows variegated leaves due to different cpDNA in leaf cells.
Petite Mutants in Yeast: Result from mutations in mitochondrial DNA affecting respiration.
Slide 8: Importance of Extrachromosomal Inheritance
Evolution: Provides insight into the evolution of eukaryotic cells.
Medicine: Understanding mitochondrial inheritance helps in diagnosing and treating mitochondrial diseases.
Agriculture: Chloroplast inheritance can be used in plant breeding and genetic modification.
Slide 9: Recent Research and Advances
Gene Editing: Techniques like CRISPR-Cas9 are being used to edit mitochondrial and chloroplast DNA.
Therapies: Development of mitochondrial replacement therapy (MRT) for preventing mitochondrial diseases.
Slide 10: Conclusion
Summary: Extrachromosomal inheritance involves the transmission of genetic material outside the nucleus and plays a crucial role in genetics, medicine, and biotechnology.
Future Directions: Continued research and technological advancements hold promise for new treatments and applications.
Slide 11: Questions and Discussion
Invite Audience: Open the floor for any questions or further discussion on the topic.
Seminar of U.V. Spectroscopy by SAMIR PANDASAMIR PANDA
Spectroscopy is a branch of science dealing the study of interaction of electromagnetic radiation with matter.
Ultraviolet-visible spectroscopy refers to absorption spectroscopy or reflect spectroscopy in the UV-VIS spectral region.
Ultraviolet-visible spectroscopy is an analytical method that can measure the amount of light received by the analyte.
This pdf is about the Schizophrenia.
For more details visit on YouTube; @SELF-EXPLANATORY;
https://www.youtube.com/channel/UCAiarMZDNhe1A3Rnpr_WkzA/videos
Thanks...!
Earliest Galaxies in the JADES Origins Field: Luminosity Function and Cosmic ...Sérgio Sacani
We characterize the earliest galaxy population in the JADES Origins Field (JOF), the deepest
imaging field observed with JWST. We make use of the ancillary Hubble optical images (5 filters
spanning 0.4−0.9µm) and novel JWST images with 14 filters spanning 0.8−5µm, including 7 mediumband filters, and reaching total exposure times of up to 46 hours per filter. We combine all our data
at > 2.3µm to construct an ultradeep image, reaching as deep as ≈ 31.4 AB mag in the stack and
30.3-31.0 AB mag (5σ, r = 0.1” circular aperture) in individual filters. We measure photometric
redshifts and use robust selection criteria to identify a sample of eight galaxy candidates at redshifts
z = 11.5 − 15. These objects show compact half-light radii of R1/2 ∼ 50 − 200pc, stellar masses of
M⋆ ∼ 107−108M⊙, and star-formation rates of SFR ∼ 0.1−1 M⊙ yr−1
. Our search finds no candidates
at 15 < z < 20, placing upper limits at these redshifts. We develop a forward modeling approach to
infer the properties of the evolving luminosity function without binning in redshift or luminosity that
marginalizes over the photometric redshift uncertainty of our candidate galaxies and incorporates the
impact of non-detections. We find a z = 12 luminosity function in good agreement with prior results,
and that the luminosity function normalization and UV luminosity density decline by a factor of ∼ 2.5
from z = 12 to z = 14. We discuss the possible implications of our results in the context of theoretical
models for evolution of the dark matter halo mass function.
Nutraceutical market, scope and growth: Herbal drug technologyLokesh Patil
As consumer awareness of health and wellness rises, the nutraceutical market—which includes goods like functional meals, drinks, and dietary supplements that provide health advantages beyond basic nutrition—is growing significantly. As healthcare expenses rise, the population ages, and people want natural and preventative health solutions more and more, this industry is increasing quickly. Further driving market expansion are product formulation innovations and the use of cutting-edge technology for customized nutrition. With its worldwide reach, the nutraceutical industry is expected to keep growing and provide significant chances for research and investment in a number of categories, including vitamins, minerals, probiotics, and herbal supplements.
What is greenhouse gasses and how many gasses are there to affect the Earth.moosaasad1975
What are greenhouse gasses how they affect the earth and its environment what is the future of the environment and earth how the weather and the climate effects.
PRESENTATION ABOUT PRINCIPLE OF COSMATIC EVALUATION
Cbr test
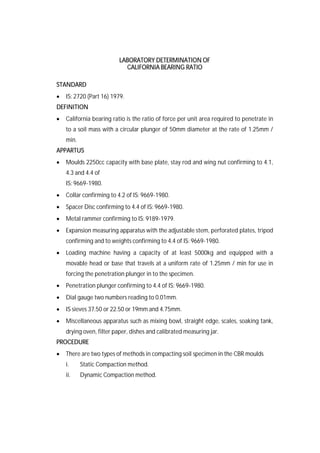
1. LABORATORY DETERMINATION OF
CALIFORNIA BEARING RATIO
STANDARD
IS: 2720 (Part 16) 1979.
DEFINITION
California bearing ratio is the ratio of force per unit area required to penetrate in
to a soil mass with a circular plunger of 50mm diameter at the rate of 1.25mm /
min.
APPARTUS
Moulds 2250cc capacity with base plate, stay rod and wing nut confirming to 4.1,
4.3 and 4.4 of
IS: 9669-1980.
Collar confirming to 4.2 of IS: 9669-1980.
Spacer Disc confirming to 4.4 of IS: 9669-1980.
Metal rammer confirming to IS: 9189-1979.
Expansion measuring apparatus with the adjustable stem, perforated plates, tripod
confirming and to weights confirming to 4.4 of IS: 9669-1980.
Loading machine having a capacity of at least 5000kg and equipped with a
movable head or base that travels at a uniform rate of 1.25mm / min for use in
forcing the penetration plunger in to the specimen.
Penetration plunger confirming to 4.4 of IS: 9669-1980.
Dial gauge two numbers reading to 0.01mm.
IS sieves 37.50 or 22.50 or 19mm and 4.75mm.
Miscellaneous apparatus such as mixing bowl, straight edge, scales, soaking tank,
drying oven, filter paper, dishes and calibrated measuring jar.
PROCEDURE
There are two types of methods in compacting soil specimen in the CBR moulds
i. Static Compaction method.
ii. Dynamic Compaction method.
2. The material used in the above two methods shall pass 19mm sieve for fine grained
soils and 37.50mm sieve for coarse materials up to 37.50mm.
Replace the material retained on 19mm sieve by an equal amount of material
passing 19mm sieve and retained on 4.75mm sieve
Replace the material retained on 37.50mm sieve by an equal amount of material
passing 37.50mm sieve and retained on 4.75mm sieve.
Static Compaction
In this method calculate the mass of wet soil at required moisture content to give a
desired density when compacted in a standard test mould as given below
Volume of mould = 2250cc.
Weight of dry soil (W) = 2250 x MDD.
m
Weight of wet soil =1+ ---------- x W
100
Weight of water = Weight of wet soil - Weight of dry soil.
m = Optimum moisture content obtained from the laboratory compaction test.
Take oven dried soil sample of calculated weight and thoroughly mix with water
(OMC) as obtained from the above equation.
Record the empty weight of the mould with base plate, with extension collar
removed (m1).
Place the correct mass of the wet soil in to the mould in five layers.
Gently compact each layer with the spacer disc.
Place a filter paper on top of the soil followed by a 5cms displacer disc.
Compact the mould by pressing it in between the platens of the compression
testing machine until the top of the spacer disc comes flush with the top of the
mould.
Held the load for about 30 seconds and then release.
3. In some soil types where a certain amount of rebound occurs, it may be necessary
to reapply load to force the displacer disc slightly below the top of the mould so
that on rebound the right volume is obtained.
Remove the mould from the compression testing machine.
Remove the spacer disc and weigh the mould with compacted soil (m2).
Replace the extension collar of the mould.
Prepare two more specimens in the same procedure as described above.
Dynamic Compaction
Take representative sample of soil weighing approximately 6kg and mix
thoroughly at OMC.
Record the empty weight of the mould with base plate, with extension collar
removed (m1).
Replace the extension collar of the mould.
Insert a spacer disc over the base plate and place a coarse filter paper on the top of
the spacer disc.
Place the mould on a solid base such as a concrete floor or plinth and compact the
wet soil in to the mould in five layers of approximately equal mass each layer being
given 56 blows with 4.90kg hammer equally distributed and dropped from a height
of 450 mm above the soil.
The amount of soil used shall be sufficient to fill the mould, leaving not more than
about 6mm to be struck off when the extension collar is removed.
Remove the extension collar and carefully level the compacted soil to the top of
the mould by means of a straight edge.
Remove the spacer disc by inverting the mould and weigh the mould with
compacted soil (m2).
Place a filter paper between the base plate and the inverted mould.
Replace the extension collar of the mould.
Prepare two more specimens in the same procedure as described above.
4. In both the cases of compaction, if the sample is to be soaked, take representative
samples of the material at the beginning of compaction and another sample of
remaining material after compaction for the determination of moisture content.
Each sample shall weigh not less than 100g for fine-grained soils and not less than
500 for granular soils.
Place the adjustable stem and perforated plate on the compacted soil specimen in
the mould.
Place the weights to produce a surcharge equal to the weight of base material and
pavement to the nearest 2.5kg on the perforated plate.
Immerse the whole mould and weights in a tank of water allowing free access of
water to the top and bottom of specimen for 96 hours.
Test for Swelling
This test is optional and may be omitted if not necessary.
Determine the initial height of specimen (h) in mm.
Mount the expansion-measuring device along with the tripod on the edge of the
mould and record the initial dial gauge reading (ds).
Keep this set up as such undisturbed for 96 hours noting down the readings every
day against the time of reading.
Maintain a constant water level through out the period of soaking.
Note the final reading of the dial gauge at the end of soaking period (dh).
Calculations for Swelling
df -ds
Expansion ratio = ----------- x 100
h
ds = Initial dial gauge reading in mm
df = final dial gauge reading in mm
h = initial height of specimen in mm
Penetration Test
After 96 hours of soaking take out the specimen from the water and remove the
extension collar, perforated disc, surcharge weights and filter paper.
5. Drain off the excess water by placing the mould inclined for about 15 minutes and
weigh the mould.
Testing of CBR specimen
Place the mould on the lower plate of the testing machine with top face exposed
To prevent upheaval of soil in to the hole of surcharge weights, place 2.5kg annular
weights on the soil surface prior to seating the penetration plunger after which
place the reminder of the surcharge weights.
Set the plunger under a load of 4 kg so that full contact is established between the
surface of the specimen and the plunger.
Set the stress and strain gauges to zero.
Consider the initial load applied to the plunger as the zero load.
Apply the load at the rate of 1.25 mm / min.
Take the readings of the load at penetration of 0, 0.5, 1.0, 1.5, 2.0, 2.5, 3.0, 4, 5,
7.5, 10 and 12.5.
Raise the plunger and detach the mould from the loading equipment.
Collect the sample of about 20 to 50gms of soil from the top 30mm layer of
specimen and determine the water content in accordance with IS: 2720 (Part 4)
1973.
Examine the specimen carefully after the test is completed for the presence of any
over size soil particles, which are likely to affect the results if they happen to be
located directly below the penetration plunger.
6. CALCULATION OF CBR FROM LOAD PENETRATION CURVE
Plot the load penetration curve in natural scale, load on Y - axis and penetration on
X – axis as shown in Fig: 2.9.2.
If the curve is uniformly convex upwards although the initial portion of the curve
may be concave upwards due to surface irregularities make correction by drawing
a tangent to the upper curve at the point of contra flexure as below
0 2.50 5.00 7.50 10.00 12.50
Load vs. Penetration curve
Take the intersection point of the tangent and the X – axis as the origin.
Calculate the CBR values for penetration of 2.50mm and 5.00mm.
Corresponding to the penetration value at which CBR is to be desired, take the
corrected load values from the load penetration curve and calculate the CBR from
the equation
PT x Cf
California Bearing Ratio = ------------- x 100.
PS
Penetration in mm
80
70
60
50
40
30
20
10
NO CORRECTION
REQUIRED
CORRECTED 5mm
PENETRATION
CORRECTED 2.5mm
PENETRATION
CORRECTED FOR CONCAVE
UPWARD SHAPE
LoadonPistoninKg/Cm2
90
100
7. PT =Corrected unit test load corresponding to the chosen penetration from load
penetration curve
PS = Total standard load for the same depth of penetration, which can be taken
from the Table below
Cf = Proving ring correction factor.
Standard loads at specified penetrations
REPORT
Report the CBR value to the nearest second decimal.
Take the average of three test specimens as the CBR value of the test.
Generally, the CBR value at 2.50mm penetration will be greater than that at
5.00mm penetration and in such case take the value at 2.50mm as the CBR value.
If the CBR value corresponding to a penetration of 5.00mm exceeds that of
2.50mm,repeat the test.
If the identical results follow, take the value corresponding to 5.00mm as the CBR
value.
PRECAUTIONS
Clean the holes of the base plate and that of perforated disc thoroughly.
Align the surcharge weight with the plunger so that the plunger penetrates freely
in to the soil.
Format on next page
Penetration depth
(mm)
Unit Standard load
Kgf/ cm2
Total Standard load
(Kgf)
2.50 70 1370
5.00 105 2055
7.50 134 2630
10.00 162 3180
12.50 183 3600