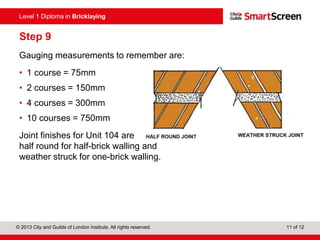
Level 1 Diploma in Bricklaying
© 2013 City and Guilds of London Institute. All rights reserved. 1 of 12
Level 1 Diploma in Bricklaying
PowerPointpresentation
Bricklaying: step by step
Unit 102: Contribute to setting out and building of
masonry structures up to damp proof course
Level 1 Diploma in Bricklaying
© 2013 City and Guilds of London Institute. All rights reserved. 2 of 12
Level 1 Diploma in Bricklaying
Introduction
This unit will enable the learner to build both half- and one-brick walling.
The cuts involved are shown in this presentation. All cutting must be
undertaken by hand.
Cutting the bricks can be done prior to the construction of the walls.
Level 1 Diploma in Bricklaying
© 2013 City and Guilds of London Institute. All rights reserved. 3 of 12
Level 1 Diploma in Bricklaying
Step 1
When selecting your bricks, always take a few bricks from different
pallets and place them together.
The bricks need to be the same size in order to maintain the bond and
vertical perpends.
Level 1 Diploma in Bricklaying
© 2013 City and Guilds of London Institute. All rights reserved. 4 of 12
Level 1 Diploma in Bricklaying
Step 2
Every wall or house at the start should be set out two courses dry.
This will ensure a good bond and will also help show the positions of
quoins, windows and door openings.
Level 1 Diploma in Bricklaying
© 2013 City and Guilds of London Institute. All rights reserved. 5 of 12
Level 1 Diploma in Bricklaying
Step 3
Upon marking out the perpends, the quoins can be built.
Be sure that the quoins are gauged, levelled and plumbed.
Ensure the quoins are square.
Your accurate infill will rely on good quoins.
Level 1 Diploma in Bricklaying
© 2013 City and Guilds of London Institute. All rights reserved. 6 of 12
Level 1 Diploma in Bricklaying
Step 4
Having completed the quoins, the infill brickwork can now be added.
Always ensure that each course is ‘ranged’ both horizontal and
diagonal.
Each course must be level with the quoin courses.
Level 1 Diploma in Bricklaying
© 2013 City and Guilds of London Institute. All rights reserved. 7 of 12
Level 1 Diploma in Bricklaying
Step 5
One-brick walling has a quarter bond – the header must be in the
middle of the stretcher below.
Always ensure that the quarter bond is equal on both sides.
Level 1 Diploma in Bricklaying
© 2013 City and Guilds of London Institute. All rights reserved. 8 of 12
Level 1 Diploma in Bricklaying
Step 6
When starting a junction wall, always
establish the main quoin bricks.
These bricks must be levelled against
each other prior to completing the
course.
One of the rules of bonding is:
• complete the face first, then
• the sides, then
• the rear.
The middle bond will now be the
easier to complete.
Level 1 Diploma in Bricklaying
© 2013 City and Guilds of London Institute. All rights reserved. 9 of 12
Level 1 Diploma in Bricklaying
Step 7
In junction walling, you have to ensure that the two walls are
tied in together.
This is done by using tie bricks – this will maintain the bond.
Level 1 Diploma in Bricklaying
© 2013 City and Guilds of London Institute. All rights reserved. 10 of 12
Level 1 Diploma in Bricklaying
Step 8
All coursed brickwork must be gauged.
Each course must be equal to 75mm.
65mm for the brick and 10mm for the bed joint = 75mm.
A gauge rod or tape measure can be used.
Level 1 Diploma in Bricklaying
© 2013 City and Guilds of London Institute. All rights reserved. 11 of 12
Level 1 Diploma in Bricklaying
Step 9
Gauging measurements to remember are:
• 1 course = 75mm
• 2 courses = 150mm
• 4 courses = 300mm
• 10 courses = 750mm
Joint finishes for Unit 104 are
half round for half-brick walling and
weather struck for one-brick walling.
Level 1 Diploma in Bricklaying
© 2013 City and Guilds of London Institute. All rights reserved. 12 of 12
Level 1 Diploma in Bricklaying
Any questions?

Bricklaying: Step by Step

  • 1.
    Level 1 Diplomain Bricklaying © 2013 City and Guilds of London Institute. All rights reserved. 1 of 12 Level 1 Diploma in Bricklaying PowerPointpresentation Bricklaying: step by step Unit 102: Contribute to setting out and building of masonry structures up to damp proof course
  • 2.
    Level 1 Diplomain Bricklaying © 2013 City and Guilds of London Institute. All rights reserved. 2 of 12 Level 1 Diploma in Bricklaying Introduction This unit will enable the learner to build both half- and one-brick walling. The cuts involved are shown in this presentation. All cutting must be undertaken by hand. Cutting the bricks can be done prior to the construction of the walls.
  • 3.
    Level 1 Diplomain Bricklaying © 2013 City and Guilds of London Institute. All rights reserved. 3 of 12 Level 1 Diploma in Bricklaying Step 1 When selecting your bricks, always take a few bricks from different pallets and place them together. The bricks need to be the same size in order to maintain the bond and vertical perpends.
  • 4.
    Level 1 Diplomain Bricklaying © 2013 City and Guilds of London Institute. All rights reserved. 4 of 12 Level 1 Diploma in Bricklaying Step 2 Every wall or house at the start should be set out two courses dry. This will ensure a good bond and will also help show the positions of quoins, windows and door openings.
  • 5.
    Level 1 Diplomain Bricklaying © 2013 City and Guilds of London Institute. All rights reserved. 5 of 12 Level 1 Diploma in Bricklaying Step 3 Upon marking out the perpends, the quoins can be built. Be sure that the quoins are gauged, levelled and plumbed. Ensure the quoins are square. Your accurate infill will rely on good quoins.
  • 6.
    Level 1 Diplomain Bricklaying © 2013 City and Guilds of London Institute. All rights reserved. 6 of 12 Level 1 Diploma in Bricklaying Step 4 Having completed the quoins, the infill brickwork can now be added. Always ensure that each course is ‘ranged’ both horizontal and diagonal. Each course must be level with the quoin courses.
  • 7.
    Level 1 Diplomain Bricklaying © 2013 City and Guilds of London Institute. All rights reserved. 7 of 12 Level 1 Diploma in Bricklaying Step 5 One-brick walling has a quarter bond – the header must be in the middle of the stretcher below. Always ensure that the quarter bond is equal on both sides.
  • 8.
    Level 1 Diplomain Bricklaying © 2013 City and Guilds of London Institute. All rights reserved. 8 of 12 Level 1 Diploma in Bricklaying Step 6 When starting a junction wall, always establish the main quoin bricks. These bricks must be levelled against each other prior to completing the course. One of the rules of bonding is: • complete the face first, then • the sides, then • the rear. The middle bond will now be the easier to complete.
  • 9.
    Level 1 Diplomain Bricklaying © 2013 City and Guilds of London Institute. All rights reserved. 9 of 12 Level 1 Diploma in Bricklaying Step 7 In junction walling, you have to ensure that the two walls are tied in together. This is done by using tie bricks – this will maintain the bond.
  • 10.
    Level 1 Diplomain Bricklaying © 2013 City and Guilds of London Institute. All rights reserved. 10 of 12 Level 1 Diploma in Bricklaying Step 8 All coursed brickwork must be gauged. Each course must be equal to 75mm. 65mm for the brick and 10mm for the bed joint = 75mm. A gauge rod or tape measure can be used.
  • 11.
    Level 1 Diplomain Bricklaying © 2013 City and Guilds of London Institute. All rights reserved. 11 of 12 Level 1 Diploma in Bricklaying Step 9 Gauging measurements to remember are: • 1 course = 75mm • 2 courses = 150mm • 4 courses = 300mm • 10 courses = 750mm Joint finishes for Unit 104 are half round for half-brick walling and weather struck for one-brick walling.
  • 12.
    Level 1 Diplomain Bricklaying © 2013 City and Guilds of London Institute. All rights reserved. 12 of 12 Level 1 Diploma in Bricklaying Any questions?