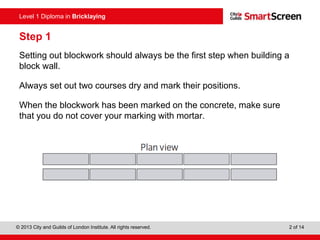
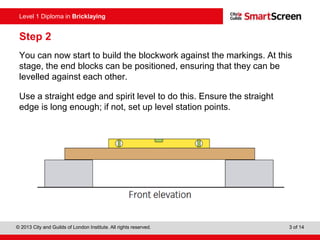
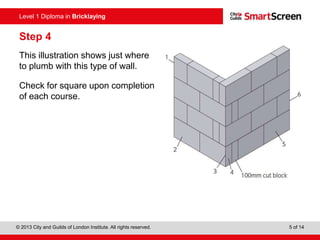
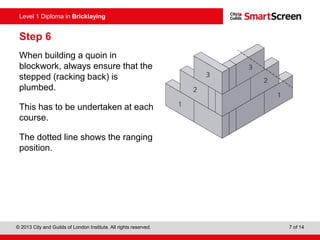
© 2013 City and Guilds of London Institute. All rights reserved. 1 of 14
Level 1 Diploma in Bricklaying
PowerPointpresentation
Blocklaying: Step by step
Unit 103: Carrying out blocklaying activities
© 2013 City and Guilds of London Institute. All rights reserved. 2 of 14
Level 1 Diploma in Bricklaying
Step 1
Setting out blockwork should always be the first step when building a
block wall.
Always set out two courses dry and mark their positions.
When the blockwork has been marked on the concrete, make sure
that you do not cover your marking with mortar.
© 2013 City and Guilds of London Institute. All rights reserved. 3 of 14
Level 1 Diploma in Bricklaying
Step 2
You can now start to build the blockwork against the markings. At this
stage, the end blocks can be positioned, ensuring that they can be
levelled against each other.
Use a straight edge and spirit level to do this. Ensure the straight
edge is long enough; if not, set up level station points.
© 2013 City and Guilds of London Institute. All rights reserved. 4 of 14
Level 1 Diploma in Bricklaying
Step 3
At the same time as setting out, you can also extend the corner (quoin)
and form a 90° right-angled quoin using a builder’s square.
The quoin has the 100mm cuts fixed every other course to help
maintain the bond.
Don’t forget:
the number of
plumbing points
increase when
forming a quoin.
© 2013 City and Guilds of London Institute. All rights reserved. 5 of 14
Level 1 Diploma in Bricklaying
Step 4
This illustration shows just where
to plumb with this type of wall.
Check for square upon completion
of each course.
© 2013 City and Guilds of London Institute. All rights reserved. 6 of 14
Level 1 Diploma in Bricklaying
Step 5
As the blockwork courses
increase, the ranging must be
undertaken.
The dotted line in this illustration
shows the angle at which to hold
your level or straight edge.
Ranging ensures that the wall has
a flat surface on the face of the
blockwork.
Ranging for the racking back is the
same as for brickwork – see Unit
104.
© 2013 City and Guilds of London Institute. All rights reserved. 7 of 14
Level 1 Diploma in Bricklaying
Step 6
When building a quoin in
blockwork, always ensure that the
stepped (racking back) is
plumbed.
This has to be undertaken at each
course.
The dotted line shows the ranging
position.
© 2013 City and Guilds of London Institute. All rights reserved. 8 of 14
Level 1 Diploma in Bricklaying
Step 7
Building blockwork course
by course requires the
bricklayer to gauge the
courses.
Each course equals
213mm plus a bed joint:
215 + 10 = 225mm.
© 2013 City and Guilds of London Institute. All rights reserved. 9 of 14
Level 1 Diploma in Bricklaying
Step 8
Each course at both sides of a wall must be level with each other.
Each step in the courses can be levelled using a straight edge and
level.
© 2013 City and Guilds of London Institute. All rights reserved. 10 of 14
Level 1 Diploma in Bricklaying
Step 9
Maintaining level courses in blockwork can be difficult.
The best way to do this is to use a line and corner blocks arrangement.
© 2013 City and Guilds of London Institute. All rights reserved. 11 of 14
Level 1 Diploma in Bricklaying
Step 10
As the wall proceeds in height,
perping becomes important.
To maintain a full and complete
perp, stand the block on end and
lay the perp as you would a bed
joint.
Perp joint
© 2013 City and Guilds of London Institute. All rights reserved. 12 of 14
Level 1 Diploma in Bricklaying
Step 11
Finishing a joint flush can be achieved with a laying trowel.
Remember to always push the trowel with the joint and never lift the
excess up the face.
© 2013 City and Guilds of London Institute. All rights reserved. 13 of 14
Level 1 Diploma in Bricklaying
Step 12
Achieving a half-round finish to a
joint can be done using a half-
round jointer.
Always joint the perps first, then
the bed joints. This will prevent
leaving any half-round jointer
marks in the bed joints.
© 2013 City and Guilds of London Institute. All rights reserved. 14 of 14
Level 1 Diploma in Bricklaying
Any questions?

Blocklaying: Step by step

  • 1.
    © 2013 Cityand Guilds of London Institute. All rights reserved. 1 of 14 Level 1 Diploma in Bricklaying PowerPointpresentation Blocklaying: Step by step Unit 103: Carrying out blocklaying activities
  • 2.
    © 2013 Cityand Guilds of London Institute. All rights reserved. 2 of 14 Level 1 Diploma in Bricklaying Step 1 Setting out blockwork should always be the first step when building a block wall. Always set out two courses dry and mark their positions. When the blockwork has been marked on the concrete, make sure that you do not cover your marking with mortar.
  • 3.
    © 2013 Cityand Guilds of London Institute. All rights reserved. 3 of 14 Level 1 Diploma in Bricklaying Step 2 You can now start to build the blockwork against the markings. At this stage, the end blocks can be positioned, ensuring that they can be levelled against each other. Use a straight edge and spirit level to do this. Ensure the straight edge is long enough; if not, set up level station points.
  • 4.
    © 2013 Cityand Guilds of London Institute. All rights reserved. 4 of 14 Level 1 Diploma in Bricklaying Step 3 At the same time as setting out, you can also extend the corner (quoin) and form a 90° right-angled quoin using a builder’s square. The quoin has the 100mm cuts fixed every other course to help maintain the bond. Don’t forget: the number of plumbing points increase when forming a quoin.
  • 5.
    © 2013 Cityand Guilds of London Institute. All rights reserved. 5 of 14 Level 1 Diploma in Bricklaying Step 4 This illustration shows just where to plumb with this type of wall. Check for square upon completion of each course.
  • 6.
    © 2013 Cityand Guilds of London Institute. All rights reserved. 6 of 14 Level 1 Diploma in Bricklaying Step 5 As the blockwork courses increase, the ranging must be undertaken. The dotted line in this illustration shows the angle at which to hold your level or straight edge. Ranging ensures that the wall has a flat surface on the face of the blockwork. Ranging for the racking back is the same as for brickwork – see Unit 104.
  • 7.
    © 2013 Cityand Guilds of London Institute. All rights reserved. 7 of 14 Level 1 Diploma in Bricklaying Step 6 When building a quoin in blockwork, always ensure that the stepped (racking back) is plumbed. This has to be undertaken at each course. The dotted line shows the ranging position.
  • 8.
    © 2013 Cityand Guilds of London Institute. All rights reserved. 8 of 14 Level 1 Diploma in Bricklaying Step 7 Building blockwork course by course requires the bricklayer to gauge the courses. Each course equals 213mm plus a bed joint: 215 + 10 = 225mm.
  • 9.
    © 2013 Cityand Guilds of London Institute. All rights reserved. 9 of 14 Level 1 Diploma in Bricklaying Step 8 Each course at both sides of a wall must be level with each other. Each step in the courses can be levelled using a straight edge and level.
  • 10.
    © 2013 Cityand Guilds of London Institute. All rights reserved. 10 of 14 Level 1 Diploma in Bricklaying Step 9 Maintaining level courses in blockwork can be difficult. The best way to do this is to use a line and corner blocks arrangement.
  • 11.
    © 2013 Cityand Guilds of London Institute. All rights reserved. 11 of 14 Level 1 Diploma in Bricklaying Step 10 As the wall proceeds in height, perping becomes important. To maintain a full and complete perp, stand the block on end and lay the perp as you would a bed joint. Perp joint
  • 12.
    © 2013 Cityand Guilds of London Institute. All rights reserved. 12 of 14 Level 1 Diploma in Bricklaying Step 11 Finishing a joint flush can be achieved with a laying trowel. Remember to always push the trowel with the joint and never lift the excess up the face.
  • 13.
    © 2013 Cityand Guilds of London Institute. All rights reserved. 13 of 14 Level 1 Diploma in Bricklaying Step 12 Achieving a half-round finish to a joint can be done using a half- round jointer. Always joint the perps first, then the bed joints. This will prevent leaving any half-round jointer marks in the bed joints.
  • 14.
    © 2013 Cityand Guilds of London Institute. All rights reserved. 14 of 14 Level 1 Diploma in Bricklaying Any questions?