The document explains data binding with the AdapterView class in Android, detailing how to connect various data sources to views like ListView, Spinner, and GridView using adapters. Key concepts include the roles of adapters, the binding process, and code examples for implementing ListView, Spinner, and GridView with click and selection handling. It emphasizes the customization and functionality of these components for displaying collections of items.


![// Step 1: Prepare Data
String[] items = {"Item 1", "Item 2", "Item 3", "Item 4"};
// Step 2: Create an Adapter
ArrayAdapter<String> adapter = new ArrayAdapter<>(this,
android.R.layout.simple_list_item_1, items);
// Step 3: Find the ListView and Set the Adapter
ListView listView = findViewById(R.id.listView);
listView.setAdapter(adapter);](https://image.slidesharecdn.com/bindingdatawiththeadapterviewclass-240831002631-8f1b790c/85/Binding-data-with-the-AdapterView-class-pptx-8-320.jpg)
![// Step 1: Prepare Data
String[] colors = {"Red", "Green", "Blue", "Yellow"};
// Step 2: Create an Adapter
ArrayAdapter<String> adapter = new ArrayAdapter<>(this,
android.R.layout.simple_spinner_item, colors);
adapter.setDropDownViewResource(android.R.layout.simple_spinner_dropdown_item);
// Step 3: Find the Spinner and Set the Adapter
Spinner spinner = findViewById(R.id.spinner);
spinner.setAdapter(adapter);](https://image.slidesharecdn.com/bindingdatawiththeadapterviewclass-240831002631-8f1b790c/85/Binding-data-with-the-AdapterView-class-pptx-11-320.jpg)

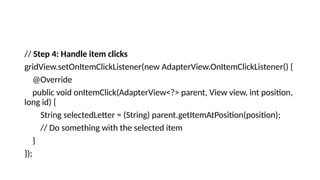
![// Step 1: Prepare Data
String[] letters = {"A", "B", "C", "D", "E", "F", "G", "H"};
// Step 2: Create an Adapter
ArrayAdapter<String> adapter = new ArrayAdapter<>(this,
android.R.layout.simple_list_item_1, letters);
// Step 3: Find the GridView and Set the Adapter
GridView gridView = findViewById(R.id.gridView);
gridView.setAdapter(adapter);](https://image.slidesharecdn.com/bindingdatawiththeadapterviewclass-240831002631-8f1b790c/85/Binding-data-with-the-AdapterView-class-pptx-14-320.jpg)