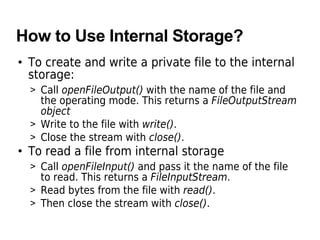
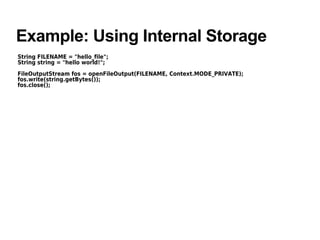
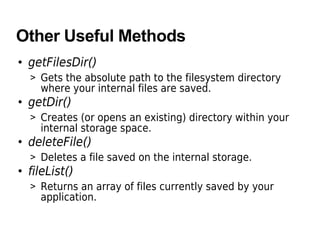
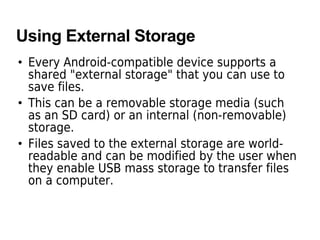
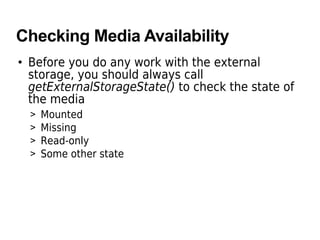
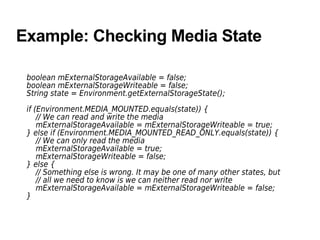
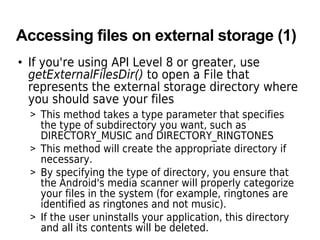
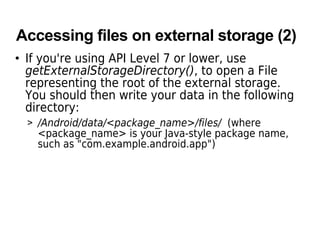
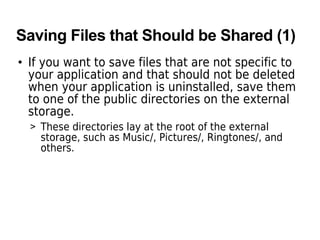
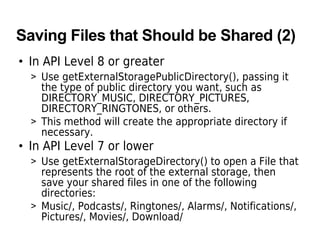
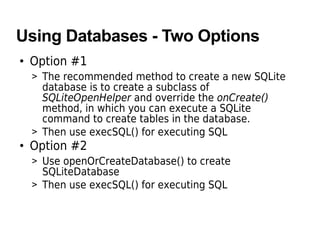
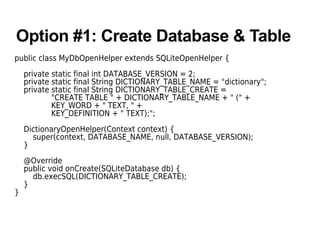
Data Storage
Topics
• Data storage options
• Shared preferences
• Internal storage
• External storage
• Database
• Network connection
Data Storage Options
Data Storage Options in Android
• Android provides several options for you to
save persistent application data.
• The solution you choose depends on your
specific needs, such as
> whether the data should be private to your
application or accessible to other applications (and
the user)
> how much space your data requires.
Data Storage Options
• Shared preferences
> Store private primitive data in key-value pairs
• Internal storage
> Store private data on the device memory
• External storage
> Store public data on the shared external storage.
• SQLite databases
> Store structured data in a private database.
• Network connection
> Store data on the web with your own network server.
Content Provider
&
Data Storage
Content Provider & Data Storage
• Most content providers store their data using
Android's file storage methods or SQLite
databases, but you can store your data any way
you want.
Shared Preferences
When to Use Shared Preferences?
• The SharedPreferences class provides a general
framework that allows you to save and retrieve
persistent key-value pairs of primitive data
types.
• You can use SharedPreferences to save any
primitive data:
> booleans, floats, ints, longs, and strings.
• This data will persist across user sessions (even
if your application is killed).
PreferenceActivity Class
• If you're interested in creating user preferences
for your application, see PreferenceActivity,
which provides an Activity framework for you to
create user preferences, which will be
automatically persisted (using shared
preferences underneath).
How to Use Shared Preferences? (1)
• To get a SharedPreferences object for your
application, use one of two methods:
> getSharedPreferences() - Use this if you need
multiple preferences files identified by name, which
you specify with the first parameter.
> getPreferences() - Use this if you need only one
preferences file for your Activity. Because this will be
the only preferences file for your Activity, you don't
supply a name.
How to Use Shared Preferences? (2)
• To write values:
> Call edit() to get a SharedPreferences.Editor.
> Add values with methods such as putBoolean() and
putString().
> Commit the new values with commit()
• To read values:
> use SharedPreferences methods such as
getBoolean() and getString()
Example: Using Shared Preferences
public class Calc extends Activity {
public static final String PREFS_NAME = "MyPrefsFile";
@Override
protected void onCreate(Bundle state){
super.onCreate(state);
. . .
// Restore preferences
SharedPreferences settings = getSharedPreferences(PREFS_NAME, 0);
boolean silent = settings.getBoolean("silentMode", false);
setSilent(silent);
}
@Override
protected void onStop(){
super.onStop();
// We need an Editor object to make preference changes.
// All objects are from android.context.Context
SharedPreferences settings = getSharedPreferences(PREFS_NAME, 0);
SharedPreferences.Editor editor = settings.edit();
editor.putBoolean("silentMode", mSilentMode);
// Commit the edits!
editor.commit();
}
}
Internal Storage
Using Internal Storage
• You can save files directly on the device's
internal storage.
• By default, files saved to the internal storage
are private to your application and other
applications cannot access them
• When the user uninstalls your application,
these files are removed.
How to Use Internal Storage?
• To create and write a private file to the internal
storage:
> Call openFileOutput() with the name of the file and
the operating mode. This returns a FileOutputStream
object
> Write to the file with write().
> Close the stream with close().
• To read a file from internal storage
> Call openFileInput() and pass it the name of the file
to read. This returns a FileInputStream.
> Read bytes from the file with read().
> Then close the stream with close().
Example: Using Internal Storage
String FILENAME = "hello_file";
String string = "hello world!";
FileOutputStream fos = openFileOutput(FILENAME, Context.MODE_PRIVATE);
fos.write(string.getBytes());
fos.close();
Other Useful Methods
• getFilesDir()
> Gets the absolute path to the filesystem directory
where your internal files are saved.
• getDir()
> Creates (or opens an existing) directory within your
internal storage space.
• deleteFile()
> Deletes a file saved on the internal storage.
• fileList()
> Returns an array of files currently saved by your
application.
External Storage
Using External Storage
• Every Android-compatible device supports a
shared "external storage" that you can use to
save files.
• This can be a removable storage media (such
as an SD card) or an internal (non-removable)
storage.
• Files saved to the external storage are world-
readable and can be modified by the user when
they enable USB mass storage to transfer files
on a computer.
Checking Media Availability
• Before you do any work with the external
storage, you should always call
getExternalStorageState() to check the state of
the media
> Mounted
> Missing
> Read-only
> Some other state
Example: Checking Media State
boolean mExternalStorageAvailable = false;
boolean mExternalStorageWriteable = false;
String state = Environment.getExternalStorageState();
if (Environment.MEDIA_MOUNTED.equals(state)) {
// We can read and write the media
mExternalStorageAvailable = mExternalStorageWriteable = true;
} else if (Environment.MEDIA_MOUNTED_READ_ONLY.equals(state)) {
// We can only read the media
mExternalStorageAvailable = true;
mExternalStorageWriteable = false;
} else {
// Something else is wrong. It may be one of many other states, but
// all we need to know is we can neither read nor write
mExternalStorageAvailable = mExternalStorageWriteable = false;
}
Accessing files on external storage (1)
• If you're using API Level 8 or greater, use
getExternalFilesDir() to open a File that
represents the external storage directory where
you should save your files
> This method takes a type parameter that specifies
the type of subdirectory you want, such as
DIRECTORY_MUSIC and DIRECTORY_RINGTONES
> This method will create the appropriate directory if
necessary.
> By specifying the type of directory, you ensure that
the Android's media scanner will properly categorize
your files in the system (for example, ringtones are
identified as ringtones and not music).
> If the user uninstalls your application, this directory
and all its contents will be deleted.
Accessing files on external storage (2)
• If you're using API Level 7 or lower, use
getExternalStorageDirectory(), to open a File
representing the root of the external storage.
You should then write your data in the following
directory:
> /Android/data/<package_name>/files/ (where
<package_name> is your Java-style package name,
such as "com.example.android.app")
Saving Files that Should be Shared (1)
• If you want to save files that are not specific to
your application and that should not be deleted
when your application is uninstalled, save them
to one of the public directories on the external
storage.
> These directories lay at the root of the external
storage, such as Music/, Pictures/, Ringtones/, and
others.
Saving Files that Should be Shared (2)
• In API Level 8 or greater
> Use getExternalStoragePublicDirectory(), passing it
the type of public directory you want, such as
DIRECTORY_MUSIC, DIRECTORY_PICTURES,
DIRECTORY_RINGTONES, or others.
> This method will create the appropriate directory if
necessary.
• In API Level 7 or lower
> Use getExternalStorageDirectory() to open a File that
represents the root of the external storage, then
save your shared files in one of the following
directories:
> Music/, Podcasts/, Ringtones/, Alarms/, Notifications/,
Pictures/, Movies/, Download/
Using Databases
Using Databases
• Android provides full support for SQLite
databases.
> SQLite is a software library that implements a self-
contained, serverless, zero-configuration,
transactional SQL database engine.
• Any databases you create will be accessible to
any class in the application, but not outside the
application.
• The recommended method to create a new
SQLite database is to create a subclass of
SQLiteOpenHelper and override the onCreate()
method, in which you can execute a SQLite
command to create tables in the database.
Using Databases - Two Options
• Option #1
> The recommended method to create a new SQLite
database is to create a subclass of
SQLiteOpenHelper and override the onCreate()
method, in which you can execute a SQLite
command to create tables in the database.
> Then use execSQL() for executing SQL
• Option #2
> Use openOrCreateDatabase() to create
SQLiteDatabase
> Then use execSQL() for executing SQL
Option #1: Create Database & Table
public class MyDbOpenHelper extends SQLiteOpenHelper {
private static final int DATABASE_VERSION = 2;
private static final String DICTIONARY_TABLE_NAME = "dictionary";
private static final String DICTIONARY_TABLE_CREATE =
"CREATE TABLE " + DICTIONARY_TABLE_NAME + " (" +
KEY_WORD + " TEXT, " +
KEY_DEFINITION + " TEXT);";
DictionaryOpenHelper(Context context) {
super(context, DATABASE_NAME, null, DATABASE_VERSION);
}
@Override
public void onCreate(SQLiteDatabase db) {
db.execSQL(DICTIONARY_TABLE_CREATE);
}
}
Option #2: Creating Database & Table
private static final String DATABASE_NAME = "myDB.db";
private static final String DATABASE_TABLE_NAME = "COUNTRY";
private static final String DATABASE_CREATE_TABLE =
"create table " + DATABASE_TABLE_NAME +
" (_id integer primary key autoincrement, " +
" country_name text not null, " +
" capital_city text not null)";
// Open a new private SQLiteDatabase associated with this Context's application
// package. Create the database file if it doesn't exist.
SQLiteDatabase myDB = openOrCreateDatabase(
DATABASE_NAME,
Context.MODE_PRIVATE, null);
// Create database table
myDB.execSQL(DATABASE_CREATE_TABLE);
Example: Inserting a row
SQLiteDatabase myDB = openOrCreateDatabase(DATABASE_NAME,
Context.MODE_PRIVATE, null);
// Create a new row and insert it into the database.
ContentValues newRow = new ContentValues();
newRow.put("country_name", "U.S.A.");
newRow.put("capital_city", "Washington D.C.");
myDB.insert(DATABASE_TABLE_NAME, null, newRow);
Example: Retrieving all rows
SQLiteDatabase myDB = openOrCreateDatabase(DATABASE_NAME,
Context.MODE_PRIVATE, null);
// Select columns to retrieve in the form of String array
String[] resultColumns = new String[] {"_id", "country_name", "capital_city"};
Cursor cursor = myDB.query(DATABASE_TABLE_NAME, resultColumns, null, null,
null, null, null, null);
String res = "Result is:";
Integer cindex = cursor.getColumnIndex("country_name");
if (cursor.moveToFirst()) {
do {
res += cursor.getString(cindex)+"-";
} while (cursor.moveToNext());
}
Thank you

Android datastorage

  • 1.
  • 2.
    Topics • Data storageoptions • Shared preferences • Internal storage • External storage • Database • Network connection
  • 3.
  • 4.
    Data Storage Optionsin Android • Android provides several options for you to save persistent application data. • The solution you choose depends on your specific needs, such as > whether the data should be private to your application or accessible to other applications (and the user) > how much space your data requires.
  • 5.
    Data Storage Options •Shared preferences > Store private primitive data in key-value pairs • Internal storage > Store private data on the device memory • External storage > Store public data on the shared external storage. • SQLite databases > Store structured data in a private database. • Network connection > Store data on the web with your own network server.
  • 6.
  • 7.
    Content Provider &Data Storage • Most content providers store their data using Android's file storage methods or SQLite databases, but you can store your data any way you want.
  • 8.
  • 9.
    When to UseShared Preferences? • The SharedPreferences class provides a general framework that allows you to save and retrieve persistent key-value pairs of primitive data types. • You can use SharedPreferences to save any primitive data: > booleans, floats, ints, longs, and strings. • This data will persist across user sessions (even if your application is killed).
  • 10.
    PreferenceActivity Class • Ifyou're interested in creating user preferences for your application, see PreferenceActivity, which provides an Activity framework for you to create user preferences, which will be automatically persisted (using shared preferences underneath).
  • 11.
    How to UseShared Preferences? (1) • To get a SharedPreferences object for your application, use one of two methods: > getSharedPreferences() - Use this if you need multiple preferences files identified by name, which you specify with the first parameter. > getPreferences() - Use this if you need only one preferences file for your Activity. Because this will be the only preferences file for your Activity, you don't supply a name.
  • 12.
    How to UseShared Preferences? (2) • To write values: > Call edit() to get a SharedPreferences.Editor. > Add values with methods such as putBoolean() and putString(). > Commit the new values with commit() • To read values: > use SharedPreferences methods such as getBoolean() and getString()
  • 13.
    Example: Using SharedPreferences public class Calc extends Activity { public static final String PREFS_NAME = "MyPrefsFile"; @Override protected void onCreate(Bundle state){ super.onCreate(state); . . . // Restore preferences SharedPreferences settings = getSharedPreferences(PREFS_NAME, 0); boolean silent = settings.getBoolean("silentMode", false); setSilent(silent); } @Override protected void onStop(){ super.onStop(); // We need an Editor object to make preference changes. // All objects are from android.context.Context SharedPreferences settings = getSharedPreferences(PREFS_NAME, 0); SharedPreferences.Editor editor = settings.edit(); editor.putBoolean("silentMode", mSilentMode); // Commit the edits! editor.commit(); } }
  • 14.
  • 15.
    Using Internal Storage •You can save files directly on the device's internal storage. • By default, files saved to the internal storage are private to your application and other applications cannot access them • When the user uninstalls your application, these files are removed.
  • 16.
    How to UseInternal Storage? • To create and write a private file to the internal storage: > Call openFileOutput() with the name of the file and the operating mode. This returns a FileOutputStream object > Write to the file with write(). > Close the stream with close(). • To read a file from internal storage > Call openFileInput() and pass it the name of the file to read. This returns a FileInputStream. > Read bytes from the file with read(). > Then close the stream with close().
  • 17.
    Example: Using InternalStorage String FILENAME = "hello_file"; String string = "hello world!"; FileOutputStream fos = openFileOutput(FILENAME, Context.MODE_PRIVATE); fos.write(string.getBytes()); fos.close();
  • 18.
    Other Useful Methods •getFilesDir() > Gets the absolute path to the filesystem directory where your internal files are saved. • getDir() > Creates (or opens an existing) directory within your internal storage space. • deleteFile() > Deletes a file saved on the internal storage. • fileList() > Returns an array of files currently saved by your application.
  • 19.
  • 20.
    Using External Storage •Every Android-compatible device supports a shared "external storage" that you can use to save files. • This can be a removable storage media (such as an SD card) or an internal (non-removable) storage. • Files saved to the external storage are world- readable and can be modified by the user when they enable USB mass storage to transfer files on a computer.
  • 21.
    Checking Media Availability •Before you do any work with the external storage, you should always call getExternalStorageState() to check the state of the media > Mounted > Missing > Read-only > Some other state
  • 22.
    Example: Checking MediaState boolean mExternalStorageAvailable = false; boolean mExternalStorageWriteable = false; String state = Environment.getExternalStorageState(); if (Environment.MEDIA_MOUNTED.equals(state)) { // We can read and write the media mExternalStorageAvailable = mExternalStorageWriteable = true; } else if (Environment.MEDIA_MOUNTED_READ_ONLY.equals(state)) { // We can only read the media mExternalStorageAvailable = true; mExternalStorageWriteable = false; } else { // Something else is wrong. It may be one of many other states, but // all we need to know is we can neither read nor write mExternalStorageAvailable = mExternalStorageWriteable = false; }
  • 23.
    Accessing files onexternal storage (1) • If you're using API Level 8 or greater, use getExternalFilesDir() to open a File that represents the external storage directory where you should save your files > This method takes a type parameter that specifies the type of subdirectory you want, such as DIRECTORY_MUSIC and DIRECTORY_RINGTONES > This method will create the appropriate directory if necessary. > By specifying the type of directory, you ensure that the Android's media scanner will properly categorize your files in the system (for example, ringtones are identified as ringtones and not music). > If the user uninstalls your application, this directory and all its contents will be deleted.
  • 24.
    Accessing files onexternal storage (2) • If you're using API Level 7 or lower, use getExternalStorageDirectory(), to open a File representing the root of the external storage. You should then write your data in the following directory: > /Android/data/<package_name>/files/ (where <package_name> is your Java-style package name, such as "com.example.android.app")
  • 25.
    Saving Files thatShould be Shared (1) • If you want to save files that are not specific to your application and that should not be deleted when your application is uninstalled, save them to one of the public directories on the external storage. > These directories lay at the root of the external storage, such as Music/, Pictures/, Ringtones/, and others.
  • 26.
    Saving Files thatShould be Shared (2) • In API Level 8 or greater > Use getExternalStoragePublicDirectory(), passing it the type of public directory you want, such as DIRECTORY_MUSIC, DIRECTORY_PICTURES, DIRECTORY_RINGTONES, or others. > This method will create the appropriate directory if necessary. • In API Level 7 or lower > Use getExternalStorageDirectory() to open a File that represents the root of the external storage, then save your shared files in one of the following directories: > Music/, Podcasts/, Ringtones/, Alarms/, Notifications/, Pictures/, Movies/, Download/
  • 27.
  • 28.
    Using Databases • Androidprovides full support for SQLite databases. > SQLite is a software library that implements a self- contained, serverless, zero-configuration, transactional SQL database engine. • Any databases you create will be accessible to any class in the application, but not outside the application. • The recommended method to create a new SQLite database is to create a subclass of SQLiteOpenHelper and override the onCreate() method, in which you can execute a SQLite command to create tables in the database.
  • 29.
    Using Databases -Two Options • Option #1 > The recommended method to create a new SQLite database is to create a subclass of SQLiteOpenHelper and override the onCreate() method, in which you can execute a SQLite command to create tables in the database. > Then use execSQL() for executing SQL • Option #2 > Use openOrCreateDatabase() to create SQLiteDatabase > Then use execSQL() for executing SQL
  • 30.
    Option #1: CreateDatabase & Table public class MyDbOpenHelper extends SQLiteOpenHelper { private static final int DATABASE_VERSION = 2; private static final String DICTIONARY_TABLE_NAME = "dictionary"; private static final String DICTIONARY_TABLE_CREATE = "CREATE TABLE " + DICTIONARY_TABLE_NAME + " (" + KEY_WORD + " TEXT, " + KEY_DEFINITION + " TEXT);"; DictionaryOpenHelper(Context context) { super(context, DATABASE_NAME, null, DATABASE_VERSION); } @Override public void onCreate(SQLiteDatabase db) { db.execSQL(DICTIONARY_TABLE_CREATE); } }
  • 31.
    Option #2: CreatingDatabase & Table private static final String DATABASE_NAME = "myDB.db"; private static final String DATABASE_TABLE_NAME = "COUNTRY"; private static final String DATABASE_CREATE_TABLE = "create table " + DATABASE_TABLE_NAME + " (_id integer primary key autoincrement, " + " country_name text not null, " + " capital_city text not null)"; // Open a new private SQLiteDatabase associated with this Context's application // package. Create the database file if it doesn't exist. SQLiteDatabase myDB = openOrCreateDatabase( DATABASE_NAME, Context.MODE_PRIVATE, null); // Create database table myDB.execSQL(DATABASE_CREATE_TABLE);
  • 32.
    Example: Inserting arow SQLiteDatabase myDB = openOrCreateDatabase(DATABASE_NAME, Context.MODE_PRIVATE, null); // Create a new row and insert it into the database. ContentValues newRow = new ContentValues(); newRow.put("country_name", "U.S.A."); newRow.put("capital_city", "Washington D.C."); myDB.insert(DATABASE_TABLE_NAME, null, newRow);
  • 33.
    Example: Retrieving allrows SQLiteDatabase myDB = openOrCreateDatabase(DATABASE_NAME, Context.MODE_PRIVATE, null); // Select columns to retrieve in the form of String array String[] resultColumns = new String[] {"_id", "country_name", "capital_city"}; Cursor cursor = myDB.query(DATABASE_TABLE_NAME, resultColumns, null, null, null, null, null, null); String res = "Result is:"; Integer cindex = cursor.getColumnIndex("country_name"); if (cursor.moveToFirst()) { do { res += cursor.getString(cindex)+"-"; } while (cursor.moveToNext()); }
  • 34.