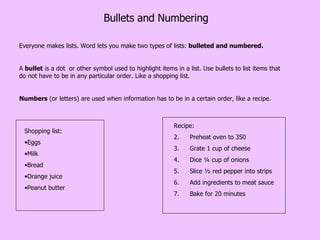
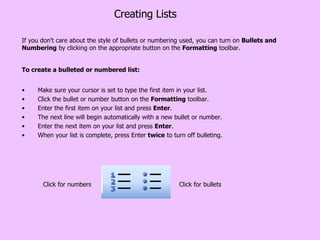
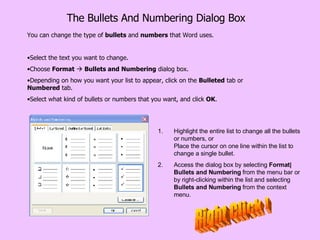
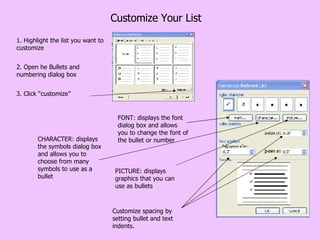
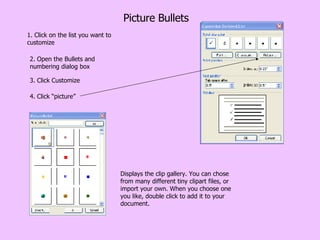
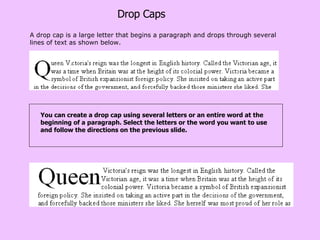
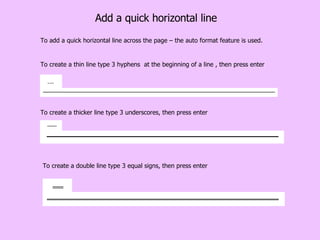
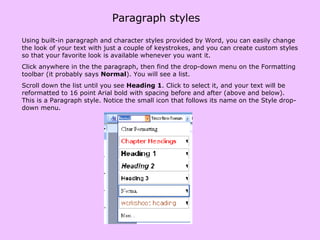
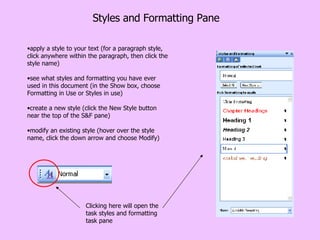
Bullets, Styles and Other Stuff
Bullets and Numbering Everyone makes lists. Word lets you make two types of lists:  bulleted and numbered.  A  bullet  is a dot  or other symbol used to highlight items in a list. Use bullets to list items that do not have to be in any particular order. Like a shopping list. Numbers  (or letters) are used when information has to be in a certain order, like a recipe. Shopping list: Eggs Milk Bread Orange juice Peanut butter Recipe: Preheat oven to 350 Grate 1 cup of cheese Dice ¼ cup of onions Slice ½ red pepper into strips Add ingredients to meat sauce Bake for 20 minutes
Creating Lists To create a bulleted or numbered list: Make sure your cursor is set to type the first item in your list. Click the bullet or number button on the  Formatting  toolbar.  Enter the first item on your list and press  Enter .  The next line will begin automatically with a new bullet or number. Enter the next item on your list and press  Enter .  When your list is complete, press Enter  twice  to turn off bulleting.  Click for bullets Click for numbers If you don't care about the style of bullets or numbering used, you can turn on  Bullets and Numbering  by clicking on the appropriate button on the  Formatting  toolbar.
Nested Lists To create a nested list, such as a numbered list inside of a bulleted list, follow these steps: 1. Type a bulleted list and increase the indentation of the items that will make up the nested list by clicking the  Increase Indent  button for each item. 2. Highlight the items and click the  Numbered List  button on the formatting toolbar.
Auto Format Word’s auto format feature will take your cue and automatically create a bulleted or numbered list for you.  Type * or 1. followed by a space.  Then type the first item in the list.  Press enter to type the second item. Word automatically starts the second line with a bullet or number 2. To end a bulleted list, press enter twice. Sometimes this auto format feature can be annoying. To turn it off, deselect it in the “auto format as you type” section of the “auto correct” dialog box found under the “tools” menu.
The Bullets And Numbering Dialog Box You can change the type of  bullets  and  numbers  that Word uses. Select the text you want to change. Choose  Format      Bullets and Numbering  dialog box. Depending on how you want your list to appear, click on the  Bulleted  tab or  Numbered  tab.  Select what kind of bullets or numbers that you want, and click  OK .  Highlight the entire list to change all the bullets or numbers, or Place the cursor on one line within the list to change a single bullet.  Access the dialog box by selecting  Format|Bullets and Numbering  from the menu bar or by right-clicking within the list and selecting  Bullets and Numbering  from the context menu. Right Click !
Customize Your List 1. Highlight the list you want to customize 2. Open he Bullets and numbering dialog box 3. Click “customize” Customize spacing by setting bullet and text indents. FONT: displays the font dialog box and allows you to change the font of the bullet or number CHARACTER: displays the symbols dialog box and allows you to choose from many symbols to use as a bullet PICTURE: displays graphics that you can use as bullets
Picture Bullets 1. Click on the list you want to customize 2. Open the Bullets and numbering dialog box 4. Click “picture” Displays the clip gallery. You can chose from many different tiny clipart files, or import your own. When you choose one you like, double click to add it to your document. 3. Click Customize
Formatting Tips You can remove a  bullet  by placing the insertion point to the right of the  bullet  and pressing  backspace  (you will not be able to place your insertion point to the left of the bullet).  If you want to change an unordered list to an ordered list (or ordered to unordered),  select  the entire list and click on the  appropriate  button. To create a line break between items in a bulleted or numbered list, place your cursor where you want the line break and press  Enter .  You can also format text using the  Alignment  and  Indent  buttons on the  Formatting  toolbar.
Helpful Hint One of Word's inconveniences is the way it handles bulleted and numbered lists. Sometimes, no matter what you do, a list will not display the way you want it to.  When this happens, simply start over.  Select the entire list. Using the  Bullets and Numbering  dialog box, select a  new  type of bullets or numbers. Click OK.  After doing this, you can usually change your selection back to the type of bullets or numbers you want.
Drop Caps You can create a drop cap using several letters or an entire word at the beginning of a paragraph. Select the letters or the word you want to use and follow the directions on the previous slide. A drop cap is a large letter that begins a paragraph and drops through several lines of text as shown below.
Drop caps Add a drop cap to a paragraph by following these steps: Place the cursor within the paragraph whose first letter will be dropped, or highlight  the first few letters or first word only to drop more than one letter.  Select  Format    Drop Cap  from the menu bar.  The  Drop Cap  dialog box allows you to select the position of the drop cap, the font, the number of lines to drop, and the distance from the body text.  Click  OK  when all selections have been made.  To modify a drop cap, select  Format    Drop Cap  again to change the attributes, or click on the letter and use the handles to move and resize the letter.  Word can only display drop caps properly in print layout and web layout views.
Add a quick horizontal line To add a quick horizontal line across the page – the auto format feature is used. To create a double line type 3 equal signs, then press enter To create a thin line type 3 hyphens  at the beginning of a line , then press enter To create a thicker line type 3 underscores, then press enter
Simple Borders You can add a border to text in your document to draw attention to important information. Select the test you want to enclose. Click the icon on the formatting toolbar
Customize Your Borders The “Page Border” tab is for placing a border to frame a page. The borders and shading dialog box gives to a lot of options to choose from. The “Borders” tab will give you tools to place borders around paragraphs and sections of text within your page.
Shading You can emphasize an area of text by shading it in color.  This can be used with or without a border.
Symbols Choose the name of the font you want to use from the menu near the top of the dialog box. This menu includes all symbol and so-called "dingbats" fonts installed in your system. The grid of available symbols changes according to the font you select. Click a symbol to select it, then click Insert. The symbol appears in the document at the insertion point. You can insert symbols that do not appear on your keyboard into your document. Place your cursor where you want you symbol to appear Insert menu    Symbol to display the Symbols tab of the Symbol dialog box.
Special Characters You can insert special characters two ways: with the Special Characters tab of the Symbol dialog box or by typing the character in. To use the Special Characters tab, choose Insert    Symbol to display the Symbol dialog box and click the Special Characters tab. Select the character you want from the scrolling list and click the Insert button. The character appears in the document at the insertion point.  You can insert special characters two ways: with the Special Characters tab of the Symbol dialog box or by typing the character in.
Create and Save Styles While the format painter is great  in  an individual document, if you like a particular style and want to be able to use it easily in more than the one document, you can save it using the “Styles” feature.  Paragraph and character styles can be saved for use in many documents. If you select the style before typing a new paragraph, the formatting is added before you type. Paragraph styles typically include information about the format of the paragraph, including alignment, indentation, and tab settings, as well as the characters in the paragraph, such as font, font size, and text color, as well.  The use of styles in Word will allow you to quickly format a document with a consistent and professional look.
Paragraph styles Using built-in paragraph and character styles provided by Word, you can easily change the look of your text with just a couple of keystrokes, and you can create custom styles so that your favorite look is available whenever you want it.  Click anywhere in the the paragraph, then find the drop-down menu on the Formatting toolbar (it probably says  Normal ). You will see a list. Scroll down the list until you see  Heading 1 . Click to select it, and your text will be reformatted to 16 point Arial bold with spacing before and after (above and below). This is a Paragraph style. Notice the small icon that follows its name on the Style drop-down menu.
Styles and Formatting Pane apply a style to your text (for a paragraph style, click anywhere within the paragraph, then click the style name)  see what styles and formatting you have ever used in this document (in the Show box, choose Formatting in Use or Styles in use)  create a new style (click the New Style button near the top of the S&F pane)  modify an existing style (hover over the style name, click the down arrow and choose Modify)  Clicking here will open the task styles and formatting task pane
Create a New Style To create your own style, format your text by selecting a font, point size, character formatting, tabs, rules, etc. When you are satisfied with the style.  Click on the formatting in the task pane and click “New style” This new style will now be available for you in all new documents created when you are logged onto this computer. Make sure “formatting in use” is selected at the bottom of the pane 3. Type a name for your new style.

Bullets and Styles

  • 1.
  • 2.
    Bullets and NumberingEveryone makes lists. Word lets you make two types of lists: bulleted and numbered. A bullet is a dot or other symbol used to highlight items in a list. Use bullets to list items that do not have to be in any particular order. Like a shopping list. Numbers (or letters) are used when information has to be in a certain order, like a recipe. Shopping list: Eggs Milk Bread Orange juice Peanut butter Recipe: Preheat oven to 350 Grate 1 cup of cheese Dice ¼ cup of onions Slice ½ red pepper into strips Add ingredients to meat sauce Bake for 20 minutes
  • 3.
    Creating Lists Tocreate a bulleted or numbered list: Make sure your cursor is set to type the first item in your list. Click the bullet or number button on the Formatting toolbar. Enter the first item on your list and press Enter . The next line will begin automatically with a new bullet or number. Enter the next item on your list and press Enter . When your list is complete, press Enter twice to turn off bulleting. Click for bullets Click for numbers If you don't care about the style of bullets or numbering used, you can turn on Bullets and Numbering by clicking on the appropriate button on the Formatting toolbar.
  • 4.
    Nested Lists Tocreate a nested list, such as a numbered list inside of a bulleted list, follow these steps: 1. Type a bulleted list and increase the indentation of the items that will make up the nested list by clicking the Increase Indent button for each item. 2. Highlight the items and click the Numbered List button on the formatting toolbar.
  • 5.
    Auto Format Word’sauto format feature will take your cue and automatically create a bulleted or numbered list for you. Type * or 1. followed by a space. Then type the first item in the list. Press enter to type the second item. Word automatically starts the second line with a bullet or number 2. To end a bulleted list, press enter twice. Sometimes this auto format feature can be annoying. To turn it off, deselect it in the “auto format as you type” section of the “auto correct” dialog box found under the “tools” menu.
  • 6.
    The Bullets AndNumbering Dialog Box You can change the type of bullets and numbers that Word uses. Select the text you want to change. Choose Format  Bullets and Numbering dialog box. Depending on how you want your list to appear, click on the Bulleted tab or Numbered tab. Select what kind of bullets or numbers that you want, and click OK . Highlight the entire list to change all the bullets or numbers, or Place the cursor on one line within the list to change a single bullet. Access the dialog box by selecting Format|Bullets and Numbering from the menu bar or by right-clicking within the list and selecting Bullets and Numbering from the context menu. Right Click !
  • 7.
    Customize Your List1. Highlight the list you want to customize 2. Open he Bullets and numbering dialog box 3. Click “customize” Customize spacing by setting bullet and text indents. FONT: displays the font dialog box and allows you to change the font of the bullet or number CHARACTER: displays the symbols dialog box and allows you to choose from many symbols to use as a bullet PICTURE: displays graphics that you can use as bullets
  • 8.
    Picture Bullets 1.Click on the list you want to customize 2. Open the Bullets and numbering dialog box 4. Click “picture” Displays the clip gallery. You can chose from many different tiny clipart files, or import your own. When you choose one you like, double click to add it to your document. 3. Click Customize
  • 9.
    Formatting Tips Youcan remove a bullet by placing the insertion point to the right of the bullet and pressing backspace (you will not be able to place your insertion point to the left of the bullet). If you want to change an unordered list to an ordered list (or ordered to unordered), select the entire list and click on the appropriate button. To create a line break between items in a bulleted or numbered list, place your cursor where you want the line break and press Enter . You can also format text using the Alignment and Indent buttons on the Formatting toolbar.
  • 10.
    Helpful Hint Oneof Word's inconveniences is the way it handles bulleted and numbered lists. Sometimes, no matter what you do, a list will not display the way you want it to. When this happens, simply start over. Select the entire list. Using the Bullets and Numbering dialog box, select a new type of bullets or numbers. Click OK. After doing this, you can usually change your selection back to the type of bullets or numbers you want.
  • 11.
    Drop Caps Youcan create a drop cap using several letters or an entire word at the beginning of a paragraph. Select the letters or the word you want to use and follow the directions on the previous slide. A drop cap is a large letter that begins a paragraph and drops through several lines of text as shown below.
  • 12.
    Drop caps Adda drop cap to a paragraph by following these steps: Place the cursor within the paragraph whose first letter will be dropped, or highlight the first few letters or first word only to drop more than one letter. Select Format  Drop Cap from the menu bar. The Drop Cap dialog box allows you to select the position of the drop cap, the font, the number of lines to drop, and the distance from the body text. Click OK when all selections have been made. To modify a drop cap, select Format  Drop Cap again to change the attributes, or click on the letter and use the handles to move and resize the letter. Word can only display drop caps properly in print layout and web layout views.
  • 13.
    Add a quickhorizontal line To add a quick horizontal line across the page – the auto format feature is used. To create a double line type 3 equal signs, then press enter To create a thin line type 3 hyphens at the beginning of a line , then press enter To create a thicker line type 3 underscores, then press enter
  • 14.
    Simple Borders Youcan add a border to text in your document to draw attention to important information. Select the test you want to enclose. Click the icon on the formatting toolbar
  • 15.
    Customize Your BordersThe “Page Border” tab is for placing a border to frame a page. The borders and shading dialog box gives to a lot of options to choose from. The “Borders” tab will give you tools to place borders around paragraphs and sections of text within your page.
  • 16.
    Shading You canemphasize an area of text by shading it in color. This can be used with or without a border.
  • 17.
    Symbols Choose thename of the font you want to use from the menu near the top of the dialog box. This menu includes all symbol and so-called "dingbats" fonts installed in your system. The grid of available symbols changes according to the font you select. Click a symbol to select it, then click Insert. The symbol appears in the document at the insertion point. You can insert symbols that do not appear on your keyboard into your document. Place your cursor where you want you symbol to appear Insert menu  Symbol to display the Symbols tab of the Symbol dialog box.
  • 18.
    Special Characters Youcan insert special characters two ways: with the Special Characters tab of the Symbol dialog box or by typing the character in. To use the Special Characters tab, choose Insert  Symbol to display the Symbol dialog box and click the Special Characters tab. Select the character you want from the scrolling list and click the Insert button. The character appears in the document at the insertion point. You can insert special characters two ways: with the Special Characters tab of the Symbol dialog box or by typing the character in.
  • 19.
    Create and SaveStyles While the format painter is great in an individual document, if you like a particular style and want to be able to use it easily in more than the one document, you can save it using the “Styles” feature. Paragraph and character styles can be saved for use in many documents. If you select the style before typing a new paragraph, the formatting is added before you type. Paragraph styles typically include information about the format of the paragraph, including alignment, indentation, and tab settings, as well as the characters in the paragraph, such as font, font size, and text color, as well. The use of styles in Word will allow you to quickly format a document with a consistent and professional look.
  • 20.
    Paragraph styles Usingbuilt-in paragraph and character styles provided by Word, you can easily change the look of your text with just a couple of keystrokes, and you can create custom styles so that your favorite look is available whenever you want it. Click anywhere in the the paragraph, then find the drop-down menu on the Formatting toolbar (it probably says Normal ). You will see a list. Scroll down the list until you see Heading 1 . Click to select it, and your text will be reformatted to 16 point Arial bold with spacing before and after (above and below). This is a Paragraph style. Notice the small icon that follows its name on the Style drop-down menu.
  • 21.
    Styles and FormattingPane apply a style to your text (for a paragraph style, click anywhere within the paragraph, then click the style name) see what styles and formatting you have ever used in this document (in the Show box, choose Formatting in Use or Styles in use) create a new style (click the New Style button near the top of the S&F pane) modify an existing style (hover over the style name, click the down arrow and choose Modify) Clicking here will open the task styles and formatting task pane
  • 22.
    Create a NewStyle To create your own style, format your text by selecting a font, point size, character formatting, tabs, rules, etc. When you are satisfied with the style. Click on the formatting in the task pane and click “New style” This new style will now be available for you in all new documents created when you are logged onto this computer. Make sure “formatting in use” is selected at the bottom of the pane 3. Type a name for your new style.