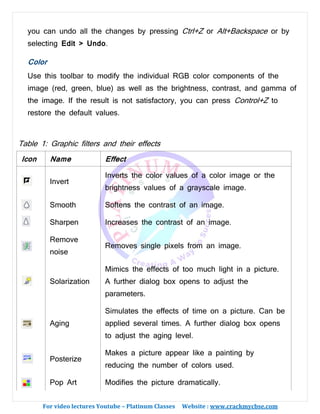
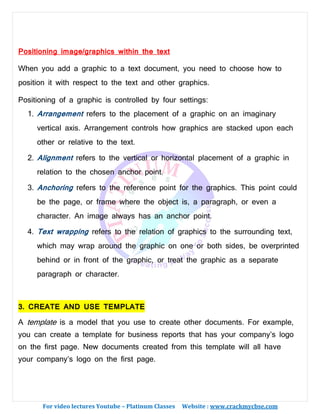
SlideShare a Scribd company logo
For video lectures Youtube – Platinum Classes Website : www.crackmycbse.com
CBSE CLASS 10 IT CODE 402
{ New Syllabus 2020-21 (Revised) For Theory }
UNIT 1: DIGITAL DOCUMENTATION
(ADVANCED)
Important Notes to score 50/50 in theory
SESSION 1: CREATE AND APPLY STYLES IN THE DOCUMENT
A style is a set of formats that you can apply to selected pages, text, frames,
and other elements in your document to quickly change their appearance.
When you apply a style, you apply a whole group of formats at the same
time.
For example, you may decide to change the indentation of all paragraphs, or
change the font of all titles.
OpenOffice.org supports the following types of styles:
• Page styles include margins, headers and footers, borders and
backgrounds. In Calc, page styles also include the sequence for printing
sheets.
For video lectures Youtube – Platinum Classes Website : www.crackmycbse.com
• Paragraph styles control all aspects of a paragraph’s appearance, such
as text alignment, tab stops, line spacing, and borders, and can include
character formatting.
• Character styles affect selected text within a paragraph, such as the
font and size of text, or bold and italic formats.
• Frame styles are used to format graphic and text frames, including
wrapping type, borders, backgrounds, and columns.
• Numbering styles apply similar alignment, numbering or bullet
characters, and fonts to numbered or bulleted lists.
• Cell styles include fonts, alignment, borders, background, number
formats (for example, currency, date, number), and cell protection.
• Graphics styles in drawings and presentations include line, area,
shadowing, transparency, font, connectors, dimensioning, and other
attributes.
• Presentation styles include attributes for font, indents, spacing,
alignment, and tabs.
Applying styles
OpenOffice.org provides several ways for you to select styles to apply.
Creating a new style from a selection
You can create a new style by copying an existing manual format.
• Open the Styles and Formatting window and choose the type of style
you want to create.
For video lectures Youtube – Platinum Classes Website : www.crackmycbse.com
• In the document, select the item you want to save as a style.
• In the Styles and Formatting window, click on the
New Style from Selection
• In the Create Style dialog, type a name for the new style. The list
shows the names of existing custom styles of the selected type. Click
OK to save the new style.
Modifying styles
OpenOffice.org provides several ways to modify styles (both the predefined
styles and custom styles that you create):
• Updating a style from a selection
• Load or copy styles from another document or template
For video lectures Youtube – Platinum Classes Website : www.crackmycbse.com
SESSION 2 : INSERT AND USE IMAGES
Images can be added to a document in several ways: by inserting an image
file, directly from a graphics program or a scanner, or from the OOo Gallery.
Inserting an image file
When the image is in a file stored on the computer, you can insert it into an
OOo document using either of the following methods:
➢ Drag and drop
• Open a file browser window and locate the image you want to insert.
• Drag the image into the Writer document and drop it where you want it
to appear. A faint vertical line marks where the image will be dropped.
➢ Insert Picture dialog
• Click in the Open Office document where you want the image to
appear.
• Choose Insert > Picture > From File from the menu bar.
• On the Insert Picture dialog (see Figure 5), navigate to the file to be
inserted, select it, and click Open.
At the bottom of the dialog are two options, Preview and Link. Select
Preview to view a thumbnail of the selected image on the right, so you can
For video lectures Youtube – Platinum Classes Website : www.crackmycbse.com
verify that you have the correct file. See below for the use of Link.
Inserting An Image From The Clipboard
1. Open both the source document and the target document.
2. In the source document, select the image to be copied.
3. Move the mouse pointer over the selected image and press Control+C to
copy the image to the clipboard.
4. Switch to the target document.
5. Click to place the cursor where the graphic is to be inserted.
6. Press Control+V to insert the image.
Inserting An Image Using A Scanner
To start this procedure, click where you want the graphic to be inserted and
select Insert > Picture > Scan > Select Source.
Inserting An Image From The Gallery
1. To open the Gallery, click on the Gallery icon (located in the right side of
the Standard toolbar) or choose Tools > Gallery from the menu bar.
2. Navigate through the Gallery to find the desired picture.
For video lectures Youtube – Platinum Classes Website : www.crackmycbse.com
3. To insert the picture, click and drag it from the Gallery into the Writer
document. You can also right-click on the picture and choose Insert>Copy.
Modifying an image
When you insert a new image, you may need to modify it to suit the
document. Here we will discuss the use of the Picture toolbar, resizing,
cropping, and a workaround to rotate a picture.
➢ Using the Picture toolbar
When you insert an image or select one already present in the document,
the Picture toolbar appears. You can set it to always be present (View >
Toolbars > Picture). Picture control buttons from the Picture toolbar can
also be added to the Standard Toolbar.
From these three toolbars, you can apply small corrections to the graphic
or obtain special effects.
Graphics mode
You can change color images to grayscale by selecting the image and then
selecting Grayscale from the Graphics mode list.
Flip vertically or horizontally
To flip an image vertically or horizontally, select the image, and then click
the relevant icon.
Filters
Table 1 provides a short description of the available filters, however the
best way to understand them is to see them in action. Feel free to
experiment with the different filters and filters settings, remembering that
For video lectures Youtube – Platinum Classes Website : www.crackmycbse.com
you can undo all the changes by pressing Ctrl+Z or Alt+Backspace or by
selecting Edit > Undo.
Color
Use this toolbar to modify the individual RGB color components of the
image (red, green, blue) as well as the brightness, contrast, and gamma of
the image. If the result is not satisfactory, you can press Control+Z to
restore the default values.
Table 1: Graphic filters and their effects
Icon Name Effect
Invert
Inverts the color values of a color image or the
brightness values of a grayscale image.
Smooth Softens the contrast of an image.
Sharpen Increases the contrast of an image.
Remove
noise
Removes single pixels from an image.
Solarization
Mimics the effects of too much light in a picture.
A further dialog box opens to adjust the
parameters.
Aging
Simulates the effects of time on a picture. Can be
applied several times. A further dialog box opens
to adjust the aging level.
Posterize
Makes a picture appear like a painting by
reducing the number of colors used.
Pop Art Modifies the picture dramatically.
For video lectures Youtube – Platinum Classes Website : www.crackmycbse.com
Icon Name Effect
Charcoal Displays the image as a charcoal sketch.
Relief
A dialog box is displayed to adjust the light
source that will create the shadow and, hence, the
relief effect.
Mosaic
Joins groups of pixels into a single area of one
color.
Transparency
Modify the percentage value in the Transparency box on the Picture toolbar
to make the image more transparent. This is particularly useful when creating
a watermark or when wrapping the image in the background.
Using The Formatting Toolbar And Picture Dialog
Grouping Drawing Objects
1. Select one object, then hold down the Shift key and select the others you
want to include in the group. The bounding box expands to include all the
selected objects.
2. With the objects selected, hover the mouse pointer over one of the objects
and choose Format > Group > Group from the menu bar or right-click and
choose Group > Group from the pop-up menu.
For video lectures Youtube – Platinum Classes Website : www.crackmycbse.com
Positioning image/graphics within the text
When you add a graphic to a text document, you need to choose how to
position it with respect to the text and other graphics.
Positioning of a graphic is controlled by four settings:
1. Arrangement refers to the placement of a graphic on an imaginary
vertical axis. Arrangement controls how graphics are stacked upon each
other or relative to the text.
2. Alignment refers to the vertical or horizontal placement of a graphic in
relation to the chosen anchor point.
3. Anchoring refers to the reference point for the graphics. This point could
be the page, or frame where the object is, a paragraph, or even a
character. An image always has an anchor point.
4. Text wrapping refers to the relation of graphics to the surrounding text,
which may wrap around the graphic on one or both sides, be overprinted
behind or in front of the graphic, or treat the graphic as a separate
paragraph or character.
3. CREATE AND USE TEMPLATE
A template is a model that you use to create other documents. For example,
you can create a template for business reports that has your company’s logo
on the first page. New documents created from this template will all have
your company’s logo on the first page.
For video lectures Youtube – Platinum Classes Website : www.crackmycbse.com
Using The Template
To use a particular template, choose File > New > Templates and
Documents.
Changing To A Different Template
To change to a different template, choose File > New > Templates and
Documents.
Working with tables
A table is a grid, an arrangement of rectangles, or cells, in rows and column.
You can use tables to format all or part of your document into columns and
rows. You need tables because they are the best way to organize graphics,
columns, headings and rows.
Column- A column is a grouping of cells that run from the top to the bottom
of a page.
Rows- Row is a grouping of cells that run from the left to right of a page.
Cell- The intersection point between a row and a column is a cell.
Inserting a Table
1. Position the insertion point where you want the table to appear.
2. Choose Table ->Insert ->Table option. This will display the Insert Table
For video lectures Youtube – Platinum Classes Website : www.crackmycbse.com
dialog box.
3. Enter the number of rows and columns for the table in the number of
columns
and the number of row boxes.
4. CREATE AND CUSTOMIZE TABLE OF CONTENTS
Writer's table of contents feature lets you build an automated table of
contents from the headings in your document.. For example, you can use the
Heading 1 style for chapter titles and the Heading 2 and Heading 3 styles
for chapter subheadings.
For video lectures Youtube – Platinum Classes Website : www.crackmycbse.com
Opening Writer's Table Of Contents Feature
Select Insert > Indexes and Tables > Indexes and Tables.
• Use the Index/Table tab to set the table's attributes.
• Use the Entries and Styles tabs to format the table entries.
• Use the Background tab to add color or a graphic to the table
background.
Protecting against manual changes
To protect the table of contents from being changed accidentally, check the
Protected against manual changes check box. If this box is checked, the
table of contents can only be changed using the context menu or the Insert
Table/Index window
Using the Entries tab
Use the Entries tab, to format the entries in the table of contents. For
each outline level, you can add and delete elements, such as chapter
numbers, and you can also apply character styles to individual elements.
For video lectures Youtube – Platinum Classes Website : www.crackmycbse.com
Deleting elements
To delete an element from the Structure line, click the button that represents
that element and then press the Delete key on your keyboard.
Adding elements
To add an element to the Structure line, follow these steps:
1. Place your cursor in the white field to the left of where you want to
insert the element.
2. Click one of the five buttons that are just below the Structure line.
(For example, to add a tab stop, click the Tab stop button.) A button
representing the new element appears on the Structure line.
Applying character styles
To apply a character style to an element on the Structure line:
On the Structure line, click the button that represents the element to which
you want to apply a style.
From the Character Style drop-down list, select the desired style. Writer
applies the selected style to the selected element.
For video lectures Youtube – Platinum Classes Website : www.crackmycbse.com
To apply a paragraph style to an outline level, follow these steps:
1) In the Levels list box, select the desired outline level by clicking it.
2) In the Paragraph Styles list box, click the paragraph style that you want
to apply.
3) Click the <button to apply the selected paragraph style to the
selected outline level.
SESSION 5: IMPLEMENT MAIL MERGE
A mail merge is a way to take a letter you’ve written and send it to a whole
bunch of people, personalizing it with information about them so they might
think that you typed that letter personally for them.
Create a Mail Merge Document: Letter
1. Open a template, if you have one you want to use, or create a new Writer
document.
2. Save the document with the appropriate name, like
mailmerge_openenrollment.ods or mailmerge_parents.odt.
Note: Don’t save it in Word format. You must save it in OpenOffice.org Writer
format or the mail merge won’t work.
For video lectures Youtube – Platinum Classes Website : www.crackmycbse.com
Editing a saved file of mailing labels
To edit a saved file of mailing labels, open the saved label file in the normal
way. You will be prompted to update all links. Choose No for the following
reason: The first label on the page is termed the “Master Label” and all other
labels are linked to it. If you update the links, then all labels will end up
containing the same data, which is probably not what you want.
You can edit individual records in the normal way, by highlighting and
changing the font name, for example.
Preparing for printing
To prepare mailing labels for printing:
● Choose File > New > Labels.
● On the Options tab, ensure that the Synchronize contents option is
selected.
● On the Labels tab (), select the Database and Table. Select the Brand
of labels to be used, and then select the Type of label.
Printing
● Choose File > Print. The message shown in appears. Click Yes to print.
For video lectures Youtube – Platinum Classes Website : www.crackmycbse.com
● In the Mail Merge dialog (), you can choose to print all records or selected
records. To select records to be printed, use Ctrl+click to select individual
records. To select a block of records, select the first record in the block,
scroll to the last record in the block, and Shift+click on the last record.
● Click OK to send the labels directly to the printer.
For Complete Notes Of IT CODE 402 Class 10 Theory + Practical Visit To
www.crackmycbse.com

More Related Content

What's hot

Ms office introduction
Ms office introductionMs office introduction
Ms office introduction
Dheenathayalan Ramasamy
 
Ms word 2010 by sachin sharma
Ms word 2010 by sachin sharmaMs word 2010 by sachin sharma
PowerPoint basics
PowerPoint basicsPowerPoint basics
PowerPoint basics
hope baido
 
Google Classroom - The Very Basics
Google Classroom - The Very BasicsGoogle Classroom - The Very Basics
Google Classroom - The Very Basics
Ann Carnevale
 
Microsoft Power Point 2010
Microsoft Power Point 2010Microsoft Power Point 2010
Microsoft Power Point 2010
home
 
Learning power point 2016
Learning power point 2016Learning power point 2016
Learning power point 2016
Aakanksha Shrivastava
 
MS Excel Basics
 MS Excel Basics MS Excel Basics
MS Excel Basics
Muhammad Yasir Bhutta
 
Word processing
Word processingWord processing
Word processing
jones brandes
 
Presentation of ms word
Presentation of ms wordPresentation of ms word
Presentation of ms word
Vaishnavi8950
 
Microsoft Office PowerPoint 2007 - Lesson 1
Microsoft Office PowerPoint 2007 - Lesson 1Microsoft Office PowerPoint 2007 - Lesson 1
Microsoft Office PowerPoint 2007 - Lesson 1
Samantha TerBeest
 
Welcome to word 2016
Welcome to word 2016Welcome to word 2016
Welcome to word 2016
JasminMiranda7
 
New Features In Power Point 2007 Ppt
New Features In Power Point 2007 PptNew Features In Power Point 2007 Ppt
New Features In Power Point 2007 Ppt
joelk
 
multimedia data and file format
multimedia data and file formatmultimedia data and file format
multimedia data and file format
ALOK SAHNI
 
Microsoft Word
Microsoft WordMicrosoft Word
Microsoft Word
Anup Chakraborty
 
Ms powerpoint 2013
Ms powerpoint 2013Ms powerpoint 2013
Ms powerpoint 2013
Noor Azman Muhammad
 
Getting Started with Google Classroom
Getting Started with Google ClassroomGetting Started with Google Classroom
Getting Started with Google Classroom
Miguel Guhlin
 
Email & internet
Email & internetEmail & internet
Email & internetsmartware
 
Presentation on Adobe Photoshop
Presentation on Adobe PhotoshopPresentation on Adobe Photoshop
Presentation on Adobe Photoshop
OpenDev
 
Presentation on Adobe Photoshop
Presentation on Adobe PhotoshopPresentation on Adobe Photoshop
Presentation on Adobe Photoshop
Mohak Jain
 

What's hot (20)

Ms office introduction
Ms office introductionMs office introduction
Ms office introduction
 
Ms word 2010 by sachin sharma
Ms word 2010 by sachin sharmaMs word 2010 by sachin sharma
Ms word 2010 by sachin sharma
 
PowerPoint basics
PowerPoint basicsPowerPoint basics
PowerPoint basics
 
Google Classroom - The Very Basics
Google Classroom - The Very BasicsGoogle Classroom - The Very Basics
Google Classroom - The Very Basics
 
Microsoft Power Point 2010
Microsoft Power Point 2010Microsoft Power Point 2010
Microsoft Power Point 2010
 
Learning power point 2016
Learning power point 2016Learning power point 2016
Learning power point 2016
 
MS Excel Basics
 MS Excel Basics MS Excel Basics
MS Excel Basics
 
Word processing
Word processingWord processing
Word processing
 
Presentation of ms word
Presentation of ms wordPresentation of ms word
Presentation of ms word
 
Microsoft Office PowerPoint 2007 - Lesson 1
Microsoft Office PowerPoint 2007 - Lesson 1Microsoft Office PowerPoint 2007 - Lesson 1
Microsoft Office PowerPoint 2007 - Lesson 1
 
Welcome to word 2016
Welcome to word 2016Welcome to word 2016
Welcome to word 2016
 
New Features In Power Point 2007 Ppt
New Features In Power Point 2007 PptNew Features In Power Point 2007 Ppt
New Features In Power Point 2007 Ppt
 
multimedia data and file format
multimedia data and file formatmultimedia data and file format
multimedia data and file format
 
Microsoft Word
Microsoft WordMicrosoft Word
Microsoft Word
 
Ms powerpoint
Ms powerpointMs powerpoint
Ms powerpoint
 
Ms powerpoint 2013
Ms powerpoint 2013Ms powerpoint 2013
Ms powerpoint 2013
 
Getting Started with Google Classroom
Getting Started with Google ClassroomGetting Started with Google Classroom
Getting Started with Google Classroom
 
Email & internet
Email & internetEmail & internet
Email & internet
 
Presentation on Adobe Photoshop
Presentation on Adobe PhotoshopPresentation on Adobe Photoshop
Presentation on Adobe Photoshop
 
Presentation on Adobe Photoshop
Presentation on Adobe PhotoshopPresentation on Adobe Photoshop
Presentation on Adobe Photoshop
 

Similar to 1 DIGITAL DOCUMENTATION.pdf

DIGITAL DOCUMENTATION_watermark.pdf
DIGITAL DOCUMENTATION_watermark.pdfDIGITAL DOCUMENTATION_watermark.pdf
DIGITAL DOCUMENTATION_watermark.pdf
Mangala R
 
Writing DE materials
Writing DE materialsWriting DE materials
Writing DE materials
Techno 2010
 
Training End Users - Daniel Allison - COMI 16901
Training End Users - Daniel Allison - COMI 16901Training End Users - Daniel Allison - COMI 16901
Training End Users - Daniel Allison - COMI 16901
Dallison1
 
Essential training on microsoft office power point 2007
Essential training on microsoft office power point 2007Essential training on microsoft office power point 2007
Essential training on microsoft office power point 2007ashok_142
 
PowerPoint 2013
PowerPoint 2013PowerPoint 2013
PowerPoint 2013
Jahnavee Parmar
 
Presentation software powerpoint 2013
Presentation software powerpoint 2013Presentation software powerpoint 2013
Presentation software powerpoint 2013
imen Tekaya Bouaziz
 
Features Of PowerPoint
Features Of PowerPointFeatures Of PowerPoint
Features Of PowerPoint
Udit Mittal
 
Microsoft Power Point
Microsoft Power PointMicrosoft Power Point
Microsoft Power PointOwly Eyes
 
CAB-Unit 3-Lesson-5.pptxgjimt2023.......
CAB-Unit 3-Lesson-5.pptxgjimt2023.......CAB-Unit 3-Lesson-5.pptxgjimt2023.......
CAB-Unit 3-Lesson-5.pptxgjimt2023.......
MahakMittal23
 
Photoshop notes cs-4
Photoshop notes  cs-4Photoshop notes  cs-4
Photoshop notes cs-4
SirajRock
 
Adobe photoshop cs6 tutorial
Adobe photoshop cs6 tutorialAdobe photoshop cs6 tutorial
Adobe photoshop cs6 tutorial
Agung Yuwono
 
Adobe photoshop cs6
Adobe photoshop cs6Adobe photoshop cs6
Adobe photoshop cs6Ila Azmil
 
Adobe photoshop cs6
Adobe photoshop cs6Adobe photoshop cs6
Adobe photoshop cs6
ilaazmil2
 
Job Aid Makeover - Captivate
Job Aid Makeover - CaptivateJob Aid Makeover - Captivate
Job Aid Makeover - CaptivateS. Rose
 
Power Point 2007 Discover The Power Of Custom Layouts
Power Point 2007    Discover The Power Of Custom LayoutsPower Point 2007    Discover The Power Of Custom Layouts
Power Point 2007 Discover The Power Of Custom LayoutsOklahoma Dept. Mental Health
 
Microsoftpowerpoint 140206084416-phpapp01
Microsoftpowerpoint 140206084416-phpapp01Microsoftpowerpoint 140206084416-phpapp01
Microsoftpowerpoint 140206084416-phpapp01
jagan reddy
 
University Powerpoint Template
University Powerpoint TemplateUniversity Powerpoint Template
University Powerpoint Template
RayEChang2
 
Class x-presentation software-unit 5-part 1
Class x-presentation software-unit 5-part 1Class x-presentation software-unit 5-part 1
Class x-presentation software-unit 5-part 1
Shaivip
 
Courselab
CourselabCourselab
Courselab
mhier1977
 
Ms power point traininghhs
Ms power point traininghhsMs power point traininghhs
Ms power point traininghhs
Mayor Cyrille
 

Similar to 1 DIGITAL DOCUMENTATION.pdf (20)

DIGITAL DOCUMENTATION_watermark.pdf
DIGITAL DOCUMENTATION_watermark.pdfDIGITAL DOCUMENTATION_watermark.pdf
DIGITAL DOCUMENTATION_watermark.pdf
 
Writing DE materials
Writing DE materialsWriting DE materials
Writing DE materials
 
Training End Users - Daniel Allison - COMI 16901
Training End Users - Daniel Allison - COMI 16901Training End Users - Daniel Allison - COMI 16901
Training End Users - Daniel Allison - COMI 16901
 
Essential training on microsoft office power point 2007
Essential training on microsoft office power point 2007Essential training on microsoft office power point 2007
Essential training on microsoft office power point 2007
 
PowerPoint 2013
PowerPoint 2013PowerPoint 2013
PowerPoint 2013
 
Presentation software powerpoint 2013
Presentation software powerpoint 2013Presentation software powerpoint 2013
Presentation software powerpoint 2013
 
Features Of PowerPoint
Features Of PowerPointFeatures Of PowerPoint
Features Of PowerPoint
 
Microsoft Power Point
Microsoft Power PointMicrosoft Power Point
Microsoft Power Point
 
CAB-Unit 3-Lesson-5.pptxgjimt2023.......
CAB-Unit 3-Lesson-5.pptxgjimt2023.......CAB-Unit 3-Lesson-5.pptxgjimt2023.......
CAB-Unit 3-Lesson-5.pptxgjimt2023.......
 
Photoshop notes cs-4
Photoshop notes  cs-4Photoshop notes  cs-4
Photoshop notes cs-4
 
Adobe photoshop cs6 tutorial
Adobe photoshop cs6 tutorialAdobe photoshop cs6 tutorial
Adobe photoshop cs6 tutorial
 
Adobe photoshop cs6
Adobe photoshop cs6Adobe photoshop cs6
Adobe photoshop cs6
 
Adobe photoshop cs6
Adobe photoshop cs6Adobe photoshop cs6
Adobe photoshop cs6
 
Job Aid Makeover - Captivate
Job Aid Makeover - CaptivateJob Aid Makeover - Captivate
Job Aid Makeover - Captivate
 
Power Point 2007 Discover The Power Of Custom Layouts
Power Point 2007    Discover The Power Of Custom LayoutsPower Point 2007    Discover The Power Of Custom Layouts
Power Point 2007 Discover The Power Of Custom Layouts
 
Microsoftpowerpoint 140206084416-phpapp01
Microsoftpowerpoint 140206084416-phpapp01Microsoftpowerpoint 140206084416-phpapp01
Microsoftpowerpoint 140206084416-phpapp01
 
University Powerpoint Template
University Powerpoint TemplateUniversity Powerpoint Template
University Powerpoint Template
 
Class x-presentation software-unit 5-part 1
Class x-presentation software-unit 5-part 1Class x-presentation software-unit 5-part 1
Class x-presentation software-unit 5-part 1
 
Courselab
CourselabCourselab
Courselab
 
Ms power point traininghhs
Ms power point traininghhsMs power point traininghhs
Ms power point traininghhs
 

Recently uploaded

The French Revolution Class 9 Study Material pdf free download
The French Revolution Class 9 Study Material pdf free downloadThe French Revolution Class 9 Study Material pdf free download
The French Revolution Class 9 Study Material pdf free download
Vivekanand Anglo Vedic Academy
 
Language Across the Curriculm LAC B.Ed.
Language Across the  Curriculm LAC B.Ed.Language Across the  Curriculm LAC B.Ed.
Language Across the Curriculm LAC B.Ed.
Atul Kumar Singh
 
Ethnobotany and Ethnopharmacology ......
Ethnobotany and Ethnopharmacology ......Ethnobotany and Ethnopharmacology ......
Ethnobotany and Ethnopharmacology ......
Ashokrao Mane college of Pharmacy Peth-Vadgaon
 
Instructions for Submissions thorugh G- Classroom.pptx
Instructions for Submissions thorugh G- Classroom.pptxInstructions for Submissions thorugh G- Classroom.pptx
Instructions for Submissions thorugh G- Classroom.pptx
Jheel Barad
 
CLASS 11 CBSE B.St Project AIDS TO TRADE - INSURANCE
CLASS 11 CBSE B.St Project AIDS TO TRADE - INSURANCECLASS 11 CBSE B.St Project AIDS TO TRADE - INSURANCE
CLASS 11 CBSE B.St Project AIDS TO TRADE - INSURANCE
BhavyaRajput3
 
Home assignment II on Spectroscopy 2024 Answers.pdf
Home assignment II on Spectroscopy 2024 Answers.pdfHome assignment II on Spectroscopy 2024 Answers.pdf
Home assignment II on Spectroscopy 2024 Answers.pdf
Tamralipta Mahavidyalaya
 
How to Make a Field invisible in Odoo 17
How to Make a Field invisible in Odoo 17How to Make a Field invisible in Odoo 17
How to Make a Field invisible in Odoo 17
Celine George
 
aaaaaaaaaaaaaaaaaaaaaaaaaaaaaaaaaaaaaaaaaaaaaaaaaaaaaaa
aaaaaaaaaaaaaaaaaaaaaaaaaaaaaaaaaaaaaaaaaaaaaaaaaaaaaaaaaaaaaaaaaaaaaaaaaaaaaaaaaaaaaaaaaaaaaaaaaaaaaaaaaaaaaa
aaaaaaaaaaaaaaaaaaaaaaaaaaaaaaaaaaaaaaaaaaaaaaaaaaaaaaa
siemaillard
 
Overview on Edible Vaccine: Pros & Cons with Mechanism
Overview on Edible Vaccine: Pros & Cons with MechanismOverview on Edible Vaccine: Pros & Cons with Mechanism
Overview on Edible Vaccine: Pros & Cons with Mechanism
DeeptiGupta154
 
Sectors of the Indian Economy - Class 10 Study Notes pdf
Sectors of the Indian Economy - Class 10 Study Notes pdfSectors of the Indian Economy - Class 10 Study Notes pdf
Sectors of the Indian Economy - Class 10 Study Notes pdf
Vivekanand Anglo Vedic Academy
 
Students, digital devices and success - Andreas Schleicher - 27 May 2024..pptx
Students, digital devices and success - Andreas Schleicher - 27 May 2024..pptxStudents, digital devices and success - Andreas Schleicher - 27 May 2024..pptx
Students, digital devices and success - Andreas Schleicher - 27 May 2024..pptx
EduSkills OECD
 
Introduction to Quality Improvement Essentials
Introduction to Quality Improvement EssentialsIntroduction to Quality Improvement Essentials
Introduction to Quality Improvement Essentials
Excellence Foundation for South Sudan
 
PART A. Introduction to Costumer Service
PART A. Introduction to Costumer ServicePART A. Introduction to Costumer Service
PART A. Introduction to Costumer Service
PedroFerreira53928
 
Model Attribute Check Company Auto Property
Model Attribute  Check Company Auto PropertyModel Attribute  Check Company Auto Property
Model Attribute Check Company Auto Property
Celine George
 
Chapter 3 - Islamic Banking Products and Services.pptx
Chapter 3 - Islamic Banking Products and Services.pptxChapter 3 - Islamic Banking Products and Services.pptx
Chapter 3 - Islamic Banking Products and Services.pptx
Mohd Adib Abd Muin, Senior Lecturer at Universiti Utara Malaysia
 
ESC Beyond Borders _From EU to You_ InfoPack general.pdf
ESC Beyond Borders _From EU to You_ InfoPack general.pdfESC Beyond Borders _From EU to You_ InfoPack general.pdf
ESC Beyond Borders _From EU to You_ InfoPack general.pdf
Fundacja Rozwoju Społeczeństwa Przedsiębiorczego
 
MARUTI SUZUKI- A Successful Joint Venture in India.pptx
MARUTI SUZUKI- A Successful Joint Venture in India.pptxMARUTI SUZUKI- A Successful Joint Venture in India.pptx
MARUTI SUZUKI- A Successful Joint Venture in India.pptx
bennyroshan06
 
How to Create Map Views in the Odoo 17 ERP
How to Create Map Views in the Odoo 17 ERPHow to Create Map Views in the Odoo 17 ERP
How to Create Map Views in the Odoo 17 ERP
Celine George
 
Synthetic Fiber Construction in lab .pptx
Synthetic Fiber Construction in lab .pptxSynthetic Fiber Construction in lab .pptx
Synthetic Fiber Construction in lab .pptx
Pavel ( NSTU)
 
Cambridge International AS A Level Biology Coursebook - EBook (MaryFosbery J...
Cambridge International AS  A Level Biology Coursebook - EBook (MaryFosbery J...Cambridge International AS  A Level Biology Coursebook - EBook (MaryFosbery J...
Cambridge International AS A Level Biology Coursebook - EBook (MaryFosbery J...
AzmatAli747758
 

Recently uploaded (20)

The French Revolution Class 9 Study Material pdf free download
The French Revolution Class 9 Study Material pdf free downloadThe French Revolution Class 9 Study Material pdf free download
The French Revolution Class 9 Study Material pdf free download
 
Language Across the Curriculm LAC B.Ed.
Language Across the  Curriculm LAC B.Ed.Language Across the  Curriculm LAC B.Ed.
Language Across the Curriculm LAC B.Ed.
 
Ethnobotany and Ethnopharmacology ......
Ethnobotany and Ethnopharmacology ......Ethnobotany and Ethnopharmacology ......
Ethnobotany and Ethnopharmacology ......
 
Instructions for Submissions thorugh G- Classroom.pptx
Instructions for Submissions thorugh G- Classroom.pptxInstructions for Submissions thorugh G- Classroom.pptx
Instructions for Submissions thorugh G- Classroom.pptx
 
CLASS 11 CBSE B.St Project AIDS TO TRADE - INSURANCE
CLASS 11 CBSE B.St Project AIDS TO TRADE - INSURANCECLASS 11 CBSE B.St Project AIDS TO TRADE - INSURANCE
CLASS 11 CBSE B.St Project AIDS TO TRADE - INSURANCE
 
Home assignment II on Spectroscopy 2024 Answers.pdf
Home assignment II on Spectroscopy 2024 Answers.pdfHome assignment II on Spectroscopy 2024 Answers.pdf
Home assignment II on Spectroscopy 2024 Answers.pdf
 
How to Make a Field invisible in Odoo 17
How to Make a Field invisible in Odoo 17How to Make a Field invisible in Odoo 17
How to Make a Field invisible in Odoo 17
 
aaaaaaaaaaaaaaaaaaaaaaaaaaaaaaaaaaaaaaaaaaaaaaaaaaaaaaa
aaaaaaaaaaaaaaaaaaaaaaaaaaaaaaaaaaaaaaaaaaaaaaaaaaaaaaaaaaaaaaaaaaaaaaaaaaaaaaaaaaaaaaaaaaaaaaaaaaaaaaaaaaaaaa
aaaaaaaaaaaaaaaaaaaaaaaaaaaaaaaaaaaaaaaaaaaaaaaaaaaaaaa
 
Overview on Edible Vaccine: Pros & Cons with Mechanism
Overview on Edible Vaccine: Pros & Cons with MechanismOverview on Edible Vaccine: Pros & Cons with Mechanism
Overview on Edible Vaccine: Pros & Cons with Mechanism
 
Sectors of the Indian Economy - Class 10 Study Notes pdf
Sectors of the Indian Economy - Class 10 Study Notes pdfSectors of the Indian Economy - Class 10 Study Notes pdf
Sectors of the Indian Economy - Class 10 Study Notes pdf
 
Students, digital devices and success - Andreas Schleicher - 27 May 2024..pptx
Students, digital devices and success - Andreas Schleicher - 27 May 2024..pptxStudents, digital devices and success - Andreas Schleicher - 27 May 2024..pptx
Students, digital devices and success - Andreas Schleicher - 27 May 2024..pptx
 
Introduction to Quality Improvement Essentials
Introduction to Quality Improvement EssentialsIntroduction to Quality Improvement Essentials
Introduction to Quality Improvement Essentials
 
PART A. Introduction to Costumer Service
PART A. Introduction to Costumer ServicePART A. Introduction to Costumer Service
PART A. Introduction to Costumer Service
 
Model Attribute Check Company Auto Property
Model Attribute  Check Company Auto PropertyModel Attribute  Check Company Auto Property
Model Attribute Check Company Auto Property
 
Chapter 3 - Islamic Banking Products and Services.pptx
Chapter 3 - Islamic Banking Products and Services.pptxChapter 3 - Islamic Banking Products and Services.pptx
Chapter 3 - Islamic Banking Products and Services.pptx
 
ESC Beyond Borders _From EU to You_ InfoPack general.pdf
ESC Beyond Borders _From EU to You_ InfoPack general.pdfESC Beyond Borders _From EU to You_ InfoPack general.pdf
ESC Beyond Borders _From EU to You_ InfoPack general.pdf
 
MARUTI SUZUKI- A Successful Joint Venture in India.pptx
MARUTI SUZUKI- A Successful Joint Venture in India.pptxMARUTI SUZUKI- A Successful Joint Venture in India.pptx
MARUTI SUZUKI- A Successful Joint Venture in India.pptx
 
How to Create Map Views in the Odoo 17 ERP
How to Create Map Views in the Odoo 17 ERPHow to Create Map Views in the Odoo 17 ERP
How to Create Map Views in the Odoo 17 ERP
 
Synthetic Fiber Construction in lab .pptx
Synthetic Fiber Construction in lab .pptxSynthetic Fiber Construction in lab .pptx
Synthetic Fiber Construction in lab .pptx
 
Cambridge International AS A Level Biology Coursebook - EBook (MaryFosbery J...
Cambridge International AS  A Level Biology Coursebook - EBook (MaryFosbery J...Cambridge International AS  A Level Biology Coursebook - EBook (MaryFosbery J...
Cambridge International AS A Level Biology Coursebook - EBook (MaryFosbery J...
 

1 DIGITAL DOCUMENTATION.pdf

  • 1. For video lectures Youtube – Platinum Classes Website : www.crackmycbse.com CBSE CLASS 10 IT CODE 402 { New Syllabus 2020-21 (Revised) For Theory } UNIT 1: DIGITAL DOCUMENTATION (ADVANCED) Important Notes to score 50/50 in theory SESSION 1: CREATE AND APPLY STYLES IN THE DOCUMENT A style is a set of formats that you can apply to selected pages, text, frames, and other elements in your document to quickly change their appearance. When you apply a style, you apply a whole group of formats at the same time. For example, you may decide to change the indentation of all paragraphs, or change the font of all titles. OpenOffice.org supports the following types of styles: • Page styles include margins, headers and footers, borders and backgrounds. In Calc, page styles also include the sequence for printing sheets.
  • 2. For video lectures Youtube – Platinum Classes Website : www.crackmycbse.com • Paragraph styles control all aspects of a paragraph’s appearance, such as text alignment, tab stops, line spacing, and borders, and can include character formatting. • Character styles affect selected text within a paragraph, such as the font and size of text, or bold and italic formats. • Frame styles are used to format graphic and text frames, including wrapping type, borders, backgrounds, and columns. • Numbering styles apply similar alignment, numbering or bullet characters, and fonts to numbered or bulleted lists. • Cell styles include fonts, alignment, borders, background, number formats (for example, currency, date, number), and cell protection. • Graphics styles in drawings and presentations include line, area, shadowing, transparency, font, connectors, dimensioning, and other attributes. • Presentation styles include attributes for font, indents, spacing, alignment, and tabs. Applying styles OpenOffice.org provides several ways for you to select styles to apply. Creating a new style from a selection You can create a new style by copying an existing manual format. • Open the Styles and Formatting window and choose the type of style you want to create.
  • 3. For video lectures Youtube – Platinum Classes Website : www.crackmycbse.com • In the document, select the item you want to save as a style. • In the Styles and Formatting window, click on the New Style from Selection • In the Create Style dialog, type a name for the new style. The list shows the names of existing custom styles of the selected type. Click OK to save the new style. Modifying styles OpenOffice.org provides several ways to modify styles (both the predefined styles and custom styles that you create): • Updating a style from a selection • Load or copy styles from another document or template
  • 4. For video lectures Youtube – Platinum Classes Website : www.crackmycbse.com SESSION 2 : INSERT AND USE IMAGES Images can be added to a document in several ways: by inserting an image file, directly from a graphics program or a scanner, or from the OOo Gallery. Inserting an image file When the image is in a file stored on the computer, you can insert it into an OOo document using either of the following methods: ➢ Drag and drop • Open a file browser window and locate the image you want to insert. • Drag the image into the Writer document and drop it where you want it to appear. A faint vertical line marks where the image will be dropped. ➢ Insert Picture dialog • Click in the Open Office document where you want the image to appear. • Choose Insert > Picture > From File from the menu bar. • On the Insert Picture dialog (see Figure 5), navigate to the file to be inserted, select it, and click Open. At the bottom of the dialog are two options, Preview and Link. Select Preview to view a thumbnail of the selected image on the right, so you can
  • 5. For video lectures Youtube – Platinum Classes Website : www.crackmycbse.com verify that you have the correct file. See below for the use of Link. Inserting An Image From The Clipboard 1. Open both the source document and the target document. 2. In the source document, select the image to be copied. 3. Move the mouse pointer over the selected image and press Control+C to copy the image to the clipboard. 4. Switch to the target document. 5. Click to place the cursor where the graphic is to be inserted. 6. Press Control+V to insert the image. Inserting An Image Using A Scanner To start this procedure, click where you want the graphic to be inserted and select Insert > Picture > Scan > Select Source. Inserting An Image From The Gallery 1. To open the Gallery, click on the Gallery icon (located in the right side of the Standard toolbar) or choose Tools > Gallery from the menu bar. 2. Navigate through the Gallery to find the desired picture.
  • 6. For video lectures Youtube – Platinum Classes Website : www.crackmycbse.com 3. To insert the picture, click and drag it from the Gallery into the Writer document. You can also right-click on the picture and choose Insert>Copy. Modifying an image When you insert a new image, you may need to modify it to suit the document. Here we will discuss the use of the Picture toolbar, resizing, cropping, and a workaround to rotate a picture. ➢ Using the Picture toolbar When you insert an image or select one already present in the document, the Picture toolbar appears. You can set it to always be present (View > Toolbars > Picture). Picture control buttons from the Picture toolbar can also be added to the Standard Toolbar. From these three toolbars, you can apply small corrections to the graphic or obtain special effects. Graphics mode You can change color images to grayscale by selecting the image and then selecting Grayscale from the Graphics mode list. Flip vertically or horizontally To flip an image vertically or horizontally, select the image, and then click the relevant icon. Filters Table 1 provides a short description of the available filters, however the best way to understand them is to see them in action. Feel free to experiment with the different filters and filters settings, remembering that
  • 7. For video lectures Youtube – Platinum Classes Website : www.crackmycbse.com you can undo all the changes by pressing Ctrl+Z or Alt+Backspace or by selecting Edit > Undo. Color Use this toolbar to modify the individual RGB color components of the image (red, green, blue) as well as the brightness, contrast, and gamma of the image. If the result is not satisfactory, you can press Control+Z to restore the default values. Table 1: Graphic filters and their effects Icon Name Effect Invert Inverts the color values of a color image or the brightness values of a grayscale image. Smooth Softens the contrast of an image. Sharpen Increases the contrast of an image. Remove noise Removes single pixels from an image. Solarization Mimics the effects of too much light in a picture. A further dialog box opens to adjust the parameters. Aging Simulates the effects of time on a picture. Can be applied several times. A further dialog box opens to adjust the aging level. Posterize Makes a picture appear like a painting by reducing the number of colors used. Pop Art Modifies the picture dramatically.
  • 8. For video lectures Youtube – Platinum Classes Website : www.crackmycbse.com Icon Name Effect Charcoal Displays the image as a charcoal sketch. Relief A dialog box is displayed to adjust the light source that will create the shadow and, hence, the relief effect. Mosaic Joins groups of pixels into a single area of one color. Transparency Modify the percentage value in the Transparency box on the Picture toolbar to make the image more transparent. This is particularly useful when creating a watermark or when wrapping the image in the background. Using The Formatting Toolbar And Picture Dialog Grouping Drawing Objects 1. Select one object, then hold down the Shift key and select the others you want to include in the group. The bounding box expands to include all the selected objects. 2. With the objects selected, hover the mouse pointer over one of the objects and choose Format > Group > Group from the menu bar or right-click and choose Group > Group from the pop-up menu.
  • 9. For video lectures Youtube – Platinum Classes Website : www.crackmycbse.com Positioning image/graphics within the text When you add a graphic to a text document, you need to choose how to position it with respect to the text and other graphics. Positioning of a graphic is controlled by four settings: 1. Arrangement refers to the placement of a graphic on an imaginary vertical axis. Arrangement controls how graphics are stacked upon each other or relative to the text. 2. Alignment refers to the vertical or horizontal placement of a graphic in relation to the chosen anchor point. 3. Anchoring refers to the reference point for the graphics. This point could be the page, or frame where the object is, a paragraph, or even a character. An image always has an anchor point. 4. Text wrapping refers to the relation of graphics to the surrounding text, which may wrap around the graphic on one or both sides, be overprinted behind or in front of the graphic, or treat the graphic as a separate paragraph or character. 3. CREATE AND USE TEMPLATE A template is a model that you use to create other documents. For example, you can create a template for business reports that has your company’s logo on the first page. New documents created from this template will all have your company’s logo on the first page.
  • 10. For video lectures Youtube – Platinum Classes Website : www.crackmycbse.com Using The Template To use a particular template, choose File > New > Templates and Documents. Changing To A Different Template To change to a different template, choose File > New > Templates and Documents. Working with tables A table is a grid, an arrangement of rectangles, or cells, in rows and column. You can use tables to format all or part of your document into columns and rows. You need tables because they are the best way to organize graphics, columns, headings and rows. Column- A column is a grouping of cells that run from the top to the bottom of a page. Rows- Row is a grouping of cells that run from the left to right of a page. Cell- The intersection point between a row and a column is a cell. Inserting a Table 1. Position the insertion point where you want the table to appear. 2. Choose Table ->Insert ->Table option. This will display the Insert Table
  • 11. For video lectures Youtube – Platinum Classes Website : www.crackmycbse.com dialog box. 3. Enter the number of rows and columns for the table in the number of columns and the number of row boxes. 4. CREATE AND CUSTOMIZE TABLE OF CONTENTS Writer's table of contents feature lets you build an automated table of contents from the headings in your document.. For example, you can use the Heading 1 style for chapter titles and the Heading 2 and Heading 3 styles for chapter subheadings.
  • 12. For video lectures Youtube – Platinum Classes Website : www.crackmycbse.com Opening Writer's Table Of Contents Feature Select Insert > Indexes and Tables > Indexes and Tables. • Use the Index/Table tab to set the table's attributes. • Use the Entries and Styles tabs to format the table entries. • Use the Background tab to add color or a graphic to the table background. Protecting against manual changes To protect the table of contents from being changed accidentally, check the Protected against manual changes check box. If this box is checked, the table of contents can only be changed using the context menu or the Insert Table/Index window Using the Entries tab Use the Entries tab, to format the entries in the table of contents. For each outline level, you can add and delete elements, such as chapter numbers, and you can also apply character styles to individual elements.
  • 13. For video lectures Youtube – Platinum Classes Website : www.crackmycbse.com Deleting elements To delete an element from the Structure line, click the button that represents that element and then press the Delete key on your keyboard. Adding elements To add an element to the Structure line, follow these steps: 1. Place your cursor in the white field to the left of where you want to insert the element. 2. Click one of the five buttons that are just below the Structure line. (For example, to add a tab stop, click the Tab stop button.) A button representing the new element appears on the Structure line. Applying character styles To apply a character style to an element on the Structure line: On the Structure line, click the button that represents the element to which you want to apply a style. From the Character Style drop-down list, select the desired style. Writer applies the selected style to the selected element.
  • 14. For video lectures Youtube – Platinum Classes Website : www.crackmycbse.com To apply a paragraph style to an outline level, follow these steps: 1) In the Levels list box, select the desired outline level by clicking it. 2) In the Paragraph Styles list box, click the paragraph style that you want to apply. 3) Click the <button to apply the selected paragraph style to the selected outline level. SESSION 5: IMPLEMENT MAIL MERGE A mail merge is a way to take a letter you’ve written and send it to a whole bunch of people, personalizing it with information about them so they might think that you typed that letter personally for them. Create a Mail Merge Document: Letter 1. Open a template, if you have one you want to use, or create a new Writer document. 2. Save the document with the appropriate name, like mailmerge_openenrollment.ods or mailmerge_parents.odt. Note: Don’t save it in Word format. You must save it in OpenOffice.org Writer format or the mail merge won’t work.
  • 15. For video lectures Youtube – Platinum Classes Website : www.crackmycbse.com Editing a saved file of mailing labels To edit a saved file of mailing labels, open the saved label file in the normal way. You will be prompted to update all links. Choose No for the following reason: The first label on the page is termed the “Master Label” and all other labels are linked to it. If you update the links, then all labels will end up containing the same data, which is probably not what you want. You can edit individual records in the normal way, by highlighting and changing the font name, for example. Preparing for printing To prepare mailing labels for printing: ● Choose File > New > Labels. ● On the Options tab, ensure that the Synchronize contents option is selected. ● On the Labels tab (), select the Database and Table. Select the Brand of labels to be used, and then select the Type of label. Printing ● Choose File > Print. The message shown in appears. Click Yes to print.
  • 16. For video lectures Youtube – Platinum Classes Website : www.crackmycbse.com ● In the Mail Merge dialog (), you can choose to print all records or selected records. To select records to be printed, use Ctrl+click to select individual records. To select a block of records, select the first record in the block, scroll to the last record in the block, and Shift+click on the last record. ● Click OK to send the labels directly to the printer. For Complete Notes Of IT CODE 402 Class 10 Theory + Practical Visit To www.crackmycbse.com