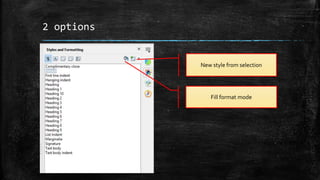
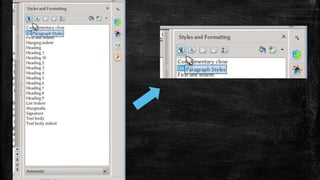
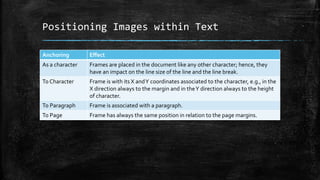
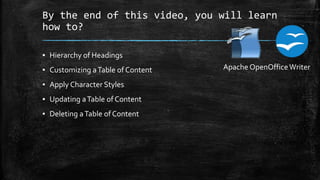
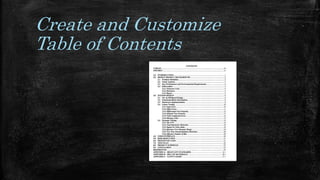
Digital Documentation
Unit - 6
Starting OpenOffice Writer
▪ Start -> All Programs -> OpenOffice folder -> OpenOfficeWriter
Apply styles in a document
Session – 1 (OpenOffice)
Styles
▪ They are physical attributes of text/object.
▪ Styles in a wordprocessor is a combination of :-
– Font effects
– Colors
– Background
▪ Such that it can be saved and applied whenever needed into the
Writer document.
▪ Apart from already available styles, you may create and save new
styles.
Why are styles needed?
▪ Styles help improve consistency in the document.
▪ Make major formatting changes easy.
▪ Ex. –
– You may want to change indentation level of all paragraphs to different values
– Make the font in all headers (or footers) a specific type.
OpenOffice has 5 style categories :-
Character styles
Paragraph styles
Frame styles Page styles
List styles
2 options
New style from selection
Fill format mode
By the end of this video, you will learn
how to?
▪ Applying various styles
▪ Using Fill Format mode
▪ Creating new styles
▪ Updating existing styles
▪ Load styles from a template or a document
▪ Drag-n-drop a selection to create a style
▪ Applying styles using custom keyboard shortcuts
Apache OpenOfficeWriter
Where can I find Styles in Writer?
▪ Stylist is the tool for administrating,
▪ Available as a deck on the Sidebar or as standalone panel
▪ ( F11 or Format → Styles and formatting).
Fill Format Mode
▪ Fill Format mode is useful to apply the same style at several points.
▪ Selecting a style from the list (for example, a character style), the
cursor changes into a "paint jar" with which it is possible to "paint"
the selected style at different points in the document.
▪ To exit this mode, press ESC or click again on the fill format button.
New Style from Selection
▪ The last button to the right is a menu with three options:
– New Style from Selection: with this button, manually formatting a text and
selecting the result, it is possible to quickly define a new style.
– Update Style: modifying the format by hand, for example on a particular
paragraph or frame, selecting this option the corresponding style will be
updated to include the manual modifications.
– Load Styles: opens a menu to load styles defined on other documents or
templates.
Insert and use images in a
document
Session - 2
By the end of this video, you will learn
how to?
▪ Insert an image file
▪ Use Drag and drop
▪ Insert image using dialog box
▪ Copy and paste images
▪ Modify an image using ImageToolbar
▪ Cropping images – using crop tool/crop page of image dialog
▪ Drawing Objects and its properties
▪ Group drawing objects
▪ Position images within text
Drawing objects
▪ We can useWriter’s drawing tools to create graphics such as simple
diagrams using :-
– Rectangles
– Circles
– Lines
– Text
– Other predefined shapes
▪ We can also group several drawing objects to make sure they
maintain their relative position and proportion.
Text
Where can you place drawing objects?
▪ Directly on a page in the document
▪ Insert into a frame
Annotations
▪ You can also use drawing tools to annotate :-
– Photographs
– Screen captures
– Other illustrations
▪ Produced by other programs, but it is not recommended because :-
– Cannot include images in a group with drawing objects
– They may get out of alignment in the document
– IfWriter document is converted to another format (e.g. HTML), the drawing
objects and the images will not remain associated; they are saved separately.
Positioning images within text
▪ When you add an image to your text document, you need to choose
how to position it w.r.t. the text and other images.
▪ Writer is a word processor rather than a Desktop Publishing program.
▪ There are limitations to the flexibility in positioning images in a word
processor.
Positioning can be controlled by 4
settings :-
▪ Arrangement – placement of image on an imaginary vertical axis. Also
controls how images are stacked upon each other or relative to the text.
▪ Alignment – vertical/horizontal placement of image in relation to chosen
anchor point.
▪ Anchoring – reference point for images like page or frame where the object
is. Could be a paragraph/character. An image always has an anchor point.
▪ Text wrapping – relation of images to the surrounding text, which may
wrap around the graphic on one or both sides, be overprinted behind/in
front of graphic/treat the graphic as a separate paragraph or character.
The Settings can be accessed in the
following ways :-
▪ Format menu >
– Anchor
– Wrap
– Arrange
▪ Right-click graphic -> context menu ->
– Anchor
– Wrap
– Arrange
– Alignment
▪ For images -> right-click -> properties -> Image dialog ->
– Type &Wrap pages of the dialog
▪ For images -> Format menu -> Image -> Properties -> Image dialog
– Type &Wrap pages of the dialog
The Settings can be accessed in the
following ways :-
▪ For drawing objects -> right-click -> context-menu -> Position & Size
▪ For an embedded object (Calc spreadsheet/Draw document) ->View
menu ->Toolbars -> OLE object toolbar
By the end of this video, you will learn
how to?
▪ Insert images, drawing, special fontwork objects.
▪ Insert pictures using several ways
▪ Drawing objects – insert/resize/modify/grouping
▪ Positioning images within text
▪ Cropping images
Apache OpenOfficeWriter
Inserting images
▪ Insert menu -> Picture -> From File
▪ View menu ->Toolbars -> Picture -> From File button
▪ Drag-n-drop from File browser
▪ Tools menu -> Gallery
Using the Picture & Drawing
toolbar
Grouping Drawing Objects
▪ Grouping drawing objects makes it easier to handle several objects as
a single entity, while preserving their relative sizes and positions.
▪ When objects are grouped, any editing operations carried out on that
group are applied to all members of the group.
– Select one object -> hold down shift key -> select other objects
– Go to Format menu -> Group -> Group
– Right-click -> context-menu -> Group option
Positioning Images within Text
Anchoring Effect
As a character Frames are placed in the document like any other character; hence, they
have an impact on the line size of the line and the line break.
To Character Frame is with its X andY coordinates associated to the character, e.g., in the
X direction always to the margin and in theY direction always to the height
of character.
To Paragraph Frame is associated with a paragraph.
To Page Frame has always the same position in relation to the page margins.
By the end of this video, you will learn
how to?
▪ Insertion from Files on Computer
▪ Inserting Clip Art Pictures
▪ Options related to inserted image
▪ Working with Drawing Objects – resize/delete/editing shape
MsWord
Editing shape of Drawing Objects
▪ Resize
▪ Delete
▪ Edit shape
– Format tab -> Insert Shapes group -> Edit Shape drop-down -> Change shape
drop-down or Edit Points.
▪ Change Shape Fill
– Format tab -> Shape Fill drop-down -> Choose any color.
▪ Change Shape Effects
– Format tab -> Shape Effects drop-down -> Choose any shape effect
Positioning Image in the Text
▪ Format tab -> Arrange group -> Position drop-down -> Choose from
options.
Create and Use Template
Session – 3 (LibreOffice)
By the end of this video, you will learn
how to?
▪ Using a template to create a document
▪ Create a template from a document
▪ Updating a document from a changed template
▪ Setting a default template
▪ Changing to a different template
▪ Creating a template category
▪ Deleting a template category
▪ Moving/deleting a template
What is a Template?
▪ A template is a document model that you use to create other documents.
▪ E.g.You can create a template for business reports that has your company’s
logo on the first page.
▪ New documents created from this template will all have your company’s
logo on the first page.
▪ Templates can contain anything that regular documents can contain, such
as :- text, graphics, a set of styles and user-specific setup information such
as :-
– Measurement units
– Language
– The default printer
– Toolbar and menu customization
Creating a template from a document
▪ In addition to formatting, any settings that can be added to or
modified in a document can be saved within template.
▪ E.g. :-
– Printer settings
– General behaviour set fromTools -> Options, such as Paths
– Menu and toolbar customizations
– Predefined text
By the end of this video, you will learn
how to?
▪ What is a document template?
▪ Create a template from pre-defined template
▪ Using pre-defined templates
▪ Changing to a different template and updating
Apache OpenOfficeWriter
By the end of this video, you will learn
how to?
▪ What is a DocumentTemplate?
▪ Inserting a template
▪ Save and reuse templates
▪ Inserting a text into a template
MsWord
DocumentTemplate
▪ A template is used as a basis for creating documents that contains:-
– pre-defined formatting styles
– Graphics
– Tables
– Objects
– Other information
▪ Word 2010 has various pre-defined templates that can be used to create
different types of documents, like :-
– Letters
– Fax
– Brochures
– Awards
– Business cards
– Calendars etc.
Save and reuse templates
▪ You can make changes to a template that you have downloaded, you
can save it on your computer and use it again.
▪ All the customized templates are saved in My templates in the New
Document dialog box.
Inserting a text into a template
▪ Templates include placeholder text that is surrounded by brackets.
▪ To personalise your document you will need to replace the
placeholder text with your own text.
Create and Customize
Table of Contents
Session – 4 (LibreOffice)
By the end of this video, you will learn
how to?
▪ Hierarchy of Headings
▪ Customising a table of contents
▪ Apply Character Styles
▪ Choosing Paragraph Styles for Heading Levels
Hierarchy of Headings
▪ To create a table of contents for a document, the Writer application
will read through the headings that are part of the document, and
can create the table of contents from this.
▪ You can change the headings, the table of contents will be updated.
▪ Writer’sTable of Contents (TOC) features lets you build an
automatedTOC from the headings in the document.
▪ Whenever changes are made to the text of a heading in the body of
the document or the page on which the heading appears, those
changes automatically appear in the table of contents when it is next
updated.
Customizing a Table of Contents
▪ Almost every aspect of theTOC can be customized to suit the style
and requirements of the document.
▪ Go to Insert ->Table of Contents and Index ->Table of Contents,
Index or Bibliography
Apply Character Styles
▪ You might want an element to be a bit different from the rest of the
line.
▪ For example, you might want the page number to be bold.
Choosing Paragraph Styles for Heading
Levels
▪ If you are using the default heading styles for the headings in your
outline, and you do not want to use heading numbering, you do not
need to do anything on the Chapter Numbering dialog.
▪ The default outline numbering scheme uses the default heading
styles.
Maintaining an Index
▪ To modify the appearance of an index, right-click anywhere in the
index
By the end of this video, you will learn
how to?
▪ Hierarchy of Headings
▪ Customizing aTable of Content
▪ Apply Character Styles
▪ Updating aTable of Content
▪ Deleting aTable of Content
Apache OpenOfficeWriter
Hierarchy of Headings
▪ Writer’sTable of Contents feature lets you build an automatedTOC
from the headings in a document.
▪ Whenever changes are made to the text of a heading in the body of
the document or the page on which the heading appears, those
changes automatically appear in the table of contents when it is next
updated.
Customizing a Table of Content
▪ Almost every aspect of the table of contents can be customized to
suit the style and requirements of your document.
Apply Character Styles
▪ To set an element to be a bit different from the rest of the line.
▪ Example :-
– You might want the page number to be bold.
Updating Table of Content
▪ Writer does not update theTOC automatically, so after any changes
to the headings, you need to update it manually.
Deleting a Table of Content
Ms Word
Create and Customize
Table of Contents
Class 10 Unit - 6 Digital Documentation.pptx

Class 10 Unit - 6 Digital Documentation.pptx

  • 1.
  • 2.
    Starting OpenOffice Writer ▪Start -> All Programs -> OpenOffice folder -> OpenOfficeWriter
  • 3.
    Apply styles ina document Session – 1 (OpenOffice)
  • 4.
    Styles ▪ They arephysical attributes of text/object. ▪ Styles in a wordprocessor is a combination of :- – Font effects – Colors – Background ▪ Such that it can be saved and applied whenever needed into the Writer document. ▪ Apart from already available styles, you may create and save new styles.
  • 5.
    Why are stylesneeded? ▪ Styles help improve consistency in the document. ▪ Make major formatting changes easy. ▪ Ex. – – You may want to change indentation level of all paragraphs to different values – Make the font in all headers (or footers) a specific type.
  • 6.
    OpenOffice has 5style categories :- Character styles Paragraph styles Frame styles Page styles List styles
  • 7.
    2 options New stylefrom selection Fill format mode
  • 8.
    By the endof this video, you will learn how to? ▪ Applying various styles ▪ Using Fill Format mode ▪ Creating new styles ▪ Updating existing styles ▪ Load styles from a template or a document ▪ Drag-n-drop a selection to create a style ▪ Applying styles using custom keyboard shortcuts Apache OpenOfficeWriter
  • 9.
    Where can Ifind Styles in Writer? ▪ Stylist is the tool for administrating, ▪ Available as a deck on the Sidebar or as standalone panel ▪ ( F11 or Format → Styles and formatting).
  • 11.
    Fill Format Mode ▪Fill Format mode is useful to apply the same style at several points. ▪ Selecting a style from the list (for example, a character style), the cursor changes into a "paint jar" with which it is possible to "paint" the selected style at different points in the document. ▪ To exit this mode, press ESC or click again on the fill format button.
  • 12.
    New Style fromSelection ▪ The last button to the right is a menu with three options: – New Style from Selection: with this button, manually formatting a text and selecting the result, it is possible to quickly define a new style. – Update Style: modifying the format by hand, for example on a particular paragraph or frame, selecting this option the corresponding style will be updated to include the manual modifications. – Load Styles: opens a menu to load styles defined on other documents or templates.
  • 13.
    Insert and useimages in a document Session - 2
  • 14.
    By the endof this video, you will learn how to? ▪ Insert an image file ▪ Use Drag and drop ▪ Insert image using dialog box ▪ Copy and paste images ▪ Modify an image using ImageToolbar ▪ Cropping images – using crop tool/crop page of image dialog ▪ Drawing Objects and its properties ▪ Group drawing objects ▪ Position images within text
  • 15.
    Drawing objects ▪ Wecan useWriter’s drawing tools to create graphics such as simple diagrams using :- – Rectangles – Circles – Lines – Text – Other predefined shapes ▪ We can also group several drawing objects to make sure they maintain their relative position and proportion. Text
  • 16.
    Where can youplace drawing objects? ▪ Directly on a page in the document ▪ Insert into a frame
  • 17.
    Annotations ▪ You canalso use drawing tools to annotate :- – Photographs – Screen captures – Other illustrations ▪ Produced by other programs, but it is not recommended because :- – Cannot include images in a group with drawing objects – They may get out of alignment in the document – IfWriter document is converted to another format (e.g. HTML), the drawing objects and the images will not remain associated; they are saved separately.
  • 18.
    Positioning images withintext ▪ When you add an image to your text document, you need to choose how to position it w.r.t. the text and other images. ▪ Writer is a word processor rather than a Desktop Publishing program. ▪ There are limitations to the flexibility in positioning images in a word processor.
  • 19.
    Positioning can becontrolled by 4 settings :- ▪ Arrangement – placement of image on an imaginary vertical axis. Also controls how images are stacked upon each other or relative to the text. ▪ Alignment – vertical/horizontal placement of image in relation to chosen anchor point. ▪ Anchoring – reference point for images like page or frame where the object is. Could be a paragraph/character. An image always has an anchor point. ▪ Text wrapping – relation of images to the surrounding text, which may wrap around the graphic on one or both sides, be overprinted behind/in front of graphic/treat the graphic as a separate paragraph or character.
  • 20.
    The Settings canbe accessed in the following ways :- ▪ Format menu > – Anchor – Wrap – Arrange ▪ Right-click graphic -> context menu -> – Anchor – Wrap – Arrange – Alignment ▪ For images -> right-click -> properties -> Image dialog -> – Type &Wrap pages of the dialog ▪ For images -> Format menu -> Image -> Properties -> Image dialog – Type &Wrap pages of the dialog
  • 21.
    The Settings canbe accessed in the following ways :- ▪ For drawing objects -> right-click -> context-menu -> Position & Size ▪ For an embedded object (Calc spreadsheet/Draw document) ->View menu ->Toolbars -> OLE object toolbar
  • 22.
    By the endof this video, you will learn how to? ▪ Insert images, drawing, special fontwork objects. ▪ Insert pictures using several ways ▪ Drawing objects – insert/resize/modify/grouping ▪ Positioning images within text ▪ Cropping images Apache OpenOfficeWriter
  • 23.
    Inserting images ▪ Insertmenu -> Picture -> From File ▪ View menu ->Toolbars -> Picture -> From File button ▪ Drag-n-drop from File browser ▪ Tools menu -> Gallery
  • 24.
    Using the Picture& Drawing toolbar
  • 25.
    Grouping Drawing Objects ▪Grouping drawing objects makes it easier to handle several objects as a single entity, while preserving their relative sizes and positions. ▪ When objects are grouped, any editing operations carried out on that group are applied to all members of the group. – Select one object -> hold down shift key -> select other objects – Go to Format menu -> Group -> Group – Right-click -> context-menu -> Group option
  • 26.
    Positioning Images withinText Anchoring Effect As a character Frames are placed in the document like any other character; hence, they have an impact on the line size of the line and the line break. To Character Frame is with its X andY coordinates associated to the character, e.g., in the X direction always to the margin and in theY direction always to the height of character. To Paragraph Frame is associated with a paragraph. To Page Frame has always the same position in relation to the page margins.
  • 27.
    By the endof this video, you will learn how to? ▪ Insertion from Files on Computer ▪ Inserting Clip Art Pictures ▪ Options related to inserted image ▪ Working with Drawing Objects – resize/delete/editing shape MsWord
  • 28.
    Editing shape ofDrawing Objects ▪ Resize ▪ Delete ▪ Edit shape – Format tab -> Insert Shapes group -> Edit Shape drop-down -> Change shape drop-down or Edit Points. ▪ Change Shape Fill – Format tab -> Shape Fill drop-down -> Choose any color. ▪ Change Shape Effects – Format tab -> Shape Effects drop-down -> Choose any shape effect
  • 29.
    Positioning Image inthe Text ▪ Format tab -> Arrange group -> Position drop-down -> Choose from options.
  • 30.
    Create and UseTemplate Session – 3 (LibreOffice)
  • 31.
    By the endof this video, you will learn how to? ▪ Using a template to create a document ▪ Create a template from a document ▪ Updating a document from a changed template ▪ Setting a default template ▪ Changing to a different template ▪ Creating a template category ▪ Deleting a template category ▪ Moving/deleting a template
  • 32.
    What is aTemplate? ▪ A template is a document model that you use to create other documents. ▪ E.g.You can create a template for business reports that has your company’s logo on the first page. ▪ New documents created from this template will all have your company’s logo on the first page. ▪ Templates can contain anything that regular documents can contain, such as :- text, graphics, a set of styles and user-specific setup information such as :- – Measurement units – Language – The default printer – Toolbar and menu customization
  • 33.
    Creating a templatefrom a document ▪ In addition to formatting, any settings that can be added to or modified in a document can be saved within template. ▪ E.g. :- – Printer settings – General behaviour set fromTools -> Options, such as Paths – Menu and toolbar customizations – Predefined text
  • 34.
    By the endof this video, you will learn how to? ▪ What is a document template? ▪ Create a template from pre-defined template ▪ Using pre-defined templates ▪ Changing to a different template and updating Apache OpenOfficeWriter
  • 35.
    By the endof this video, you will learn how to? ▪ What is a DocumentTemplate? ▪ Inserting a template ▪ Save and reuse templates ▪ Inserting a text into a template MsWord
  • 36.
    DocumentTemplate ▪ A templateis used as a basis for creating documents that contains:- – pre-defined formatting styles – Graphics – Tables – Objects – Other information ▪ Word 2010 has various pre-defined templates that can be used to create different types of documents, like :- – Letters – Fax – Brochures – Awards – Business cards – Calendars etc.
  • 37.
    Save and reusetemplates ▪ You can make changes to a template that you have downloaded, you can save it on your computer and use it again. ▪ All the customized templates are saved in My templates in the New Document dialog box.
  • 38.
    Inserting a textinto a template ▪ Templates include placeholder text that is surrounded by brackets. ▪ To personalise your document you will need to replace the placeholder text with your own text.
  • 39.
    Create and Customize Tableof Contents Session – 4 (LibreOffice)
  • 40.
    By the endof this video, you will learn how to? ▪ Hierarchy of Headings ▪ Customising a table of contents ▪ Apply Character Styles ▪ Choosing Paragraph Styles for Heading Levels
  • 41.
    Hierarchy of Headings ▪To create a table of contents for a document, the Writer application will read through the headings that are part of the document, and can create the table of contents from this. ▪ You can change the headings, the table of contents will be updated. ▪ Writer’sTable of Contents (TOC) features lets you build an automatedTOC from the headings in the document. ▪ Whenever changes are made to the text of a heading in the body of the document or the page on which the heading appears, those changes automatically appear in the table of contents when it is next updated.
  • 42.
    Customizing a Tableof Contents ▪ Almost every aspect of theTOC can be customized to suit the style and requirements of the document. ▪ Go to Insert ->Table of Contents and Index ->Table of Contents, Index or Bibliography
  • 43.
    Apply Character Styles ▪You might want an element to be a bit different from the rest of the line. ▪ For example, you might want the page number to be bold.
  • 44.
    Choosing Paragraph Stylesfor Heading Levels ▪ If you are using the default heading styles for the headings in your outline, and you do not want to use heading numbering, you do not need to do anything on the Chapter Numbering dialog. ▪ The default outline numbering scheme uses the default heading styles.
  • 45.
    Maintaining an Index ▪To modify the appearance of an index, right-click anywhere in the index
  • 46.
    By the endof this video, you will learn how to? ▪ Hierarchy of Headings ▪ Customizing aTable of Content ▪ Apply Character Styles ▪ Updating aTable of Content ▪ Deleting aTable of Content Apache OpenOfficeWriter
  • 47.
    Hierarchy of Headings ▪Writer’sTable of Contents feature lets you build an automatedTOC from the headings in a document. ▪ Whenever changes are made to the text of a heading in the body of the document or the page on which the heading appears, those changes automatically appear in the table of contents when it is next updated.
  • 48.
    Customizing a Tableof Content ▪ Almost every aspect of the table of contents can be customized to suit the style and requirements of your document.
  • 49.
    Apply Character Styles ▪To set an element to be a bit different from the rest of the line. ▪ Example :- – You might want the page number to be bold.
  • 50.
    Updating Table ofContent ▪ Writer does not update theTOC automatically, so after any changes to the headings, you need to update it manually.
  • 51.
    Deleting a Tableof Content
  • 52.
  • 53.