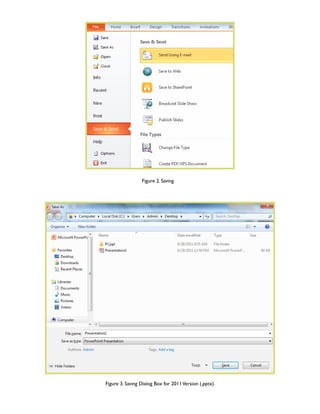
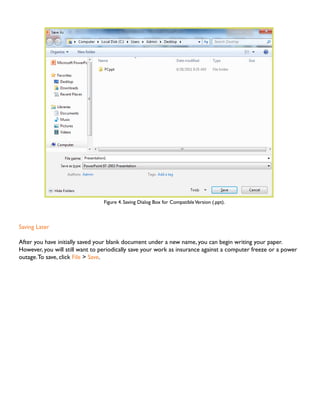
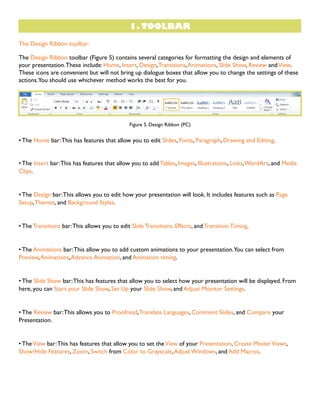
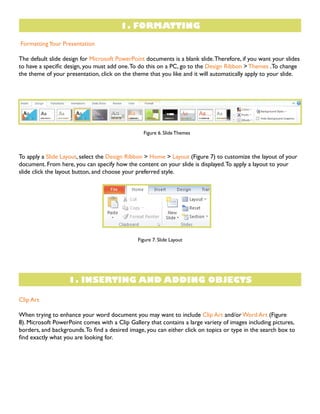
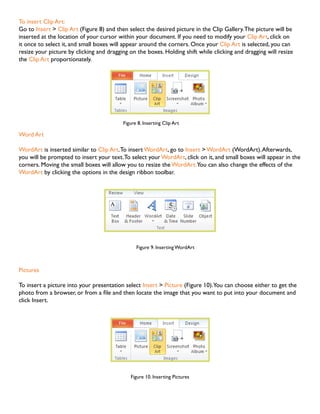
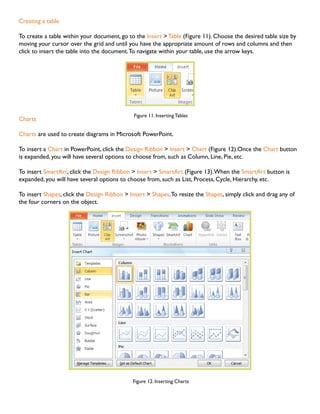
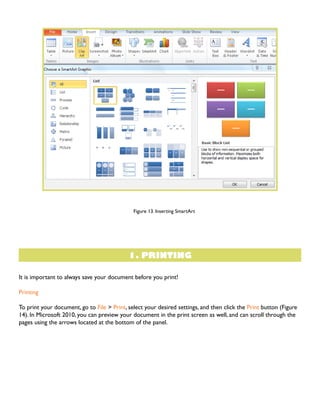
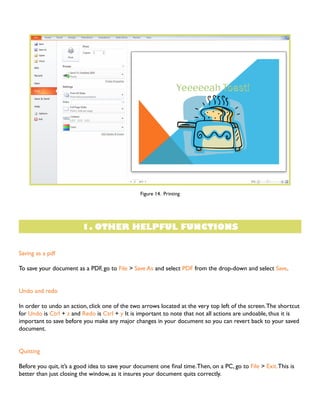
SlideShare a Scribd company logo
1 of 12
Download to read offline
Microsoft Powerpoint 2010 Tutorial
GETTING STARTED
Microsoft PowerPoint is one of the most popular presentation programs supported by both Mac and PC
platforms. Microsoft PowerPoint can be used to create interactive presentations for classroom, business, or
personal use.

TABLE OF CONTENTS
01: Getting Started . . . . . . . . . . . . . . . . . . . . . . . . . . . . . . . . . . . . . . . . . . . . . . . . . . . . . . . . . . . . . . . . . . . . . . . . . . . . . . . . . . . . . . Pg. 3
	
02: Saving . . . . . . . . . . . . . . . . . . . . . . . . . . . . . . . . . . . . . . . . . . . . . . . . . . . . . . . . . . . . . . . . . . . . . . . . . . . . . . . . . . . . . . . . . . . . . . . . Pg. 3
03: Toolbar . . . . . . . . . . . . . . . . . . . . . . . . . . . . . . . . . . . . . . . . . . . . . . . . . . . . . . . . . . . . . . . . . . . . . . . . . . . . . . . . . . . . . . . . . . . . . Pg. 5
04: Formatting . . . . . . . . . . . . . . . . . . . . . . . . . . . . . . . . . . . . . . . . . . . . . . . . . . . . . . . . . . . . . . . . . . . . . . . . . . . . . . . . . . . . . . . . . . Pg. 6
05: Inserting and Adding Objects . . . . . . . . . . . . . . . . . . . . . . . . . . . . . . . . . . . . . . . . . . . . . . . . . . . . . . . . . . . . . . . . . . . . . . . . . . Pg. 7
06: Printing . . . . . . . . . . . . . . . . . . . . . . . . . . . . . . . . . . . . . . . . . . . . . . . . . . . . . . . . . . . . . . . . . . . . . . . . . . . . . . . . . . . . . . . . . . . . . . Pg. 10
07: Other Helpful Functions . . . . . . . . . . . . . . . . . . . . . . . . . . . . . . . . . . . . . . . . . . . . . . . . . . . . . . . . . . . . . . . . . . . . . . . . . . . . . Pg. 11
08: Shortcut Keys For Microsoft Office. . . . . . . . . . . . . . . . . . . . . . . . . . . . . . . . . . . . . . . . . . . . . . . . . . . . . . . . . . . . . . . . . . Pg. 12
1. GETTING STARTED
To begin Microsoft PowerPoint, go to Start Menu > All Programs > Microsoft Office > Microsoft PowerPoint
2010 (Figure 1). Select PowerPoint Presentation from the Project Gallery if a blank document does not open.

Figure 1. Navigation to Microsoft Powerpoint on a PC

1. SAVING
Computers crash and documents are lost all the time, so it is best to save often!
Saving Initially
Before you begin to type, you should save your document. To do this, go to File > Save As (Figure 2). Microsoft
PowerPoint will open a dialog box where you can specify the new file’s name and location where you want
it saved. Once you have specified a name and a place for your new file, press the Save button. By default, the
format for PowerPoint 2010 is .pptx (Figure 3) not .ppt like in previous versions.
Note: If you want to save your document on a Mac and then open it on a PC you must specify a file extension
(i.e. .ppt). Usually your computer will do this for you, but if it does not you must do this process while in Save
As. Once you have named your document, you change the file extension by clicking Save As Type > PowerPoint
97-2003 Presentation (Figure 4).
Figure 2. Saving

Figure 3. Saving Dialog Box for 2011 Version (.pptx).
Figure 4. Saving Dialog Box for Compatible Version (.ppt).

Saving Later
After you have initially saved your blank document under a new name, you can begin writing your paper.
However, you will still want to periodically save your work as insurance against a computer freeze or a power
outage. To save, click File > Save.
1. TOOLBAR
The Design Ribbon toolbar:
The Design Ribbon toolbar (Figure 5) contains several categories for formatting the design and elements of
your presentation. These include: Home, Insert, Design, Transitions, Animations, Slide Show, Review and View.
These icons are convenient but will not bring up dialogue boxes that allow you to change the settings of these
actions.You should use whichever method works the best for you.

Figure 5. Design Ribbon (PC)

• The Home bar: This has features that allow you to edit Slides, Fonts, Paragraph, Drawing and Editing.
• The Insert bar: This has features that allow you to add Tables, Images, Illustrations, Links, WordArt, and Media
Clips.

• The Design bar: This allows you to edit how your presentation will look. It includes features such as Page
Setup, Themes, and Background Styles.

• The Transitions bar: This allows you to edit Slide Transitions, Effects, and Transition Timing.

• The Animations bar: This allow you to add custom animations to your presentation.You can select from
Preview, Animations, Advance Animation, and Animation timing.

• The Slide Show bar: This has features that allow you to select how your presentation will be displayed. From
here, you can Start your Slide Show, Set Up your Slide Show, and Adjust Monitor Settings.

• The Review bar: This allows you to Proofread, Translate Languages, Comment Slides, and Compare your
Presentation.

• The View bar: This has features that allow you to set the View of your Presentation, Create Master Views,
Show/Hide Features, Zoom, Switch from Color to Grayscale, Adjust Windows, and Add Macros.
1. FORMATTING
Formatting Your Presentation
The default slide design for Microsoft PowerPoint documents is a blank slide. Therefore, if you want your slides
to have a specific design, you must add one. To do this on a PC, go to the Design Ribbon > Themes .To change
the theme of your presentation, click on the theme that you like and it will automatically apply to your slide.

Figure 6. Slide Themes

To apply a Slide Layout, select the Design Ribbon > Home > Layout (Figure 7) to customize the layout of your
document. From here, you can specify how the content on your slide is displayed. To apply a layout to your
slide click the layout button, and choose your preferred style.

Figure 7. Slide Layout

1. INSERTING AND ADDING OBJECTS
Clip Art
When trying to enhance your word document you may want to include Clip Art and/or Word Art (Figure
8). Microsoft PowerPoint comes with a Clip Gallery that contains a large variety of images including pictures,
borders, and backgrounds. To find a desired image, you can either click on topics or type in the search box to
find exactly what you are looking for.
To insert Clip Art:
Go to Insert > Clip Art (Figure 8) and then select the desired picture in the Clip Gallery. The picture will be
inserted at the location of your cursor within your document. If you need to modify your Clip Art, click on
it once to select it, and small boxes will appear around the corners. Once your Clip Art is selected, you can
resize your picture by clicking and dragging on the boxes. Holding shift while clicking and dragging will resize
the Clip Art proportionately.

Figure 8. Inserting Clip Art

Word Art
WordArt is inserted similar to Clip Art. To insert WordArt, go to Insert > WordArt (WordArt). Afterwards,
you will be prompted to insert your text. To select your WordArt, click on it, and small boxes will appear in the
corners. Moving the small boxes will allow you to resize the WordArt.You can also change the effects of the
WordArt by clicking the options in the design ribbon toolbar.

Figure 9. Inserting WordArt

Pictures
To insert a picture into your presentation select Insert > Picture (Figure 10).You can choose either to get the
photo from a browser, or from a file and then locate the image that you want to put into your document and
click Insert.

Figure 10. Inserting Pictures
Creating a table
To create a table within your document, go to the Insert > Table (Figure 11). Choose the desired table size by
moving your cursor over the grid and until you have the appropriate amount of rows and columns and then
click to insert the table into the document. To navigate within your table, use the arrow keys.

Charts

Figure 11. Inserting Tables

Charts are used to create diagrams in Microsoft PowerPoint.
To insert a Chart in PowerPoint, click the Design Ribbon > Insert > Chart (Figure 12).Once the Chart button
is expanded, you will have several options to choose from, such as Column, Line, Pie, etc.
To insert SmartArt, click the Design Ribbon > Insert > SmartArt (Figure 13). When the SmartArt button is
expanded, you will have several options to choose from, such as List, Process, Cycle, Hierarchy, etc.
To insert Shapes, click the Design Ribbon > Insert > Shapes. To resize the Shapes, simply click and drag any of
the four corners on the object.

Figure 12. Inserting Charts
Figure 13. Inserting SmartArt

1. PRINTING
It is important to always save your document before you print!
Printing
To print your document, go to File > Print, select your desired settings, and then click the Print button (Figure
14). In Microsoft 2010, you can preview your document in the print screen as well, and can scroll through the
pages using the arrows located at the bottom of the panel.
Figure 14. Printing

1. OTHER HELPFUL FUNCTIONS
Saving as a pdf
To save your document as a PDF, go to File > Save As and select PDF from the drop-down and select Save.
Undo and redo
In order to undo an action, click one of the two arrows located at the very top left of the screen. The shortcut
for Undo is Ctrl + z and Redo is Ctrl + y It is important to note that not all actions are undoable, thus it is
important to save before you make any major changes in your document so you can revert back to your saved
document.
Quitting
Before you quit, it’s a good idea to save your document one final time. Then, on a PC, go to File > Exit. This is
better than just closing the window, as it insures your document quits correctly.
1. SHORTCUT KEYS FOR MICROSOFT OFFICE

More Related Content

What's hot

Ms office ppt 2010 views
Ms office ppt 2010 viewsMs office ppt 2010 views
Ms office ppt 2010 viewsFrya Lora
 
Ppt 2007 tutorial complete
Ppt 2007 tutorial completePpt 2007 tutorial complete
Ppt 2007 tutorial completeMaster Jhay
 
Microsoft Power Point
Microsoft Power PointMicrosoft Power Point
Microsoft Power PointOwly Eyes
 
Microsoft PowerPoint features
Microsoft PowerPoint featuresMicrosoft PowerPoint features
Microsoft PowerPoint featuresSaira Randhawa
 
Microsoft powerpoint partsviews
Microsoft powerpoint partsviewsMicrosoft powerpoint partsviews
Microsoft powerpoint partsviewsJesus Obenita Jr.
 
Microsoft power point 2010 publish
Microsoft power point 2010 publishMicrosoft power point 2010 publish
Microsoft power point 2010 publishRazif Rahman
 
Microsoft Powerpoint
Microsoft PowerpointMicrosoft Powerpoint
Microsoft PowerpointJack Frost
 
Microsoft Office PowerPoint 2007 - Lesson 1
Microsoft Office PowerPoint 2007 - Lesson 1Microsoft Office PowerPoint 2007 - Lesson 1
Microsoft Office PowerPoint 2007 - Lesson 1Samantha TerBeest
 
Power point 2010 (Reviewing Presentations)
Power point 2010 (Reviewing Presentations) Power point 2010 (Reviewing Presentations)
Power point 2010 (Reviewing Presentations) Christine Joy Pilapil
 
Triad 2010 power_point_chapter_1
Triad 2010 power_point_chapter_1Triad 2010 power_point_chapter_1
Triad 2010 power_point_chapter_1mindysholder
 
Learn MS Powerpoint basics
Learn MS Powerpoint basicsLearn MS Powerpoint basics
Learn MS Powerpoint basicsvethics
 
Project on ms power point
Project on ms power pointProject on ms power point
Project on ms power pointSachin Jaiswal
 
MS power point
MS power pointMS power point
MS power pointprvnpatil2
 
Powerpoint tutorials
Powerpoint tutorials Powerpoint tutorials
Powerpoint tutorials ePowerpoint
 
New features on microsoft ppt
New features on microsoft pptNew features on microsoft ppt
New features on microsoft pptGosick
 
Nine Easy Steps To Creating A PPt Presentation
Nine Easy Steps To Creating A PPt PresentationNine Easy Steps To Creating A PPt Presentation
Nine Easy Steps To Creating A PPt Presentationjoelk
 

What's hot (20)

Ms office ppt 2010 views
Ms office ppt 2010 viewsMs office ppt 2010 views
Ms office ppt 2010 views
 
Ppt 2007 tutorial complete
Ppt 2007 tutorial completePpt 2007 tutorial complete
Ppt 2007 tutorial complete
 
Microsoft Power Point
Microsoft Power PointMicrosoft Power Point
Microsoft Power Point
 
Microsoft PowerPoint features
Microsoft PowerPoint featuresMicrosoft PowerPoint features
Microsoft PowerPoint features
 
Microsoft powerpoint partsviews
Microsoft powerpoint partsviewsMicrosoft powerpoint partsviews
Microsoft powerpoint partsviews
 
Microsoft power point 2010 publish
Microsoft power point 2010 publishMicrosoft power point 2010 publish
Microsoft power point 2010 publish
 
Introduction to ms power point Grade 9
Introduction to ms power point Grade 9Introduction to ms power point Grade 9
Introduction to ms power point Grade 9
 
Microsoft Powerpoint
Microsoft PowerpointMicrosoft Powerpoint
Microsoft Powerpoint
 
Microsoft Office PowerPoint 2007 - Lesson 1
Microsoft Office PowerPoint 2007 - Lesson 1Microsoft Office PowerPoint 2007 - Lesson 1
Microsoft Office PowerPoint 2007 - Lesson 1
 
Power point 2010 (Reviewing Presentations)
Power point 2010 (Reviewing Presentations) Power point 2010 (Reviewing Presentations)
Power point 2010 (Reviewing Presentations)
 
Triad 2010 power_point_chapter_1
Triad 2010 power_point_chapter_1Triad 2010 power_point_chapter_1
Triad 2010 power_point_chapter_1
 
Learn MS Powerpoint basics
Learn MS Powerpoint basicsLearn MS Powerpoint basics
Learn MS Powerpoint basics
 
Ms powerpoint 2013
Ms powerpoint 2013Ms powerpoint 2013
Ms powerpoint 2013
 
Project on ms power point
Project on ms power pointProject on ms power point
Project on ms power point
 
Presentation101 by Adrian Bulacan
Presentation101 by Adrian BulacanPresentation101 by Adrian Bulacan
Presentation101 by Adrian Bulacan
 
MS power point
MS power pointMS power point
MS power point
 
Powerpoint tutorials
Powerpoint tutorials Powerpoint tutorials
Powerpoint tutorials
 
New features on microsoft ppt
New features on microsoft pptNew features on microsoft ppt
New features on microsoft ppt
 
Learning power point 2016
Learning power point 2016Learning power point 2016
Learning power point 2016
 
Nine Easy Steps To Creating A PPt Presentation
Nine Easy Steps To Creating A PPt PresentationNine Easy Steps To Creating A PPt Presentation
Nine Easy Steps To Creating A PPt Presentation
 

Similar to Ppt 2010

Writing DE materials
Writing DE materialsWriting DE materials
Writing DE materialsTechno 2010
 
Microsoft office power_point_2007_tutorial
Microsoft office power_point_2007_tutorialMicrosoft office power_point_2007_tutorial
Microsoft office power_point_2007_tutorialMizuhashi Yuki
 
Effective use of powerpoint
Effective use of powerpointEffective use of powerpoint
Effective use of powerpointMaye Payumo
 
Microsoft PowerPoint Basic features
Microsoft PowerPoint Basic featuresMicrosoft PowerPoint Basic features
Microsoft PowerPoint Basic featuresAkashMeghwar2
 
Pranavi verma-class-9-digital-presentation
Pranavi verma-class-9-digital-presentationPranavi verma-class-9-digital-presentation
Pranavi verma-class-9-digital-presentationPranaviVerma
 
PowerPoint__2013.pptx
PowerPoint__2013.pptxPowerPoint__2013.pptx
PowerPoint__2013.pptxElma Shahid
 
CAB-Unit 3-Lesson-5.pptxgjimt2023.......
CAB-Unit 3-Lesson-5.pptxgjimt2023.......CAB-Unit 3-Lesson-5.pptxgjimt2023.......
CAB-Unit 3-Lesson-5.pptxgjimt2023.......MahakMittal23
 
mspowerpoint-111212103552-phpapp01.pptx
mspowerpoint-111212103552-phpapp01.pptxmspowerpoint-111212103552-phpapp01.pptx
mspowerpoint-111212103552-phpapp01.pptxLadyChristianneBucsi
 
MS PowerPoint Tasks (1).docx
MS PowerPoint Tasks (1).docxMS PowerPoint Tasks (1).docx
MS PowerPoint Tasks (1).docxPrashanthGatla
 
In 2015 E. c Doyogena Higa Model Grade 9th Student 2nd Semester ICT Note.pdf
In 2015 E. c Doyogena Higa Model Grade 9th Student 2nd Semester ICT Note.pdfIn 2015 E. c Doyogena Higa Model Grade 9th Student 2nd Semester ICT Note.pdf
In 2015 E. c Doyogena Higa Model Grade 9th Student 2nd Semester ICT Note.pdfalazargirma2
 
Bcsl 013 solved-assignment-2019-20 without
Bcsl 013   solved-assignment-2019-20 withoutBcsl 013   solved-assignment-2019-20 without
Bcsl 013 solved-assignment-2019-20 withoutAbhinavSingh732
 
Chapter.09
Chapter.09Chapter.09
Chapter.09klivsie
 
Power point by Gulshan K Maheshwari(QAU)
Power point by Gulshan  K Maheshwari(QAU)Power point by Gulshan  K Maheshwari(QAU)
Power point by Gulshan K Maheshwari(QAU)GulshanKumar368
 
All about PowerPoint tips and a usefull guide
All about PowerPoint tips and a usefull guideAll about PowerPoint tips and a usefull guide
All about PowerPoint tips and a usefull guiderithikkapoor7
 

Similar to Ppt 2010 (20)

Manual de microsoft power point 2010
Manual de microsoft power point 2010Manual de microsoft power point 2010
Manual de microsoft power point 2010
 
Writing DE materials
Writing DE materialsWriting DE materials
Writing DE materials
 
Microsoft office power_point_2007_tutorial
Microsoft office power_point_2007_tutorialMicrosoft office power_point_2007_tutorial
Microsoft office power_point_2007_tutorial
 
11. pp beginner
11. pp beginner11. pp beginner
11. pp beginner
 
Effective use of powerpoint
Effective use of powerpointEffective use of powerpoint
Effective use of powerpoint
 
Microsoft PowerPoint Basic features
Microsoft PowerPoint Basic featuresMicrosoft PowerPoint Basic features
Microsoft PowerPoint Basic features
 
210-Power Point TA 2013
210-Power Point TA 2013210-Power Point TA 2013
210-Power Point TA 2013
 
Pranavi verma-class-9-digital-presentation
Pranavi verma-class-9-digital-presentationPranavi verma-class-9-digital-presentation
Pranavi verma-class-9-digital-presentation
 
PowerPoint__2013.pptx
PowerPoint__2013.pptxPowerPoint__2013.pptx
PowerPoint__2013.pptx
 
CAB-Unit 3-Lesson-5.pptxgjimt2023.......
CAB-Unit 3-Lesson-5.pptxgjimt2023.......CAB-Unit 3-Lesson-5.pptxgjimt2023.......
CAB-Unit 3-Lesson-5.pptxgjimt2023.......
 
mspowerpoint-111212103552-phpapp01.pptx
mspowerpoint-111212103552-phpapp01.pptxmspowerpoint-111212103552-phpapp01.pptx
mspowerpoint-111212103552-phpapp01.pptx
 
MS PowerPoint Tasks (1).docx
MS PowerPoint Tasks (1).docxMS PowerPoint Tasks (1).docx
MS PowerPoint Tasks (1).docx
 
In 2015 E. c Doyogena Higa Model Grade 9th Student 2nd Semester ICT Note.pdf
In 2015 E. c Doyogena Higa Model Grade 9th Student 2nd Semester ICT Note.pdfIn 2015 E. c Doyogena Higa Model Grade 9th Student 2nd Semester ICT Note.pdf
In 2015 E. c Doyogena Higa Model Grade 9th Student 2nd Semester ICT Note.pdf
 
Mspowerpoint 111212103552-phpapp01
Mspowerpoint 111212103552-phpapp01Mspowerpoint 111212103552-phpapp01
Mspowerpoint 111212103552-phpapp01
 
Bcsl 013 solved-assignment-2019-20 without
Bcsl 013   solved-assignment-2019-20 withoutBcsl 013   solved-assignment-2019-20 without
Bcsl 013 solved-assignment-2019-20 without
 
Chapter.09
Chapter.09Chapter.09
Chapter.09
 
Chapter.09
Chapter.09Chapter.09
Chapter.09
 
Power point by Gulshan K Maheshwari(QAU)
Power point by Gulshan  K Maheshwari(QAU)Power point by Gulshan  K Maheshwari(QAU)
Power point by Gulshan K Maheshwari(QAU)
 
Zekepowerpoint
ZekepowerpointZekepowerpoint
Zekepowerpoint
 
All about PowerPoint tips and a usefull guide
All about PowerPoint tips and a usefull guideAll about PowerPoint tips and a usefull guide
All about PowerPoint tips and a usefull guide
 

Ppt 2010

  • 2. GETTING STARTED Microsoft PowerPoint is one of the most popular presentation programs supported by both Mac and PC platforms. Microsoft PowerPoint can be used to create interactive presentations for classroom, business, or personal use. TABLE OF CONTENTS 01: Getting Started . . . . . . . . . . . . . . . . . . . . . . . . . . . . . . . . . . . . . . . . . . . . . . . . . . . . . . . . . . . . . . . . . . . . . . . . . . . . . . . . . . . . . . Pg. 3 02: Saving . . . . . . . . . . . . . . . . . . . . . . . . . . . . . . . . . . . . . . . . . . . . . . . . . . . . . . . . . . . . . . . . . . . . . . . . . . . . . . . . . . . . . . . . . . . . . . . . Pg. 3 03: Toolbar . . . . . . . . . . . . . . . . . . . . . . . . . . . . . . . . . . . . . . . . . . . . . . . . . . . . . . . . . . . . . . . . . . . . . . . . . . . . . . . . . . . . . . . . . . . . . Pg. 5 04: Formatting . . . . . . . . . . . . . . . . . . . . . . . . . . . . . . . . . . . . . . . . . . . . . . . . . . . . . . . . . . . . . . . . . . . . . . . . . . . . . . . . . . . . . . . . . . Pg. 6 05: Inserting and Adding Objects . . . . . . . . . . . . . . . . . . . . . . . . . . . . . . . . . . . . . . . . . . . . . . . . . . . . . . . . . . . . . . . . . . . . . . . . . . Pg. 7 06: Printing . . . . . . . . . . . . . . . . . . . . . . . . . . . . . . . . . . . . . . . . . . . . . . . . . . . . . . . . . . . . . . . . . . . . . . . . . . . . . . . . . . . . . . . . . . . . . . Pg. 10 07: Other Helpful Functions . . . . . . . . . . . . . . . . . . . . . . . . . . . . . . . . . . . . . . . . . . . . . . . . . . . . . . . . . . . . . . . . . . . . . . . . . . . . . Pg. 11 08: Shortcut Keys For Microsoft Office. . . . . . . . . . . . . . . . . . . . . . . . . . . . . . . . . . . . . . . . . . . . . . . . . . . . . . . . . . . . . . . . . . Pg. 12
  • 3. 1. GETTING STARTED To begin Microsoft PowerPoint, go to Start Menu > All Programs > Microsoft Office > Microsoft PowerPoint 2010 (Figure 1). Select PowerPoint Presentation from the Project Gallery if a blank document does not open. Figure 1. Navigation to Microsoft Powerpoint on a PC 1. SAVING Computers crash and documents are lost all the time, so it is best to save often! Saving Initially Before you begin to type, you should save your document. To do this, go to File > Save As (Figure 2). Microsoft PowerPoint will open a dialog box where you can specify the new file’s name and location where you want it saved. Once you have specified a name and a place for your new file, press the Save button. By default, the format for PowerPoint 2010 is .pptx (Figure 3) not .ppt like in previous versions. Note: If you want to save your document on a Mac and then open it on a PC you must specify a file extension (i.e. .ppt). Usually your computer will do this for you, but if it does not you must do this process while in Save As. Once you have named your document, you change the file extension by clicking Save As Type > PowerPoint 97-2003 Presentation (Figure 4).
  • 4. Figure 2. Saving Figure 3. Saving Dialog Box for 2011 Version (.pptx).
  • 5. Figure 4. Saving Dialog Box for Compatible Version (.ppt). Saving Later After you have initially saved your blank document under a new name, you can begin writing your paper. However, you will still want to periodically save your work as insurance against a computer freeze or a power outage. To save, click File > Save.
  • 6. 1. TOOLBAR The Design Ribbon toolbar: The Design Ribbon toolbar (Figure 5) contains several categories for formatting the design and elements of your presentation. These include: Home, Insert, Design, Transitions, Animations, Slide Show, Review and View. These icons are convenient but will not bring up dialogue boxes that allow you to change the settings of these actions.You should use whichever method works the best for you. Figure 5. Design Ribbon (PC) • The Home bar: This has features that allow you to edit Slides, Fonts, Paragraph, Drawing and Editing. • The Insert bar: This has features that allow you to add Tables, Images, Illustrations, Links, WordArt, and Media Clips. • The Design bar: This allows you to edit how your presentation will look. It includes features such as Page Setup, Themes, and Background Styles. • The Transitions bar: This allows you to edit Slide Transitions, Effects, and Transition Timing. • The Animations bar: This allow you to add custom animations to your presentation.You can select from Preview, Animations, Advance Animation, and Animation timing. • The Slide Show bar: This has features that allow you to select how your presentation will be displayed. From here, you can Start your Slide Show, Set Up your Slide Show, and Adjust Monitor Settings. • The Review bar: This allows you to Proofread, Translate Languages, Comment Slides, and Compare your Presentation. • The View bar: This has features that allow you to set the View of your Presentation, Create Master Views, Show/Hide Features, Zoom, Switch from Color to Grayscale, Adjust Windows, and Add Macros.
  • 7. 1. FORMATTING Formatting Your Presentation The default slide design for Microsoft PowerPoint documents is a blank slide. Therefore, if you want your slides to have a specific design, you must add one. To do this on a PC, go to the Design Ribbon > Themes .To change the theme of your presentation, click on the theme that you like and it will automatically apply to your slide. Figure 6. Slide Themes To apply a Slide Layout, select the Design Ribbon > Home > Layout (Figure 7) to customize the layout of your document. From here, you can specify how the content on your slide is displayed. To apply a layout to your slide click the layout button, and choose your preferred style. Figure 7. Slide Layout 1. INSERTING AND ADDING OBJECTS Clip Art When trying to enhance your word document you may want to include Clip Art and/or Word Art (Figure 8). Microsoft PowerPoint comes with a Clip Gallery that contains a large variety of images including pictures, borders, and backgrounds. To find a desired image, you can either click on topics or type in the search box to find exactly what you are looking for.
  • 8. To insert Clip Art: Go to Insert > Clip Art (Figure 8) and then select the desired picture in the Clip Gallery. The picture will be inserted at the location of your cursor within your document. If you need to modify your Clip Art, click on it once to select it, and small boxes will appear around the corners. Once your Clip Art is selected, you can resize your picture by clicking and dragging on the boxes. Holding shift while clicking and dragging will resize the Clip Art proportionately. Figure 8. Inserting Clip Art Word Art WordArt is inserted similar to Clip Art. To insert WordArt, go to Insert > WordArt (WordArt). Afterwards, you will be prompted to insert your text. To select your WordArt, click on it, and small boxes will appear in the corners. Moving the small boxes will allow you to resize the WordArt.You can also change the effects of the WordArt by clicking the options in the design ribbon toolbar. Figure 9. Inserting WordArt Pictures To insert a picture into your presentation select Insert > Picture (Figure 10).You can choose either to get the photo from a browser, or from a file and then locate the image that you want to put into your document and click Insert. Figure 10. Inserting Pictures
  • 9. Creating a table To create a table within your document, go to the Insert > Table (Figure 11). Choose the desired table size by moving your cursor over the grid and until you have the appropriate amount of rows and columns and then click to insert the table into the document. To navigate within your table, use the arrow keys. Charts Figure 11. Inserting Tables Charts are used to create diagrams in Microsoft PowerPoint. To insert a Chart in PowerPoint, click the Design Ribbon > Insert > Chart (Figure 12).Once the Chart button is expanded, you will have several options to choose from, such as Column, Line, Pie, etc. To insert SmartArt, click the Design Ribbon > Insert > SmartArt (Figure 13). When the SmartArt button is expanded, you will have several options to choose from, such as List, Process, Cycle, Hierarchy, etc. To insert Shapes, click the Design Ribbon > Insert > Shapes. To resize the Shapes, simply click and drag any of the four corners on the object. Figure 12. Inserting Charts
  • 10. Figure 13. Inserting SmartArt 1. PRINTING It is important to always save your document before you print! Printing To print your document, go to File > Print, select your desired settings, and then click the Print button (Figure 14). In Microsoft 2010, you can preview your document in the print screen as well, and can scroll through the pages using the arrows located at the bottom of the panel.
  • 11. Figure 14. Printing 1. OTHER HELPFUL FUNCTIONS Saving as a pdf To save your document as a PDF, go to File > Save As and select PDF from the drop-down and select Save. Undo and redo In order to undo an action, click one of the two arrows located at the very top left of the screen. The shortcut for Undo is Ctrl + z and Redo is Ctrl + y It is important to note that not all actions are undoable, thus it is important to save before you make any major changes in your document so you can revert back to your saved document. Quitting Before you quit, it’s a good idea to save your document one final time. Then, on a PC, go to File > Exit. This is better than just closing the window, as it insures your document quits correctly.
  • 12. 1. SHORTCUT KEYS FOR MICROSOFT OFFICE