Downloaded 22 times

![The VI Command
• Once started, VI will fill the entire terminal screen until exited
and returned to the shell prompt.
• VI is old, it originated from a predecessor called “ed” which
was used on printer terminals hence its commands and
shortcuts are different than the keyboard shortcuts we know
in modern systems, such as CTRL-[letter].
• Starting VI:
vi [filename(s)] – enters the editor while editing the file(s) specified.
view [filename(s)] – opens the file(s) in read-only mode.
vi –r [filename] – recovers a crashed file.](https://image.slidesharecdn.com/07vitexteditor-130801014816-phpapp02/85/07-vi-text_editor-3-320.jpg)

![Cursor Movement
• VIM supports moving the cursor around with the keyboard
arrows; VI only allows arrow navigation in newer versions.
• We can use the following alternatives to move around:
0 – go to the beginning of the line.
$ - go to the end of the line.
[n]G – jump to line number [n].
G – jump to last line in the file.
gg – jump to the first line in the file.
b – jump to the beginning of the word.
e – jump to the end of the word.
w – jump to the beginning of the next word.
^L – refresh the screen
• These are just some of the basic controls, there are many
more.](https://image.slidesharecdn.com/07vitexteditor-130801014816-phpapp02/85/07-vi-text_editor-6-320.jpg)
![Command Mode
• Pressing ESC returns VI from insert to command mode.
• Basic command structure in VI:
[count][command][scope]
• Let’s break down the command 10dw for example:
10 – this is the count of objects we wish the command to affect.
d – “d” refers to delete.
w – “w” is the scope, in this case – words.
• The above command will delete 10 words, beginning at the
current location of the cursor.](https://image.slidesharecdn.com/07vitexteditor-130801014816-phpapp02/85/07-vi-text_editor-7-320.jpg)


![Last-Line Mode
• Search in VI:
/[pattern] – search forward for pattern matches
?[pattern] – search backwards for pattern matches
n – repeat last search
N – repeat last search in the opposite direction
• Search & Replace:
:s/search-string/replace-with-string/g – this command will search for
“search-string” throughout the file and replace it with “replace-with-
string”.
:10,20s/search-string/replace-with-string/g – same as above but the
search will be performed only between lines 10 and 20.
:s/search-string/replace-with-string/gc – this command will search
for “search-string” throughout the file and replace it with “replace-
with-string” but ask for confirmation before each replacement.](https://image.slidesharecdn.com/07vitexteditor-130801014816-phpapp02/85/07-vi-text_editor-12-320.jpg)
![File Commands
• :r [filename] – read the file and place its contents under the
cursor.
• :w – write (saves changes).
• :w! – override write-protection mode and save changes.
• :w [filename] – save into a file with the specific name.
• :wq – save changes and quit VI
• :x – save changes and quit VI
• :q – quit without saving
• :q! – force quit without saving
• :![command] – execute a shell command
• :r![command] – execute a shell command and place its output in the file
being edited.](https://image.slidesharecdn.com/07vitexteditor-130801014816-phpapp02/85/07-vi-text_editor-13-320.jpg)


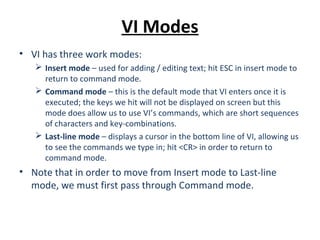
VI/VIM are text editors where VI is the standard UNIX editor and VIM improves on VI. VI has three modes - command mode which is default, insert mode for editing text, and last-line mode to see commands. Commands include deleting, changing, cutting, copying and pasting text using keyboard shortcuts. VI can also search/replace text, execute shell commands, and save/quit files.