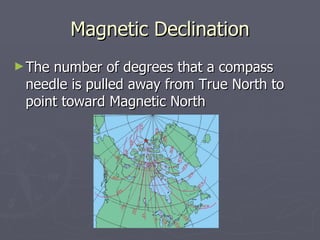
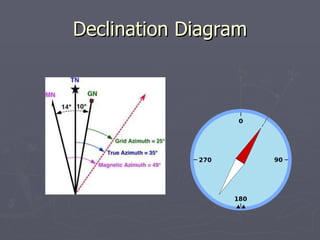
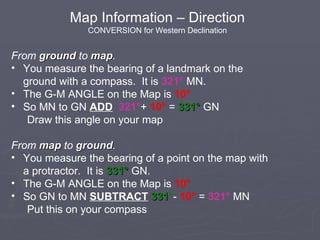
Transforming Data Streams with Kafka Connect: An Introduction to Single Messa...
Declination
1. Land Navigation Term: Magnetic Declination Website: http://www.ngdc.noaa.gov/ Go to “Geomagnetic Data” Go to “Declination” Go to “Compute your declination” (N38 °, W77°) What is the declination for Warrenton? What was it on this day in 1994? 1974?
13. Thumb Loop Lanyard Ring Sighting Slot Lens Luminous Bezel Line Luminous Magnetic Arrow Fixed Index Line Luminous Heading Luminous Sighting Dots Sighting Wire Graduated Straight Edge Floating Dial Bezel LENSATIC COMPASS PARTS and Features of a Lensatic compass PART 1 Basic Land Navigation 1. COVER 2. BASE 3. LENS REAR SITE
19. 65° AZIMUTH (11.5m = 1,150mils) SIGHTING A LENSATIC COMPASS PART 1 Basic Land Navigation
20.
21.
Editor's Notes
Give the following information to the students to practice this. From GROUND to MAP You target a landmark at MN azimuth 17º to a hill What is the map GN azimuth from your location? Answer ( 26º ) 17º + 9º = 26º From MAP to GROUND With protractor and map, you plot a GN azimuth 112º to a lake What is the ground MN azimuth from your location? Answer ( 103º ) 112º - 9º = 103º
BEFORE CONTINUING WITH THE SLIDE “ The lensatic compass has 3 PARTS with features on each part.” “ As we go through these PARTS and FEATURES, we will go into more detail on each feature on the next slides. Right now we are just going to go through the names of each item.” CONTINUE WITH THE SLIDE PARTS 1. Cover 2. Base 3. Lens Rear Site FEATURES Luminous Sighting Dots Sighting Wire Etc Read the following ( IN BLUE ) to the students
AT THE END OF THE RED RING DESCRIPTION Have students look at the compass. Read the following ( IN BLUE ) to the students
“ Holding the compass to your cheek is very accurate and steady.” “ You sight your target and then read the azimuth.” Read the following ( IN BLUE ) to the students
“ This is what you see when looking through the lens at the dial. You see the current azimuth reading on the Black Index Line, both in degrees and mils.” Read the following ( IN BLUE ) to the students
“ As you can see, you can observe both the target and azimuth reading by simply shifting your eye up or down.” “ It is very accurate, fast, and easy compared to an orienteering compass.” Read the following ( IN BLUE ) to the students
“ Let’s say you want to know what the azimuth heading is to the water tower, so you can calculate your position.” Click to next slide Read the following ( IN BLUE ) to the students
“ Using the compass-to-cheek method . . . click slide . . . this is what you get.” “ 65 ° azimuth, 1,150 mils.” “ Use this information to calculate your position on the map. This is taught in Part 2 Intermediate Land Navigation.” Read the following ( IN BLUE ) to the students