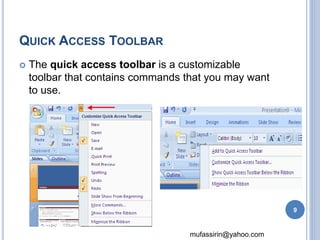
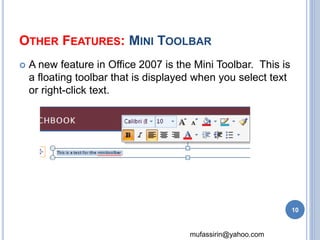
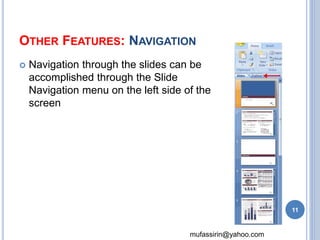
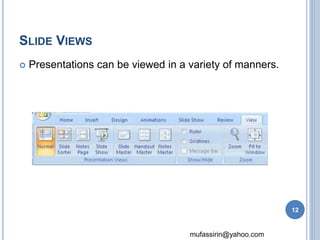
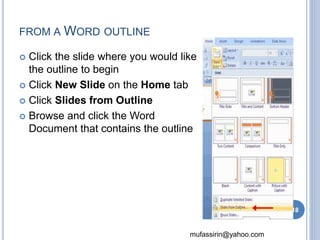
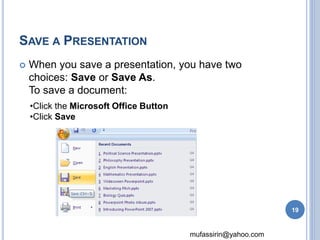
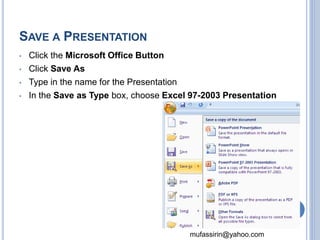
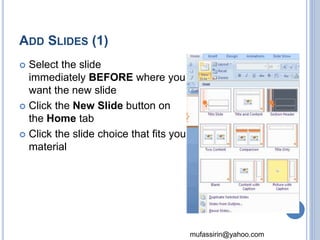
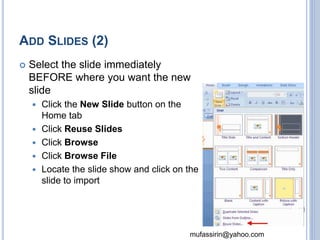
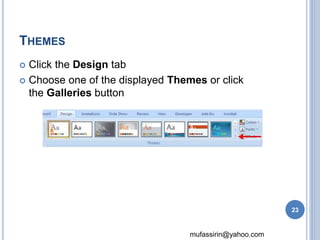
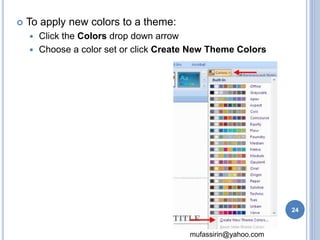
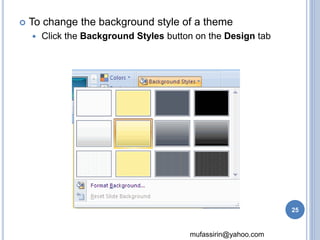
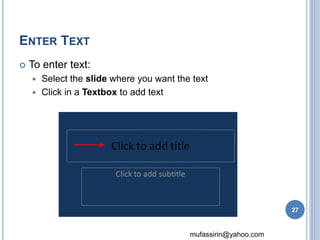
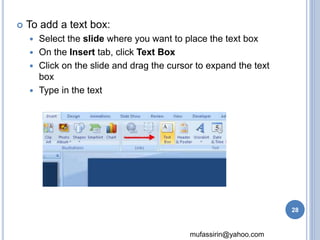
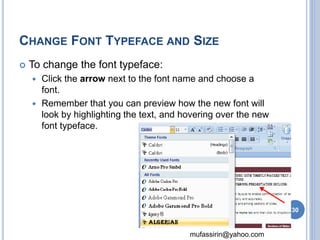
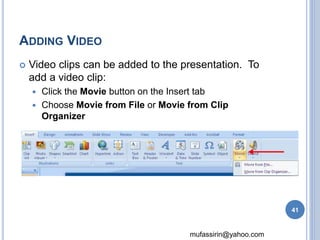
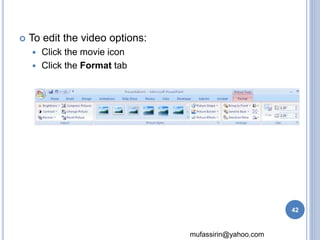
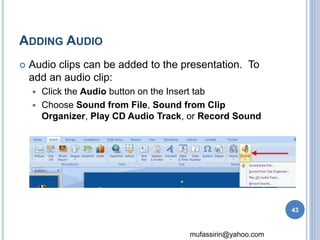
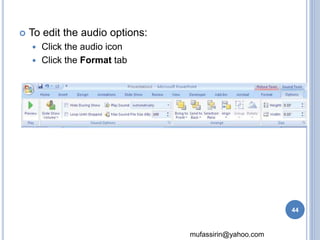
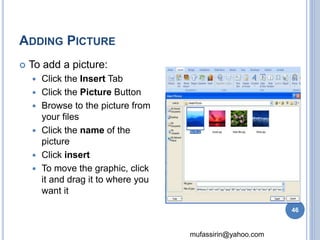
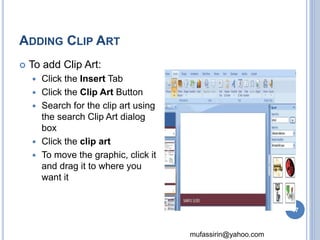
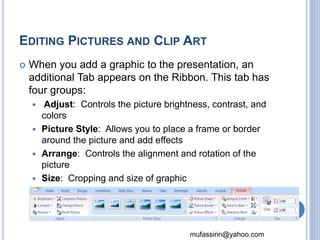
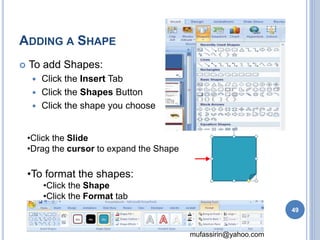
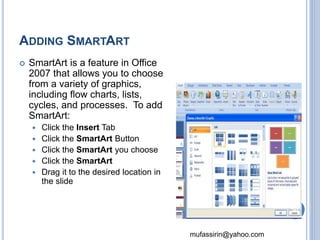
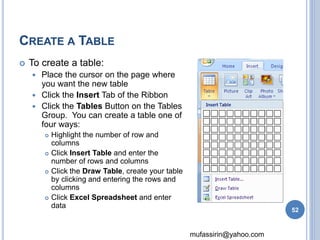
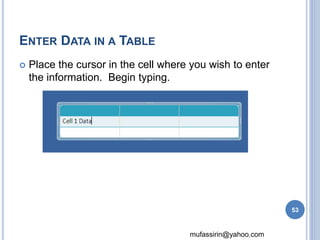
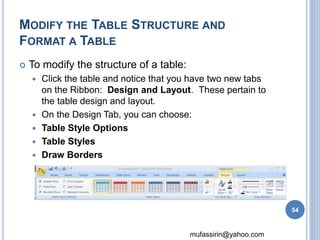
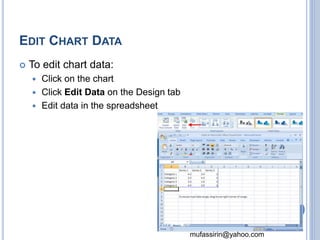
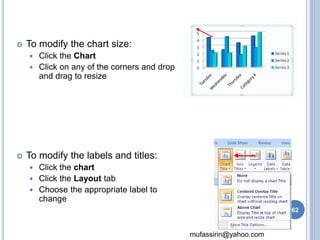
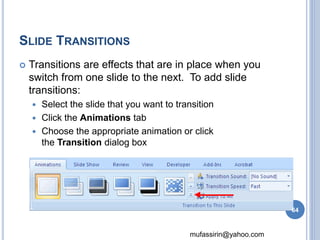
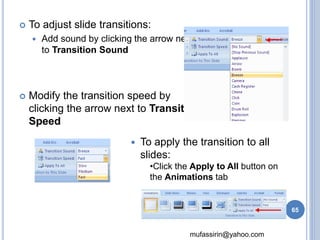
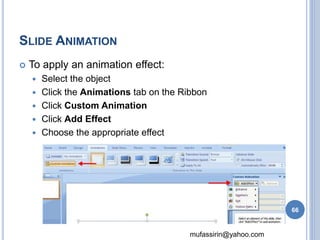
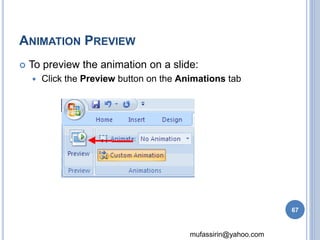
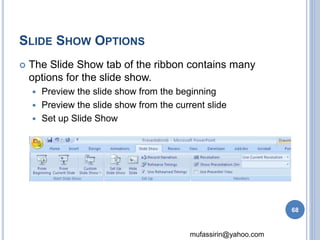
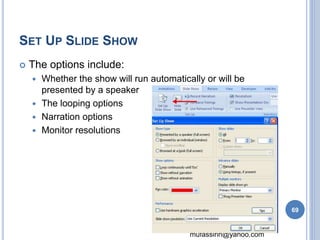
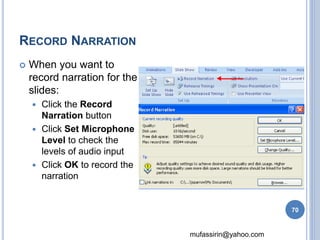
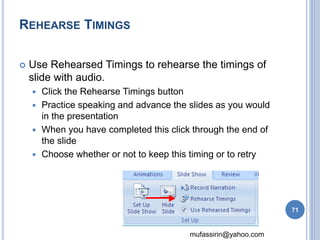
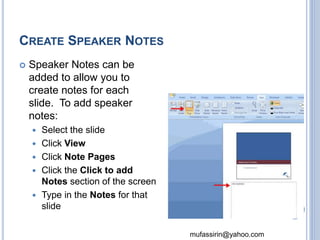
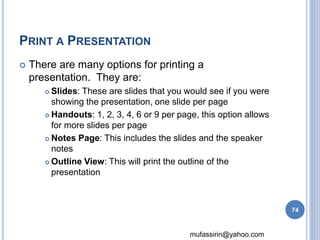
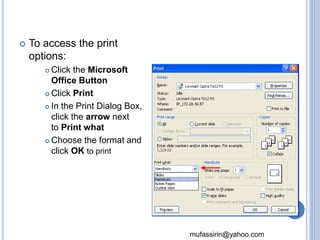
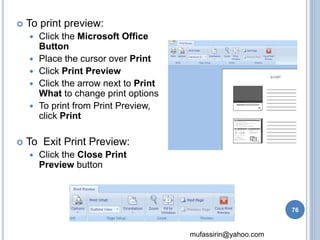
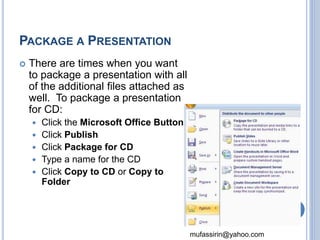
ELECTRONIC PRESENTATION 
& 
MS POWERPOINT 
Mohamed Mufassirin 1
mufassirin@yahoo.com 
OUTLINES 
 Introduction 
 Getting Started with MS PowerPoint 2007 
 Modifying Presentation 
 Formatting Presentation 
 Working with Graphics and Chart 
 Delivering the Presentation 
 Working with Multimedia 
 Printing 2
mufassirin@yahoo.com 
INTRODUCTION 
 What is a presentation? 
 It is the process of presenting the content of a 
topic to an audience consisting of one or more 
persons. 
3
DIFFERENT PRESENTATION APPLICATION 
PACKAGE 
mufassirin@yahoo.com 
 PowerPoint 
 Flash 
 Open Office Impress 
 Apple Keynote 
 Photoshop 
 NXPowerLite 
 PowerPlugs Charts 
 Perspector 
 Color Schemer 
 PowerConverter 
4
STARTED WITH MS POWER POINT 2007 
A PowerPoint presentation is a collection of 
electronic slides that can have text, pictures, 
graphics, tables, sound and video. This collection 
can run automatically or can be controlled by a 
presenter. 
5
 There are three features that you should remember as 
you work within PowerPoint 2007: 
mufassirin@yahoo.com 
1. Office Button 
2. The Ribbon 
3. Quick Access Toolbar 
1 
2 
3 
6
mufassirin@yahoo.com 
MICROSOFT OFFICE BUTTON 
 The Microsoft Office Button 
performs many of the functions 
that were located in the File 
menu of older versions of 
PowerPoint. 
7
The ribbon is the panel at the top portion of the document 
mufassirin@yahoo.com 
THE RIBBON: THE TABS 
 Home: Slides, Font, Paragraph, Drawing, Editing 
 Insert: Tables, Graphics, Links, Text, Media Clips 
 Design: Page Setup, Themes, Background 
 Animations: Preview, Animations, Transitions 
 Slide Show: Start Slide Show 
 View: Presentation Views, Show/Hide, Zoom, Window 
8
mufassirin@yahoo.com 
QUICK ACCESS TOOLBAR 
 The quick access toolbar is a customizable 
toolbar that contains commands that you may want 
to use. 
9
OTHER FEATURES: MINI TOOLBAR 
 A new feature in Office 2007 is the Mini Toolbar. This is 
a floating toolbar that is displayed when you select text 
or right-click text. 
mufassirin@yahoo.com 
10
OTHER FEATURES: NAVIGATION 
 Navigation through the slides can be 
accomplished through the Slide 
Navigation menu on the left side of the 
screen 
mufassirin@yahoo.com 
11
mufassirin@yahoo.com 
SLIDE VIEWS 
 Presentations can be viewed in a variety of manners. 
12
CREATING A PRESENTATION 
13
mufassirin@yahoo.com 
NEW PRESENTATION 
You can start a new presentation from 
 A blank slide, 
 A template, 
 An existing presentations, 
 or a Word outline. 
14
mufassirin@yahoo.com 
FROM A BLANK SLIDE 
 Click the Microsoft Office Button 
 Click New 
 Click Blank Presentation 
15
mufassirin@yahoo.com 
FROM A TEMPLATE 
 Click the Microsoft Office Button 
 Click New 
 Click Installed Templates or Browse through Microsoft 
Office Online Templates 
 Click the template you choose 
16
FROM AN EXISTING PRESENTATION 
 Click the Microsoft Office Button 
mufassirin@yahoo.com 
 Click New 
 Click New from Existing 
 Browse to and click the presentation 
17
mufassirin@yahoo.com 
FROM AWORD OUTLINE 
 Click the slide where you would like 
the outline to begin 
 Click New Slide on the Home tab 
 Click Slides from Outline 
 Browse and click the Word 
Document that contains the outline 
18
mufassirin@yahoo.com 
SAVE A PRESENTATION 
 When you save a presentation, you have two 
choices: Save or Save As. 
To save a document: 
•Click the Microsoft Office Button 
•Click Save 
19
mufassirin@yahoo.com 
SAVE A PRESENTATION 
• Click the Microsoft Office Button 
• Click Save As 
• Type in the name for the Presentation 
• In the Save as Type box, choose Excel 97-2003 Presentation 
20
mufassirin@yahoo.com 
ADD SLIDES (1) 
 Select the slide 
immediately BEFORE where you 
want the new slide 
 Click the New Slide button on 
the Home tab 
 Click the slide choice that fits your 
material 
21
mufassirin@yahoo.com 
ADD SLIDES (2) 
 Select the slide immediately 
BEFORE where you want the new 
slide 
 Click the New Slide button on the 
Home tab 
 Click Reuse Slides 
 Click Browse 
 Click Browse File 
 Locate the slide show and click on the 
slide to import 
22
mufassirin@yahoo.com 
THEMES 
 Click the Design tab 
 Choose one of the displayed Themes or click 
the Galleries button 
23
mufassirin@yahoo.com 
 To apply new colors to a theme: 
 Click the Colors drop down arrow 
 Choose a color set or click Create New Theme Colors 
24
 To change the background style of a theme 
 Click the Background Styles button on the Design tab 
mufassirin@yahoo.com 
25
WORKING WITH CONTENT 
26
mufassirin@yahoo.com 
ENTER TEXT 
 To enter text: 
 Select the slide where you want the text 
 Click in a Textbox to add text 
27
mufassirin@yahoo.com 
 To add a text box: 
 Select the slide where you want to place the text box 
 On the Insert tab, click Text Box 
 Click on the slide and drag the cursor to expand the text 
box 
 Type in the text 
28
FORMATTING TEXT 
29
CHANGE FONT TYPEFACE AND SIZE 
mufassirin@yahoo.com 
 To change the font typeface: 
 Click the arrow next to the font name and choose a 
font. 
 Remember that you can preview how the new font will 
look by highlighting the text, and hovering over the new 
font typeface. 
30
mufassirin@yahoo.com 
 To change the font size: 
 Click the arrow next to the font size and choose the 
appropriate size, or 
 Click the increase or decrease font size buttons. 
31
mufassirin@yahoo.com 
FONT STYLES AND EFFECTS 
 Font styles are predefined formatting options that 
are used to emphasize text. They include: Bold, 
Italic, and Underline. To add these to text: 
 Select the text and click the Font Styles included on the 
Font group of the Home tab or 
 Select the text and right click to display the font tools 
32
mufassirin@yahoo.com 
CHANGE TEXT COLOR 
 To change the text color: 
 Select the text and click 
the Colors button 
included on the Font 
Group of the Ribbon, or 
 Highlight the text and 
right click and choose the 
colors tool. 
 Select the color by 
clicking the down arrow 
next to the font color 
button. 
33
CHANGE PARAGRAPH ALIGNMENT 
 The paragraph alignment allows you to set how you 
want text to appear. 
mufassirin@yahoo.com 
 Click the Home Tab 
 Choose the appropriate button for alignment on the 
Paragraph Group. 
 Align Left: the text is aligned with your left margin 
 Center: The text is centered within your margins 
 Align Right: Aligns text with the right margin 
 Justify: Aligns text to both the left and right margins. 
34
mufassirin@yahoo.com 
INDENT PARAGRAPHS 
 To indent paragraphs, you can do the following: 
 Click the Indent buttons to control the indent. 
 Click the Indent button repeated times to increase the 
size of the indent. 
35
mufassirin@yahoo.com 
TEXT DIRECTION 
 To change the text direction: 
 Select the text 
 Click the Text Direction button on the Home tab 
 Click the selection 
36
ADDING CONTENT 
37
BULLETED AND NUMBERED LISTS 
 Bulleted lists have bullet points, numbered lists 
have numbers, and outline lists combine numbers 
and letters depending on the organization of the list. 
 Select the text you wish to make a list 
 Click the Bulleted or Numbered Lists button 
mufassirin@yahoo.com 
38
mufassirin@yahoo.com 
NESTED LISTS 
 A nested list is list with several levels of indented 
text. To create a nested list: 
 Create your list following the directions above 
 Click the Increase or Decrease Indent button 
39
mufassirin@yahoo.com 
FORMATTING LISTS 
 The bullet image and numbering 
format can be changed by using 
the Bullets or Numbering dialog 
box. 
 Select the entire list to change all the 
bullets or numbers, or Place the 
cursor on one line within the list to 
change a single bullet. 
 Click the arrow next to the bulleted or 
numbered list and choose a bullet or 
numbering style. 
40
mufassirin@yahoo.com 
ADDING VIDEO 
 Video clips can be added to the presentation. To 
add a video clip: 
 Click the Movie button on the Insert tab 
 Choose Movie from File or Movie from Clip 
Organizer 
41
mufassirin@yahoo.com 
 To edit the video options: 
 Click the movie icon 
 Click the Format tab 
42
mufassirin@yahoo.com 
ADDING AUDIO 
 Audio clips can be added to the presentation. To 
add an audio clip: 
 Click the Audio button on the Insert tab 
 Choose Sound from File, Sound from Clip 
Organizer, Play CD Audio Track, or Record Sound 
43
mufassirin@yahoo.com 
 To edit the audio options: 
 Click the audio icon 
 Click the Format tab 
44
GRAPHICS 
45
mufassirin@yahoo.com 
ADDING PICTURE 
 To add a picture: 
 Click the Insert Tab 
 Click the Picture Button 
 Browse to the picture from 
your files 
 Click the name of the 
picture 
 Click insert 
 To move the graphic, click 
it and drag it to where you 
want it 
46
mufassirin@yahoo.com 
ADDING CLIP ART 
 To add Clip Art: 
 Click the Insert Tab 
 Click the Clip Art Button 
 Search for the clip art using 
the search Clip Art dialog 
box 
 Click the clip art 
 To move the graphic, click it 
and drag it to where you 
want it 
47
EDITING PICTURES AND CLIP ART 
 When you add a graphic to the presentation, an 
additional Tab appears on the Ribbon. This tab has 
four groups: 
 Adjust: Controls the picture brightness, contrast, and 
mufassirin@yahoo.com 
colors 
 Picture Style: Allows you to place a frame or border 
around the picture and add effects 
 Arrange: Controls the alignment and rotation of the 
picture 
 Size: Cropping and size of graphic 
48
mufassirin@yahoo.com 
ADDING A SHAPE 
 To add Shapes: 
 Click the Insert Tab 
 Click the Shapes Button 
 Click the shape you choose 
•Click the Slide 
•Drag the cursor to expand the Shape 
•To format the shapes: 
•Click the Shape 
•Click the Format tab 
49
mufassirin@yahoo.com 
ADDING SMARTART 
 SmartArt is a feature in Office 
2007 that allows you to choose 
from a variety of graphics, 
including flow charts, lists, 
cycles, and processes. To add 
SmartArt: 
 Click the Insert Tab 
 Click the SmartArt Button 
 Click the SmartArt you choose 
 Click the SmartArt 
 Drag it to the desired location in 
the slide 
50
TABLES 
51
mufassirin@yahoo.com 
CREATE A TABLE 
 To create a table: 
 Place the cursor on the page where 
you want the new table 
 Click the Insert Tab of the Ribbon 
 Click the Tables Button on the Tables 
Group. You can create a table one of 
four ways: 
 Highlight the number of row and 
columns 
 Click Insert Table and enter the 
number of rows and columns 
 Click the Draw Table, create your table 
by clicking and entering the rows and 
columns 
 Click Excel Spreadsheet and enter 
data 
52
mufassirin@yahoo.com 
ENTER DATA IN A TABLE 
 Place the cursor in the cell where you wish to enter 
the information. Begin typing. 
53
MODIFY THE TABLE STRUCTURE AND 
FORMAT A TABLE 
mufassirin@yahoo.com 
 To modify the structure of a table: 
 Click the table and notice that you have two new tabs 
on the Ribbon: Design and Layout. These pertain to 
the table design and layout. 
 On the Design Tab, you can choose: 
 Table Style Options 
 Table Styles 
 Draw Borders 
54
 To format a table, click the table and then click 
the Layout Tab on the Ribbon. This Layout tab 
allows you to: 
 View Gridlines and Properties (from the Table Group) 
 Insert Rows and Columns (from the Rows & Columns Group) 
 Delete the Table, Rows and/or Columns (from the Rows & 
Columns Group) 
 Merge or Split Cells (from the Merge Group) 
 Increase and decrease cell size (Cell Size Group) 
 Align text within the cells and change text directions 
(Alignment Group) 
mufassirin@yahoo.com 
55
INSERT A TABLE FROM WORD OR EXCEL 
 Open the Word document or Excel worksheet 
mufassirin@yahoo.com 
 Select the chart 
 Click Copy on the Home tab 
 Go to the PowerPoint document where you want the 
chart located 
 Click Paste on the Home tab 
56
CHARTS 
57
mufassirin@yahoo.com 
CHARTS 
 Charts allow you to present information contained 
in the worksheet in a graphic format. PowerPoint 
offers many types of charts including: Column, Line, 
Pie, Bar, Area, Scatter and more. To view the 
charts available click the Insert Tab on the Ribbon. 
58
mufassirin@yahoo.com 
CREATE A CHART 
 To create a chart: 
 Click the Insert tab on 
the ribbon 
 Click the type 
of Chart you want to 
create 
 Insert 
the Data and Labels 
59
mufassirin@yahoo.com 
EDIT CHART DATA 
 To edit chart data: 
 Click on the chart 
 Click Edit Data on the Design tab 
 Edit data in the spreadsheet 
60
mufassirin@yahoo.com 
MODIFY A CHART 
 Once you have created a chart you can do several 
things to modify the chart. 
To move the chart: 
 Click the Chart and Drag it another location on the 
same slide, or 
 Copy it to another slide 
 Choose the desired location and click Paste 
61
mufassirin@yahoo.com 
 To modify the chart size: 
 Click the Chart 
 Click on any of the corners and drop 
and drag to resize 
 To modify the labels and titles: 
 Click the chart 
 Click the Layout tab 
 Choose the appropriate label to 
change 
62
SLIDE EFFECT 
63
mufassirin@yahoo.com 
SLIDE TRANSITIONS 
 Transitions are effects that are in place when you 
switch from one slide to the next. To add slide 
transitions: 
 Select the slide that you want to transition 
 Click the Animations tab 
 Choose the appropriate animation or click 
the Transition dialog box 
64
mufassirin@yahoo.com 
 To adjust slide transitions: 
 Add sound by clicking the arrow next 
to Transition Sound 
 Modify the transition speed by 
clicking the arrow next to Transition 
Speed 
 To apply the transition to all 
slides: 
•Click the Apply to All button on 
the Animations tab 
65
mufassirin@yahoo.com 
SLIDE ANIMATION 
 To apply an animation effect: 
 Select the object 
 Click the Animations tab on the Ribbon 
 Click Custom Animation 
 Click Add Effect 
 Choose the appropriate effect 
66
mufassirin@yahoo.com 
ANIMATION PREVIEW 
 To preview the animation on a slide: 
 Click the Preview button on the Animations tab 
67
mufassirin@yahoo.com 
SLIDE SHOW OPTIONS 
 The Slide Show tab of the ribbon contains many 
options for the slide show. 
 Preview the slide show from the beginning 
 Preview the slide show from the current slide 
 Set up Slide Show 
68
mufassirin@yahoo.com 
SET UP SLIDE SHOW 
 The options include: 
 Whether the show will run automatically or will be 
presented by a speaker 
 The looping options 
 Narration options 
 Monitor resolutions 
69
mufassirin@yahoo.com 
RECORD NARRATION 
 When you want to 
record narration for the 
slides: 
 Click the Record 
Narration button 
 Click Set Microphone 
Level to check the 
levels of audio input 
 Click OK to record the 
narration 
70
mufassirin@yahoo.com 
REHEARSE TIMINGS 
 Use Rehearsed Timings to rehearse the timings of 
slide with audio. 
 Click the Rehearse Timings button 
 Practice speaking and advance the slides as you would 
in the presentation 
 When you have completed this click through the end of 
the slide 
 Choose whether or not to keep this timing or to retry 
71
PRINTING 
72
mufassirin@yahoo.com 
CREATE SPEAKER NOTES 
 Speaker Notes can be 
added to allow you to 
create notes for each 
slide. To add speaker 
notes: 
 Select the slide 
 Click View 
 Click Note Pages 
 Click the Click to add 
Notes section of the screen 
 Type in the Notes for that 
slide 73
mufassirin@yahoo.com 
PRINT A PRESENTATION 
 There are many options for printing a 
presentation. They are: 
 Slides: These are slides that you would see if you were 
showing the presentation, one slide per page 
 Handouts: 1, 2, 3, 4, 6 or 9 per page, this option allows 
for more slides per page 
 Notes Page: This includes the slides and the speaker 
notes 
 Outline View: This will print the outline of the 
presentation 
74
mufassirin@yahoo.com 
 To access the print 
options: 
 Click the Microsoft 
Office Button 
 Click Print 
 In the Print Dialog Box, 
click the arrow next 
to Print what 
 Choose the format and 
click OK to print 
75
mufassirin@yahoo.com 
 To print preview: 
 Click the Microsoft Office 
Button 
 Place the cursor over Print 
 Click Print Preview 
 Click the arrow next to Print 
What to change print options 
 To print from Print Preview, 
click Print 
 To Exit Print Preview: 
 Click the Close Print 
Preview button 
76
mufassirin@yahoo.com 
PACKAGE A PRESENTATION 
 There are times when you want 
to package a presentation with all 
of the additional files attached as 
well. To package a presentation 
for CD: 
 Click the Microsoft Office Button 
 Click Publish 
 Click Package for CD 
 Type a name for the CD 
 Click Copy to CD or Copy to 
Folder 
77
THANK YOU 
mufassirin@yahoo.com 
78

Presentation

  • 1.
    ELECTRONIC PRESENTATION & MS POWERPOINT Mohamed Mufassirin 1
  • 2.
    mufassirin@yahoo.com OUTLINES Introduction  Getting Started with MS PowerPoint 2007  Modifying Presentation  Formatting Presentation  Working with Graphics and Chart  Delivering the Presentation  Working with Multimedia  Printing 2
  • 3.
    mufassirin@yahoo.com INTRODUCTION What is a presentation?  It is the process of presenting the content of a topic to an audience consisting of one or more persons. 3
  • 4.
    DIFFERENT PRESENTATION APPLICATION PACKAGE mufassirin@yahoo.com  PowerPoint  Flash  Open Office Impress  Apple Keynote  Photoshop  NXPowerLite  PowerPlugs Charts  Perspector  Color Schemer  PowerConverter 4
  • 5.
    STARTED WITH MSPOWER POINT 2007 A PowerPoint presentation is a collection of electronic slides that can have text, pictures, graphics, tables, sound and video. This collection can run automatically or can be controlled by a presenter. 5
  • 6.
     There arethree features that you should remember as you work within PowerPoint 2007: mufassirin@yahoo.com 1. Office Button 2. The Ribbon 3. Quick Access Toolbar 1 2 3 6
  • 7.
    mufassirin@yahoo.com MICROSOFT OFFICEBUTTON  The Microsoft Office Button performs many of the functions that were located in the File menu of older versions of PowerPoint. 7
  • 8.
    The ribbon isthe panel at the top portion of the document mufassirin@yahoo.com THE RIBBON: THE TABS  Home: Slides, Font, Paragraph, Drawing, Editing  Insert: Tables, Graphics, Links, Text, Media Clips  Design: Page Setup, Themes, Background  Animations: Preview, Animations, Transitions  Slide Show: Start Slide Show  View: Presentation Views, Show/Hide, Zoom, Window 8
  • 9.
    mufassirin@yahoo.com QUICK ACCESSTOOLBAR  The quick access toolbar is a customizable toolbar that contains commands that you may want to use. 9
  • 10.
    OTHER FEATURES: MINITOOLBAR  A new feature in Office 2007 is the Mini Toolbar. This is a floating toolbar that is displayed when you select text or right-click text. mufassirin@yahoo.com 10
  • 11.
    OTHER FEATURES: NAVIGATION  Navigation through the slides can be accomplished through the Slide Navigation menu on the left side of the screen mufassirin@yahoo.com 11
  • 12.
    mufassirin@yahoo.com SLIDE VIEWS  Presentations can be viewed in a variety of manners. 12
  • 13.
  • 14.
    mufassirin@yahoo.com NEW PRESENTATION You can start a new presentation from  A blank slide,  A template,  An existing presentations,  or a Word outline. 14
  • 15.
    mufassirin@yahoo.com FROM ABLANK SLIDE  Click the Microsoft Office Button  Click New  Click Blank Presentation 15
  • 16.
    mufassirin@yahoo.com FROM ATEMPLATE  Click the Microsoft Office Button  Click New  Click Installed Templates or Browse through Microsoft Office Online Templates  Click the template you choose 16
  • 17.
    FROM AN EXISTINGPRESENTATION  Click the Microsoft Office Button mufassirin@yahoo.com  Click New  Click New from Existing  Browse to and click the presentation 17
  • 18.
    mufassirin@yahoo.com FROM AWORDOUTLINE  Click the slide where you would like the outline to begin  Click New Slide on the Home tab  Click Slides from Outline  Browse and click the Word Document that contains the outline 18
  • 19.
    mufassirin@yahoo.com SAVE APRESENTATION  When you save a presentation, you have two choices: Save or Save As. To save a document: •Click the Microsoft Office Button •Click Save 19
  • 20.
    mufassirin@yahoo.com SAVE APRESENTATION • Click the Microsoft Office Button • Click Save As • Type in the name for the Presentation • In the Save as Type box, choose Excel 97-2003 Presentation 20
  • 21.
    mufassirin@yahoo.com ADD SLIDES(1)  Select the slide immediately BEFORE where you want the new slide  Click the New Slide button on the Home tab  Click the slide choice that fits your material 21
  • 22.
    mufassirin@yahoo.com ADD SLIDES(2)  Select the slide immediately BEFORE where you want the new slide  Click the New Slide button on the Home tab  Click Reuse Slides  Click Browse  Click Browse File  Locate the slide show and click on the slide to import 22
  • 23.
    mufassirin@yahoo.com THEMES Click the Design tab  Choose one of the displayed Themes or click the Galleries button 23
  • 24.
    mufassirin@yahoo.com  Toapply new colors to a theme:  Click the Colors drop down arrow  Choose a color set or click Create New Theme Colors 24
  • 25.
     To changethe background style of a theme  Click the Background Styles button on the Design tab mufassirin@yahoo.com 25
  • 26.
  • 27.
    mufassirin@yahoo.com ENTER TEXT  To enter text:  Select the slide where you want the text  Click in a Textbox to add text 27
  • 28.
    mufassirin@yahoo.com  Toadd a text box:  Select the slide where you want to place the text box  On the Insert tab, click Text Box  Click on the slide and drag the cursor to expand the text box  Type in the text 28
  • 29.
  • 30.
    CHANGE FONT TYPEFACEAND SIZE mufassirin@yahoo.com  To change the font typeface:  Click the arrow next to the font name and choose a font.  Remember that you can preview how the new font will look by highlighting the text, and hovering over the new font typeface. 30
  • 31.
    mufassirin@yahoo.com  Tochange the font size:  Click the arrow next to the font size and choose the appropriate size, or  Click the increase or decrease font size buttons. 31
  • 32.
    mufassirin@yahoo.com FONT STYLESAND EFFECTS  Font styles are predefined formatting options that are used to emphasize text. They include: Bold, Italic, and Underline. To add these to text:  Select the text and click the Font Styles included on the Font group of the Home tab or  Select the text and right click to display the font tools 32
  • 33.
    mufassirin@yahoo.com CHANGE TEXTCOLOR  To change the text color:  Select the text and click the Colors button included on the Font Group of the Ribbon, or  Highlight the text and right click and choose the colors tool.  Select the color by clicking the down arrow next to the font color button. 33
  • 34.
    CHANGE PARAGRAPH ALIGNMENT  The paragraph alignment allows you to set how you want text to appear. mufassirin@yahoo.com  Click the Home Tab  Choose the appropriate button for alignment on the Paragraph Group.  Align Left: the text is aligned with your left margin  Center: The text is centered within your margins  Align Right: Aligns text with the right margin  Justify: Aligns text to both the left and right margins. 34
  • 35.
    mufassirin@yahoo.com INDENT PARAGRAPHS  To indent paragraphs, you can do the following:  Click the Indent buttons to control the indent.  Click the Indent button repeated times to increase the size of the indent. 35
  • 36.
    mufassirin@yahoo.com TEXT DIRECTION  To change the text direction:  Select the text  Click the Text Direction button on the Home tab  Click the selection 36
  • 37.
  • 38.
    BULLETED AND NUMBEREDLISTS  Bulleted lists have bullet points, numbered lists have numbers, and outline lists combine numbers and letters depending on the organization of the list.  Select the text you wish to make a list  Click the Bulleted or Numbered Lists button mufassirin@yahoo.com 38
  • 39.
    mufassirin@yahoo.com NESTED LISTS  A nested list is list with several levels of indented text. To create a nested list:  Create your list following the directions above  Click the Increase or Decrease Indent button 39
  • 40.
    mufassirin@yahoo.com FORMATTING LISTS  The bullet image and numbering format can be changed by using the Bullets or Numbering dialog box.  Select the entire list to change all the bullets or numbers, or Place the cursor on one line within the list to change a single bullet.  Click the arrow next to the bulleted or numbered list and choose a bullet or numbering style. 40
  • 41.
    mufassirin@yahoo.com ADDING VIDEO  Video clips can be added to the presentation. To add a video clip:  Click the Movie button on the Insert tab  Choose Movie from File or Movie from Clip Organizer 41
  • 42.
    mufassirin@yahoo.com  Toedit the video options:  Click the movie icon  Click the Format tab 42
  • 43.
    mufassirin@yahoo.com ADDING AUDIO  Audio clips can be added to the presentation. To add an audio clip:  Click the Audio button on the Insert tab  Choose Sound from File, Sound from Clip Organizer, Play CD Audio Track, or Record Sound 43
  • 44.
    mufassirin@yahoo.com  Toedit the audio options:  Click the audio icon  Click the Format tab 44
  • 45.
  • 46.
    mufassirin@yahoo.com ADDING PICTURE  To add a picture:  Click the Insert Tab  Click the Picture Button  Browse to the picture from your files  Click the name of the picture  Click insert  To move the graphic, click it and drag it to where you want it 46
  • 47.
    mufassirin@yahoo.com ADDING CLIPART  To add Clip Art:  Click the Insert Tab  Click the Clip Art Button  Search for the clip art using the search Clip Art dialog box  Click the clip art  To move the graphic, click it and drag it to where you want it 47
  • 48.
    EDITING PICTURES ANDCLIP ART  When you add a graphic to the presentation, an additional Tab appears on the Ribbon. This tab has four groups:  Adjust: Controls the picture brightness, contrast, and mufassirin@yahoo.com colors  Picture Style: Allows you to place a frame or border around the picture and add effects  Arrange: Controls the alignment and rotation of the picture  Size: Cropping and size of graphic 48
  • 49.
    mufassirin@yahoo.com ADDING ASHAPE  To add Shapes:  Click the Insert Tab  Click the Shapes Button  Click the shape you choose •Click the Slide •Drag the cursor to expand the Shape •To format the shapes: •Click the Shape •Click the Format tab 49
  • 50.
    mufassirin@yahoo.com ADDING SMARTART  SmartArt is a feature in Office 2007 that allows you to choose from a variety of graphics, including flow charts, lists, cycles, and processes. To add SmartArt:  Click the Insert Tab  Click the SmartArt Button  Click the SmartArt you choose  Click the SmartArt  Drag it to the desired location in the slide 50
  • 51.
  • 52.
    mufassirin@yahoo.com CREATE ATABLE  To create a table:  Place the cursor on the page where you want the new table  Click the Insert Tab of the Ribbon  Click the Tables Button on the Tables Group. You can create a table one of four ways:  Highlight the number of row and columns  Click Insert Table and enter the number of rows and columns  Click the Draw Table, create your table by clicking and entering the rows and columns  Click Excel Spreadsheet and enter data 52
  • 53.
    mufassirin@yahoo.com ENTER DATAIN A TABLE  Place the cursor in the cell where you wish to enter the information. Begin typing. 53
  • 54.
    MODIFY THE TABLESTRUCTURE AND FORMAT A TABLE mufassirin@yahoo.com  To modify the structure of a table:  Click the table and notice that you have two new tabs on the Ribbon: Design and Layout. These pertain to the table design and layout.  On the Design Tab, you can choose:  Table Style Options  Table Styles  Draw Borders 54
  • 55.
     To formata table, click the table and then click the Layout Tab on the Ribbon. This Layout tab allows you to:  View Gridlines and Properties (from the Table Group)  Insert Rows and Columns (from the Rows & Columns Group)  Delete the Table, Rows and/or Columns (from the Rows & Columns Group)  Merge or Split Cells (from the Merge Group)  Increase and decrease cell size (Cell Size Group)  Align text within the cells and change text directions (Alignment Group) mufassirin@yahoo.com 55
  • 56.
    INSERT A TABLEFROM WORD OR EXCEL  Open the Word document or Excel worksheet mufassirin@yahoo.com  Select the chart  Click Copy on the Home tab  Go to the PowerPoint document where you want the chart located  Click Paste on the Home tab 56
  • 57.
  • 58.
    mufassirin@yahoo.com CHARTS Charts allow you to present information contained in the worksheet in a graphic format. PowerPoint offers many types of charts including: Column, Line, Pie, Bar, Area, Scatter and more. To view the charts available click the Insert Tab on the Ribbon. 58
  • 59.
    mufassirin@yahoo.com CREATE ACHART  To create a chart:  Click the Insert tab on the ribbon  Click the type of Chart you want to create  Insert the Data and Labels 59
  • 60.
    mufassirin@yahoo.com EDIT CHARTDATA  To edit chart data:  Click on the chart  Click Edit Data on the Design tab  Edit data in the spreadsheet 60
  • 61.
    mufassirin@yahoo.com MODIFY ACHART  Once you have created a chart you can do several things to modify the chart. To move the chart:  Click the Chart and Drag it another location on the same slide, or  Copy it to another slide  Choose the desired location and click Paste 61
  • 62.
    mufassirin@yahoo.com  Tomodify the chart size:  Click the Chart  Click on any of the corners and drop and drag to resize  To modify the labels and titles:  Click the chart  Click the Layout tab  Choose the appropriate label to change 62
  • 63.
  • 64.
    mufassirin@yahoo.com SLIDE TRANSITIONS  Transitions are effects that are in place when you switch from one slide to the next. To add slide transitions:  Select the slide that you want to transition  Click the Animations tab  Choose the appropriate animation or click the Transition dialog box 64
  • 65.
    mufassirin@yahoo.com  Toadjust slide transitions:  Add sound by clicking the arrow next to Transition Sound  Modify the transition speed by clicking the arrow next to Transition Speed  To apply the transition to all slides: •Click the Apply to All button on the Animations tab 65
  • 66.
    mufassirin@yahoo.com SLIDE ANIMATION  To apply an animation effect:  Select the object  Click the Animations tab on the Ribbon  Click Custom Animation  Click Add Effect  Choose the appropriate effect 66
  • 67.
    mufassirin@yahoo.com ANIMATION PREVIEW  To preview the animation on a slide:  Click the Preview button on the Animations tab 67
  • 68.
    mufassirin@yahoo.com SLIDE SHOWOPTIONS  The Slide Show tab of the ribbon contains many options for the slide show.  Preview the slide show from the beginning  Preview the slide show from the current slide  Set up Slide Show 68
  • 69.
    mufassirin@yahoo.com SET UPSLIDE SHOW  The options include:  Whether the show will run automatically or will be presented by a speaker  The looping options  Narration options  Monitor resolutions 69
  • 70.
    mufassirin@yahoo.com RECORD NARRATION  When you want to record narration for the slides:  Click the Record Narration button  Click Set Microphone Level to check the levels of audio input  Click OK to record the narration 70
  • 71.
    mufassirin@yahoo.com REHEARSE TIMINGS  Use Rehearsed Timings to rehearse the timings of slide with audio.  Click the Rehearse Timings button  Practice speaking and advance the slides as you would in the presentation  When you have completed this click through the end of the slide  Choose whether or not to keep this timing or to retry 71
  • 72.
  • 73.
    mufassirin@yahoo.com CREATE SPEAKERNOTES  Speaker Notes can be added to allow you to create notes for each slide. To add speaker notes:  Select the slide  Click View  Click Note Pages  Click the Click to add Notes section of the screen  Type in the Notes for that slide 73
  • 74.
    mufassirin@yahoo.com PRINT APRESENTATION  There are many options for printing a presentation. They are:  Slides: These are slides that you would see if you were showing the presentation, one slide per page  Handouts: 1, 2, 3, 4, 6 or 9 per page, this option allows for more slides per page  Notes Page: This includes the slides and the speaker notes  Outline View: This will print the outline of the presentation 74
  • 75.
    mufassirin@yahoo.com  Toaccess the print options:  Click the Microsoft Office Button  Click Print  In the Print Dialog Box, click the arrow next to Print what  Choose the format and click OK to print 75
  • 76.
    mufassirin@yahoo.com  Toprint preview:  Click the Microsoft Office Button  Place the cursor over Print  Click Print Preview  Click the arrow next to Print What to change print options  To print from Print Preview, click Print  To Exit Print Preview:  Click the Close Print Preview button 76
  • 77.
    mufassirin@yahoo.com PACKAGE APRESENTATION  There are times when you want to package a presentation with all of the additional files attached as well. To package a presentation for CD:  Click the Microsoft Office Button  Click Publish  Click Package for CD  Type a name for the CD  Click Copy to CD or Copy to Folder 77
  • 78.