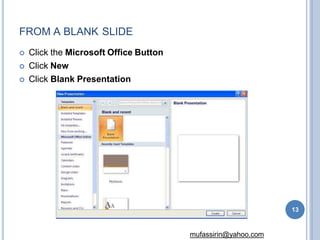
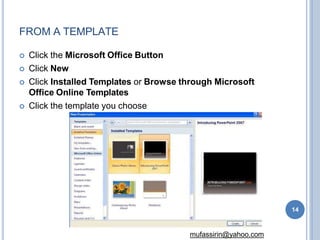
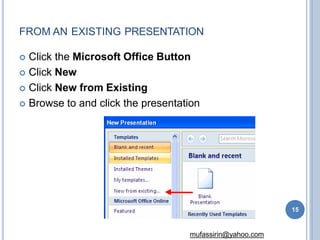
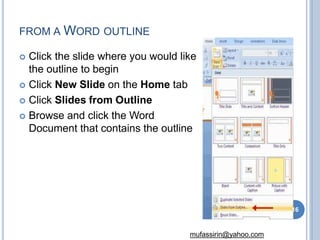
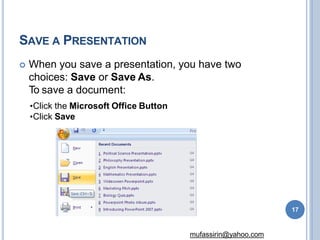
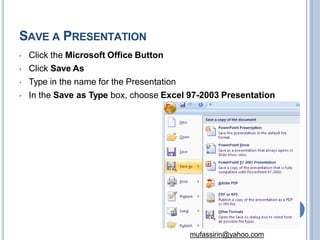
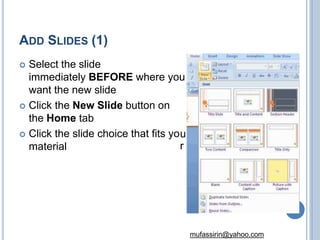
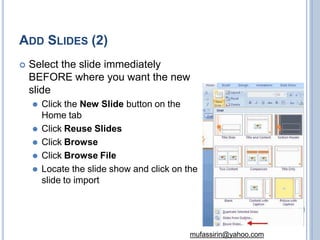
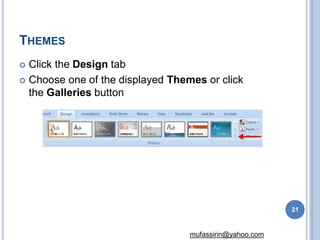
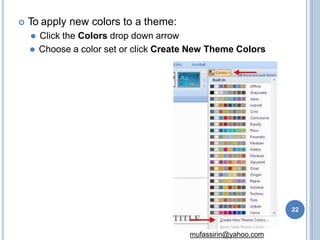
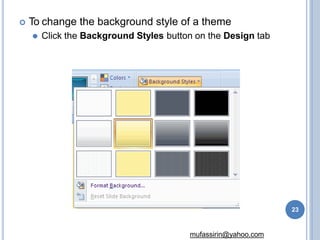
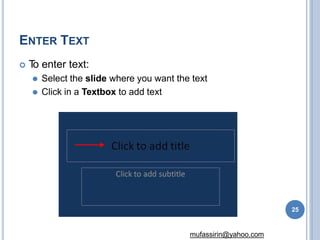
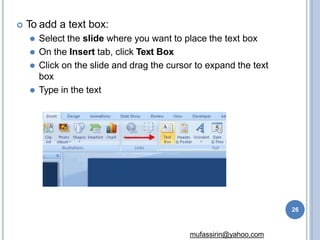
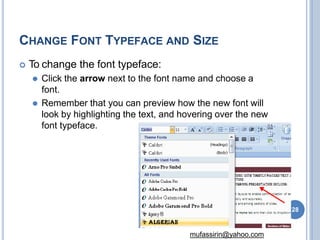
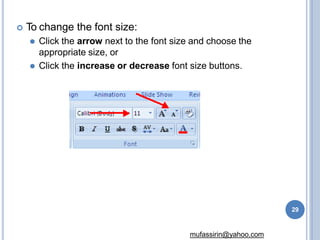
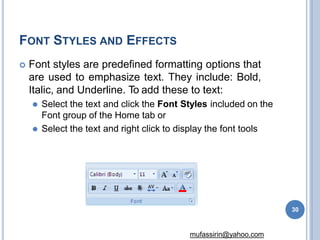
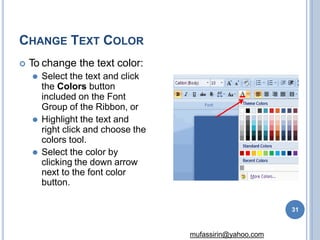
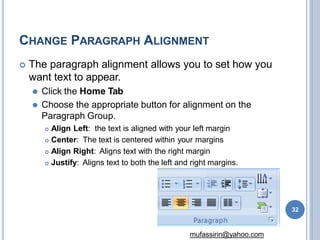
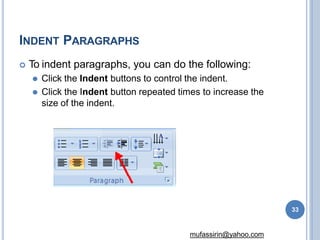
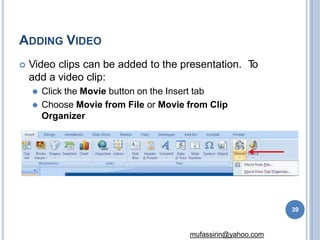
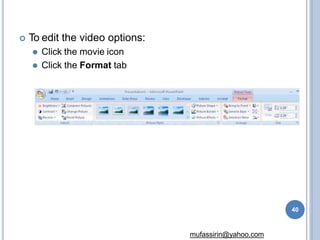
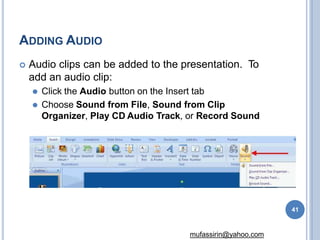
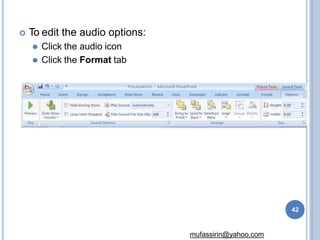
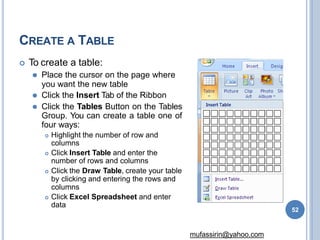
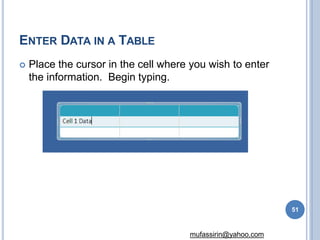
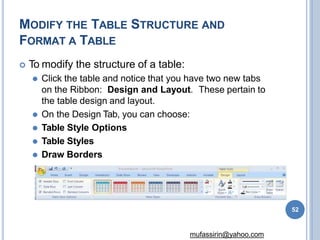
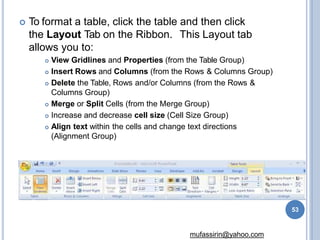
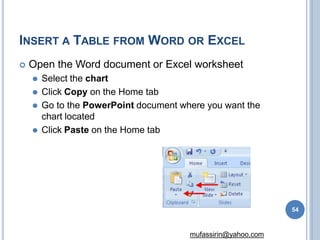
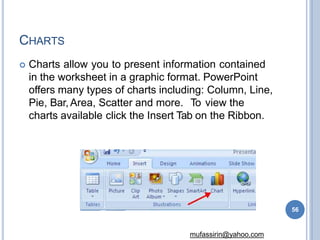
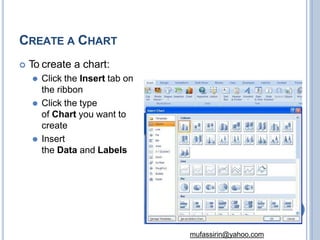
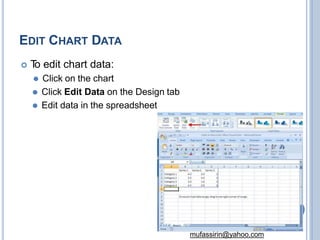
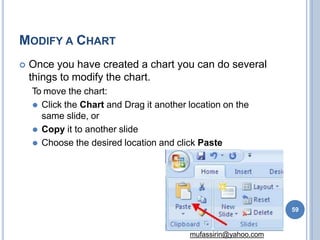
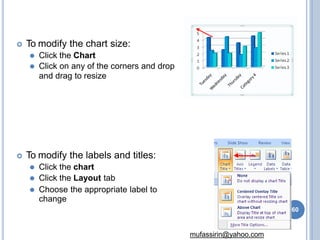
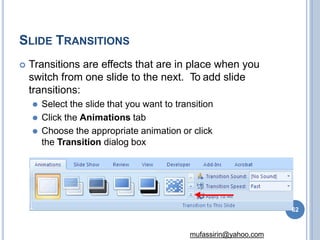
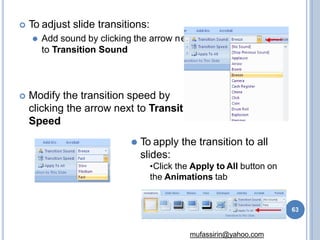
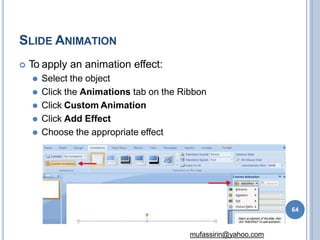
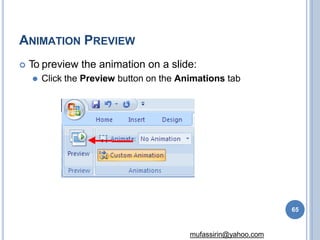
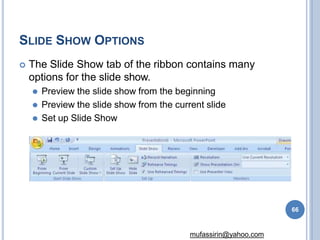
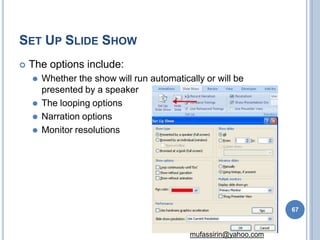
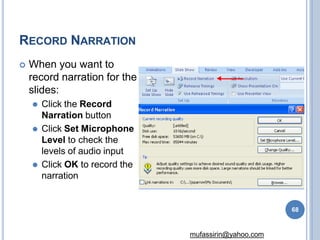
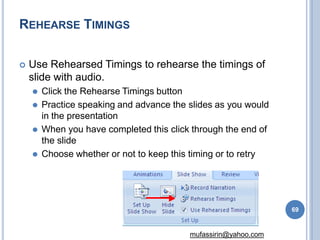
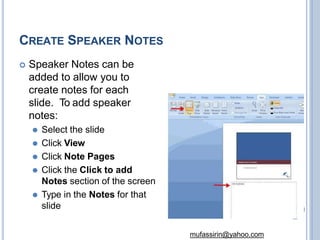
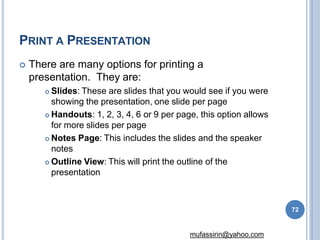
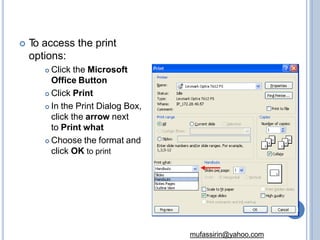
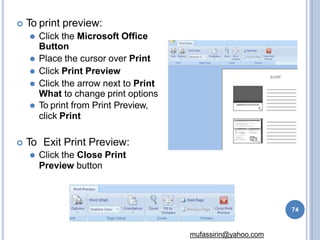
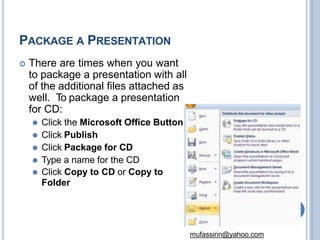
SlideShare a Scribd company logo
ELECTRONIC PRESENTATION
&
MS POWERPOINT
Mohamed Mufassirin
1
INTRODUCTION
2
mufassirin@yahoo.com
 What is a presentation?
⚫ It is the process of presenting the content of a
topic to an audience consisting of one or more
persons.
STARTED WITH MS POWER POINT 2007
A PowerPoint presentation is a collection of
electronic slides that can have text, pictures,
graphics, tables, sound and video. This collection
can run automatically or can be controlled by a
presenter.
5
 There are three features that you should remember as
you work within PowerPoint 2007:
1. Office Button
2. The Ribbon
3. Quick Access T
oolbar
1
2
3
4
mufassirin@yahoo.com
MICROSOFT OFFICE BUTTON
 The Microsoft Office Button
performs many of the functions
that were located in the File
menu of older versions of
PowerPoint.
5
mufassirin@yahoo.com
THE RIBBON: THE TABS
 Home: Slides, Font, Paragraph, Drawing, Editing
 Insert: Tables, Graphics, Links, Text, Media Clips
 Design: Page Setup, Themes, Background
 Animations: Preview,Animations, Transitions
 Slide Show: Start Slide Show
 View: Presentation Views, Show/Hide, Zoom, Window
The ribbon is the panel at the top portion of the document
6
mufassirin@yahoo.com
QUICK ACCESS TOOLBAR
 The quick access toolbar is a customizable
toolbar that contains commands that you may want
to use.
7
mufassirin@yahoo.com
OTHER FEATURES: MINI TOOLBAR
 A new feature in Office 2007 is the Mini Toolbar. This is
a floating toolbar that is displayed when you select text
or right-click text.
8
mufassirin@yahoo.com
OTHER FEATURES: NAVIGATION
 Navigation through the slides can be
accomplished through the Slide
Navigation menu on the left side of the
screen
9
mufassirin@yahoo.com
SLIDE VIEWS
 Presentations can be viewed in a variety of manners.
10
mufassirin@yahoo.com
CREATING A PRESENTATION
13
NEW PRESENTATION
12
mufassirin@yahoo.com
 You can start a new presentation from
⚫ A blank slide,
⚫ Atemplate,
⚫ An existing presentations,
⚫ or a Word outline.
FROM A BLANK SLIDE
 Click the Microsoft Office Button
 Click New
 Click Blank Presentation
13
mufassirin@yahoo.com
FROM A TEMPLATE
 Click the Microsoft Office Button
 Click New
 Click Installed Templates or Browse through Microsoft
Office Online Templates
 Click the template you choose
14
mufassirin@yahoo.com
FROM AN EXISTING PRESENTATION
 Click the Microsoft Office Button
 Click New
 Click New from Existing
 Browse to and click the presentation
15
mufassirin@yahoo.com
FROM A WORD OUTLINE
 Click the slide where you would like
the outline to begin
 Click New Slide on the Home tab
 Click Slides from Outline
 Browse and click the Word
Document that contains the outline
16
mufassirin@yahoo.com
SAVE A PRESENTATION
 When you save a presentation, you have two
choices: Save or Save As.
To save a document:
•Click the Microsoft Office Button
•Click Save
17
mufassirin@yahoo.com
SAVE A PRESENTATION
• Click the Microsoft Office Button
• Click Save As
• Type in the name for the Presentation
• In the Save as Type box, choose Excel 97-2003 Presentation
18
mufassirin@yahoo.com
ADD SLIDES (1)
u
r
 Select the slide
immediately BEFORE where you
want the new slide
 Click the New Slide button on
the Home tab
 Click the slide choice that fits yo
material
19
mufassirin@yahoo.com
ADD SLIDES (2)
 Select the slide immediately
BEFORE where you want the new
slide
⚫ Click the New Slide button on the
Home tab
⚫ Click Reuse Slides
⚫ Click Browse
⚫ Click Browse File
⚫ Locate the slide show and click on the
slide to import
20
mufassirin@yahoo.com
THEMES
 Click the Design tab
 Choose one of the displayed Themes or click
the Galleries button
21
mufassirin@yahoo.com
 To apply new colors to a theme:
⚫ Click the Colors drop down arrow
⚫ Choose a color set or click Create New Theme Colors
22
mufassirin@yahoo.com
 To change the background style of a theme
⚫ Click the Background Styles button on the Design tab
23
mufassirin@yahoo.com
WORKING WITH CONTENT
26
ENTER TEXT
 T
o enter text:
⚫ Select the slide where you want the text
⚫ Click in a Textbox to add text
25
mufassirin@yahoo.com
 To add a text box:
⚫ Select the slide where you want to place the text box
⚫ On the Insert tab, click Text Box
⚫ Click on the slide and drag the cursor to expand the text
box
⚫ Type in the text
26
mufassirin@yahoo.com
FORMATTING TEXT
29
CHANGE FONT TYPEFACE AND SIZE
 To change the font typeface:
⚫ Click the arrow next to the font name and choose a
font.
⚫ Remember that you can preview how the new font will
look by highlighting the text, and hovering over the new
font typeface.
28
mufassirin@yahoo.com
 To change the font size:
⚫ Click the arrow next to the font size and choose the
appropriate size, or
⚫ Click the increase or decrease font size buttons.
29
mufassirin@yahoo.com
FONT STYLES AND EFFECTS
 Font styles are predefined formatting options that
are used to emphasize text. They include: Bold,
Italic, and Underline. To add these to text:
⚫ Select the text and click the Font Styles included on the
Font group of the Home tab or
⚫ Select the text and right click to display the font tools
30
mufassirin@yahoo.com
CHANGE TEXT COLOR
 To change the text color:
⚫ Select the text and click
the Colors button
included on the Font
Group of the Ribbon, or
⚫ Highlight the text and
right click and choose the
colors tool.
⚫ Select the color by
clicking the down arrow
next to the font color
button.
31
mufassirin@yahoo.com
CHANGE PARAGRAPH ALIGNMENT
 The paragraph alignment allows you to set how you
want text to appear.
⚫ Click the Home Tab
⚫ Choose the appropriate button for alignment on the
Paragraph Group.
 Align Left: the text is aligned with your left margin
 Center: The text is centered within your margins
 Align Right: Aligns text with the right margin
 Justify: Aligns text to both the left and right margins.
32
mufassirin@yahoo.com
INDENT PARAGRAPHS
 To indent paragraphs, you can do the following:
⚫ Click the Indent buttons to control the indent.
⚫ Click the Indent button repeated times to increase the
size of the indent.
33
mufassirin@yahoo.com
TEXT DIRECTION
 To change the text direction:
⚫ Select the text
⚫ Click the Text Direction button on the Home tab
⚫ Click the selection
34
mufassirin@yahoo.com
ADDING CONTENT
37
BULLETED AND NUMBERED LISTS
 Bulleted lists have bullet points, numbered lists
have numbers, and outline lists combine numbers
and letters depending on the organization of the list.
⚫ Select the text you wish to make a list
⚫ Click the Bulleted or Numbered Lists button
36
mufassirin@yahoo.com
NESTED LISTS
 A nested list is list with several levels of indented
text. To create a nested list:
⚫ Create your list following the directions above
⚫ Click the Increase or Decrease Indent button
37
mufassirin@yahoo.com
FORMATTING LISTS
 The bullet image and numbering
format can be changed by using
the Bullets or Numbering dialog
box.
⚫ Select the entire list to change all the
bullets or numbers, or Place the
cursor on one line within the list to
change a single bullet.
⚫ Click the arrow next to the bulleted or
numbered list and choose a bullet or
numbering style.
38
mufassirin@yahoo.com
ADDING VIDEO
 Video clips can be added to the presentation. T
o
add a video clip:
⚫ Click the Movie button on the Insert tab
⚫ Choose Movie from File or Movie from Clip
Organizer
39
mufassirin@yahoo.com
 To edit the video options:
⚫ Click the movie icon
⚫ Click the Format tab
40
mufassirin@yahoo.com
ADDING AUDIO
 Audio clips can be added to the presentation. To
add an audio clip:
⚫ Click the Audio button on the Insert tab
⚫ Choose Sound from File, Sound from Clip
Organizer, Play CD Audio Track, or Record Sound
41
mufassirin@yahoo.com
 To edit the audio options:
⚫ Click the audio icon
⚫ Click the Format tab
42
mufassirin@yahoo.com
GRAPHICS
45
ADDING PICTURE
 To add a picture:
⚫ Click the Insert Tab
⚫ Click the Picture Button
⚫ Browse to the picture from
your files
⚫ Click the name of the
picture
⚫ Click insert
⚫ To move the graphic, click
it and drag it to where you
want it
44
mufassirin@yahoo.com
ADDING CLIP ART
 T
o add Clip Art:
⚫ Click the Insert Tab
⚫ Click the Clip Art Button
⚫ Search for the clip art using
the search Clip Art dialog
box
⚫ Click the clip art
⚫ To move the graphic, click it
and drag it to where you
want it
45
mufassirin@yahoo.com
EDITING PICTURES AND CLIP ART
 When you add a graphic to the presentation, an
additional Tab appears on the Ribbon. This tab has
four groups:
⚫ Adjust: Controls the picture brightness, contrast, and
colors
⚫ Picture Style: Allows you to place a frame or border
around the picture and add effects
⚫ Arrange: Controls the alignment and rotation of the
picture
⚫ Size: Cropping and size of graphic
46
mufassirin@yahoo.com
ADDING A SHAPE
 T
o add Shapes:
⚫ Click the Insert Tab
⚫ Click the Shapes Button
⚫ Click the shape you choose
•Click the Slide
•Drag the cursor to expand the Shape
•To format the shapes:
•Click the Shape
•Click the Format tab
47
mufassirin@yahoo.com
ADDING SMARTART
 SmartArt is a feature in Office
2007 that allows you to choose
from a variety of graphics,
including flow charts, lists,
cycles, and processes. T
o add
SmartArt:
⚫ Click the Insert Tab
⚫ Click the SmartArt Button
⚫ Click the SmartArt you choose
⚫ Click the SmartArt
⚫ Drag it to the desired location in
the slide
48
mufassirin@yahoo.com
TABLES
51
CREATE A TABLE
 To create a table:
⚫ Place the cursor on the page where
you want the new table
⚫ Click the Insert Tab of the Ribbon
⚫ Click the Tables Button on the Tables
Group. You can create a table one of
four ways:
 Highlight the number of row and
columns
 Click Insert Table and enter the
number of rows and columns
 Click the Draw Table, create your table
by clicking and entering the rows and
columns
 Click Excel Spreadsheet and enter
data
52
mufassirin@yahoo.com
ENTER DATA IN A TABLE
 Place the cursor in the cell where you wish to enter
the information. Begin typing.
51
mufassirin@yahoo.com
MODIFY THE TABLE STRUCTURE AND
FORMAT A TABLE
 To modify the structure of a table:
⚫ Click the table and notice that you have two new tabs
on the Ribbon: Design and Layout. These pertain to
the table design and layout.
⚫ On the Design Tab, you can choose:
⚫ Table Style Options
⚫ Table Styles
⚫ Draw Borders
52
mufassirin@yahoo.com
 To format a table, click the table and then click
the Layout Tab on the Ribbon. This Layout tab
allows you to:
 View Gridlines and Properties (from the Table Group)
 Insert Rows and Columns (from the Rows & Columns Group)
 Delete the Table, Rows and/or Columns (from the Rows &
Columns Group)
 Merge or Split Cells (from the Merge Group)
 Increase and decrease cell size (Cell Size Group)
 Align text within the cells and change text directions
(Alignment Group)
53
mufassirin@yahoo.com
INSERT A TABLE FROM WORD OR EXCEL
 Open the Word document or Excel worksheet
⚫ Select the chart
⚫ Click Copy on the Home tab
⚫ Go to the PowerPoint document where you want the
chart located
⚫ Click Paste on the Home tab
54
mufassirin@yahoo.com
CHARTS
57
CHARTS
 Charts allow you to present information contained
in the worksheet in a graphic format. PowerPoint
offers many types of charts including: Column, Line,
Pie, Bar, Area, Scatter and more. To view the
charts available click the Insert Tab on the Ribbon.
56
mufassirin@yahoo.com
CREATE A CHART
 To create a chart:
⚫ Click the Insert tab on
the ribbon
⚫ Click the type
of Chart you want to
create
⚫ Insert
the Data and Labels
57
mufassirin@yahoo.com
EDIT CHART DATA
 T
o edit chart data:
⚫ Click on the chart
⚫ Click Edit Data on the Design tab
⚫ Edit data in the spreadsheet
58
mufassirin@yahoo.com
MODIFY A CHART
 Once you have created a chart you can do several
things to modify the chart.
To move the chart:
⚫ Click the Chart and Drag it another location on the
same slide, or
⚫ Copy it to another slide
⚫ Choose the desired location and click Paste
59
mufassirin@yahoo.com
 To modify the chart size:
⚫ Click the Chart
⚫ Click on any of the corners and drop
and drag to resize
 To modify the labels and titles:
⚫ Click the chart
⚫ Click the Layout tab
⚫ Choose the appropriate label to
change
60
mufassirin@yahoo.com
SLIDE EFFECT
63
SLIDE TRANSITIONS
 Transitions are effects that are in place when you
switch from one slide to the next. To add slide
transitions:
⚫ Select the slide that you want to transition
⚫ Click the Animations tab
⚫ Choose the appropriate animation or click
the Transition dialog box
62
mufassirin@yahoo.com
 To adjust slide transitions:
⚫ Add sound by clicking the arrow n
to Transition Sound
ext
ion
 Modify the transition speed by
clicking the arrow next to Transit
Speed
⚫ To apply the transition to all
slides:
•Click the Apply to All button on
the Animations tab
63
mufassirin@yahoo.com
SLIDE ANIMATION
 To apply an animation effect:
⚫ Select the object
⚫ Click the Animations tab on the Ribbon
⚫ Click Custom Animation
⚫ Click Add Effect
⚫ Choose the appropriate effect
64
mufassirin@yahoo.com
ANIMATION PREVIEW
 To preview the animation on a slide:
⚫ Click the Preview button on the Animations tab
65
mufassirin@yahoo.com
SLIDE SHOW OPTIONS
 The Slide Show tab of the ribbon contains many
options for the slide show.
⚫ Preview the slide show from the beginning
⚫ Preview the slide show from the current slide
⚫ Set up Slide Show
66
mufassirin@yahoo.com
SET UP SLIDE SHOW
 The options include:
⚫ Whether the show will run automatically or will be
presented by a speaker
⚫ The looping options
⚫ Narration options
⚫ Monitor resolutions
67
mufassirin@yahoo.com
RECORD NARRATION
 When you want to
record narration for the
slides:
⚫ Click the Record
Narration button
⚫ Click Set Microphone
Level to check the
levels of audio input
⚫ Click OK to record the
narration
68
mufassirin@yahoo.com
REHEARSE TIMINGS
 Use Rehearsed Timings to rehearse the timings of
slide with audio.
⚫ Click the Rehearse Timings button
⚫ Practice speaking and advance the slides as you would
in the presentation
⚫ When you have completed this click through the end of
the slide
⚫ Choose whether or not to keep this timing or to retry
69
mufassirin@yahoo.com
PRINTING
72
CREATE SPEAKER NOTES
 Speaker Notes can be
added to allow you to
create notes for each
slide. To add speaker
notes:
⚫ Select the slide
⚫ Click View
⚫ Click Note Pages
⚫ Click the Click to add
Notes section of the screen
⚫ Type in the Notes for that
slide
mufassirin@yahoo.com
PRINT A PRESENTATION
72
mufassirin@yahoo.com
 There are many options for printing a
presentation. They are:
 Slides: These are slides that you would see if you were
showing the presentation, one slide per page
 Handouts: 1, 2, 3, 4, 6 or 9 per page, this option allows
for more slides per page
 Notes Page: This includes the slides and the speaker
notes
 Outline View: This will print the outline of the
presentation
 T
o access the print
options:
 Click the Microsoft
Office Button
 Click Print
 In the Print Dialog Box,
click the arrow next
to Print what
 Choose the format and
click OK to print
73
mufassirin@yahoo.com
 To print preview:
⚫ Click the Microsoft Office
Button
⚫ Place the cursor over Print
⚫ Click Print Preview
⚫ Click the arrow next to Print
What to change print options
⚫ To print from Print Preview,
click Print
 To Exit Print Preview:
⚫ Click the Close Print
Preview button
74
mufassirin@yahoo.com
PACKAGE A PRESENTATION
 There are times when you want
to package a presentation with all
of the additional files attached as
well. To package a presentation
for CD:
⚫ Click the Microsoft Office Button
⚫ Click Publish
⚫ Click Package for CD
⚫ Type a name for the CD
⚫ Click Copy to CD or Copy to
Folder
75
mufassirin@yahoo.com
THANK YOU
76
mufassirin@yahoo.com

More Related Content

Similar to PPT-4.pptx

ID lecture-7 (1).PPT
ID lecture-7 (1).PPTID lecture-7 (1).PPT
ID lecture-7 (1).PPT
IANROLDAN1
 
ID lecture-7.PPT
ID lecture-7.PPTID lecture-7.PPT
ID lecture-7.PPT
rohitkumar451275
 
ppt introduction.ppt
ppt introduction.pptppt introduction.ppt
ppt introduction.ppt
BanbanUmbod
 
Mid-Fi Prototyping with PowerPoint.PPT
Mid-Fi Prototyping with PowerPoint.PPTMid-Fi Prototyping with PowerPoint.PPT
Mid-Fi Prototyping with PowerPoint.PPT
shahid1204as
 
Powerpoint 2013-cheat-sheet
Powerpoint 2013-cheat-sheetPowerpoint 2013-cheat-sheet
Powerpoint 2013-cheat-sheet
CBRE España
 
Powerpoint 2013-cheat-sheet
Powerpoint 2013-cheat-sheetPowerpoint 2013-cheat-sheet
Powerpoint 2013-cheat-sheetWilliam McIntosh
 
ms-powerpoint 2010
ms-powerpoint 2010ms-powerpoint 2010
ms-powerpoint 2010
Tarun Singhal
 
Power point text graphics
Power point text graphicsPower point text graphics
Power point text graphicsAbrar Farisi
 
05. ms powerpoint
05. ms powerpoint05. ms powerpoint
05. ms powerpoint
Lakshmi Prasad
 
MS power point
MS power pointMS power point
MS power point
prvnpatil2
 
PowerPoint Tutorial
PowerPoint TutorialPowerPoint Tutorial
PowerPoint Tutorial
Ashford University
 
How To Make6 Ppt
How To Make6 PptHow To Make6 Ppt
How To Make6 Ppt
IES La Arboleda
 
PowerPoint 2013
PowerPoint 2013PowerPoint 2013
PowerPoint 2013
Jahnavee Parmar
 
Power Point Text Graphics
Power Point Text GraphicsPower Point Text Graphics
Power Point Text Graphics
Victor Fascio
 
LIVE DEMO: Using PowerPoint to Create Compelling Presentations for Virtual Tr...
LIVE DEMO: Using PowerPoint to Create Compelling Presentations for Virtual Tr...LIVE DEMO: Using PowerPoint to Create Compelling Presentations for Virtual Tr...
LIVE DEMO: Using PowerPoint to Create Compelling Presentations for Virtual Tr...
Aggregage
 
PowerPoint Chapter 01
PowerPoint Chapter 01PowerPoint Chapter 01
PowerPoint Chapter 01xtin101
 
Powerpoint 2011 mac-cheat-sheet
Powerpoint 2011 mac-cheat-sheetPowerpoint 2011 mac-cheat-sheet
Powerpoint 2011 mac-cheat-sheetWilliam McIntosh
 
Powerpoint 2011 mac-cheat-sheet
Powerpoint 2011 mac-cheat-sheetPowerpoint 2011 mac-cheat-sheet
Powerpoint 2011 mac-cheat-sheet
SchoolVision Inc.
 

Similar to PPT-4.pptx (20)

ID lecture-7 (1).PPT
ID lecture-7 (1).PPTID lecture-7 (1).PPT
ID lecture-7 (1).PPT
 
ID lecture-7.PPT
ID lecture-7.PPTID lecture-7.PPT
ID lecture-7.PPT
 
ppt introduction.ppt
ppt introduction.pptppt introduction.ppt
ppt introduction.ppt
 
Mid-Fi Prototyping with PowerPoint.PPT
Mid-Fi Prototyping with PowerPoint.PPTMid-Fi Prototyping with PowerPoint.PPT
Mid-Fi Prototyping with PowerPoint.PPT
 
Powerpoint 2013-cheat-sheet
Powerpoint 2013-cheat-sheetPowerpoint 2013-cheat-sheet
Powerpoint 2013-cheat-sheet
 
Powerpoint 2013-cheat-sheet
Powerpoint 2013-cheat-sheetPowerpoint 2013-cheat-sheet
Powerpoint 2013-cheat-sheet
 
ms-powerpoint 2010
ms-powerpoint 2010ms-powerpoint 2010
ms-powerpoint 2010
 
Power point text graphics
Power point text graphicsPower point text graphics
Power point text graphics
 
05. ms powerpoint
05. ms powerpoint05. ms powerpoint
05. ms powerpoint
 
MS power point
MS power pointMS power point
MS power point
 
Ms powerpoint
Ms powerpointMs powerpoint
Ms powerpoint
 
PowerPoint Tutorial
PowerPoint TutorialPowerPoint Tutorial
PowerPoint Tutorial
 
How To Make6 Ppt
How To Make6 PptHow To Make6 Ppt
How To Make6 Ppt
 
PowerPoint 2013
PowerPoint 2013PowerPoint 2013
PowerPoint 2013
 
Powerpoint.02
Powerpoint.02Powerpoint.02
Powerpoint.02
 
Power Point Text Graphics
Power Point Text GraphicsPower Point Text Graphics
Power Point Text Graphics
 
LIVE DEMO: Using PowerPoint to Create Compelling Presentations for Virtual Tr...
LIVE DEMO: Using PowerPoint to Create Compelling Presentations for Virtual Tr...LIVE DEMO: Using PowerPoint to Create Compelling Presentations for Virtual Tr...
LIVE DEMO: Using PowerPoint to Create Compelling Presentations for Virtual Tr...
 
PowerPoint Chapter 01
PowerPoint Chapter 01PowerPoint Chapter 01
PowerPoint Chapter 01
 
Powerpoint 2011 mac-cheat-sheet
Powerpoint 2011 mac-cheat-sheetPowerpoint 2011 mac-cheat-sheet
Powerpoint 2011 mac-cheat-sheet
 
Powerpoint 2011 mac-cheat-sheet
Powerpoint 2011 mac-cheat-sheetPowerpoint 2011 mac-cheat-sheet
Powerpoint 2011 mac-cheat-sheet
 

More from VikasTuwar1

BSC notes of _HTML_Easyto understand lease see.pptx
BSC notes of _HTML_Easyto understand lease see.pptxBSC notes of _HTML_Easyto understand lease see.pptx
BSC notes of _HTML_Easyto understand lease see.pptx
VikasTuwar1
 
Python SQLite3...
Python                                                                SQLite3...Python                                                                SQLite3...
Python SQLite3...
VikasTuwar1
 
Unit-3.pptx
Unit-3.pptxUnit-3.pptx
Unit-3.pptx
VikasTuwar1
 
Unit-1.pptx
Unit-1.pptxUnit-1.pptx
Unit-1.pptx
VikasTuwar1
 
Unit-1.pptx
Unit-1.pptxUnit-1.pptx
Unit-1.pptx
VikasTuwar1
 
DataMining.ppt
DataMining.pptDataMining.ppt
DataMining.ppt
VikasTuwar1
 
PPT-3.pptx
PPT-3.pptxPPT-3.pptx
PPT-3.pptx
VikasTuwar1
 
PPT-2.pptx
PPT-2.pptxPPT-2.pptx
PPT-2.pptx
VikasTuwar1
 
PPT-1.pptx
PPT-1.pptxPPT-1.pptx
PPT-1.pptx
VikasTuwar1
 
wordprocessing-150308082138-conversion-gate01.pdf
wordprocessing-150308082138-conversion-gate01.pdfwordprocessing-150308082138-conversion-gate01.pdf
wordprocessing-150308082138-conversion-gate01.pdf
VikasTuwar1
 
Word Processing.ppt
Word Processing.pptWord Processing.ppt
Word Processing.ppt
VikasTuwar1
 

More from VikasTuwar1 (11)

BSC notes of _HTML_Easyto understand lease see.pptx
BSC notes of _HTML_Easyto understand lease see.pptxBSC notes of _HTML_Easyto understand lease see.pptx
BSC notes of _HTML_Easyto understand lease see.pptx
 
Python SQLite3...
Python                                                                SQLite3...Python                                                                SQLite3...
Python SQLite3...
 
Unit-3.pptx
Unit-3.pptxUnit-3.pptx
Unit-3.pptx
 
Unit-1.pptx
Unit-1.pptxUnit-1.pptx
Unit-1.pptx
 
Unit-1.pptx
Unit-1.pptxUnit-1.pptx
Unit-1.pptx
 
DataMining.ppt
DataMining.pptDataMining.ppt
DataMining.ppt
 
PPT-3.pptx
PPT-3.pptxPPT-3.pptx
PPT-3.pptx
 
PPT-2.pptx
PPT-2.pptxPPT-2.pptx
PPT-2.pptx
 
PPT-1.pptx
PPT-1.pptxPPT-1.pptx
PPT-1.pptx
 
wordprocessing-150308082138-conversion-gate01.pdf
wordprocessing-150308082138-conversion-gate01.pdfwordprocessing-150308082138-conversion-gate01.pdf
wordprocessing-150308082138-conversion-gate01.pdf
 
Word Processing.ppt
Word Processing.pptWord Processing.ppt
Word Processing.ppt
 

Recently uploaded

The approach at University of Liverpool.pptx
The approach at University of Liverpool.pptxThe approach at University of Liverpool.pptx
The approach at University of Liverpool.pptx
Jisc
 
Sha'Carri Richardson Presentation 202345
Sha'Carri Richardson Presentation 202345Sha'Carri Richardson Presentation 202345
Sha'Carri Richardson Presentation 202345
beazzy04
 
How to Split Bills in the Odoo 17 POS Module
How to Split Bills in the Odoo 17 POS ModuleHow to Split Bills in the Odoo 17 POS Module
How to Split Bills in the Odoo 17 POS Module
Celine George
 
GIÁO ÁN DẠY THÊM (KẾ HOẠCH BÀI BUỔI 2) - TIẾNG ANH 8 GLOBAL SUCCESS (2 CỘT) N...
GIÁO ÁN DẠY THÊM (KẾ HOẠCH BÀI BUỔI 2) - TIẾNG ANH 8 GLOBAL SUCCESS (2 CỘT) N...GIÁO ÁN DẠY THÊM (KẾ HOẠCH BÀI BUỔI 2) - TIẾNG ANH 8 GLOBAL SUCCESS (2 CỘT) N...
GIÁO ÁN DẠY THÊM (KẾ HOẠCH BÀI BUỔI 2) - TIẾNG ANH 8 GLOBAL SUCCESS (2 CỘT) N...
Nguyen Thanh Tu Collection
 
Ethnobotany and Ethnopharmacology ......
Ethnobotany and Ethnopharmacology ......Ethnobotany and Ethnopharmacology ......
Ethnobotany and Ethnopharmacology ......
Ashokrao Mane college of Pharmacy Peth-Vadgaon
 
Supporting (UKRI) OA monographs at Salford.pptx
Supporting (UKRI) OA monographs at Salford.pptxSupporting (UKRI) OA monographs at Salford.pptx
Supporting (UKRI) OA monographs at Salford.pptx
Jisc
 
How to Make a Field invisible in Odoo 17
How to Make a Field invisible in Odoo 17How to Make a Field invisible in Odoo 17
How to Make a Field invisible in Odoo 17
Celine George
 
The Art Pastor's Guide to Sabbath | Steve Thomason
The Art Pastor's Guide to Sabbath | Steve ThomasonThe Art Pastor's Guide to Sabbath | Steve Thomason
The Art Pastor's Guide to Sabbath | Steve Thomason
Steve Thomason
 
Model Attribute Check Company Auto Property
Model Attribute  Check Company Auto PropertyModel Attribute  Check Company Auto Property
Model Attribute Check Company Auto Property
Celine George
 
Synthetic Fiber Construction in lab .pptx
Synthetic Fiber Construction in lab .pptxSynthetic Fiber Construction in lab .pptx
Synthetic Fiber Construction in lab .pptx
Pavel ( NSTU)
 
1.4 modern child centered education - mahatma gandhi-2.pptx
1.4 modern child centered education - mahatma gandhi-2.pptx1.4 modern child centered education - mahatma gandhi-2.pptx
1.4 modern child centered education - mahatma gandhi-2.pptx
JosvitaDsouza2
 
Basic phrases for greeting and assisting costumers
Basic phrases for greeting and assisting costumersBasic phrases for greeting and assisting costumers
Basic phrases for greeting and assisting costumers
PedroFerreira53928
 
Unit 2- Research Aptitude (UGC NET Paper I).pdf
Unit 2- Research Aptitude (UGC NET Paper I).pdfUnit 2- Research Aptitude (UGC NET Paper I).pdf
Unit 2- Research Aptitude (UGC NET Paper I).pdf
Thiyagu K
 
Operation Blue Star - Saka Neela Tara
Operation Blue Star   -  Saka Neela TaraOperation Blue Star   -  Saka Neela Tara
Operation Blue Star - Saka Neela Tara
Balvir Singh
 
How to Create Map Views in the Odoo 17 ERP
How to Create Map Views in the Odoo 17 ERPHow to Create Map Views in the Odoo 17 ERP
How to Create Map Views in the Odoo 17 ERP
Celine George
 
aaaaaaaaaaaaaaaaaaaaaaaaaaaaaaaaaaaaaaaaaaaaaaaaaaaaaaa
aaaaaaaaaaaaaaaaaaaaaaaaaaaaaaaaaaaaaaaaaaaaaaaaaaaaaaaaaaaaaaaaaaaaaaaaaaaaaaaaaaaaaaaaaaaaaaaaaaaaaaaaaaaaaa
aaaaaaaaaaaaaaaaaaaaaaaaaaaaaaaaaaaaaaaaaaaaaaaaaaaaaaa
siemaillard
 
Palestine last event orientationfvgnh .pptx
Palestine last event orientationfvgnh .pptxPalestine last event orientationfvgnh .pptx
Palestine last event orientationfvgnh .pptx
RaedMohamed3
 
TESDA TM1 REVIEWER FOR NATIONAL ASSESSMENT WRITTEN AND ORAL QUESTIONS WITH A...
TESDA TM1 REVIEWER  FOR NATIONAL ASSESSMENT WRITTEN AND ORAL QUESTIONS WITH A...TESDA TM1 REVIEWER  FOR NATIONAL ASSESSMENT WRITTEN AND ORAL QUESTIONS WITH A...
TESDA TM1 REVIEWER FOR NATIONAL ASSESSMENT WRITTEN AND ORAL QUESTIONS WITH A...
EugeneSaldivar
 
Polish students' mobility in the Czech Republic
Polish students' mobility in the Czech RepublicPolish students' mobility in the Czech Republic
Polish students' mobility in the Czech Republic
Anna Sz.
 
Sectors of the Indian Economy - Class 10 Study Notes pdf
Sectors of the Indian Economy - Class 10 Study Notes pdfSectors of the Indian Economy - Class 10 Study Notes pdf
Sectors of the Indian Economy - Class 10 Study Notes pdf
Vivekanand Anglo Vedic Academy
 

Recently uploaded (20)

The approach at University of Liverpool.pptx
The approach at University of Liverpool.pptxThe approach at University of Liverpool.pptx
The approach at University of Liverpool.pptx
 
Sha'Carri Richardson Presentation 202345
Sha'Carri Richardson Presentation 202345Sha'Carri Richardson Presentation 202345
Sha'Carri Richardson Presentation 202345
 
How to Split Bills in the Odoo 17 POS Module
How to Split Bills in the Odoo 17 POS ModuleHow to Split Bills in the Odoo 17 POS Module
How to Split Bills in the Odoo 17 POS Module
 
GIÁO ÁN DẠY THÊM (KẾ HOẠCH BÀI BUỔI 2) - TIẾNG ANH 8 GLOBAL SUCCESS (2 CỘT) N...
GIÁO ÁN DẠY THÊM (KẾ HOẠCH BÀI BUỔI 2) - TIẾNG ANH 8 GLOBAL SUCCESS (2 CỘT) N...GIÁO ÁN DẠY THÊM (KẾ HOẠCH BÀI BUỔI 2) - TIẾNG ANH 8 GLOBAL SUCCESS (2 CỘT) N...
GIÁO ÁN DẠY THÊM (KẾ HOẠCH BÀI BUỔI 2) - TIẾNG ANH 8 GLOBAL SUCCESS (2 CỘT) N...
 
Ethnobotany and Ethnopharmacology ......
Ethnobotany and Ethnopharmacology ......Ethnobotany and Ethnopharmacology ......
Ethnobotany and Ethnopharmacology ......
 
Supporting (UKRI) OA monographs at Salford.pptx
Supporting (UKRI) OA monographs at Salford.pptxSupporting (UKRI) OA monographs at Salford.pptx
Supporting (UKRI) OA monographs at Salford.pptx
 
How to Make a Field invisible in Odoo 17
How to Make a Field invisible in Odoo 17How to Make a Field invisible in Odoo 17
How to Make a Field invisible in Odoo 17
 
The Art Pastor's Guide to Sabbath | Steve Thomason
The Art Pastor's Guide to Sabbath | Steve ThomasonThe Art Pastor's Guide to Sabbath | Steve Thomason
The Art Pastor's Guide to Sabbath | Steve Thomason
 
Model Attribute Check Company Auto Property
Model Attribute  Check Company Auto PropertyModel Attribute  Check Company Auto Property
Model Attribute Check Company Auto Property
 
Synthetic Fiber Construction in lab .pptx
Synthetic Fiber Construction in lab .pptxSynthetic Fiber Construction in lab .pptx
Synthetic Fiber Construction in lab .pptx
 
1.4 modern child centered education - mahatma gandhi-2.pptx
1.4 modern child centered education - mahatma gandhi-2.pptx1.4 modern child centered education - mahatma gandhi-2.pptx
1.4 modern child centered education - mahatma gandhi-2.pptx
 
Basic phrases for greeting and assisting costumers
Basic phrases for greeting and assisting costumersBasic phrases for greeting and assisting costumers
Basic phrases for greeting and assisting costumers
 
Unit 2- Research Aptitude (UGC NET Paper I).pdf
Unit 2- Research Aptitude (UGC NET Paper I).pdfUnit 2- Research Aptitude (UGC NET Paper I).pdf
Unit 2- Research Aptitude (UGC NET Paper I).pdf
 
Operation Blue Star - Saka Neela Tara
Operation Blue Star   -  Saka Neela TaraOperation Blue Star   -  Saka Neela Tara
Operation Blue Star - Saka Neela Tara
 
How to Create Map Views in the Odoo 17 ERP
How to Create Map Views in the Odoo 17 ERPHow to Create Map Views in the Odoo 17 ERP
How to Create Map Views in the Odoo 17 ERP
 
aaaaaaaaaaaaaaaaaaaaaaaaaaaaaaaaaaaaaaaaaaaaaaaaaaaaaaa
aaaaaaaaaaaaaaaaaaaaaaaaaaaaaaaaaaaaaaaaaaaaaaaaaaaaaaaaaaaaaaaaaaaaaaaaaaaaaaaaaaaaaaaaaaaaaaaaaaaaaaaaaaaaaa
aaaaaaaaaaaaaaaaaaaaaaaaaaaaaaaaaaaaaaaaaaaaaaaaaaaaaaa
 
Palestine last event orientationfvgnh .pptx
Palestine last event orientationfvgnh .pptxPalestine last event orientationfvgnh .pptx
Palestine last event orientationfvgnh .pptx
 
TESDA TM1 REVIEWER FOR NATIONAL ASSESSMENT WRITTEN AND ORAL QUESTIONS WITH A...
TESDA TM1 REVIEWER  FOR NATIONAL ASSESSMENT WRITTEN AND ORAL QUESTIONS WITH A...TESDA TM1 REVIEWER  FOR NATIONAL ASSESSMENT WRITTEN AND ORAL QUESTIONS WITH A...
TESDA TM1 REVIEWER FOR NATIONAL ASSESSMENT WRITTEN AND ORAL QUESTIONS WITH A...
 
Polish students' mobility in the Czech Republic
Polish students' mobility in the Czech RepublicPolish students' mobility in the Czech Republic
Polish students' mobility in the Czech Republic
 
Sectors of the Indian Economy - Class 10 Study Notes pdf
Sectors of the Indian Economy - Class 10 Study Notes pdfSectors of the Indian Economy - Class 10 Study Notes pdf
Sectors of the Indian Economy - Class 10 Study Notes pdf
 

PPT-4.pptx

  • 2. INTRODUCTION 2 mufassirin@yahoo.com  What is a presentation? ⚫ It is the process of presenting the content of a topic to an audience consisting of one or more persons.
  • 3. STARTED WITH MS POWER POINT 2007 A PowerPoint presentation is a collection of electronic slides that can have text, pictures, graphics, tables, sound and video. This collection can run automatically or can be controlled by a presenter. 5
  • 4.  There are three features that you should remember as you work within PowerPoint 2007: 1. Office Button 2. The Ribbon 3. Quick Access T oolbar 1 2 3 4 mufassirin@yahoo.com
  • 5. MICROSOFT OFFICE BUTTON  The Microsoft Office Button performs many of the functions that were located in the File menu of older versions of PowerPoint. 5 mufassirin@yahoo.com
  • 6. THE RIBBON: THE TABS  Home: Slides, Font, Paragraph, Drawing, Editing  Insert: Tables, Graphics, Links, Text, Media Clips  Design: Page Setup, Themes, Background  Animations: Preview,Animations, Transitions  Slide Show: Start Slide Show  View: Presentation Views, Show/Hide, Zoom, Window The ribbon is the panel at the top portion of the document 6 mufassirin@yahoo.com
  • 7. QUICK ACCESS TOOLBAR  The quick access toolbar is a customizable toolbar that contains commands that you may want to use. 7 mufassirin@yahoo.com
  • 8. OTHER FEATURES: MINI TOOLBAR  A new feature in Office 2007 is the Mini Toolbar. This is a floating toolbar that is displayed when you select text or right-click text. 8 mufassirin@yahoo.com
  • 9. OTHER FEATURES: NAVIGATION  Navigation through the slides can be accomplished through the Slide Navigation menu on the left side of the screen 9 mufassirin@yahoo.com
  • 10. SLIDE VIEWS  Presentations can be viewed in a variety of manners. 10 mufassirin@yahoo.com
  • 12. NEW PRESENTATION 12 mufassirin@yahoo.com  You can start a new presentation from ⚫ A blank slide, ⚫ Atemplate, ⚫ An existing presentations, ⚫ or a Word outline.
  • 13. FROM A BLANK SLIDE  Click the Microsoft Office Button  Click New  Click Blank Presentation 13 mufassirin@yahoo.com
  • 14. FROM A TEMPLATE  Click the Microsoft Office Button  Click New  Click Installed Templates or Browse through Microsoft Office Online Templates  Click the template you choose 14 mufassirin@yahoo.com
  • 15. FROM AN EXISTING PRESENTATION  Click the Microsoft Office Button  Click New  Click New from Existing  Browse to and click the presentation 15 mufassirin@yahoo.com
  • 16. FROM A WORD OUTLINE  Click the slide where you would like the outline to begin  Click New Slide on the Home tab  Click Slides from Outline  Browse and click the Word Document that contains the outline 16 mufassirin@yahoo.com
  • 17. SAVE A PRESENTATION  When you save a presentation, you have two choices: Save or Save As. To save a document: •Click the Microsoft Office Button •Click Save 17 mufassirin@yahoo.com
  • 18. SAVE A PRESENTATION • Click the Microsoft Office Button • Click Save As • Type in the name for the Presentation • In the Save as Type box, choose Excel 97-2003 Presentation 18 mufassirin@yahoo.com
  • 19. ADD SLIDES (1) u r  Select the slide immediately BEFORE where you want the new slide  Click the New Slide button on the Home tab  Click the slide choice that fits yo material 19 mufassirin@yahoo.com
  • 20. ADD SLIDES (2)  Select the slide immediately BEFORE where you want the new slide ⚫ Click the New Slide button on the Home tab ⚫ Click Reuse Slides ⚫ Click Browse ⚫ Click Browse File ⚫ Locate the slide show and click on the slide to import 20 mufassirin@yahoo.com
  • 21. THEMES  Click the Design tab  Choose one of the displayed Themes or click the Galleries button 21 mufassirin@yahoo.com
  • 22.  To apply new colors to a theme: ⚫ Click the Colors drop down arrow ⚫ Choose a color set or click Create New Theme Colors 22 mufassirin@yahoo.com
  • 23.  To change the background style of a theme ⚫ Click the Background Styles button on the Design tab 23 mufassirin@yahoo.com
  • 25. ENTER TEXT  T o enter text: ⚫ Select the slide where you want the text ⚫ Click in a Textbox to add text 25 mufassirin@yahoo.com
  • 26.  To add a text box: ⚫ Select the slide where you want to place the text box ⚫ On the Insert tab, click Text Box ⚫ Click on the slide and drag the cursor to expand the text box ⚫ Type in the text 26 mufassirin@yahoo.com
  • 28. CHANGE FONT TYPEFACE AND SIZE  To change the font typeface: ⚫ Click the arrow next to the font name and choose a font. ⚫ Remember that you can preview how the new font will look by highlighting the text, and hovering over the new font typeface. 28 mufassirin@yahoo.com
  • 29.  To change the font size: ⚫ Click the arrow next to the font size and choose the appropriate size, or ⚫ Click the increase or decrease font size buttons. 29 mufassirin@yahoo.com
  • 30. FONT STYLES AND EFFECTS  Font styles are predefined formatting options that are used to emphasize text. They include: Bold, Italic, and Underline. To add these to text: ⚫ Select the text and click the Font Styles included on the Font group of the Home tab or ⚫ Select the text and right click to display the font tools 30 mufassirin@yahoo.com
  • 31. CHANGE TEXT COLOR  To change the text color: ⚫ Select the text and click the Colors button included on the Font Group of the Ribbon, or ⚫ Highlight the text and right click and choose the colors tool. ⚫ Select the color by clicking the down arrow next to the font color button. 31 mufassirin@yahoo.com
  • 32. CHANGE PARAGRAPH ALIGNMENT  The paragraph alignment allows you to set how you want text to appear. ⚫ Click the Home Tab ⚫ Choose the appropriate button for alignment on the Paragraph Group.  Align Left: the text is aligned with your left margin  Center: The text is centered within your margins  Align Right: Aligns text with the right margin  Justify: Aligns text to both the left and right margins. 32 mufassirin@yahoo.com
  • 33. INDENT PARAGRAPHS  To indent paragraphs, you can do the following: ⚫ Click the Indent buttons to control the indent. ⚫ Click the Indent button repeated times to increase the size of the indent. 33 mufassirin@yahoo.com
  • 34. TEXT DIRECTION  To change the text direction: ⚫ Select the text ⚫ Click the Text Direction button on the Home tab ⚫ Click the selection 34 mufassirin@yahoo.com
  • 36. BULLETED AND NUMBERED LISTS  Bulleted lists have bullet points, numbered lists have numbers, and outline lists combine numbers and letters depending on the organization of the list. ⚫ Select the text you wish to make a list ⚫ Click the Bulleted or Numbered Lists button 36 mufassirin@yahoo.com
  • 37. NESTED LISTS  A nested list is list with several levels of indented text. To create a nested list: ⚫ Create your list following the directions above ⚫ Click the Increase or Decrease Indent button 37 mufassirin@yahoo.com
  • 38. FORMATTING LISTS  The bullet image and numbering format can be changed by using the Bullets or Numbering dialog box. ⚫ Select the entire list to change all the bullets or numbers, or Place the cursor on one line within the list to change a single bullet. ⚫ Click the arrow next to the bulleted or numbered list and choose a bullet or numbering style. 38 mufassirin@yahoo.com
  • 39. ADDING VIDEO  Video clips can be added to the presentation. T o add a video clip: ⚫ Click the Movie button on the Insert tab ⚫ Choose Movie from File or Movie from Clip Organizer 39 mufassirin@yahoo.com
  • 40.  To edit the video options: ⚫ Click the movie icon ⚫ Click the Format tab 40 mufassirin@yahoo.com
  • 41. ADDING AUDIO  Audio clips can be added to the presentation. To add an audio clip: ⚫ Click the Audio button on the Insert tab ⚫ Choose Sound from File, Sound from Clip Organizer, Play CD Audio Track, or Record Sound 41 mufassirin@yahoo.com
  • 42.  To edit the audio options: ⚫ Click the audio icon ⚫ Click the Format tab 42 mufassirin@yahoo.com
  • 44. ADDING PICTURE  To add a picture: ⚫ Click the Insert Tab ⚫ Click the Picture Button ⚫ Browse to the picture from your files ⚫ Click the name of the picture ⚫ Click insert ⚫ To move the graphic, click it and drag it to where you want it 44 mufassirin@yahoo.com
  • 45. ADDING CLIP ART  T o add Clip Art: ⚫ Click the Insert Tab ⚫ Click the Clip Art Button ⚫ Search for the clip art using the search Clip Art dialog box ⚫ Click the clip art ⚫ To move the graphic, click it and drag it to where you want it 45 mufassirin@yahoo.com
  • 46. EDITING PICTURES AND CLIP ART  When you add a graphic to the presentation, an additional Tab appears on the Ribbon. This tab has four groups: ⚫ Adjust: Controls the picture brightness, contrast, and colors ⚫ Picture Style: Allows you to place a frame or border around the picture and add effects ⚫ Arrange: Controls the alignment and rotation of the picture ⚫ Size: Cropping and size of graphic 46 mufassirin@yahoo.com
  • 47. ADDING A SHAPE  T o add Shapes: ⚫ Click the Insert Tab ⚫ Click the Shapes Button ⚫ Click the shape you choose •Click the Slide •Drag the cursor to expand the Shape •To format the shapes: •Click the Shape •Click the Format tab 47 mufassirin@yahoo.com
  • 48. ADDING SMARTART  SmartArt is a feature in Office 2007 that allows you to choose from a variety of graphics, including flow charts, lists, cycles, and processes. T o add SmartArt: ⚫ Click the Insert Tab ⚫ Click the SmartArt Button ⚫ Click the SmartArt you choose ⚫ Click the SmartArt ⚫ Drag it to the desired location in the slide 48 mufassirin@yahoo.com
  • 50. CREATE A TABLE  To create a table: ⚫ Place the cursor on the page where you want the new table ⚫ Click the Insert Tab of the Ribbon ⚫ Click the Tables Button on the Tables Group. You can create a table one of four ways:  Highlight the number of row and columns  Click Insert Table and enter the number of rows and columns  Click the Draw Table, create your table by clicking and entering the rows and columns  Click Excel Spreadsheet and enter data 52 mufassirin@yahoo.com
  • 51. ENTER DATA IN A TABLE  Place the cursor in the cell where you wish to enter the information. Begin typing. 51 mufassirin@yahoo.com
  • 52. MODIFY THE TABLE STRUCTURE AND FORMAT A TABLE  To modify the structure of a table: ⚫ Click the table and notice that you have two new tabs on the Ribbon: Design and Layout. These pertain to the table design and layout. ⚫ On the Design Tab, you can choose: ⚫ Table Style Options ⚫ Table Styles ⚫ Draw Borders 52 mufassirin@yahoo.com
  • 53.  To format a table, click the table and then click the Layout Tab on the Ribbon. This Layout tab allows you to:  View Gridlines and Properties (from the Table Group)  Insert Rows and Columns (from the Rows & Columns Group)  Delete the Table, Rows and/or Columns (from the Rows & Columns Group)  Merge or Split Cells (from the Merge Group)  Increase and decrease cell size (Cell Size Group)  Align text within the cells and change text directions (Alignment Group) 53 mufassirin@yahoo.com
  • 54. INSERT A TABLE FROM WORD OR EXCEL  Open the Word document or Excel worksheet ⚫ Select the chart ⚫ Click Copy on the Home tab ⚫ Go to the PowerPoint document where you want the chart located ⚫ Click Paste on the Home tab 54 mufassirin@yahoo.com
  • 56. CHARTS  Charts allow you to present information contained in the worksheet in a graphic format. PowerPoint offers many types of charts including: Column, Line, Pie, Bar, Area, Scatter and more. To view the charts available click the Insert Tab on the Ribbon. 56 mufassirin@yahoo.com
  • 57. CREATE A CHART  To create a chart: ⚫ Click the Insert tab on the ribbon ⚫ Click the type of Chart you want to create ⚫ Insert the Data and Labels 57 mufassirin@yahoo.com
  • 58. EDIT CHART DATA  T o edit chart data: ⚫ Click on the chart ⚫ Click Edit Data on the Design tab ⚫ Edit data in the spreadsheet 58 mufassirin@yahoo.com
  • 59. MODIFY A CHART  Once you have created a chart you can do several things to modify the chart. To move the chart: ⚫ Click the Chart and Drag it another location on the same slide, or ⚫ Copy it to another slide ⚫ Choose the desired location and click Paste 59 mufassirin@yahoo.com
  • 60.  To modify the chart size: ⚫ Click the Chart ⚫ Click on any of the corners and drop and drag to resize  To modify the labels and titles: ⚫ Click the chart ⚫ Click the Layout tab ⚫ Choose the appropriate label to change 60 mufassirin@yahoo.com
  • 62. SLIDE TRANSITIONS  Transitions are effects that are in place when you switch from one slide to the next. To add slide transitions: ⚫ Select the slide that you want to transition ⚫ Click the Animations tab ⚫ Choose the appropriate animation or click the Transition dialog box 62 mufassirin@yahoo.com
  • 63.  To adjust slide transitions: ⚫ Add sound by clicking the arrow n to Transition Sound ext ion  Modify the transition speed by clicking the arrow next to Transit Speed ⚫ To apply the transition to all slides: •Click the Apply to All button on the Animations tab 63 mufassirin@yahoo.com
  • 64. SLIDE ANIMATION  To apply an animation effect: ⚫ Select the object ⚫ Click the Animations tab on the Ribbon ⚫ Click Custom Animation ⚫ Click Add Effect ⚫ Choose the appropriate effect 64 mufassirin@yahoo.com
  • 65. ANIMATION PREVIEW  To preview the animation on a slide: ⚫ Click the Preview button on the Animations tab 65 mufassirin@yahoo.com
  • 66. SLIDE SHOW OPTIONS  The Slide Show tab of the ribbon contains many options for the slide show. ⚫ Preview the slide show from the beginning ⚫ Preview the slide show from the current slide ⚫ Set up Slide Show 66 mufassirin@yahoo.com
  • 67. SET UP SLIDE SHOW  The options include: ⚫ Whether the show will run automatically or will be presented by a speaker ⚫ The looping options ⚫ Narration options ⚫ Monitor resolutions 67 mufassirin@yahoo.com
  • 68. RECORD NARRATION  When you want to record narration for the slides: ⚫ Click the Record Narration button ⚫ Click Set Microphone Level to check the levels of audio input ⚫ Click OK to record the narration 68 mufassirin@yahoo.com
  • 69. REHEARSE TIMINGS  Use Rehearsed Timings to rehearse the timings of slide with audio. ⚫ Click the Rehearse Timings button ⚫ Practice speaking and advance the slides as you would in the presentation ⚫ When you have completed this click through the end of the slide ⚫ Choose whether or not to keep this timing or to retry 69 mufassirin@yahoo.com
  • 71. CREATE SPEAKER NOTES  Speaker Notes can be added to allow you to create notes for each slide. To add speaker notes: ⚫ Select the slide ⚫ Click View ⚫ Click Note Pages ⚫ Click the Click to add Notes section of the screen ⚫ Type in the Notes for that slide mufassirin@yahoo.com
  • 72. PRINT A PRESENTATION 72 mufassirin@yahoo.com  There are many options for printing a presentation. They are:  Slides: These are slides that you would see if you were showing the presentation, one slide per page  Handouts: 1, 2, 3, 4, 6 or 9 per page, this option allows for more slides per page  Notes Page: This includes the slides and the speaker notes  Outline View: This will print the outline of the presentation
  • 73.  T o access the print options:  Click the Microsoft Office Button  Click Print  In the Print Dialog Box, click the arrow next to Print what  Choose the format and click OK to print 73 mufassirin@yahoo.com
  • 74.  To print preview: ⚫ Click the Microsoft Office Button ⚫ Place the cursor over Print ⚫ Click Print Preview ⚫ Click the arrow next to Print What to change print options ⚫ To print from Print Preview, click Print  To Exit Print Preview: ⚫ Click the Close Print Preview button 74 mufassirin@yahoo.com
  • 75. PACKAGE A PRESENTATION  There are times when you want to package a presentation with all of the additional files attached as well. To package a presentation for CD: ⚫ Click the Microsoft Office Button ⚫ Click Publish ⚫ Click Package for CD ⚫ Type a name for the CD ⚫ Click Copy to CD or Copy to Folder 75 mufassirin@yahoo.com