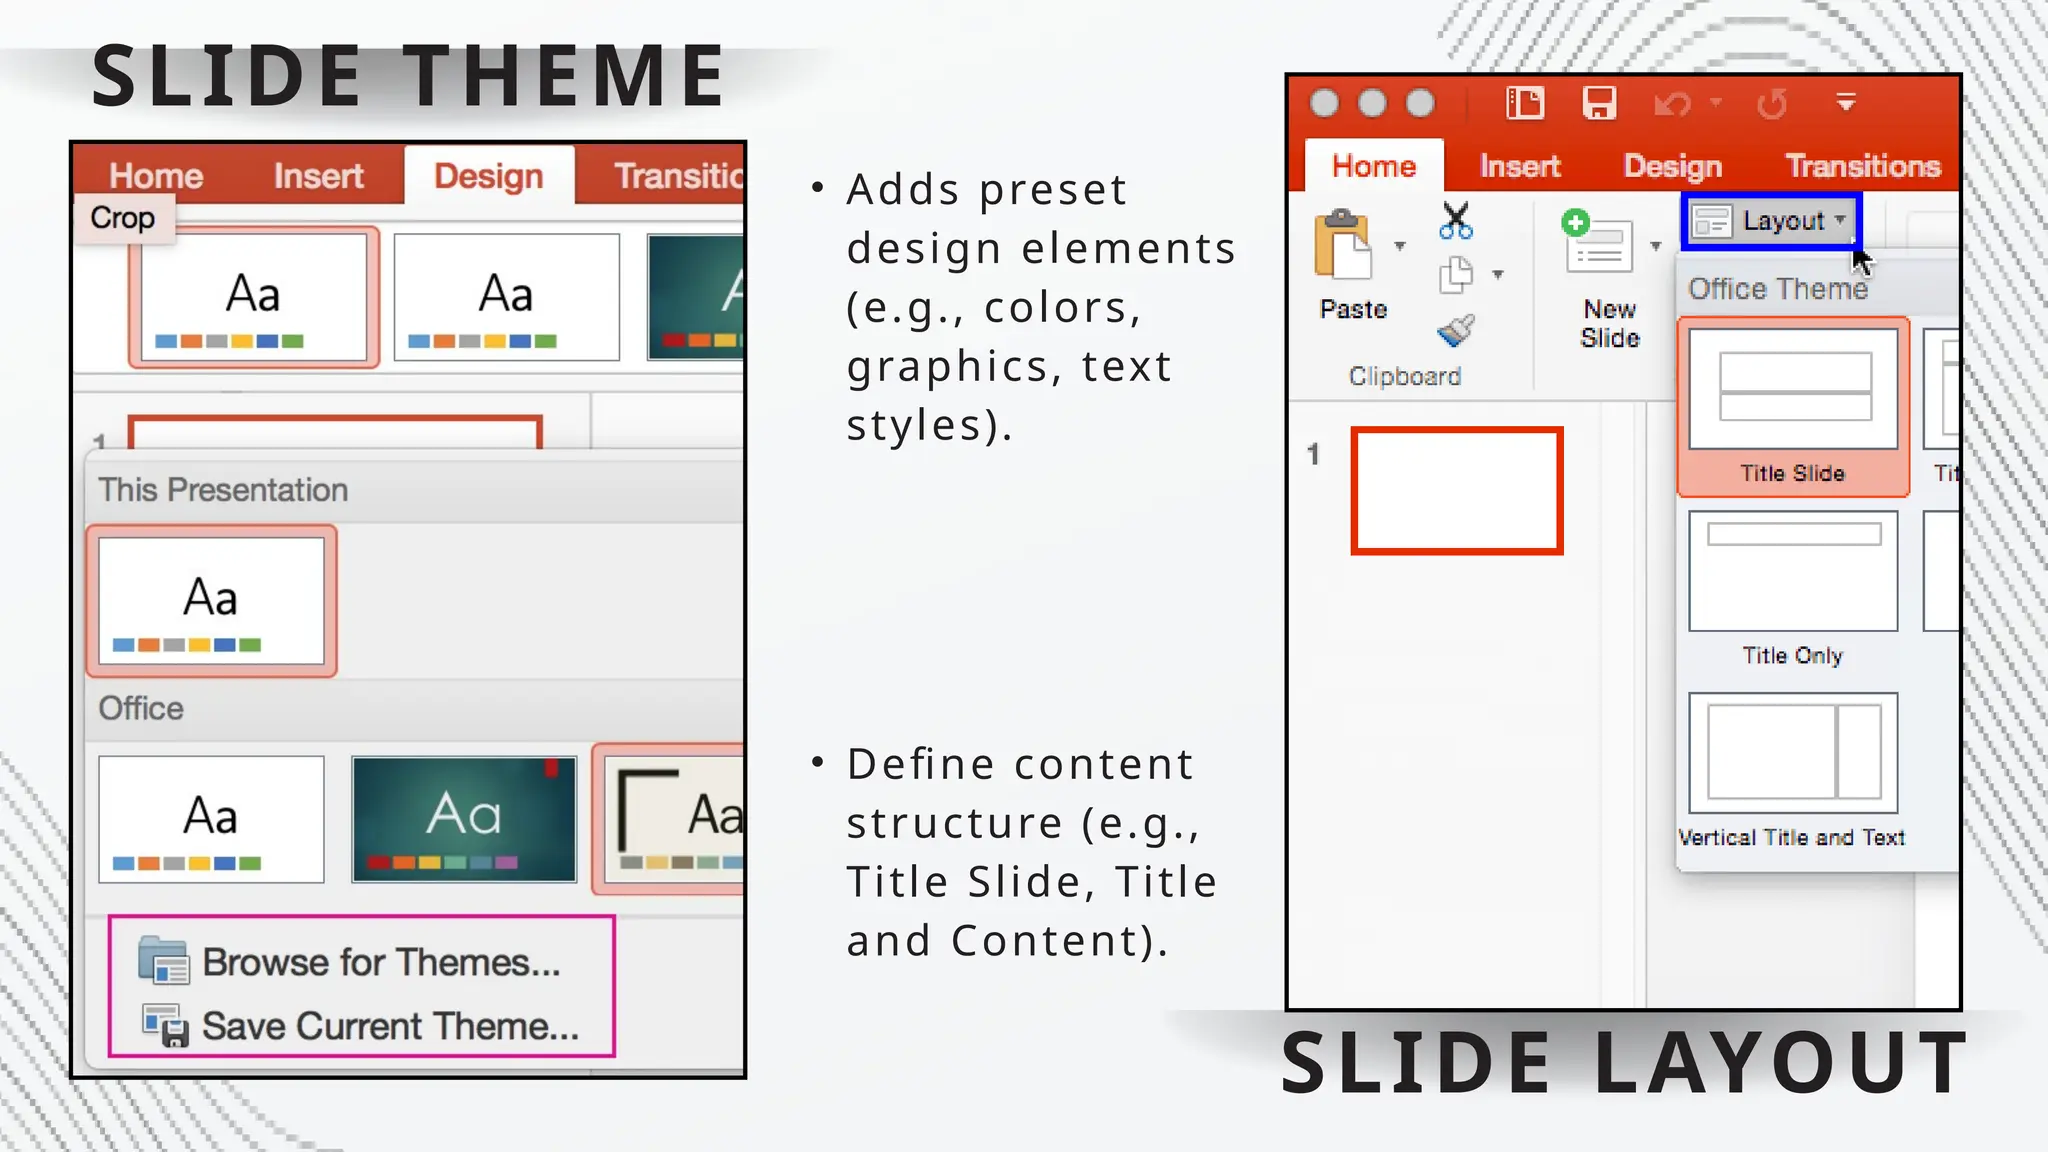
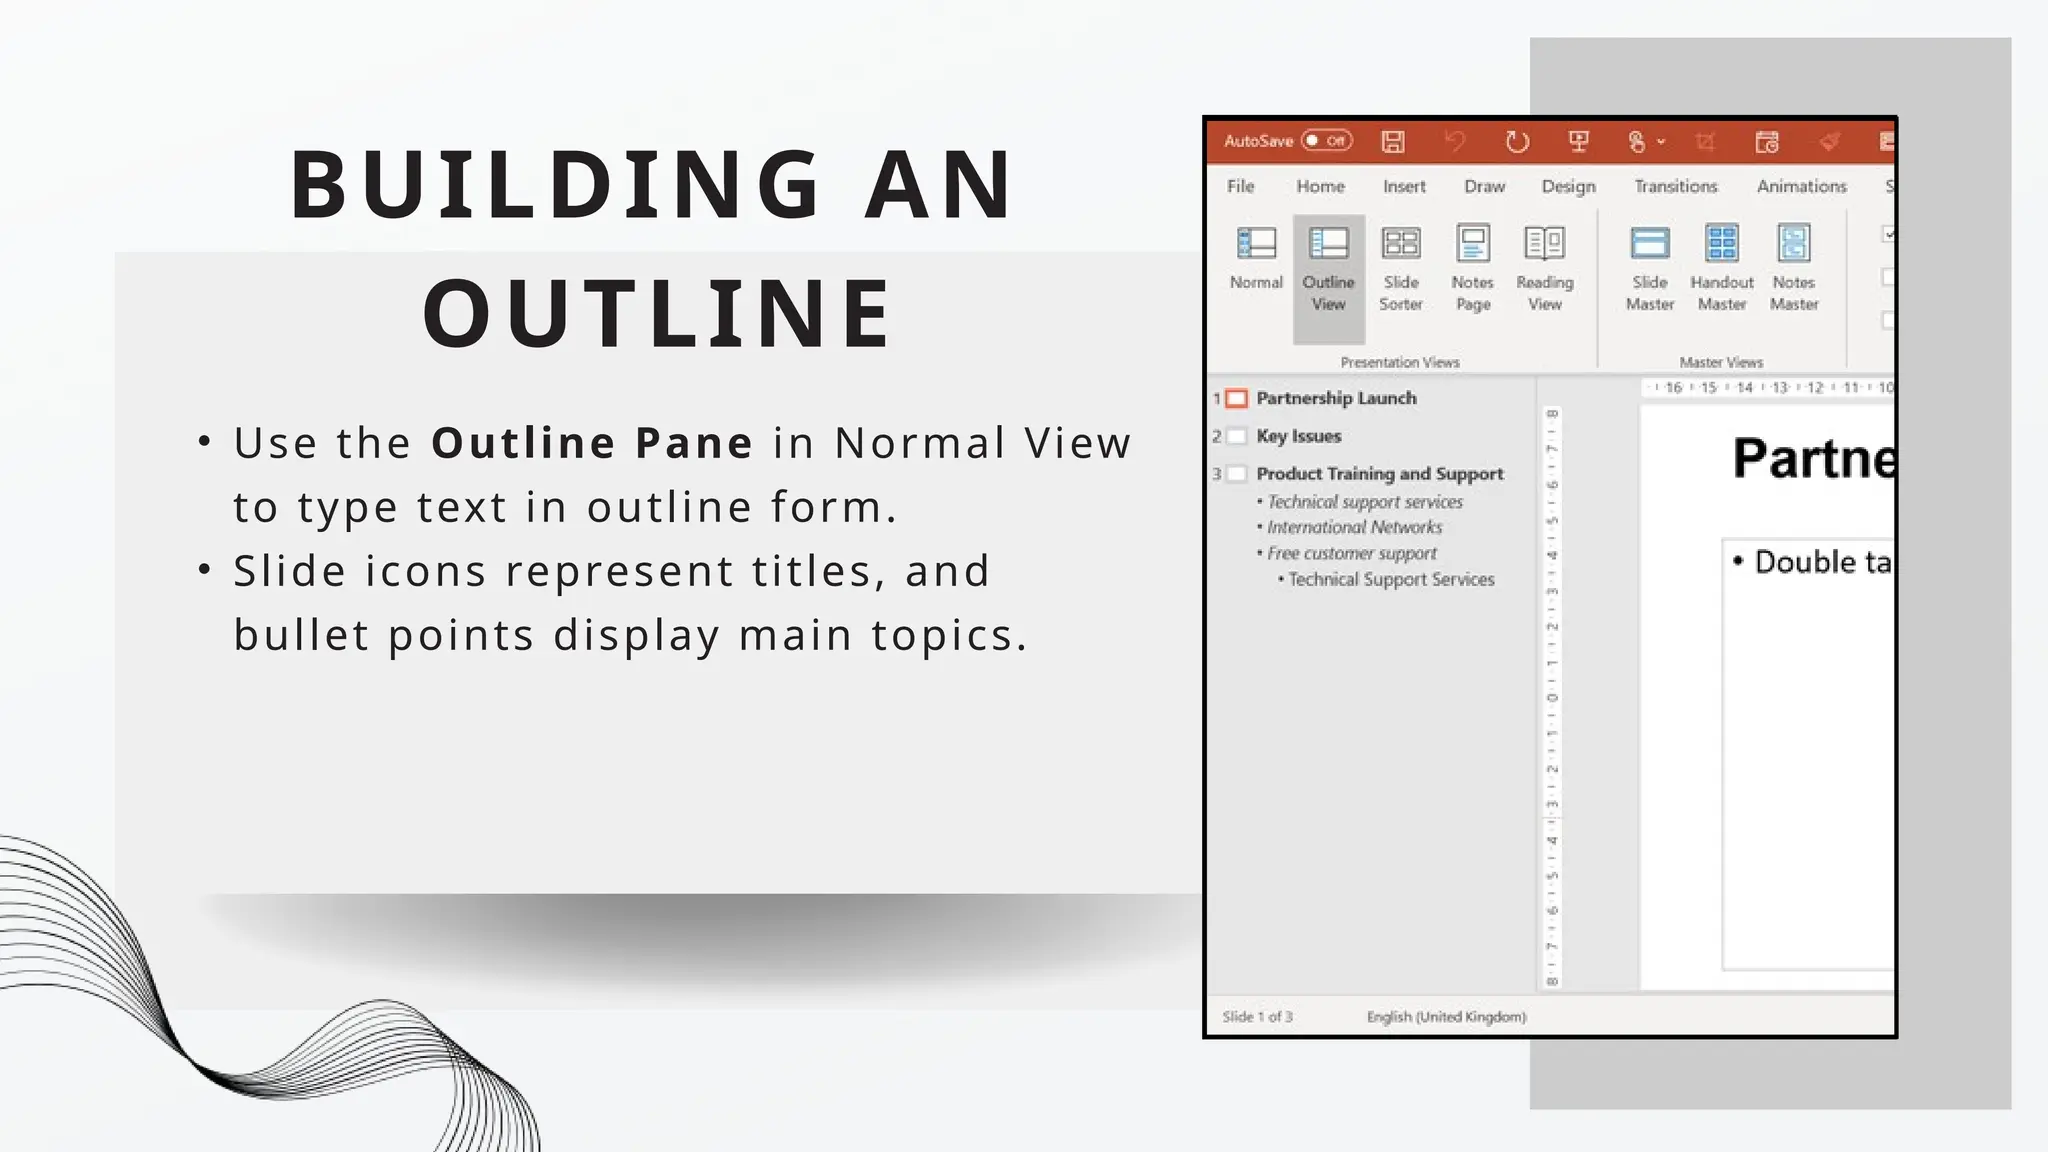
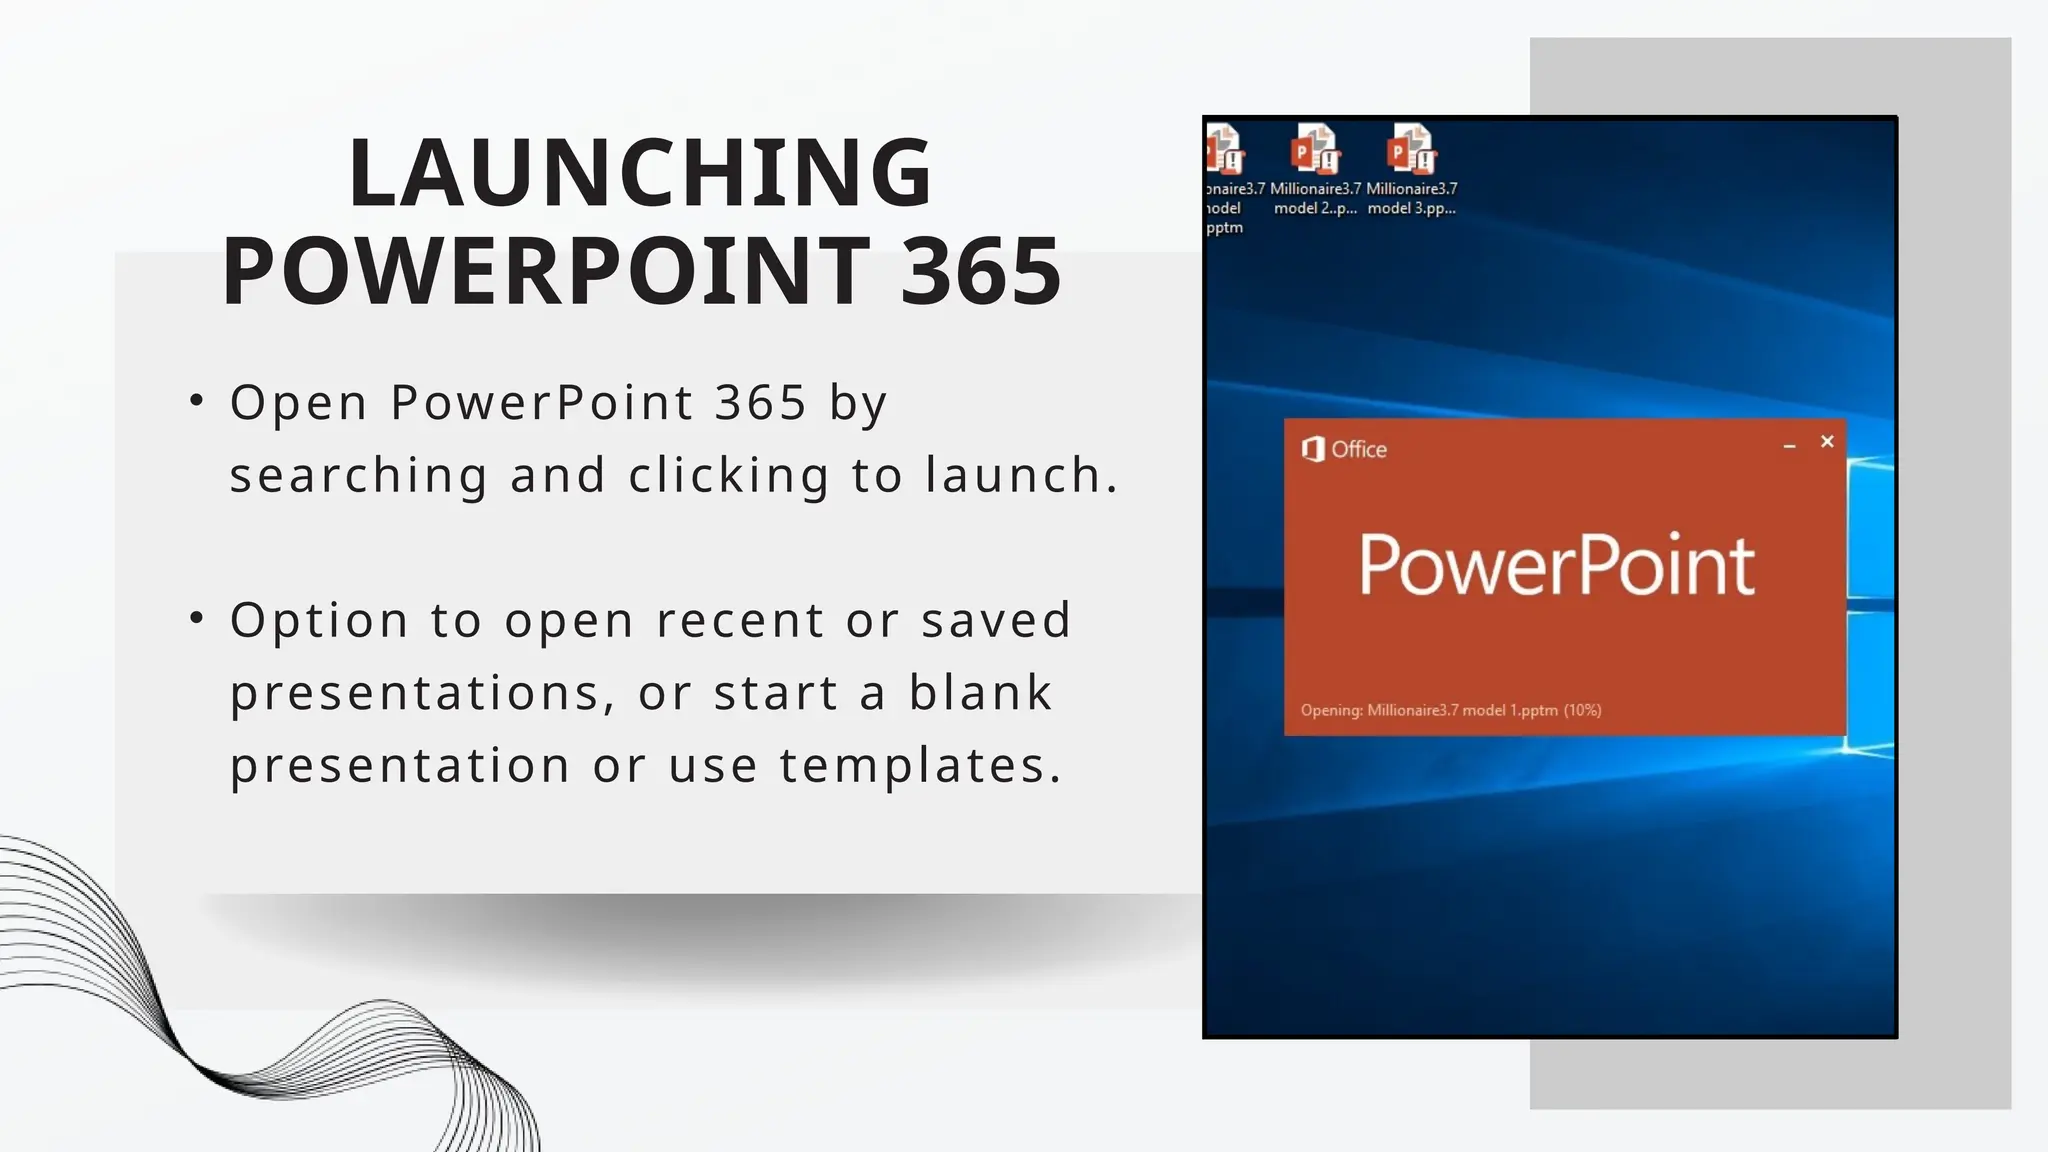
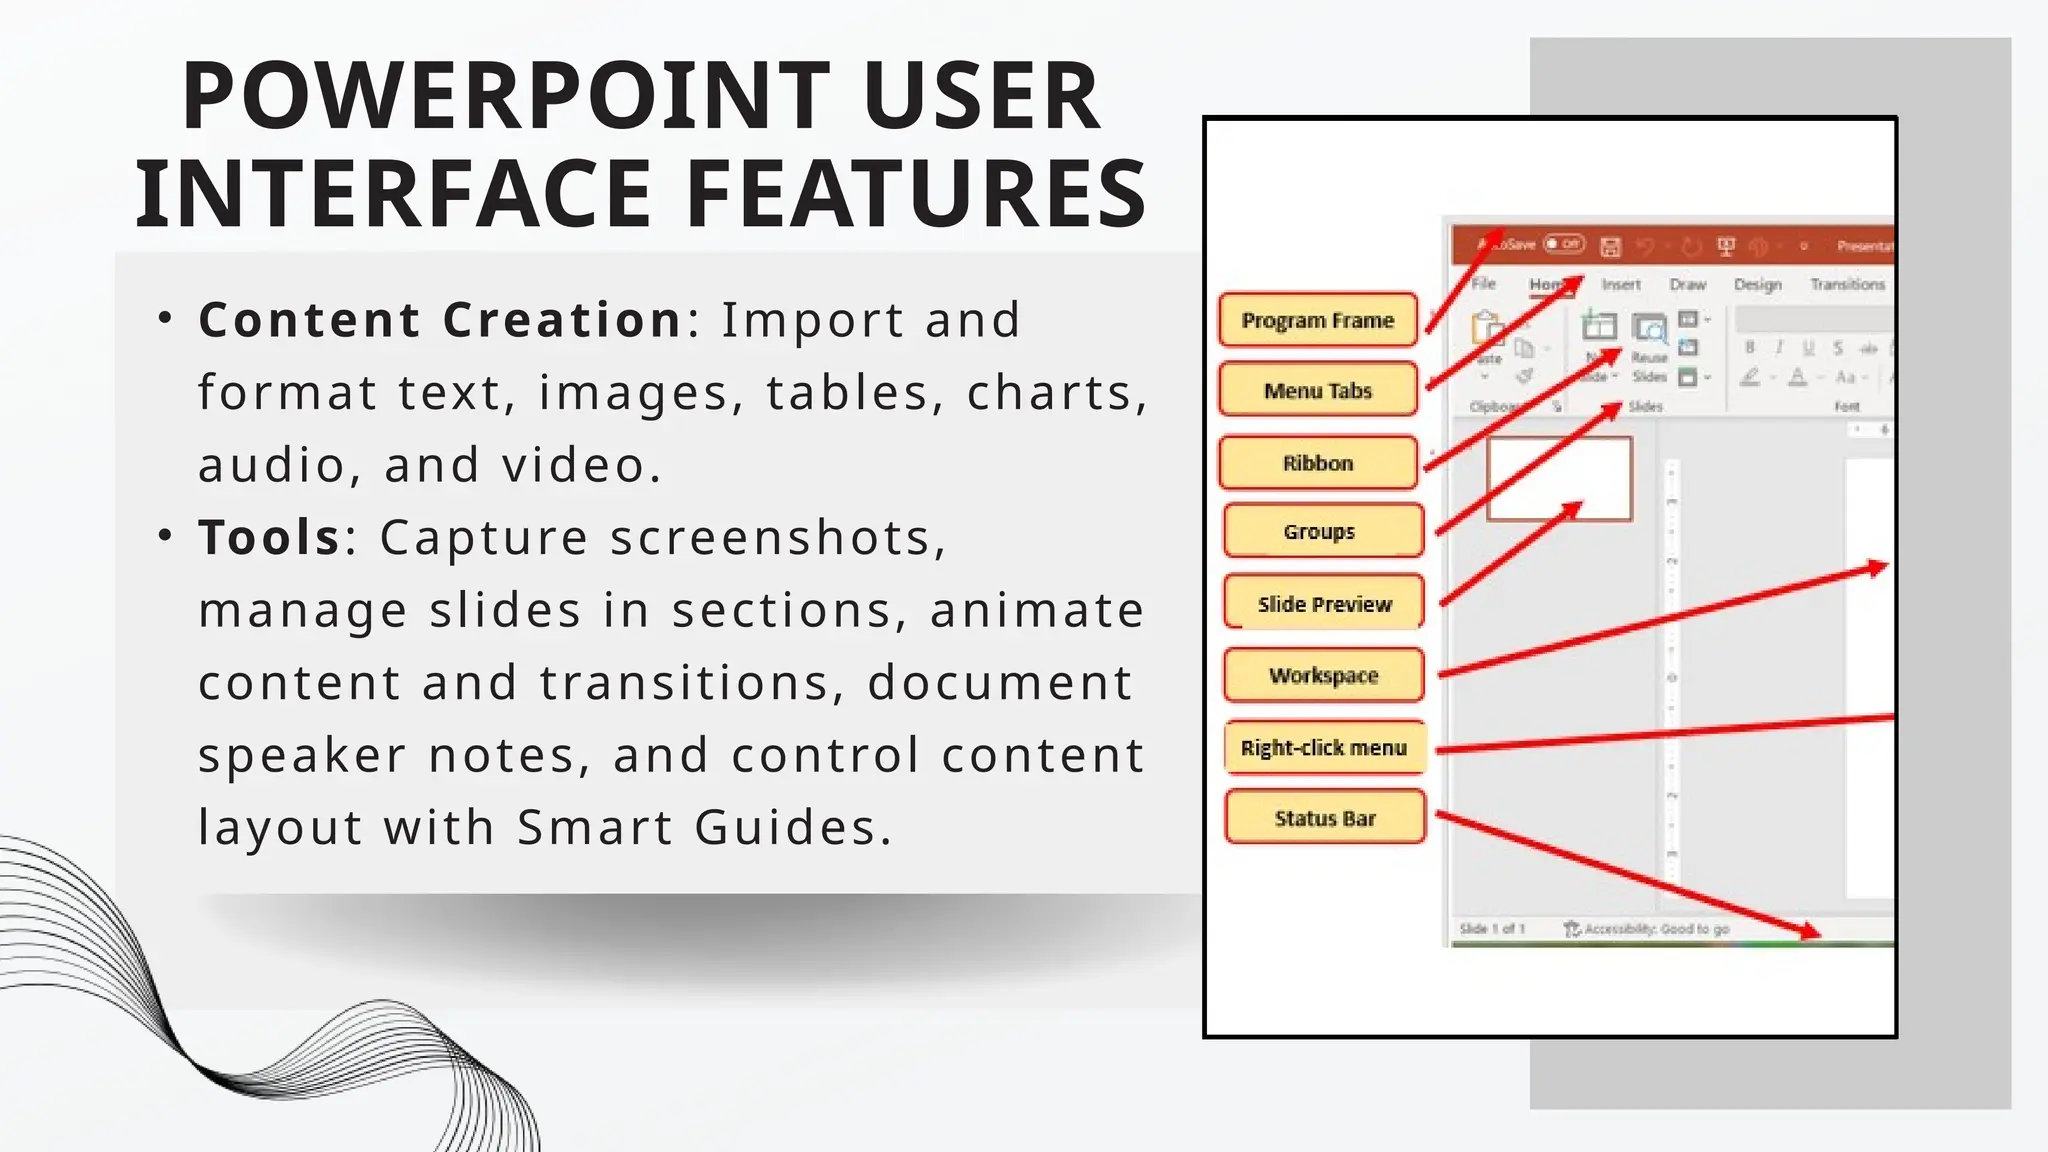
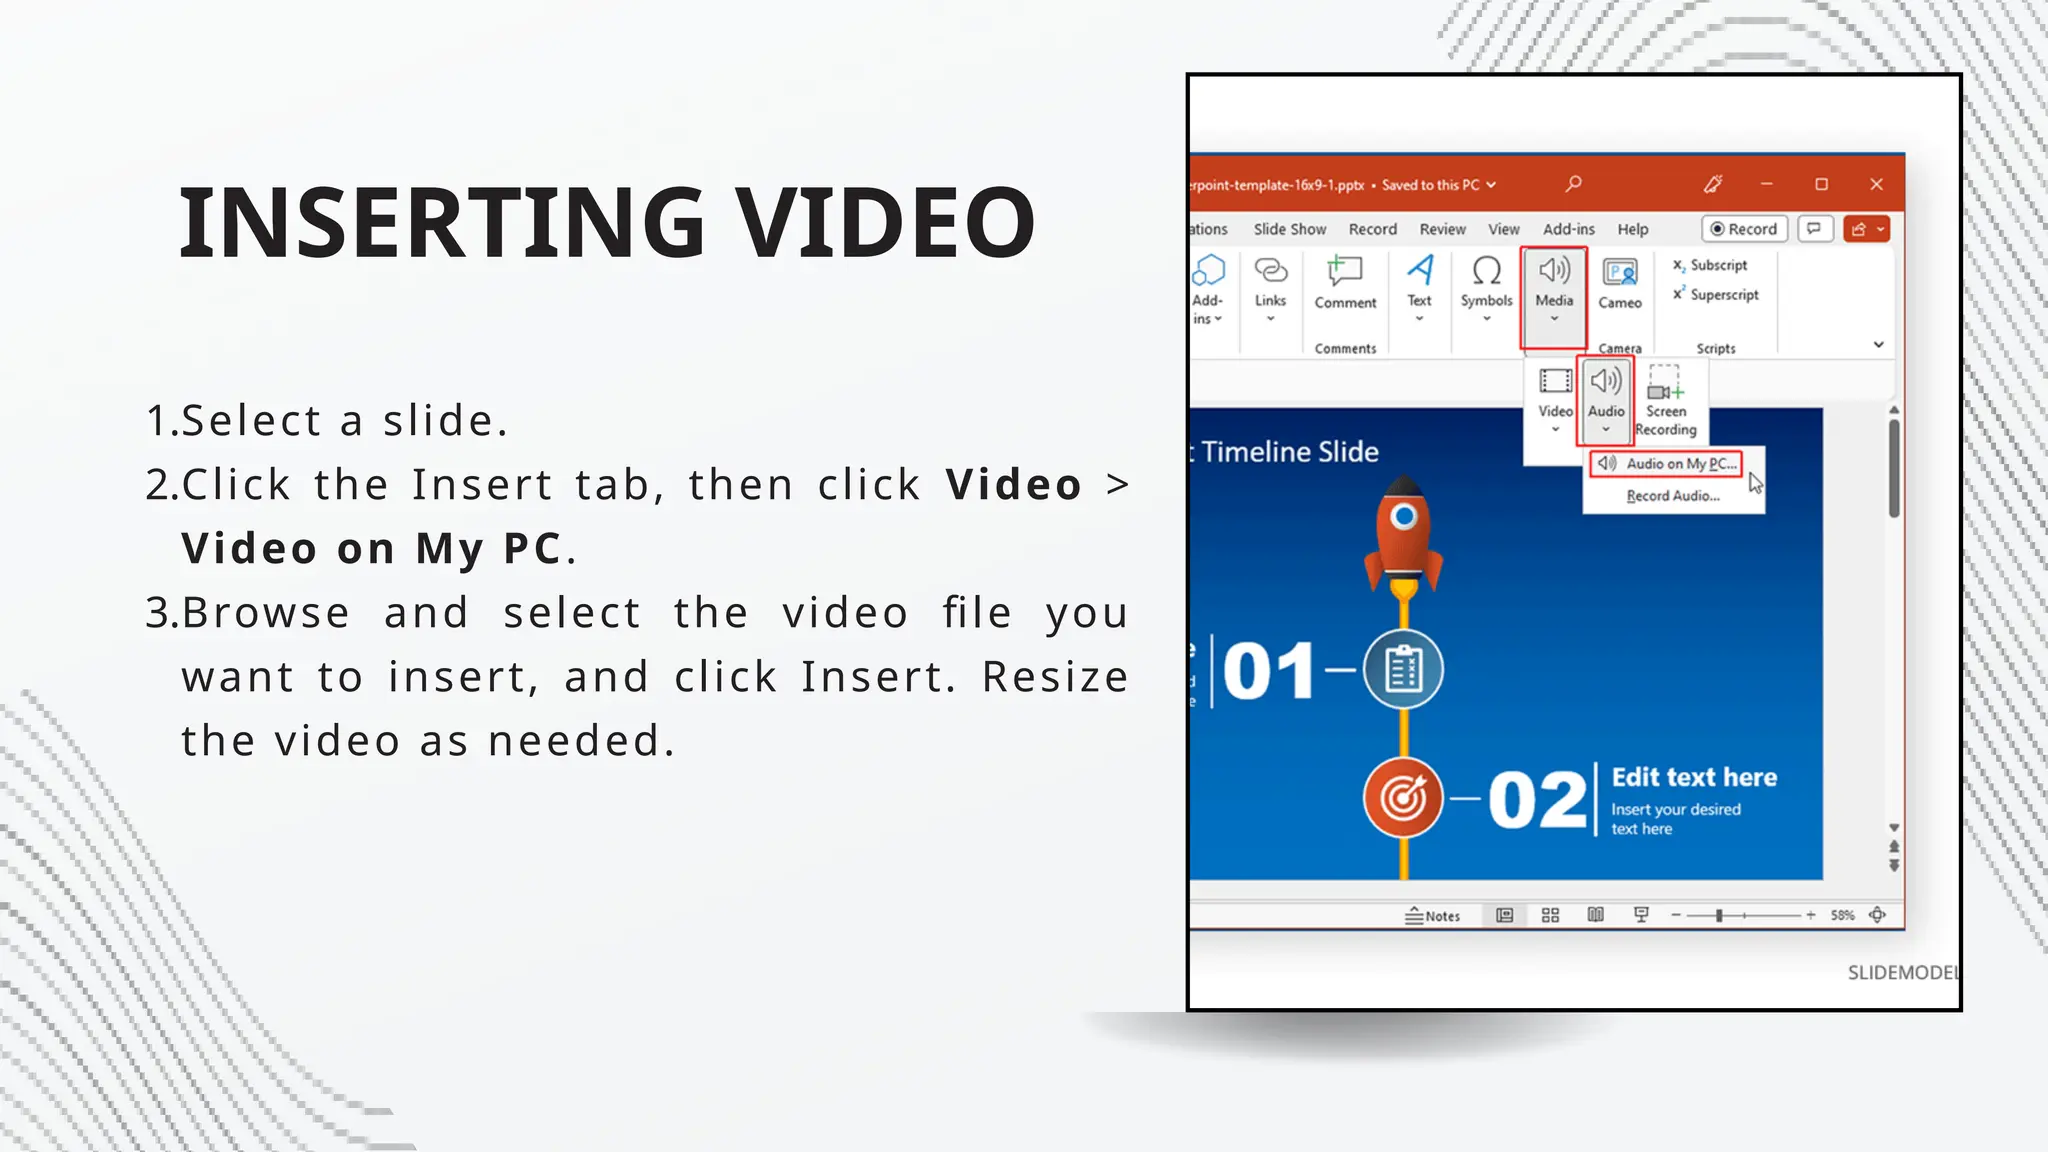
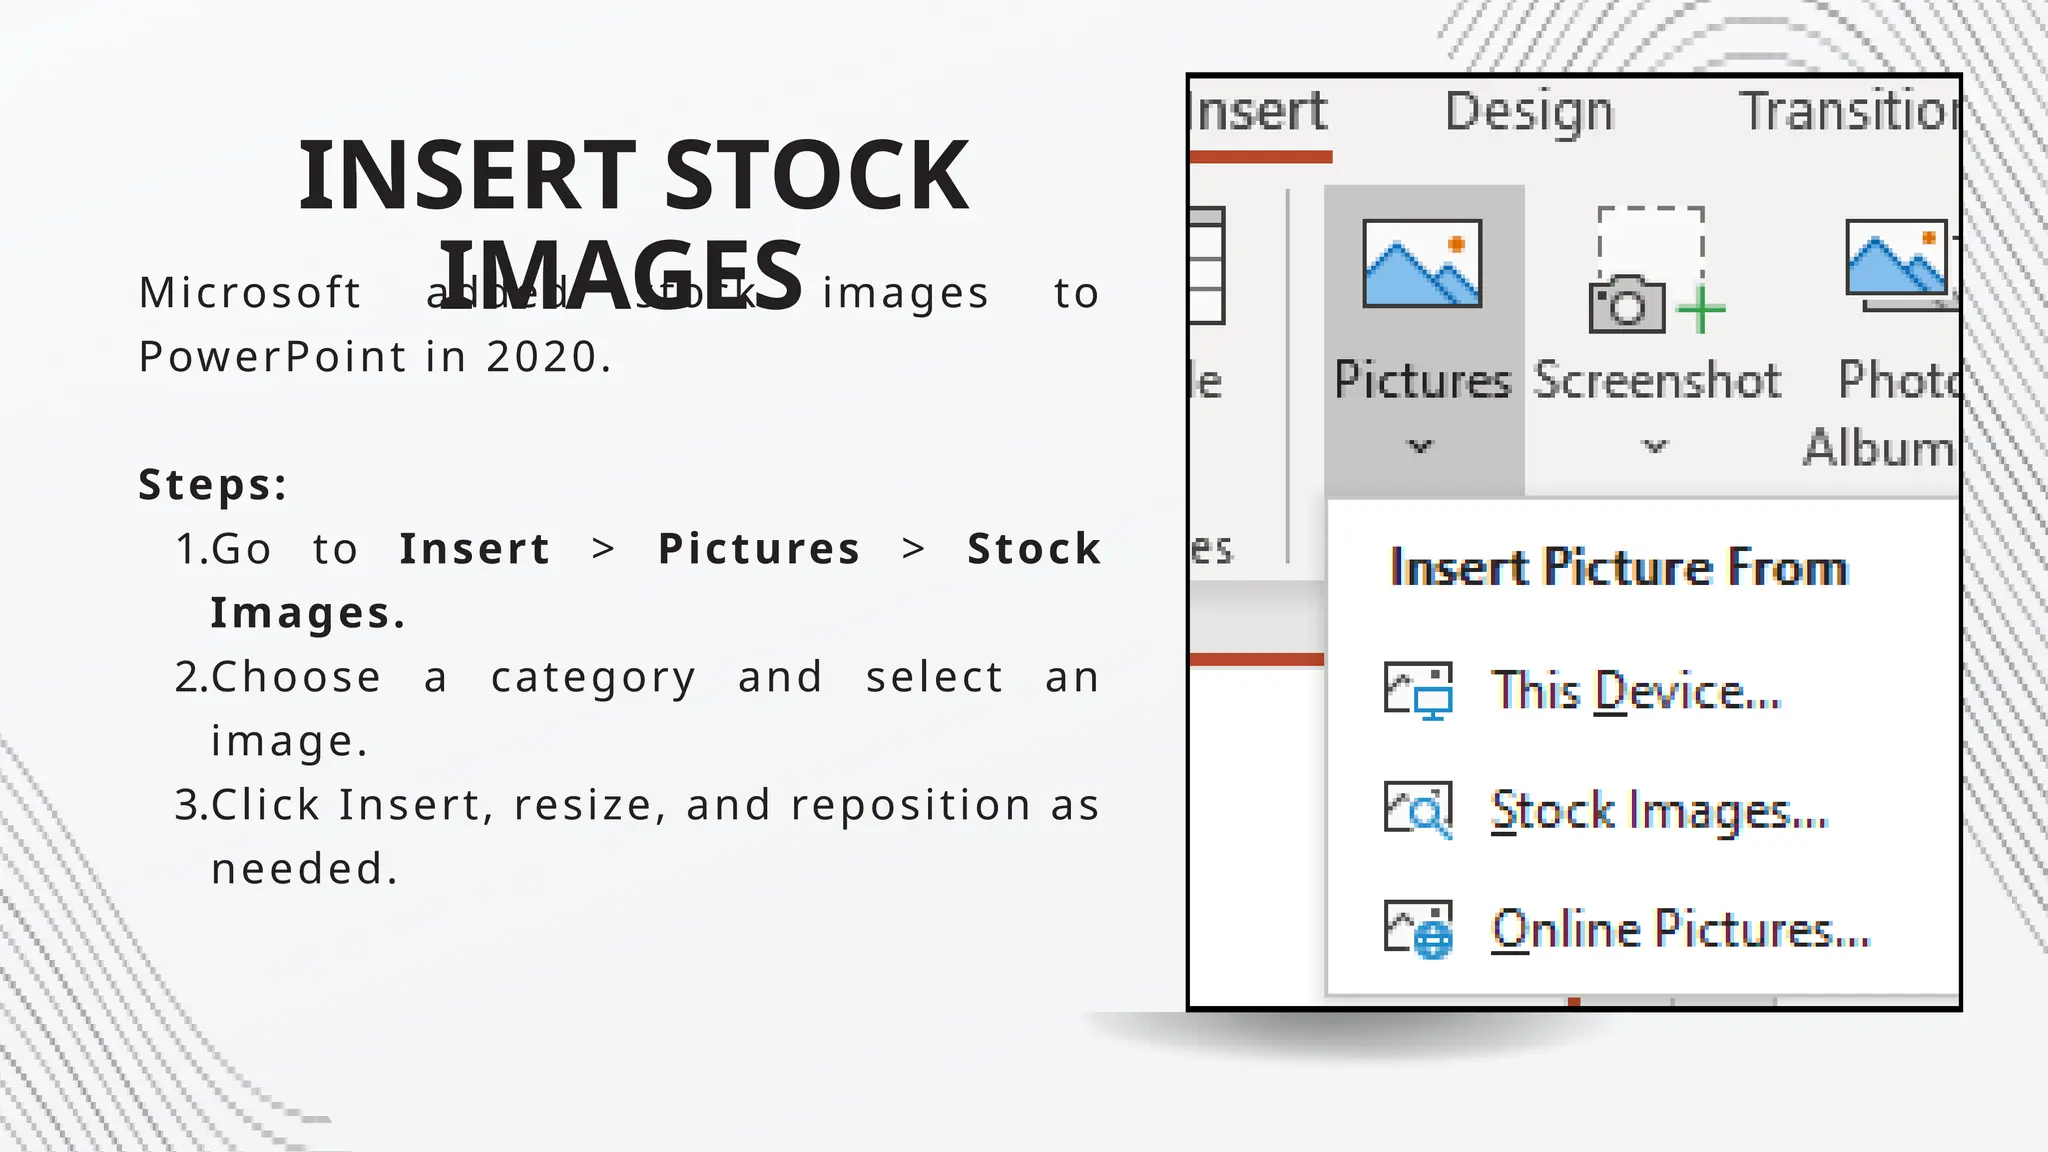
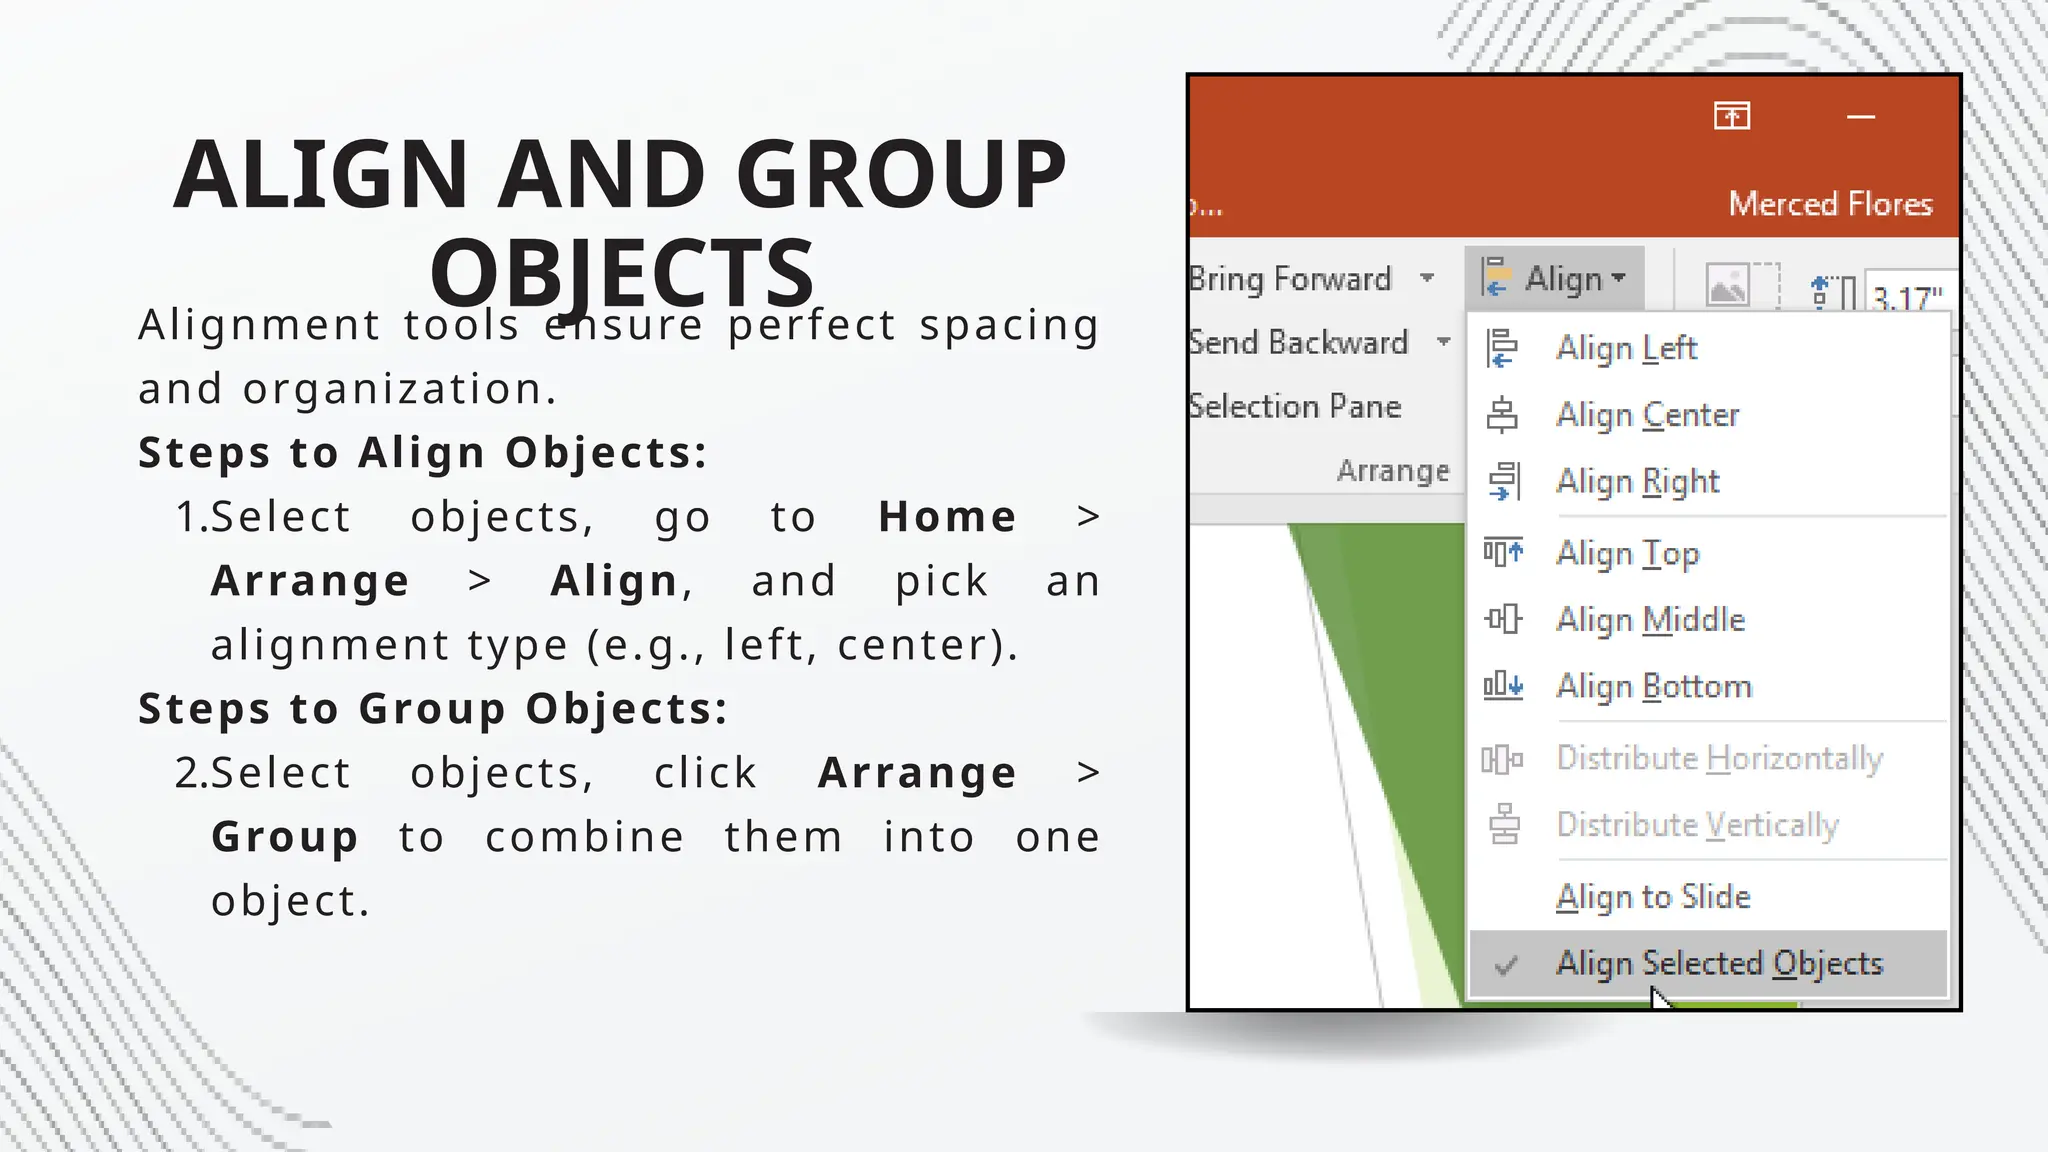
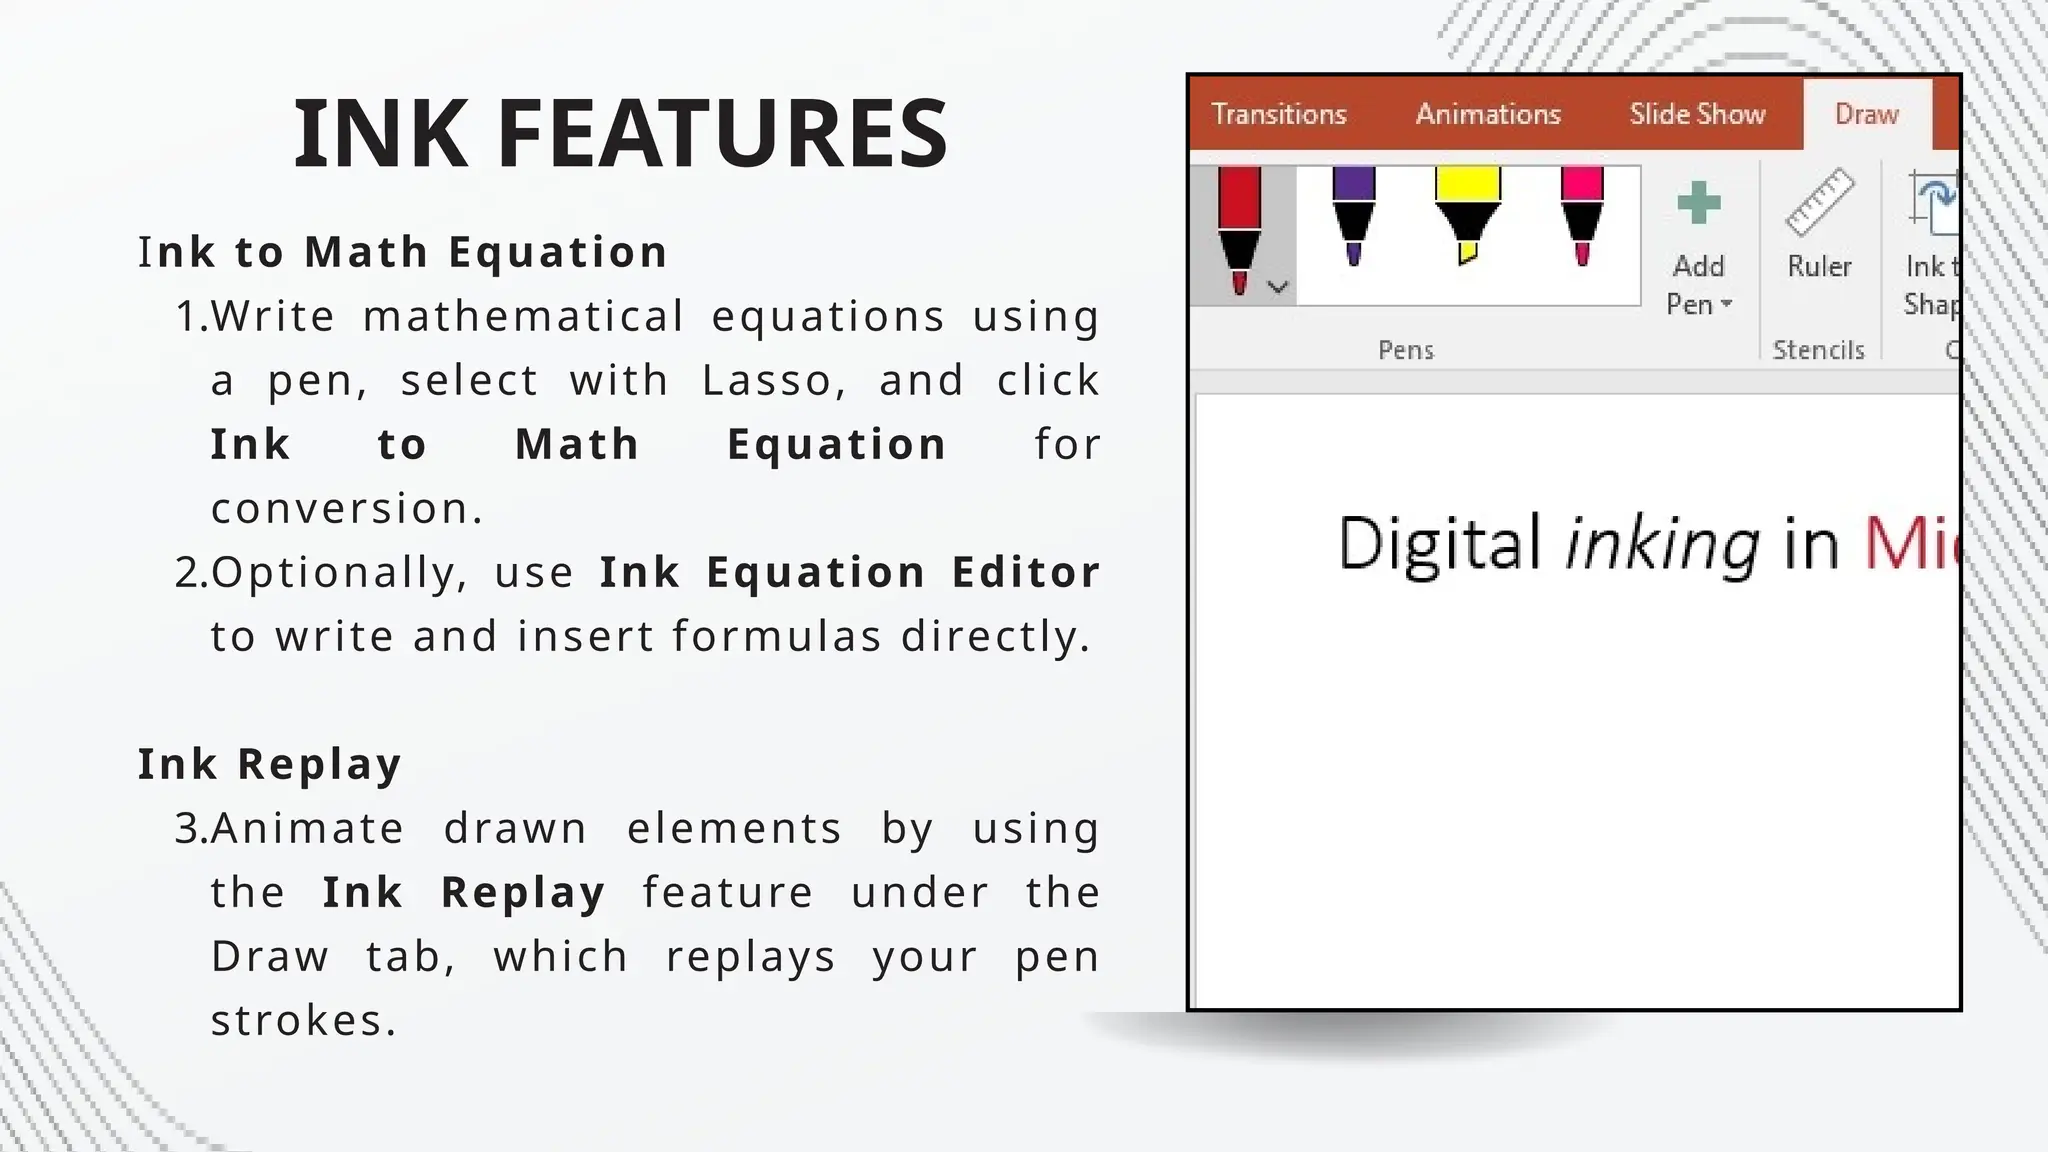
POWERPOI
NT
MICROSOFT
BOOK 2
INTRODUCT
ION
• PowerPoint is a presentation software
developed by Microsoft.
• Part of the Office suite alongside
Word and Excel.
• Used to create basic to complex
presentations.
• Commonly used for business
presentations, but also for
educational and informal purposes.
INTRODUCT
ION
• Presentations can include text,
images, audio clips, movies, sound
effects, and animated transitions.
• Designed to create slide shows with
important information, charts, and
visuals.
• Recent advances include:
⚬ Subtitling on slides.
⚬ Presenter Coach.
⚬ Other interactive features.
CHAPTER 2
POWERPOINT
Things to Know about
PowerPoint Approach
Function
POWERPOI
NT BASICS
WHAT IS
POWERPOINT?
• PowerPoint is used to create slide shows with
important information, charts, and images.
• Most presentations use templates with
predefined backgrounds, fonts, and layouts.
• Changes to the master slide (e.g.,
background) apply automatically to all slides
in the presentation.
SLIDE THEME
• Define content
structure (e.g.,
Title Slide, Title
and Content).
• Adds preset
design elements
(e.g., colors,
graphics, text
styles).
SLIDE LAYOUT
ADDING
CONTENT AND
MEDIA
• Add original text, charts, graphs, and
media (photos, logos, videos).
• Use the Normal View:
⚬ Slides Pane: Displays slide
thumbnails.
⚬ Outline Pane: Shows slide text
only.
ORGANIZING
SLIDES
• Reorder slides using the Slide Sorter
View or the Slides Pane in Normal
View.
• Move, delete, duplicate, or hide
slides to adjust sequence.
BUILDING AN
OUTLINE
• Use the Outline Pane in Normal View
to type text in outline form.
• Slide icons represent titles, and
bullet points display main topics.
WORKING
WITH MASTERS
• Master slides ensure consistent
design across slides.
• Add repeating elements like logos or
footers once for all slides using the
same template.
SETTING UP
SHOWS AND
OPTIONS
• Add audio, animations, and
transitions:
⚬ Animations: Move elements (e.g.,
bouncing objects).
⚬ Transitions: Define how slides
appear (e.g., fade-in).
• Record narrations for presentations.
PRESENTING OR
SHARING SLIDE
SHOWS
• Use on-screen tools during
presentations to control slides and
annotate.
• Presenter View: Displays notes and a
timer for effective delivery.
Exploring the PowerPoint
Start Screen
POWERPOI
NT BASICS
LAUNCHING
POWERPOINT 365
• Windows 10: Access via Start
menu, All Apps, or taskbar
search.
• Windows 8: Use Apps screen or
Start screen search.
• Windows 7: Start menu or All
Programs.
LAUNCHING
POWERPOINT 365
• Open PowerPoint 365 by
searching and clicking to launch.
• Option to open recent or saved
presentations, or start a blank
presentation or use templates.
POWERPOINT USER
INTERFACE FEATURES
• Content Creation: Import and
format text, images, tables, charts,
audio, and video.
• Tools: Capture screenshots,
manage slides in sections, animate
content and transitions, document
speaker notes, and control content
layout with Smart Guides.
POWERPOINT USER
INTERFACE FEATURES
• Slide Show: Create, rehearse, present,
and record presentations.
• File Handling: Save, export, and send
presentations in various formats.
WORKING WITH
POWERPOINT START
SCREEN
• Launch PowerPoint and choose between
creating a new presentation or opening
an existing one.
• Select a template or search for one
online.
• Preview and select themes, layouts, and
start a new presentation.
POWERPOINT WINDOW
ELEMENTS
• Title Bar: Displays file name and app
name, with options to manage window.
• Quick Access Toolbar: Customizable
toolbar for frequently used commands
(Save, Undo, Redo, Start from
Beginning).
POWERPOINT WINDOW
ELEMENTS
• Ribbon: Centralized location for all
commands, with tabs for specific
functions.
• Backstage View: Click File tab for access
to file-related commands and settings.
CREATING AND INSERTING
SLIDES
• START WITH A BLANK PRESENTATION AND SELECT A LAYOUT.
• Use the Home tab to add a TITLE SLIDE, ENTER TITLE AND SUBTITLE.
• ADD MORE SLIDES USING THE "NEW SLIDE" BUTTON OR KEYBOARD
SHORTCUT CTRL + M.
• CHANGE LAYOUTS FOR DIFFERENT SLIDE TYPES.
• FOCUS ON CONTENT FIRST, THEN ADD DESIGN ELEMENTS LATER TO
AVOID SPENDING TOO MUCH TIME ON COLORS AND IMAGES EARLY
ON.
• RIGHT-CLICK THE "NEW SLIDE" BUTTON FOR LAYOUT OPTIONS.
CREATING A PRESENTATION
FROM BACKSTAGE VIEW
• To create a presentation, click the File
tab to access Backstage view.
• Choose New to either start a blank
presentation or select a template.
• Pin a template for future use by
clicking the Pushpin button.
• Pick a theme and color scheme, then
click Create to generate the
presentation.
SAVING A PRESENTATION
• Save a new presentation by specifying
the file name and location.
• To save a previously saved
presentation, click the Save icon or
press Ctrl + S.
• Use Save As to choose a location,
change the file name, or select a
different file format.
EXPLORING NORMAL VIEW
• Normal View is where you work on
slides—creating, formatting, and
arranging slide objects.
• Navigation between different views
(Slide Sorter, Outline, Slide Show, etc.)
is possible via the View tab or the
status bar.
• Slide Pane displays the current slide
and allows for editing.
NAVIGATING POWERPOINT
VIEWS
• Normal View: Navigate slides using
scrollbars or the Next/Previous Slide
buttons.
• Slide Thumbnail Pane: Click on
thumbnails to navigate to specific
slides.
• Outline View: View slides in outline
format for easy text entry.
• Slide Sorter View: Organize and
reorder slides by dragging them.
ARRANGEMENT OF
PRESENTATION WINDOWS
• For comparing multiple presentations,
use the Cascade feature to arrange
windows.
• Limit the number of open presentations
for optimal viewing.
ARRANGEMENT OF
PRESENTATION WINDOWS
• For comparing multiple presentations,
use the Cascade feature to arrange
windows.
• Limit the number of open presentations
for optimal viewing.
USING HELP
• Online Help: Search for articles and
videos when connected to the Internet.
• Offline Help: Use the Tell Me field in
the ribbon to locate tasks and options
within PowerPoint.
CHAPTER 3
USING THEMES AND TEMPLATES
THEMES
• A theme is a set of predefined
colors, fonts, and visual effects
applied to slides for a unified,
professional look.
• It can be customized and saved for
future use. Themes are applied to
all slides to maintain consistency.
APPLYING THEMES
• You can apply a theme to a
presentation by selecting from the
built-in themes or downloading one
online.
• It’s important to use one theme for
the entire presentation but
different themes can be applied to
specific slides for emphasis.
APPLYING THEMES
• You can apply a theme to a
presentation by selecting from the
built-in themes or downloading one
online.
• It’s important to use one theme for
the entire presentation but
different themes can be applied to
specific slides for emphasis.
MODIFYING
THEMES
• Themes can be modified by
adjusting the background, color
schemes, and fonts.
• These changes are automatically
reflected across all slides using
that theme.
SEARCHING FOR
THEMES ONLINE
• PowerPoint allows you to search for
online themes and templates.
• You can find templates using
keywords, view their previews, and
download them directly into your
presentation.
APPLYING A THEME TO
SELECTED SLIDES
• Themes can be applied to specific
slides or sections of a presentation
for a unique look.
• Multiple themes can be used within
a presentation, but they should
complement each other.
MODIFYING
BACKGROUNDS
• Backgrounds can be modified with
solid colors, gradients, patterns, or
textures.
• A digital image or texture can also
be used as a background to add
drama to your presentation, but it
should not overwhelm the text.
USING TEMPLATES
• Templates help create
presentations with predefined
structures and layouts.
• These can be customized, and you
can search for templates online to
find ones that suit your needs.
CHAPTER 4
INCORPORATING MEDIA INTO PRESENTATIONS
INSERTING A
PICTURE
FROM YOUR COMPUTER:
1.Select the slide where you want to
add the image.
2.Click the Insert tab, then click
Pictures.
3.In the Insert Picture dialog box,
find and select the image you want
to insert.
4.Click Insert, and the image will
appear on your slide. Resize or
reposition it as needed.
INSERTING A
PICTURE
FROM AN ONline source:
1.Click Insert > Online Pictures.
2.Type a search term (e.g., "grape")
in the Bing Image Search box.
3.Select the image you want and click
Insert to add it to your slide.
REMOVING THE
BACKGROUND FROM A
PICTURE
1.Select the image you’ve inserted.
2.Click the Picture Format tab and choose
Remove Background.
3.PowerPoint will automatically detect the
background. You can adjust the areas to
keep or remove by dragging the handles
and marking areas to keep (use the Mark
Areas to Keep and Mark Areas to
Remove buttons).
4.Click Keep Changes to remove the
background.
CREATING A PHOTO
ALBUM
1.Open a new or existing presentation.
2.Go to the Insert tab and click the Photo
Album drop-down menu.
3.Choose New Photo Album. In the dialog
box, click File/Disk, and select the
folder containing the photos you want
to add.
4.Select multiple images (hold Ctrl to
select multiple) and click Insert.
5.Choose a layout for your photo album
(e.g., picture with captions), then click
Create to generate the album.
INSERTING VIDEO
1.Select a slide.
2.Click the Insert tab, then click Video >
Video on My PC.
3.Browse and select the video file you
want to insert, and click Insert. Resize
the video as needed.
INSERTING AN AUDIO
CLIP
1.Select a slide.
2.Click Insert > Audio > Audio on My PC.
3.Browse and select your audio file, and
click Insert.
4.You can adjust the playback options in
the Audio Tools Playback tab.
RECORDING AN
AUDIO CLIP
1.Select a slide where you want the
audio.
2.Click the Insert tab, then click Audio >
Record Audio.
3.In the dialog box, type a name for the
recording (e.g., "Introduction"), then
click Record.
4.Record your audio and click Stop when
done. Click OK to insert the audio clip.
5.Use the Playback controls to listen to
or adjust the volume.
INSERTING VIDEO
FROM THE INTERNET
(YOUTUBE)
1.Select a slide.
2.Click the Insert tab, then click Video >
Online Video.
3.In the Insert Video dialog box, search
for a YouTube video by typing
keywords in the search box or paste
the embed code from a specific video.
4.Click Insert, and the video will appear
on your slide.
INSERTING
HYPERLINKS
1.Select the text or object you want to
link.
2.Right-click and select Link.
3.In the dialog box, enter the URL you
want to link to and click OK.
SCREEN RECORDING
1.Go to the Insert tab, then click
Screen Recording.
2.Select the area of the screen you
want to capture.
3.Click Record. Once done, click Stop,
and the recording will appear as a
video on your slide.
TRIMMING AUDIO
CLIPS
1.Select the audio clip you inserted.
2.Go to the Audio Tools Playback tab
and click Trim Audio.
3.Adjust the start and end times of the
clip by dragging the sliders, then
click OK.
CHAPTER 5
TIPS AND TRICKS IN POWERPOINT
INSERT STOCK
IMAGES
Microsoft added stock images to
PowerPoint in 2020.
Steps:
1.Go to Insert > Pictures > Stock
Images.
2.Choose a category and select an
image.
3.Click Insert, resize, and reposition as
needed.
CUSTOMIZE SHAPES
PowerPoint allows shape customization
using Edit Points.
Steps to Insert a Shape:
1.Click Insert > Shapes, then pick a
shape.
Steps to Customize a Shape:
2.Select the shape, click Shape Format
> Edit Shape > Edit Points.
3.Adjust points by dragging them to
modify the shape.
MORPH TRANSITION
Morph transition animates smooth
movement between slides.
Steps:
1.Duplicate a slide, rearrange objects
in the duplicate.
2.Go to Transitions > Morph to create
seamless animation.
CREATE A FILLED MAP
Maps in PowerPoint are great for
visualizing data.
Steps:
1.Go to Insert > Chart > Map.
2.Edit the table to include location-
specific data.
ALIGN AND GROUP
OBJECTS
Alignment tools ensure perfect spacing
and organization.
Steps to Align Objects:
1.Select objects, go to Home >
Arrange > Align, and pick an
alignment type (e.g., left, center).
Steps to Group Objects:
2.Select objects, click Arrange >
Group to combine them into one
object.
INK FEATURES
Ink to Text
1.Use the Draw tab to select a pen,
write on the slide, and use Lasso to
select the text.
2.Click Ink to Text to convert the
handwriting into editable text.
Ink to Shapes
3.Draw shapes using a pen under the
Draw tab.
4.Use Lasso to select the drawing and
click Ink to Shape to transform it
into a clean shape.
INK FEATURES
Ink to Math Equation
1.Write mathematical equations using
a pen, select with Lasso, and click
Ink to Math Equation for
conversion.
2.Optionally, use Ink Equation Editor
to write and insert formulas directly.
Ink Replay
3.Animate drawn elements by using
the Ink Replay feature under the
Draw tab, which replays your pen
strokes.
EYEDROPPER TOOL
The Eyedropper tool helps match colors
from any object.
Steps:
1.Select a shape, go to Shape Format
> Shape Fill > Eyedropper.
2.Click any object to pick its color.
DICTATION AND
TRANSLATION
Dictate text and translate it directly in
PowerPoint.
Steps for Dictation:
1.Insert a text box, click Dictate, and
speak into the microphone.
2.Highlight text, go to Review >
Translate to change its language.
INSTANT PHOTO
ALBUM
Create a photo album from multiple
images.
Steps:
1.Go to Insert > Photo Album >
File/Disk.
2.Select images, customize the layout,
and click Create.
• Apply a professional design using
Design Ideas.
CHAPTER 6
SHORTCUTS IN POWERPOINT

BOOK 2. Basics Use of Microsoft PowerPoint

  • 1.
  • 2.
    INTRODUCT ION • PowerPoint isa presentation software developed by Microsoft. • Part of the Office suite alongside Word and Excel. • Used to create basic to complex presentations. • Commonly used for business presentations, but also for educational and informal purposes.
  • 3.
    INTRODUCT ION • Presentations caninclude text, images, audio clips, movies, sound effects, and animated transitions. • Designed to create slide shows with important information, charts, and visuals. • Recent advances include: ⚬ Subtitling on slides. ⚬ Presenter Coach. ⚬ Other interactive features.
  • 4.
  • 5.
    Things to Knowabout PowerPoint Approach Function POWERPOI NT BASICS
  • 6.
    WHAT IS POWERPOINT? • PowerPointis used to create slide shows with important information, charts, and images. • Most presentations use templates with predefined backgrounds, fonts, and layouts. • Changes to the master slide (e.g., background) apply automatically to all slides in the presentation.
  • 7.
    SLIDE THEME • Definecontent structure (e.g., Title Slide, Title and Content). • Adds preset design elements (e.g., colors, graphics, text styles). SLIDE LAYOUT
  • 8.
    ADDING CONTENT AND MEDIA • Addoriginal text, charts, graphs, and media (photos, logos, videos). • Use the Normal View: ⚬ Slides Pane: Displays slide thumbnails. ⚬ Outline Pane: Shows slide text only.
  • 9.
    ORGANIZING SLIDES • Reorder slidesusing the Slide Sorter View or the Slides Pane in Normal View. • Move, delete, duplicate, or hide slides to adjust sequence.
  • 10.
    BUILDING AN OUTLINE • Usethe Outline Pane in Normal View to type text in outline form. • Slide icons represent titles, and bullet points display main topics.
  • 11.
    WORKING WITH MASTERS • Masterslides ensure consistent design across slides. • Add repeating elements like logos or footers once for all slides using the same template.
  • 12.
    SETTING UP SHOWS AND OPTIONS •Add audio, animations, and transitions: ⚬ Animations: Move elements (e.g., bouncing objects). ⚬ Transitions: Define how slides appear (e.g., fade-in). • Record narrations for presentations.
  • 13.
    PRESENTING OR SHARING SLIDE SHOWS •Use on-screen tools during presentations to control slides and annotate. • Presenter View: Displays notes and a timer for effective delivery.
  • 14.
    Exploring the PowerPoint StartScreen POWERPOI NT BASICS
  • 15.
    LAUNCHING POWERPOINT 365 • Windows10: Access via Start menu, All Apps, or taskbar search. • Windows 8: Use Apps screen or Start screen search. • Windows 7: Start menu or All Programs.
  • 16.
    LAUNCHING POWERPOINT 365 • OpenPowerPoint 365 by searching and clicking to launch. • Option to open recent or saved presentations, or start a blank presentation or use templates.
  • 17.
    POWERPOINT USER INTERFACE FEATURES •Content Creation: Import and format text, images, tables, charts, audio, and video. • Tools: Capture screenshots, manage slides in sections, animate content and transitions, document speaker notes, and control content layout with Smart Guides.
  • 18.
    POWERPOINT USER INTERFACE FEATURES •Slide Show: Create, rehearse, present, and record presentations. • File Handling: Save, export, and send presentations in various formats.
  • 19.
    WORKING WITH POWERPOINT START SCREEN •Launch PowerPoint and choose between creating a new presentation or opening an existing one. • Select a template or search for one online. • Preview and select themes, layouts, and start a new presentation.
  • 20.
    POWERPOINT WINDOW ELEMENTS • TitleBar: Displays file name and app name, with options to manage window. • Quick Access Toolbar: Customizable toolbar for frequently used commands (Save, Undo, Redo, Start from Beginning).
  • 21.
    POWERPOINT WINDOW ELEMENTS • Ribbon:Centralized location for all commands, with tabs for specific functions. • Backstage View: Click File tab for access to file-related commands and settings.
  • 22.
    CREATING AND INSERTING SLIDES •START WITH A BLANK PRESENTATION AND SELECT A LAYOUT. • Use the Home tab to add a TITLE SLIDE, ENTER TITLE AND SUBTITLE. • ADD MORE SLIDES USING THE "NEW SLIDE" BUTTON OR KEYBOARD SHORTCUT CTRL + M. • CHANGE LAYOUTS FOR DIFFERENT SLIDE TYPES. • FOCUS ON CONTENT FIRST, THEN ADD DESIGN ELEMENTS LATER TO AVOID SPENDING TOO MUCH TIME ON COLORS AND IMAGES EARLY ON. • RIGHT-CLICK THE "NEW SLIDE" BUTTON FOR LAYOUT OPTIONS.
  • 23.
    CREATING A PRESENTATION FROMBACKSTAGE VIEW • To create a presentation, click the File tab to access Backstage view. • Choose New to either start a blank presentation or select a template. • Pin a template for future use by clicking the Pushpin button. • Pick a theme and color scheme, then click Create to generate the presentation.
  • 24.
    SAVING A PRESENTATION •Save a new presentation by specifying the file name and location. • To save a previously saved presentation, click the Save icon or press Ctrl + S. • Use Save As to choose a location, change the file name, or select a different file format.
  • 25.
    EXPLORING NORMAL VIEW •Normal View is where you work on slides—creating, formatting, and arranging slide objects. • Navigation between different views (Slide Sorter, Outline, Slide Show, etc.) is possible via the View tab or the status bar. • Slide Pane displays the current slide and allows for editing.
  • 26.
    NAVIGATING POWERPOINT VIEWS • NormalView: Navigate slides using scrollbars or the Next/Previous Slide buttons. • Slide Thumbnail Pane: Click on thumbnails to navigate to specific slides. • Outline View: View slides in outline format for easy text entry. • Slide Sorter View: Organize and reorder slides by dragging them.
  • 27.
    ARRANGEMENT OF PRESENTATION WINDOWS •For comparing multiple presentations, use the Cascade feature to arrange windows. • Limit the number of open presentations for optimal viewing.
  • 28.
    ARRANGEMENT OF PRESENTATION WINDOWS •For comparing multiple presentations, use the Cascade feature to arrange windows. • Limit the number of open presentations for optimal viewing.
  • 29.
    USING HELP • OnlineHelp: Search for articles and videos when connected to the Internet. • Offline Help: Use the Tell Me field in the ribbon to locate tasks and options within PowerPoint.
  • 30.
  • 31.
    THEMES • A themeis a set of predefined colors, fonts, and visual effects applied to slides for a unified, professional look. • It can be customized and saved for future use. Themes are applied to all slides to maintain consistency.
  • 32.
    APPLYING THEMES • Youcan apply a theme to a presentation by selecting from the built-in themes or downloading one online. • It’s important to use one theme for the entire presentation but different themes can be applied to specific slides for emphasis.
  • 33.
    APPLYING THEMES • Youcan apply a theme to a presentation by selecting from the built-in themes or downloading one online. • It’s important to use one theme for the entire presentation but different themes can be applied to specific slides for emphasis.
  • 34.
    MODIFYING THEMES • Themes canbe modified by adjusting the background, color schemes, and fonts. • These changes are automatically reflected across all slides using that theme.
  • 35.
    SEARCHING FOR THEMES ONLINE •PowerPoint allows you to search for online themes and templates. • You can find templates using keywords, view their previews, and download them directly into your presentation.
  • 36.
    APPLYING A THEMETO SELECTED SLIDES • Themes can be applied to specific slides or sections of a presentation for a unique look. • Multiple themes can be used within a presentation, but they should complement each other.
  • 37.
    MODIFYING BACKGROUNDS • Backgrounds canbe modified with solid colors, gradients, patterns, or textures. • A digital image or texture can also be used as a background to add drama to your presentation, but it should not overwhelm the text.
  • 38.
    USING TEMPLATES • Templateshelp create presentations with predefined structures and layouts. • These can be customized, and you can search for templates online to find ones that suit your needs.
  • 39.
  • 40.
    INSERTING A PICTURE FROM YOURCOMPUTER: 1.Select the slide where you want to add the image. 2.Click the Insert tab, then click Pictures. 3.In the Insert Picture dialog box, find and select the image you want to insert. 4.Click Insert, and the image will appear on your slide. Resize or reposition it as needed.
  • 41.
    INSERTING A PICTURE FROM ANONline source: 1.Click Insert > Online Pictures. 2.Type a search term (e.g., "grape") in the Bing Image Search box. 3.Select the image you want and click Insert to add it to your slide.
  • 42.
    REMOVING THE BACKGROUND FROMA PICTURE 1.Select the image you’ve inserted. 2.Click the Picture Format tab and choose Remove Background. 3.PowerPoint will automatically detect the background. You can adjust the areas to keep or remove by dragging the handles and marking areas to keep (use the Mark Areas to Keep and Mark Areas to Remove buttons). 4.Click Keep Changes to remove the background.
  • 43.
    CREATING A PHOTO ALBUM 1.Opena new or existing presentation. 2.Go to the Insert tab and click the Photo Album drop-down menu. 3.Choose New Photo Album. In the dialog box, click File/Disk, and select the folder containing the photos you want to add. 4.Select multiple images (hold Ctrl to select multiple) and click Insert. 5.Choose a layout for your photo album (e.g., picture with captions), then click Create to generate the album.
  • 44.
    INSERTING VIDEO 1.Select aslide. 2.Click the Insert tab, then click Video > Video on My PC. 3.Browse and select the video file you want to insert, and click Insert. Resize the video as needed.
  • 45.
    INSERTING AN AUDIO CLIP 1.Selecta slide. 2.Click Insert > Audio > Audio on My PC. 3.Browse and select your audio file, and click Insert. 4.You can adjust the playback options in the Audio Tools Playback tab.
  • 46.
    RECORDING AN AUDIO CLIP 1.Selecta slide where you want the audio. 2.Click the Insert tab, then click Audio > Record Audio. 3.In the dialog box, type a name for the recording (e.g., "Introduction"), then click Record. 4.Record your audio and click Stop when done. Click OK to insert the audio clip. 5.Use the Playback controls to listen to or adjust the volume.
  • 47.
    INSERTING VIDEO FROM THEINTERNET (YOUTUBE) 1.Select a slide. 2.Click the Insert tab, then click Video > Online Video. 3.In the Insert Video dialog box, search for a YouTube video by typing keywords in the search box or paste the embed code from a specific video. 4.Click Insert, and the video will appear on your slide.
  • 48.
    INSERTING HYPERLINKS 1.Select the textor object you want to link. 2.Right-click and select Link. 3.In the dialog box, enter the URL you want to link to and click OK.
  • 49.
    SCREEN RECORDING 1.Go tothe Insert tab, then click Screen Recording. 2.Select the area of the screen you want to capture. 3.Click Record. Once done, click Stop, and the recording will appear as a video on your slide.
  • 50.
    TRIMMING AUDIO CLIPS 1.Select theaudio clip you inserted. 2.Go to the Audio Tools Playback tab and click Trim Audio. 3.Adjust the start and end times of the clip by dragging the sliders, then click OK.
  • 51.
    CHAPTER 5 TIPS ANDTRICKS IN POWERPOINT
  • 52.
    INSERT STOCK IMAGES Microsoft addedstock images to PowerPoint in 2020. Steps: 1.Go to Insert > Pictures > Stock Images. 2.Choose a category and select an image. 3.Click Insert, resize, and reposition as needed.
  • 53.
    CUSTOMIZE SHAPES PowerPoint allowsshape customization using Edit Points. Steps to Insert a Shape: 1.Click Insert > Shapes, then pick a shape. Steps to Customize a Shape: 2.Select the shape, click Shape Format > Edit Shape > Edit Points. 3.Adjust points by dragging them to modify the shape.
  • 54.
    MORPH TRANSITION Morph transitionanimates smooth movement between slides. Steps: 1.Duplicate a slide, rearrange objects in the duplicate. 2.Go to Transitions > Morph to create seamless animation.
  • 55.
    CREATE A FILLEDMAP Maps in PowerPoint are great for visualizing data. Steps: 1.Go to Insert > Chart > Map. 2.Edit the table to include location- specific data.
  • 56.
    ALIGN AND GROUP OBJECTS Alignmenttools ensure perfect spacing and organization. Steps to Align Objects: 1.Select objects, go to Home > Arrange > Align, and pick an alignment type (e.g., left, center). Steps to Group Objects: 2.Select objects, click Arrange > Group to combine them into one object.
  • 57.
    INK FEATURES Ink toText 1.Use the Draw tab to select a pen, write on the slide, and use Lasso to select the text. 2.Click Ink to Text to convert the handwriting into editable text. Ink to Shapes 3.Draw shapes using a pen under the Draw tab. 4.Use Lasso to select the drawing and click Ink to Shape to transform it into a clean shape.
  • 58.
    INK FEATURES Ink toMath Equation 1.Write mathematical equations using a pen, select with Lasso, and click Ink to Math Equation for conversion. 2.Optionally, use Ink Equation Editor to write and insert formulas directly. Ink Replay 3.Animate drawn elements by using the Ink Replay feature under the Draw tab, which replays your pen strokes.
  • 59.
    EYEDROPPER TOOL The Eyedroppertool helps match colors from any object. Steps: 1.Select a shape, go to Shape Format > Shape Fill > Eyedropper. 2.Click any object to pick its color.
  • 60.
    DICTATION AND TRANSLATION Dictate textand translate it directly in PowerPoint. Steps for Dictation: 1.Insert a text box, click Dictate, and speak into the microphone. 2.Highlight text, go to Review > Translate to change its language.
  • 61.
    INSTANT PHOTO ALBUM Create aphoto album from multiple images. Steps: 1.Go to Insert > Photo Album > File/Disk. 2.Select images, customize the layout, and click Create. • Apply a professional design using Design Ideas.
  • 62.