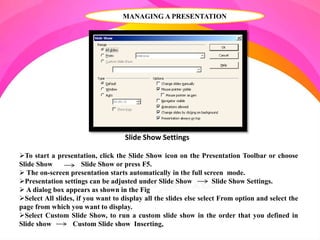
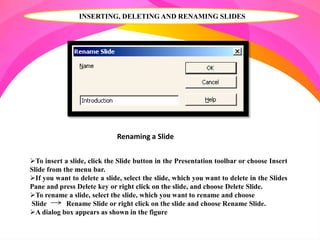
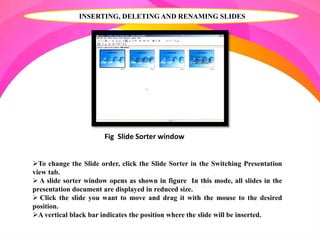
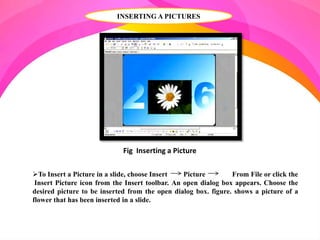
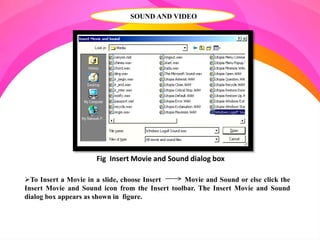
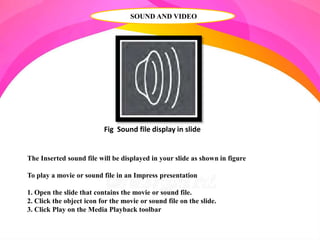
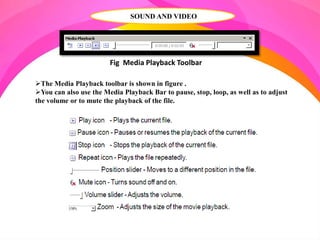
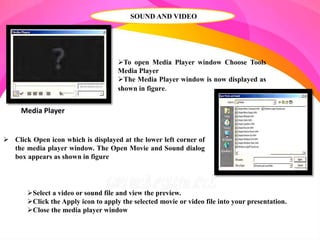
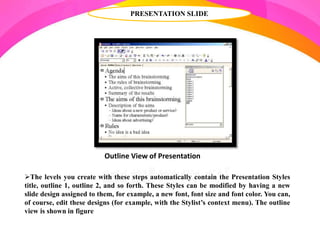
R.D.SIVAKUMAR, M.Sc.,M.Phil.,M.Tech.,
Assistant Professor of Computer Science &
Assistant Professor and Head, Department of M.Com.(CA),
Ayya Nadar Janaki Ammal College,
Sivakasi – 626 124.
Mobile: 099440-42243
e-mail : sivamsccsit@gmail.com
website: www.rdsivakumar.blogspot.in
MANAGING A PRESENTATION
Slide Show Settings
To start a presentation, click the Slide Show icon on the Presentation Toolbar or choose
Slide Show Slide Show or press F5.
 The on-screen presentation starts automatically in the full screen mode.
Presentation settings can be adjusted under Slide Show Slide Show Settings.
 A dialog box appears as shown in the Fig
Select All slides, if you want to display all the slides else select From option and select the
page from which you want to display.
Select Custom Slide Show, to run a custom slide show in the order that you defined in
Slide show Custom Slide show Inserting,
INSERTING, DELETING AND RENAMING SLIDES
To insert a slide, click the Slide button in the Presentation toolbar or choose Insert
Slide from the menu bar.
If you want to delete a slide, select the slide, which you want to delete in the Slides
Pane and press Delete key or right click on the slide, and choose Delete Slide.
To rename a slide, select the slide, which you want to rename and choose
Slide Rename Slide or right click on the slide and choose Rename Slide.
A dialog box appears as shown in the figure
Renaming a Slide
INSERTING, DELETING AND RENAMING SLIDES
Fig Slide Sorter window
To change the Slide order, click the Slide Sorter in the Switching Presentation
view tab.
 A slide sorter window opens as shown in figure In this mode, all slides in the
presentation document are displayed in reduced size.
 Click the slide you want to move and drag it with the mouse to the desired
position.
A vertical black bar indicates the position where the slide will be inserted.
INSERTING A PICTURES
To Insert a Picture in a slide, choose Insert Picture From File or click the
Insert Picture icon from the Insert toolbar. An open dialog box appears. Choose the
desired picture to be inserted from the open dialog box. figure. shows a picture of a
flower that has been inserted in a slide.
Fig Inserting a Picture
SOUND AND VIDEO
To Insert a Movie in a slide, choose Insert Movie and Sound or else click the
Insert Movie and Sound icon from the Insert toolbar. The Insert Movie and Sound
dialog box appears as shown in figure.
Fig Insert Movie and Sound dialog box
SOUND AND VIDEO
Fig Sound file display in slide
The Inserted sound file will be displayed in your slide as shown in figure
To play a movie or sound file in an Impress presentation
1. Open the slide that contains the movie or sound file.
2. Click the object icon for the movie or sound file on the slide.
3. Click Play on the Media Playback toolbar
SOUND AND VIDEO
Fig Media Playback Toolbar
The Media Playback toolbar is shown in figure .
You can also use the Media Playback Bar to pause, stop, loop, as well as to adjust
the volume or to mute the playback of the file.
SOUND AND VIDEO
Media Player
To open Media Player window Choose Tools
Media Player
The Media Player window is now displayed as
shown in figure.
 Click Open icon which is displayed at the lower left corner of
the media player window. The Open Movie and Sound dialog
box appears as shown in figure
Select a video or sound file and view the preview.
Click the Apply icon to apply the selected movie or video file into your presentation.
Close the media player window
SOUND AND VIDEO
Fig Movie file played during slide show
Start slide show by choosing Slide Show Slide Show or press the F5 key.
Figure displays a sample movie file played during a slide show
INSERTING OBJECTS
StarOffice Impress provides tools for inserting objects like charts, formula,
etc. in a presentation.
 To insert an object in a slide, choose an object from Insert Object
INSERT FORMULA
This is used for inserting a formula into the presentation for performing
calculations
This is used to import objects from other application into a presentation.
For example, StarOffice spreadsheet, formulae, text and even Microsoft
application objects can be inserted. Figures show how to insert a Microsoft Word
Document.
INSERT OLE OBJECT
Inserting OLE Object Object Type Selection window
INSERT OLE OBJECT
Inserting OLE Object
If you want to insert a Microsoft Word Document, choose Further objects and Create
New option in the Insert OLE Object dialog box and click OK.
 In the Insert Object dialog box, select Microsoft Word Document as object type and
click Ok
INSERT OLE OBJECT
Object Type Selection window
Microsoft Word Application is opened automatically.
Type your information in MS Word and close it.
StarOffice Impress automatically saves the document and inserts it into the slide.
 figure shows the inserted MS Word document.
OLE Object in Presentation
Insert Applet
This is used to import Applets into the presentation
SLIDE TRANSITIONS, EFFECTS AND ANIMATION
AUTOMATIC SLIDE TRANSITION
The easiest way to assign slide transition effects to slides is in Slide View. Choose
View Toolbars Slide View.
Select the number of slides to be listed in the Slides Per Row spin box.
 The number of slides in the Slides view changes according to the number specified in
the Slides Per Row spin box as shown in the figureThe Slides view displays the slides in
certain numbers specified in the
Slides Per Row spin box as shown in the figure
Slide View Floating window Slide View window
EFFECTS FOR OBJECTS
All these effects can be assigned using the Normal View (View Normal View).
Choose Custom Animation from Slide Show Custom Animation.
First you must select the object to which you want to apply the effect.
Click Add in Modify Effect. The Custom Animation window as show in the figure.
appears.
Then select the desired effect. Click the Ok button.
You can also have your object fade in (in the Custom Animation window, on the Entrance
tab under Special category) and additionally, fade out (in the Custom Animation window,
on the Exit tab under Special category) per mouse-click.
Custom Animation window
CHANGING SLIDE BACKGROUND
Background Fill combo box
You can change the background color or the background fill of the current slide or all
of the slides in your document.
For a background fill, you can use hatching, gradient, or bitmap image as shown in the
figure 9.26.
Choose Format Page Background. Select the background fill from the
following options.
Color
Gradient
Hatching
Bitmap Image.
CHANGING SLIDE BACKGROUND
In this example, Colour is selected as the Fill type.
 Note that the list box below the Fill combo box changes to a list of different
colors as shown in the figure
In the Fill area, do one of the following:
• Select Color, and then click a color in the list.
• Select Gradient, and then click a gradient style in the list.
• Select Hatching, and then click a hatching style in the list.
• Select Bitmap, and then click bitmap image in the list.
Selecting Background Color
CHANGING SLIDE BACKGROUND
Background Fill Dialog Box
Then, Click Ok. Page Settings dialog box appears as shown in figure If you
want to change the background fill for all of the slides, click YES when the
‘Background setting for all pages’ dialog box appears else click NO to change the
background fill for a single slide.
APPLYING A SLIDE DESIGN TO A MASTER SLIDE
To apply a new slide design:
Select Format Slide Design. A dialog box appears as shown in the figure
Do one of the following:
To apply the slide design to all of the slides in your presentation, select the
Exchange background page check box.
To apply the slide design to the current slide only, clear the Exchange background
page check box. Click Load
Slide Design window
A window as shown in the figure appears.
Under Categories, select a slide design.
Under Templates, select a template with the design that you want to apply.
To preview the template, click More, and then select the Preview check box.
Click OK to see the changes in the master slide.
APPLYING A SLIDE DESIGN TO A MASTER SLIDE
Load Style Design window
PRESENTATION SLIDE
Along with the slide design you can also assign a whole set of Presentation Styles to your
slides.
Open the Style list to see a list of the pre-defined Styles.
 You can modify the existing Styles and you can create new Styles
Activate the outline view mode by choosing menu View Outline View.
Open the Stylist either by choosing Format Styles and Formatting or with the F11 key.
A window appears as shown in the figure
Styles and Formatting window
PRESENTATION SLIDE
Fig Styles and Formatting window
The cursor is now blinking next to the small icon for slide 1.Enter the desired text,
for example First Page. This will be the title for slide 1.
 If you press the Enter key, a small icon for slide 2 appears in the next line of the
Outline view. Enter a title for the second slide, for example, Second Page.
Press the Enter key again. Now press the Tab key before you enter any text. By doing
that, you ensure that the text you then enter here will be a subtitle on slide 2.
PRESENTATION SLIDE
Styles and Formatting window
You can also first start entering the text for the subtitle and then press the Tab key.
In case, if you have already entered text in the line, you will see a message, which
warns you that with this action, you will delete the existing text. To delete click Ok.
Continue to enter more subtitles of the first level on page two. By pressing the Tab
key, you move the line down one level and with Shift + Tab one level up. This enables
you to even make a new slide out of a sub-topic.
PRESENTATION SLIDE
The levels you create with these steps automatically contain the Presentation Styles
title, outline 1, outline 2, and so forth. These Styles can be modified by having a new
slide design assigned to them, for example, a new font, font size and font color. You can,
of course, edit these designs (for example, with the Stylist’s context menu). The outline
view is shown in figure
Outline View of Presentation
THANK YOU..!!

Managing a Presentation - R.D.Sivakumar

  • 1.
    R.D.SIVAKUMAR, M.Sc.,M.Phil.,M.Tech., Assistant Professorof Computer Science & Assistant Professor and Head, Department of M.Com.(CA), Ayya Nadar Janaki Ammal College, Sivakasi – 626 124. Mobile: 099440-42243 e-mail : sivamsccsit@gmail.com website: www.rdsivakumar.blogspot.in MANAGING A PRESENTATION
  • 2.
    MANAGING A PRESENTATION SlideShow Settings To start a presentation, click the Slide Show icon on the Presentation Toolbar or choose Slide Show Slide Show or press F5.  The on-screen presentation starts automatically in the full screen mode. Presentation settings can be adjusted under Slide Show Slide Show Settings.  A dialog box appears as shown in the Fig Select All slides, if you want to display all the slides else select From option and select the page from which you want to display. Select Custom Slide Show, to run a custom slide show in the order that you defined in Slide show Custom Slide show Inserting,
  • 3.
    INSERTING, DELETING ANDRENAMING SLIDES To insert a slide, click the Slide button in the Presentation toolbar or choose Insert Slide from the menu bar. If you want to delete a slide, select the slide, which you want to delete in the Slides Pane and press Delete key or right click on the slide, and choose Delete Slide. To rename a slide, select the slide, which you want to rename and choose Slide Rename Slide or right click on the slide and choose Rename Slide. A dialog box appears as shown in the figure Renaming a Slide
  • 4.
    INSERTING, DELETING ANDRENAMING SLIDES Fig Slide Sorter window To change the Slide order, click the Slide Sorter in the Switching Presentation view tab.  A slide sorter window opens as shown in figure In this mode, all slides in the presentation document are displayed in reduced size.  Click the slide you want to move and drag it with the mouse to the desired position. A vertical black bar indicates the position where the slide will be inserted.
  • 5.
    INSERTING A PICTURES ToInsert a Picture in a slide, choose Insert Picture From File or click the Insert Picture icon from the Insert toolbar. An open dialog box appears. Choose the desired picture to be inserted from the open dialog box. figure. shows a picture of a flower that has been inserted in a slide. Fig Inserting a Picture
  • 6.
    SOUND AND VIDEO ToInsert a Movie in a slide, choose Insert Movie and Sound or else click the Insert Movie and Sound icon from the Insert toolbar. The Insert Movie and Sound dialog box appears as shown in figure. Fig Insert Movie and Sound dialog box
  • 7.
    SOUND AND VIDEO FigSound file display in slide The Inserted sound file will be displayed in your slide as shown in figure To play a movie or sound file in an Impress presentation 1. Open the slide that contains the movie or sound file. 2. Click the object icon for the movie or sound file on the slide. 3. Click Play on the Media Playback toolbar
  • 8.
    SOUND AND VIDEO FigMedia Playback Toolbar The Media Playback toolbar is shown in figure . You can also use the Media Playback Bar to pause, stop, loop, as well as to adjust the volume or to mute the playback of the file.
  • 9.
    SOUND AND VIDEO MediaPlayer To open Media Player window Choose Tools Media Player The Media Player window is now displayed as shown in figure.  Click Open icon which is displayed at the lower left corner of the media player window. The Open Movie and Sound dialog box appears as shown in figure Select a video or sound file and view the preview. Click the Apply icon to apply the selected movie or video file into your presentation. Close the media player window
  • 10.
    SOUND AND VIDEO FigMovie file played during slide show Start slide show by choosing Slide Show Slide Show or press the F5 key. Figure displays a sample movie file played during a slide show
  • 11.
    INSERTING OBJECTS StarOffice Impressprovides tools for inserting objects like charts, formula, etc. in a presentation.  To insert an object in a slide, choose an object from Insert Object INSERT FORMULA This is used for inserting a formula into the presentation for performing calculations This is used to import objects from other application into a presentation. For example, StarOffice spreadsheet, formulae, text and even Microsoft application objects can be inserted. Figures show how to insert a Microsoft Word Document. INSERT OLE OBJECT Inserting OLE Object Object Type Selection window
  • 12.
    INSERT OLE OBJECT InsertingOLE Object If you want to insert a Microsoft Word Document, choose Further objects and Create New option in the Insert OLE Object dialog box and click OK.  In the Insert Object dialog box, select Microsoft Word Document as object type and click Ok
  • 13.
    INSERT OLE OBJECT ObjectType Selection window Microsoft Word Application is opened automatically. Type your information in MS Word and close it. StarOffice Impress automatically saves the document and inserts it into the slide.  figure shows the inserted MS Word document. OLE Object in Presentation Insert Applet This is used to import Applets into the presentation
  • 14.
    SLIDE TRANSITIONS, EFFECTSAND ANIMATION AUTOMATIC SLIDE TRANSITION The easiest way to assign slide transition effects to slides is in Slide View. Choose View Toolbars Slide View. Select the number of slides to be listed in the Slides Per Row spin box.  The number of slides in the Slides view changes according to the number specified in the Slides Per Row spin box as shown in the figureThe Slides view displays the slides in certain numbers specified in the Slides Per Row spin box as shown in the figure Slide View Floating window Slide View window
  • 15.
    EFFECTS FOR OBJECTS Allthese effects can be assigned using the Normal View (View Normal View). Choose Custom Animation from Slide Show Custom Animation. First you must select the object to which you want to apply the effect. Click Add in Modify Effect. The Custom Animation window as show in the figure. appears. Then select the desired effect. Click the Ok button. You can also have your object fade in (in the Custom Animation window, on the Entrance tab under Special category) and additionally, fade out (in the Custom Animation window, on the Exit tab under Special category) per mouse-click. Custom Animation window
  • 16.
    CHANGING SLIDE BACKGROUND BackgroundFill combo box You can change the background color or the background fill of the current slide or all of the slides in your document. For a background fill, you can use hatching, gradient, or bitmap image as shown in the figure 9.26. Choose Format Page Background. Select the background fill from the following options. Color Gradient Hatching Bitmap Image.
  • 17.
    CHANGING SLIDE BACKGROUND Inthis example, Colour is selected as the Fill type.  Note that the list box below the Fill combo box changes to a list of different colors as shown in the figure In the Fill area, do one of the following: • Select Color, and then click a color in the list. • Select Gradient, and then click a gradient style in the list. • Select Hatching, and then click a hatching style in the list. • Select Bitmap, and then click bitmap image in the list. Selecting Background Color
  • 18.
    CHANGING SLIDE BACKGROUND BackgroundFill Dialog Box Then, Click Ok. Page Settings dialog box appears as shown in figure If you want to change the background fill for all of the slides, click YES when the ‘Background setting for all pages’ dialog box appears else click NO to change the background fill for a single slide.
  • 19.
    APPLYING A SLIDEDESIGN TO A MASTER SLIDE To apply a new slide design: Select Format Slide Design. A dialog box appears as shown in the figure Do one of the following: To apply the slide design to all of the slides in your presentation, select the Exchange background page check box. To apply the slide design to the current slide only, clear the Exchange background page check box. Click Load Slide Design window
  • 20.
    A window asshown in the figure appears. Under Categories, select a slide design. Under Templates, select a template with the design that you want to apply. To preview the template, click More, and then select the Preview check box. Click OK to see the changes in the master slide. APPLYING A SLIDE DESIGN TO A MASTER SLIDE Load Style Design window
  • 21.
    PRESENTATION SLIDE Along withthe slide design you can also assign a whole set of Presentation Styles to your slides. Open the Style list to see a list of the pre-defined Styles.  You can modify the existing Styles and you can create new Styles Activate the outline view mode by choosing menu View Outline View. Open the Stylist either by choosing Format Styles and Formatting or with the F11 key. A window appears as shown in the figure Styles and Formatting window
  • 22.
    PRESENTATION SLIDE Fig Stylesand Formatting window The cursor is now blinking next to the small icon for slide 1.Enter the desired text, for example First Page. This will be the title for slide 1.  If you press the Enter key, a small icon for slide 2 appears in the next line of the Outline view. Enter a title for the second slide, for example, Second Page. Press the Enter key again. Now press the Tab key before you enter any text. By doing that, you ensure that the text you then enter here will be a subtitle on slide 2.
  • 23.
    PRESENTATION SLIDE Styles andFormatting window You can also first start entering the text for the subtitle and then press the Tab key. In case, if you have already entered text in the line, you will see a message, which warns you that with this action, you will delete the existing text. To delete click Ok. Continue to enter more subtitles of the first level on page two. By pressing the Tab key, you move the line down one level and with Shift + Tab one level up. This enables you to even make a new slide out of a sub-topic.
  • 24.
    PRESENTATION SLIDE The levelsyou create with these steps automatically contain the Presentation Styles title, outline 1, outline 2, and so forth. These Styles can be modified by having a new slide design assigned to them, for example, a new font, font size and font color. You can, of course, edit these designs (for example, with the Stylist’s context menu). The outline view is shown in figure Outline View of Presentation
  • 25.