Pixlr image optimization workshop1
•
0 likes•320 views

This workshop introduces instructors to the basics of editing using the Pixlr Editor resource. To access the images in compressed Zip format, email me at -> johnharold llan @ gmail .com

Recommended
More Related Content
What's hot
What's hot (20)
Viewers also liked
Similar to Pixlr image optimization workshop1
Similar to Pixlr image optimization workshop1 (20)
More from John Allan
More from John Allan (20)
Recently uploaded
Recently uploaded (20)
Pixlr image optimization workshop1
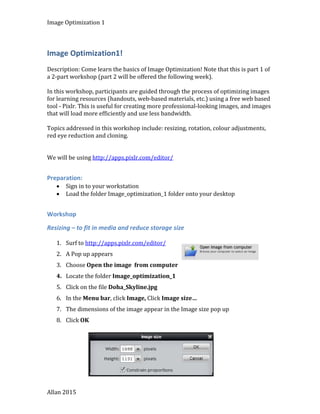
- 1. Image Optimization 1 Image Optimization1! Description: Come learn the basics of Image Optimization! Note that this is part 1 of a 2-part workshop (part 2 will be offered the following week). In this workshop, participants are guided through the process of optimizing images for learning resources (handouts, web-based materials, etc.) using a free web based tool - Pixlr. This is useful for creating more professional-looking images, and images that will load more efficiently and use less bandwidth. Topics addressed in this workshop include: resizing, rotation, colour adjustments, red eye reduction and cloning. We will be using http://apps.pixlr.com/editor/ Preparation: • Sign in to your workstation • Load the folder Image_optimization_1 folder onto your desktop Workshop Resizing – to fit in media and reduce storage size 1. Surf to http://apps.pixlr.com/editor/ 2. A Pop up appears 3. Choose Open the image from computer 4. Locate the folder Image_optimization_1 5. Click on the file Doha_Skyline.jpg 6. In the Menu bar, click Image, Click Image size… 7. The dimensions of the image appear in the Image size pop up 8. Click OK Allan 2015
- 2. Image Optimization 1 9. To determine the current storage size of the image, click File, click Save 10. Note: With Jpeg files (most photographs are saved with this format) The higher the quality setting, the more file storage required. Normally the Quality setting for web based images is between 80 and 100 11. It is your job to find a balance between aesthetic value vs file size. 12. Jot the file size down on a piece of paper. 13. Click Cancel 14. On the menu bar, click Image 15. Click Image size… 16. Ensure that the Constrain proportions check box is ticked 17. Change the Width to 400 pixels 18. Note that the Height setting is automatically changed to 266 Pixels 19. Click on the OK button 20. On the menu bar, click View 21. Click Actual Pixels 22. To determine the current storage size of the image, click File, click Save 23. Note the difference. It is quite substantial. 24. In the Name field change the name to Doha_Skyline_small 25. Click OK 26. Select a suitable location then click Save Allan 2015
- 3. Image Optimization 1 Rotating – correct images with odd orientation 1. Click File, Open image… 2. Locate the folder Image_optimization_1 3. Click on the file dutch_buildings.jpg 4. In the Menu bar, click Image 5. Click Rotate canvas 90 CCW 6. Click File, click Save 7. Click OK 8. Select a suitable location then click Save Allan 2015
- 4. Image Optimization 1 Red Eye Correction 1. Choose File, Open image… 2. Locate the folder Image_optimization_1 3. Click on the file redeyedbaby.jpg 4. Click Open 5. On the toolbar (on the left) choose the Red eye reduction tool 6. Move the mouse pointer over the baby’s left eye, 7. Click 8. Repeat step 6 with the right eye, your image should appear as below. 9. Click File, click Save 10. Click OK 11. Select a suitable location then click Save Allan 2015
- 5. Image Optimization 1 Clone Tool 1. Choose File, Open image… 2. Locate the folder Image_optimization_1 3. Click on the file Moon.jpg 4. Click Open 5. On the Menu bar click View 6. Click Zoom Out 7. Click Image, Canvas Size… 8. Change the Width to 1200 and set the anchor to the left, centre square (see right) 9. Click OK Note: The image canvas is larger without distorting the image 10.Ensure that the Set Main colour chip is black 11.Click on the Paint bucket tool 12.Click on the white part of the canvas 13.In the Tools bar click on the Clone stamp tool 14.Hold the {CTRL} key down and click on the centre of the moon. Allan 2015
- 6. Image Optimization 1 15.Ensure that you have released the mouse button. 16.Click on the image as below, then drag in a circular motion. It quickly becomes apparent that a second moon is being created. 17.Complete making the second moon. 18.Click File on the Menu bar 19.Click Close 20.Click No Allan 2015
- 7. Image Optimization 1 Distort 1. Choose File, Open image… 2. Locate the folder Image_optimization_1 3. Click on the file Distort_me.jpg 4. Click Open 5. On the Menu bar, click Edit 6. Select Free distort… 7. Drag the corner nodes inwards 8. When satisfied with the result, click on the screen 9. Click Yes (to the apply changes prompt) 10.Click File on the Menu bar 11.Click Close 12.Click No * All images Free Copyright from MorgueFile.com Allan 2015
- 8. Image Optimization 1 Colour adjustment 1. Choose File, Open image… 2. Locate the folder Image_optimization_1 3. Click on the file two_cats_before.jpg 4. Click Open 5. On the Menu bar, click Adjustment 6. Click Auto levels Note: If this always happened the other adjustment tools would not be necessary 7. On the Menu bar, click Adjustment 8. Click Brightness and Contrast 9. A pop up appears 10.Slide the Brightness setting to 50 11.Slide the Brightness setting to -50 12. Return the Brightness setting to 0 13.Slide the Contrast setting to 100 14.Slide the Contrast setting to -70 15. Return the Contrast setting to 0 16. Click Cancel 17.On the Menu bar, click Adjustment 18. There are 16 features in the Adjustments menu explore a few. Note that some Adjustments make the file storage size larger than others. 19. When you are finished, close application. * All images Free Copyright from MorgueFile.com Allan 2015