Zaption "How To" Resource
•
0 likes•212 views

Zaption is a free online tool that allows users to take online videos and make them interactive by adding questions, comments, and other elements. The document provides step-by-step instructions on how to use Zaption to crop videos, add text or image comments, draw on videos, add different types of questions, and share the interactive video without requiring students to log in.

Recommended
More Related Content
Viewers also liked
Similar to Zaption "How To" Resource
Similar to Zaption "How To" Resource (20)
More from John Allan
More from John Allan (20)
Recently uploaded
Recently uploaded (20)
Zaption "How To" Resource
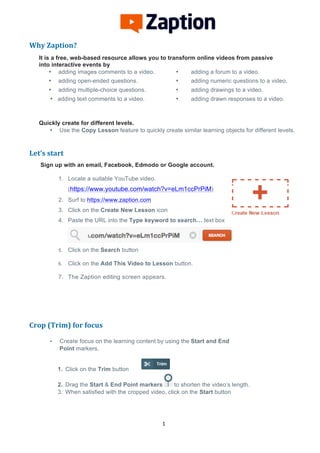
- 1. 1 Why Zaption? It is a free, web-based resource allows you to transform online videos from passive into interactive events by • adding images comments to a video. • adding open-ended questions. • adding multiple-choice questions. • adding text comments to a video. • adding a forum to a video. • adding numeric questions to a video. • adding drawings to a video. • adding drawn responses to a video. Quickly create for different levels. • Use the Copy Lesson feature to quickly create similar learning objects for different levels. Let’s start Sign up with an email, Facebook, Edmodo or Google account. 1. Locate a suitable YouTube video. (https://www.youtube.com/watch?v=eLm1ccPrPiM) 2. Surf to https://www.zaption.com 3. Click on the Create New Lesson icon 4. Paste the URL into the Type keyword to search… text box 5. Click on the Search button 6. Click on the Add This Video to Lesson button. 7. The Zaption editing screen appears. Crop (Trim) for focus • Create focus on the learning content by using the Start and End Point markers. 1. Click on the Trim button 2. Drag the Start & End Point markers to shorten the video‘s length. 3. When satisfied with the cropped video, click on the Start button
- 2. 2 Adding Additional Information to a video Add comments (Text Slide) Comments offer a way to add additional information, personality and instructions to a video. 1. Position the playback head to the appropriate place on the timeline 2. Click on the Text Slide icon (at the top of the screen) 3. Drag the Text Slide icon onto the video pane or the sidebar (right) 4. Click on the text Click here to edit text slide 5. Input comments into the text editor 6. A yellow icon indicates the position of the Text Slide on the timeline Add comments/Static Visuals (Image Slide) Images offer a way to add additional information, personality and clarification to a video. 1. Position the playback head to the appropriate place on the timeline 2. Click on the Image Slide icon (at the top of the screen) 3. Drag the Image Slide icon onto the video pane or the sidebar (right) 4. Drag an image onto the text Drag an image here 5. The image appears 6. A yellow icon indicates the position of the Image Slide on the timeline Drawing over a video Drawing over a video frame offers a way to add additional information, personality and clarification to a video. 1. Position the playback head to the appropriate place on the timeline 2. Click on the Drawing icon (at the top of the screen) 3. Drag the Drawing icon onto the video pane or the sidebar (right)
- 3. 3 4. Drag to draw items on the video pane or in the sidebar 5. A mustard colored marker indicates the position of the drawing on the timeline Adding Questions to the video Add an open ended question 1. Position the playback head to the appropriate place on the timeline 2. Click on the Open Response icon (at the top of the screen) 3. Drag the Open Response icon onto the video pane or the sidebar (right) 4. Click on the text Click here to write your question 5. Input an open ended question into the editor 6. A mustard colored marker indicates the position of the open ended question on the timeline Add a Numerical Response question 1. Position the playback head to the appropriate place on the timeline 2. Click on the Numerical Response icon (at the top of the screen) 3. Drag the Numerical Response icon onto the video pane or the sidebar (right) 4. Click on the text Click here to write your question 5. Input a question into the editor 6. Click on the Scoring button 7. Choose a value based on the two fields provided 8. Click on the Done button 9. A mustard colored marker indicates the position of the Numerical Response question on the timeline
- 4. 4 Add a multiple choice question 1. Position the playback head to the appropriate place on the timeline 2. Click on the Multiple Choice icon (at the top of the screen) 3. Drag the Multiple Choice icon onto the video pane or the sidebar (right) 4. Click on the text Click here to write your question 5. Input an multiple choice question into the editor 6. Click on the text Click to edit choice #1 7. Input an answer/distracter into the editor 8. Click on the text Click to edit choice #2 9. Input an answer/distracter into the editor 10. If required, click on the Add Choice button 11. Repeat steps 6 and 7 12. Indicate the correct response, click on the check icon 13. Choose 14. Indicate the incorrect responses, click on the check icon 15. Choose 16. A mustard colored marker indicates the position of the multiple choice question on the timeline
- 5. 5 Add a drawn response question 1. Position the playback head to the appropriate place on the timeline 2. Click on the Drawn Response icon (at the top of the screen) 3. Drag the Drawn Response icon onto the video pane 4. Click on the text Click here to edit drawing prompt 5. Input a prompt into the editor 6. A mustard colored marker indicates the position of the drawn response question on the timeline Add a Discussion (Forum) to the video 1. Position the playback head to the appropriate place on the timeline 2. Click on the Discussion icon (at the top of the screen) 3. Drag the Multiple Choice icon onto the sidebar (right) 4. Click on the text Enter a discussion prompt 5. Input a prompt into the editor 6. A yellow icon indicates the position of the Discussion on the timeline Finish & Share Sharing without a class on Zaption allows the students to use the activity without a login. Feedback, for most question types, is immediate. 1. Click on the Preview button at the top right of the screen 2. Click on the Start button 3. Test the video for mistakes and general flow 4. Click on the Publish button at the top right of the screen 5. Click on the Share button at the top right of the screen 6. Choose sharing options that suit your purposes