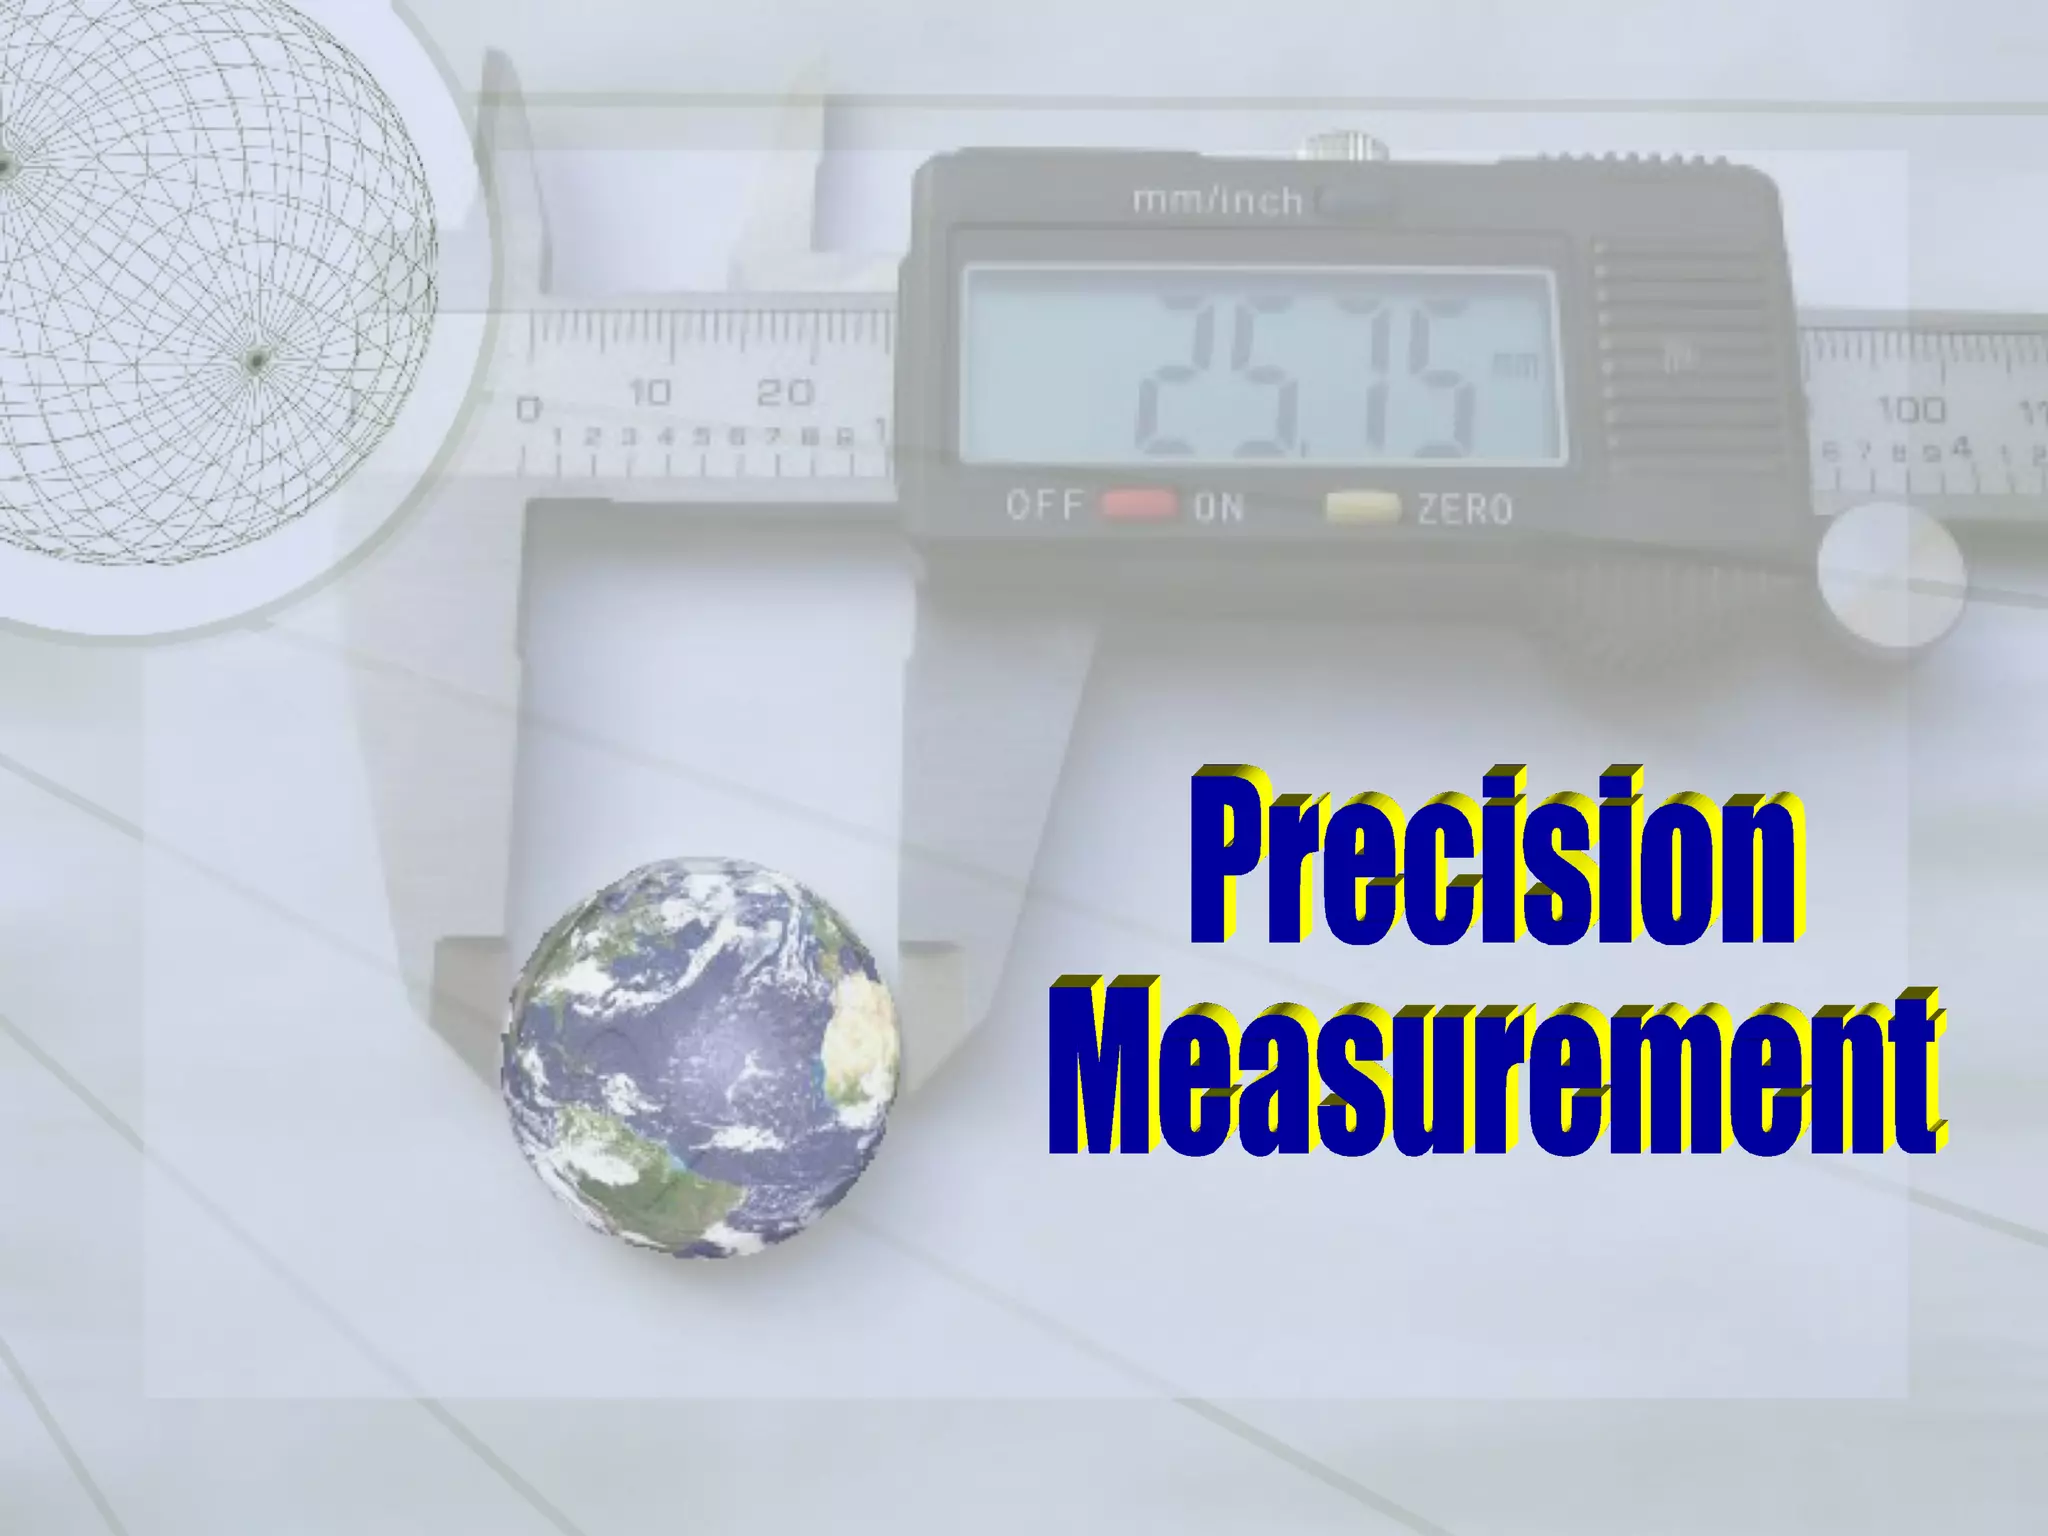
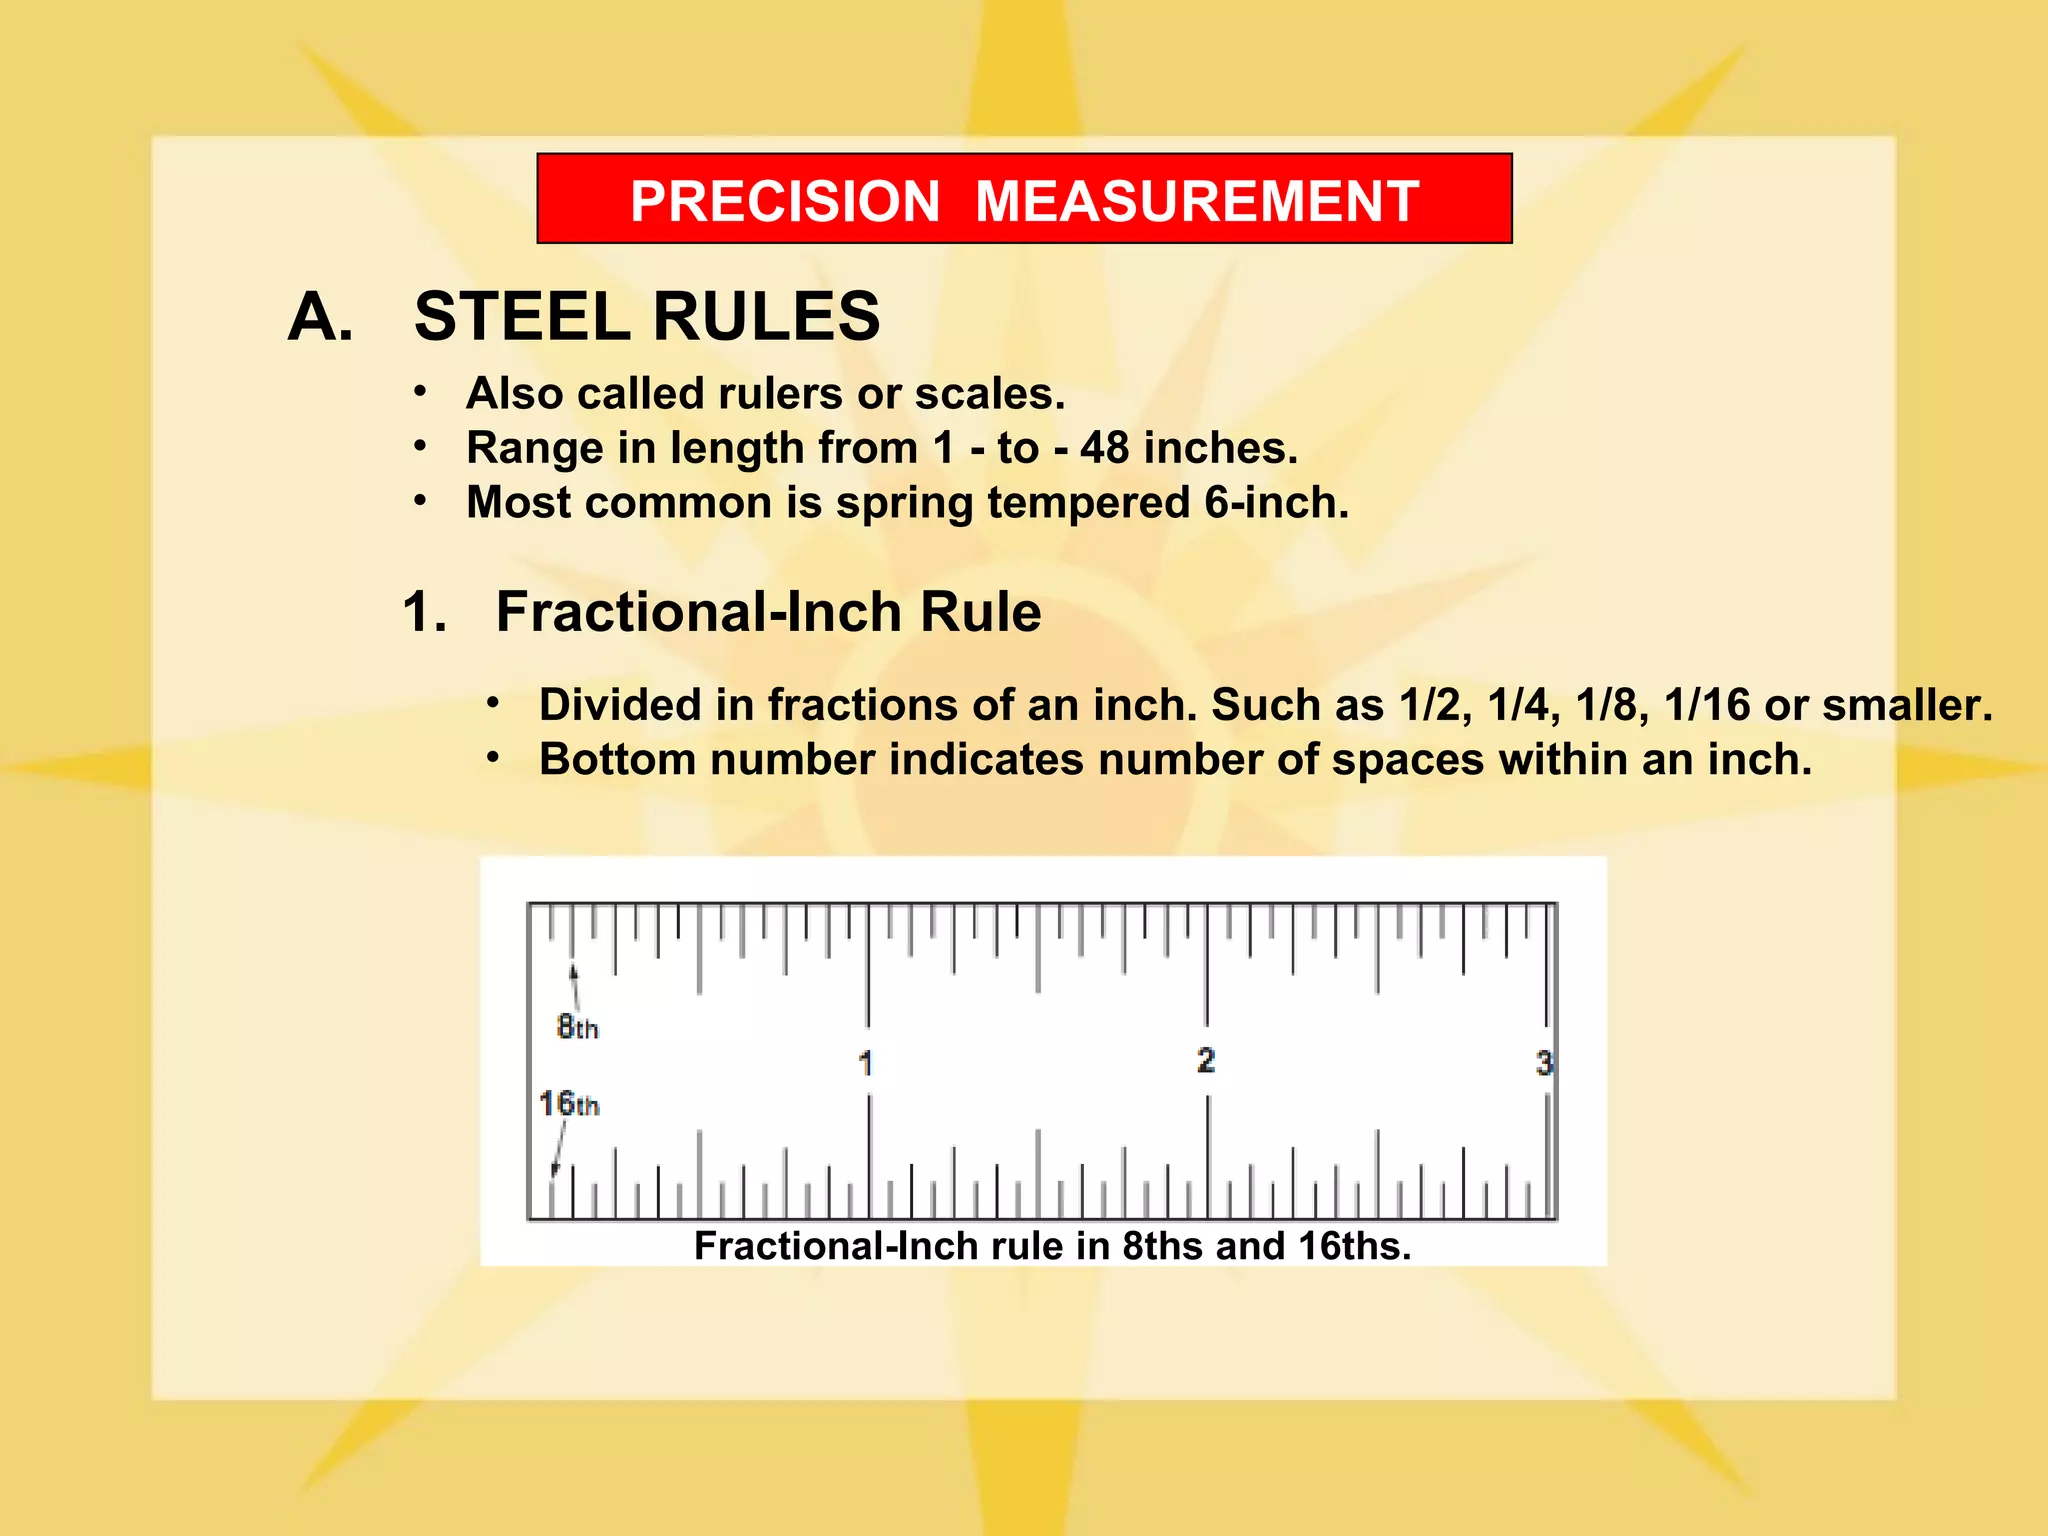
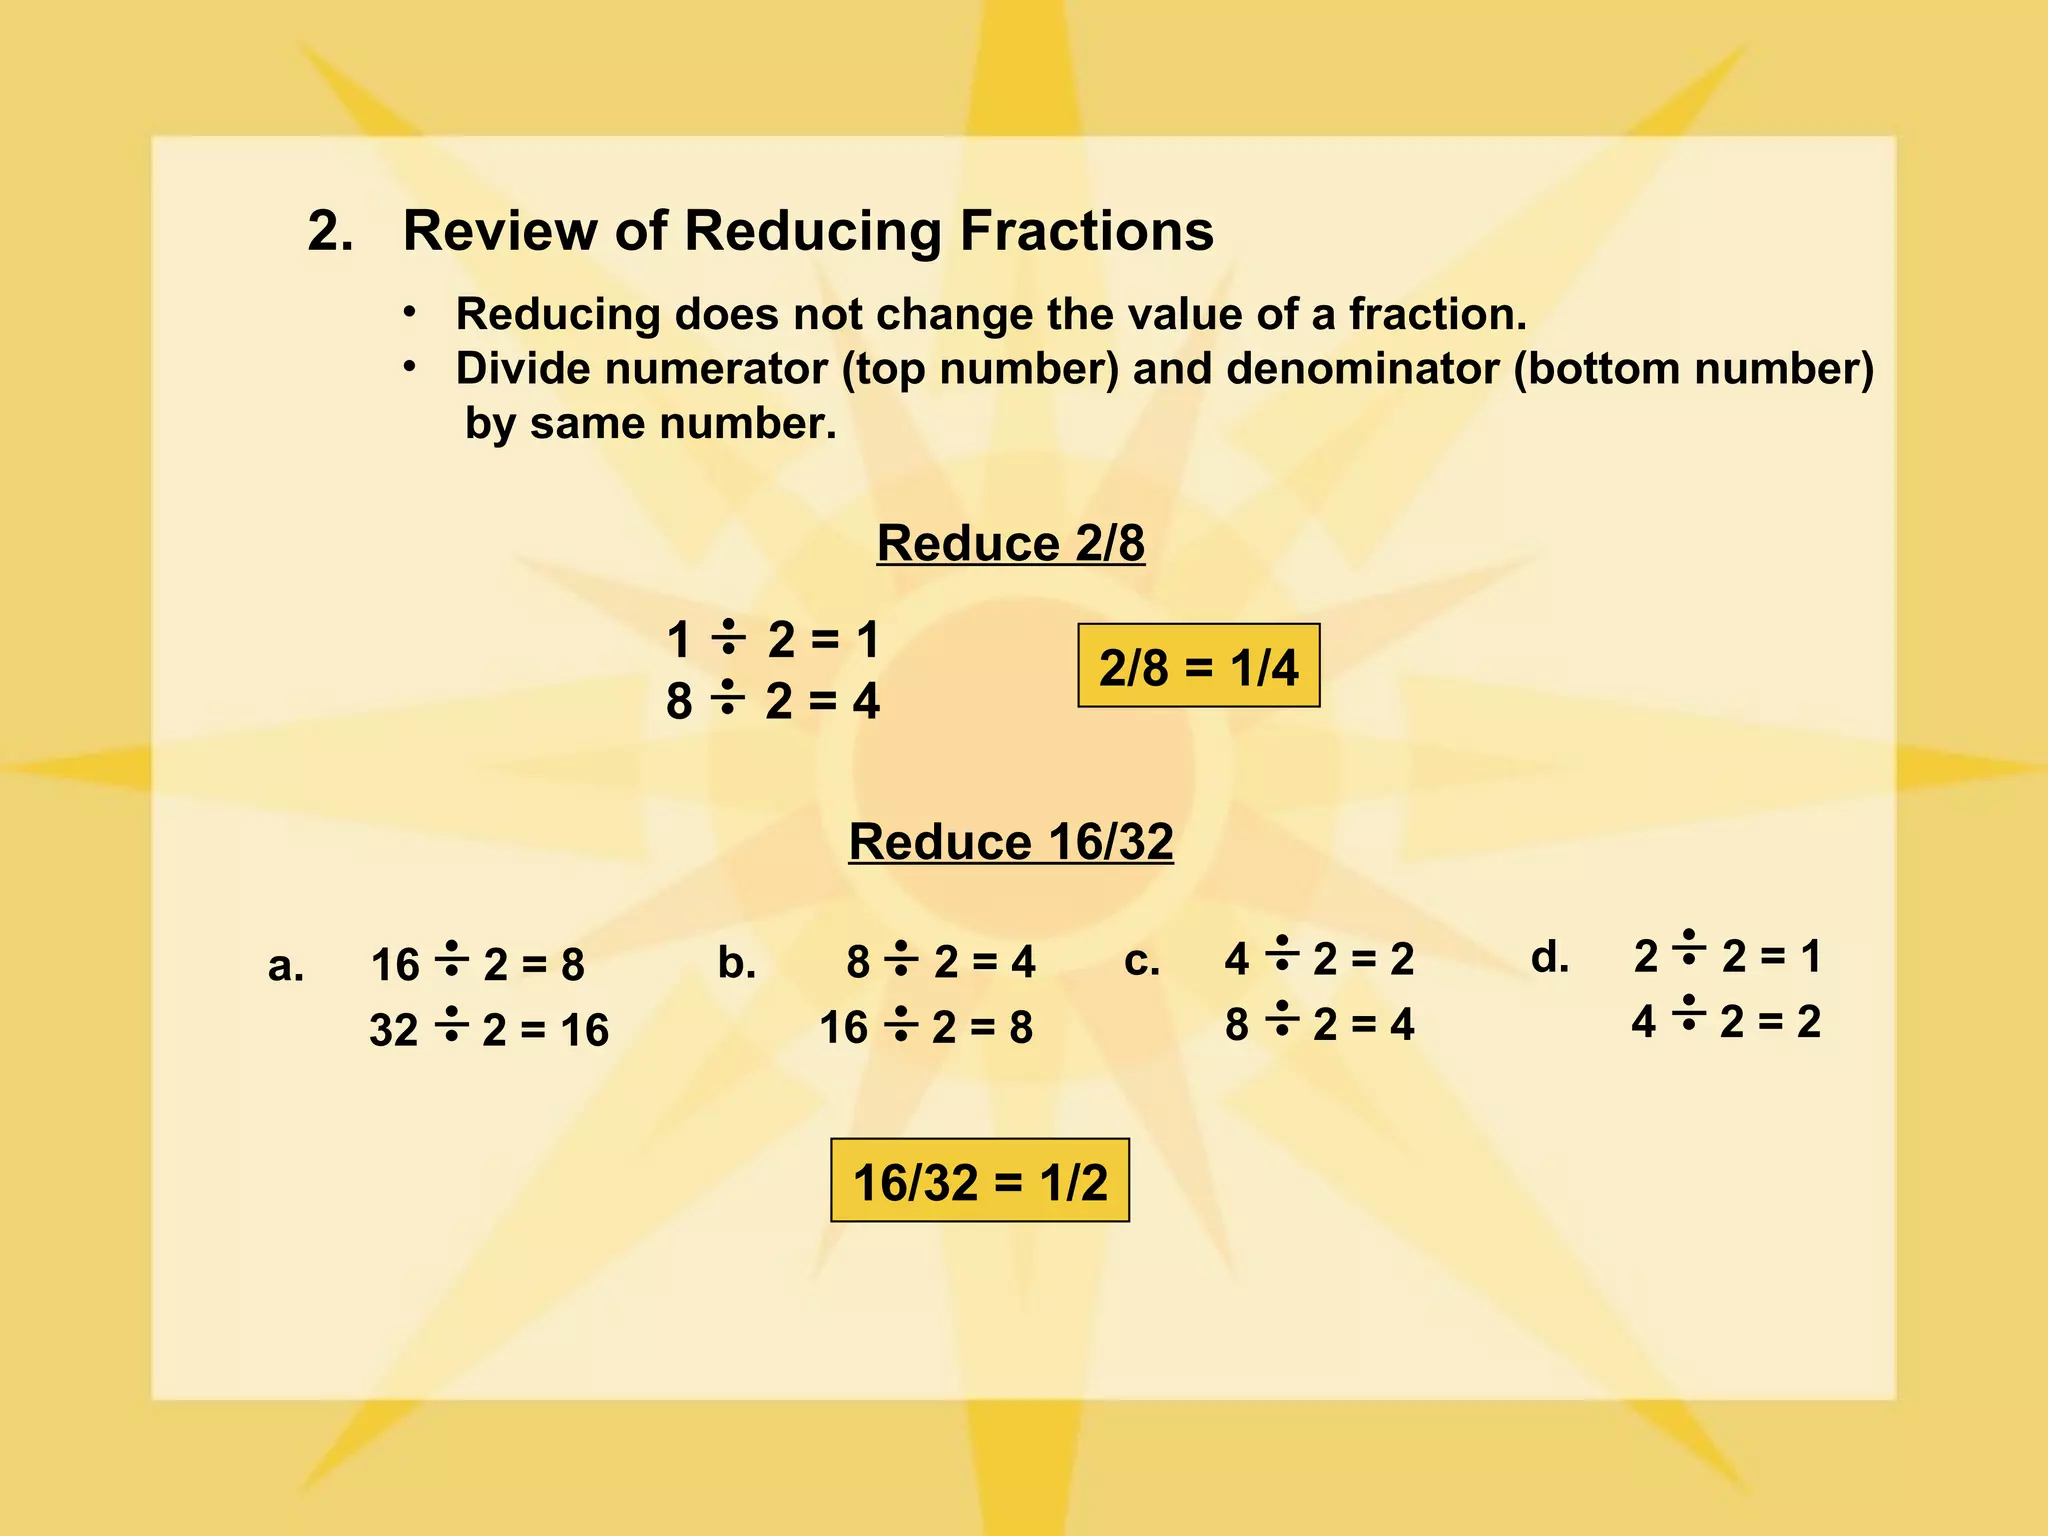
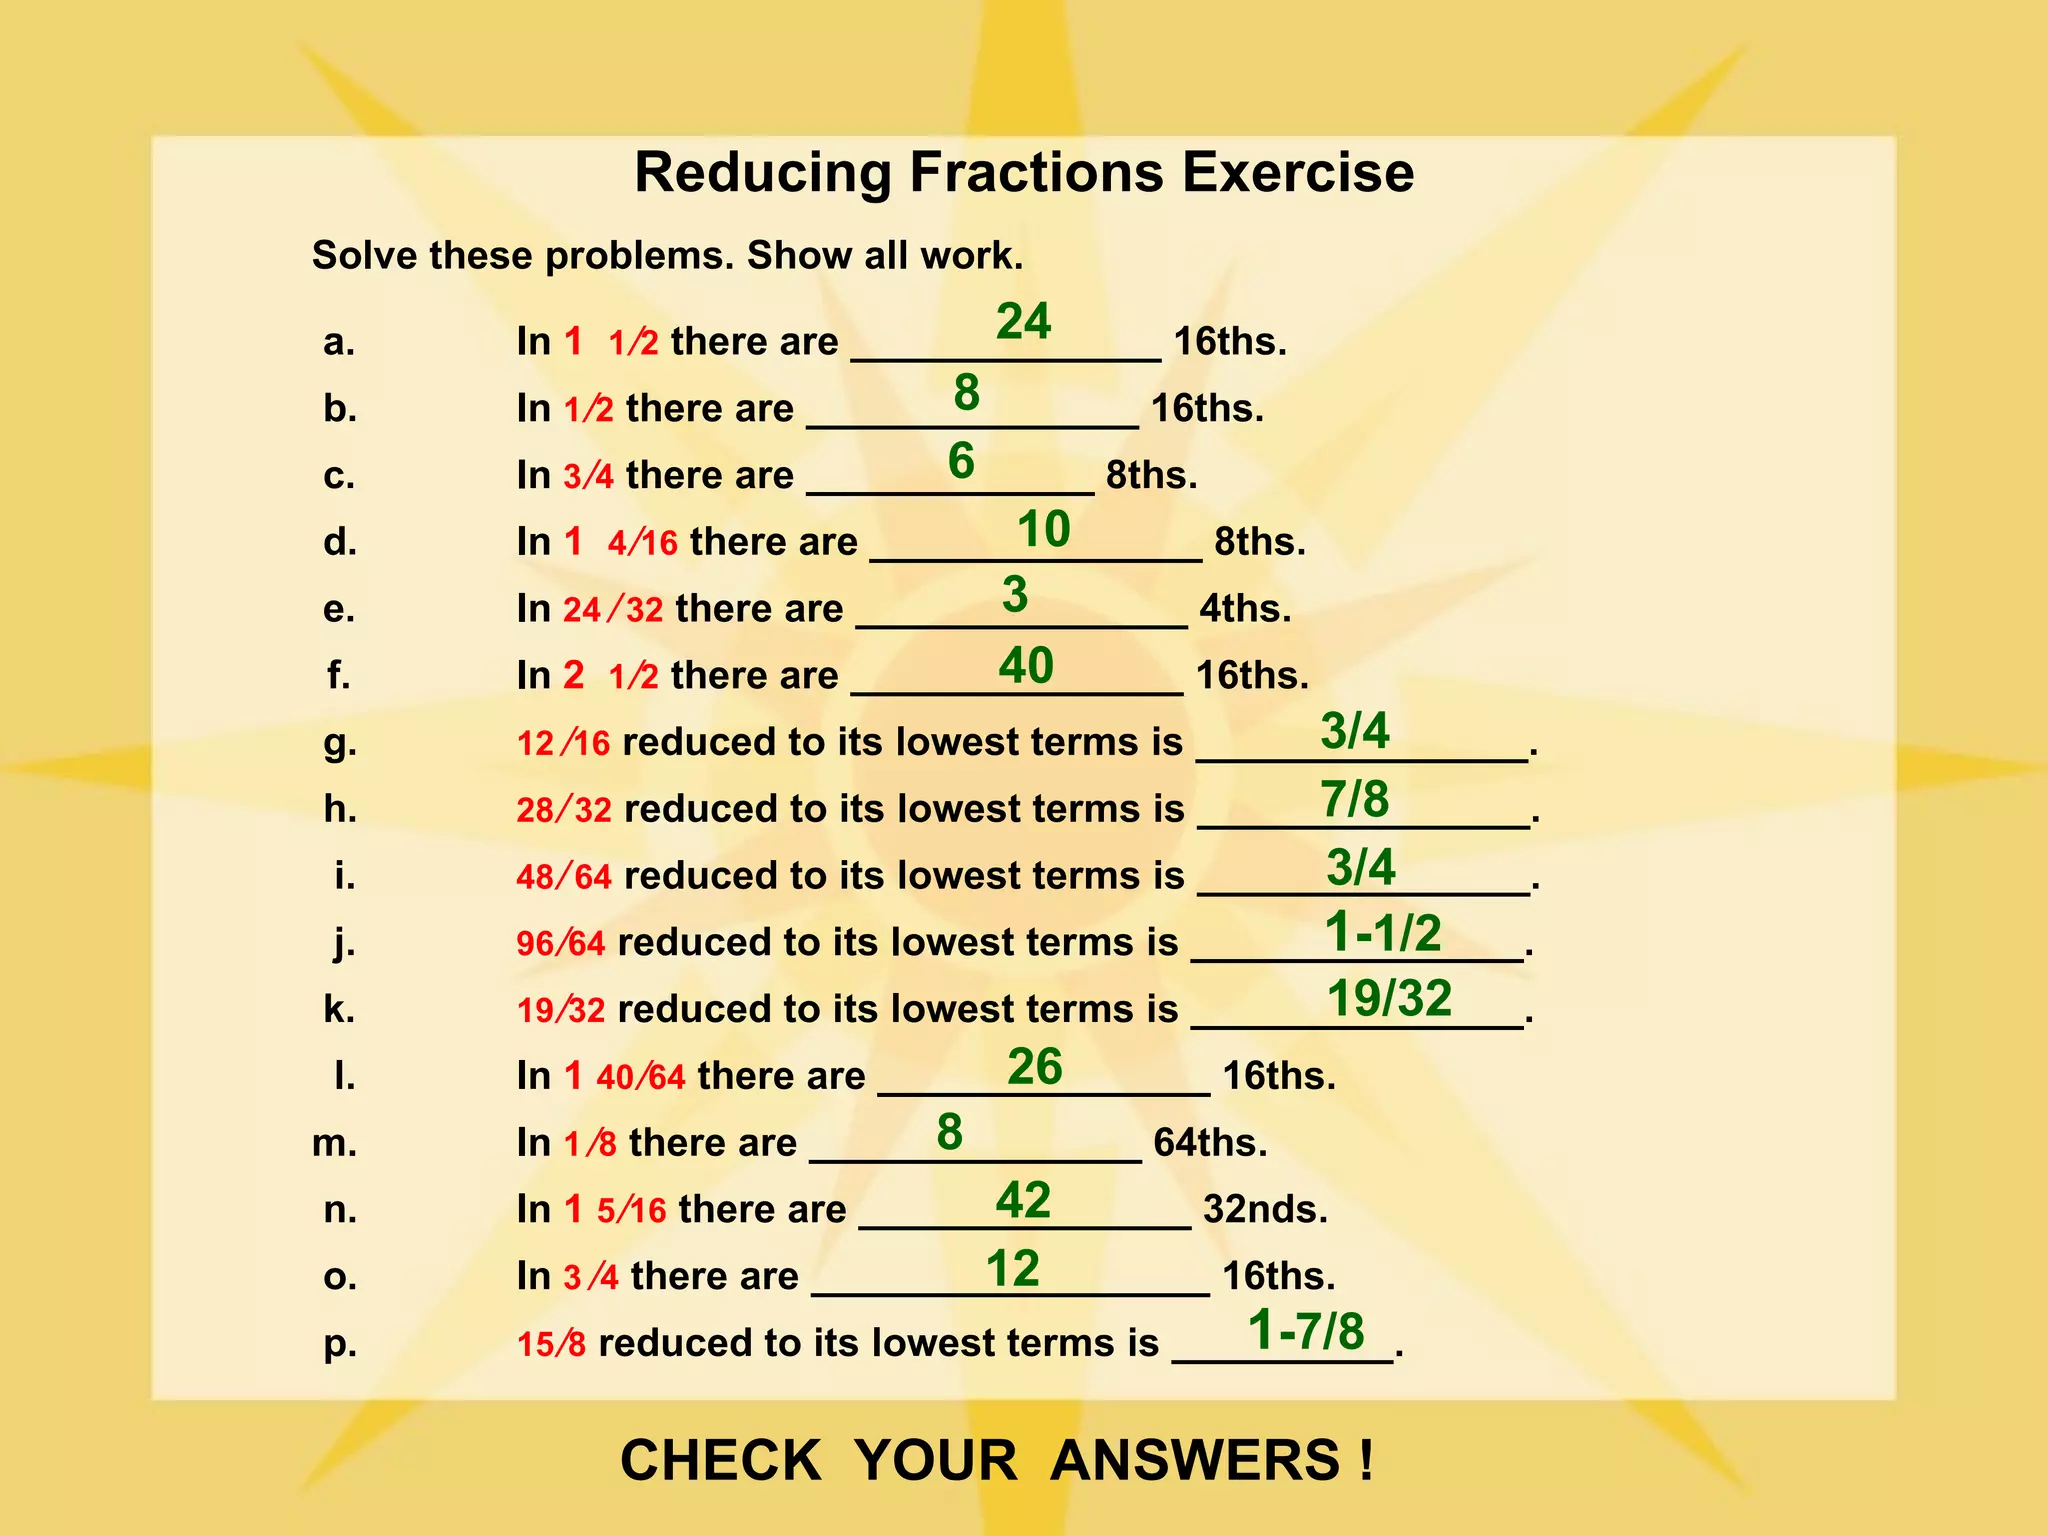
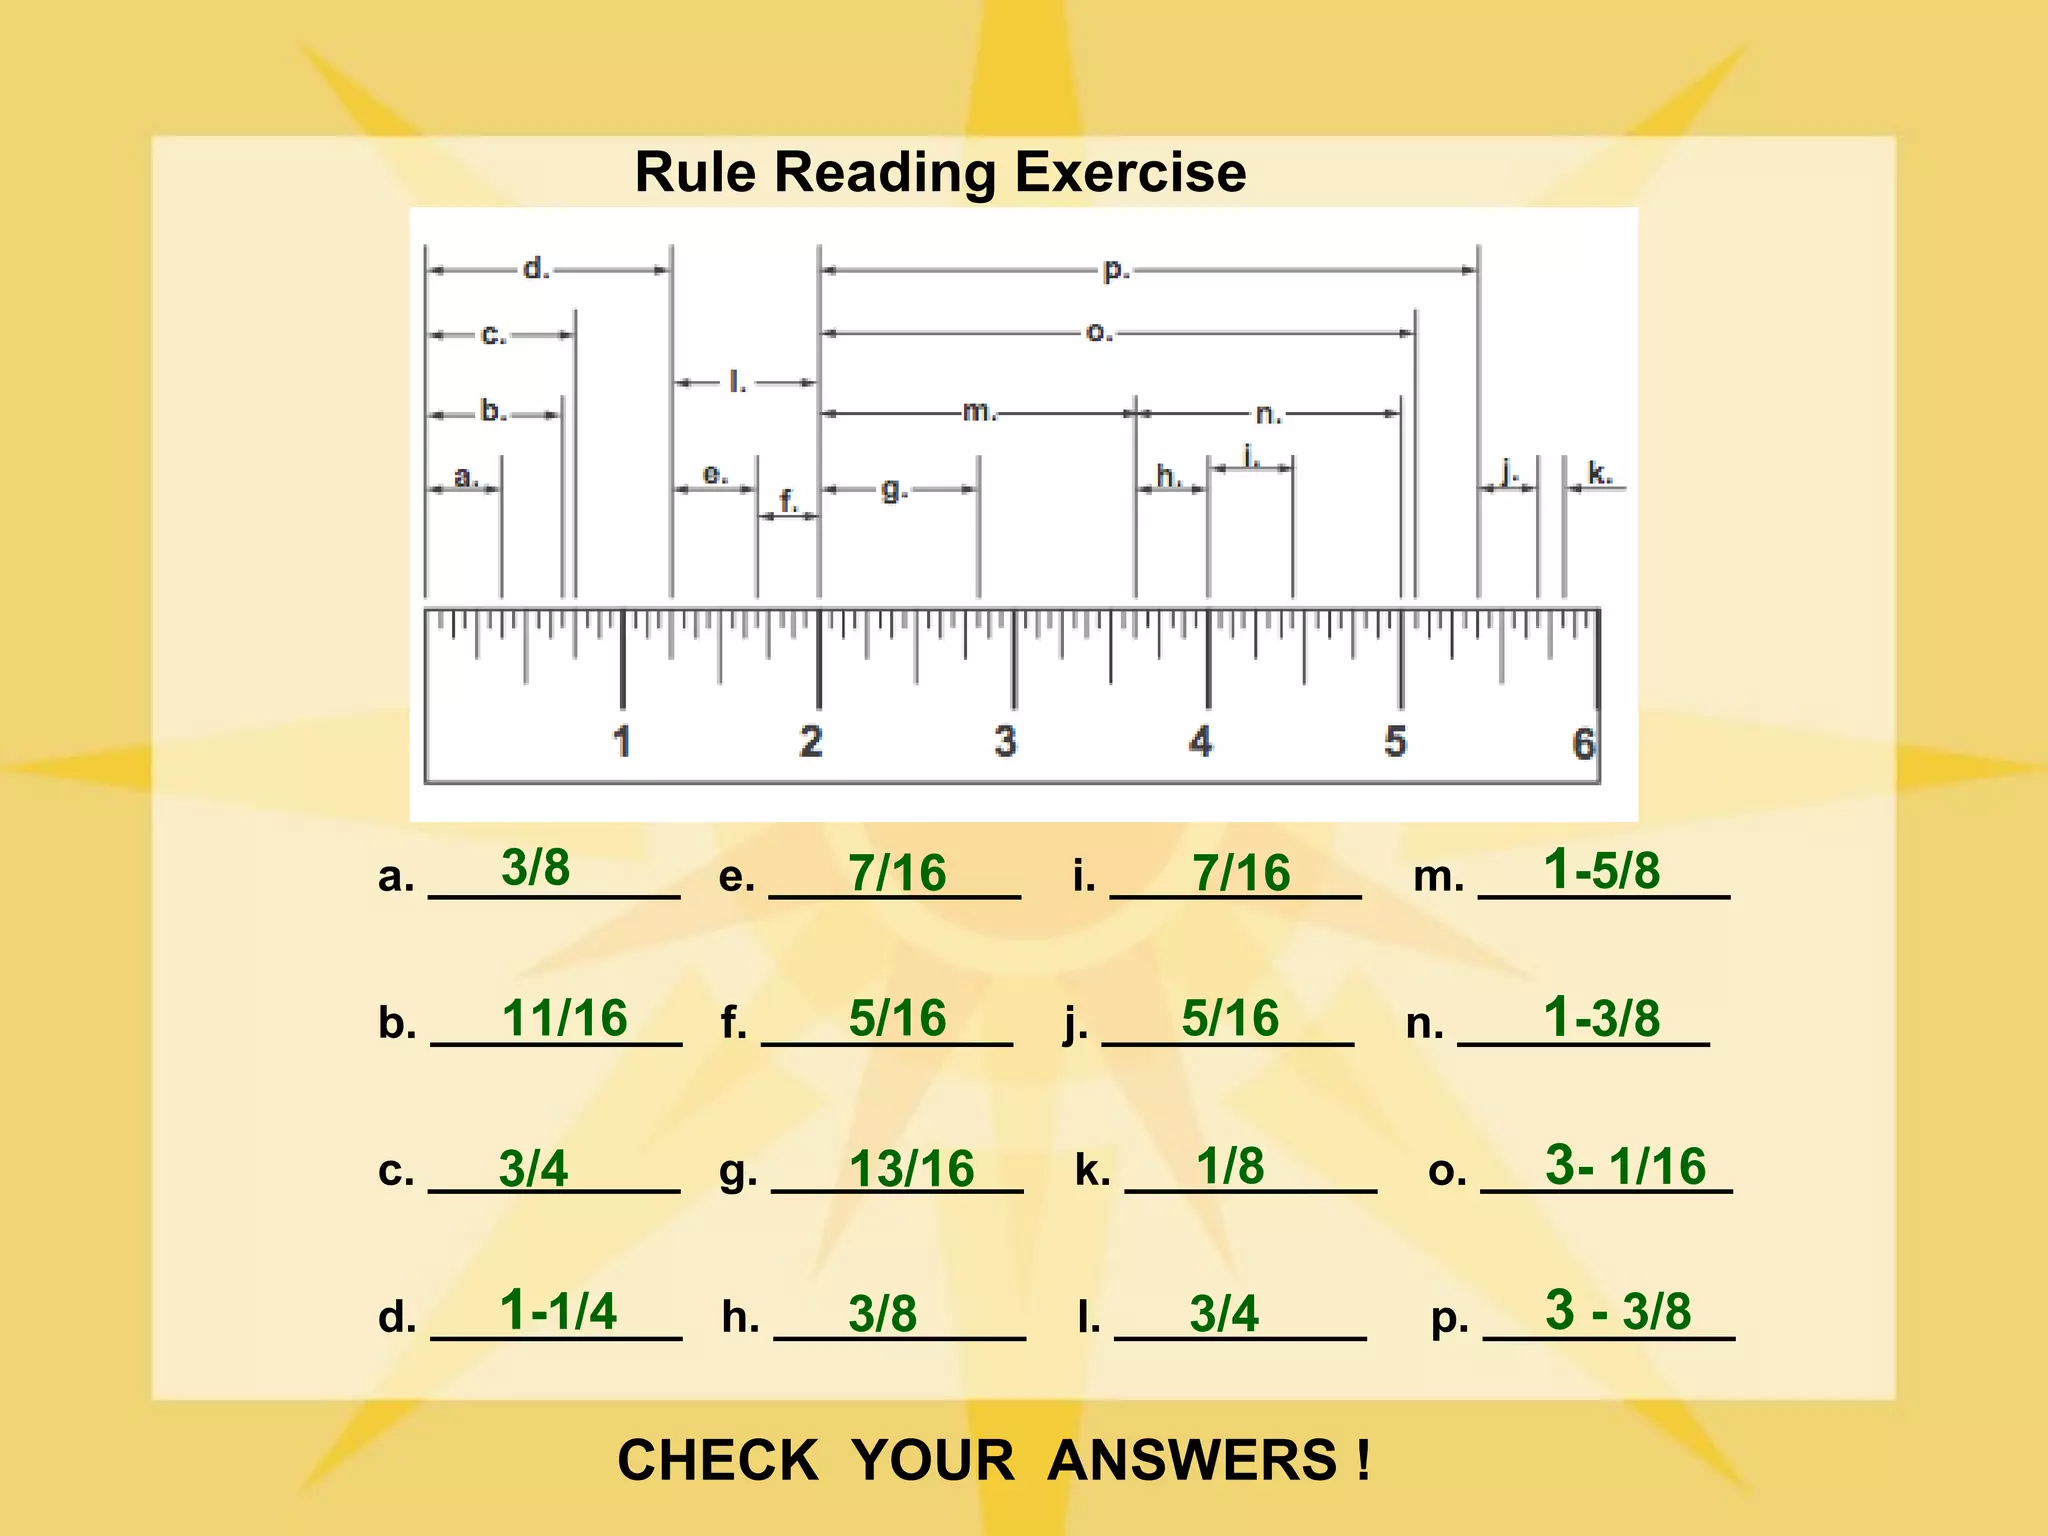
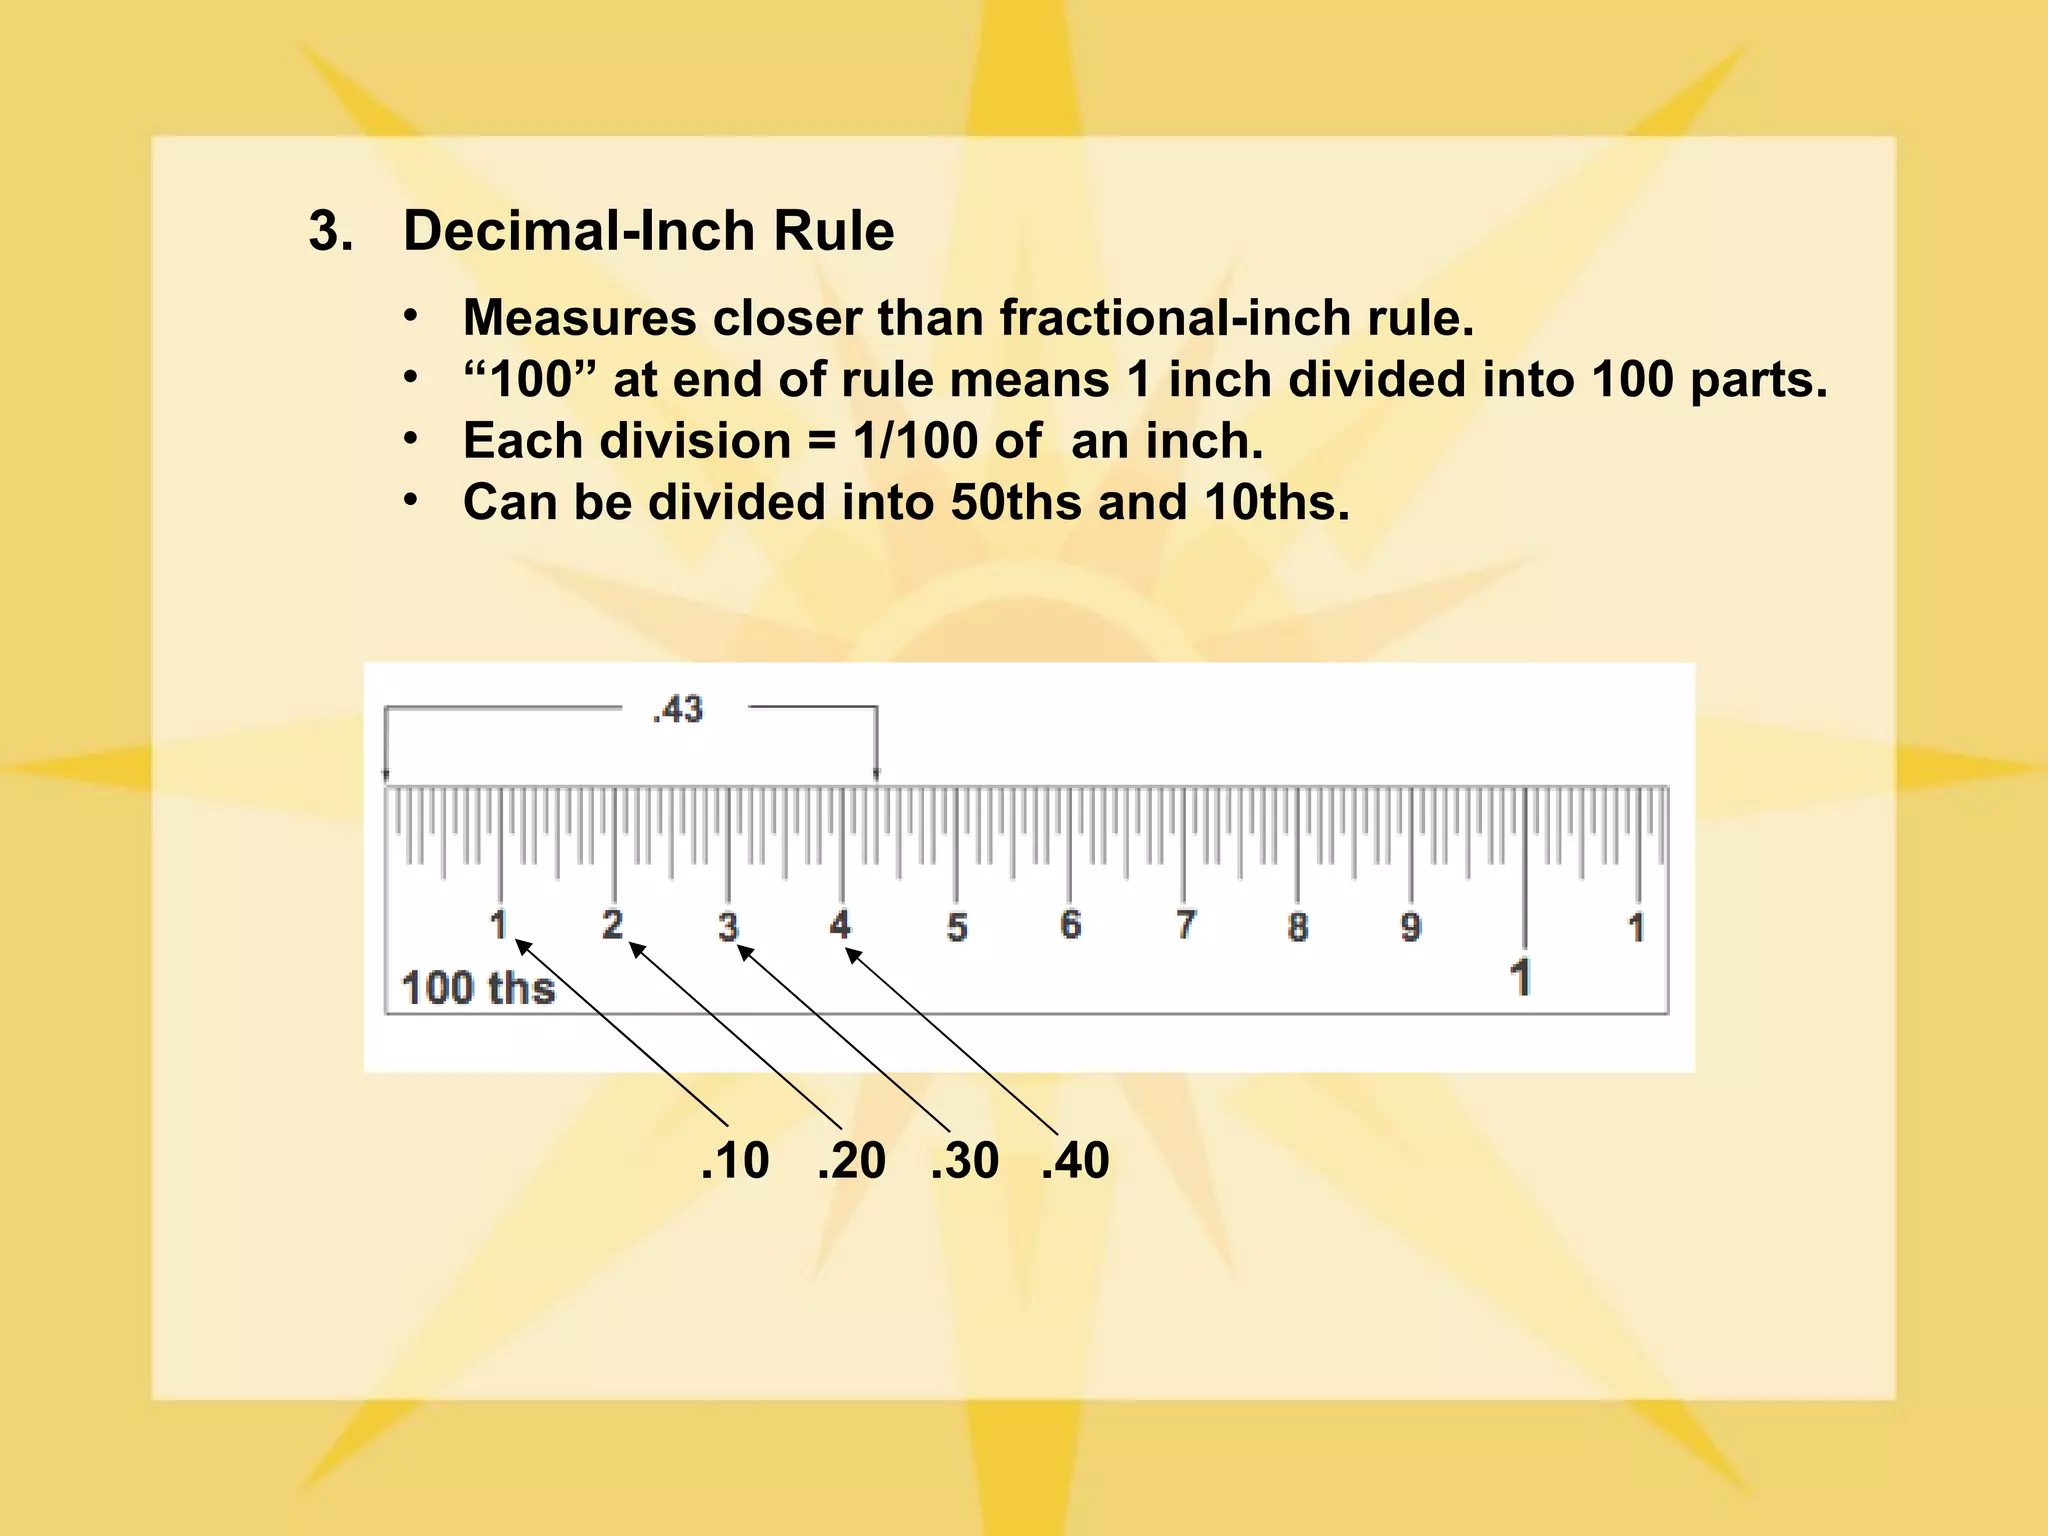
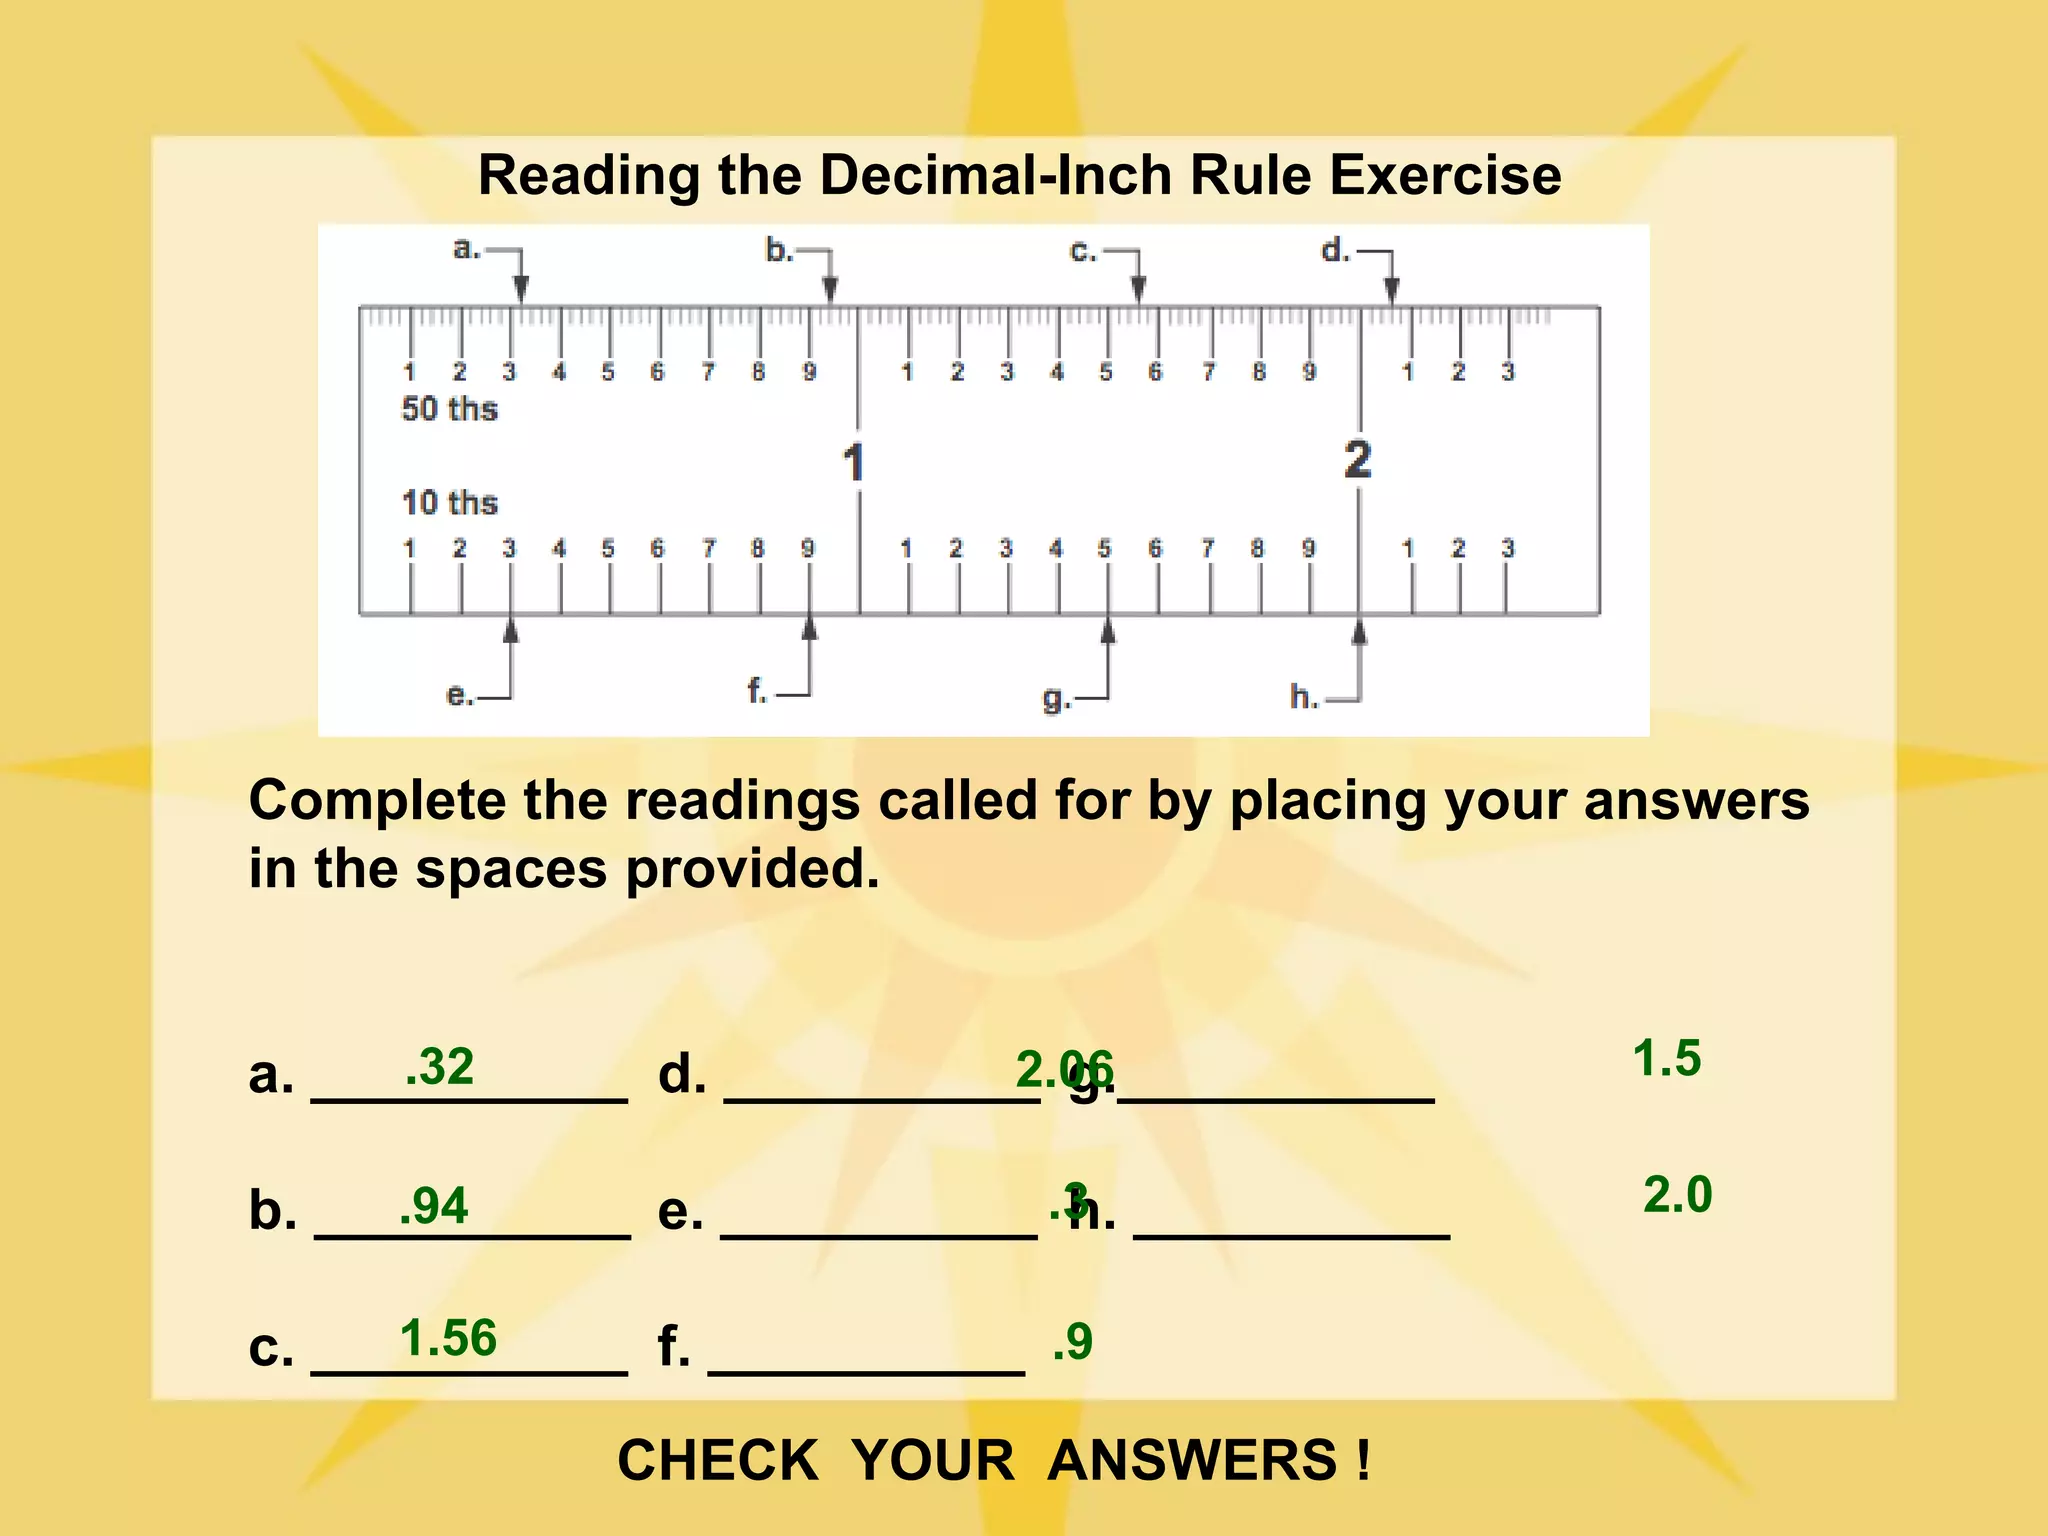
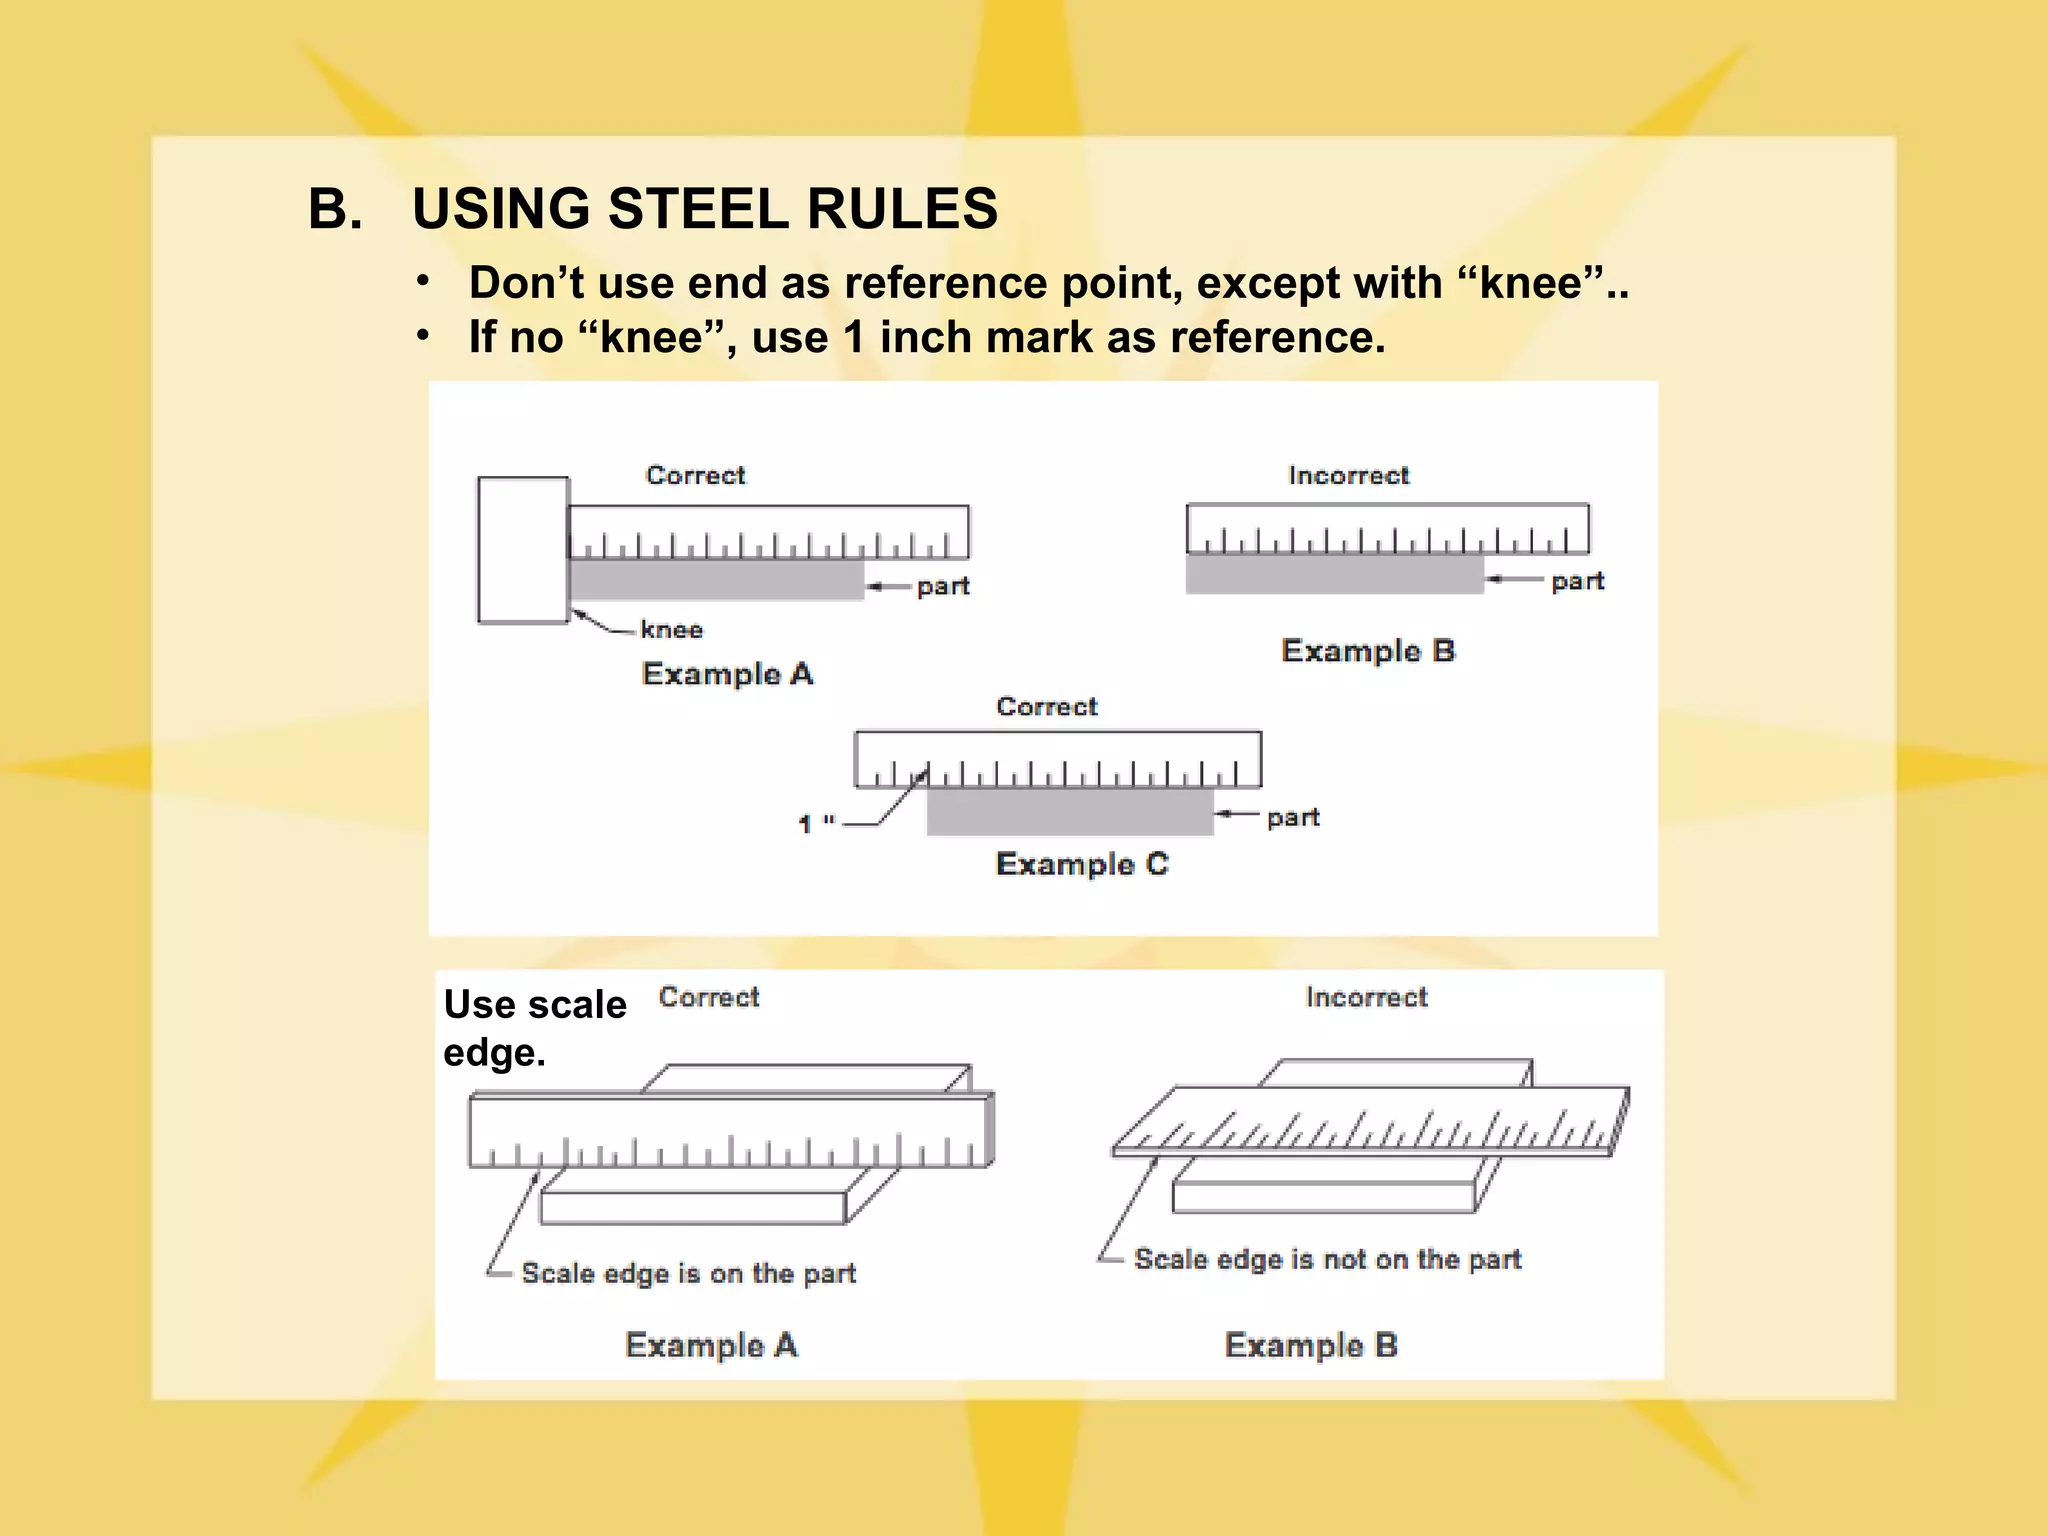
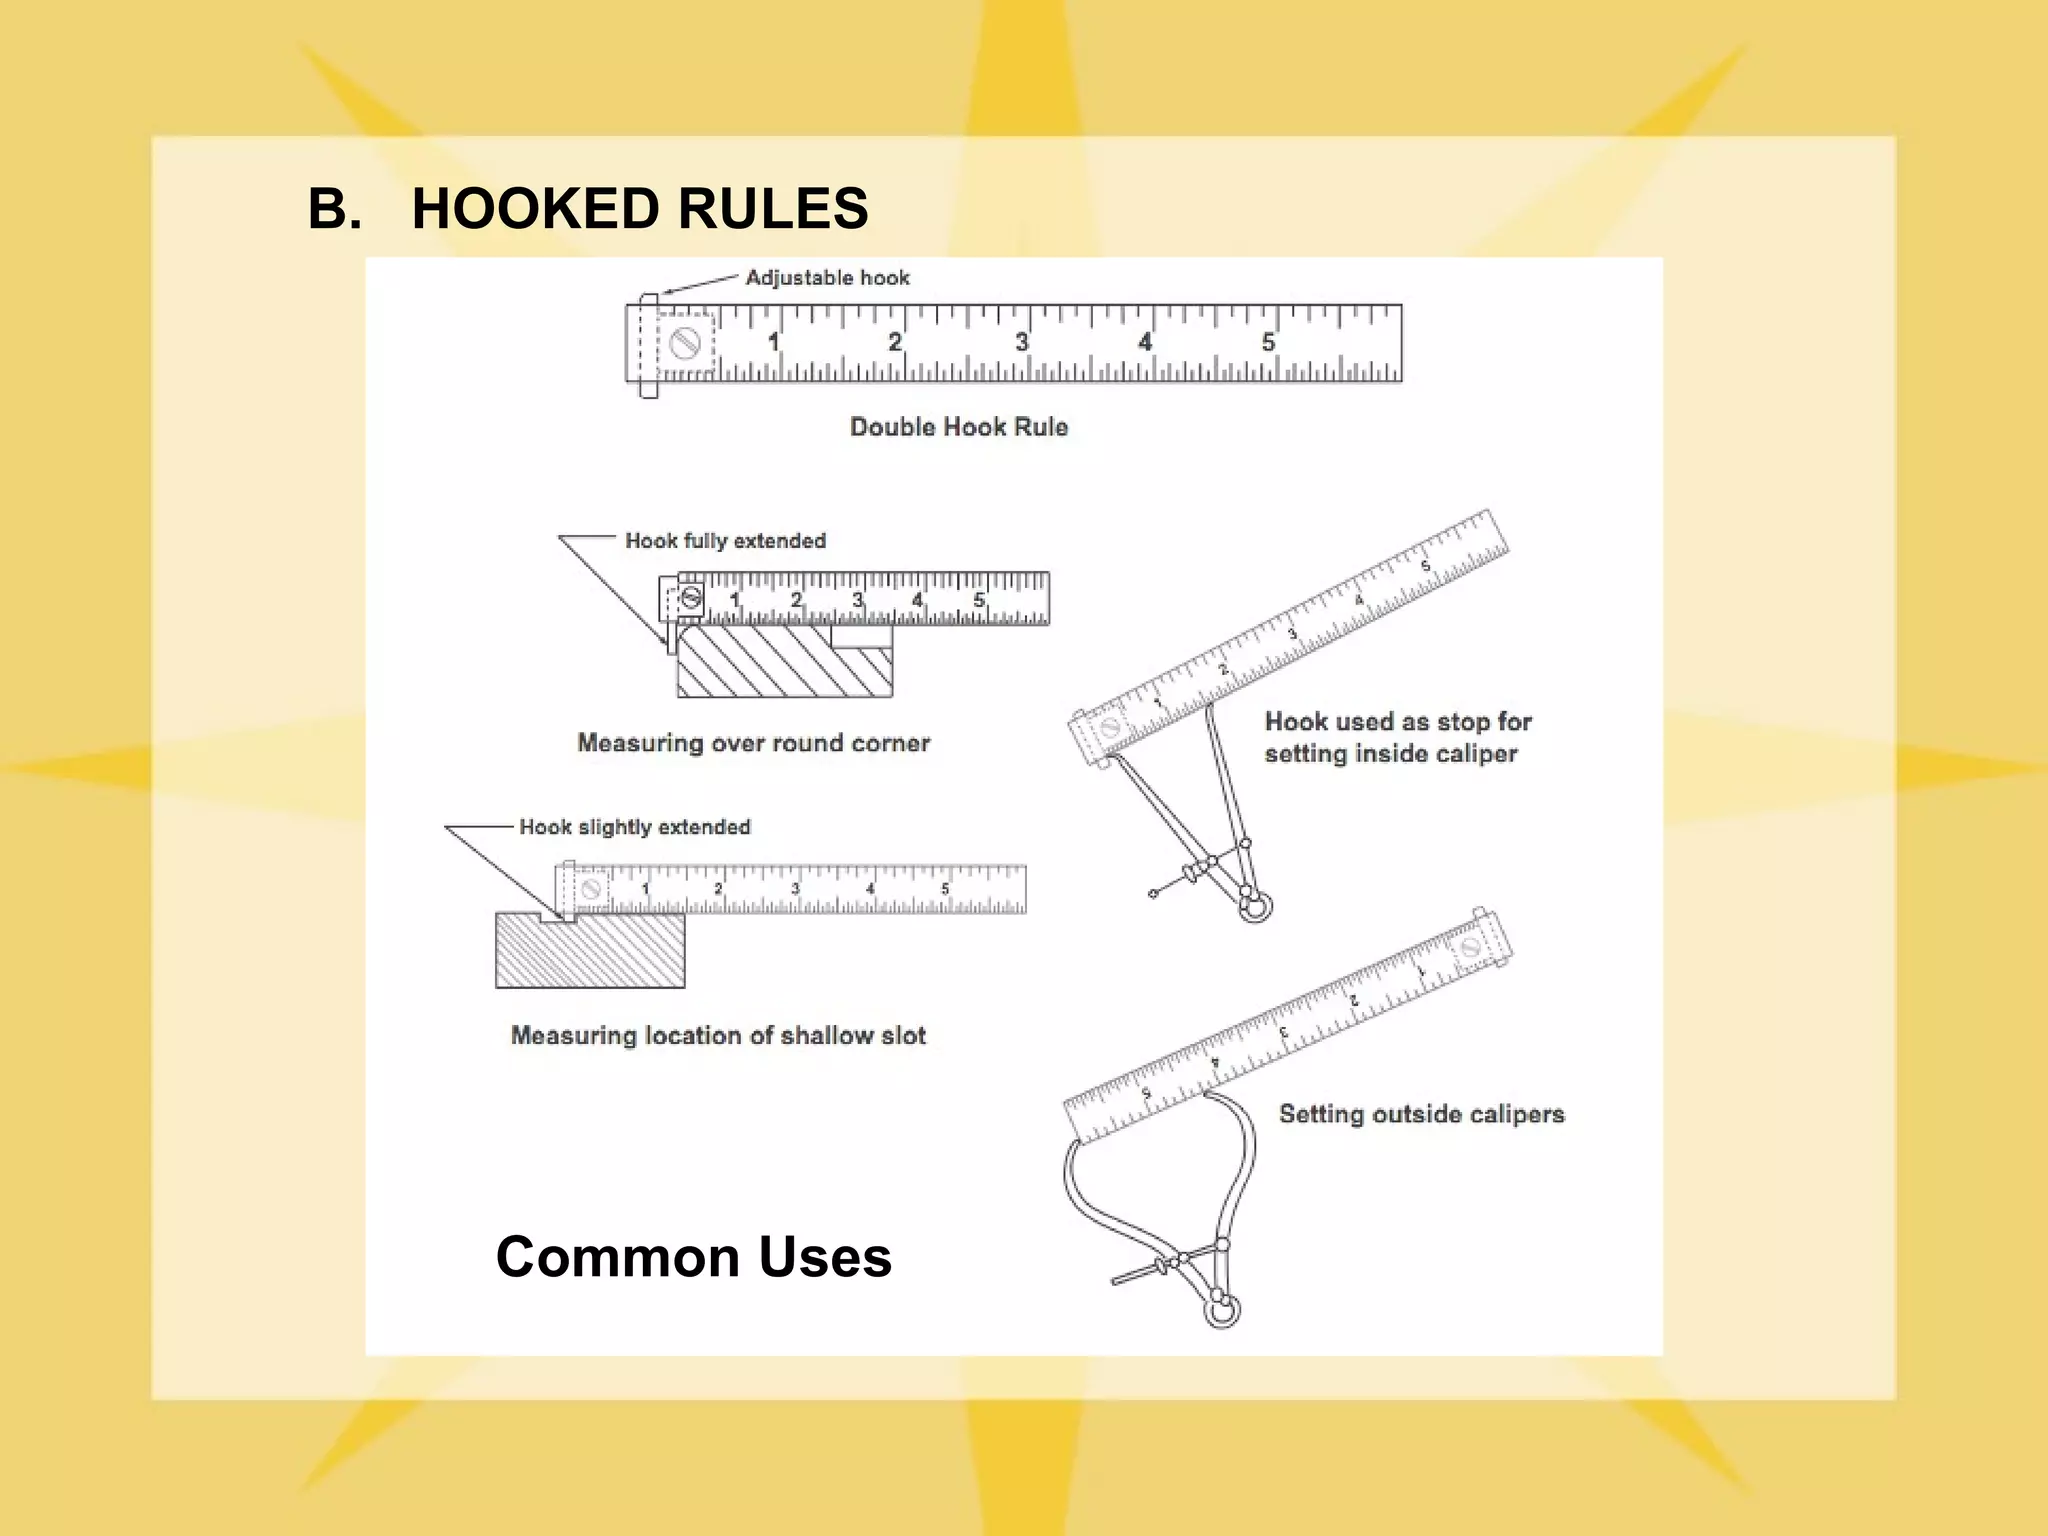
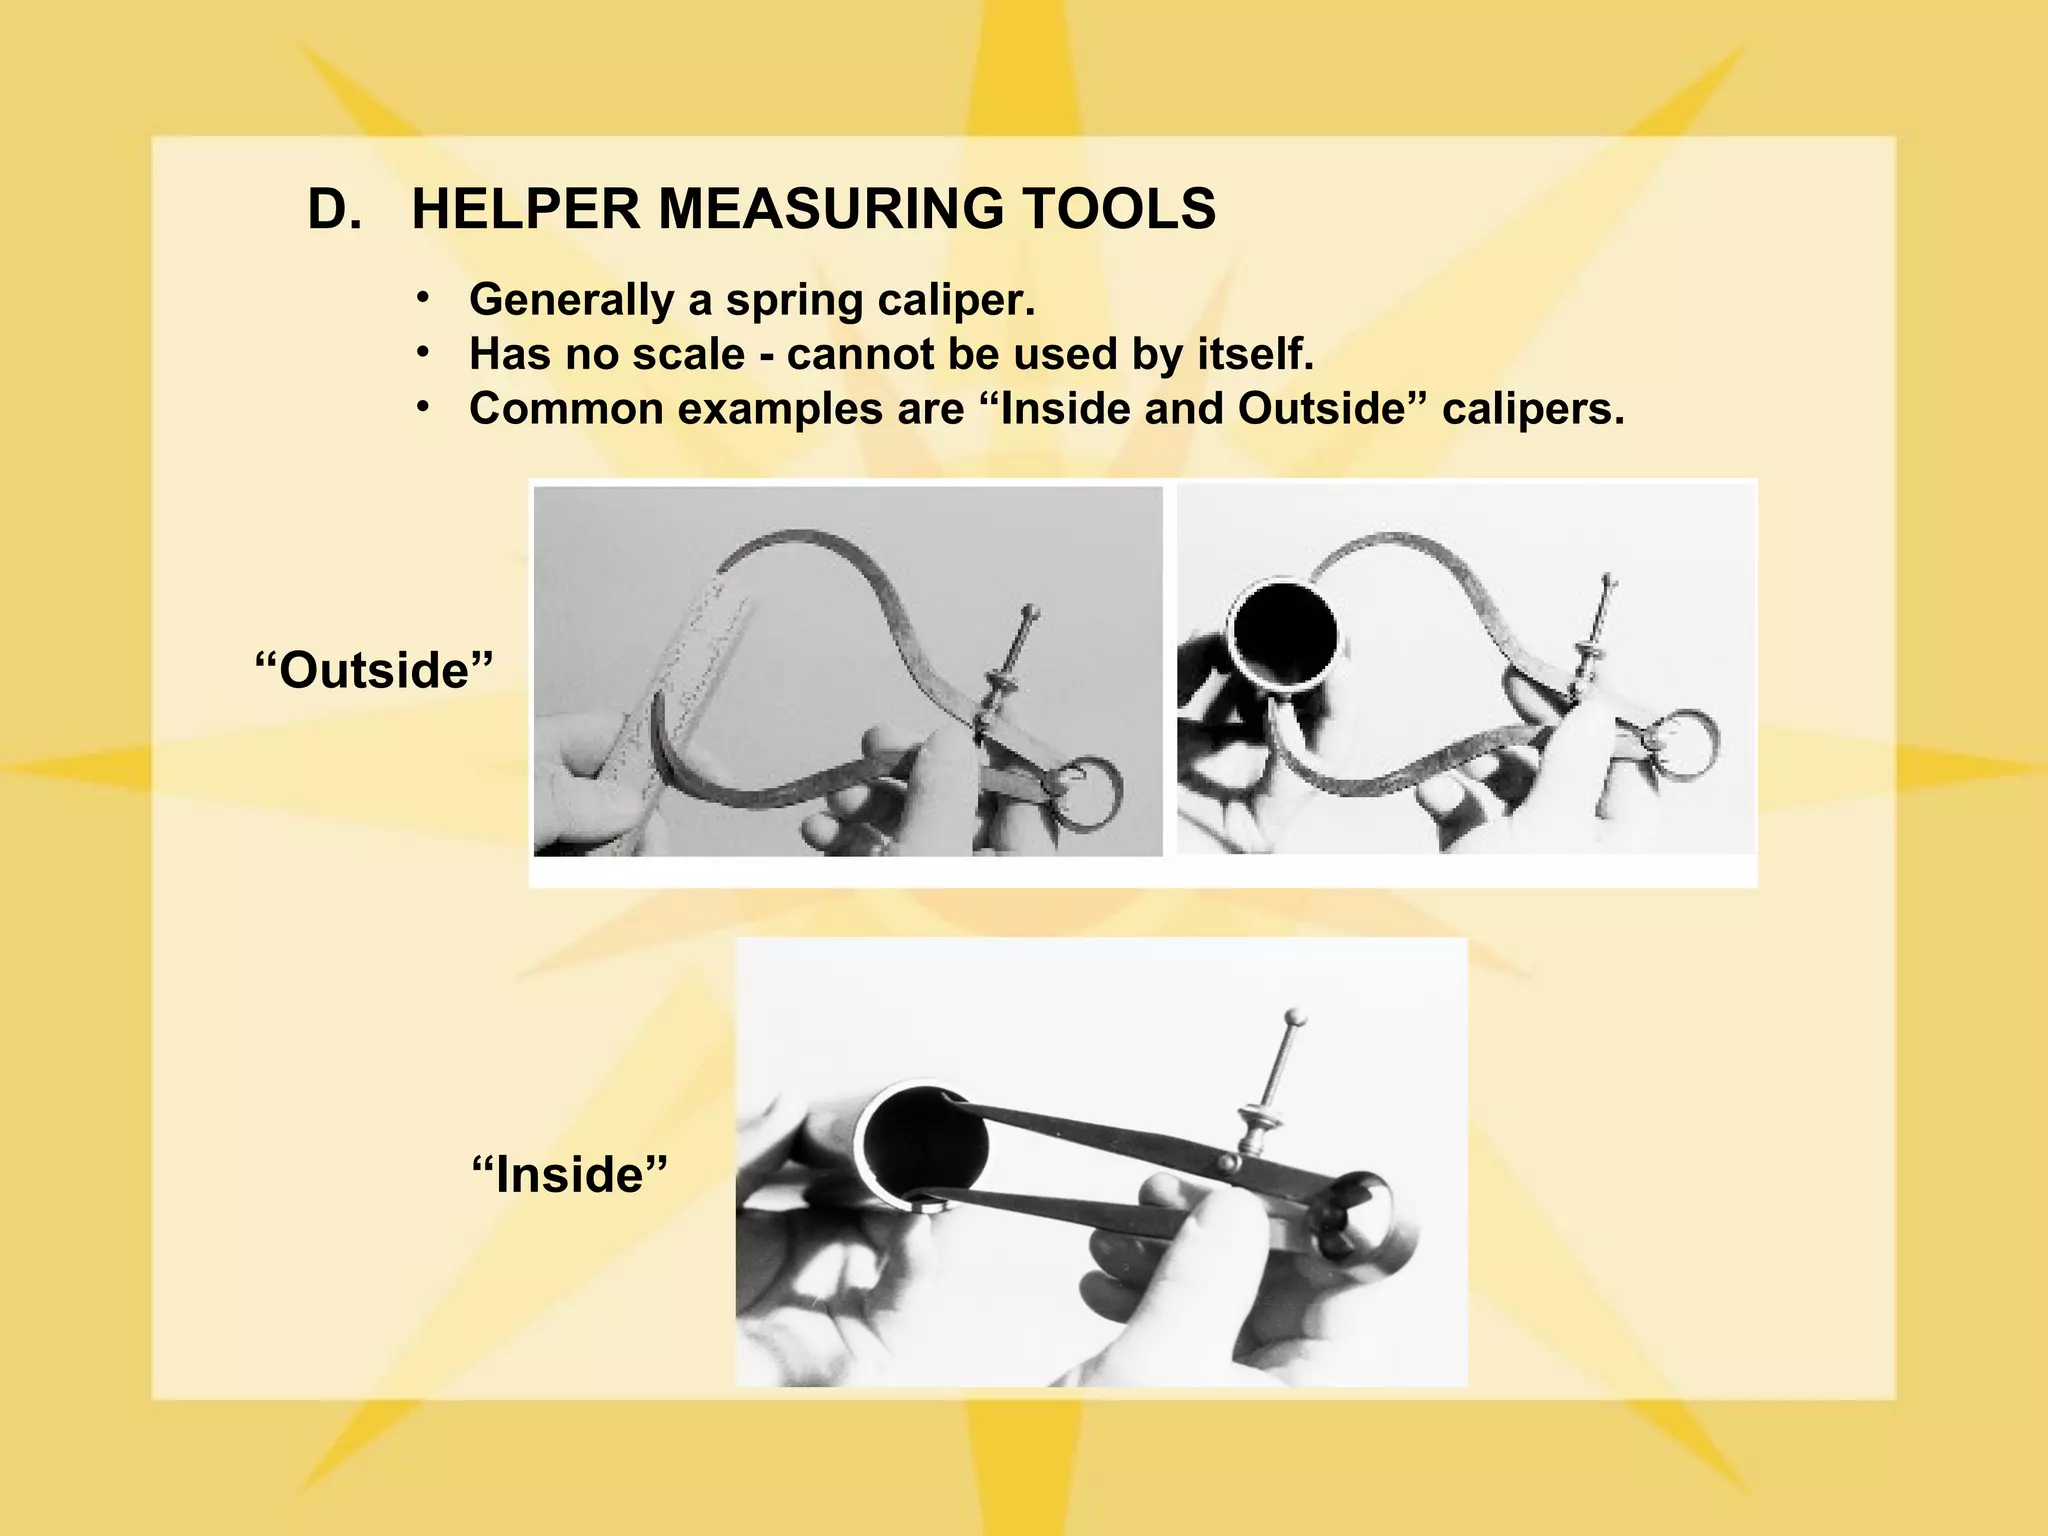
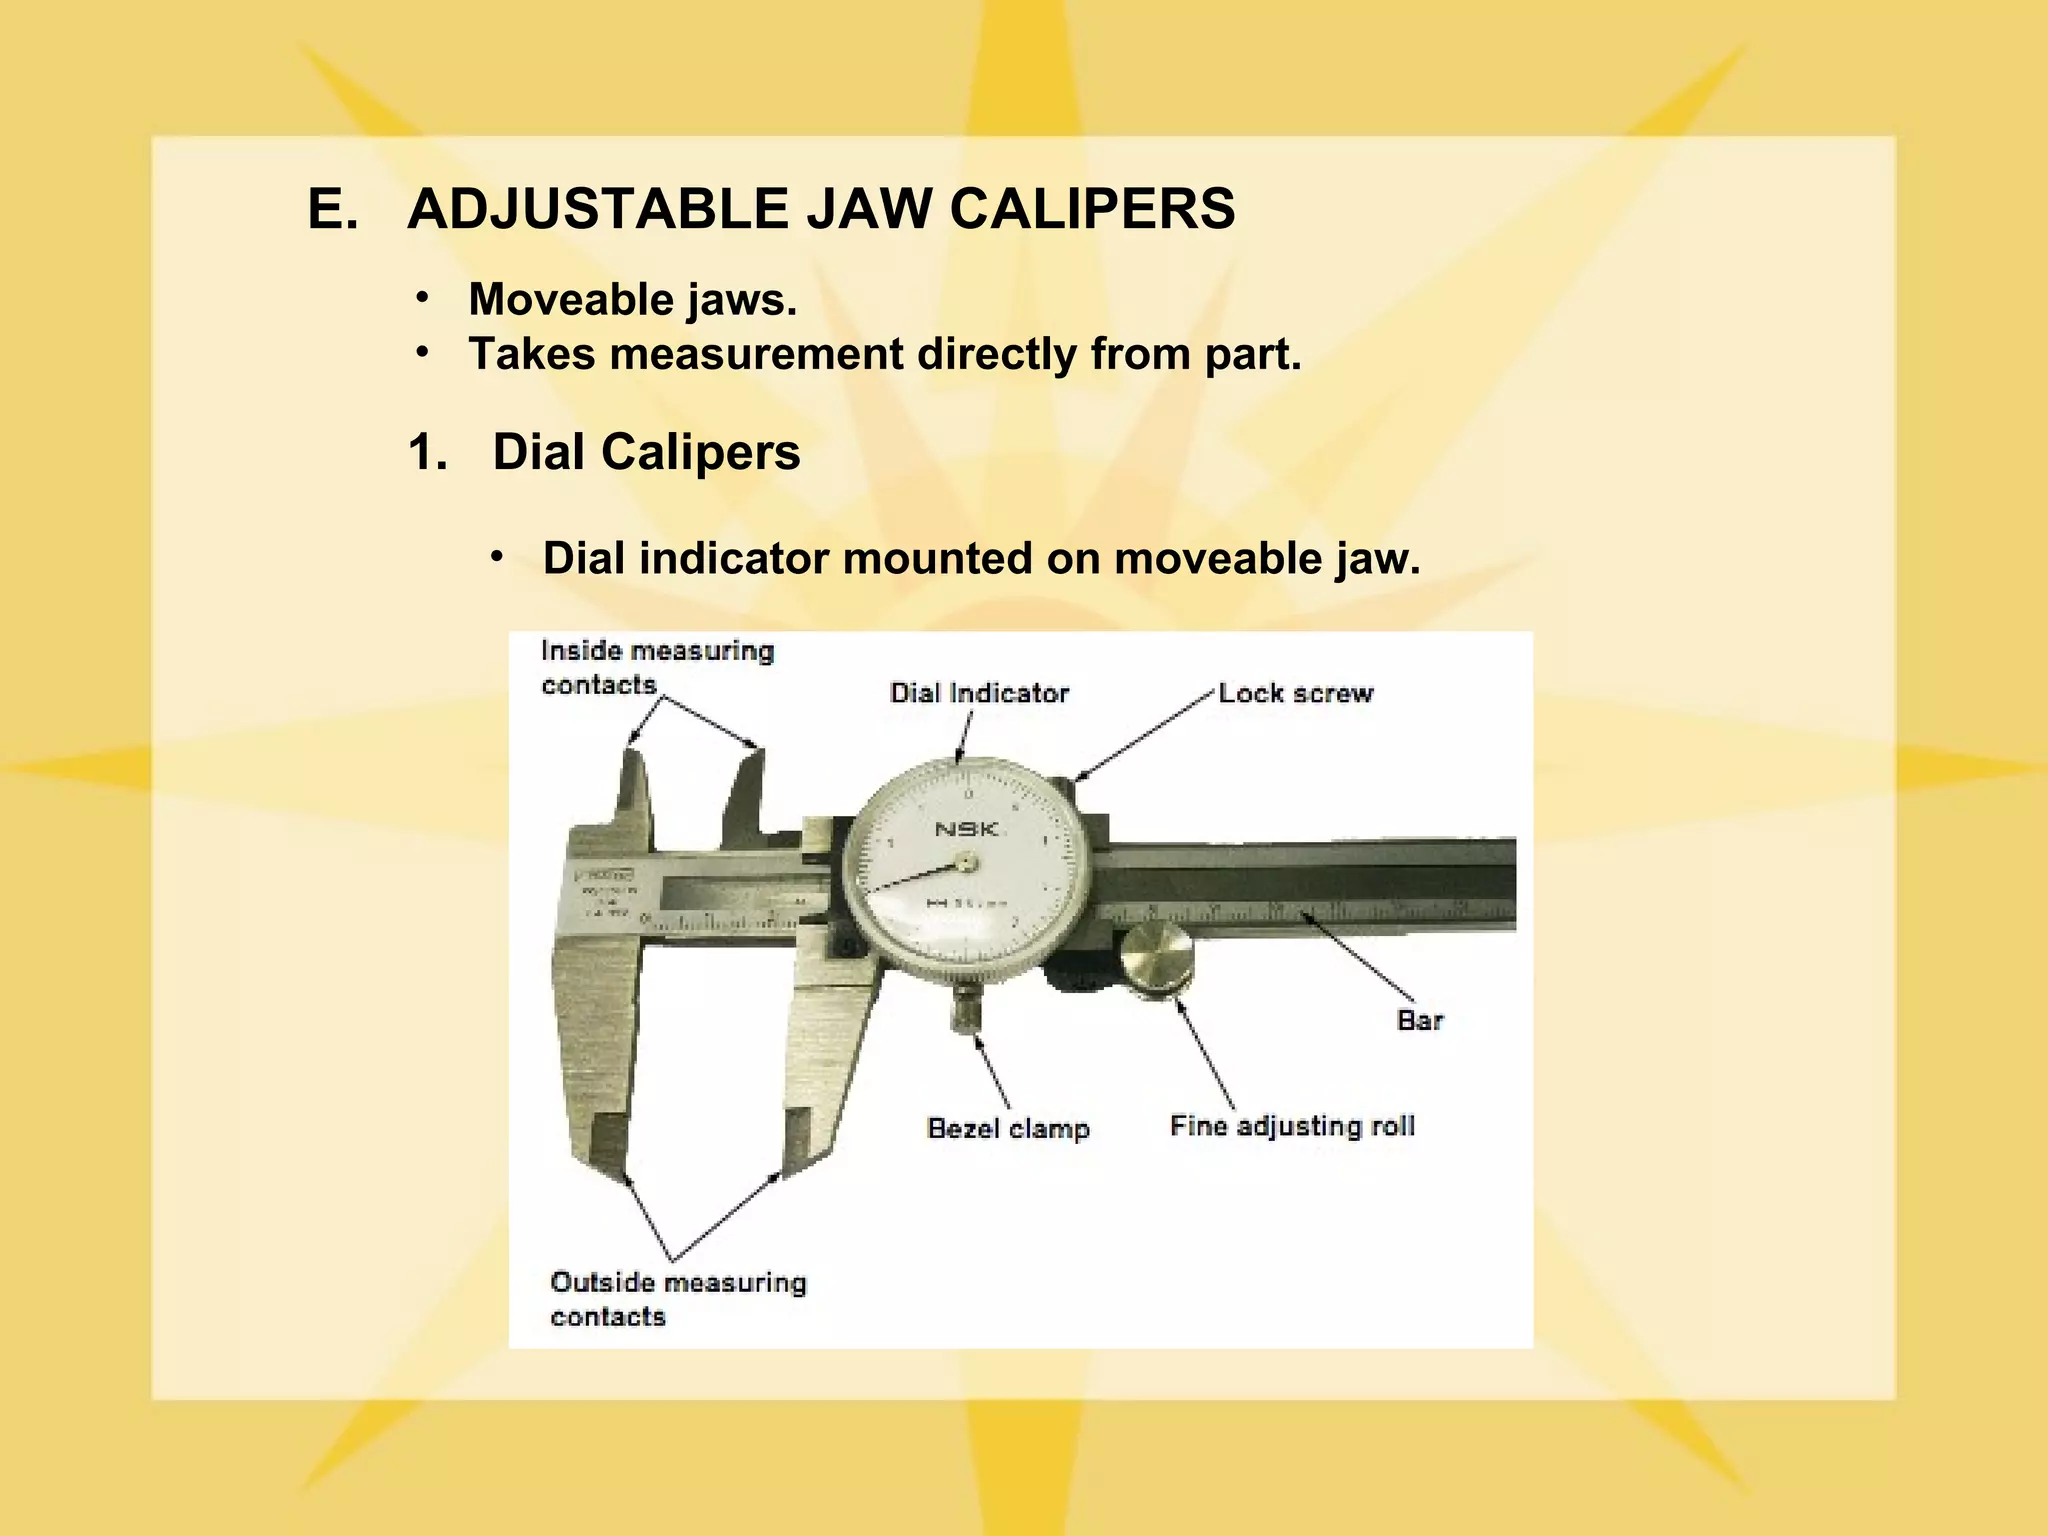
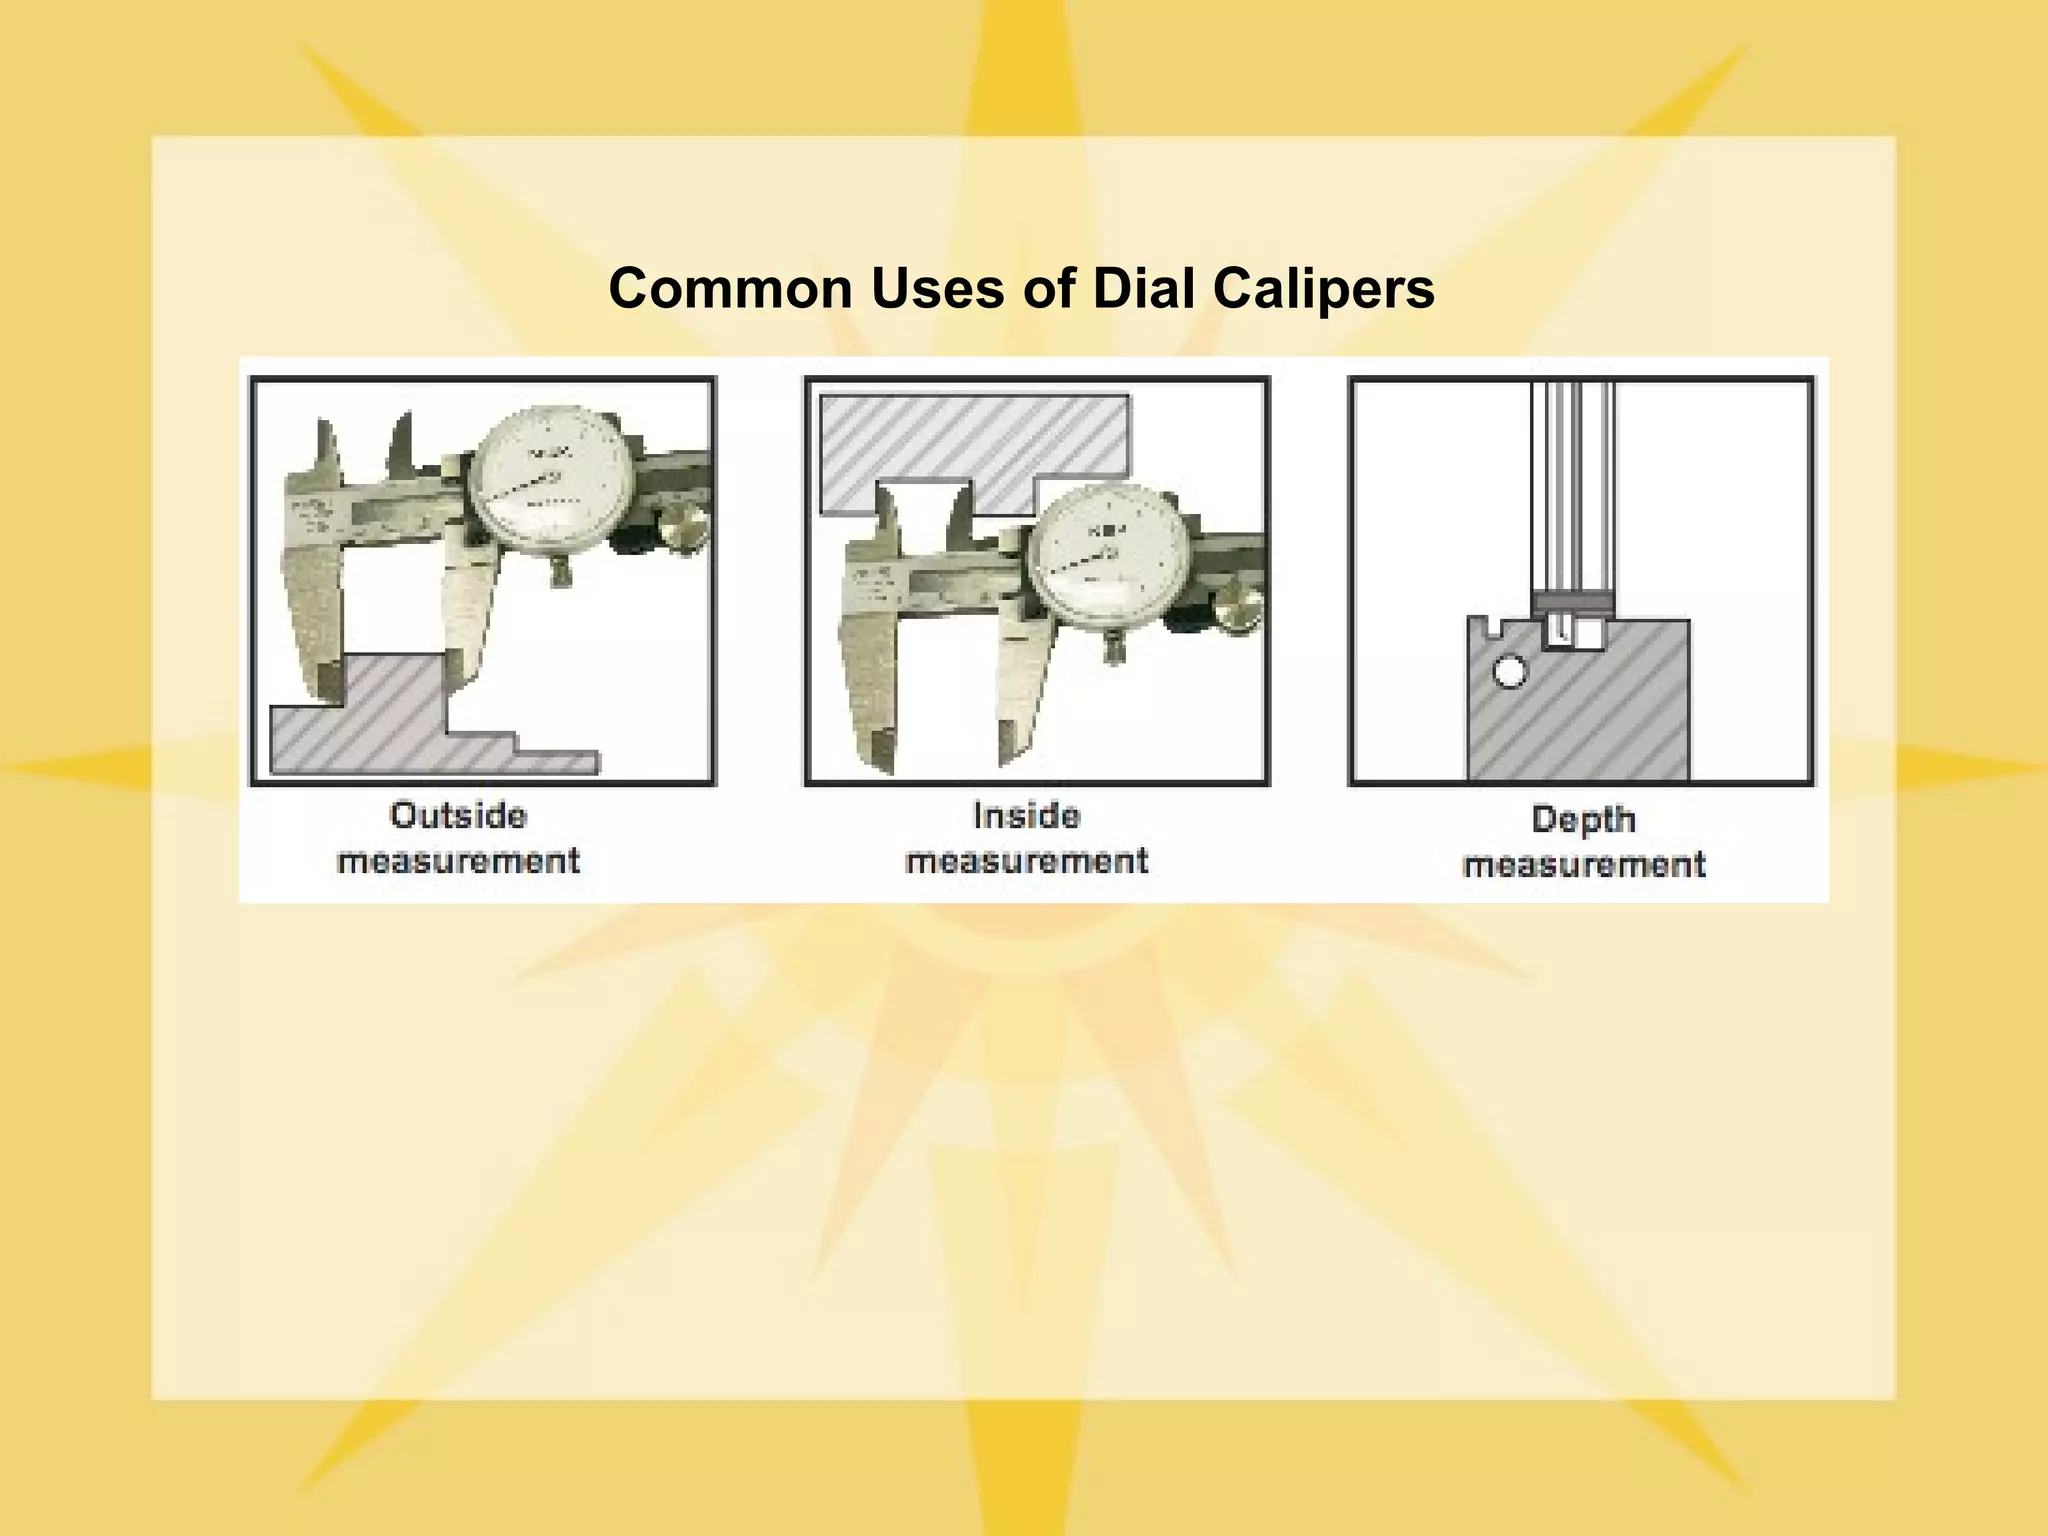
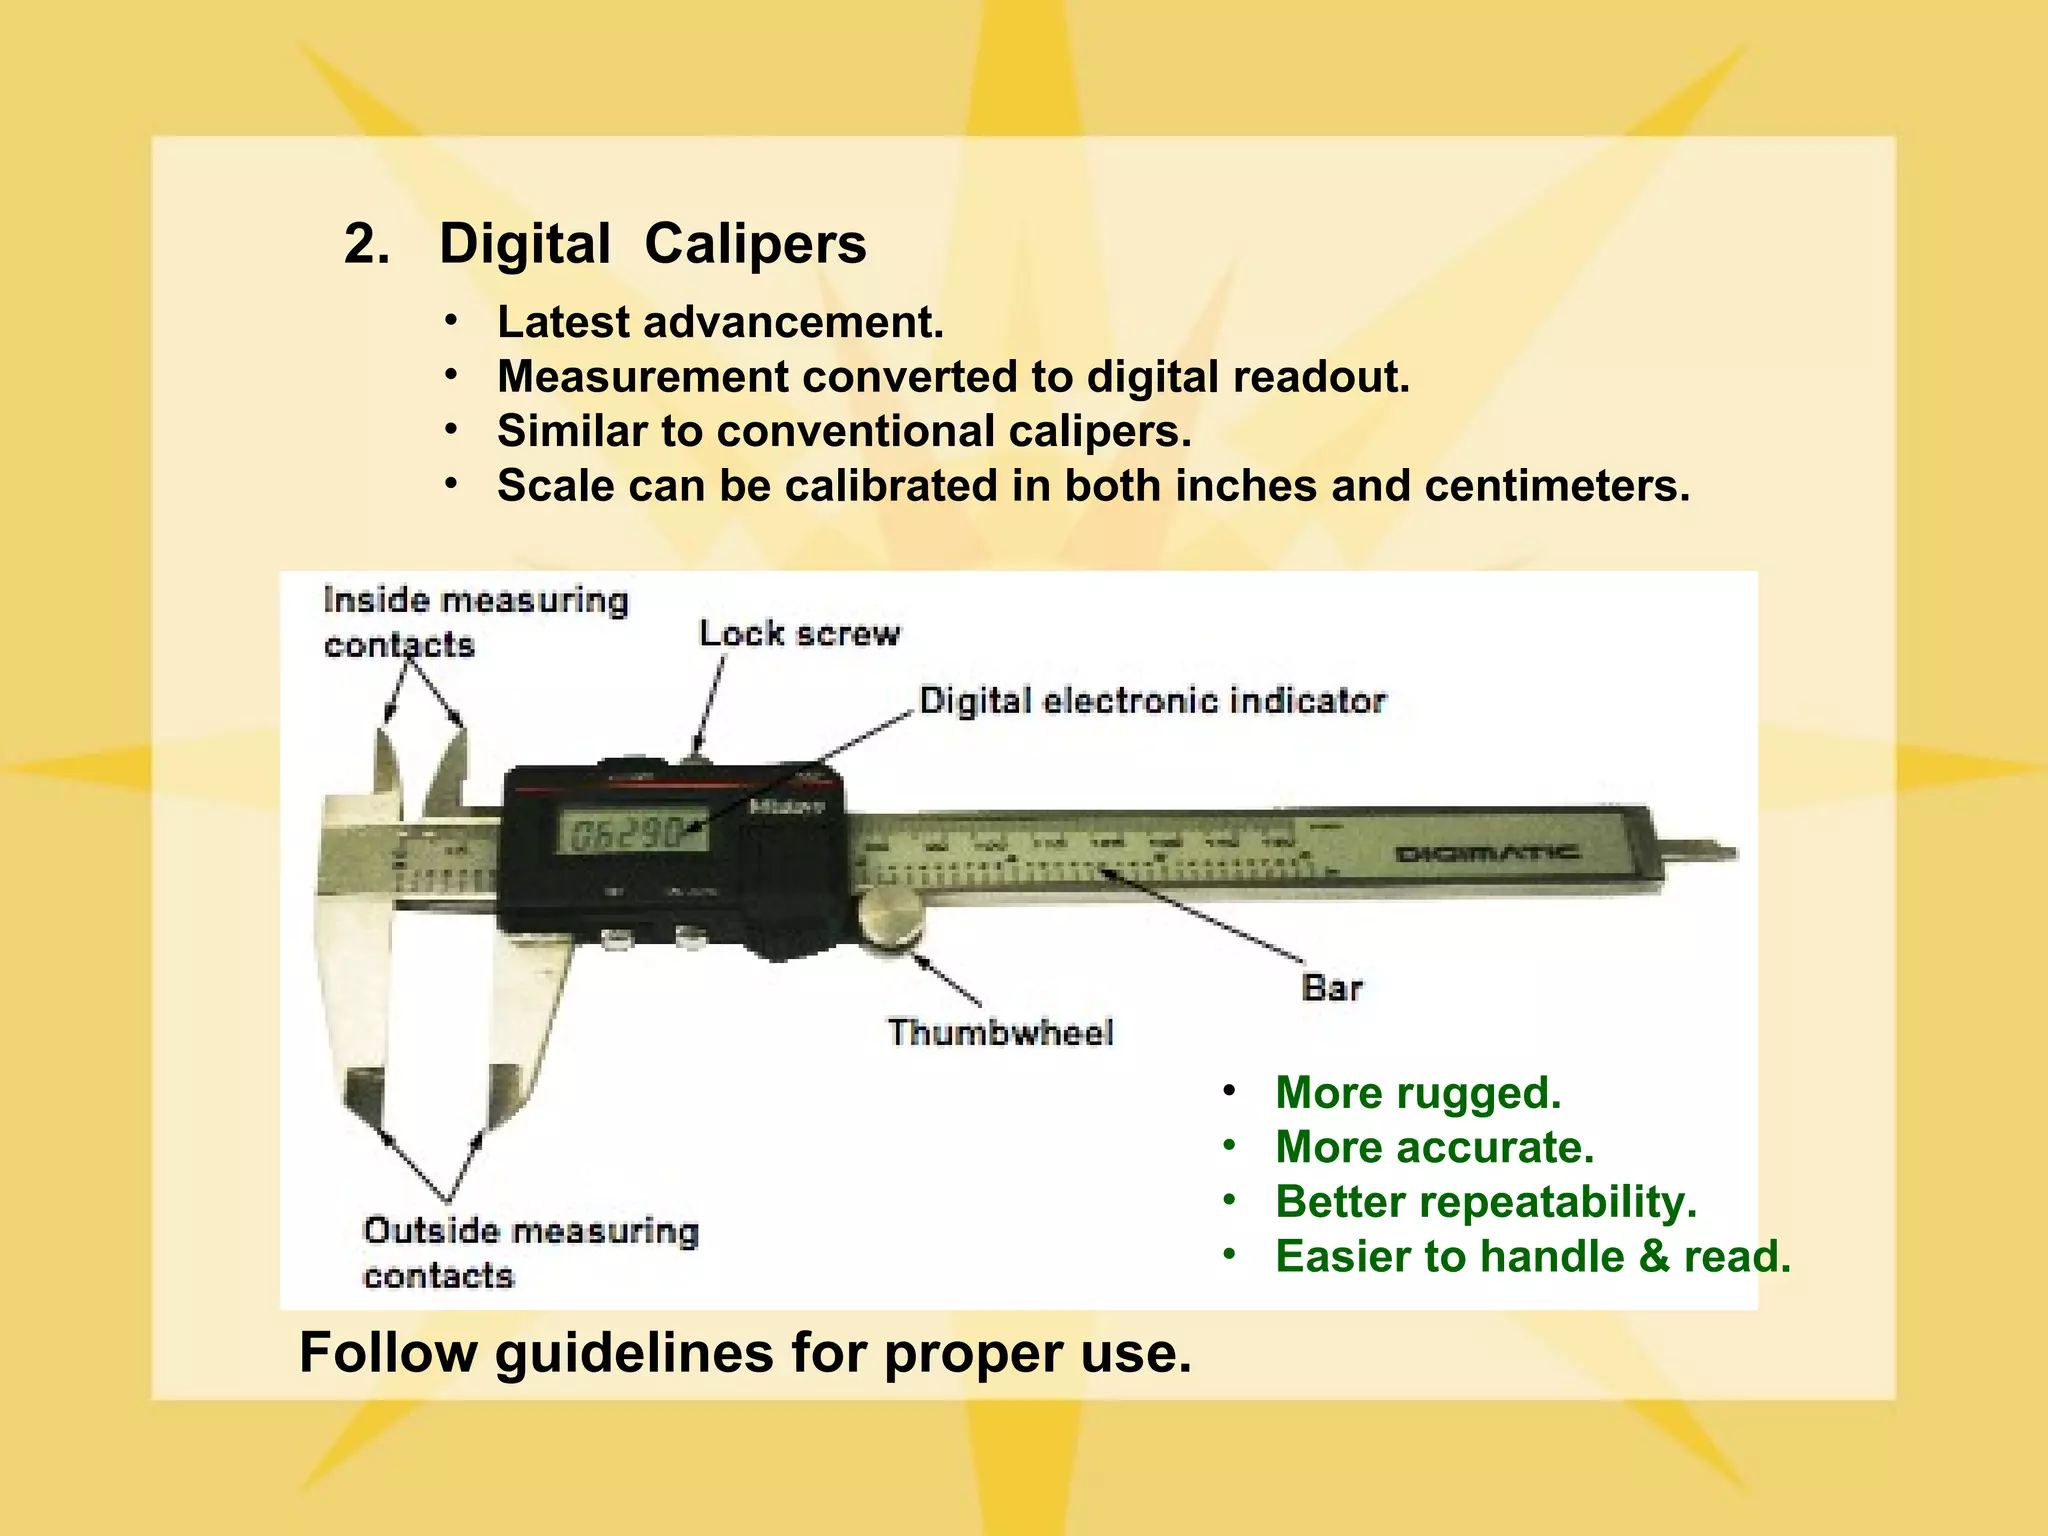
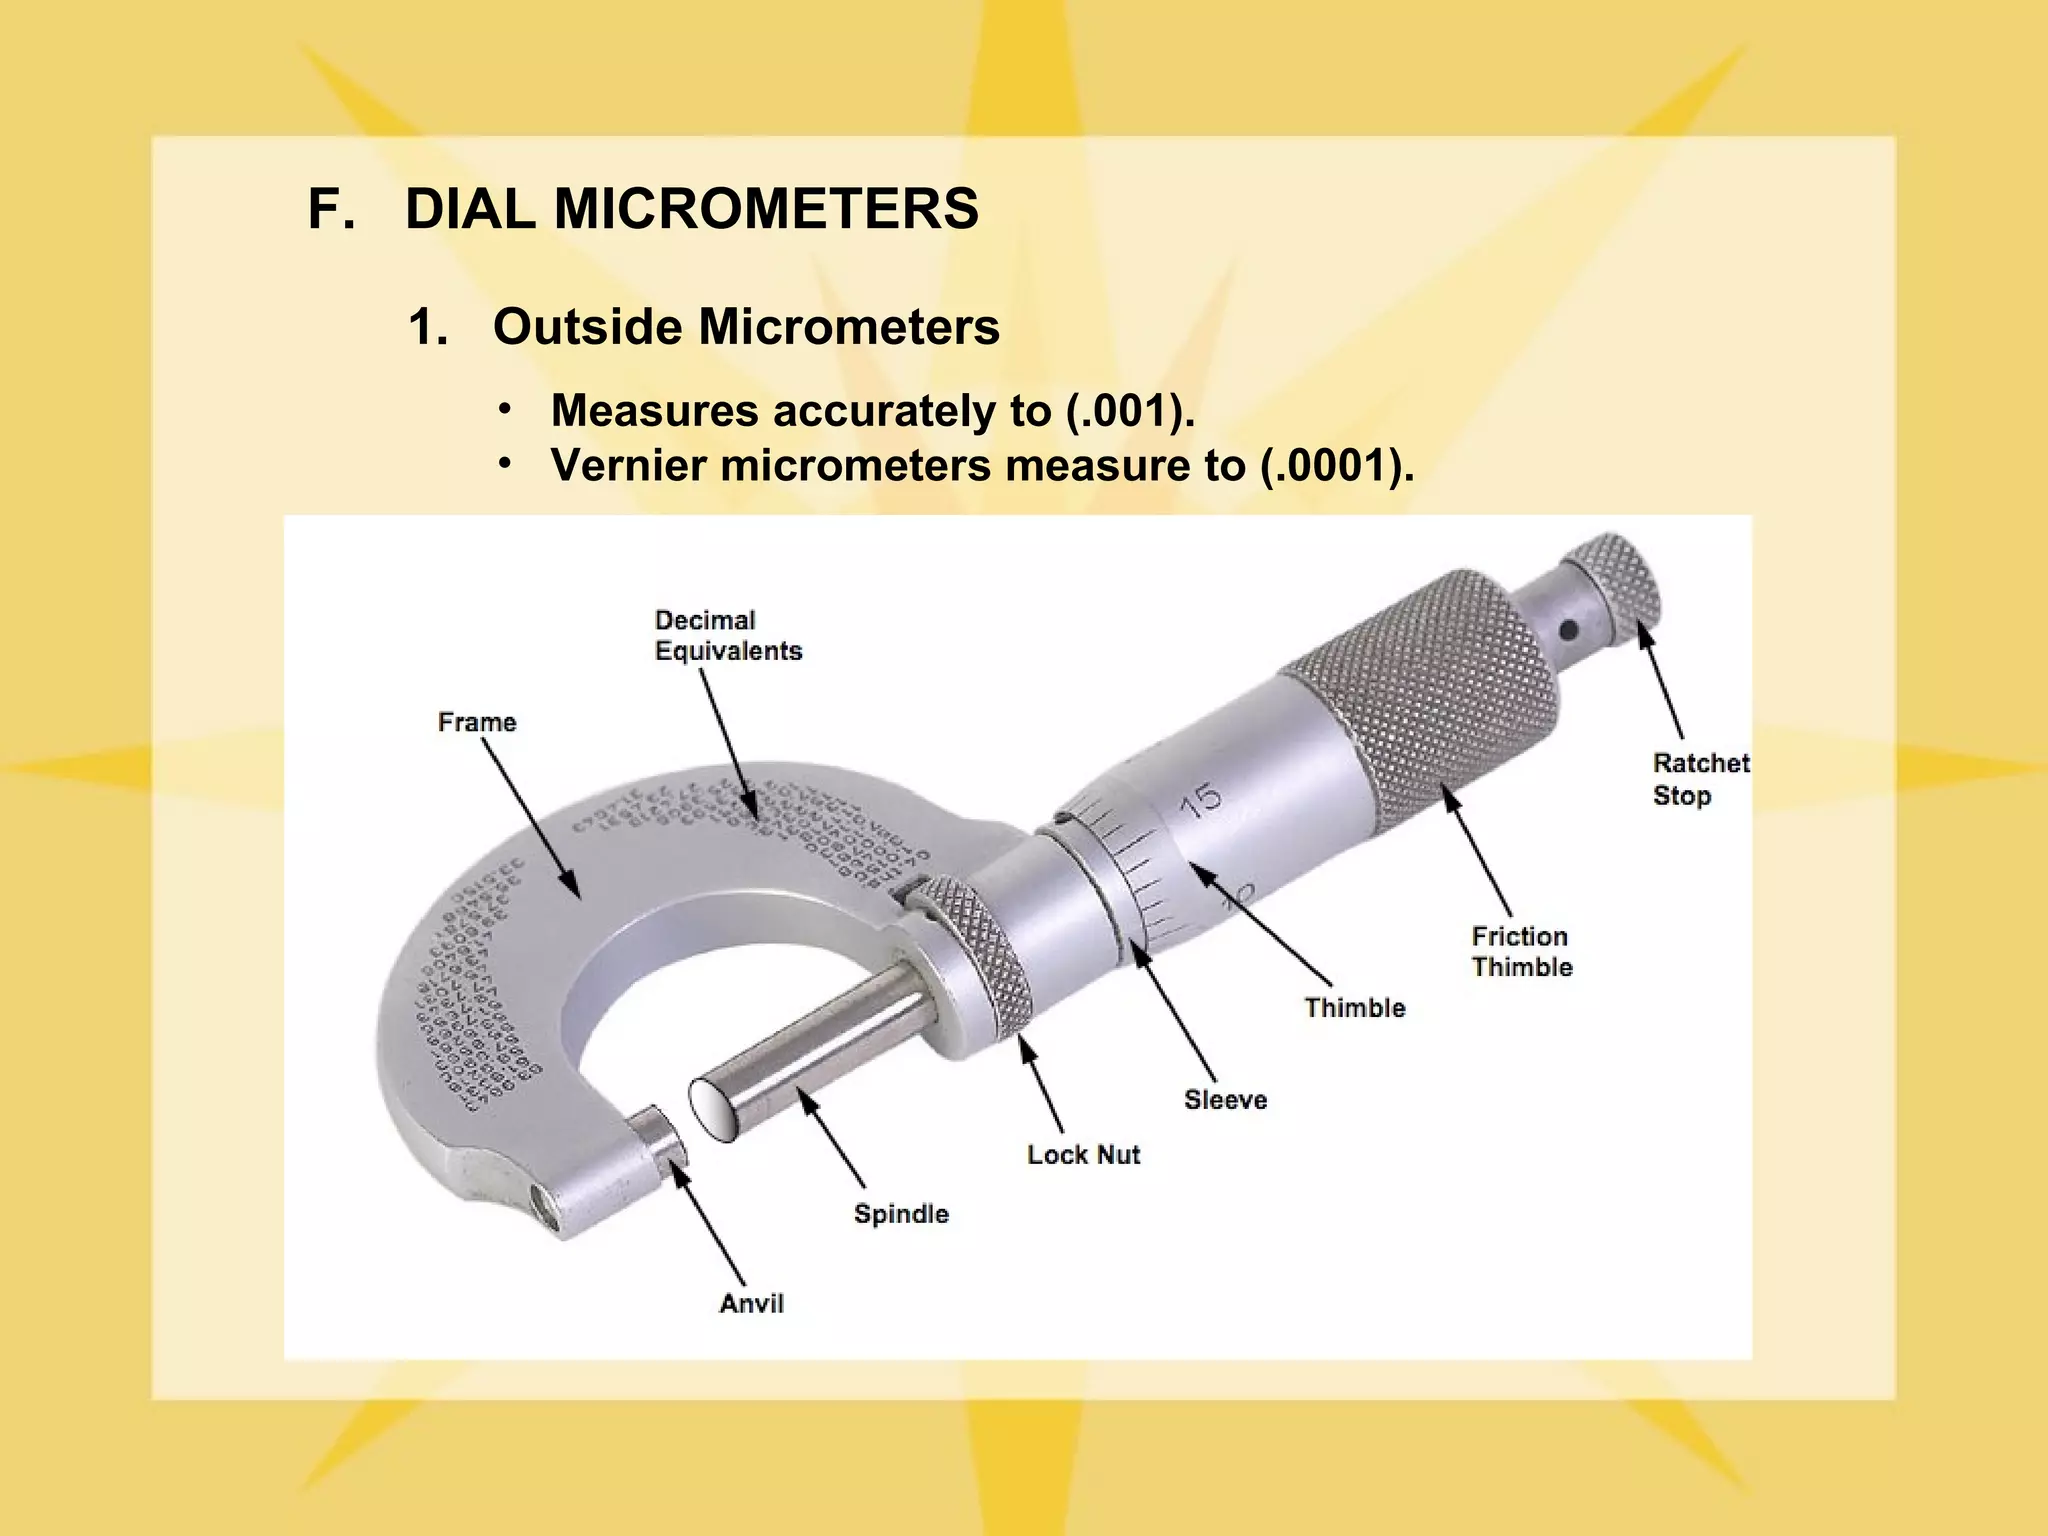
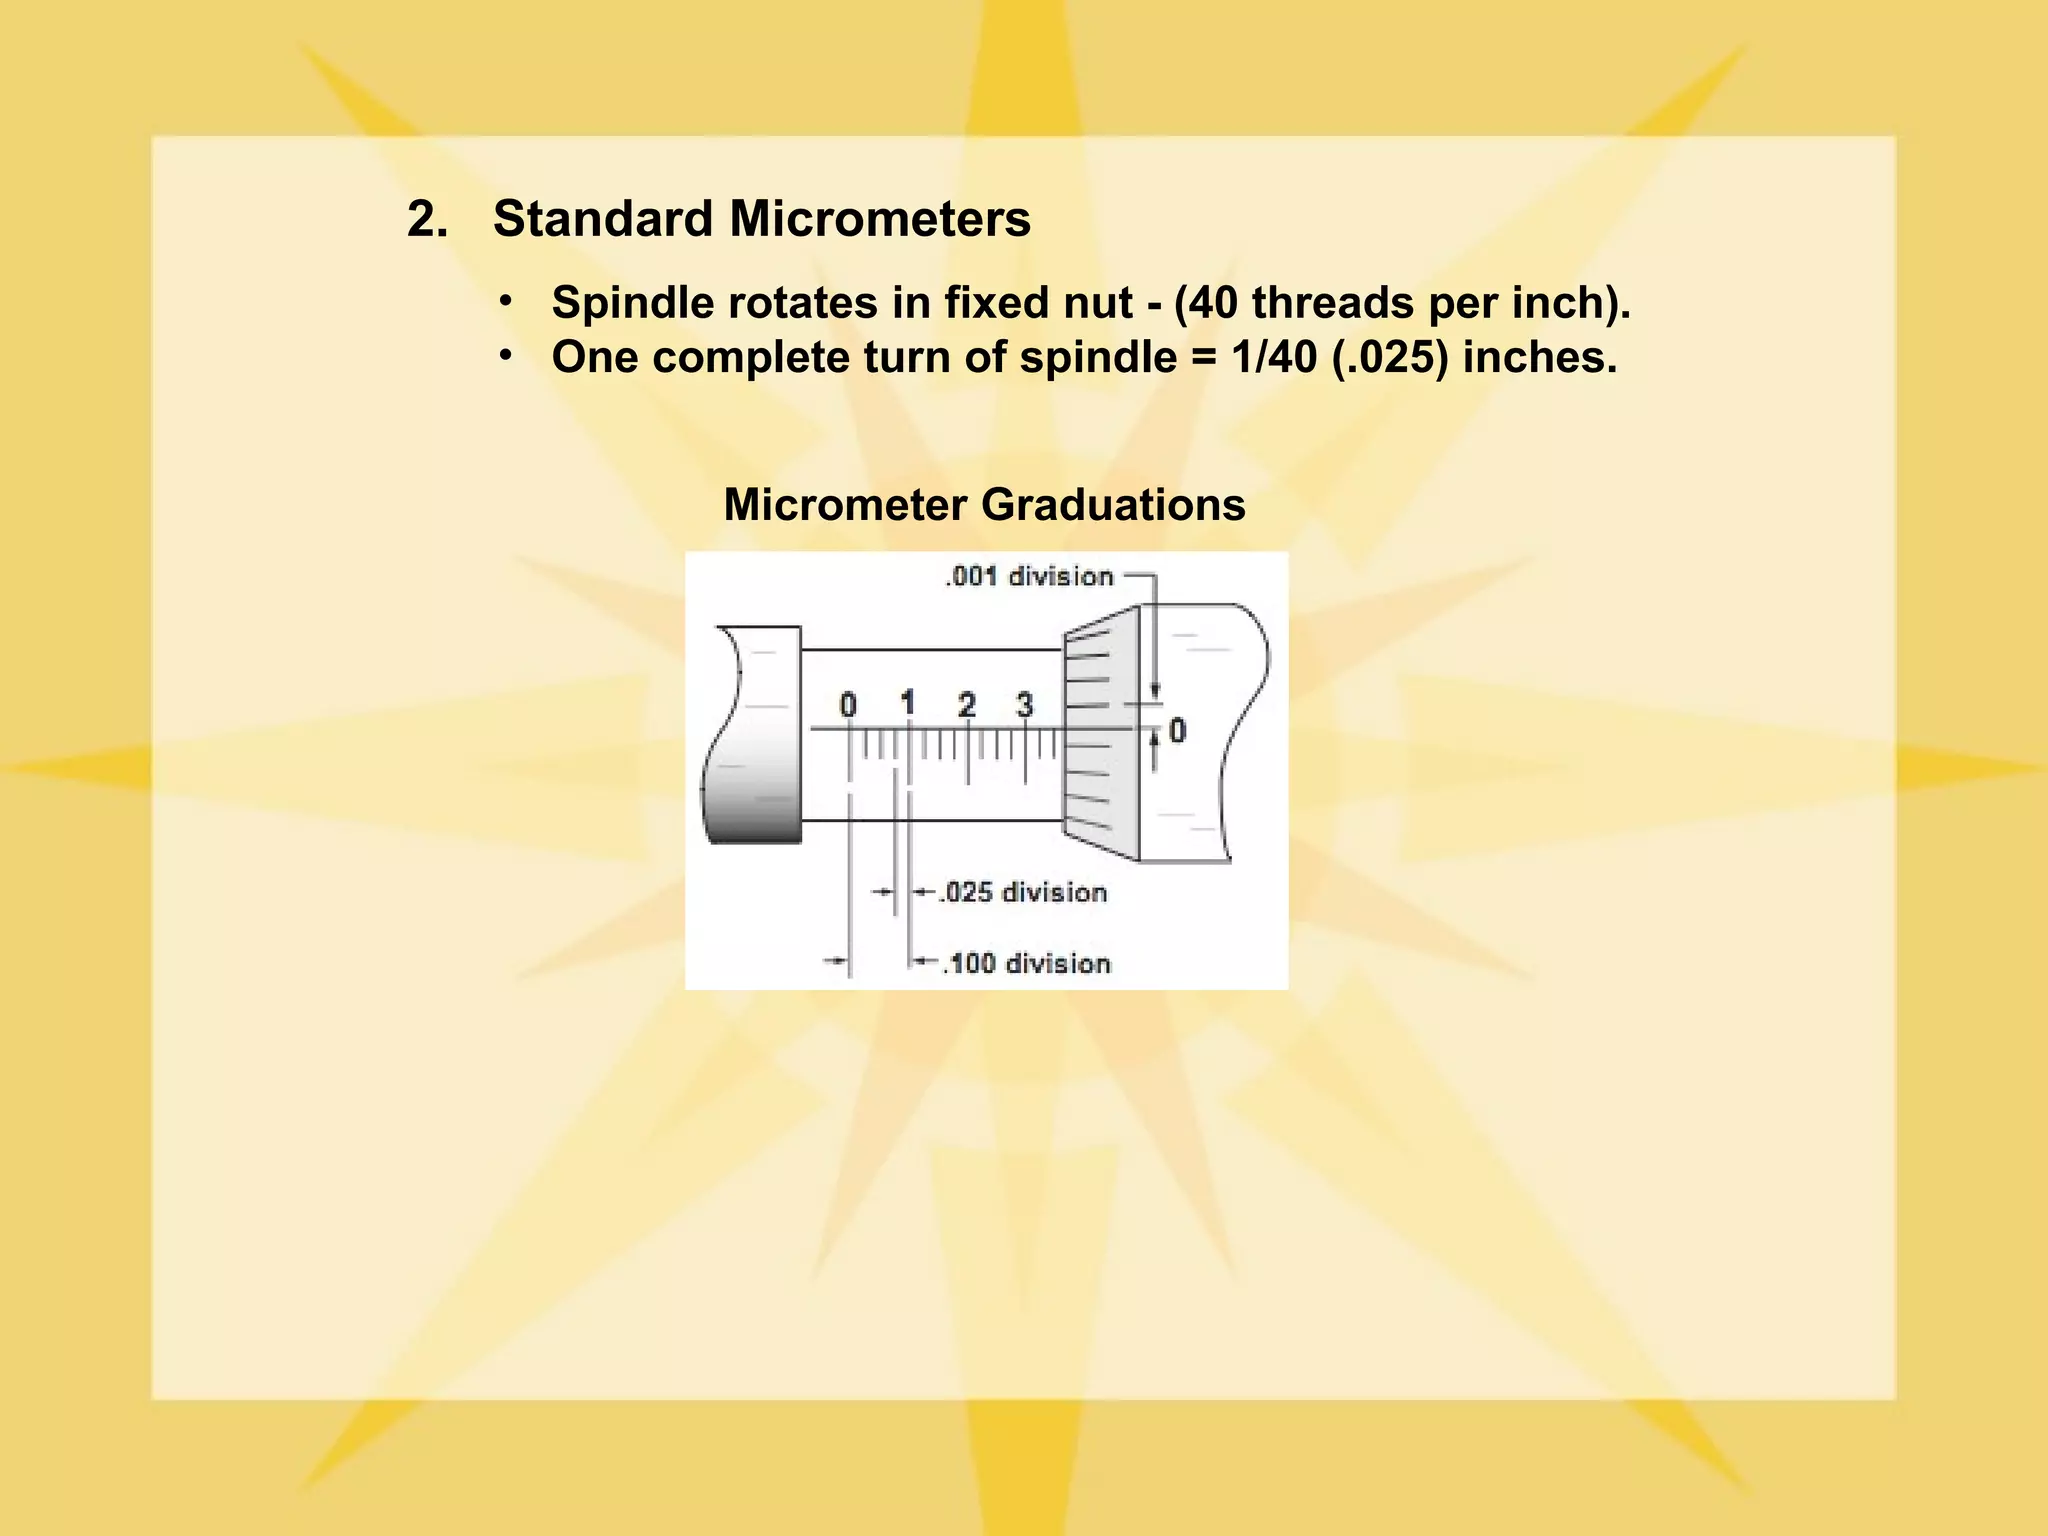
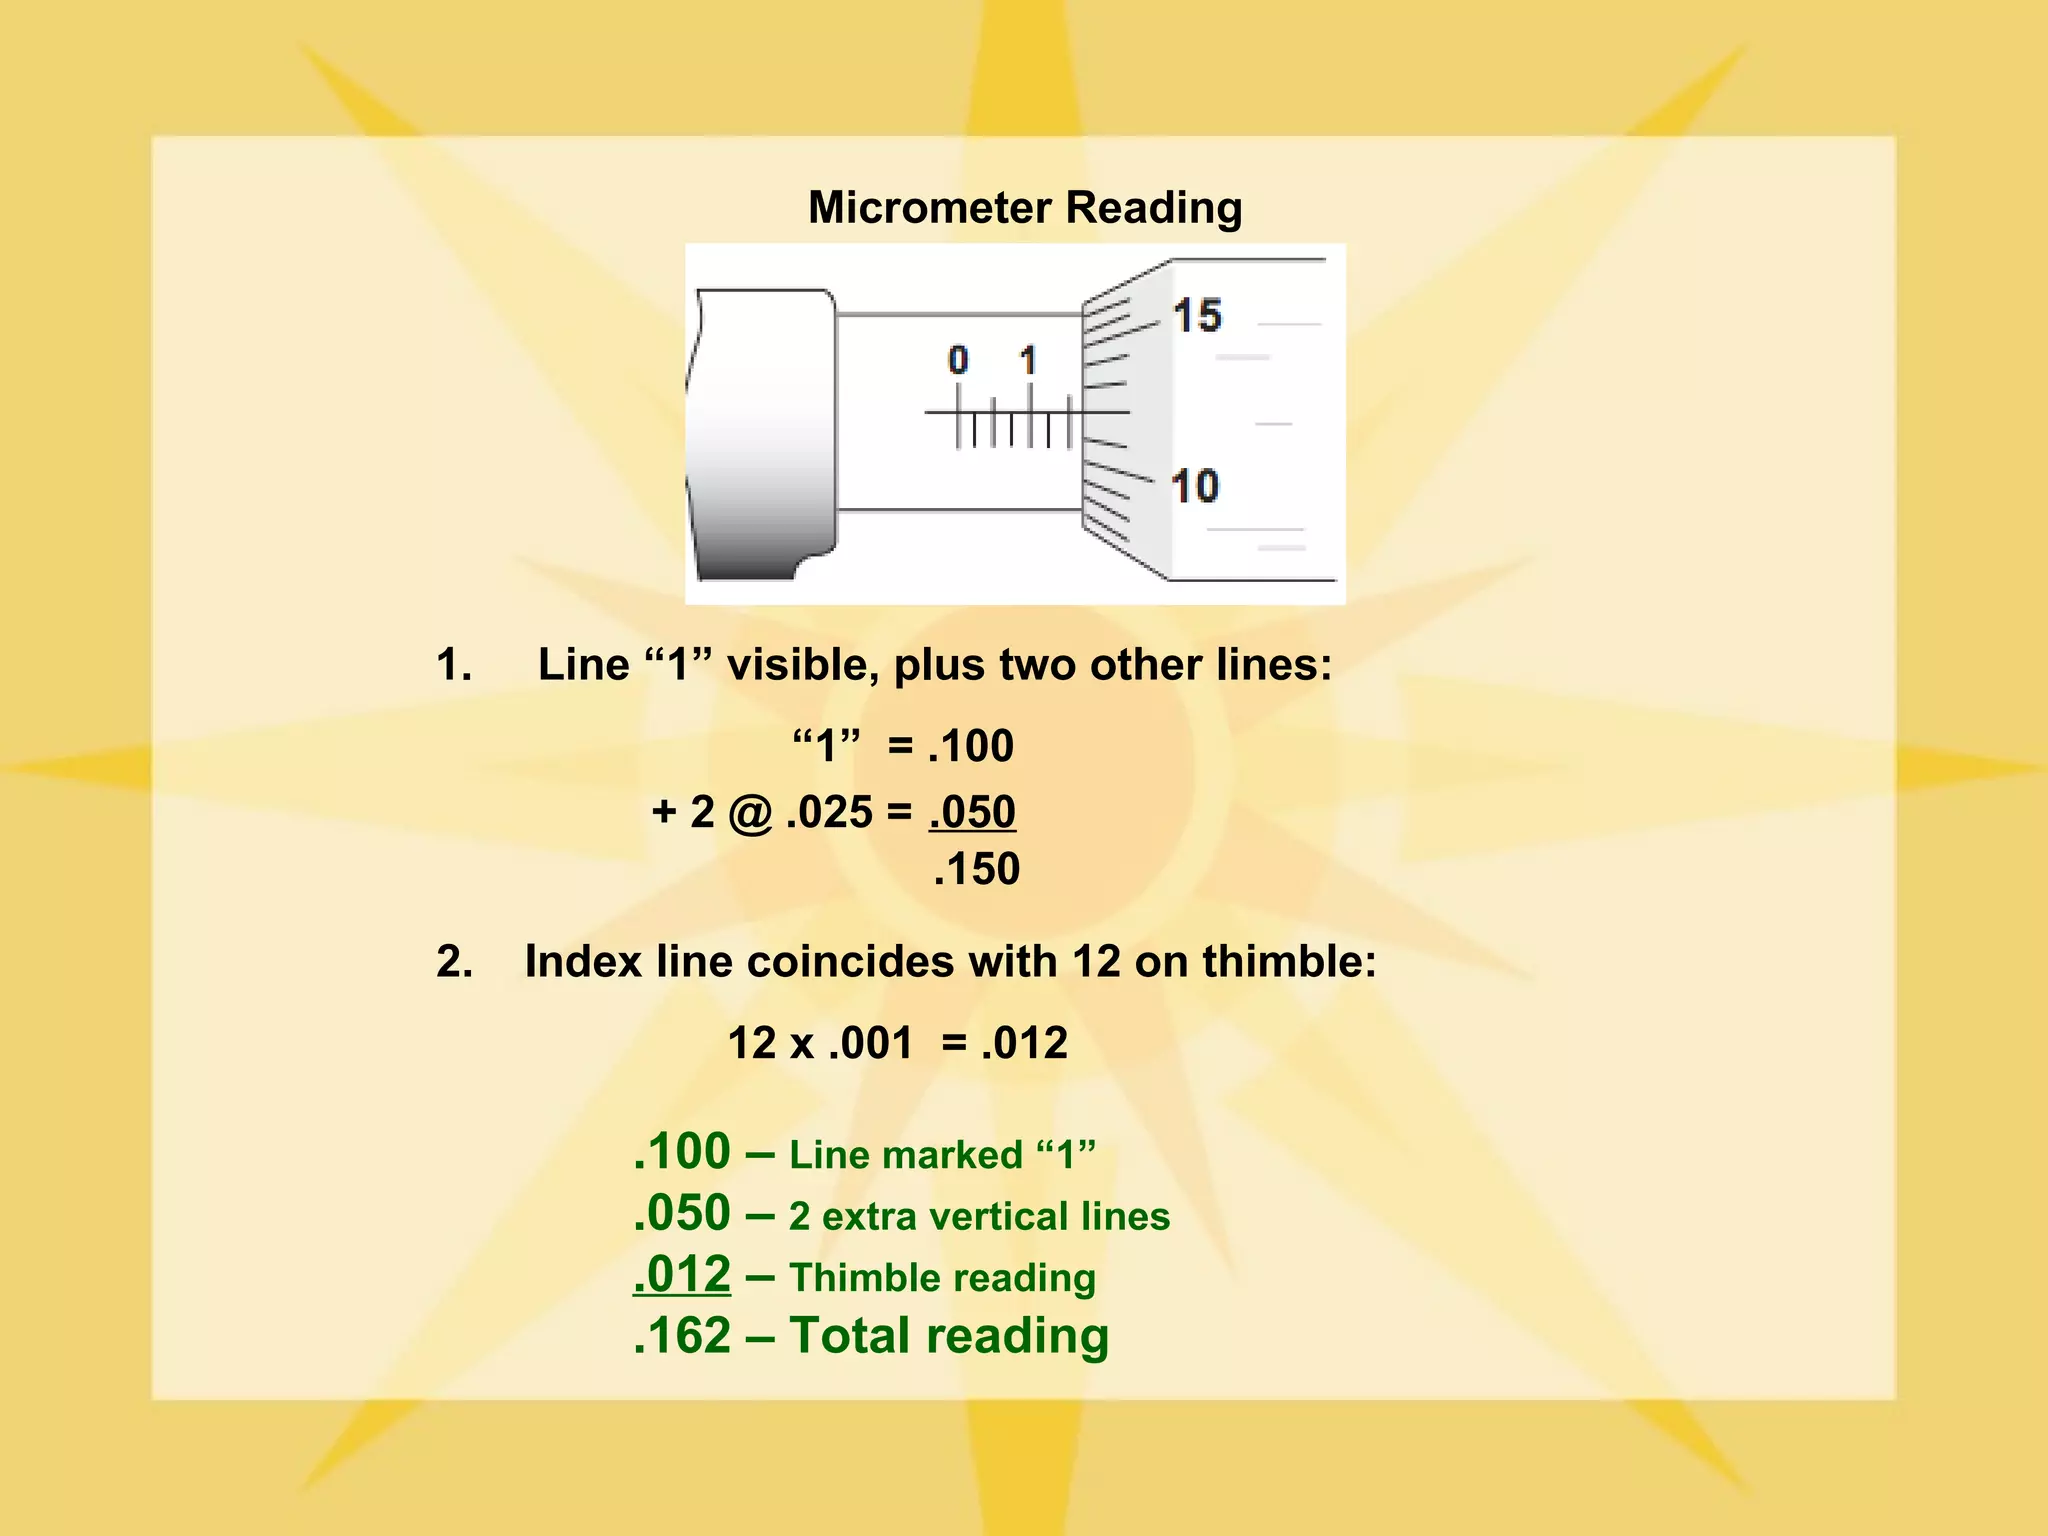
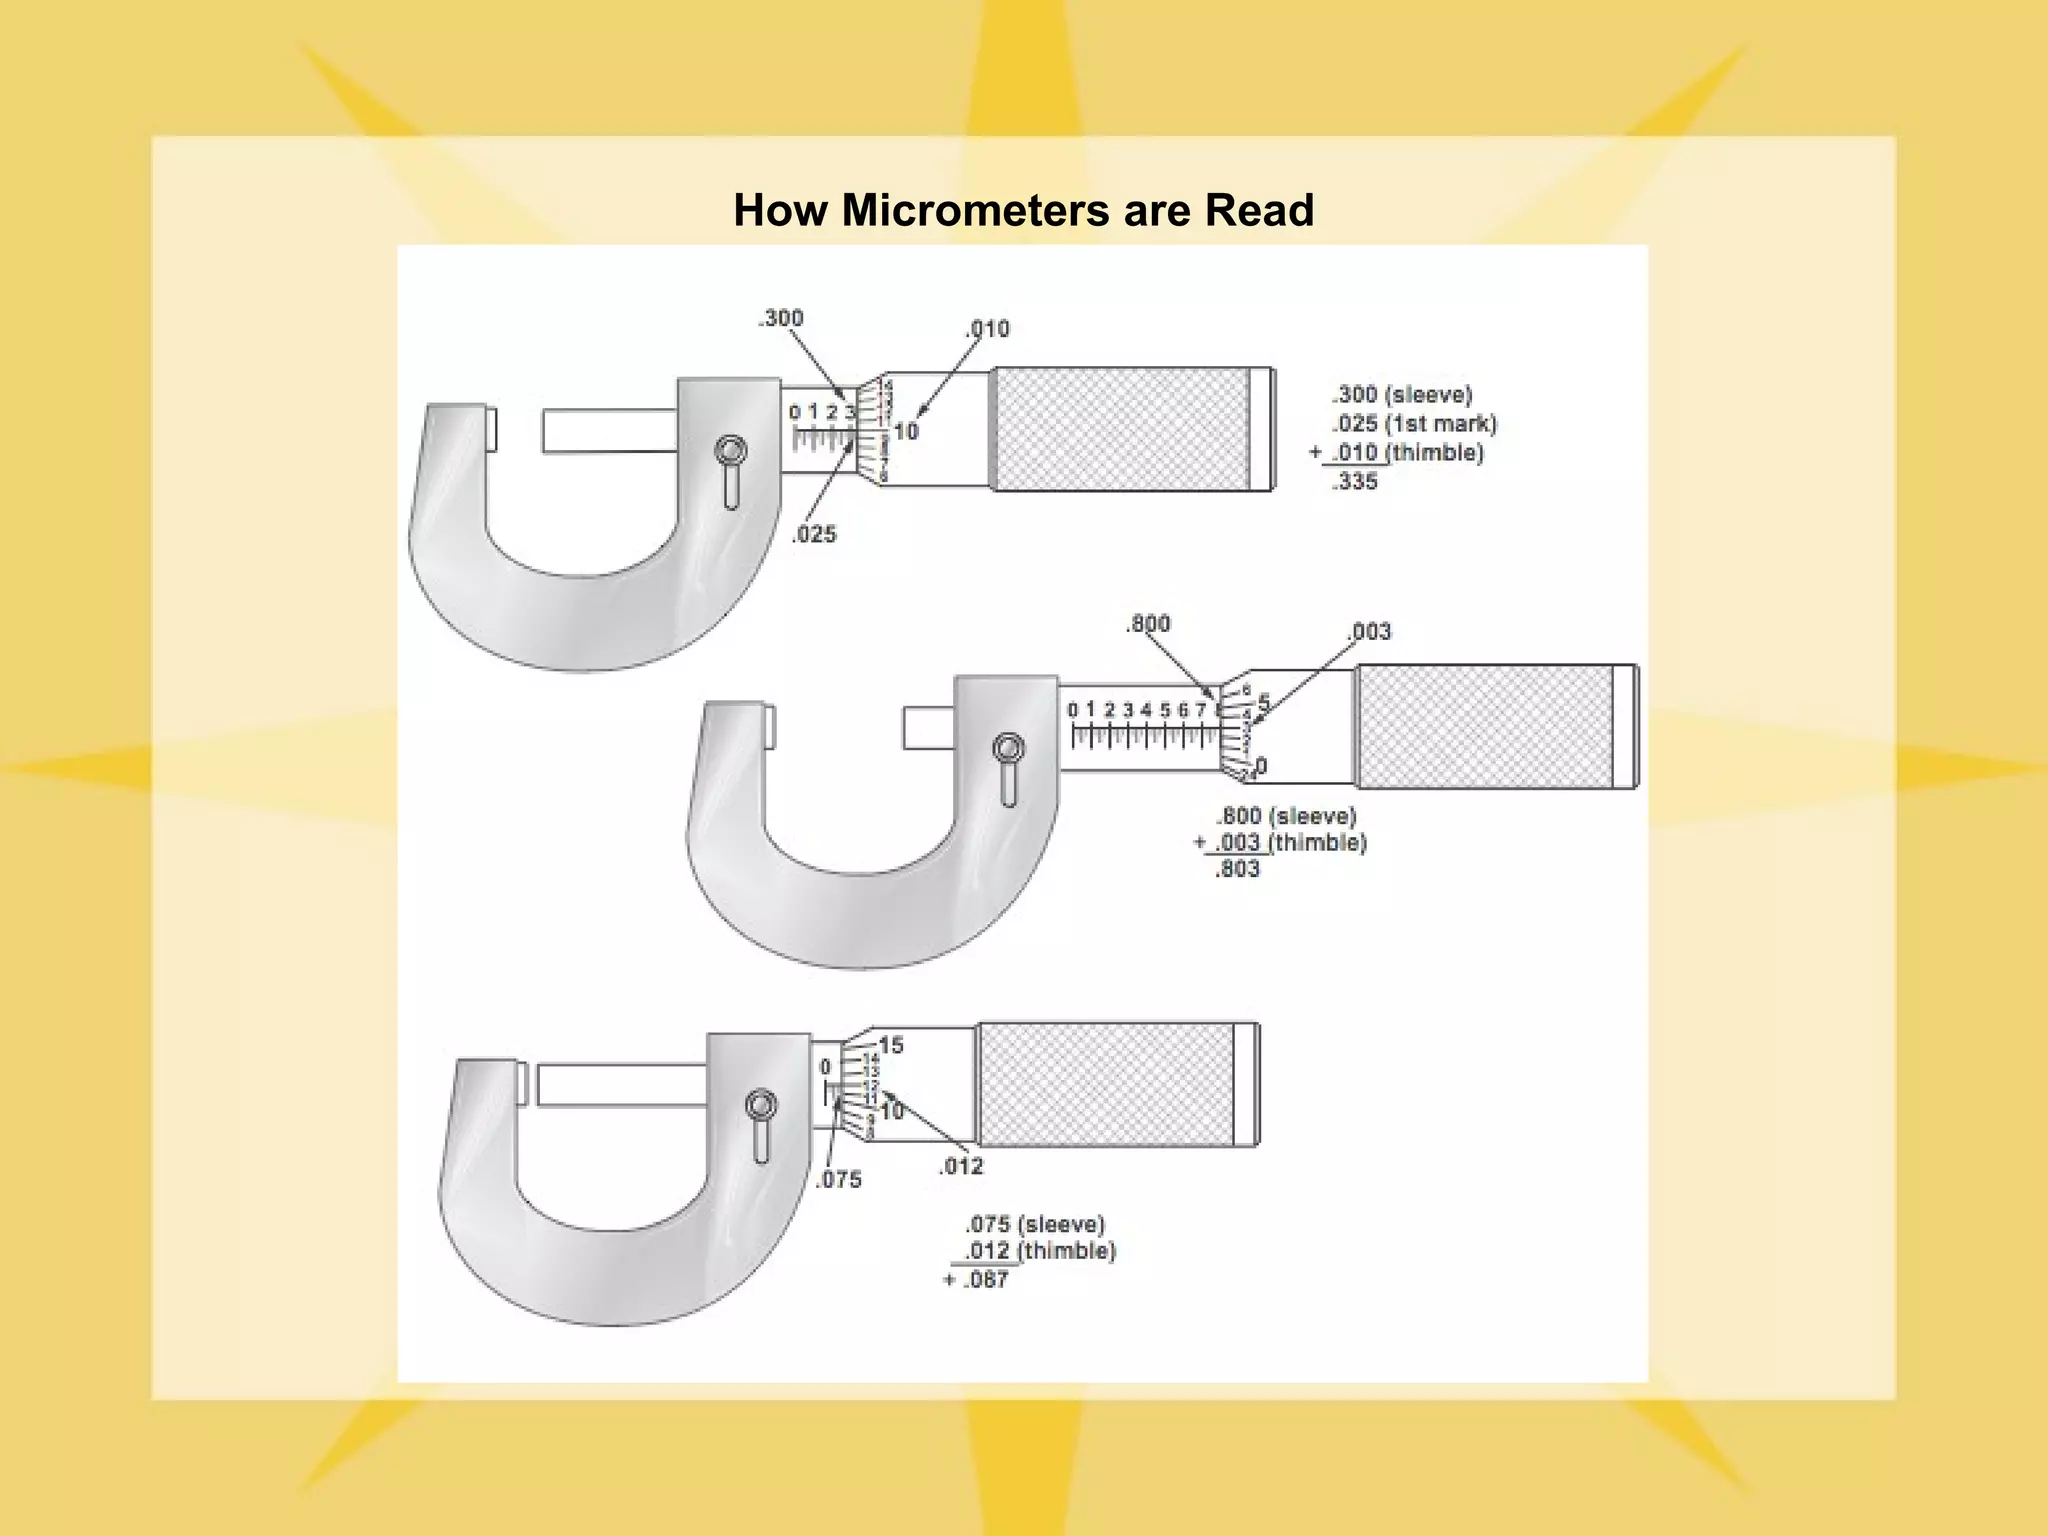
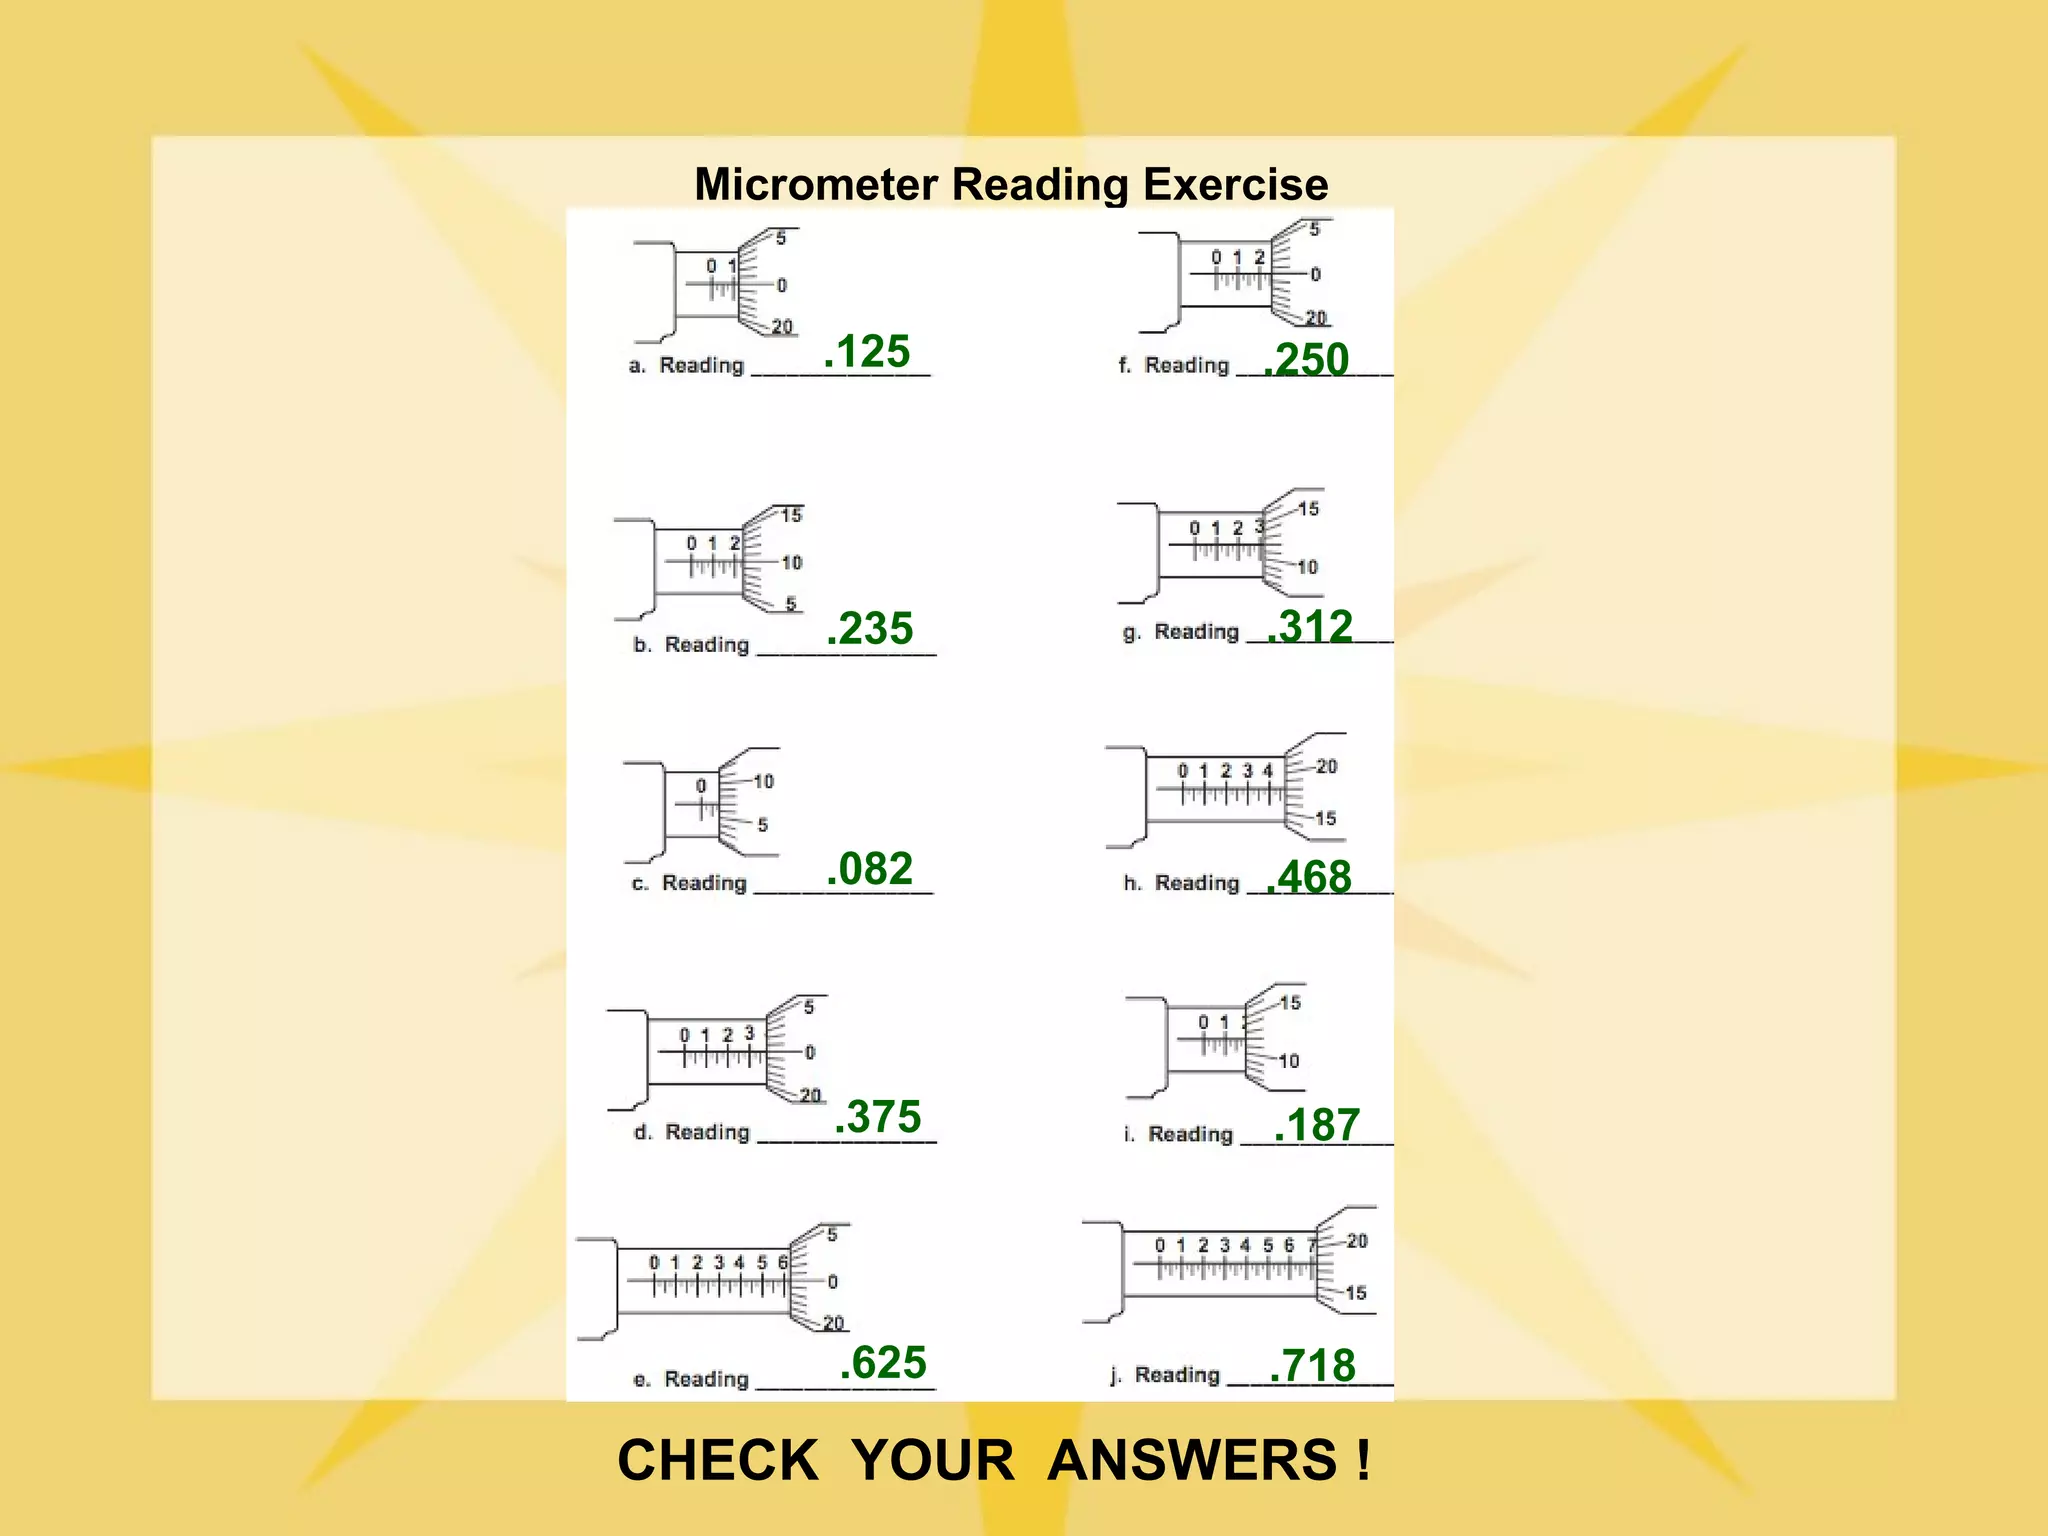
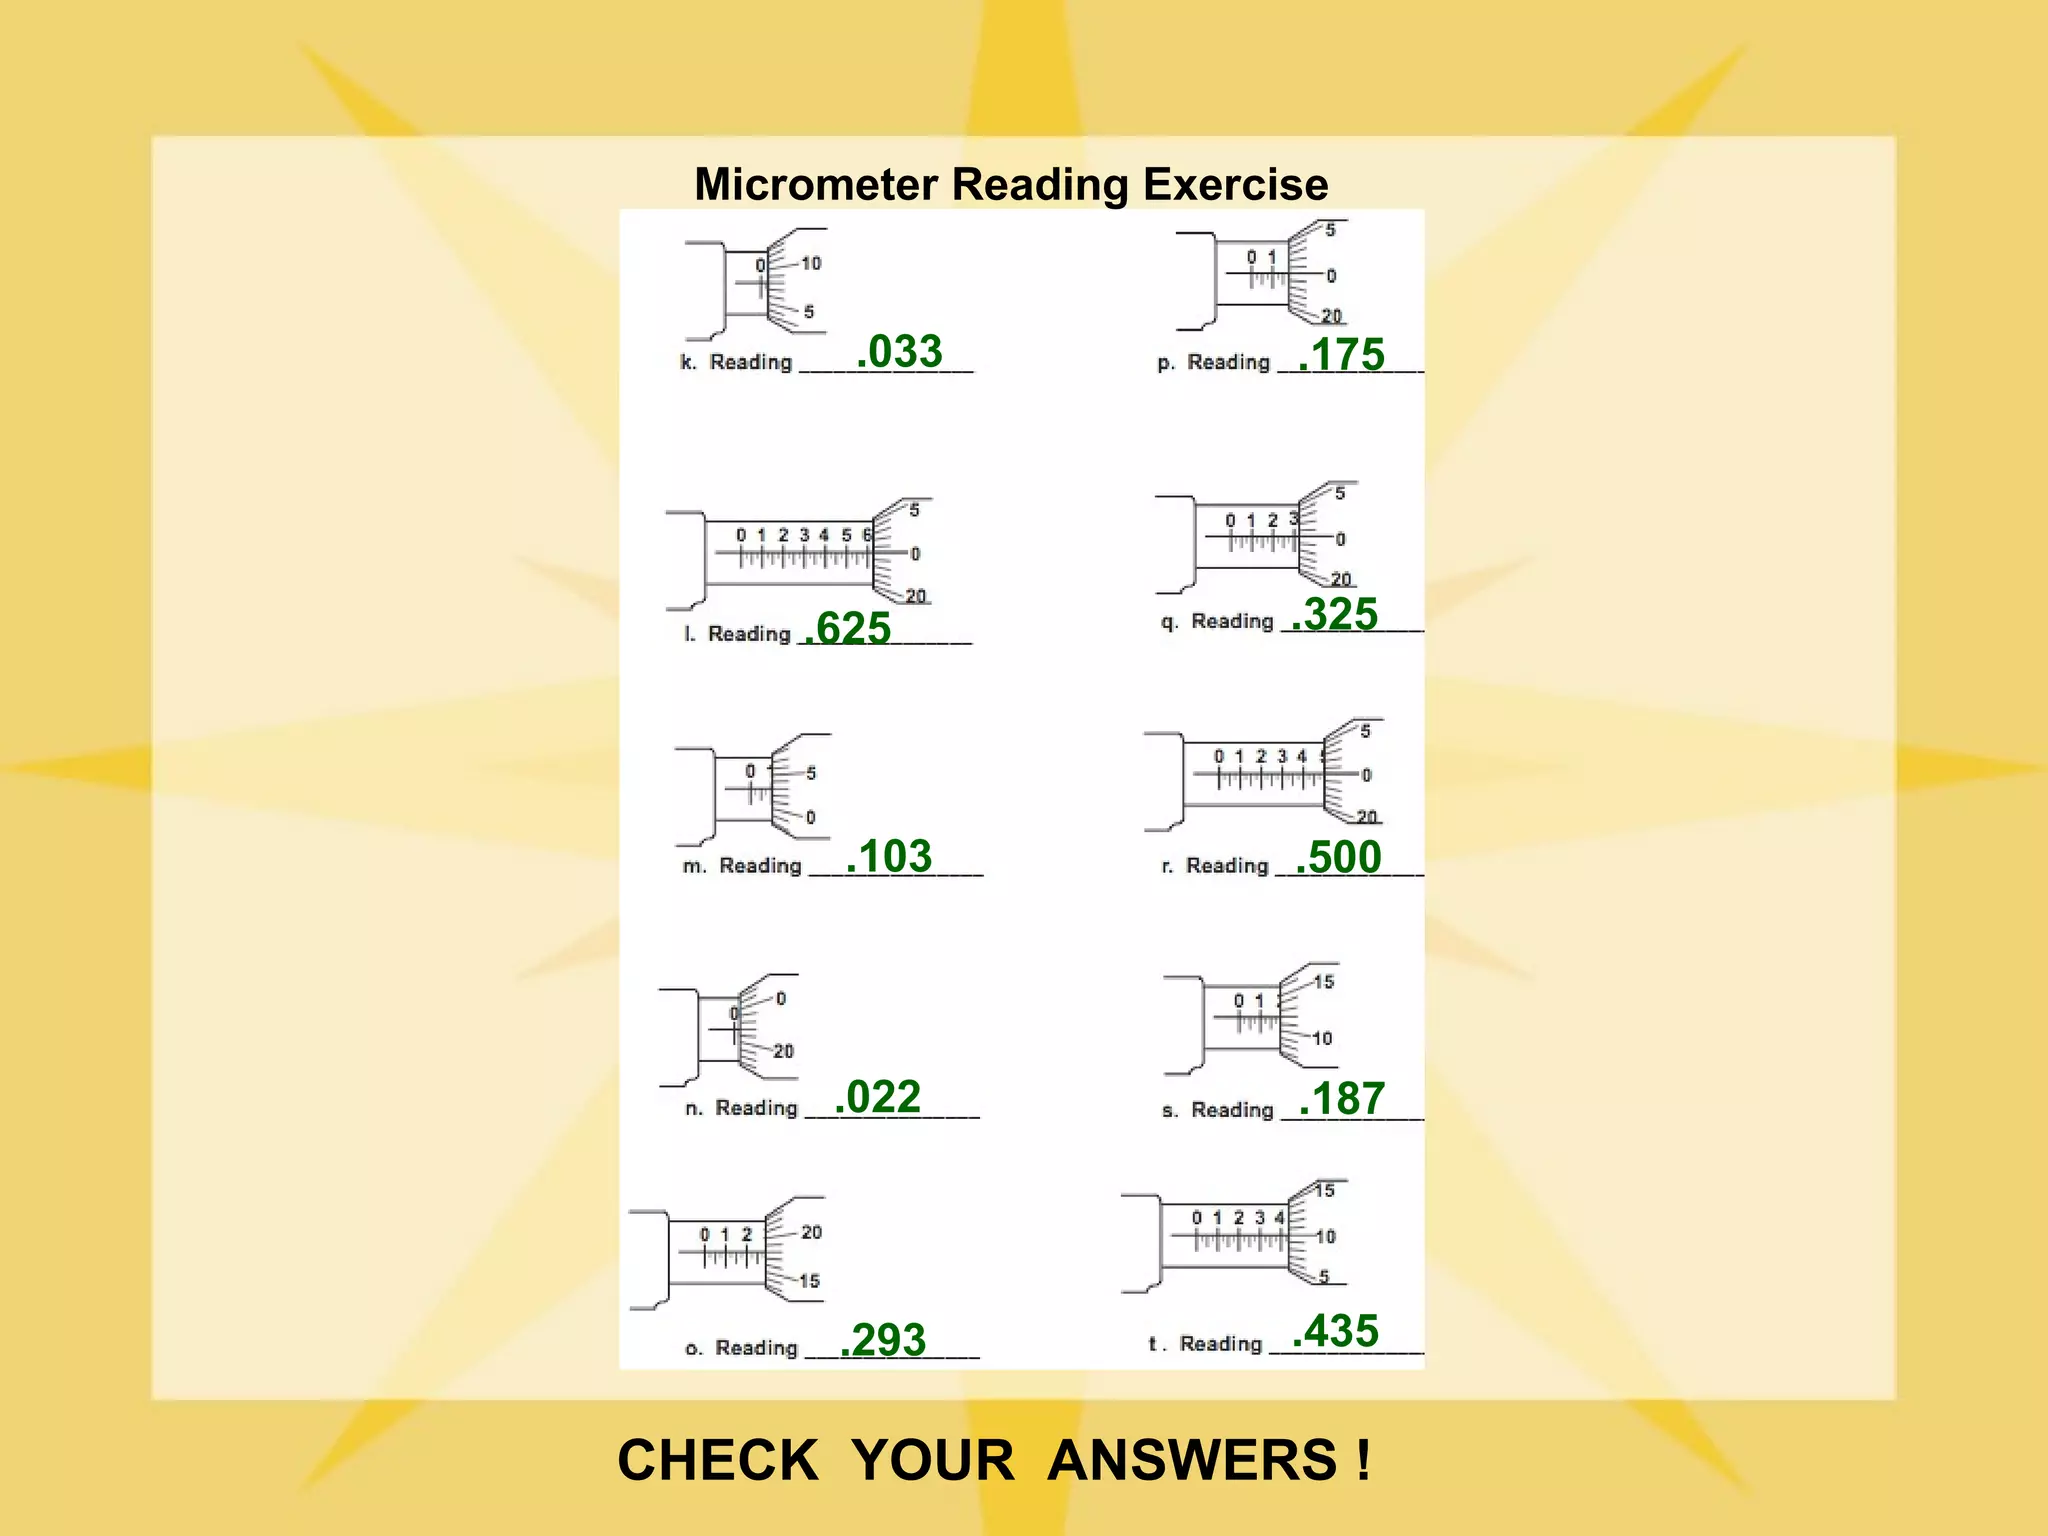
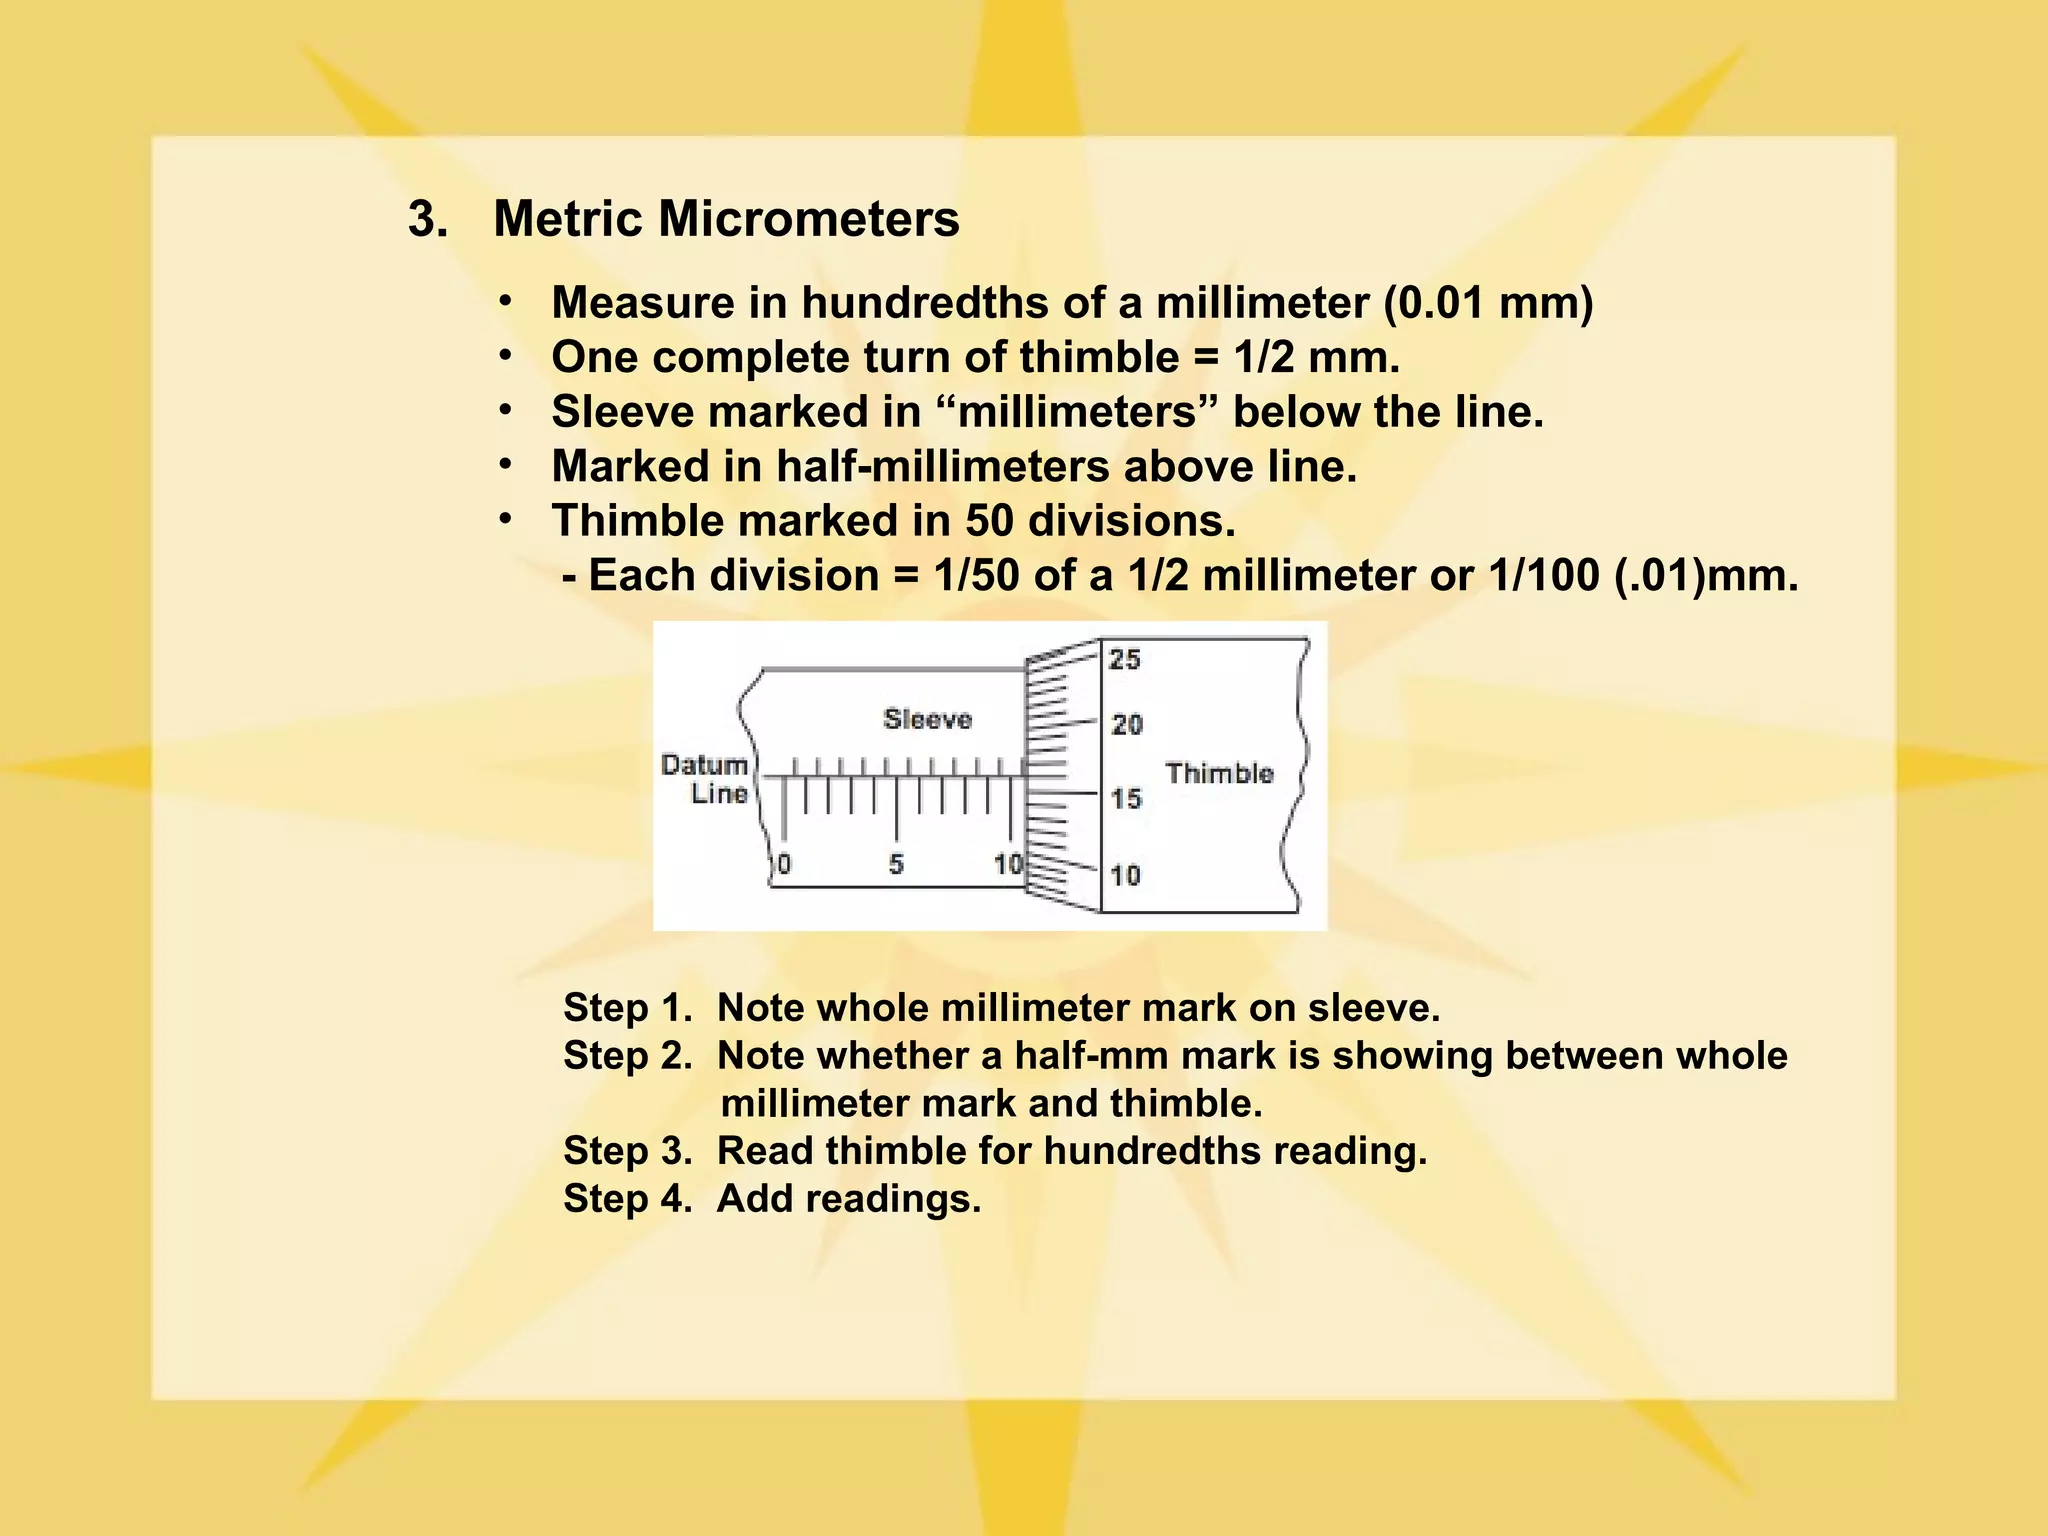
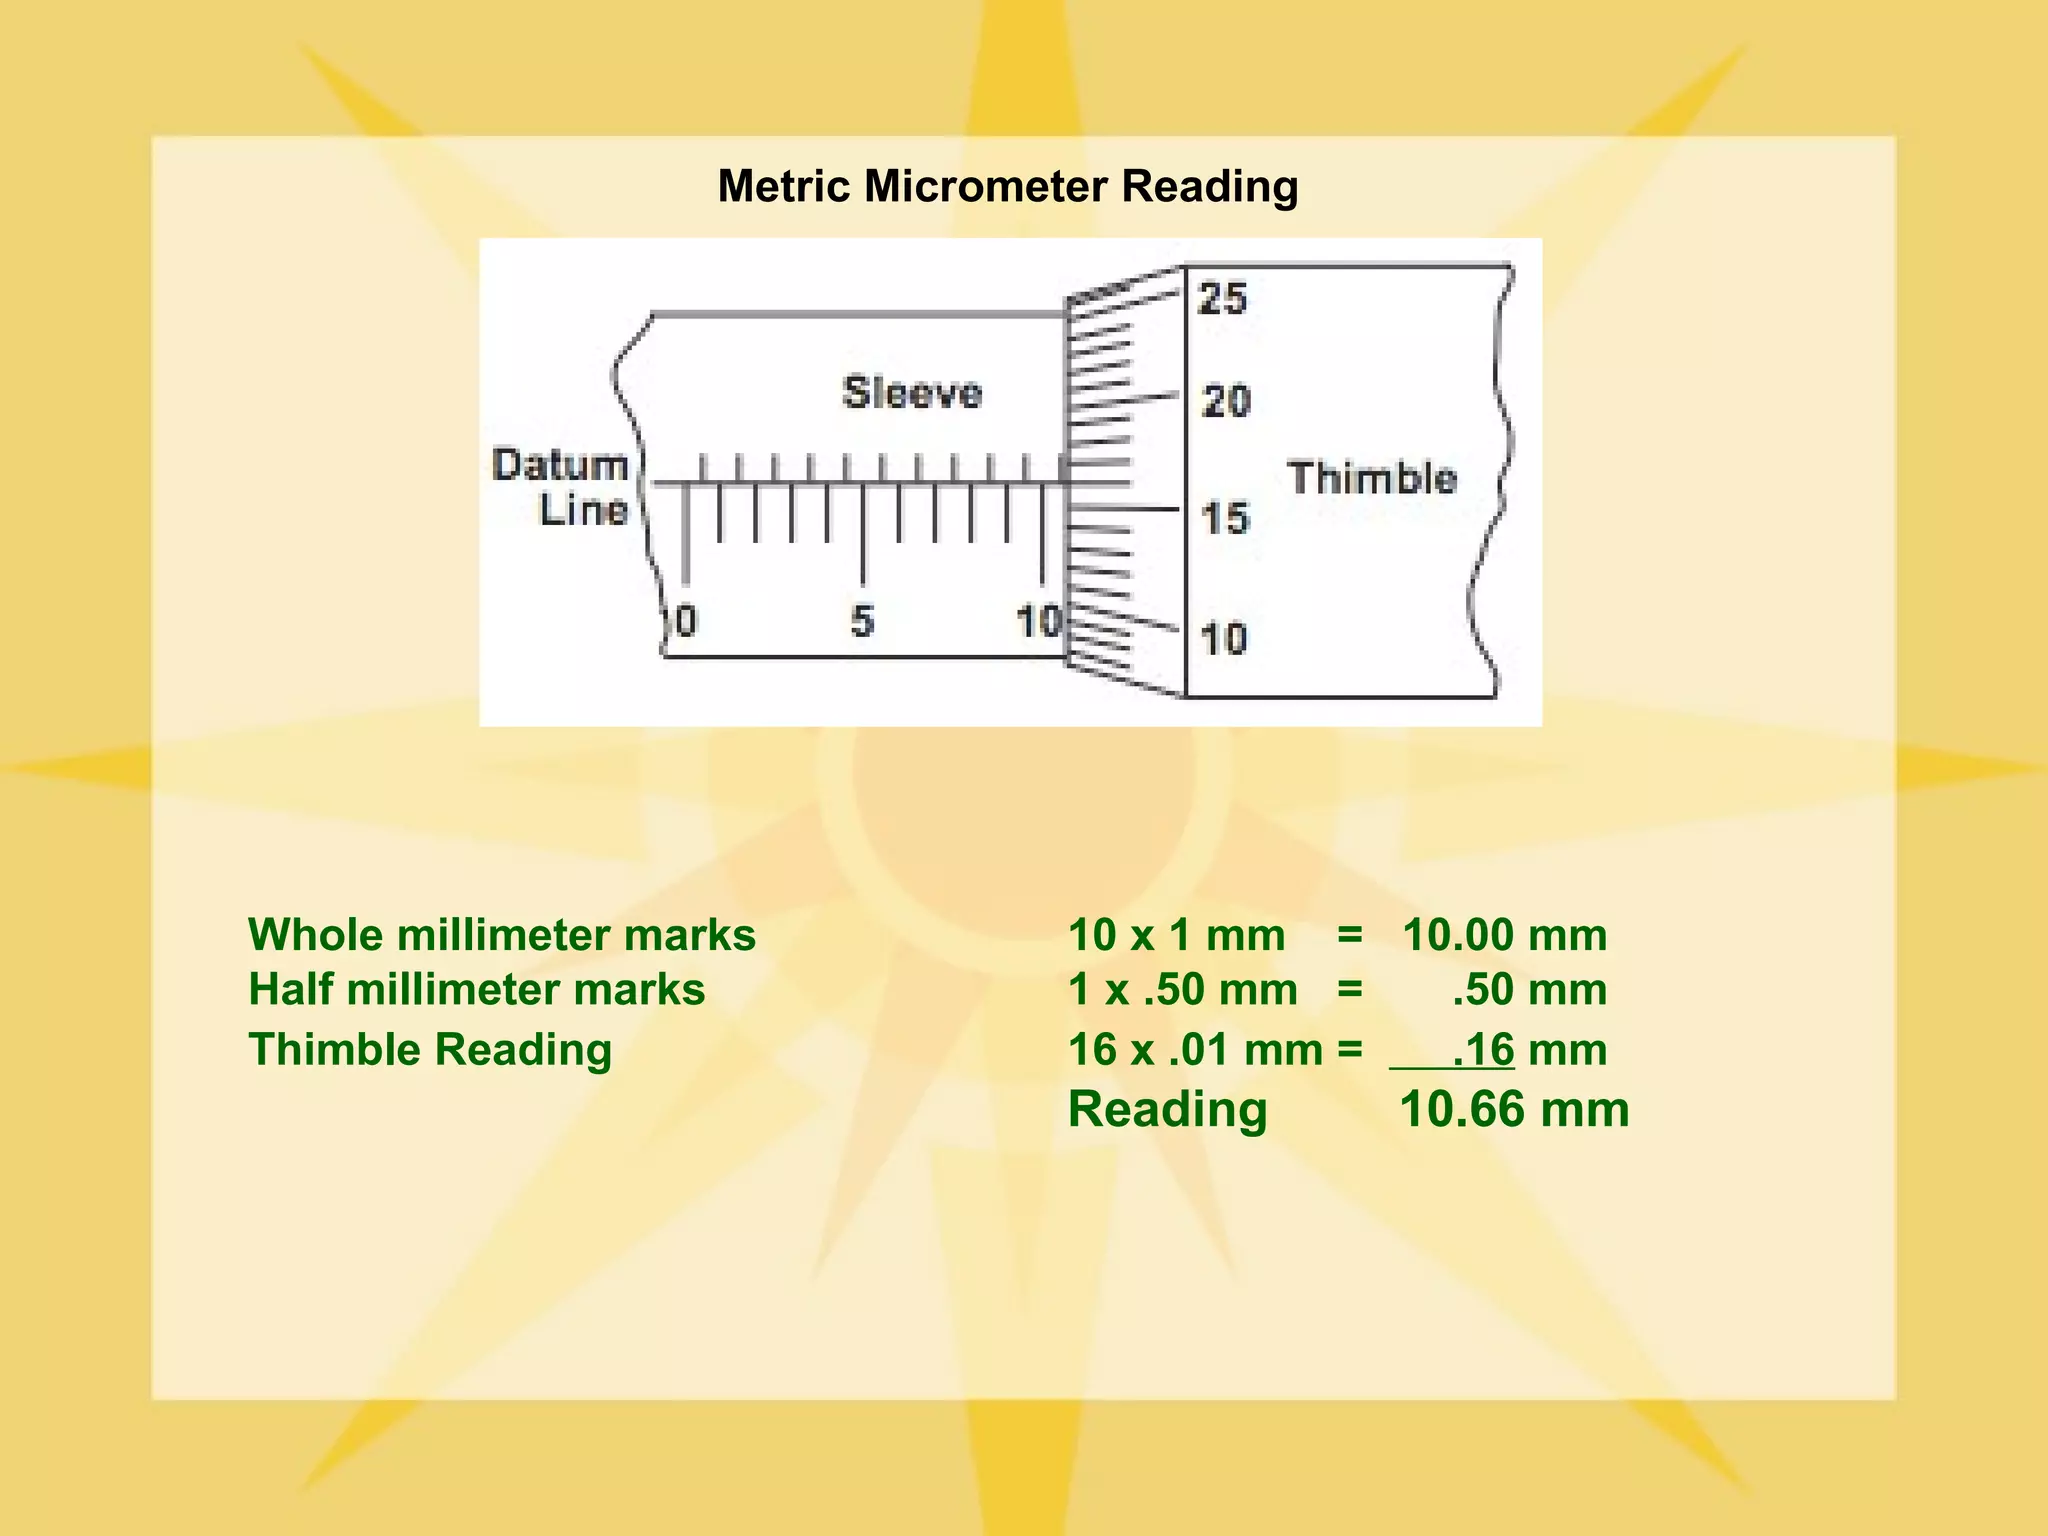
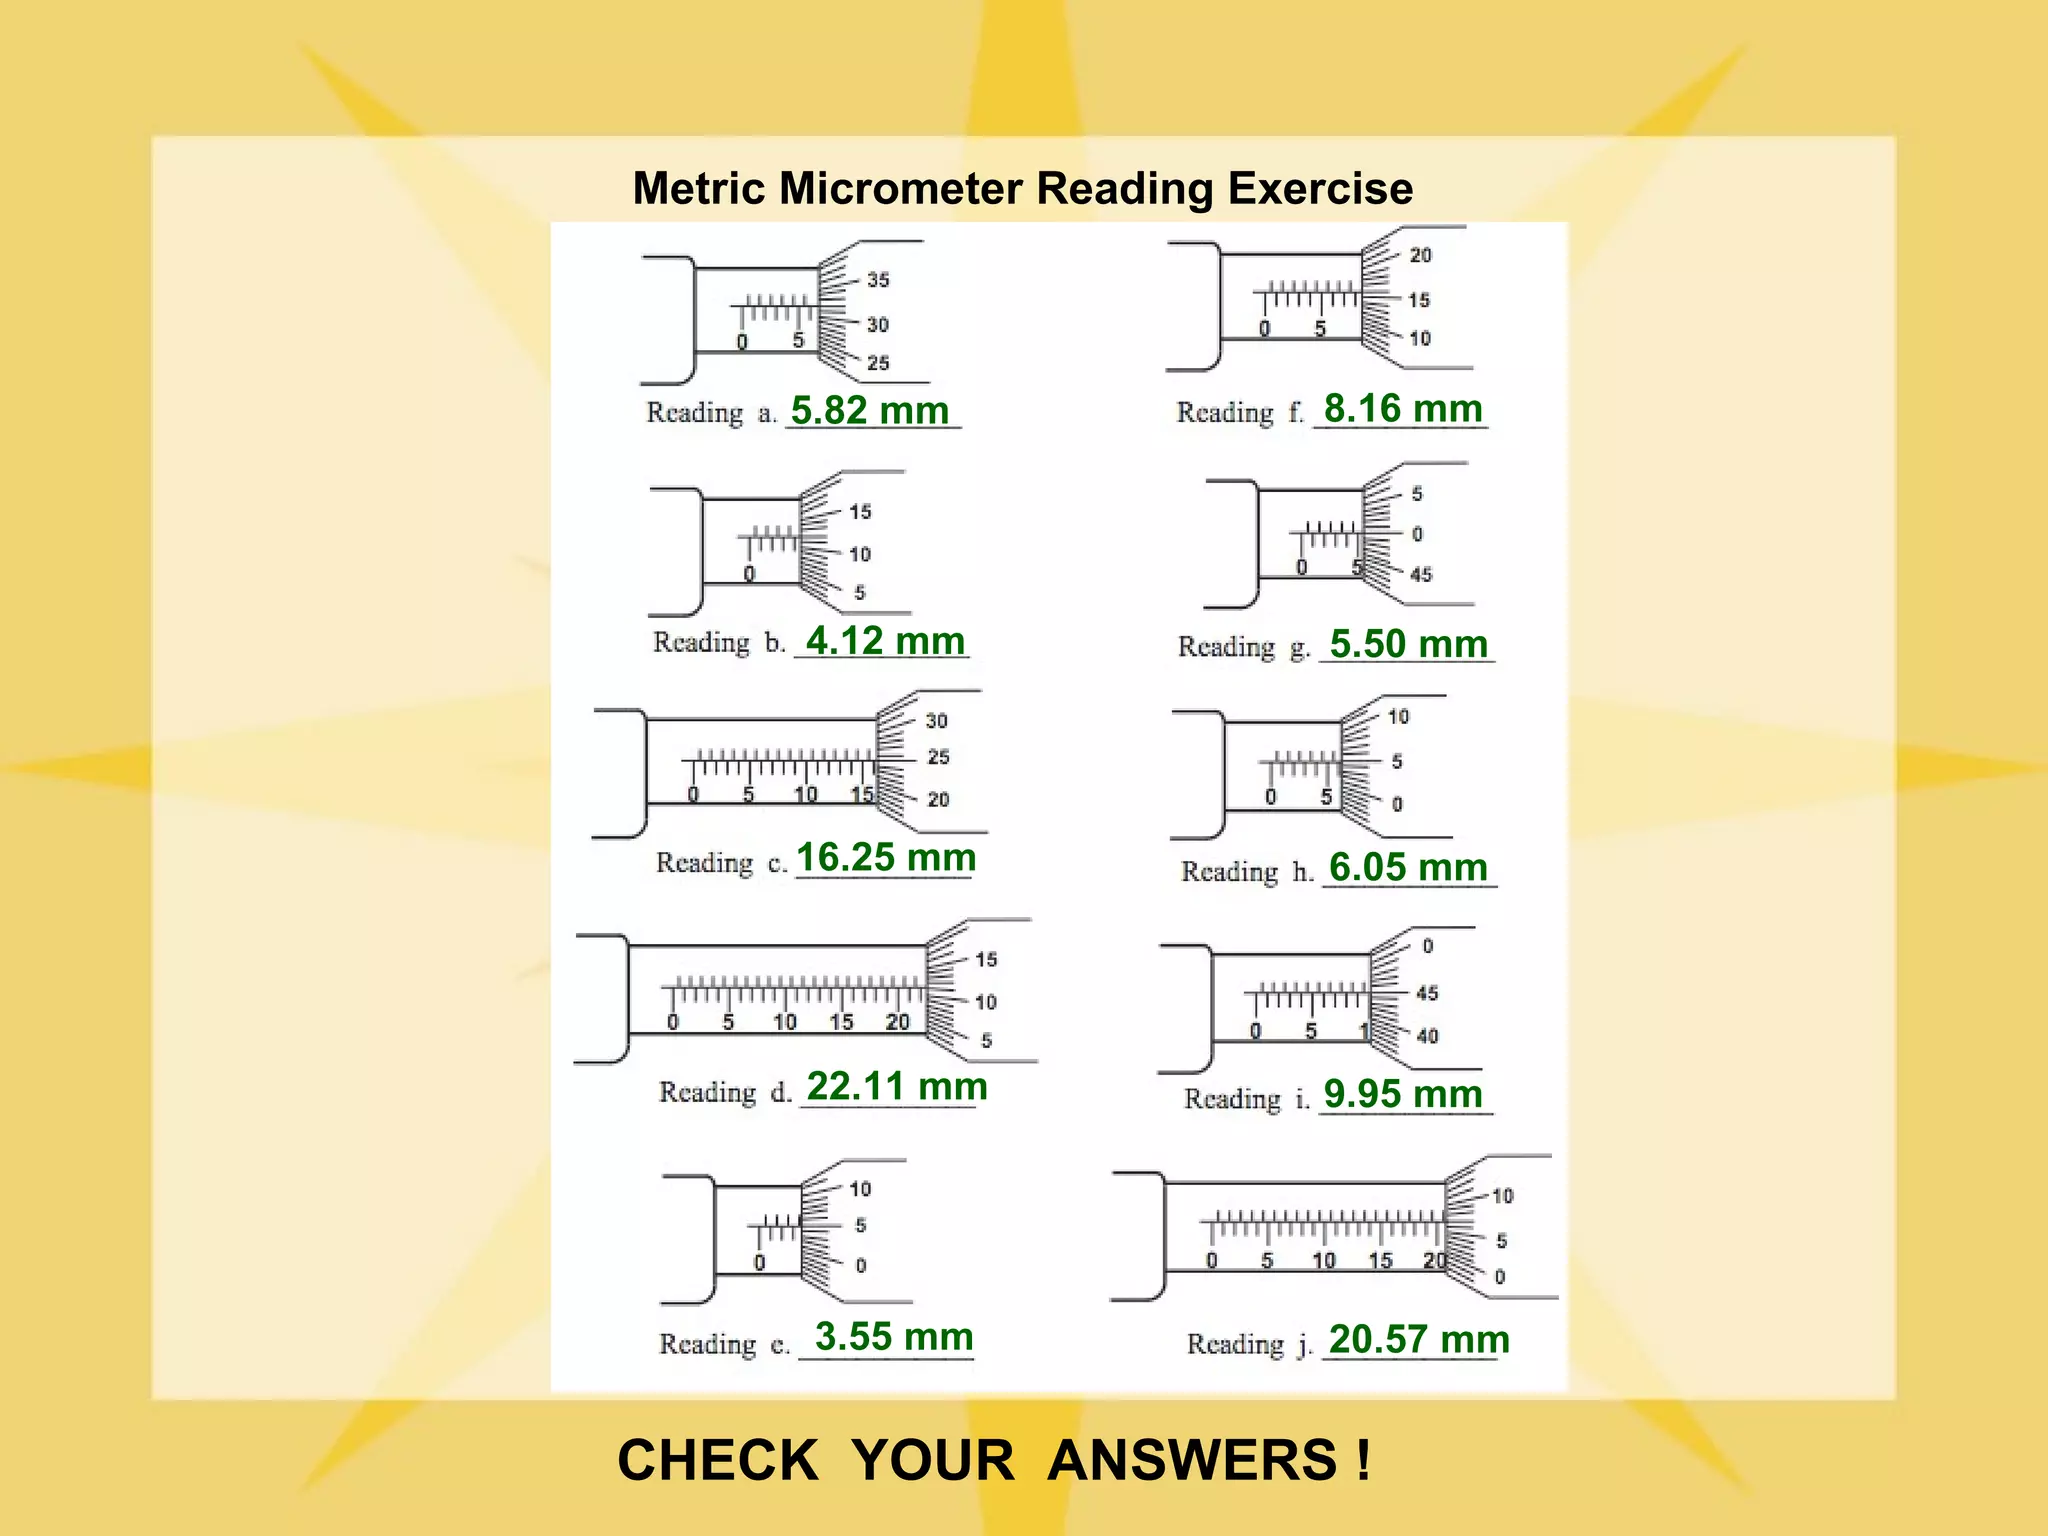
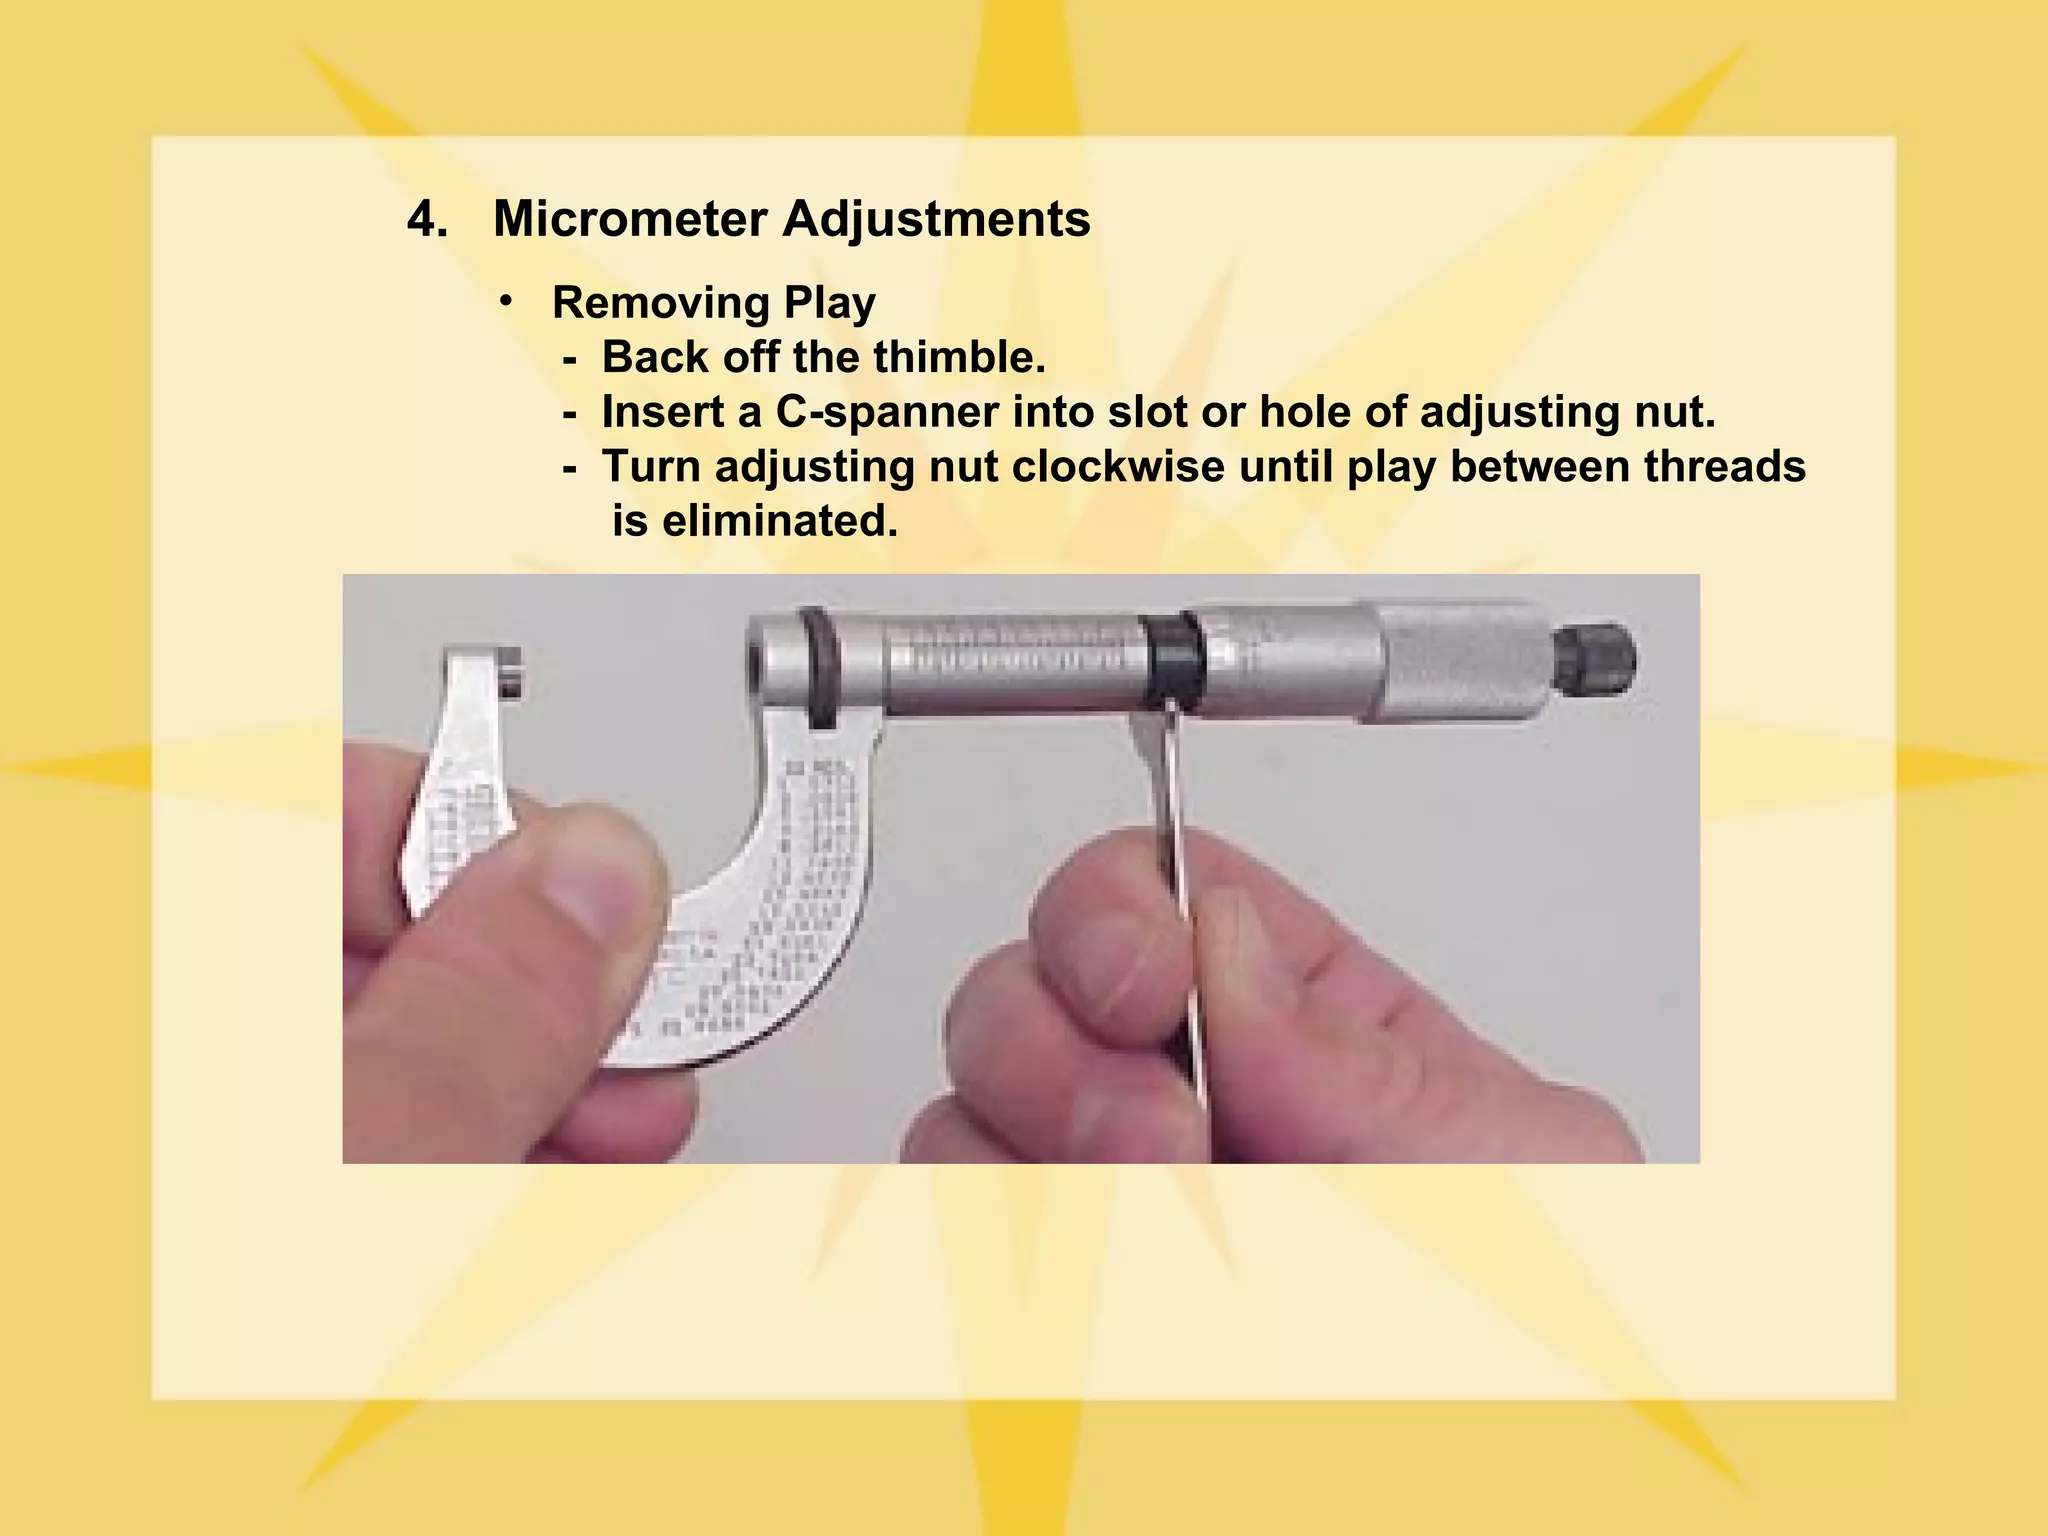
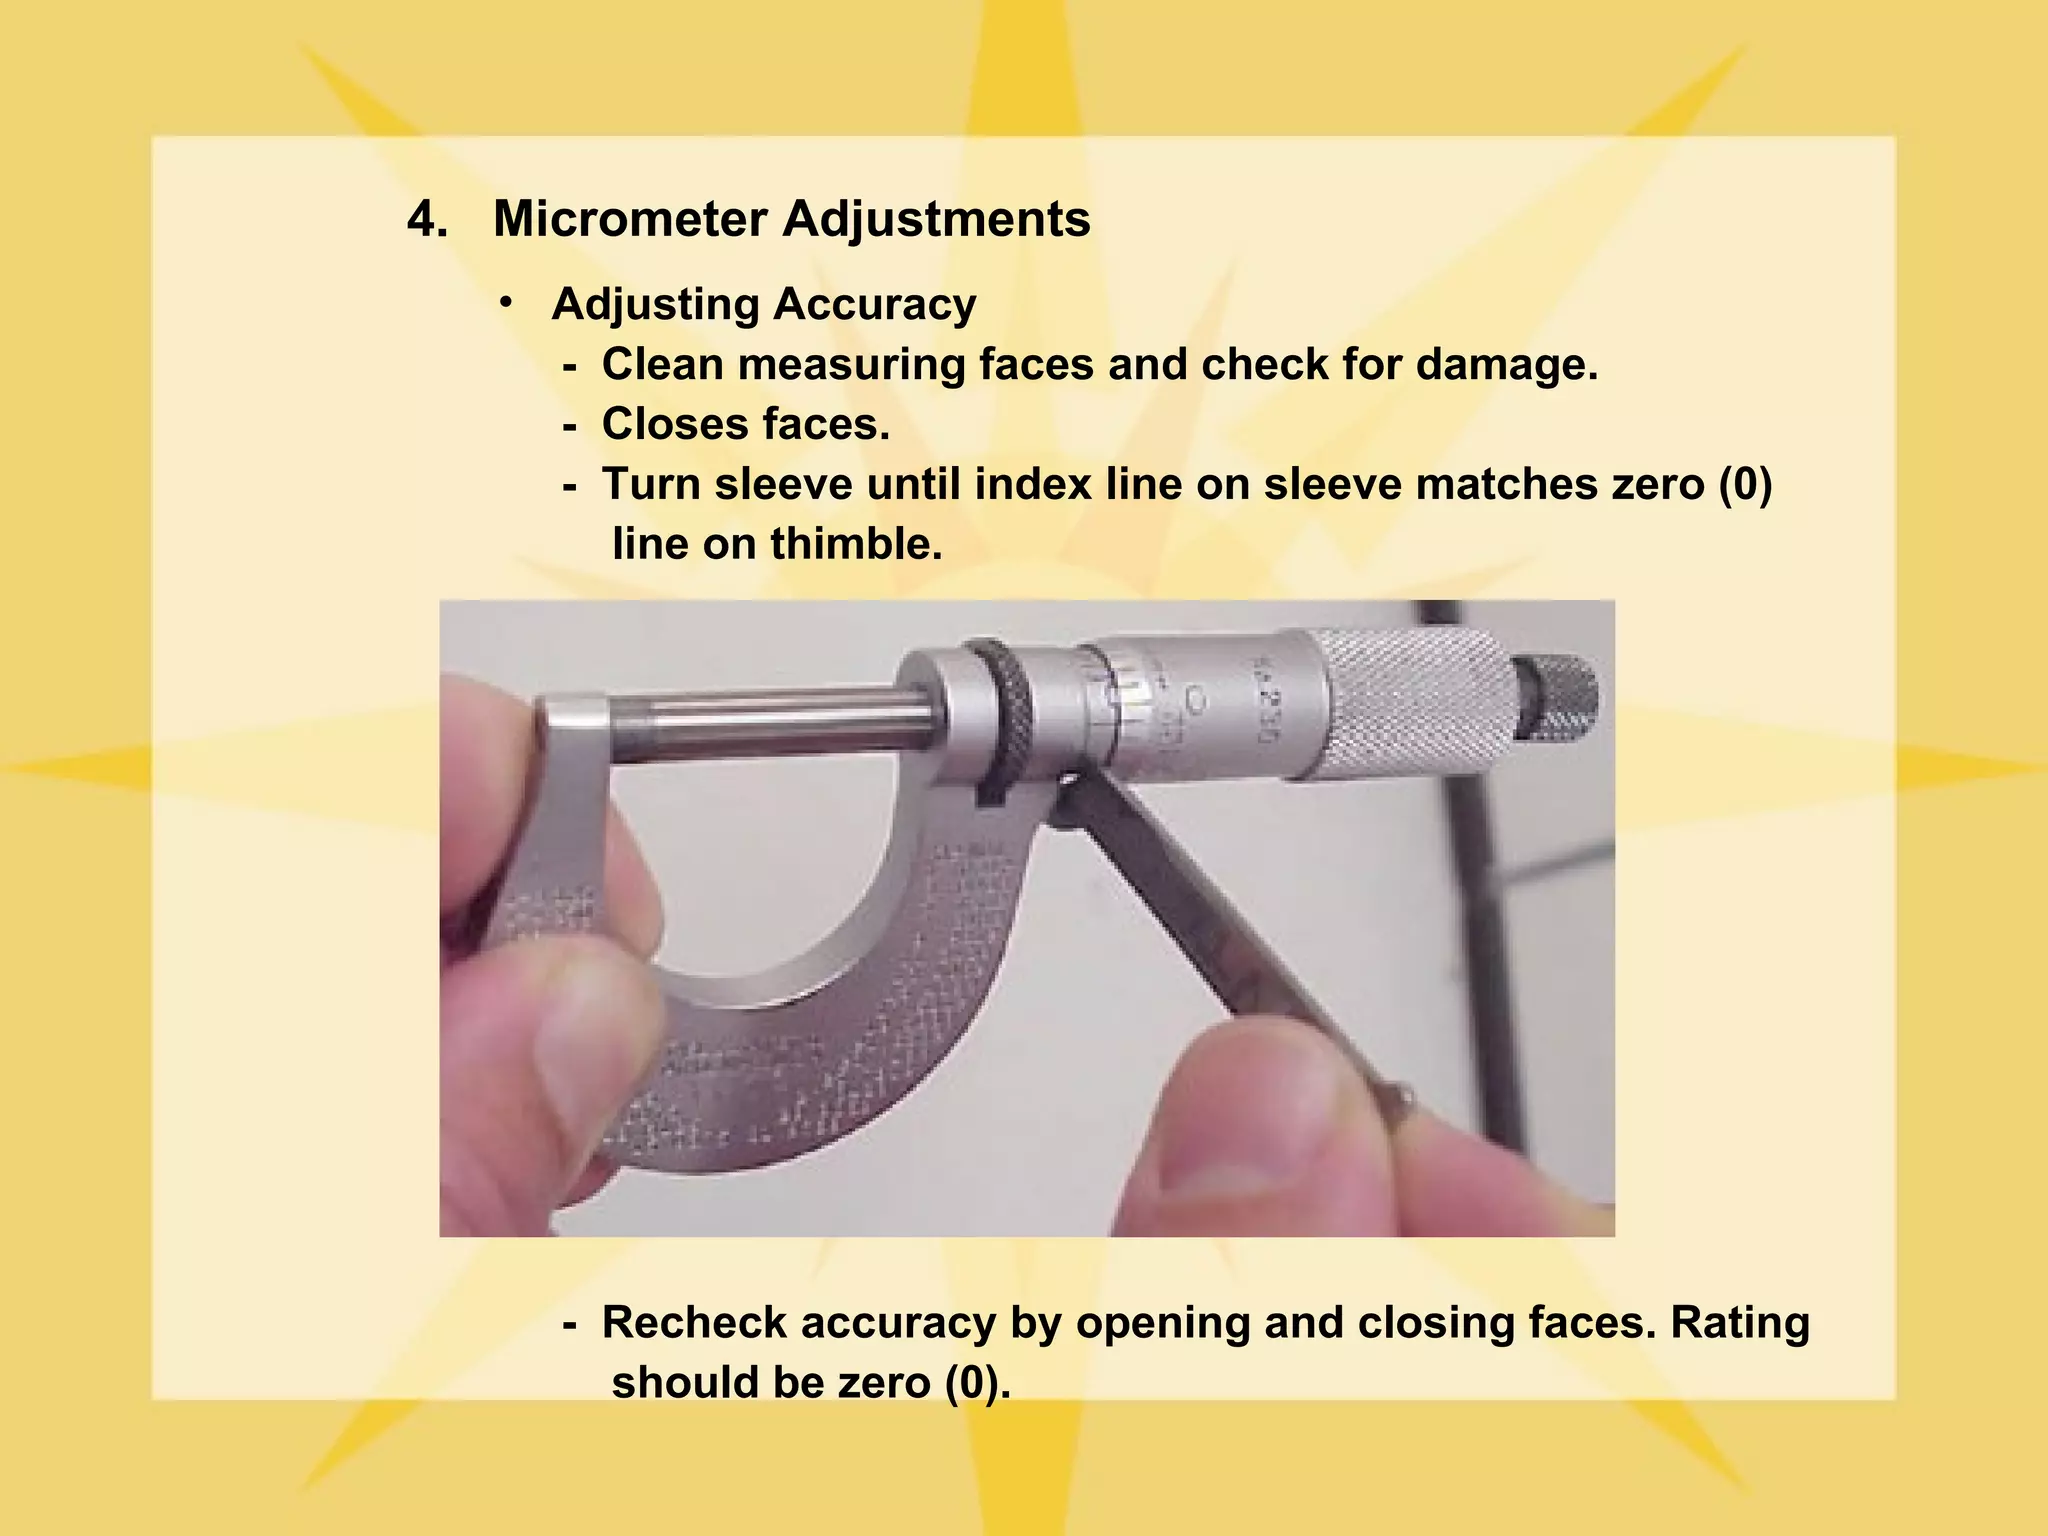
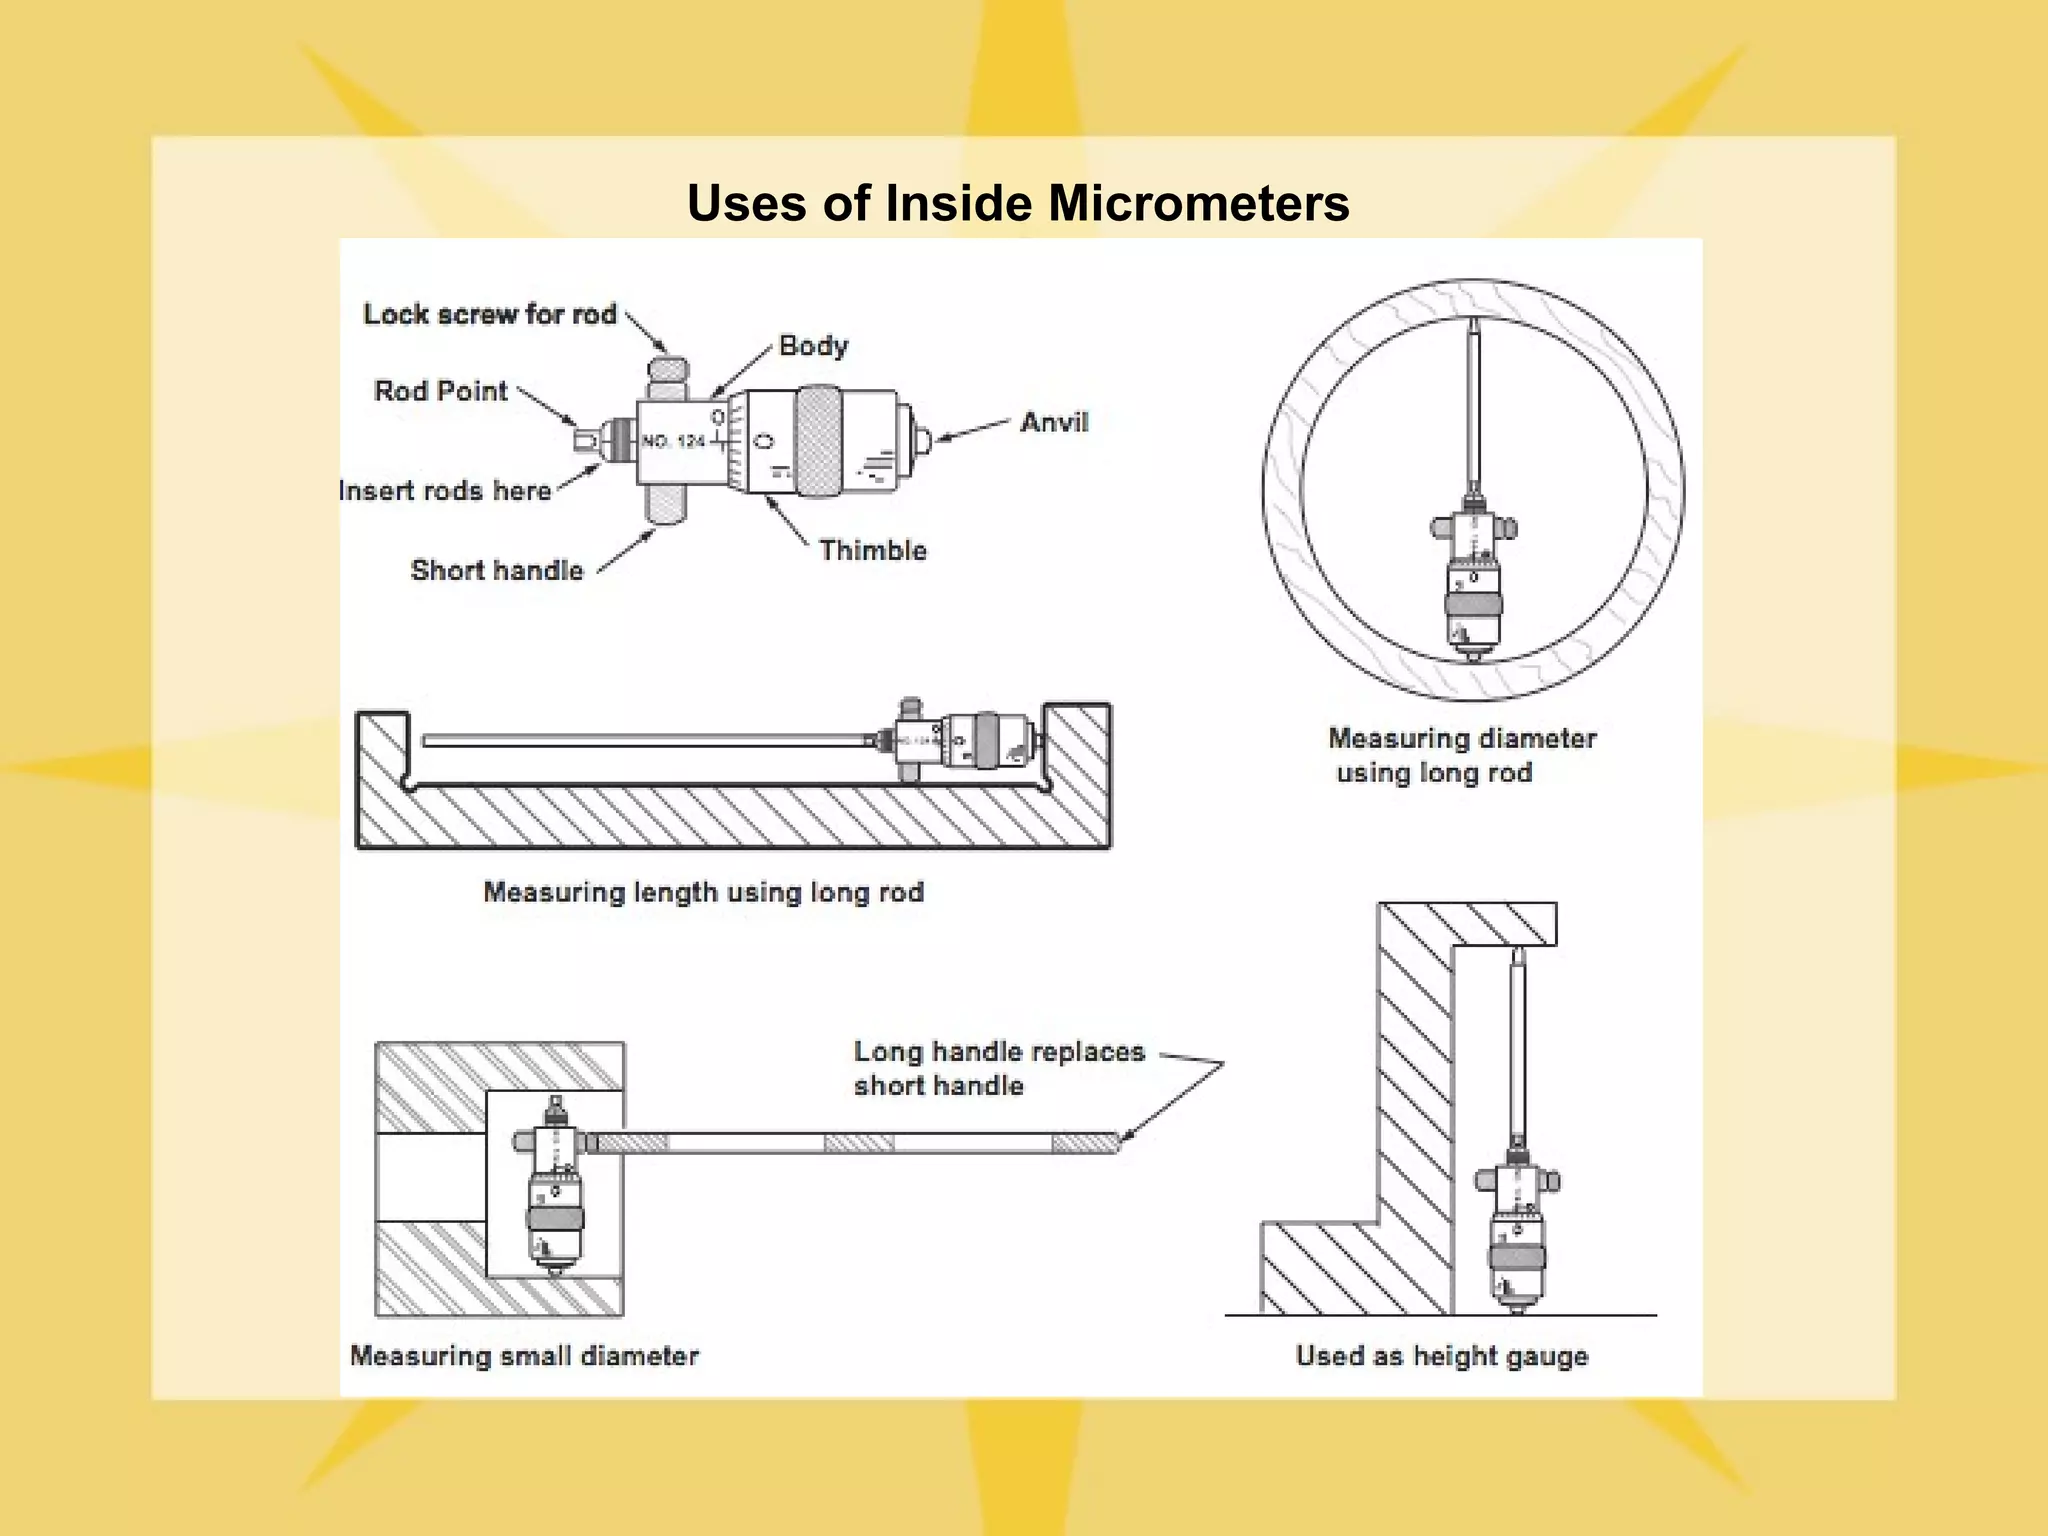
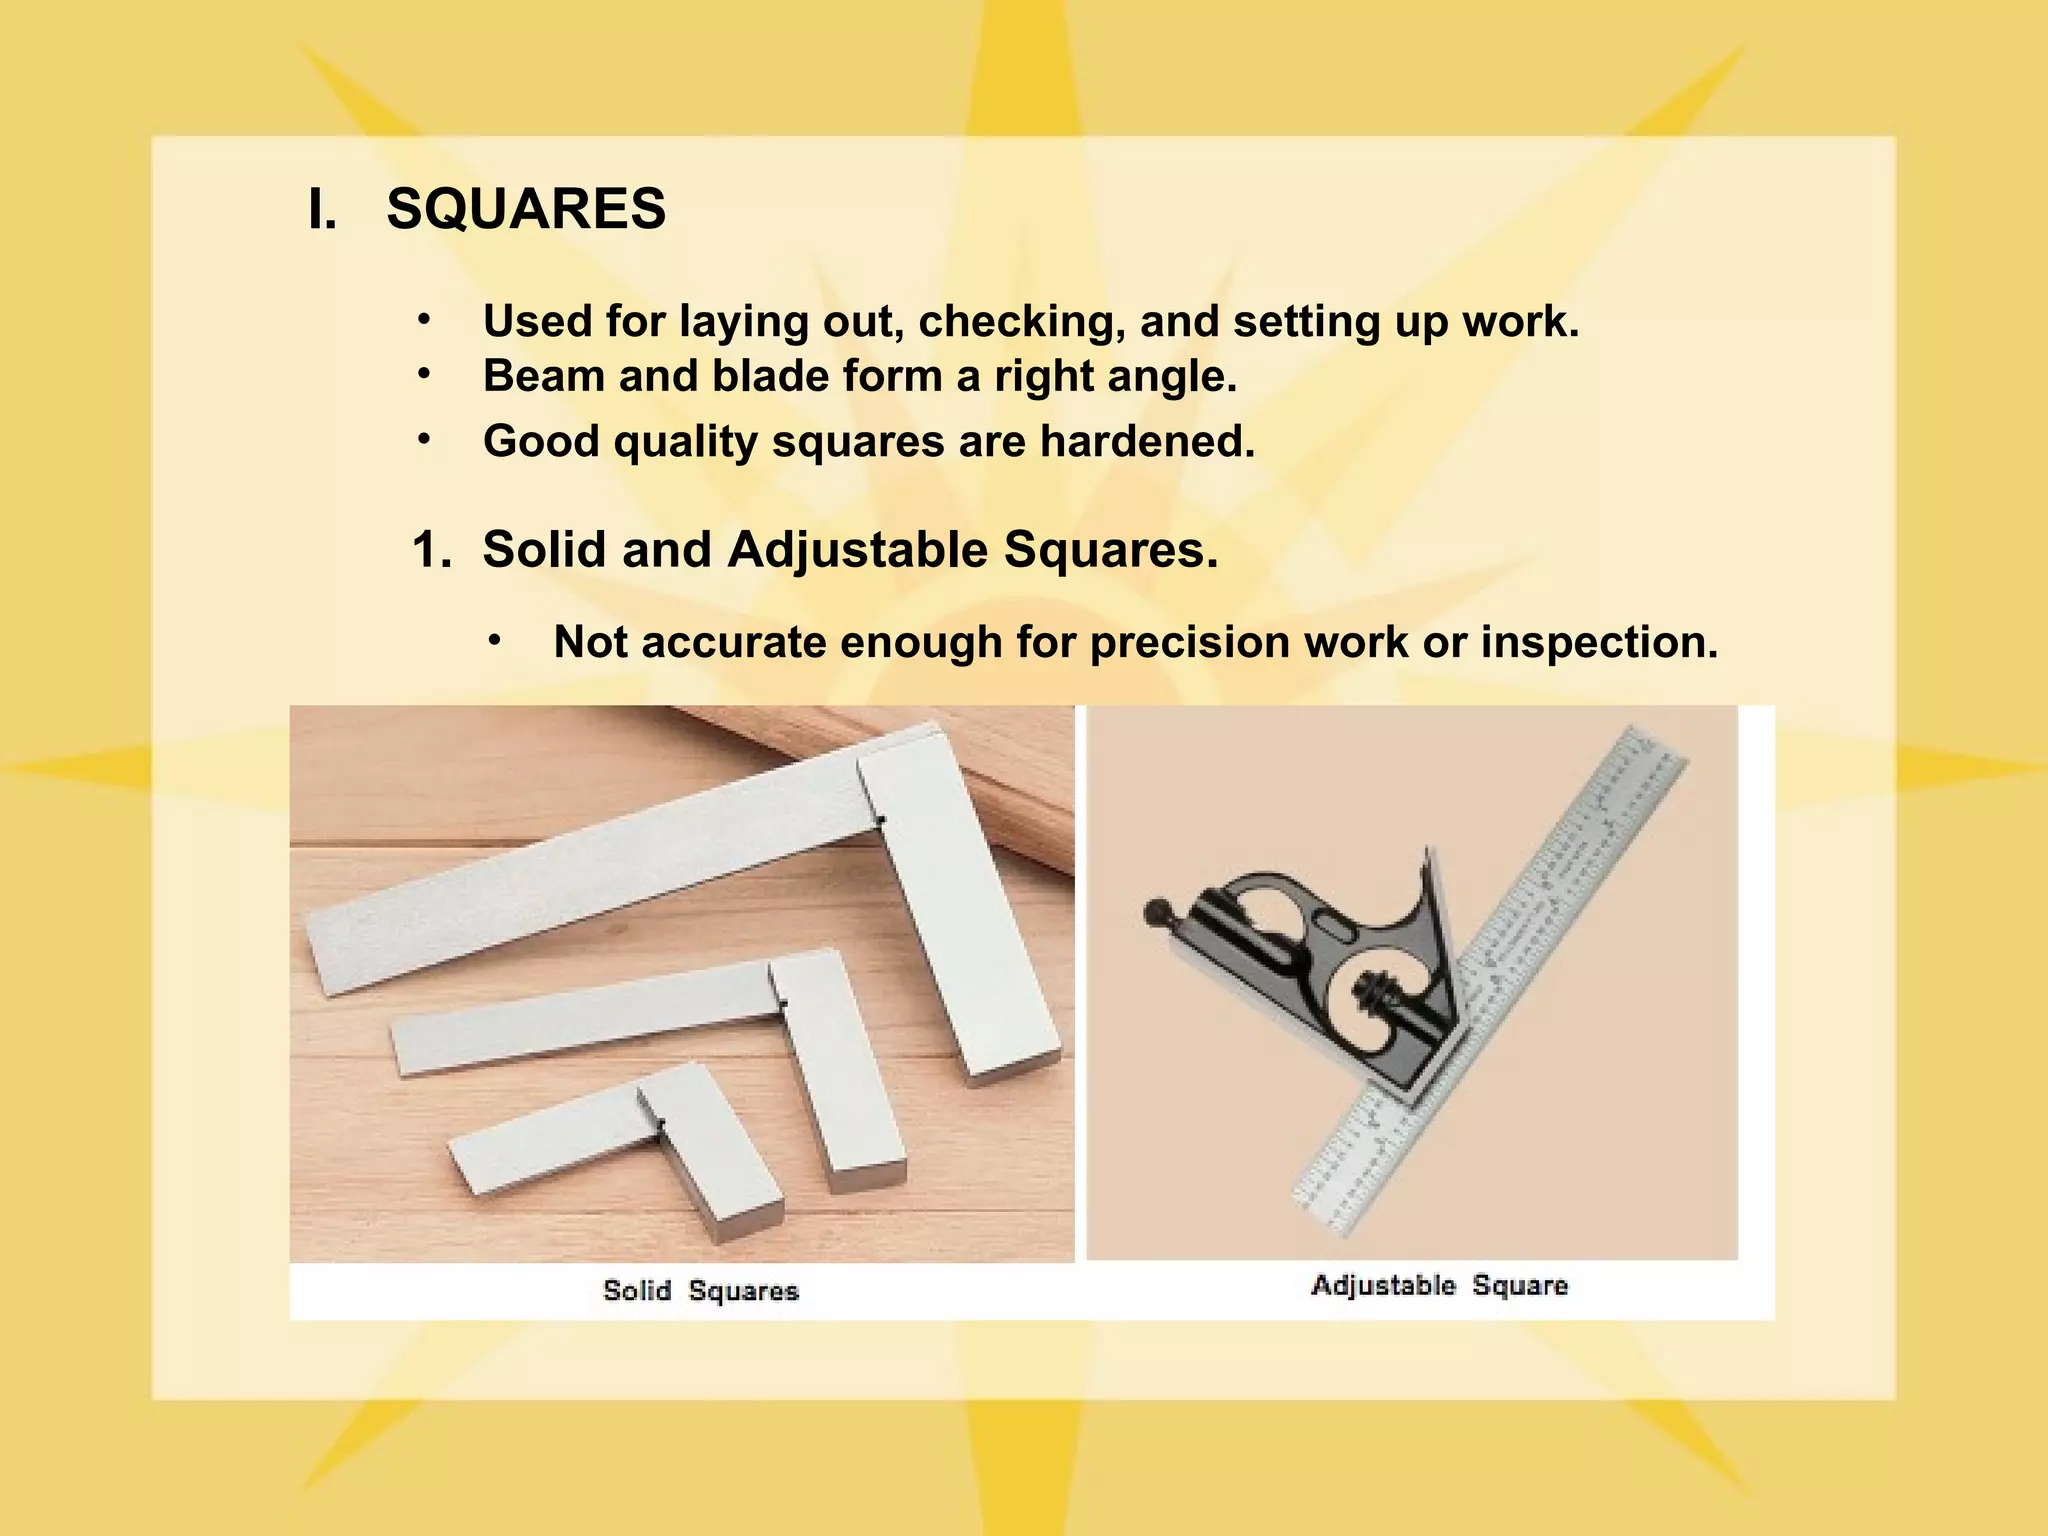
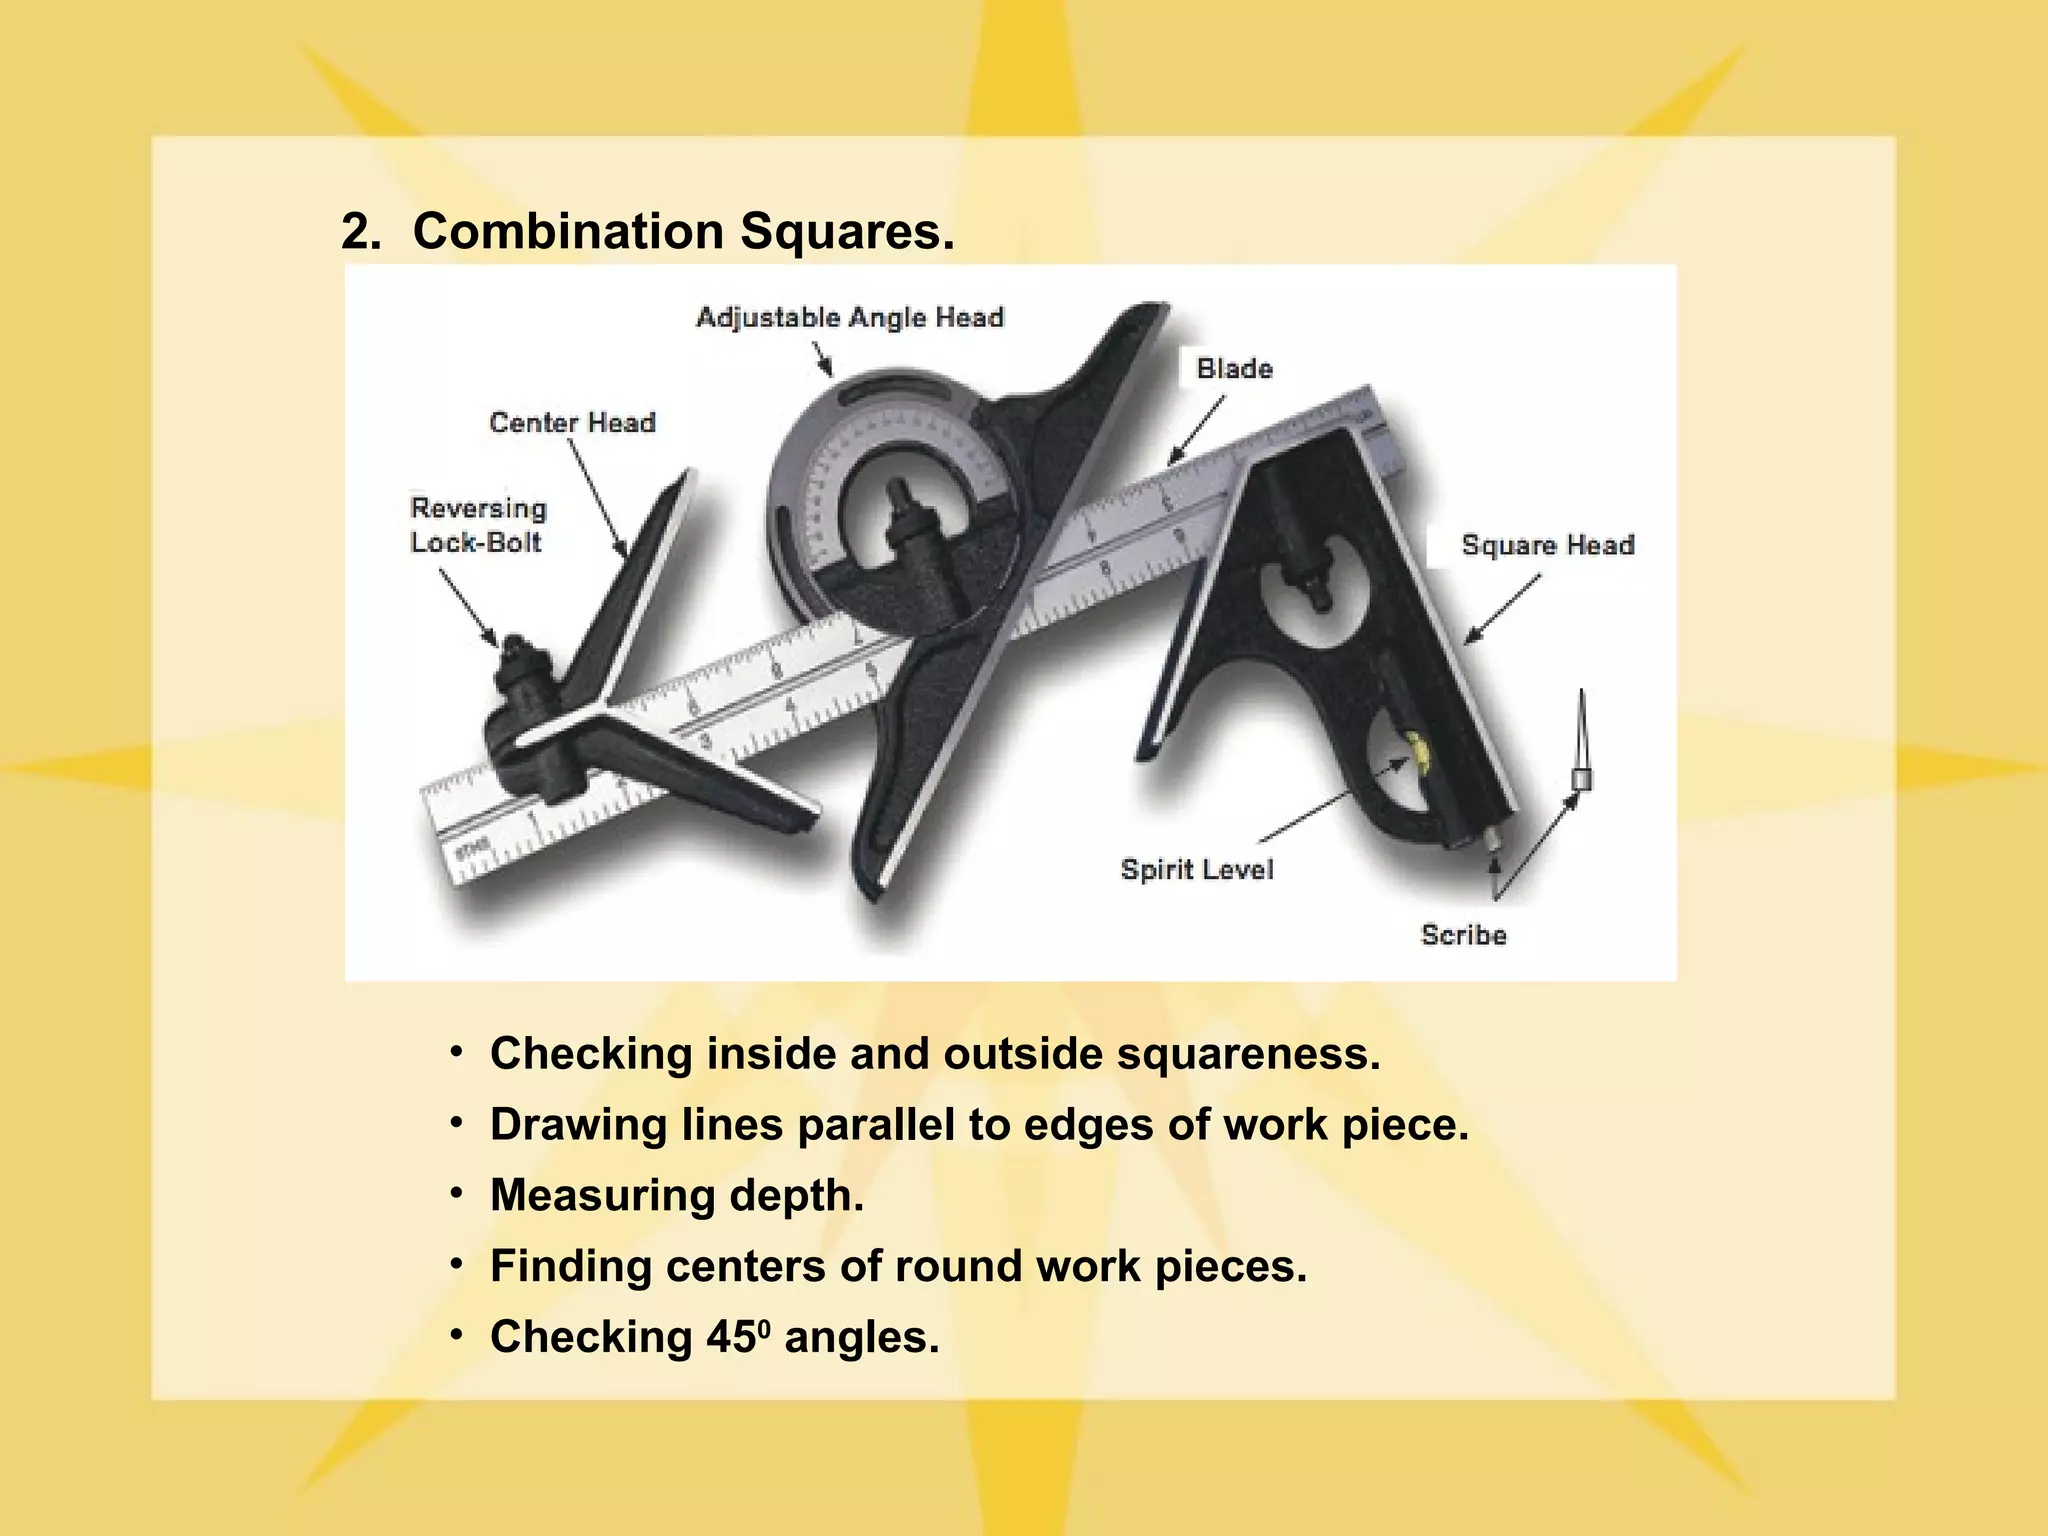
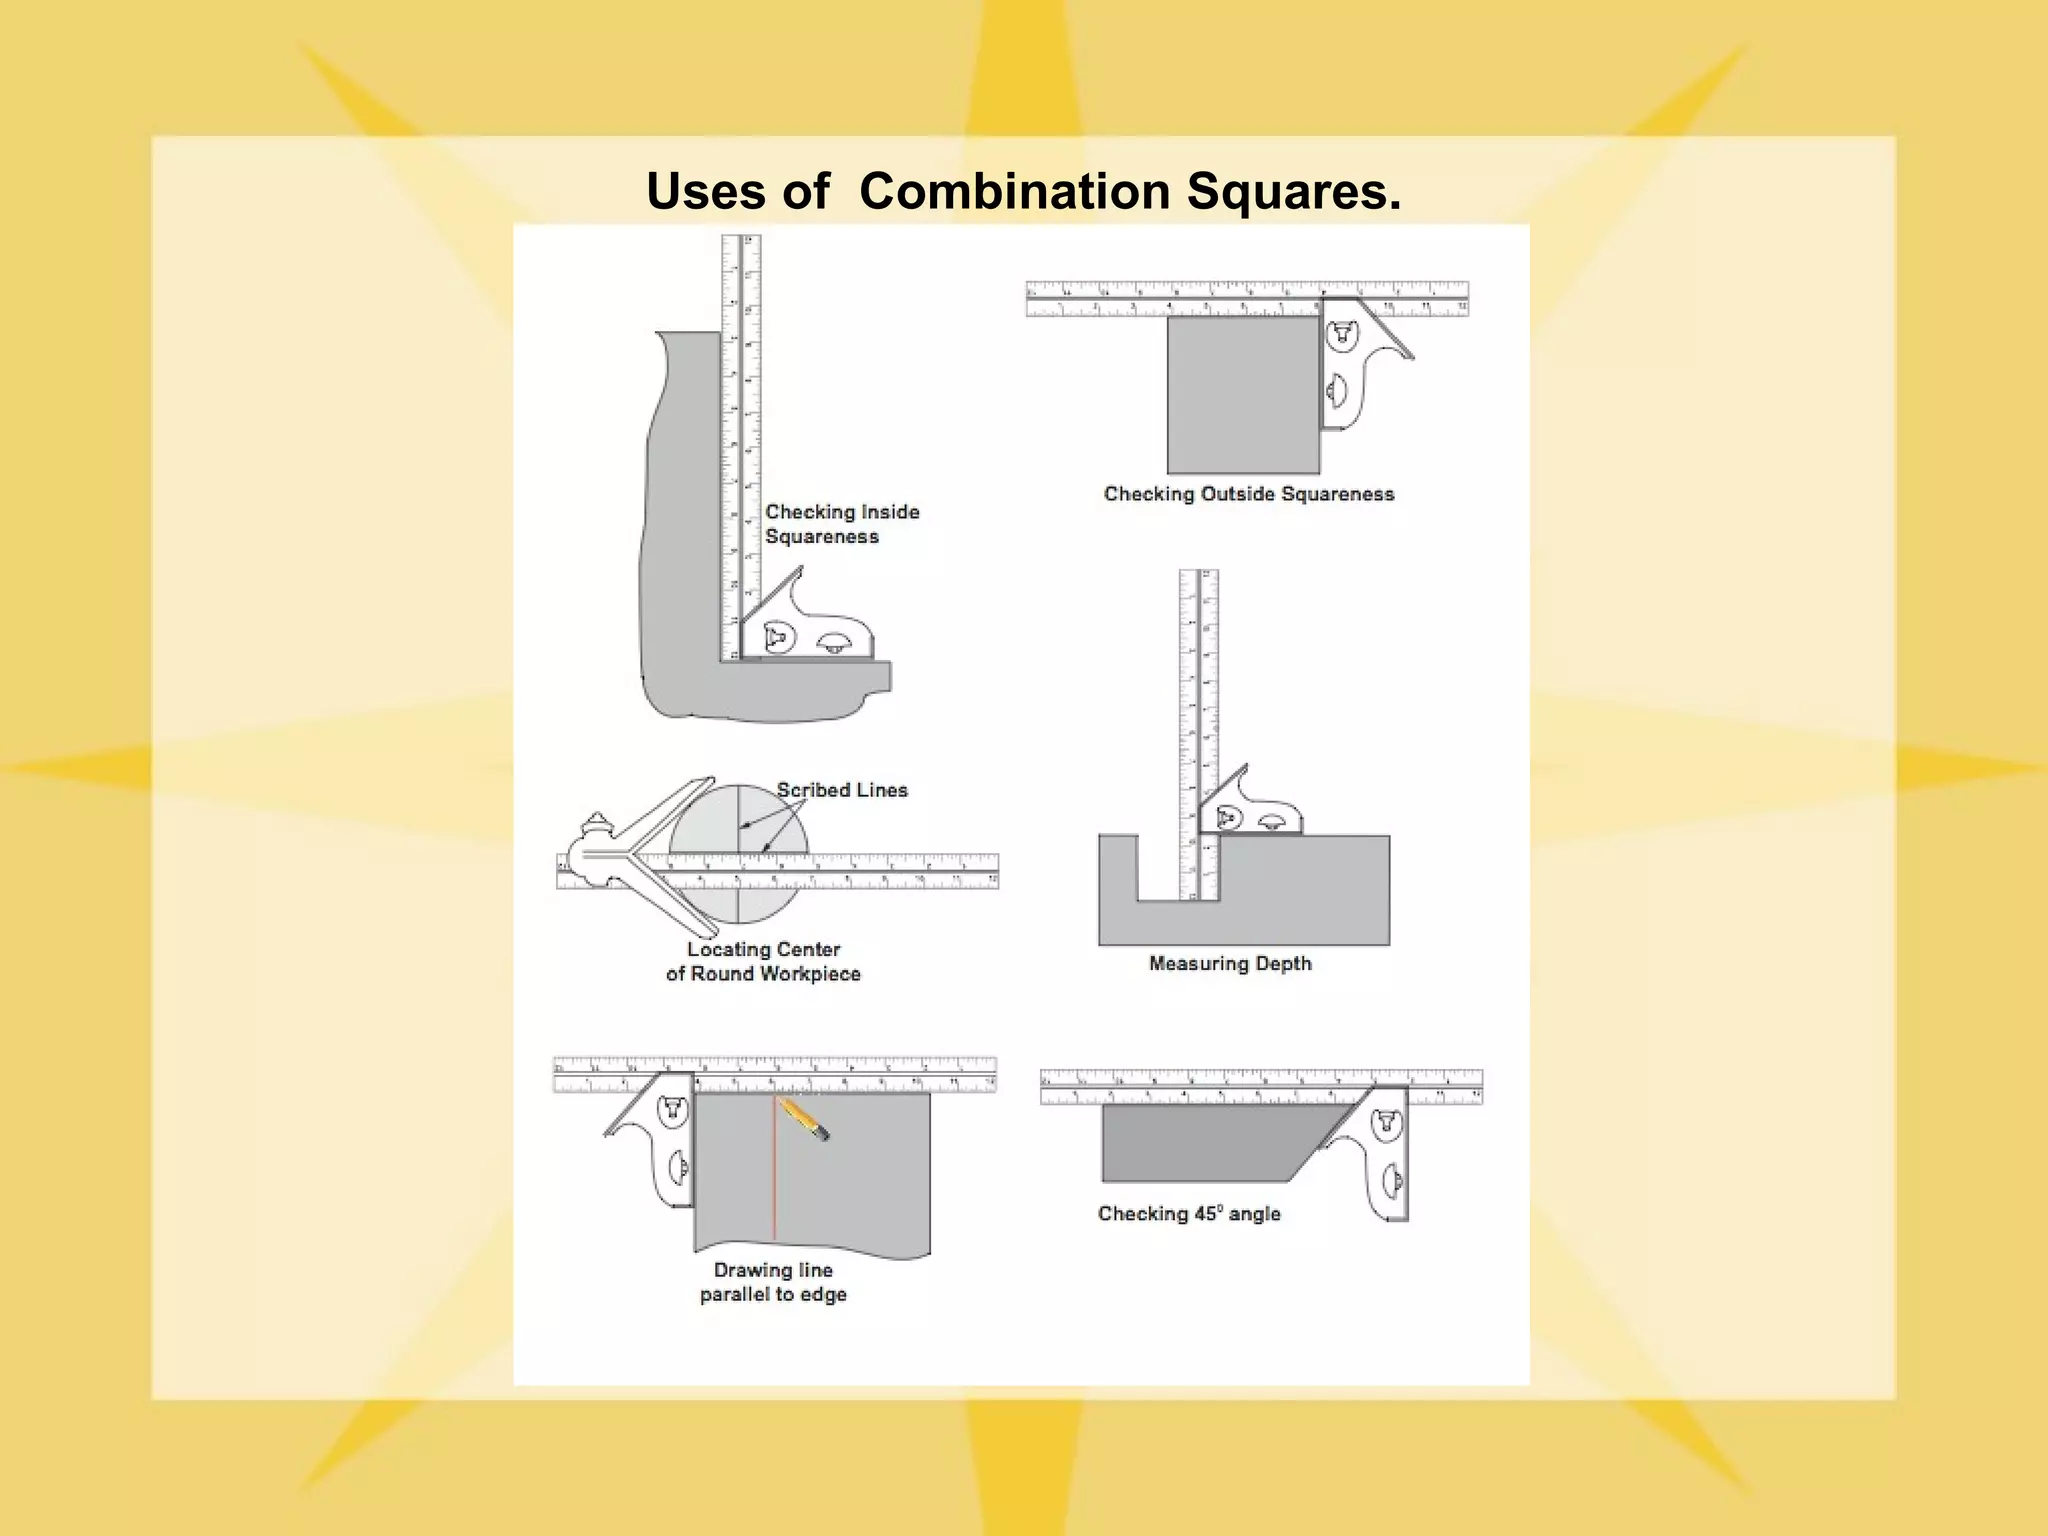
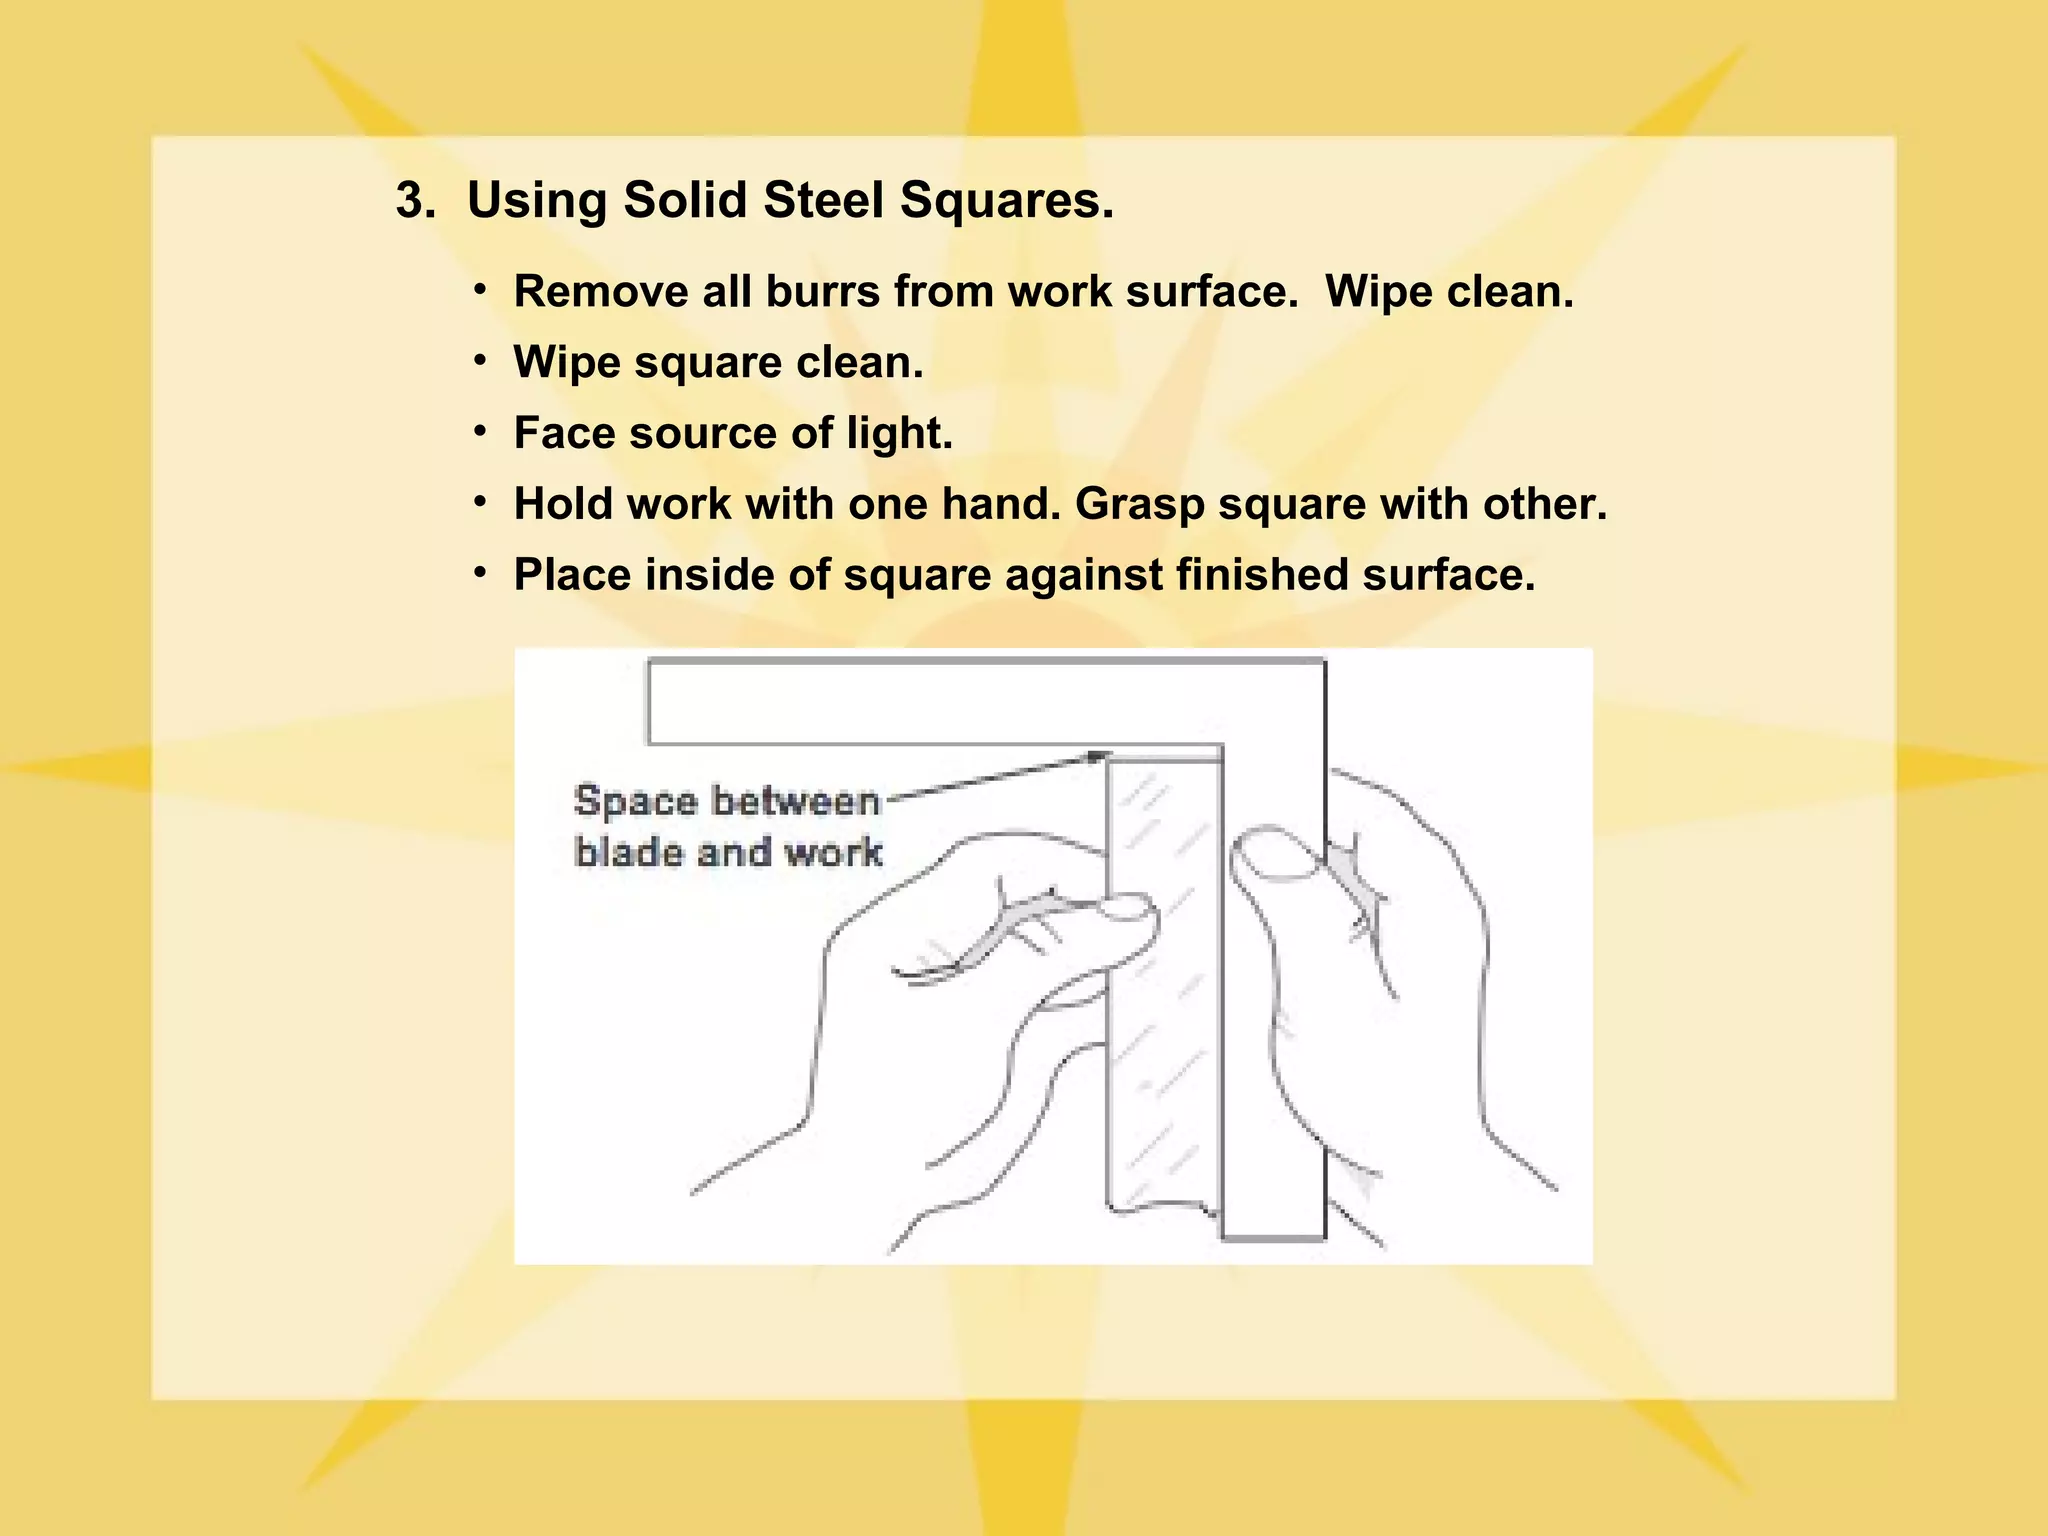
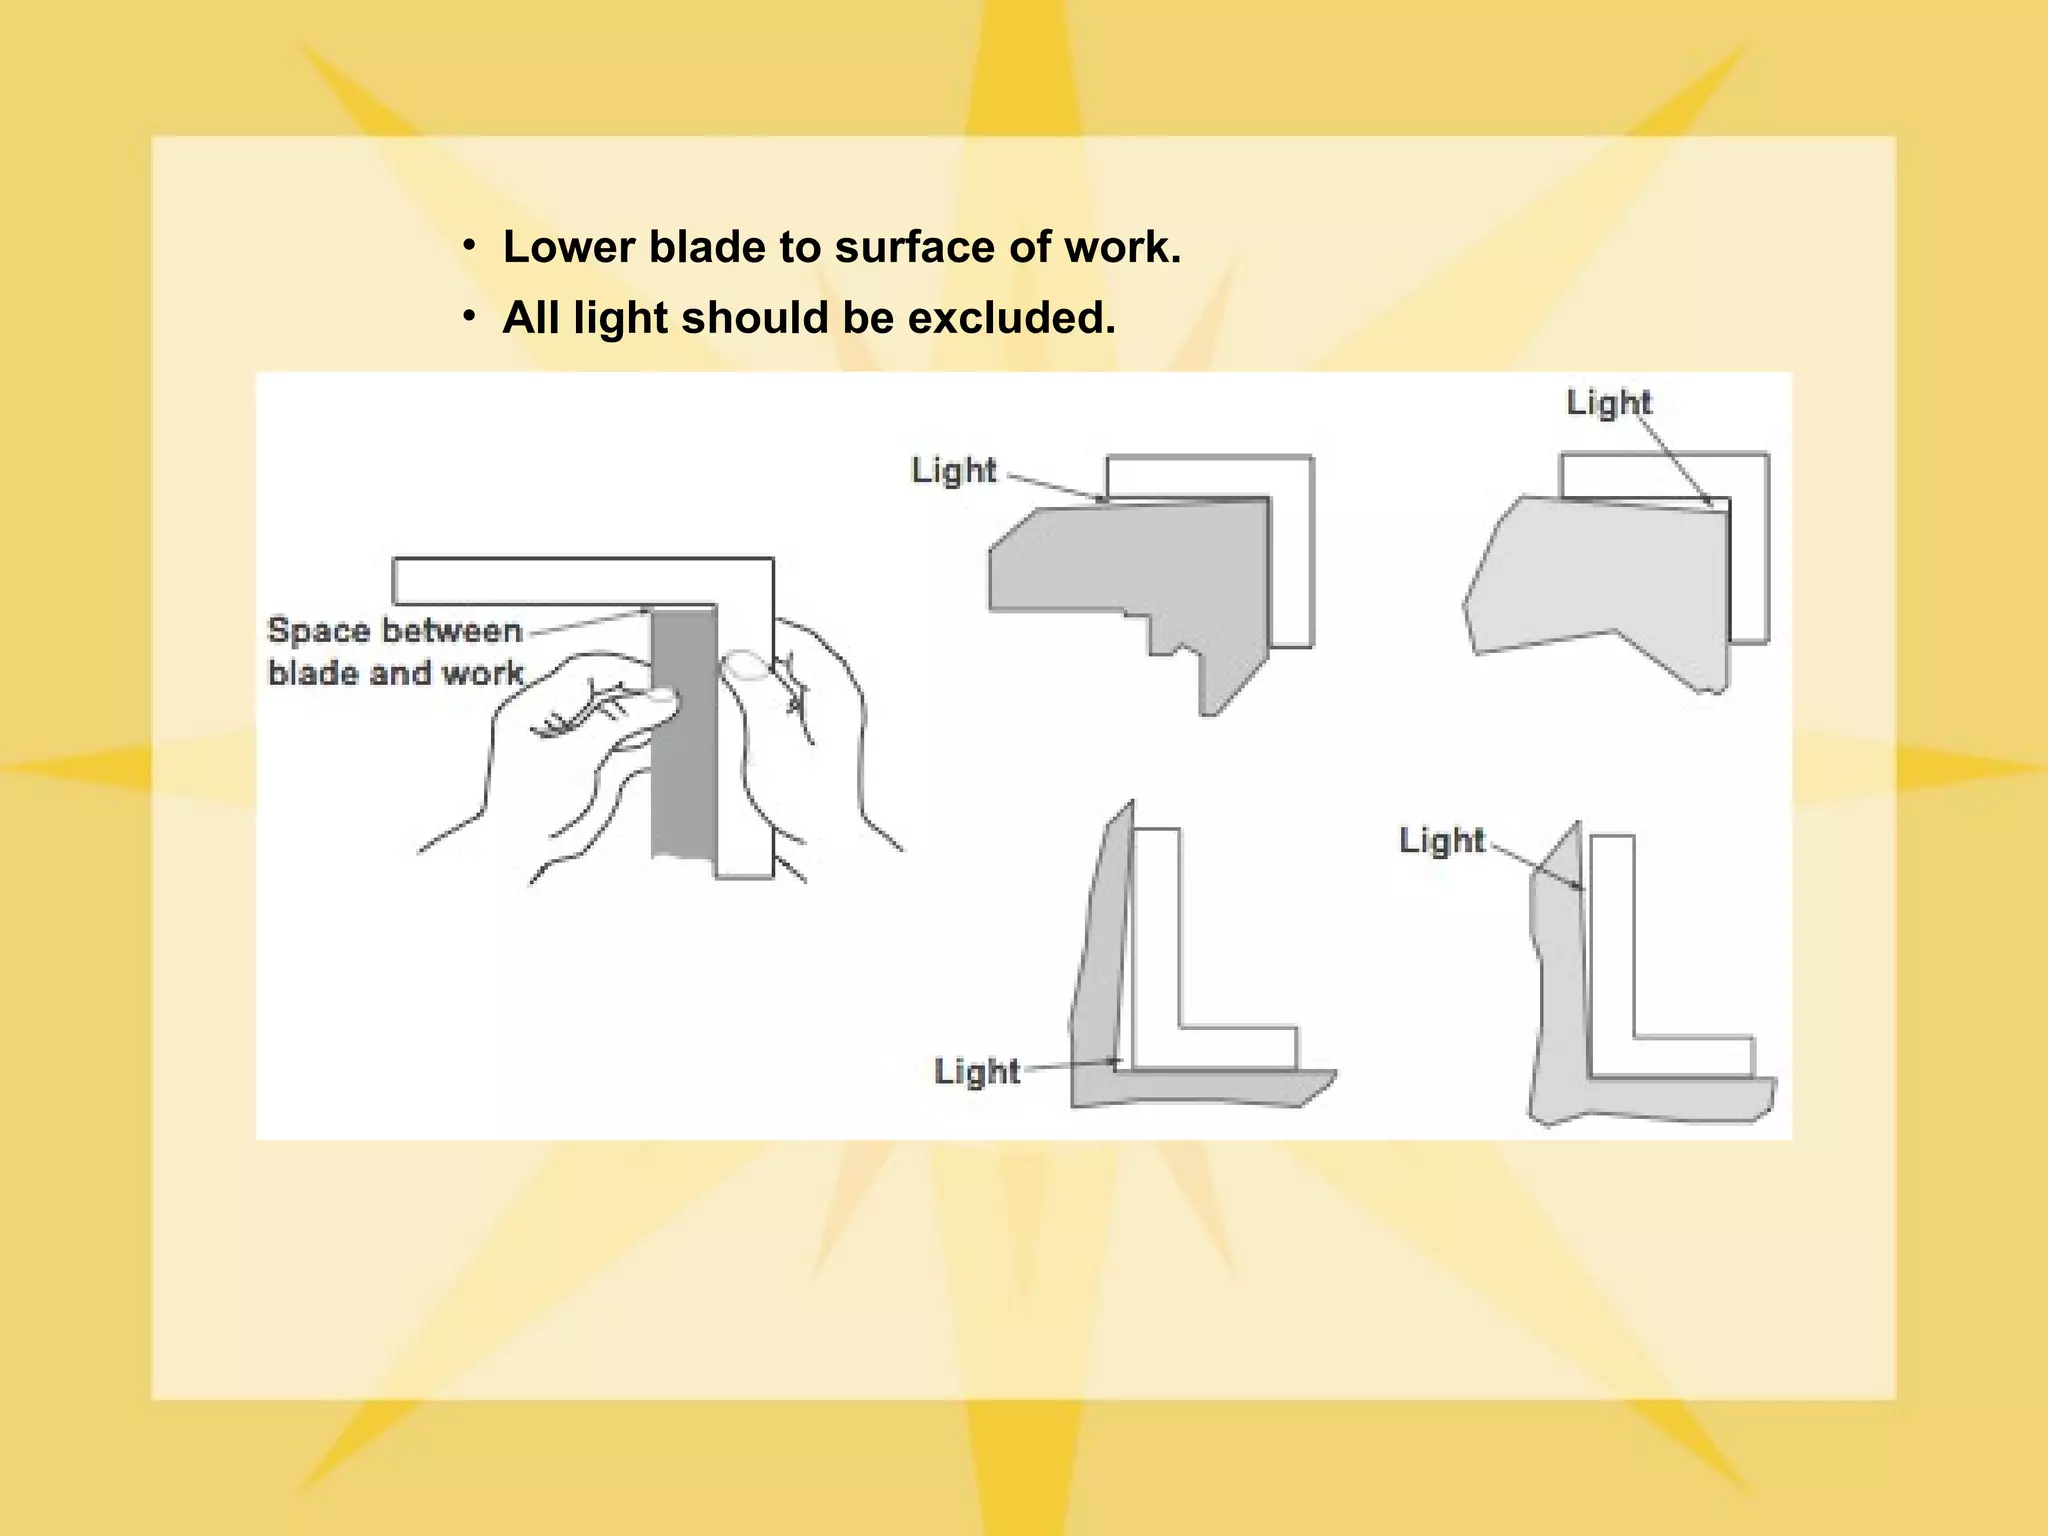
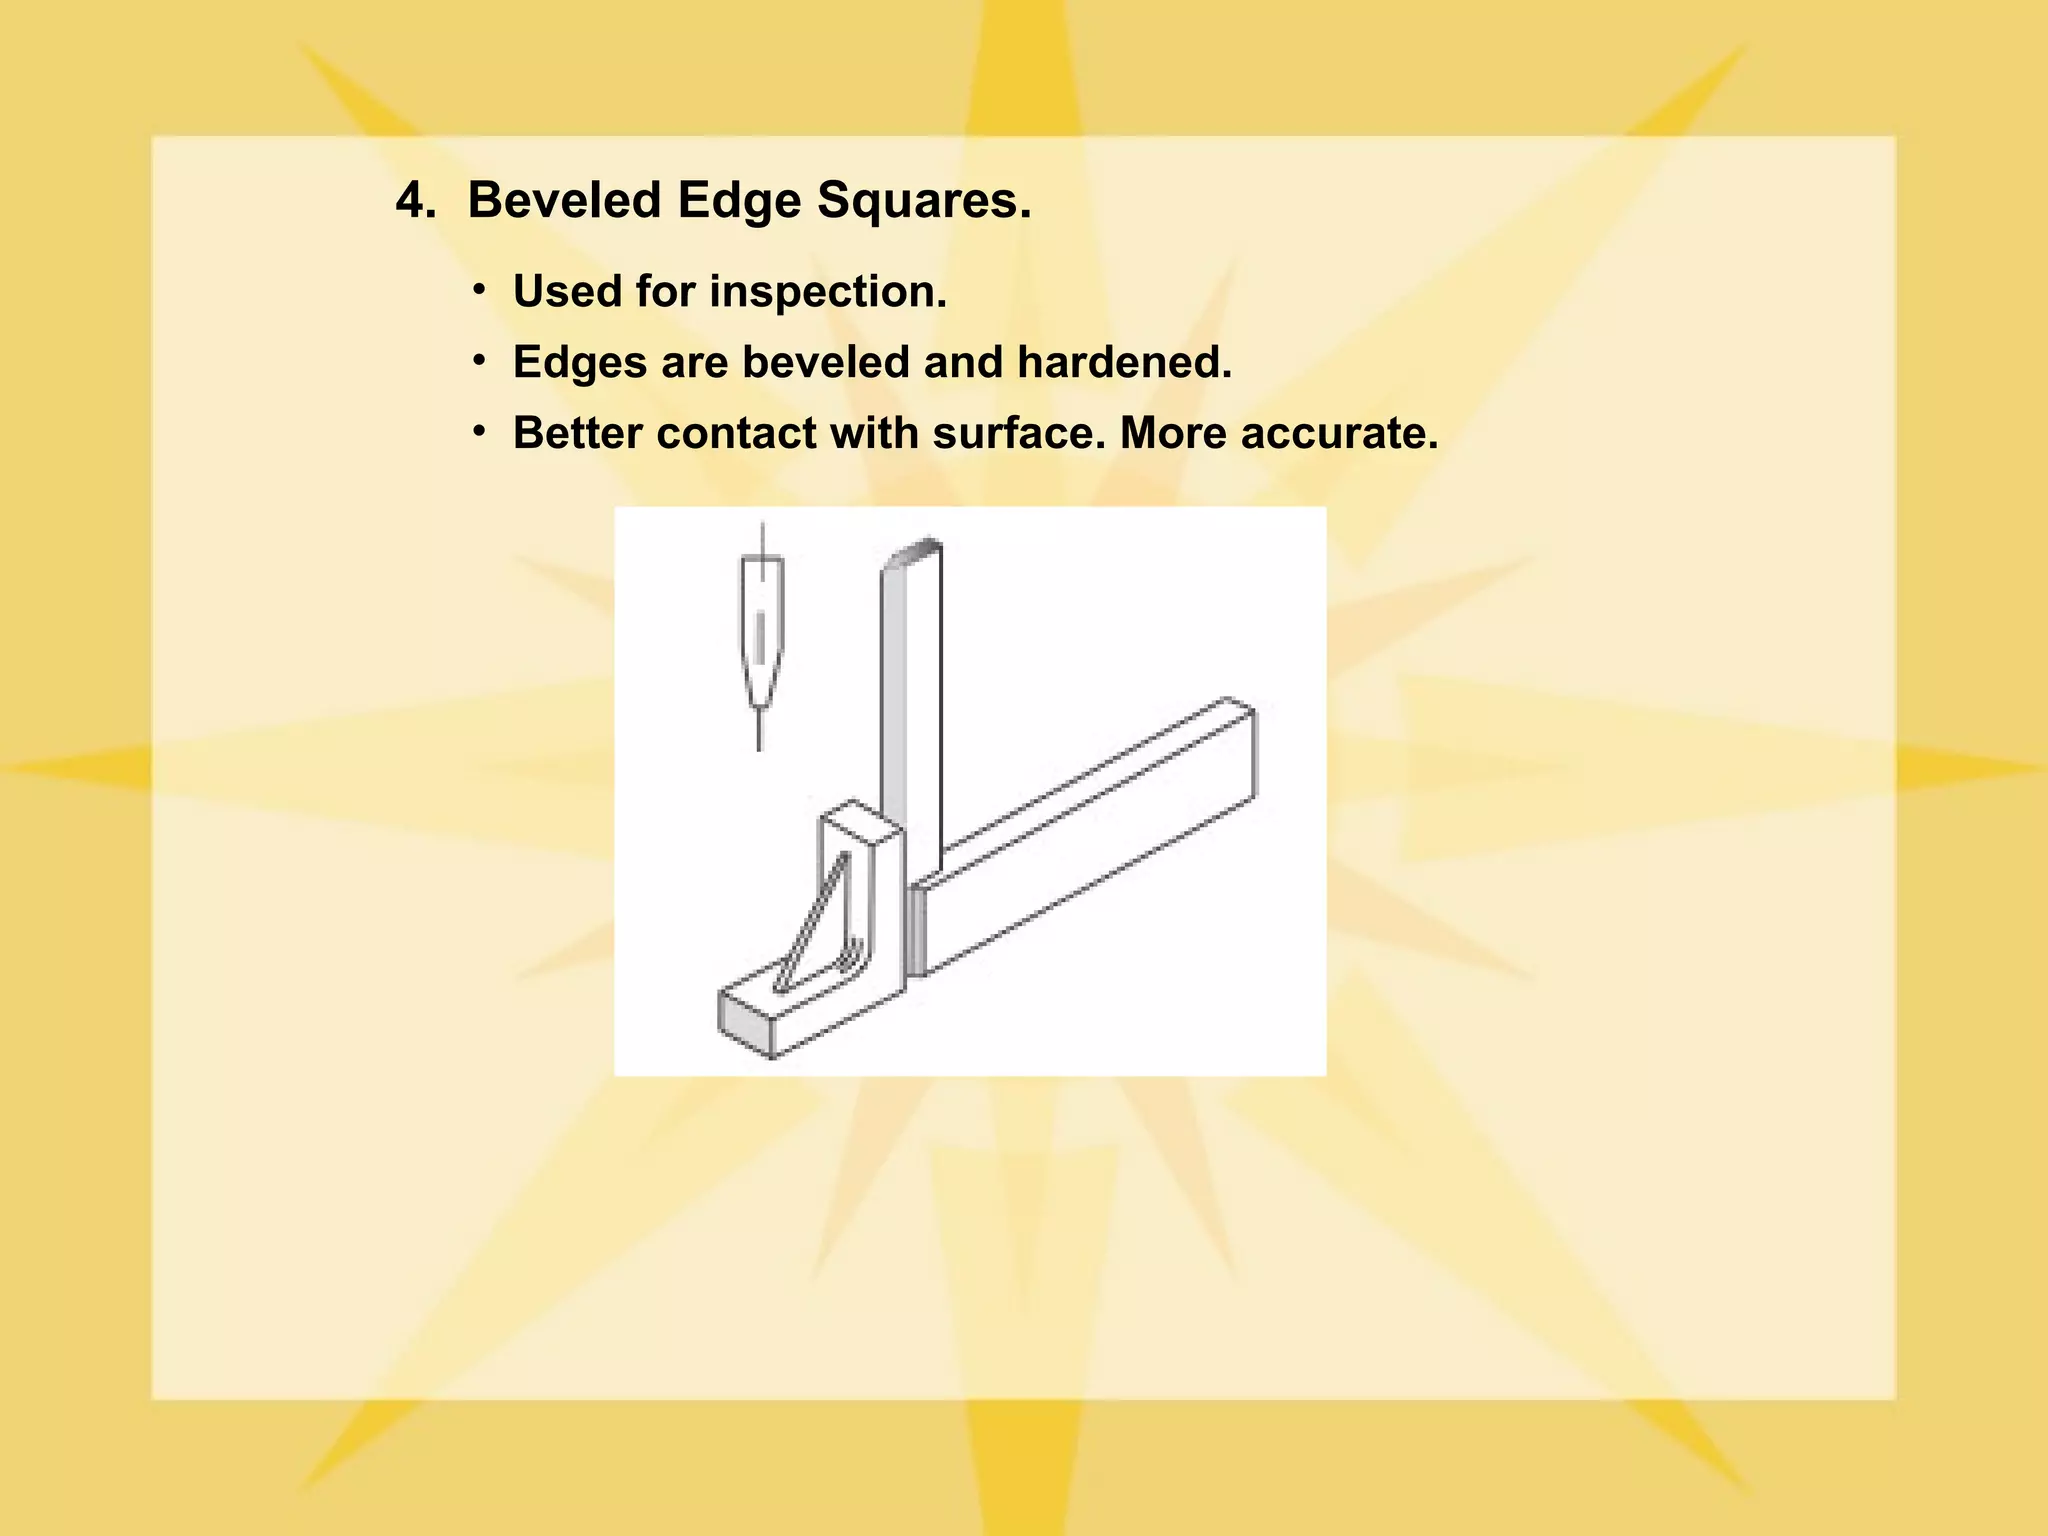
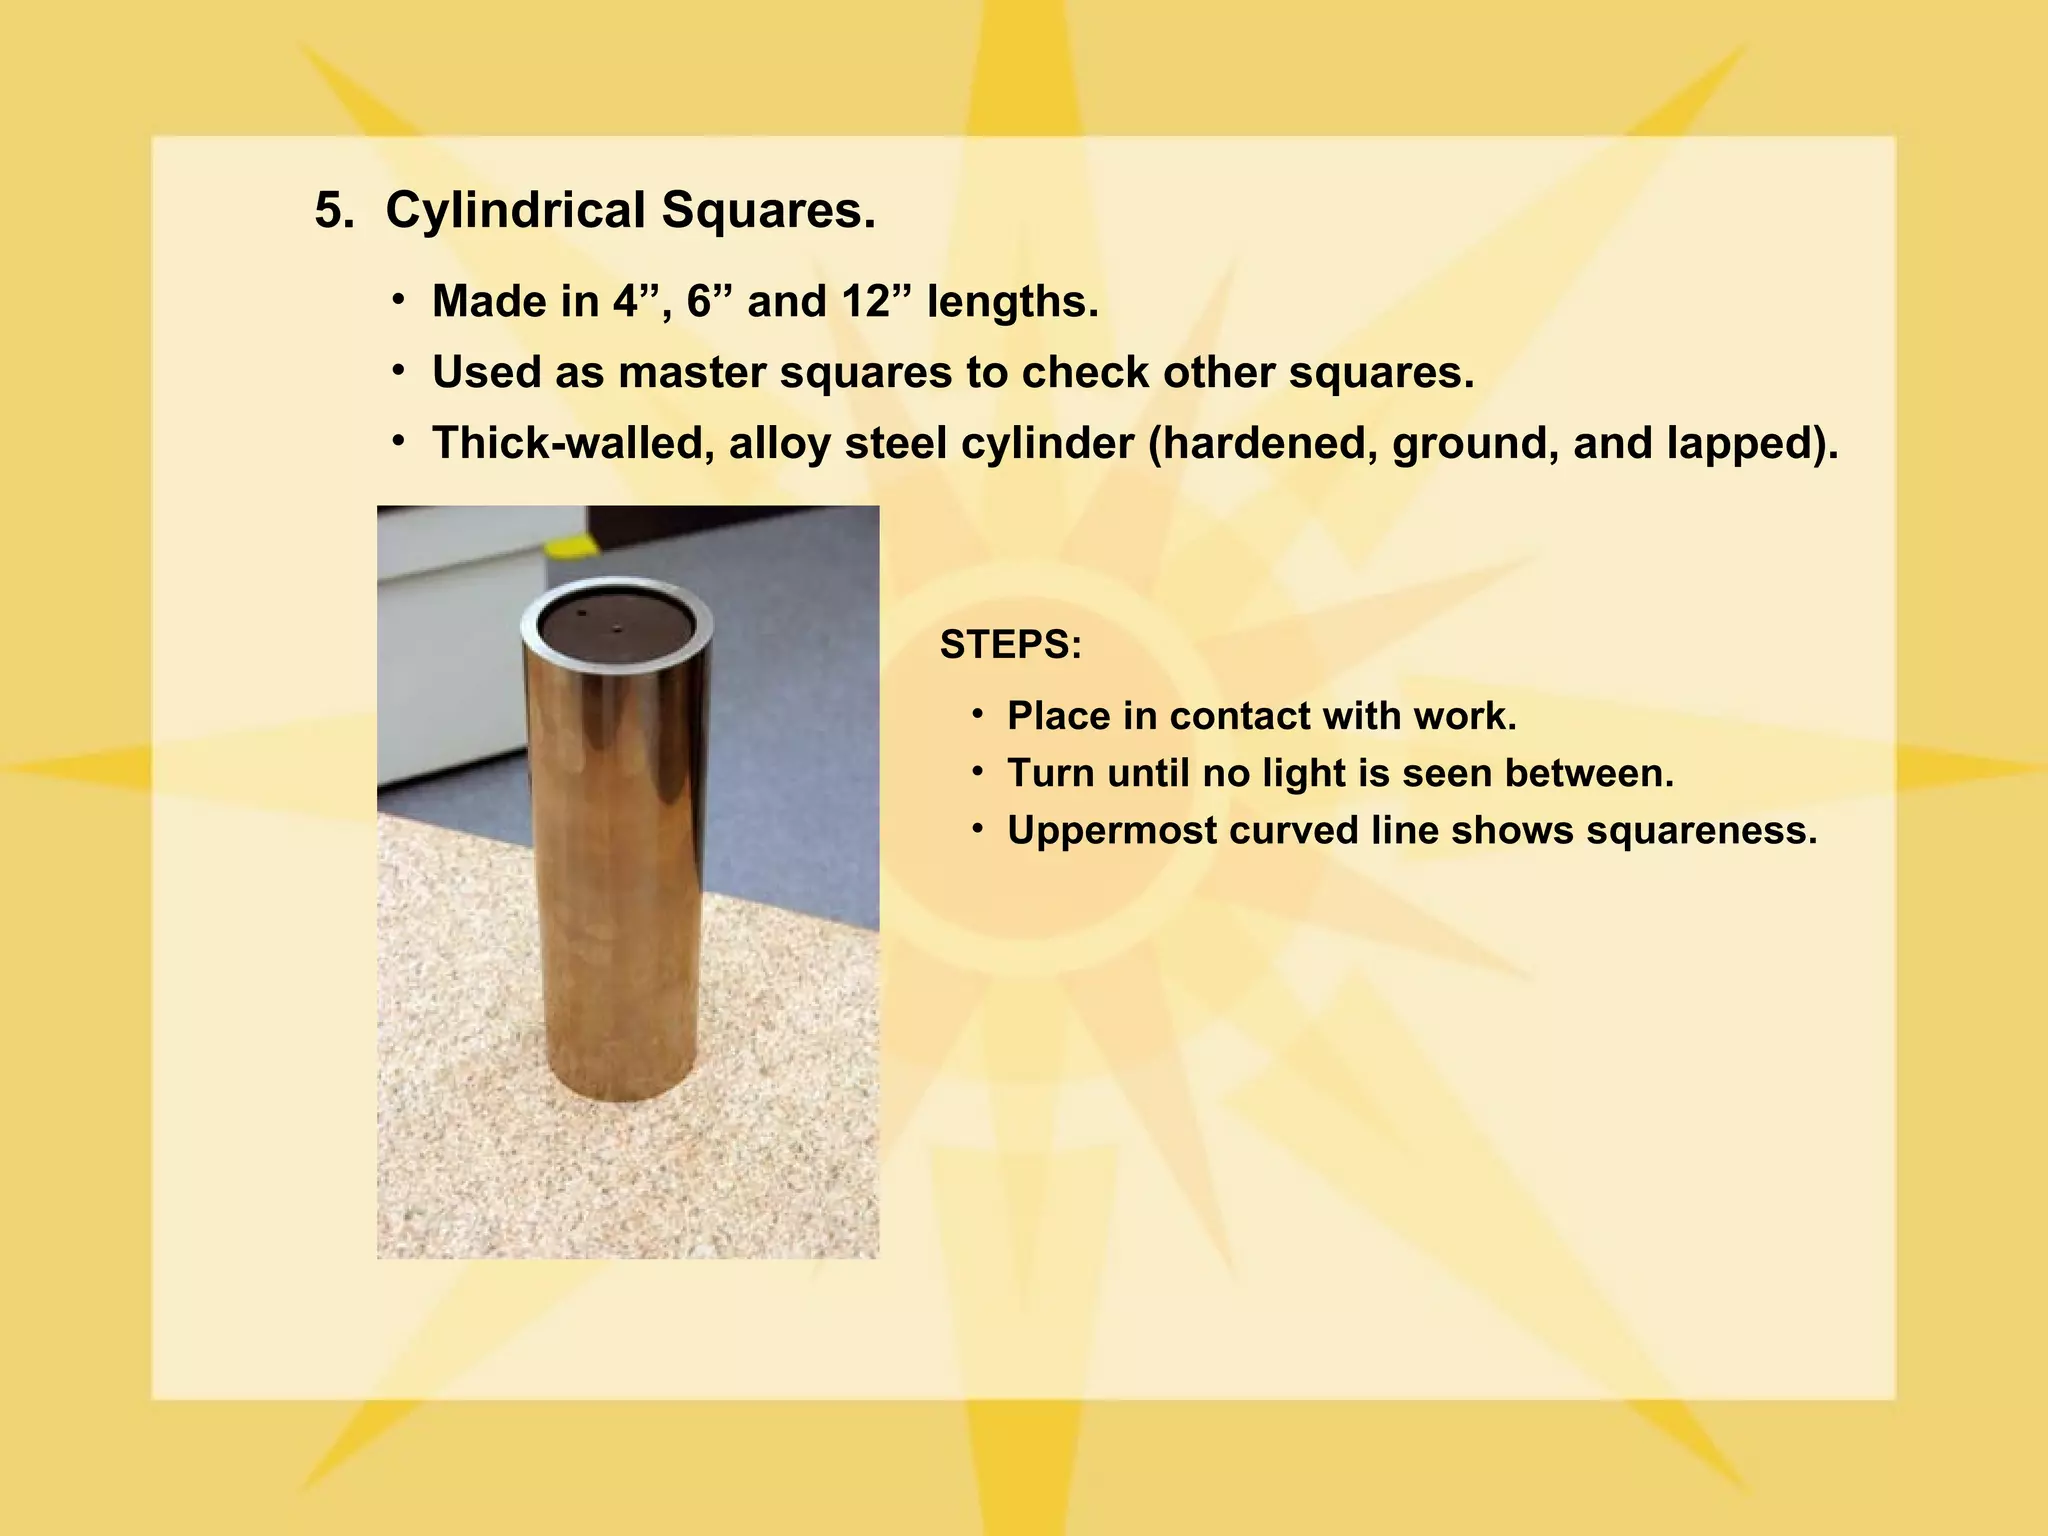
PRECISION MEASUREMENT

A. STEEL RULES
  • Also called rulers or scales.
  • Range in length from 1 - to - 48 inches.
  • Most common is spring tempered 6-inch.

  1. Fractional-Inch Rule
     • Divided in fractions of an inch. Such as 1/2, 1/4, 1/8, 1/16 or smaller.
     • Bottom number indicates number of spaces within an inch.


               Fractional-Inch rule in 8ths and 16ths.
2. Review of Reducing Fractions
        • Reducing does not change the value of a fraction.
        • Divide numerator (top number) and denominator (bottom number)
          by same number.

                                    Reduce 2/8
                     1        2=1
                                            2/8 = 1/4
                     8        2=4

                                Reduce 16/32

a.     16   2=8          b.     8     2=4     c.   4    2=2   d.   2   2=1
       32   2 = 16             16     2=8          8    2=4        4   2=2


                                16/32 = 1/2
Reducing Fractions Exercise
Solve these problems. Show all work.

a.                                   24
          In 1 1 ⁄2 there are ______________ 16ths.
b.                                 8
          In 1 ⁄2 there are _______________ 16ths.
c.                                6
          In 3 ⁄4 there are _____________ 8ths.
d.                                    10
          In 1 4 ⁄16 there are _______________ 8ths.
e.                                    3
          In 24 ⁄ 32 there are _______________ 4ths.
f.                                   40
          In 2 1 ⁄2 there are _______________ 16ths.
g.                                                    3/4
          12 ⁄16 reduced to its lowest terms is _______________.
h.                                                     7/8
          28 ⁄ 32 reduced to its lowest terms is _______________.
 i.                                                    3/4
          48 ⁄ 64 reduced to its lowest terms is _______________.
 j.                                                    1
                                                       -1/2
          96 ⁄64 reduced to its lowest terms is _______________.
k.                                                    19/32
          19 ⁄32 reduced to its lowest terms is _______________.
 l.                                   26
          In 1 40 ⁄64 there are _______________ 16ths.
m.                                8
          In 1 ⁄8 there are _______________ 64ths.
n.                                   42
          In 1 5 ⁄16 there are _______________ 32nds.
o.                                  12
          In 3 ⁄4 there are __________________ 16ths.
p.                                                1 -7/8
          15 ⁄8 reduced to its lowest terms is __________.


               CHECK YOUR ANSWERS !
Rule Reading Exercise


      3/8           7/16
a. __________ e. __________         7/16
                              i. __________         1-5/8
                                              m. __________


      11/16         5/16
b. __________ f. __________         5/16
                              j. __________         1-3/8
                                              n. __________


      3/4           13/16
c. __________ g. __________         1/8
                              k. __________         3- 1/16
                                              o. __________


      1-1/4         3/8
d. __________ h. __________         3/4
                              l. __________         3 - 3/8
                                               p. __________


          CHECK YOUR ANSWERS !
3. Decimal-Inch Rule
   •   Measures closer than fractional-inch rule.
   •   “100” at end of rule means 1 inch divided into 100 parts.
   •   Each division = 1/100 of an inch.
   •   Can be divided into 50ths and 10ths.


                .10 .20 .30 .40
Reading the Decimal-Inch Rule Exercise


Complete the readings called for by placing your answers
in the spaces provided.


      .32                 2.06
a. __________ d. __________ g.__________         1.5


b. __________ e. __________ .3 __________
      .94                    h.                  2.0

      1.56
c. __________ f. __________ .9

             CHECK YOUR ANSWERS !
B. USING STEEL RULES
   • Don’t use end as reference point, except with “knee”..
   • If no “knee”, use 1 inch mark as reference.


    Use scale
    edge.
1. Care of The Rule
   • Don’t use as screwdriver.
   • Keep away from moving machinery.
   • Don’t lay other tools on the rule (destroys markings).
   • Wipe often with oily cloth (prevents rust).
   • Clean with fine steel wool.
   • Store rule by itself.
   • Don’t damage ends or edges.
   • Use correct rule for job.
   • Coat rule with wax or rust preventative for long storage time.
B. HOOKED RULES


     Common Uses
D. HELPER MEASURING TOOLS
      • Generally a spring caliper.
      • Has no scale - cannot be used by itself.
      • Common examples are “Inside and Outside” calipers.


“Outside”


        “Inside”
E. ADJUSTABLE JAW CALIPERS
   • Moveable jaws.
   • Takes measurement directly from part.

  1. Dial Calipers
      • Dial indicator mounted on moveable jaw.
Common Uses of Dial Calipers
2. Digital Calipers
     •   Latest advancement.
     •   Measurement converted to digital readout.
     •   Similar to conventional calipers.
     •   Scale can be calibrated in both inches and centimeters.


                                          •   More rugged.
                                          •   More accurate.
                                          •   Better repeatability.
                                          •   Easier to handle & read.

Follow guidelines for proper use.
F. DIAL MICROMETERS

  1. Outside Micrometers
     • Measures accurately to (.001).
     • Vernier micrometers measure to (.0001).
2. Standard Micrometers
   • Spindle rotates in fixed nut - (40 threads per inch).
   • One complete turn of spindle = 1/40 (.025) inches.


             Micrometer Graduations
Micrometer Reading


1.   Line “1” visible, plus two other lines:
                 “1” = .100
           + 2 @ .025 = .050
                        .150

2.   Index line coincides with 12 on thimble:
               12 x .001 = .012

          .100 – Line marked “1”
          .050 – 2 extra vertical lines
          .012 – Thimble reading
          .162 – Total reading
How Micrometers are Read
Micrometer Reading Exercise


       .125               .250


       .235               .312


       .082               .468


       .375               .187


        .625              .718

CHECK YOUR ANSWERS !
Micrometer Reading Exercise


        .033               .175


      .625                 .325


        .103               .500


       .022                .187


        .293               .435

CHECK YOUR ANSWERS !
3. Metric Micrometers
   •   Measure in hundredths of a millimeter (0.01 mm)
   •   One complete turn of thimble = 1/2 mm.
   •   Sleeve marked in “millimeters” below the line.
   •   Marked in half-millimeters above line.
   •   Thimble marked in 50 divisions.
       - Each division = 1/50 of a 1/2 millimeter or 1/100 (.01)mm.


       Step 1. Note whole millimeter mark on sleeve.
       Step 2. Note whether a half-mm mark is showing between whole
               millimeter mark and thimble.
       Step 3. Read thimble for hundredths reading.
       Step 4. Add readings.
Metric Micrometer Reading


Whole millimeter marks             10 x 1 mm = 10.00 mm
Half millimeter marks              1 x .50 mm =  .50 mm
Thimble Reading                    16 x .01 mm = .16 mm
                                   Reading      10.66 mm
Metric Micrometer Reading Exercise


      5.82 mm                 8.16 mm


       4.12 mm                5.50 mm


       16.25 mm               6.05 mm


       22.11 mm               9.95 mm


       3.55 mm                20.57 mm


CHECK YOUR ANSWERS !
4. Micrometer Adjustments
   • Removing Play
     - Back off the thimble.
     - Insert a C-spanner into slot or hole of adjusting nut.
     - Turn adjusting nut clockwise until play between threads
        is eliminated.
4. Micrometer Adjustments
   • Adjusting Accuracy
     - Clean measuring faces and check for damage.
     - Closes faces.
     - Turn sleeve until index line on sleeve matches zero (0)
       line on thimble.


     - Recheck accuracy by opening and closing faces. Rating
       should be zero (0).
5. Care of the Micrometer
   • Close faces carefully to avoid damage.
   • Keep micrometer clean. Wipe with oily cloth. Oil threads.
   • Not too much pressure.
   • Clean face of anvil and spindle before use.
   • Check for accuracy. Close faces - should read zero (0).
   • Don’t lay unit where it could fall.
   • Don’t twirl micrometer to open or close a great distance.
   • Clean and oil for long term storage. Place in box.
6. Inside Micrometers
     • For internal measurements larger than 1-1/2 inch
     • Consists of:
       - Micrometer head - Range of 1/2 to 1 inch.
       - Extension rods- different lengths inserted in head.
       - 1/2 inch spacing collar.


Review and follow steps for using inside micrometer.
Uses of Inside Micrometers
G. DIGITAL MICROMETERS
   • Modern Version - Results Displayed Electronically
   • Delicate instrument - handle with care.


   1. How to Read Digital Micrometers

      a.   Before taking reading, do the following:
           - Turn display on.
           - Press button to activate desired scale.
           - Slowly close micrometer until ratchet engages.
           - Zero micrometer by pressing Origin or Set button.

      g.   For thickness reading:
           - Open micrometer.
           - Insert sample.
           - Slowly close micrometer until ratchet engages.
           - Read thickness on digital display.
2. Proper Care of Digital Micrometers

   •   When finished, open slightly.
   •   Never store with spindle closed
   •   Turn instrument off and store in protective case.
H. GAUGE BLOCKS
  •   Rectangular blocks - hardened and ground alloy steel.
  •   Measuring surfaces lapped and polished - accurate to within
      a few millionths of an inch.
  •   Size of block stamped one surface.
Wringing Gage Blocks Together
I. SQUARES
   •   Used for laying out, checking, and setting up work.
   •   Beam and blade form a right angle.
   •   Good quality squares are hardened.

  1. Solid and Adjustable Squares.
       •   Not accurate enough for precision work or inspection.
2. Combination Squares.


    • Checking inside and outside squareness.
    • Drawing lines parallel to edges of work piece.
    • Measuring depth.
    • Finding centers of round work pieces.
    • Checking 450 angles.
Uses of Combination Squares.
3. Using Solid Steel Squares.
   • Remove all burrs from work surface. Wipe clean.
   • Wipe square clean.
   • Face source of light.
   • Hold work with one hand. Grasp square with other.
   • Place inside of square against finished surface.
• Lower blade to surface of work.
• All light should be excluded.
4. Beveled Edge Squares.
  • Used for inspection.
  • Edges are beveled and hardened.
  • Better contact with surface. More accurate.
5. Cylindrical Squares.
   • Made in 4”, 6” and 12” lengths.
   • Used as master squares to check other squares.
   • Thick-walled, alloy steel cylinder (hardened, ground, and lapped).


                            STEPS:
                              • Place in contact with work.
                              • Turn until no light is seen between.
                              • Uppermost curved line shows squareness.

Precision measurement

  • 2.
    PRECISION MEASUREMENT A. STEELRULES • Also called rulers or scales. • Range in length from 1 - to - 48 inches. • Most common is spring tempered 6-inch. 1. Fractional-Inch Rule • Divided in fractions of an inch. Such as 1/2, 1/4, 1/8, 1/16 or smaller. • Bottom number indicates number of spaces within an inch. Fractional-Inch rule in 8ths and 16ths.
  • 3.
    2. Review ofReducing Fractions • Reducing does not change the value of a fraction. • Divide numerator (top number) and denominator (bottom number) by same number. Reduce 2/8 1 2=1 2/8 = 1/4 8 2=4 Reduce 16/32 a. 16 2=8 b. 8 2=4 c. 4 2=2 d. 2 2=1 32 2 = 16 16 2=8 8 2=4 4 2=2 16/32 = 1/2
  • 4.
    Reducing Fractions Exercise Solvethese problems. Show all work. a. 24 In 1 1 ⁄2 there are ______________ 16ths. b. 8 In 1 ⁄2 there are _______________ 16ths. c. 6 In 3 ⁄4 there are _____________ 8ths. d. 10 In 1 4 ⁄16 there are _______________ 8ths. e. 3 In 24 ⁄ 32 there are _______________ 4ths. f. 40 In 2 1 ⁄2 there are _______________ 16ths. g. 3/4 12 ⁄16 reduced to its lowest terms is _______________. h. 7/8 28 ⁄ 32 reduced to its lowest terms is _______________. i. 3/4 48 ⁄ 64 reduced to its lowest terms is _______________. j. 1 -1/2 96 ⁄64 reduced to its lowest terms is _______________. k. 19/32 19 ⁄32 reduced to its lowest terms is _______________. l. 26 In 1 40 ⁄64 there are _______________ 16ths. m. 8 In 1 ⁄8 there are _______________ 64ths. n. 42 In 1 5 ⁄16 there are _______________ 32nds. o. 12 In 3 ⁄4 there are __________________ 16ths. p. 1 -7/8 15 ⁄8 reduced to its lowest terms is __________. CHECK YOUR ANSWERS !
  • 5.
    Rule Reading Exercise 3/8 7/16 a. __________ e. __________ 7/16 i. __________ 1-5/8 m. __________ 11/16 5/16 b. __________ f. __________ 5/16 j. __________ 1-3/8 n. __________ 3/4 13/16 c. __________ g. __________ 1/8 k. __________ 3- 1/16 o. __________ 1-1/4 3/8 d. __________ h. __________ 3/4 l. __________ 3 - 3/8 p. __________ CHECK YOUR ANSWERS !
  • 6.
    3. Decimal-Inch Rule • Measures closer than fractional-inch rule. • “100” at end of rule means 1 inch divided into 100 parts. • Each division = 1/100 of an inch. • Can be divided into 50ths and 10ths. .10 .20 .30 .40
  • 7.
    Reading the Decimal-InchRule Exercise Complete the readings called for by placing your answers in the spaces provided. .32 2.06 a. __________ d. __________ g.__________ 1.5 b. __________ e. __________ .3 __________ .94 h. 2.0 1.56 c. __________ f. __________ .9 CHECK YOUR ANSWERS !
  • 8.
    B. USING STEELRULES • Don’t use end as reference point, except with “knee”.. • If no “knee”, use 1 inch mark as reference. Use scale edge.
  • 9.
    1. Care ofThe Rule • Don’t use as screwdriver. • Keep away from moving machinery. • Don’t lay other tools on the rule (destroys markings). • Wipe often with oily cloth (prevents rust). • Clean with fine steel wool. • Store rule by itself. • Don’t damage ends or edges. • Use correct rule for job. • Coat rule with wax or rust preventative for long storage time.
  • 10.
    B. HOOKED RULES Common Uses
  • 11.
    D. HELPER MEASURINGTOOLS • Generally a spring caliper. • Has no scale - cannot be used by itself. • Common examples are “Inside and Outside” calipers. “Outside” “Inside”
  • 12.
    E. ADJUSTABLE JAWCALIPERS • Moveable jaws. • Takes measurement directly from part. 1. Dial Calipers • Dial indicator mounted on moveable jaw.
  • 13.
    Common Uses ofDial Calipers
  • 14.
    2. Digital Calipers • Latest advancement. • Measurement converted to digital readout. • Similar to conventional calipers. • Scale can be calibrated in both inches and centimeters. • More rugged. • More accurate. • Better repeatability. • Easier to handle & read. Follow guidelines for proper use.
  • 15.
    F. DIAL MICROMETERS 1. Outside Micrometers • Measures accurately to (.001). • Vernier micrometers measure to (.0001).
  • 16.
    2. Standard Micrometers • Spindle rotates in fixed nut - (40 threads per inch). • One complete turn of spindle = 1/40 (.025) inches. Micrometer Graduations
  • 17.
    Micrometer Reading 1. Line “1” visible, plus two other lines: “1” = .100 + 2 @ .025 = .050 .150 2. Index line coincides with 12 on thimble: 12 x .001 = .012 .100 – Line marked “1” .050 – 2 extra vertical lines .012 – Thimble reading .162 – Total reading
  • 18.
  • 19.
    Micrometer Reading Exercise .125 .250 .235 .312 .082 .468 .375 .187 .625 .718 CHECK YOUR ANSWERS !
  • 20.
    Micrometer Reading Exercise .033 .175 .625 .325 .103 .500 .022 .187 .293 .435 CHECK YOUR ANSWERS !
  • 21.
    3. Metric Micrometers • Measure in hundredths of a millimeter (0.01 mm) • One complete turn of thimble = 1/2 mm. • Sleeve marked in “millimeters” below the line. • Marked in half-millimeters above line. • Thimble marked in 50 divisions. - Each division = 1/50 of a 1/2 millimeter or 1/100 (.01)mm. Step 1. Note whole millimeter mark on sleeve. Step 2. Note whether a half-mm mark is showing between whole millimeter mark and thimble. Step 3. Read thimble for hundredths reading. Step 4. Add readings.
  • 22.
    Metric Micrometer Reading Wholemillimeter marks 10 x 1 mm = 10.00 mm Half millimeter marks 1 x .50 mm = .50 mm Thimble Reading 16 x .01 mm = .16 mm Reading 10.66 mm
  • 23.
    Metric Micrometer ReadingExercise 5.82 mm 8.16 mm 4.12 mm 5.50 mm 16.25 mm 6.05 mm 22.11 mm 9.95 mm 3.55 mm 20.57 mm CHECK YOUR ANSWERS !
  • 24.
    4. Micrometer Adjustments • Removing Play - Back off the thimble. - Insert a C-spanner into slot or hole of adjusting nut. - Turn adjusting nut clockwise until play between threads is eliminated.
  • 25.
    4. Micrometer Adjustments • Adjusting Accuracy - Clean measuring faces and check for damage. - Closes faces. - Turn sleeve until index line on sleeve matches zero (0) line on thimble. - Recheck accuracy by opening and closing faces. Rating should be zero (0).
  • 26.
    5. Care ofthe Micrometer • Close faces carefully to avoid damage. • Keep micrometer clean. Wipe with oily cloth. Oil threads. • Not too much pressure. • Clean face of anvil and spindle before use. • Check for accuracy. Close faces - should read zero (0). • Don’t lay unit where it could fall. • Don’t twirl micrometer to open or close a great distance. • Clean and oil for long term storage. Place in box.
  • 27.
    6. Inside Micrometers • For internal measurements larger than 1-1/2 inch • Consists of: - Micrometer head - Range of 1/2 to 1 inch. - Extension rods- different lengths inserted in head. - 1/2 inch spacing collar. Review and follow steps for using inside micrometer.
  • 28.
    Uses of InsideMicrometers
  • 29.
    G. DIGITAL MICROMETERS • Modern Version - Results Displayed Electronically • Delicate instrument - handle with care. 1. How to Read Digital Micrometers a. Before taking reading, do the following: - Turn display on. - Press button to activate desired scale. - Slowly close micrometer until ratchet engages. - Zero micrometer by pressing Origin or Set button. g. For thickness reading: - Open micrometer. - Insert sample. - Slowly close micrometer until ratchet engages. - Read thickness on digital display.
  • 30.
    2. Proper Careof Digital Micrometers • When finished, open slightly. • Never store with spindle closed • Turn instrument off and store in protective case.
  • 31.
    H. GAUGE BLOCKS • Rectangular blocks - hardened and ground alloy steel. • Measuring surfaces lapped and polished - accurate to within a few millionths of an inch. • Size of block stamped one surface.
  • 32.
  • 33.
    I. SQUARES • Used for laying out, checking, and setting up work. • Beam and blade form a right angle. • Good quality squares are hardened. 1. Solid and Adjustable Squares. • Not accurate enough for precision work or inspection.
  • 34.
    2. Combination Squares. • Checking inside and outside squareness. • Drawing lines parallel to edges of work piece. • Measuring depth. • Finding centers of round work pieces. • Checking 450 angles.
  • 35.
  • 36.
    3. Using SolidSteel Squares. • Remove all burrs from work surface. Wipe clean. • Wipe square clean. • Face source of light. • Hold work with one hand. Grasp square with other. • Place inside of square against finished surface.
  • 37.
    • Lower bladeto surface of work. • All light should be excluded.
  • 38.
    4. Beveled EdgeSquares. • Used for inspection. • Edges are beveled and hardened. • Better contact with surface. More accurate.
  • 39.
    5. Cylindrical Squares. • Made in 4”, 6” and 12” lengths. • Used as master squares to check other squares. • Thick-walled, alloy steel cylinder (hardened, ground, and lapped). STEPS: • Place in contact with work. • Turn until no light is seen between. • Uppermost curved line shows squareness.