SlideShare a Scribd company logo
1 of 47
01
How to Create a Queen of Hearts Photo Manipulation
With Adobe Photoshop
What You'll Be Creating
In this tutorial I'll show you how to create a Queen of Hearts photo manipulation.
First we'll build the background with an ornament image and a rock one. After that we'll import the frame and
create the effect inside it with the Clouds filter and a nebula image. Later we'll add the model and the crown and
blend them together using adjustment layers, masking, and brushes.
We'll create the cards with different hearts and arrange them to create a dynamic scene. Then we'll use several
adjustment layers and paint the red light to complete the final effect.
Tutorial Assets
The following assets were used during the production of this tutorial:
1. Build the Environment Step 1
Create a new 2000 x 2000 px document in Photoshop with the settings below:
Step 2
Open the background image. Drag this image into the white canvas using the Move Tool (V):
Step 3
There are some unwanted details on the background, and they might mess up the final effect. To fix it, make a
new layer and set it as Clipping Mask. Use the Clone Tool (S) to remove the indicated details.
Step 4
Add a Color Balance adjustment layer to make the background color red. Change the Shadows settings:
Step 5
Create a Curves adjustment layer to darken the background. On this layer mask, use a soft black brush to reduce
the effect around the middle where the main model will be added.
Step 6
Use another Curves adjustment layer to make the background darker. Paint around the middle to reveal the light
there:
Step 7
Open the rock image. Use the Move Tool to place it in the bottom of the document and use the Free Transform
Tool (Control-T) to narrow it as shown below.
Step 8
Use a Curves adjustment layer to darken the rock floor. On this layer mask, use a soft black brush to reveal some
light in the middle:
Step 9
Make a Color Balance adjustment layer to add red to the floor:
Step 10
The floor doesn't look well blended with the background. Create a new layer and use a soft black brush to paint
the shadow on both sides of the floor to fit the shadow on the lower background.
2. Add the Frame Step 1
Isolate the heart frame and add it to the top center of the background. Use Control-T with Warp mode to bend the
heart a little.
Step 2
Double click the frame layer, and choose Drop Shadow:
Step 3
Make a Curves adjustment layer to match the lightness of the frame with the background:
Step 4
Make a new layer and set the foreground and background to #5c0301 and #fd0000. Use the Rectangular
Marquee Tool (M) to grab a square and go to Filter > Render > Clouds:
Move it onto the frame area and use a layer mask to make it fit inside the frame:
Step 5
Use a Curves adjustment layer to darken the effect, making it appear more subtle:
Step 6
Open the nebula image. Drag it onto the cloud effect and change its mode to Overlay 100%. Use a layer mask to
erase the part outside the frame:
Step 7
Use a Curves adjustment layer to make the effect more visible. Paint on the left side so that it's not affected by
this adjustment layer.
3. Add the Model Step 1
Open the model images pack. Choose the first image and Control-click the mask to load the selection. Hit
Control-Shift-I to invert the selection. Still keep the selection, choose the main image (not mask), and use the
Move Tool to place the isolated model in the middle of the scene. Reduce her size using Control-T.
Step 2
Add a mask to the model layer and use a hard black brush to remove some remaining white edges:
Step 3
Go to Edit > Puppet Warp and change the pose of the pointing arm following the eyes' direction:
Step 4
Go back to the model original image. Select the head only and add this head to the existing model, making it
much bigger than the body.
Use a layer mask to blend the head with the body:
Step 5
Make a new layer, change the mode to Overlay 100%, and fill it with 50% gray:
Select the Burn Tool (O) with Midtones Range, Exposure about 15-20% to darken the model's cheeks a bit. You
can see how I did it with Normal mode and the result with Overlay mode:
Step 6
Hit U to activate the Custom Shape Tool. Choose the Heart shape and set the foreground to #dc1c17. Draw a
shape onto the lips area and change the mode to Multiply 100%:
Step 7
Duplicate this layer twice and move them to the eyes area. Use a layer mask on each of these layers to remove
the part covering the eyes.
Step 8
Make a new layer and use a medium-hard black brush with the color #d03733 to paint more hair for the model.
Step 9
Select the model layer and the related ones and press Control-G to make a group for them. Change this group
mode to Normal 100%. Use a Curves adjustment layer to darken the model, and then on its layer mask, use a
soft black brush to show some light on the body and dress.
Step 10
Make a Color Balance adjustment layer and change the Midtones values. On this layer mask, use a soft black
brush to remove the red effect on the model head and lower body, leave it visible on the middle dress part.
Step 11
Create a new layer under the model one and paint her shadow on the floor with a soft black brush.
4. Add the Crown Step 1
Isolate the crown and add it to the top middle of the model head, making it a lot smaller than the head.
Step 2
Use a Curves adjustment layer to darken the crown:
Step 3
Make a Hue/Saturation adjustment layer to change the crown color:
Step 4
To make the red light from the frame reflected on the crown, make a new layer and use a medium-soft brush with
red color and a small size (about 3-4 px) to paint along the crown contour. Set this layer as Clipping Mask to
make this step easier.
5. Add the Cards Step 1
Open the cards image and isolate the 8 of hearts card from the background.
Step 2
We're aiming to create cards with different numbers of hearts. To do it, first create a new layer above the isolated
card one. Use a medium-soft brush with the color #d5d1c6 (picked from the card) to paint on the card and hide
the unwanted hearts. Name it "painting".
Use the Heart shape with red color to draw different shapes of heart on the separate layers. I've made the card
with one, two, three, four or six hearts. With the card with one big heart in the center, select the isolated card, the
painting layer and the heart one and use the Move Tool to drag these three layers into our main canvas. Merge
them into a new one and use Control-T to tweak it, making it curvy and bendy.
Step 3
Use the same method to create the cards with different hearts. You can mix the handmade hearts with the
original card to add to the scene. Make them fly around the model, and arrange some on the floor. The Warp
mode is very useful in this case, so don't be afraid to go wild with it! Apply a Gaussian Blur of 6 px (Filter > Blur >
Gaussian Blur) to some of the cards on the edges to create depth of field.
Step 4
Make a group for the cards and add a Curves adjustment layer to darken these layers.
Use a soft black brush to reveal the light on the cards, especially on the middle ones.
Step 5
Create a Color Balance adjustment layer to match the cards' color with the background.
6. The Final Adjustment Step 1
Create a Gradient Map adjustment layer and pick the colors #e10019 and #00601b. Lower the Opacity of this
layer to 20%.
Step 2
Make a Color Balance adjustment layer and change the Midtones and Highlights settings:
Step 3
Use a Curves adjustment layer to change the color and contrast of the whole scene.
Step 4
Create a new layer and use a hard brush with a red color (I've chosen #fd0000) to paint red light on the model's
body and on the cards near the frame. The nearer the card, the stronger the light. Also paint red hair strands on
top of the model's head.
Step 5
Make a new layer and change the mode to Overlay 100%. Use the same brush to paint glowing red light on the
cards around the frame.
Congratulations, You're Done!
I hope that you've learned something useful for your future projects. Feel free to leave your comments in the box
below—I'd love to see them. Enjoy Photoshopping!
02
Prisma photo editing app to get video support soon
SoftBank Group Q1 profit rises 19% year-on-year
Green House ventures out to launch Rs 350 cr fund for startups
Sony to sell battery business to Murata Manufacturing
Byndr raises Rs 4.7 crore in seed funding from Education Design Studio
PayU India plans to double value of processed transactions to $1 billion per month
The origins of oil trader Gene Grabinski's love of Yahoo
Government's BPO promotion scheme gets a lukewarm response from IT majors
Gradual decline in enthusiasm for Facebook, Twitter: Study
Crippling cyber fraud: Cases rise 3-fold in Tamil Nadu
03
Prisma,The Photo Editing app officially launched on
Android !!
In the initial time the app was launched only for iOS users on the Apple App Store, but after the huge response
the company launched the app for android users too on 24th July 2016. The app, which allows users to apply
various artistic filters to their photos, recently launched on Google Play Store. Why is it so popular?
Popular camera filter app Prisma will soon be adding video support to their applications.
What sets it apart from other similar apps like Instagram is its ability to reproduce images from scratch rather than
just applying layers to it.
Salva Kiir issues republican decree to relieve Riek MacharKiir, who had invited Machar to return to the capital,
Juba, on Tuesday denied having a role in his ouster. Last week Kiir called on him to help bring peace or risked
being removed.
Ben Affleck & Jennifer Garner are not back togetherSo what better way to find out than going straight to the
source? "I didn't marry a movie star; I married him". While there, Jennifer was questioned by a TMZ camera man
about recent rumors that she's pregnant.
US British Open hope Thompson wooed by WoburnScot Catriona Matthew, the victor at Royal Lytham in 2009,
admitted she was a little disappointed to return to a woodland course. Mehaffey has a busy few weeks on the
road as she played the European Ladies' Amateur Championship last week and finished third.
According to the developer, Prisma Labs, the app makes use of several algorithms to create the artistic images.
The filters vary from modern artwork, oil paintings, paper art, water colors, and many more. When you snap a
picture it takes multiple shots and chooses the best one, while also doing all manner of behind the scenes
fanciness to make sure that faces look well exposed. You can then adjust how much of the filter you want on your
photo.
Prisma, the instant art filter app has become an instant hit with Android users within two days of the full fledged
Android version of the app. After editing the photo can be used on any social media sites or for personal uses.
The app is being downloaded nearly 2 million times from the Google Play Store every day. Prisma is available for
download in the Play Store or App Store.

More Related Content

What's hot

Photoshop techniques
Photoshop techniquesPhotoshop techniques
Photoshop techniques
Heywoodmedia
 
Wd133 unit 6 module 1 working with layer masks
Wd133 unit 6 module 1 working with layer masksWd133 unit 6 module 1 working with layer masks
Wd133 unit 6 module 1 working with layer masks
kateridrex
 
Dig imag unit 6 module 1 working with layer masks
Dig imag unit 6 module 1 working with layer masksDig imag unit 6 module 1 working with layer masks
Dig imag unit 6 module 1 working with layer masks
kateridrex
 
Photo shop cs5-watercolor-painting-effect-tutorial
Photo shop cs5-watercolor-painting-effect-tutorialPhoto shop cs5-watercolor-painting-effect-tutorial
Photo shop cs5-watercolor-painting-effect-tutorial
MenSagam Technologies
 
Paths, Masks And Blend Modes
Paths, Masks And Blend ModesPaths, Masks And Blend Modes
Paths, Masks And Blend Modes
Shan
 
Principles of Design - Photoshopping Basics
Principles of Design - Photoshopping BasicsPrinciples of Design - Photoshopping Basics
Principles of Design - Photoshopping Basics
MrLawler
 

What's hot (19)

Cartooning yourself using photoshop
Cartooning yourself using photoshopCartooning yourself using photoshop
Cartooning yourself using photoshop
 
Lemon mix up
Lemon mix upLemon mix up
Lemon mix up
 
Watercolor effect using photoshop
Watercolor effect using photoshopWatercolor effect using photoshop
Watercolor effect using photoshop
 
Juliet evangelista
Juliet evangelistaJuliet evangelista
Juliet evangelista
 
5 combining images and applying filters
5 combining images and applying filters5 combining images and applying filters
5 combining images and applying filters
 
Adobe photoshop
Adobe photoshopAdobe photoshop
Adobe photoshop
 
Marie christine joyce buena
Marie christine joyce buenaMarie christine joyce buena
Marie christine joyce buena
 
Photoshop techniques
Photoshop techniquesPhotoshop techniques
Photoshop techniques
 
Wd133 unit 6 module 1 working with layer masks
Wd133 unit 6 module 1 working with layer masksWd133 unit 6 module 1 working with layer masks
Wd133 unit 6 module 1 working with layer masks
 
Advanced Digital Photography
Advanced Digital PhotographyAdvanced Digital Photography
Advanced Digital Photography
 
Dig imag unit 6 module 1 working with layer masks
Dig imag unit 6 module 1 working with layer masksDig imag unit 6 module 1 working with layer masks
Dig imag unit 6 module 1 working with layer masks
 
Inkscape Beginner Tutorial: How to Make a Yoga Class Flyer
Inkscape Beginner Tutorial: How to Make a Yoga Class FlyerInkscape Beginner Tutorial: How to Make a Yoga Class Flyer
Inkscape Beginner Tutorial: How to Make a Yoga Class Flyer
 
Photo shop cs5-watercolor-painting-effect-tutorial
Photo shop cs5-watercolor-painting-effect-tutorialPhoto shop cs5-watercolor-painting-effect-tutorial
Photo shop cs5-watercolor-painting-effect-tutorial
 
Pop Culture Ms Bio
Pop Culture Ms BioPop Culture Ms Bio
Pop Culture Ms Bio
 
Paths, Masks And Blend Modes
Paths, Masks And Blend ModesPaths, Masks And Blend Modes
Paths, Masks And Blend Modes
 
Masking
MaskingMasking
Masking
 
Inkscape Fall Fest Flyer Tutorial
Inkscape Fall Fest Flyer TutorialInkscape Fall Fest Flyer Tutorial
Inkscape Fall Fest Flyer Tutorial
 
Principles of Design - Photoshopping Basics
Principles of Design - Photoshopping BasicsPrinciples of Design - Photoshopping Basics
Principles of Design - Photoshopping Basics
 
Edgy Colors
Edgy ColorsEdgy Colors
Edgy Colors
 

Similar to Image manipulation

Playing with timeline in photoshop cs6
Playing with timeline in photoshop cs6Playing with timeline in photoshop cs6
Playing with timeline in photoshop cs6
baljaadsg
 
Introduction to portraiture
Introduction to portraitureIntroduction to portraiture
Introduction to portraiture
MissBrazeau
 
How To Make A Lineart And Color It In Photoshop
How To Make A Lineart And Color It In PhotoshopHow To Make A Lineart And Color It In Photoshop
How To Make A Lineart And Color It In Photoshop
Sonia Campos
 
3 d polaroid effect
3 d polaroid effect3 d polaroid effect
3 d polaroid effect
syncmaster92
 
3 d polaroid effect
3 d polaroid effect3 d polaroid effect
3 d polaroid effect
Nader Belal
 

Similar to Image manipulation (20)

Create a Photo Collage in Photoshop.pdf
Create a Photo Collage in Photoshop.pdfCreate a Photo Collage in Photoshop.pdf
Create a Photo Collage in Photoshop.pdf
 
DAY2_SUPERHERO.pptx
DAY2_SUPERHERO.pptxDAY2_SUPERHERO.pptx
DAY2_SUPERHERO.pptx
 
Photoshop tutorials1
Photoshop tutorials1Photoshop tutorials1
Photoshop tutorials1
 
TUTORIAL ON PHOTOSHOP
TUTORIAL ON PHOTOSHOPTUTORIAL ON PHOTOSHOP
TUTORIAL ON PHOTOSHOP
 
Balloons tutorial by rokas petskevicius visualpelican
Balloons tutorial by rokas petskevicius visualpelicanBalloons tutorial by rokas petskevicius visualpelican
Balloons tutorial by rokas petskevicius visualpelican
 
ProductDesignAd - A Practice Guide to Photoshop
ProductDesignAd - A Practice Guide to PhotoshopProductDesignAd - A Practice Guide to Photoshop
ProductDesignAd - A Practice Guide to Photoshop
 
How to Turn a Picture Into a Line Drawing in Photoshop
How to Turn a Picture Into a Line Drawing in PhotoshopHow to Turn a Picture Into a Line Drawing in Photoshop
How to Turn a Picture Into a Line Drawing in Photoshop
 
How to create a photo caricature in adobe photoshop
How to create a photo caricature in adobe photoshopHow to create a photo caricature in adobe photoshop
How to create a photo caricature in adobe photoshop
 
Create a canvas banner in photoshop
Create a canvas banner in photoshopCreate a canvas banner in photoshop
Create a canvas banner in photoshop
 
Cut out image with hard hair mask
Cut out image with hard hair maskCut out image with hard hair mask
Cut out image with hard hair mask
 
Playing with timeline in photoshop cs6
Playing with timeline in photoshop cs6Playing with timeline in photoshop cs6
Playing with timeline in photoshop cs6
 
Introduction to portraiture
Introduction to portraitureIntroduction to portraiture
Introduction to portraiture
 
Editing process
Editing processEditing process
Editing process
 
How To Make A Lineart And Color It In Photoshop
How To Make A Lineart And Color It In PhotoshopHow To Make A Lineart And Color It In Photoshop
How To Make A Lineart And Color It In Photoshop
 
The 8 Basic Steps Elements 6
The 8 Basic Steps  Elements 6The 8 Basic Steps  Elements 6
The 8 Basic Steps Elements 6
 
The 8 Basic Steps Elements 6
The 8 Basic Steps  Elements 6The 8 Basic Steps  Elements 6
The 8 Basic Steps Elements 6
 
adobephotoshop_frerking
adobephotoshop_frerking adobephotoshop_frerking
adobephotoshop_frerking
 
3 d polaroid effect
3 d polaroid effect3 d polaroid effect
3 d polaroid effect
 
3 d polaroid effect
3 d polaroid effect3 d polaroid effect
3 d polaroid effect
 
Cours photoshop
Cours photoshopCours photoshop
Cours photoshop
 

Recently uploaded

一比一定(购)卡尔顿大学毕业证(CU毕业证)成绩单学位证
一比一定(购)卡尔顿大学毕业证(CU毕业证)成绩单学位证一比一定(购)卡尔顿大学毕业证(CU毕业证)成绩单学位证
一比一定(购)卡尔顿大学毕业证(CU毕业证)成绩单学位证
wpkuukw
 
一比一原版澳洲堪培拉大学毕业证(UC毕业证书)毕业证成绩单留信认证
一比一原版澳洲堪培拉大学毕业证(UC毕业证书)毕业证成绩单留信认证一比一原版澳洲堪培拉大学毕业证(UC毕业证书)毕业证成绩单留信认证
一比一原版澳洲堪培拉大学毕业证(UC毕业证书)毕业证成绩单留信认证
khuurq8kz
 
如何办理(Columbia College毕业证书)纽约市哥伦比亚大学毕业证成绩单本科硕士学位证留信学历认证
如何办理(Columbia College毕业证书)纽约市哥伦比亚大学毕业证成绩单本科硕士学位证留信学历认证如何办理(Columbia College毕业证书)纽约市哥伦比亚大学毕业证成绩单本科硕士学位证留信学历认证
如何办理(Columbia College毕业证书)纽约市哥伦比亚大学毕业证成绩单本科硕士学位证留信学历认证
ugzga
 
如何办理(UoB毕业证书)伯明翰大学毕业证成绩单本科硕士学位证留信学历认证
如何办理(UoB毕业证书)伯明翰大学毕业证成绩单本科硕士学位证留信学历认证如何办理(UoB毕业证书)伯明翰大学毕业证成绩单本科硕士学位证留信学历认证
如何办理(UoB毕业证书)伯明翰大学毕业证成绩单本科硕士学位证留信学历认证
ugzga
 
一比一定(购)西悉尼大学毕业证(WSU毕业证)成绩单学位证
一比一定(购)西悉尼大学毕业证(WSU毕业证)成绩单学位证一比一定(购)西悉尼大学毕业证(WSU毕业证)成绩单学位证
一比一定(购)西悉尼大学毕业证(WSU毕业证)成绩单学位证
eqaqen
 
Jual Obat Aborsi Semarang ( Asli No.1 ) 085657271886 Obat Penggugur Kandungan...
Jual Obat Aborsi Semarang ( Asli No.1 ) 085657271886 Obat Penggugur Kandungan...Jual Obat Aborsi Semarang ( Asli No.1 ) 085657271886 Obat Penggugur Kandungan...
Jual Obat Aborsi Semarang ( Asli No.1 ) 085657271886 Obat Penggugur Kandungan...
ZurliaSoop
 
Design-System - FinTech - Isadora Agency
Design-System - FinTech - Isadora AgencyDesign-System - FinTech - Isadora Agency
Design-System - FinTech - Isadora Agency
Isadora Agency
 
一比一定(购)滑铁卢大学毕业证(UW毕业证)成绩单学位证
一比一定(购)滑铁卢大学毕业证(UW毕业证)成绩单学位证一比一定(购)滑铁卢大学毕业证(UW毕业证)成绩单学位证
一比一定(购)滑铁卢大学毕业证(UW毕业证)成绩单学位证
wpkuukw
 
怎样办理伦敦国王学院毕业证(KCL毕业证书)成绩单留信认证
怎样办理伦敦国王学院毕业证(KCL毕业证书)成绩单留信认证怎样办理伦敦国王学院毕业证(KCL毕业证书)成绩单留信认证
怎样办理伦敦国王学院毕业证(KCL毕业证书)成绩单留信认证
eeanqy
 
一比一原版(ANU毕业证书)澳大利亚国立大学毕业证原件一模一样
一比一原版(ANU毕业证书)澳大利亚国立大学毕业证原件一模一样一比一原版(ANU毕业证书)澳大利亚国立大学毕业证原件一模一样
一比一原版(ANU毕业证书)澳大利亚国立大学毕业证原件一模一样
yhavx
 
定(购)莫纳什大学毕业证(Monash毕业证)成绩单学位证专业定制
定(购)莫纳什大学毕业证(Monash毕业证)成绩单学位证专业定制定(购)莫纳什大学毕业证(Monash毕业证)成绩单学位证专业定制
定(购)莫纳什大学毕业证(Monash毕业证)成绩单学位证专业定制
eqaqen
 

Recently uploaded (20)

Academic Portfolio (2017-2021) .pdf
Academic Portfolio (2017-2021)      .pdfAcademic Portfolio (2017-2021)      .pdf
Academic Portfolio (2017-2021) .pdf
 
一比一定(购)卡尔顿大学毕业证(CU毕业证)成绩单学位证
一比一定(购)卡尔顿大学毕业证(CU毕业证)成绩单学位证一比一定(购)卡尔顿大学毕业证(CU毕业证)成绩单学位证
一比一定(购)卡尔顿大学毕业证(CU毕业证)成绩单学位证
 
Furniture & Joinery Details_Designs.pptx
Furniture & Joinery Details_Designs.pptxFurniture & Joinery Details_Designs.pptx
Furniture & Joinery Details_Designs.pptx
 
Morgenbooster: Storytelling in Identity Design
Morgenbooster: Storytelling in Identity DesignMorgenbooster: Storytelling in Identity Design
Morgenbooster: Storytelling in Identity Design
 
一比一原版澳洲堪培拉大学毕业证(UC毕业证书)毕业证成绩单留信认证
一比一原版澳洲堪培拉大学毕业证(UC毕业证书)毕业证成绩单留信认证一比一原版澳洲堪培拉大学毕业证(UC毕业证书)毕业证成绩单留信认证
一比一原版澳洲堪培拉大学毕业证(UC毕业证书)毕业证成绩单留信认证
 
如何办理(Columbia College毕业证书)纽约市哥伦比亚大学毕业证成绩单本科硕士学位证留信学历认证
如何办理(Columbia College毕业证书)纽约市哥伦比亚大学毕业证成绩单本科硕士学位证留信学历认证如何办理(Columbia College毕业证书)纽约市哥伦比亚大学毕业证成绩单本科硕士学位证留信学历认证
如何办理(Columbia College毕业证书)纽约市哥伦比亚大学毕业证成绩单本科硕士学位证留信学历认证
 
如何办理(UoB毕业证书)伯明翰大学毕业证成绩单本科硕士学位证留信学历认证
如何办理(UoB毕业证书)伯明翰大学毕业证成绩单本科硕士学位证留信学历认证如何办理(UoB毕业证书)伯明翰大学毕业证成绩单本科硕士学位证留信学历认证
如何办理(UoB毕业证书)伯明翰大学毕业证成绩单本科硕士学位证留信学历认证
 
一比一定(购)西悉尼大学毕业证(WSU毕业证)成绩单学位证
一比一定(购)西悉尼大学毕业证(WSU毕业证)成绩单学位证一比一定(购)西悉尼大学毕业证(WSU毕业证)成绩单学位证
一比一定(购)西悉尼大学毕业证(WSU毕业证)成绩单学位证
 
Jual Obat Aborsi Semarang ( Asli No.1 ) 085657271886 Obat Penggugur Kandungan...
Jual Obat Aborsi Semarang ( Asli No.1 ) 085657271886 Obat Penggugur Kandungan...Jual Obat Aborsi Semarang ( Asli No.1 ) 085657271886 Obat Penggugur Kandungan...
Jual Obat Aborsi Semarang ( Asli No.1 ) 085657271886 Obat Penggugur Kandungan...
 
Design-System - FinTech - Isadora Agency
Design-System - FinTech - Isadora AgencyDesign-System - FinTech - Isadora Agency
Design-System - FinTech - Isadora Agency
 
一比一定(购)滑铁卢大学毕业证(UW毕业证)成绩单学位证
一比一定(购)滑铁卢大学毕业证(UW毕业证)成绩单学位证一比一定(购)滑铁卢大学毕业证(UW毕业证)成绩单学位证
一比一定(购)滑铁卢大学毕业证(UW毕业证)成绩单学位证
 
怎样办理伦敦国王学院毕业证(KCL毕业证书)成绩单留信认证
怎样办理伦敦国王学院毕业证(KCL毕业证书)成绩单留信认证怎样办理伦敦国王学院毕业证(KCL毕业证书)成绩单留信认证
怎样办理伦敦国王学院毕业证(KCL毕业证书)成绩单留信认证
 
Spring Summer 2026 Inspirations trend book Peclers Paris
Spring Summer 2026 Inspirations trend book Peclers ParisSpring Summer 2026 Inspirations trend book Peclers Paris
Spring Summer 2026 Inspirations trend book Peclers Paris
 
Abortion pills in Riyadh +966572737505 <> buy cytotec <> unwanted kit Saudi A...
Abortion pills in Riyadh +966572737505 <> buy cytotec <> unwanted kit Saudi A...Abortion pills in Riyadh +966572737505 <> buy cytotec <> unwanted kit Saudi A...
Abortion pills in Riyadh +966572737505 <> buy cytotec <> unwanted kit Saudi A...
 
Branding in the Psychedelic Landscape Report.pdf
Branding in the Psychedelic Landscape Report.pdfBranding in the Psychedelic Landscape Report.pdf
Branding in the Psychedelic Landscape Report.pdf
 
18+ Young ℂall Girls Vadodara Book Esha 7427069034 Top Class ℂall Girl Serviℂ...
18+ Young ℂall Girls Vadodara Book Esha 7427069034 Top Class ℂall Girl Serviℂ...18+ Young ℂall Girls Vadodara Book Esha 7427069034 Top Class ℂall Girl Serviℂ...
18+ Young ℂall Girls Vadodara Book Esha 7427069034 Top Class ℂall Girl Serviℂ...
 
一比一原版(ANU毕业证书)澳大利亚国立大学毕业证原件一模一样
一比一原版(ANU毕业证书)澳大利亚国立大学毕业证原件一模一样一比一原版(ANU毕业证书)澳大利亚国立大学毕业证原件一模一样
一比一原版(ANU毕业证书)澳大利亚国立大学毕业证原件一模一样
 
Spring Summer 26 Colors Trend Book Peclers Paris
Spring Summer 26 Colors Trend Book Peclers ParisSpring Summer 26 Colors Trend Book Peclers Paris
Spring Summer 26 Colors Trend Book Peclers Paris
 
Essential UI/UX Design Principles: A Comprehensive Guide
Essential UI/UX Design Principles: A Comprehensive GuideEssential UI/UX Design Principles: A Comprehensive Guide
Essential UI/UX Design Principles: A Comprehensive Guide
 
定(购)莫纳什大学毕业证(Monash毕业证)成绩单学位证专业定制
定(购)莫纳什大学毕业证(Monash毕业证)成绩单学位证专业定制定(购)莫纳什大学毕业证(Monash毕业证)成绩单学位证专业定制
定(购)莫纳什大学毕业证(Monash毕业证)成绩单学位证专业定制
 

Image manipulation

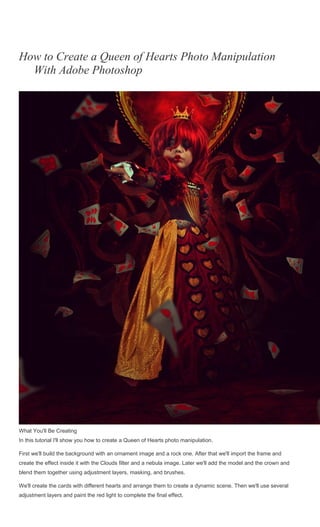
  • 1. 01 How to Create a Queen of Hearts Photo Manipulation With Adobe Photoshop What You'll Be Creating In this tutorial I'll show you how to create a Queen of Hearts photo manipulation. First we'll build the background with an ornament image and a rock one. After that we'll import the frame and create the effect inside it with the Clouds filter and a nebula image. Later we'll add the model and the crown and blend them together using adjustment layers, masking, and brushes. We'll create the cards with different hearts and arrange them to create a dynamic scene. Then we'll use several adjustment layers and paint the red light to complete the final effect.
  • 2. Tutorial Assets The following assets were used during the production of this tutorial: 1. Build the Environment Step 1 Create a new 2000 x 2000 px document in Photoshop with the settings below: Step 2 Open the background image. Drag this image into the white canvas using the Move Tool (V):
  • 3. Step 3 There are some unwanted details on the background, and they might mess up the final effect. To fix it, make a new layer and set it as Clipping Mask. Use the Clone Tool (S) to remove the indicated details.
  • 4.
  • 5. Step 4 Add a Color Balance adjustment layer to make the background color red. Change the Shadows settings:
  • 6. Step 5 Create a Curves adjustment layer to darken the background. On this layer mask, use a soft black brush to reduce the effect around the middle where the main model will be added.
  • 7.
  • 8. Step 6 Use another Curves adjustment layer to make the background darker. Paint around the middle to reveal the light there:
  • 9.
  • 10. Step 7 Open the rock image. Use the Move Tool to place it in the bottom of the document and use the Free Transform Tool (Control-T) to narrow it as shown below.
  • 11. Step 8 Use a Curves adjustment layer to darken the rock floor. On this layer mask, use a soft black brush to reveal some light in the middle:
  • 12. Step 9 Make a Color Balance adjustment layer to add red to the floor:
  • 13. Step 10 The floor doesn't look well blended with the background. Create a new layer and use a soft black brush to paint the shadow on both sides of the floor to fit the shadow on the lower background.
  • 14. 2. Add the Frame Step 1 Isolate the heart frame and add it to the top center of the background. Use Control-T with Warp mode to bend the heart a little.
  • 15. Step 2 Double click the frame layer, and choose Drop Shadow:
  • 16. Step 3 Make a Curves adjustment layer to match the lightness of the frame with the background:
  • 17. Step 4 Make a new layer and set the foreground and background to #5c0301 and #fd0000. Use the Rectangular Marquee Tool (M) to grab a square and go to Filter > Render > Clouds:
  • 18. Move it onto the frame area and use a layer mask to make it fit inside the frame: Step 5 Use a Curves adjustment layer to darken the effect, making it appear more subtle:
  • 19. Step 6 Open the nebula image. Drag it onto the cloud effect and change its mode to Overlay 100%. Use a layer mask to erase the part outside the frame:
  • 21. Use a Curves adjustment layer to make the effect more visible. Paint on the left side so that it's not affected by this adjustment layer. 3. Add the Model Step 1 Open the model images pack. Choose the first image and Control-click the mask to load the selection. Hit Control-Shift-I to invert the selection. Still keep the selection, choose the main image (not mask), and use the Move Tool to place the isolated model in the middle of the scene. Reduce her size using Control-T.
  • 22. Step 2 Add a mask to the model layer and use a hard black brush to remove some remaining white edges:
  • 23. Step 3 Go to Edit > Puppet Warp and change the pose of the pointing arm following the eyes' direction:
  • 24. Step 4 Go back to the model original image. Select the head only and add this head to the existing model, making it much bigger than the body.
  • 25. Use a layer mask to blend the head with the body:
  • 26. Step 5 Make a new layer, change the mode to Overlay 100%, and fill it with 50% gray: Select the Burn Tool (O) with Midtones Range, Exposure about 15-20% to darken the model's cheeks a bit. You can see how I did it with Normal mode and the result with Overlay mode:
  • 27. Step 6 Hit U to activate the Custom Shape Tool. Choose the Heart shape and set the foreground to #dc1c17. Draw a shape onto the lips area and change the mode to Multiply 100%: Step 7 Duplicate this layer twice and move them to the eyes area. Use a layer mask on each of these layers to remove the part covering the eyes. Step 8 Make a new layer and use a medium-hard black brush with the color #d03733 to paint more hair for the model.
  • 28. Step 9 Select the model layer and the related ones and press Control-G to make a group for them. Change this group mode to Normal 100%. Use a Curves adjustment layer to darken the model, and then on its layer mask, use a soft black brush to show some light on the body and dress.
  • 29. Step 10 Make a Color Balance adjustment layer and change the Midtones values. On this layer mask, use a soft black brush to remove the red effect on the model head and lower body, leave it visible on the middle dress part.
  • 30.
  • 31. Step 11 Create a new layer under the model one and paint her shadow on the floor with a soft black brush.
  • 32. 4. Add the Crown Step 1 Isolate the crown and add it to the top middle of the model head, making it a lot smaller than the head. Step 2 Use a Curves adjustment layer to darken the crown:
  • 33. Step 3 Make a Hue/Saturation adjustment layer to change the crown color: Step 4 To make the red light from the frame reflected on the crown, make a new layer and use a medium-soft brush with red color and a small size (about 3-4 px) to paint along the crown contour. Set this layer as Clipping Mask to make this step easier.
  • 34. 5. Add the Cards Step 1 Open the cards image and isolate the 8 of hearts card from the background. Step 2 We're aiming to create cards with different numbers of hearts. To do it, first create a new layer above the isolated card one. Use a medium-soft brush with the color #d5d1c6 (picked from the card) to paint on the card and hide the unwanted hearts. Name it "painting".
  • 35. Use the Heart shape with red color to draw different shapes of heart on the separate layers. I've made the card with one, two, three, four or six hearts. With the card with one big heart in the center, select the isolated card, the painting layer and the heart one and use the Move Tool to drag these three layers into our main canvas. Merge them into a new one and use Control-T to tweak it, making it curvy and bendy.
  • 36. Step 3 Use the same method to create the cards with different hearts. You can mix the handmade hearts with the original card to add to the scene. Make them fly around the model, and arrange some on the floor. The Warp mode is very useful in this case, so don't be afraid to go wild with it! Apply a Gaussian Blur of 6 px (Filter > Blur > Gaussian Blur) to some of the cards on the edges to create depth of field.
  • 37. Step 4 Make a group for the cards and add a Curves adjustment layer to darken these layers.
  • 38. Use a soft black brush to reveal the light on the cards, especially on the middle ones.
  • 39. Step 5 Create a Color Balance adjustment layer to match the cards' color with the background.
  • 40. 6. The Final Adjustment Step 1 Create a Gradient Map adjustment layer and pick the colors #e10019 and #00601b. Lower the Opacity of this layer to 20%.
  • 41. Step 2 Make a Color Balance adjustment layer and change the Midtones and Highlights settings:
  • 42.
  • 43. Step 3 Use a Curves adjustment layer to change the color and contrast of the whole scene.
  • 44. Step 4 Create a new layer and use a hard brush with a red color (I've chosen #fd0000) to paint red light on the model's body and on the cards near the frame. The nearer the card, the stronger the light. Also paint red hair strands on top of the model's head.
  • 45. Step 5 Make a new layer and change the mode to Overlay 100%. Use the same brush to paint glowing red light on the cards around the frame. Congratulations, You're Done! I hope that you've learned something useful for your future projects. Feel free to leave your comments in the box below—I'd love to see them. Enjoy Photoshopping!
  • 46. 02 Prisma photo editing app to get video support soon SoftBank Group Q1 profit rises 19% year-on-year Green House ventures out to launch Rs 350 cr fund for startups Sony to sell battery business to Murata Manufacturing Byndr raises Rs 4.7 crore in seed funding from Education Design Studio PayU India plans to double value of processed transactions to $1 billion per month The origins of oil trader Gene Grabinski's love of Yahoo Government's BPO promotion scheme gets a lukewarm response from IT majors
  • 47. Gradual decline in enthusiasm for Facebook, Twitter: Study Crippling cyber fraud: Cases rise 3-fold in Tamil Nadu 03 Prisma,The Photo Editing app officially launched on Android !! In the initial time the app was launched only for iOS users on the Apple App Store, but after the huge response the company launched the app for android users too on 24th July 2016. The app, which allows users to apply various artistic filters to their photos, recently launched on Google Play Store. Why is it so popular? Popular camera filter app Prisma will soon be adding video support to their applications. What sets it apart from other similar apps like Instagram is its ability to reproduce images from scratch rather than just applying layers to it. Salva Kiir issues republican decree to relieve Riek MacharKiir, who had invited Machar to return to the capital, Juba, on Tuesday denied having a role in his ouster. Last week Kiir called on him to help bring peace or risked being removed. Ben Affleck & Jennifer Garner are not back togetherSo what better way to find out than going straight to the source? "I didn't marry a movie star; I married him". While there, Jennifer was questioned by a TMZ camera man about recent rumors that she's pregnant. US British Open hope Thompson wooed by WoburnScot Catriona Matthew, the victor at Royal Lytham in 2009, admitted she was a little disappointed to return to a woodland course. Mehaffey has a busy few weeks on the road as she played the European Ladies' Amateur Championship last week and finished third. According to the developer, Prisma Labs, the app makes use of several algorithms to create the artistic images. The filters vary from modern artwork, oil paintings, paper art, water colors, and many more. When you snap a picture it takes multiple shots and chooses the best one, while also doing all manner of behind the scenes fanciness to make sure that faces look well exposed. You can then adjust how much of the filter you want on your photo. Prisma, the instant art filter app has become an instant hit with Android users within two days of the full fledged Android version of the app. After editing the photo can be used on any social media sites or for personal uses. The app is being downloaded nearly 2 million times from the Google Play Store every day. Prisma is available for download in the Play Store or App Store.