Raw images aren’t ready for commercial use. So we need to manage it and prepare it for use by applying for many editing works. There are many ways for the cut out image but when we are going to Cut out image with hard hair mask from a model image sometimes it’s become harder. In that case, we need to apply advanced editing services or technique.
Photo retouching tips and tricks in photoshopRemon Mia
If you want to redefine the foreground and background colors, use the Eyedropper tool to select the foreground color, and then switch the position with the background color, maybe by using the shortcut X, and pick up the next color. But there is an easier way. First, define the foreground color just as you’re accustomed to, but then define the background color by holding the Alt/Option key. Instead of changing the foreground color, you’ll redefine the background color with just one click.
https://goo.gl/pwqYM7
How to blur an image, photoshop tutorialBán Markus
In this PP Presentation we explain in detail how to blur an image using Photoshop.
Blur effect takes your images to another level allowing you to lead viewers to specific area of the image or simply to protect someone's identity on a professional way.
Learn how to create Sticky Note effect using photoshop. Please visit our website to learn more in tips our blog, and also to find cheap photography supplies.
Knowing how to sharpen a picture in Photoshop is helpful expertise for any photographic artist. Foggy pictures occur for various reasons. Perhaps you had your camera self-adjust and it set the center point in some unacceptable spot.
In photography, Blur refers to an image (or sections of an image) that are not sharp. This is frequently brought about by camera shake, and it’s a mix-up that you ordinarily need to stay away from.
In this Photoshop tutorial, I’m going to show you an easy, step-by-step process for creating a stunning photo collage in Photoshop.
Photo collages are unique art forms that can be used to show off a theme or concept! This kind of style was largely used on posters, record covers, etc…
As far as I know, by now in 2023, most of the techy dudes are familiar with the variety of collage apps on their smartphones.
But what if you want to make a collage in Photoshop? Don’t worry! I will make it easier than you think.
Let’s dive into the process. I hope you enjoy it.
How to Turn a Picture Into a Line Drawing in PhotoshopZenith Clipping
To transform a photograph into a line drawing in Photoshop, you don’t need it to appear as though you did it in Photoshop, you’ll need to focus on detail and set up your picture appropriately before you apply any channels.
10 photoshop techniques for visualization
Visit https://newinformation.com.ng
This Photoshop technique is great for every beginner.
Copyright to the respective owner.
A cut out image can be utilized for various things. As a result of the various requirements and utilizations, Adobe Photoshop offers various tools and methods that permit you to cut out an image and eliminate the background.
A layer style is one or more effects applied to a layer or layer group. You can apply one of the preset styles provided with Photoshop or create a custom style using the Layer Style dialog box. The layer effects icon appears to the right of the layer's name in the Layers panel.
Book Formatting: Quality Control Checks for DesignersConfidence Ago
This presentation was made to help designers who work in publishing houses or format books for printing ensure quality.
Quality control is vital to every industry. This is why every department in a company need create a method they use in ensuring quality. This, perhaps, will not only improve the quality of products and bring errors to the barest minimum, but take it to a near perfect finish.
It is beyond a moot point that a good book will somewhat be judged by its cover, but the content of the book remains king. No matter how beautiful the cover, if the quality of writing or presentation is off, that will be a reason for readers not to come back to the book or recommend it.
So, this presentation points designers to some important things that may be missed by an editor that they could eventually discover and call the attention of the editor.
White wonder, Work developed by Eva TschoppMansi Shah
White Wonder by Eva Tschopp
A tale about our culture around the use of fertilizers and pesticides visiting small farms around Ahmedabad in Matar and Shilaj.
Can AI do good? at 'offtheCanvas' India HCI preludeAlan Dix
Invited talk at 'offtheCanvas' IndiaHCI prelude, 29th June 2024.
https://www.alandix.com/academic/talks/offtheCanvas-IndiaHCI2024/
The world is being changed fundamentally by AI and we are constantly faced with newspaper headlines about its harmful effects. However, there is also the potential to both ameliorate theses harms and use the new abilities of AI to transform society for the good. Can you make the difference?
Expert Accessory Dwelling Unit (ADU) Drafting ServicesResDraft
Whether you’re looking to create a guest house, a rental unit, or a private retreat, our experienced team will design a space that complements your existing home and maximizes your investment. We provide personalized, comprehensive expert accessory dwelling unit (ADU)drafting solutions tailored to your needs, ensuring a seamless process from concept to completion.
Dive into the innovative world of smart garages with our insightful presentation, "Exploring the Future of Smart Garages." This comprehensive guide covers the latest advancements in garage technology, including automated systems, smart security features, energy efficiency solutions, and seamless integration with smart home ecosystems. Learn how these technologies are transforming traditional garages into high-tech, efficient spaces that enhance convenience, safety, and sustainability.
Ideal for homeowners, tech enthusiasts, and industry professionals, this presentation provides valuable insights into the trends, benefits, and future developments in smart garage technology. Stay ahead of the curve with our expert analysis and practical tips on implementing smart garage solutions.
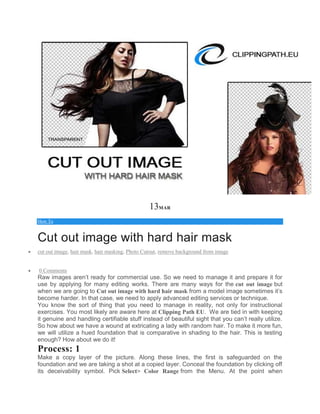
1. 13MAR
How To
Cut out image with hard hair mask
cut out image, hair mask, hair masking, Photo Cutout, remove background from image
0 Comments
Raw images aren’t ready for commercial use. So we need to manage it and prepare it for
use by applying for many editing works. There are many ways for the cut out image but
when we are going to Cut out image with hard hair mask from a model image sometimes it’s
become harder. In that case, we need to apply advanced editing services or technique.
You know the sort of thing that you need to manage in reality, not only for instructional
exercises. You most likely are aware here at Clipping Path EU. We are tied in with keeping
it genuine and handling certifiable stuff instead of beautiful sight that you can’t really utilize.
So how about we have a wound at extricating a lady with random hair. To make it more fun,
we will utilize a hued foundation that is comparative in shading to the hair. This is testing
enough? How about we do it!
Process: 1
Make a copy layer of the picture. Along these lines, the first is safeguarded on the
foundation and we are taking a shot at a copied layer. Conceal the foundation by clicking off
its deceivability symbol. Pick Select> Color Range from the Menu. At the point when
2. the Color Range Dialog box open, pick the Left Eye Dropper device and tap on the
foundation shading in the picture window (pink). You will see the chose shading turn white
in the discourse box. Move the Fuzziness slider until the point when the picture is generally
dark and the foundation is a perfect as you can get it. Tip: To add shading to the
determination tap on the eyedropper apparatus with the, in addition, to sign and snap in the
picture. Snap alright for Cut out image with hard hair mask.
3. Process: 2
With the choice dynamic, change to the Channels palette. Tap the spare choice as channel
catch; it’s the second one to one side on the base of the channels palette. Another alpha
channel will now be unmistakable. Press “Ctrl/Cmd+D” to Deselect and tap on Alpha 1 in
the channels palette. The primary window will now turn high contrast. The benefit of utilizing
a channel is the capacity to adjust the choice without affecting the first picture. Dark speaks
to the regions that we need to keep and white, the zones to be disposed of.
4.
5. Process: 3
Notice that there are zones of dim, this future semi-straightforward and need to wind up
strong highly contrasting (with the exception of regions that ought to be semitransparent, for
example, delicate edges). There are minor specks additionally unmistakable; there will
make for an extremely muddled choice. Here is a speedy arrangement that I have
concocted: Click Image>Adjustments>Levels.
In the levels Dialog box, tap the dark point slider on the left and drag it to one side until the
point that the hazy areas have turned into a strong dark, Slide the White guide slider toward
the left until the point that the whites are pleasant and clean and the grainy impact has
gone. Snap alright to apply for Cut out image with hard hair mask.
6. Process: 4
Pick a dark brush and make the edge hard. Paint over every one of the regions that have a
place in the question covers out. Utilize a bigger brush for expansive regions and a little
brush for better detail, for example, around the plumes. Utilize a white paint shading to paint
out the zones that ought to be expelled.
Process: 5
Once in a while, it can be difficult to figure which part of the picture has a place in the closer
view and a look at the first picture is required. Tap on eye symbol to one side of RGB at the
highest point of the Channels palette. The first photograph is currently noticeable and the
cover shows up as ruddy shading. Tap the eye symbol to backpedal to the veil see. The
cover can likewise be covered up by flipping the eye (deceivability symbol). Continue going
until the point when you have a perfect cover.
Process: 6
7. Hold Cmd (Ctrl PC) and tap on the Alpha 1 thumbnail. You will now observe a dynamic
determination. Tap on RGB to see the shading picture. Open the layers palette. Select the
working layer and include a layered cover. The covered region of the background will now
be expelled to uncover a decent clean veiling impact. In the event that it looks the inverse,
tap on the layer cover and press Ctrl/Cmd+I to rearrange the veil. You can touch up the veil
by painting with dark or white to include or expel parts of the picture.
Process: 7
In the event that there are zones that still should be evacuated, for example, on the correct
side of this picture, rehash the procedure steps. Since each picture is one of a kind, some
will require a few passes and some should be possible in a solitary pass. As should be
obvious, this strategy is exceptionally compelling and the picture can be dropped onto any
foundation. Take a gander at the upper left of the picture to perceive how exact the cut out
is on the nitty gritty quills. Attempt that with the pen device!
8. Hope you are enjoying Cut Out image Tutorial. Connect with us and get a more interesting
tutorial in Photoshop image editing service.