SlideShare a Scribd company logo
1 of 27
Download to read offline
Photo Manipulation in Photoshop (Tutorial
Step By Step).
Various photo manipulations are measured with skillful artwork while others are frown upon as
unprincipled practices, particularly when used to mislead the public, such as that use for following
misinformation, or to create a result or person seem improved.
Photo manipulation date backside to some of the initial photograph capture on glass and tin plates
throughout the 19th
century. The perform began not lengthy after the formation of the first image
(1825) by Joseph Nicéphore Niépce who improved heliography and complete the original pictorial
print from a photoengraved print plate. Traditional pictorial prints can be changed using different
methods and techniques that engage manipulation straight to the print, such as retouch with ink,
paint, airbrushing, or scratch Polaroid’s during emergent.
Step 1
Begin it by creating a new document by select File > New and put the setting as shown in the
picture below.
Step 2
Place the jungle picture to the main manuscript by selecting File > Place Embedded or Place
and then put it into the main document. Also, resize it a little bit so it resemble to below
photo.
Step 3
We are completing it right now by adding depth to jungle image. To do this, convert the
jungle photo into a smart object (right-click on it and decide to change to Smart Object) and
then go to Filter > Blur > Gaussian Blur. Set the radius value as exposed in the picture below.
Step 4
Trigger up the Brush tool by tapping (B) on the keyboard. Select a soft round black brush. Set
its opacity and stream it about 30% then start blurring the selected effect by painting on the
layer mask of Gaussian Blur filter.
Here we’ve added deepness to the picture.
Step 5
Create a Brightness & Contrast tuning layer (Layer > New Adjustment layers >
Brightness/Contrast) to jungle picture as clipping mask (red one) to decrease glowness of the
forest.
Step 6
Use a Color stability adjustment layer to add some blue tones to the jungle.
Here are the outcome.
Step 7
Use the Color adjustment layer to decrease yellow tones from the jungle image.
Here are the outcome.
Step 8
Insert the nebula picture to the scene and resize it as revealed in the picture below so it can
cover the whole image.
Create the blend mode of Nebula image to display and decrease the opacity to 33%. Here
are the consequences and as here it shown by adding the nebula picture we’ve little bit
delightful effect added to the scene.
Step 9
Apply a Hue/Saturation adjustment layer to counterpart the color of nebula to the rest of the
background of the image.
Step 10
Open up the image PSD file in Photoshop. Place a raven to the main file and also add a
Gaussian Blur filter to crow so it can unify with jungle blur parts.
Step 11
Time to make a light source using Brush tool. Make a new layer by tapping (CTRL + SHIFT +
ALT + N) on the keyboard and name it ‘Light Source’ or whatever you want to name it. Now
make active the brush tool by tapping (B) on the keyboard and adjust your foreground color
to #1b3a5d this metrics then make a large stroke (use half of the brush) as shown in the
picture beneath.
Alter the blend mode of the light basis to Linear Dodge and decrease the opacity to 88%
(reducing the opacity depending on you).
Step 12
Open up the starry surface and place the starry picture to the main file. Use the half of the
surface as we only want the bright particles not the rest of it. See the image below that how it
placed.
Change the blend form of Starry4 to display to get rid of black environment.
Step 13
Equivalent the color of Starry4 surface using a Hue/Saturation adjustments layer by dropping
the saturation.
To add some more bright particles to the prospect, make a new layer and name it ‘Little
Glow’ or whatever you want. Make active the brush tool and using soft round white brush
tool paint a white tiny dot as indicated by red ball.
Step 14
Insert a glow to the little glow layer by adding up an outer glow effect. To add an external
glow effect, right click on the ‘little glow’ or the name whatever you have been set up in the
layer and take blending options then set the setting as shown in the picture underneath.
Imitate the ‘Little glow’ layer by tapping (CTRL + J)
Step 15
Pull out the deer from its backdrop and place it to the main file.
Hide the legs of deer using a Layer Mask
Step 16
Make some shadow for the deer, to do this makes a new layer and turn on the brush tool by
tapping (B) on the keyboard. Make the opacity and flow of brush tool to 30% and then make
a shadow for the deer where the deer legs.
Step 17
Decrease the saturation of deer by using Hue/Saturation adjustment layer.
Step 18
The glow of deer doesn’t match with the picture as it got a dark background but deer has
more glow than the background. So decrease the brightness of deer by using Curves
adjustment layer.
Here is the outcome.
Step 19
Create a Color balance adjustment layer to deer to merge it properly to the picture.
Here are the outcome.
Step 20
• Make a new layer and name it “Highlights”.
• Modify your foreground color to #2b5463 and then use a soft round brush tool with
opacity and run about 30%.
• Draw some lights on deer parts that are shade up by the light source. See the arrow
direction as shown in the picture below.
• Now modify the blend mode of show up layer to Linear Dodge and decrease the
opacity to 55%.
Step 21
• Insert more lights to the image.
• Now use the full brush as shown in the picture below.
Step 22
Modify the blend mode to Lighten mode and decrease the opacity to 66%.
Step 23
• Now to confirm the picture using the Final Adjustment layers.
• Add the Gradient Map adjustment to the picture in the image below.
• Change the mode of Gradient Map to Color Dodge to light up the prospect.
Step 24
Add the Selective Color to eliminate the green color from the jungle.
Here is the outcome.
Step 25
• Insert the Brightness/Contrast and Color Lookup tuning layers to the scene.
• Also decrease the opacity of Brightness/Contrast adjustment layer to 64% .
• For Color Lookup decrease it to 55%.
Here is the consequence.
Step 26
Add again a Brightness/Contrast adjustment layer to the prospect.
Here is the outcome.
Step 27
On the layer mask of Brightness/Contrast adjustment layer conceal the selected consequence
using a soft round black brush to keep some lights in the center.
Here are the consequences.
Step 28
• As you can visibly notice that thickness of layer mask is set to 100%.
• Now decrease the density of layer mask to 69% by dragging the controller to left.
• As you decrease thickness of layer you can see that layer mask color now altered from
black to gray that means it revealing the effect.
Let’s see the ultimate outcome now.
As you can observe we’ve decreased lightness in the middle by using the thickness of layer
mask. Always keep in mind by dragging the modular, on the possessions of layer mask, to left
mean it painting with white color and by dragging the modular to right means that it painting
on the layer mask with black color.
Conclusion
So, these are process for manipulating any images by Photoshop. And most of the professional photo
editor use Photoshop for its uniqueness of work. And Photoshop can do lots photo editing work like
clipping path image and this kind of service basically take photographers who take bulk amount of
images. So they don’t have enough time to edit these images this is why they take clipping path
service to remove background or takes photo retouching service.
For ecommerce business they also do photo editing because of, here main thing is image which
actually people can rely on it.

More Related Content

What's hot

4. production experiments (1)
4. production experiments (1)4. production experiments (1)
4. production experiments (1)GabrielWard7
 
Techniques Used in Photography
Techniques Used in PhotographyTechniques Used in Photography
Techniques Used in PhotographyTheJellehKed
 
Day_1__Adjusting_images
Day_1__Adjusting_imagesDay_1__Adjusting_images
Day_1__Adjusting_imagestutorialsruby
 
Colored pencil effect
Colored pencil effectColored pencil effect
Colored pencil effectNatalie Hurd
 
Cartooning yourself using photoshop
Cartooning yourself using photoshopCartooning yourself using photoshop
Cartooning yourself using photoshopcristy nazareno
 
Steps to work_on_photoshop[1]
Steps to work_on_photoshop[1]Steps to work_on_photoshop[1]
Steps to work_on_photoshop[1]Fabio Lopez
 
Unit 4: Case Study and Tutorials
Unit 4: Case Study and TutorialsUnit 4: Case Study and Tutorials
Unit 4: Case Study and TutorialsMrLawler
 
Portrait retouching with photoshop
Portrait retouching with photoshopPortrait retouching with photoshop
Portrait retouching with photoshophmazzuto
 
Photography Unit 4 LO4 Grain
Photography Unit 4 LO4 GrainPhotography Unit 4 LO4 Grain
Photography Unit 4 LO4 GrainAdam Green
 
Colored pencil-sketch-tutorial
Colored pencil-sketch-tutorialColored pencil-sketch-tutorial
Colored pencil-sketch-tutorialNatalie Hurd
 
Fire In Hands Presentation 2
Fire In Hands  Presentation 2Fire In Hands  Presentation 2
Fire In Hands Presentation 2Charnie
 
How to apply a sunset to a landscape using photoshop
How to apply a sunset to a landscape using photoshopHow to apply a sunset to a landscape using photoshop
How to apply a sunset to a landscape using photoshophmazzuto
 
Sticky note effect, Photoshop Tutorial
Sticky note effect, Photoshop TutorialSticky note effect, Photoshop Tutorial
Sticky note effect, Photoshop TutorialBán Markus
 

What's hot (17)

Coke can tutorial
Coke can tutorialCoke can tutorial
Coke can tutorial
 
4. production experiments (1)
4. production experiments (1)4. production experiments (1)
4. production experiments (1)
 
Techniques Used in Photography
Techniques Used in PhotographyTechniques Used in Photography
Techniques Used in Photography
 
Image manipulation
Image manipulationImage manipulation
Image manipulation
 
Chap32
Chap32Chap32
Chap32
 
Day_1__Adjusting_images
Day_1__Adjusting_imagesDay_1__Adjusting_images
Day_1__Adjusting_images
 
Colored pencil effect
Colored pencil effectColored pencil effect
Colored pencil effect
 
Cartooning yourself using photoshop
Cartooning yourself using photoshopCartooning yourself using photoshop
Cartooning yourself using photoshop
 
Steps to work_on_photoshop[1]
Steps to work_on_photoshop[1]Steps to work_on_photoshop[1]
Steps to work_on_photoshop[1]
 
Unit 4: Case Study and Tutorials
Unit 4: Case Study and TutorialsUnit 4: Case Study and Tutorials
Unit 4: Case Study and Tutorials
 
Portrait retouching with photoshop
Portrait retouching with photoshopPortrait retouching with photoshop
Portrait retouching with photoshop
 
Photography Unit 4 LO4 Grain
Photography Unit 4 LO4 GrainPhotography Unit 4 LO4 Grain
Photography Unit 4 LO4 Grain
 
Colored pencil-sketch-tutorial
Colored pencil-sketch-tutorialColored pencil-sketch-tutorial
Colored pencil-sketch-tutorial
 
Fire In Hands Presentation 2
Fire In Hands  Presentation 2Fire In Hands  Presentation 2
Fire In Hands Presentation 2
 
Double exposure in photoshop
Double exposure in photoshopDouble exposure in photoshop
Double exposure in photoshop
 
How to apply a sunset to a landscape using photoshop
How to apply a sunset to a landscape using photoshopHow to apply a sunset to a landscape using photoshop
How to apply a sunset to a landscape using photoshop
 
Sticky note effect, Photoshop Tutorial
Sticky note effect, Photoshop TutorialSticky note effect, Photoshop Tutorial
Sticky note effect, Photoshop Tutorial
 

Similar to Photo Manipulation Tutorial (Step by Step Process)

DAY2_SUPERHERO.pptx
DAY2_SUPERHERO.pptxDAY2_SUPERHERO.pptx
DAY2_SUPERHERO.pptxPoddarWorks
 
Steps to work_on_photoshop[1]
Steps to work_on_photoshop[1]Steps to work_on_photoshop[1]
Steps to work_on_photoshop[1]Fabio Lopez
 
Artwork tutorial 2 making it look like banksy
Artwork tutorial 2   making it look like banksyArtwork tutorial 2   making it look like banksy
Artwork tutorial 2 making it look like banksyXP School
 
Abstract Halloween Tutorial
Abstract Halloween TutorialAbstract Halloween Tutorial
Abstract Halloween Tutorialstephonsimeon
 
Paths, Masks And Blend Modes
Paths, Masks And Blend ModesPaths, Masks And Blend Modes
Paths, Masks And Blend ModesShan
 
The 8 Basic Steps Elements 6
The 8 Basic Steps  Elements 6The 8 Basic Steps  Elements 6
The 8 Basic Steps Elements 6joelk
 
The 8 Basic Steps Elements 6
The 8 Basic Steps  Elements 6The 8 Basic Steps  Elements 6
The 8 Basic Steps Elements 6joelk
 
Create a Photo Collage in Photoshop.pdf
Create a Photo Collage in Photoshop.pdfCreate a Photo Collage in Photoshop.pdf
Create a Photo Collage in Photoshop.pdfPinkverge
 
How to Sharpen an Image in Photoshop
How to Sharpen an Image in PhotoshopHow to Sharpen an Image in Photoshop
How to Sharpen an Image in PhotoshopZenith Clipping
 
Create a canvas banner in photoshop
Create a canvas banner in photoshopCreate a canvas banner in photoshop
Create a canvas banner in photoshopNaomiPB
 
6. [pro forma] project pro-forma
6. [pro forma] project pro-forma6. [pro forma] project pro-forma
6. [pro forma] project pro-formaWill NotTellYou
 
Cut out image with hard hair mask
Cut out image with hard hair maskCut out image with hard hair mask
Cut out image with hard hair masksujon hasan
 

Similar to Photo Manipulation Tutorial (Step by Step Process) (20)

Lemon mix up
Lemon mix upLemon mix up
Lemon mix up
 
Lemon mix up
Lemon mix upLemon mix up
Lemon mix up
 
DAY2_SUPERHERO.pptx
DAY2_SUPERHERO.pptxDAY2_SUPERHERO.pptx
DAY2_SUPERHERO.pptx
 
Photoshop tutorials1
Photoshop tutorials1Photoshop tutorials1
Photoshop tutorials1
 
Steps to work_on_photoshop[1]
Steps to work_on_photoshop[1]Steps to work_on_photoshop[1]
Steps to work_on_photoshop[1]
 
Artwork tutorial 2 making it look like banksy
Artwork tutorial 2   making it look like banksyArtwork tutorial 2   making it look like banksy
Artwork tutorial 2 making it look like banksy
 
Advanced Digital Photography
Advanced Digital PhotographyAdvanced Digital Photography
Advanced Digital Photography
 
Abstract Halloween Tutorial
Abstract Halloween TutorialAbstract Halloween Tutorial
Abstract Halloween Tutorial
 
Paths, Masks And Blend Modes
Paths, Masks And Blend ModesPaths, Masks And Blend Modes
Paths, Masks And Blend Modes
 
The 8 Basic Steps Elements 6
The 8 Basic Steps  Elements 6The 8 Basic Steps  Elements 6
The 8 Basic Steps Elements 6
 
The 8 Basic Steps Elements 6
The 8 Basic Steps  Elements 6The 8 Basic Steps  Elements 6
The 8 Basic Steps Elements 6
 
Create a Photo Collage in Photoshop.pdf
Create a Photo Collage in Photoshop.pdfCreate a Photo Collage in Photoshop.pdf
Create a Photo Collage in Photoshop.pdf
 
Concept
ConceptConcept
Concept
 
How to Sharpen an Image in Photoshop
How to Sharpen an Image in PhotoshopHow to Sharpen an Image in Photoshop
How to Sharpen an Image in Photoshop
 
Ps zen mj
Ps zen mjPs zen mj
Ps zen mj
 
Create a canvas banner in photoshop
Create a canvas banner in photoshopCreate a canvas banner in photoshop
Create a canvas banner in photoshop
 
6. [pro forma] project pro-forma
6. [pro forma] project pro-forma6. [pro forma] project pro-forma
6. [pro forma] project pro-forma
 
Cut out image with hard hair mask
Cut out image with hard hair maskCut out image with hard hair mask
Cut out image with hard hair mask
 
P 13 Spolight
P 13 SpolightP 13 Spolight
P 13 Spolight
 
Learn photoshop
Learn photoshopLearn photoshop
Learn photoshop
 

Recently uploaded

办理(宾州州立毕业证书)美国宾夕法尼亚州立大学毕业证成绩单原版一比一
办理(宾州州立毕业证书)美国宾夕法尼亚州立大学毕业证成绩单原版一比一办理(宾州州立毕业证书)美国宾夕法尼亚州立大学毕业证成绩单原版一比一
办理(宾州州立毕业证书)美国宾夕法尼亚州立大学毕业证成绩单原版一比一F La
 
办理学位证(TheAuckland证书)新西兰奥克兰大学毕业证成绩单原版一比一
办理学位证(TheAuckland证书)新西兰奥克兰大学毕业证成绩单原版一比一办理学位证(TheAuckland证书)新西兰奥克兰大学毕业证成绩单原版一比一
办理学位证(TheAuckland证书)新西兰奥克兰大学毕业证成绩单原版一比一Fi L
 
VIP Call Girls Service Bhagyanagar Hyderabad Call +91-8250192130
VIP Call Girls Service Bhagyanagar Hyderabad Call +91-8250192130VIP Call Girls Service Bhagyanagar Hyderabad Call +91-8250192130
VIP Call Girls Service Bhagyanagar Hyderabad Call +91-8250192130Suhani Kapoor
 
2024新版美国旧金山州立大学毕业证成绩单pdf电子版制作修改#毕业文凭制作#回国入职#diploma#degree
2024新版美国旧金山州立大学毕业证成绩单pdf电子版制作修改#毕业文凭制作#回国入职#diploma#degree2024新版美国旧金山州立大学毕业证成绩单pdf电子版制作修改#毕业文凭制作#回国入职#diploma#degree
2024新版美国旧金山州立大学毕业证成绩单pdf电子版制作修改#毕业文凭制作#回国入职#diploma#degreeyuu sss
 
ARt app | UX Case Study
ARt app | UX Case StudyARt app | UX Case Study
ARt app | UX Case StudySophia Viganò
 
Call Us ✡️97111⇛47426⇛Call In girls Vasant Vihar༒(Delhi)
Call Us ✡️97111⇛47426⇛Call In girls Vasant Vihar༒(Delhi)Call Us ✡️97111⇛47426⇛Call In girls Vasant Vihar༒(Delhi)
Call Us ✡️97111⇛47426⇛Call In girls Vasant Vihar༒(Delhi)jennyeacort
 
办理学位证(NUS证书)新加坡国立大学毕业证成绩单原版一比一
办理学位证(NUS证书)新加坡国立大学毕业证成绩单原版一比一办理学位证(NUS证书)新加坡国立大学毕业证成绩单原版一比一
办理学位证(NUS证书)新加坡国立大学毕业证成绩单原版一比一Fi L
 
NO1 Famous Amil Baba In Karachi Kala Jadu In Karachi Amil baba In Karachi Add...
NO1 Famous Amil Baba In Karachi Kala Jadu In Karachi Amil baba In Karachi Add...NO1 Famous Amil Baba In Karachi Kala Jadu In Karachi Amil baba In Karachi Add...
NO1 Famous Amil Baba In Karachi Kala Jadu In Karachi Amil baba In Karachi Add...Amil baba
 
Passbook project document_april_21__.pdf
Passbook project document_april_21__.pdfPassbook project document_april_21__.pdf
Passbook project document_april_21__.pdfvaibhavkanaujia
 
VIP Call Girls Service Kukatpally Hyderabad Call +91-8250192130
VIP Call Girls Service Kukatpally Hyderabad Call +91-8250192130VIP Call Girls Service Kukatpally Hyderabad Call +91-8250192130
VIP Call Girls Service Kukatpally Hyderabad Call +91-8250192130Suhani Kapoor
 
办理学位证(SFU证书)西蒙菲莎大学毕业证成绩单原版一比一
办理学位证(SFU证书)西蒙菲莎大学毕业证成绩单原版一比一办理学位证(SFU证书)西蒙菲莎大学毕业证成绩单原版一比一
办理学位证(SFU证书)西蒙菲莎大学毕业证成绩单原版一比一F dds
 
Call Girls In Safdarjung Enclave 24/7✡️9711147426✡️ Escorts Service
Call Girls In Safdarjung Enclave 24/7✡️9711147426✡️ Escorts ServiceCall Girls In Safdarjung Enclave 24/7✡️9711147426✡️ Escorts Service
Call Girls In Safdarjung Enclave 24/7✡️9711147426✡️ Escorts Servicejennyeacort
 
Kindergarten Assessment Questions Via LessonUp
Kindergarten Assessment Questions Via LessonUpKindergarten Assessment Questions Via LessonUp
Kindergarten Assessment Questions Via LessonUpmainac1
 
在线办理ohio毕业证俄亥俄大学毕业证成绩单留信学历认证
在线办理ohio毕业证俄亥俄大学毕业证成绩单留信学历认证在线办理ohio毕业证俄亥俄大学毕业证成绩单留信学历认证
在线办理ohio毕业证俄亥俄大学毕业证成绩单留信学历认证nhjeo1gg
 
shot list for my tv series two steps back
shot list for my tv series two steps backshot list for my tv series two steps back
shot list for my tv series two steps back17lcow074
 
西北大学毕业证学位证成绩单-怎么样办伪造
西北大学毕业证学位证成绩单-怎么样办伪造西北大学毕业证学位证成绩单-怎么样办伪造
西北大学毕业证学位证成绩单-怎么样办伪造kbdhl05e
 
Call Girls in Ashok Nagar Delhi ✡️9711147426✡️ Escorts Service
Call Girls in Ashok Nagar Delhi ✡️9711147426✡️ Escorts ServiceCall Girls in Ashok Nagar Delhi ✡️9711147426✡️ Escorts Service
Call Girls in Ashok Nagar Delhi ✡️9711147426✡️ Escorts Servicejennyeacort
 
8377877756 Full Enjoy @24/7 Call Girls in Nirman Vihar Delhi NCR
8377877756 Full Enjoy @24/7 Call Girls in Nirman Vihar Delhi NCR8377877756 Full Enjoy @24/7 Call Girls in Nirman Vihar Delhi NCR
8377877756 Full Enjoy @24/7 Call Girls in Nirman Vihar Delhi NCRdollysharma2066
 
Call Girls in Okhla Delhi 💯Call Us 🔝8264348440🔝
Call Girls in Okhla Delhi 💯Call Us 🔝8264348440🔝Call Girls in Okhla Delhi 💯Call Us 🔝8264348440🔝
Call Girls in Okhla Delhi 💯Call Us 🔝8264348440🔝soniya singh
 

Recently uploaded (20)

办理(宾州州立毕业证书)美国宾夕法尼亚州立大学毕业证成绩单原版一比一
办理(宾州州立毕业证书)美国宾夕法尼亚州立大学毕业证成绩单原版一比一办理(宾州州立毕业证书)美国宾夕法尼亚州立大学毕业证成绩单原版一比一
办理(宾州州立毕业证书)美国宾夕法尼亚州立大学毕业证成绩单原版一比一
 
办理学位证(TheAuckland证书)新西兰奥克兰大学毕业证成绩单原版一比一
办理学位证(TheAuckland证书)新西兰奥克兰大学毕业证成绩单原版一比一办理学位证(TheAuckland证书)新西兰奥克兰大学毕业证成绩单原版一比一
办理学位证(TheAuckland证书)新西兰奥克兰大学毕业证成绩单原版一比一
 
VIP Call Girls Service Bhagyanagar Hyderabad Call +91-8250192130
VIP Call Girls Service Bhagyanagar Hyderabad Call +91-8250192130VIP Call Girls Service Bhagyanagar Hyderabad Call +91-8250192130
VIP Call Girls Service Bhagyanagar Hyderabad Call +91-8250192130
 
2024新版美国旧金山州立大学毕业证成绩单pdf电子版制作修改#毕业文凭制作#回国入职#diploma#degree
2024新版美国旧金山州立大学毕业证成绩单pdf电子版制作修改#毕业文凭制作#回国入职#diploma#degree2024新版美国旧金山州立大学毕业证成绩单pdf电子版制作修改#毕业文凭制作#回国入职#diploma#degree
2024新版美国旧金山州立大学毕业证成绩单pdf电子版制作修改#毕业文凭制作#回国入职#diploma#degree
 
ARt app | UX Case Study
ARt app | UX Case StudyARt app | UX Case Study
ARt app | UX Case Study
 
Call Us ✡️97111⇛47426⇛Call In girls Vasant Vihar༒(Delhi)
Call Us ✡️97111⇛47426⇛Call In girls Vasant Vihar༒(Delhi)Call Us ✡️97111⇛47426⇛Call In girls Vasant Vihar༒(Delhi)
Call Us ✡️97111⇛47426⇛Call In girls Vasant Vihar༒(Delhi)
 
办理学位证(NUS证书)新加坡国立大学毕业证成绩单原版一比一
办理学位证(NUS证书)新加坡国立大学毕业证成绩单原版一比一办理学位证(NUS证书)新加坡国立大学毕业证成绩单原版一比一
办理学位证(NUS证书)新加坡国立大学毕业证成绩单原版一比一
 
NO1 Famous Amil Baba In Karachi Kala Jadu In Karachi Amil baba In Karachi Add...
NO1 Famous Amil Baba In Karachi Kala Jadu In Karachi Amil baba In Karachi Add...NO1 Famous Amil Baba In Karachi Kala Jadu In Karachi Amil baba In Karachi Add...
NO1 Famous Amil Baba In Karachi Kala Jadu In Karachi Amil baba In Karachi Add...
 
Passbook project document_april_21__.pdf
Passbook project document_april_21__.pdfPassbook project document_april_21__.pdf
Passbook project document_april_21__.pdf
 
VIP Call Girls Service Kukatpally Hyderabad Call +91-8250192130
VIP Call Girls Service Kukatpally Hyderabad Call +91-8250192130VIP Call Girls Service Kukatpally Hyderabad Call +91-8250192130
VIP Call Girls Service Kukatpally Hyderabad Call +91-8250192130
 
Cheap Rate Call girls Kalkaji 9205541914 shot 1500 night
Cheap Rate Call girls Kalkaji 9205541914 shot 1500 nightCheap Rate Call girls Kalkaji 9205541914 shot 1500 night
Cheap Rate Call girls Kalkaji 9205541914 shot 1500 night
 
办理学位证(SFU证书)西蒙菲莎大学毕业证成绩单原版一比一
办理学位证(SFU证书)西蒙菲莎大学毕业证成绩单原版一比一办理学位证(SFU证书)西蒙菲莎大学毕业证成绩单原版一比一
办理学位证(SFU证书)西蒙菲莎大学毕业证成绩单原版一比一
 
Call Girls In Safdarjung Enclave 24/7✡️9711147426✡️ Escorts Service
Call Girls In Safdarjung Enclave 24/7✡️9711147426✡️ Escorts ServiceCall Girls In Safdarjung Enclave 24/7✡️9711147426✡️ Escorts Service
Call Girls In Safdarjung Enclave 24/7✡️9711147426✡️ Escorts Service
 
Kindergarten Assessment Questions Via LessonUp
Kindergarten Assessment Questions Via LessonUpKindergarten Assessment Questions Via LessonUp
Kindergarten Assessment Questions Via LessonUp
 
在线办理ohio毕业证俄亥俄大学毕业证成绩单留信学历认证
在线办理ohio毕业证俄亥俄大学毕业证成绩单留信学历认证在线办理ohio毕业证俄亥俄大学毕业证成绩单留信学历认证
在线办理ohio毕业证俄亥俄大学毕业证成绩单留信学历认证
 
shot list for my tv series two steps back
shot list for my tv series two steps backshot list for my tv series two steps back
shot list for my tv series two steps back
 
西北大学毕业证学位证成绩单-怎么样办伪造
西北大学毕业证学位证成绩单-怎么样办伪造西北大学毕业证学位证成绩单-怎么样办伪造
西北大学毕业证学位证成绩单-怎么样办伪造
 
Call Girls in Ashok Nagar Delhi ✡️9711147426✡️ Escorts Service
Call Girls in Ashok Nagar Delhi ✡️9711147426✡️ Escorts ServiceCall Girls in Ashok Nagar Delhi ✡️9711147426✡️ Escorts Service
Call Girls in Ashok Nagar Delhi ✡️9711147426✡️ Escorts Service
 
8377877756 Full Enjoy @24/7 Call Girls in Nirman Vihar Delhi NCR
8377877756 Full Enjoy @24/7 Call Girls in Nirman Vihar Delhi NCR8377877756 Full Enjoy @24/7 Call Girls in Nirman Vihar Delhi NCR
8377877756 Full Enjoy @24/7 Call Girls in Nirman Vihar Delhi NCR
 
Call Girls in Okhla Delhi 💯Call Us 🔝8264348440🔝
Call Girls in Okhla Delhi 💯Call Us 🔝8264348440🔝Call Girls in Okhla Delhi 💯Call Us 🔝8264348440🔝
Call Girls in Okhla Delhi 💯Call Us 🔝8264348440🔝
 

Photo Manipulation Tutorial (Step by Step Process)

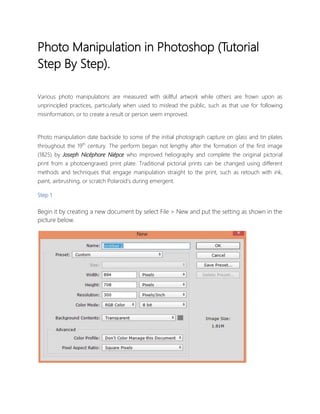
  • 1. Photo Manipulation in Photoshop (Tutorial Step By Step). Various photo manipulations are measured with skillful artwork while others are frown upon as unprincipled practices, particularly when used to mislead the public, such as that use for following misinformation, or to create a result or person seem improved. Photo manipulation date backside to some of the initial photograph capture on glass and tin plates throughout the 19th century. The perform began not lengthy after the formation of the first image (1825) by Joseph Nicéphore Niépce who improved heliography and complete the original pictorial print from a photoengraved print plate. Traditional pictorial prints can be changed using different methods and techniques that engage manipulation straight to the print, such as retouch with ink, paint, airbrushing, or scratch Polaroid’s during emergent. Step 1 Begin it by creating a new document by select File > New and put the setting as shown in the picture below.
  • 2. Step 2 Place the jungle picture to the main manuscript by selecting File > Place Embedded or Place and then put it into the main document. Also, resize it a little bit so it resemble to below photo. Step 3 We are completing it right now by adding depth to jungle image. To do this, convert the jungle photo into a smart object (right-click on it and decide to change to Smart Object) and then go to Filter > Blur > Gaussian Blur. Set the radius value as exposed in the picture below.
  • 3. Step 4 Trigger up the Brush tool by tapping (B) on the keyboard. Select a soft round black brush. Set its opacity and stream it about 30% then start blurring the selected effect by painting on the layer mask of Gaussian Blur filter.
  • 4. Here we’ve added deepness to the picture. Step 5 Create a Brightness & Contrast tuning layer (Layer > New Adjustment layers > Brightness/Contrast) to jungle picture as clipping mask (red one) to decrease glowness of the forest.
  • 5. Step 6 Use a Color stability adjustment layer to add some blue tones to the jungle. Here are the outcome.
  • 6. Step 7 Use the Color adjustment layer to decrease yellow tones from the jungle image. Here are the outcome.
  • 7. Step 8 Insert the nebula picture to the scene and resize it as revealed in the picture below so it can cover the whole image. Create the blend mode of Nebula image to display and decrease the opacity to 33%. Here are the consequences and as here it shown by adding the nebula picture we’ve little bit delightful effect added to the scene.
  • 8. Step 9 Apply a Hue/Saturation adjustment layer to counterpart the color of nebula to the rest of the background of the image. Step 10 Open up the image PSD file in Photoshop. Place a raven to the main file and also add a Gaussian Blur filter to crow so it can unify with jungle blur parts.
  • 9. Step 11 Time to make a light source using Brush tool. Make a new layer by tapping (CTRL + SHIFT + ALT + N) on the keyboard and name it ‘Light Source’ or whatever you want to name it. Now make active the brush tool by tapping (B) on the keyboard and adjust your foreground color to #1b3a5d this metrics then make a large stroke (use half of the brush) as shown in the picture beneath. Alter the blend mode of the light basis to Linear Dodge and decrease the opacity to 88% (reducing the opacity depending on you). Step 12 Open up the starry surface and place the starry picture to the main file. Use the half of the surface as we only want the bright particles not the rest of it. See the image below that how it placed.
  • 10. Change the blend form of Starry4 to display to get rid of black environment. Step 13 Equivalent the color of Starry4 surface using a Hue/Saturation adjustments layer by dropping the saturation.
  • 11. To add some more bright particles to the prospect, make a new layer and name it ‘Little Glow’ or whatever you want. Make active the brush tool and using soft round white brush tool paint a white tiny dot as indicated by red ball.
  • 12. Step 14 Insert a glow to the little glow layer by adding up an outer glow effect. To add an external glow effect, right click on the ‘little glow’ or the name whatever you have been set up in the layer and take blending options then set the setting as shown in the picture underneath.
  • 13. Imitate the ‘Little glow’ layer by tapping (CTRL + J) Step 15 Pull out the deer from its backdrop and place it to the main file.
  • 14. Hide the legs of deer using a Layer Mask Step 16 Make some shadow for the deer, to do this makes a new layer and turn on the brush tool by tapping (B) on the keyboard. Make the opacity and flow of brush tool to 30% and then make a shadow for the deer where the deer legs.
  • 15. Step 17 Decrease the saturation of deer by using Hue/Saturation adjustment layer. Step 18 The glow of deer doesn’t match with the picture as it got a dark background but deer has more glow than the background. So decrease the brightness of deer by using Curves adjustment layer.
  • 16. Here is the outcome. Step 19 Create a Color balance adjustment layer to deer to merge it properly to the picture.
  • 17. Here are the outcome. Step 20 • Make a new layer and name it “Highlights”.
  • 18. • Modify your foreground color to #2b5463 and then use a soft round brush tool with opacity and run about 30%. • Draw some lights on deer parts that are shade up by the light source. See the arrow direction as shown in the picture below. • Now modify the blend mode of show up layer to Linear Dodge and decrease the opacity to 55%.
  • 19. Step 21 • Insert more lights to the image. • Now use the full brush as shown in the picture below. Step 22 Modify the blend mode to Lighten mode and decrease the opacity to 66%.
  • 20. Step 23 • Now to confirm the picture using the Final Adjustment layers. • Add the Gradient Map adjustment to the picture in the image below. • Change the mode of Gradient Map to Color Dodge to light up the prospect.
  • 21. Step 24 Add the Selective Color to eliminate the green color from the jungle. Here is the outcome.
  • 22. Step 25 • Insert the Brightness/Contrast and Color Lookup tuning layers to the scene. • Also decrease the opacity of Brightness/Contrast adjustment layer to 64% . • For Color Lookup decrease it to 55%. Here is the consequence.
  • 23. Step 26 Add again a Brightness/Contrast adjustment layer to the prospect. Here is the outcome.
  • 24. Step 27 On the layer mask of Brightness/Contrast adjustment layer conceal the selected consequence using a soft round black brush to keep some lights in the center.
  • 25. Here are the consequences.
  • 26. Step 28 • As you can visibly notice that thickness of layer mask is set to 100%. • Now decrease the density of layer mask to 69% by dragging the controller to left. • As you decrease thickness of layer you can see that layer mask color now altered from black to gray that means it revealing the effect.
  • 27. Let’s see the ultimate outcome now. As you can observe we’ve decreased lightness in the middle by using the thickness of layer mask. Always keep in mind by dragging the modular, on the possessions of layer mask, to left mean it painting with white color and by dragging the modular to right means that it painting on the layer mask with black color. Conclusion So, these are process for manipulating any images by Photoshop. And most of the professional photo editor use Photoshop for its uniqueness of work. And Photoshop can do lots photo editing work like clipping path image and this kind of service basically take photographers who take bulk amount of images. So they don’t have enough time to edit these images this is why they take clipping path service to remove background or takes photo retouching service. For ecommerce business they also do photo editing because of, here main thing is image which actually people can rely on it.