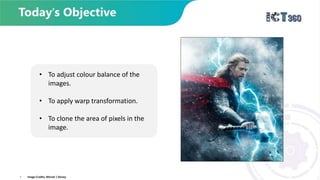
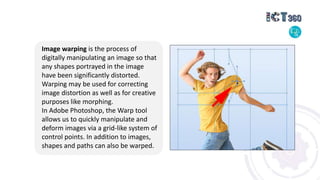
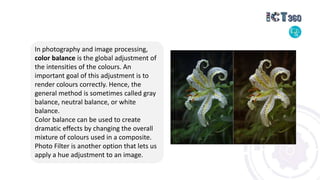
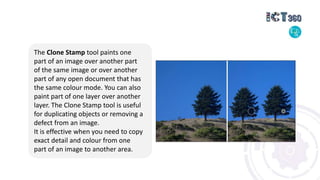
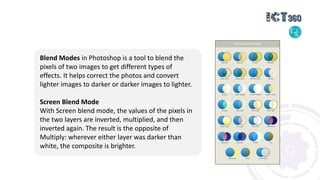
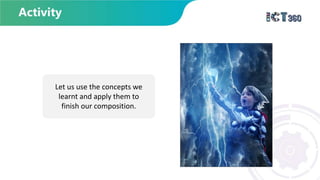
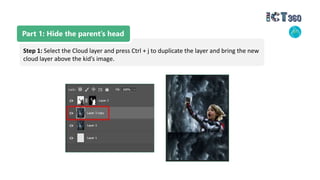
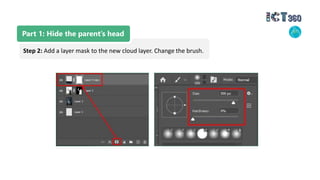
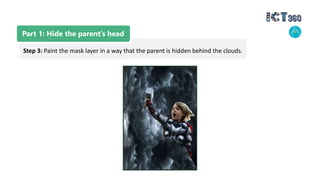
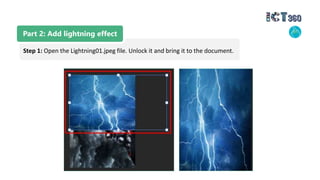
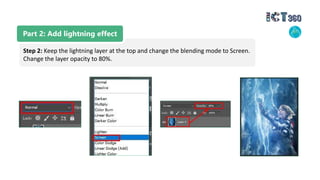
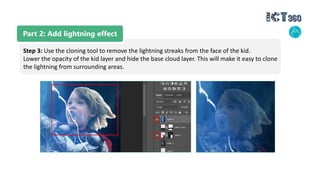
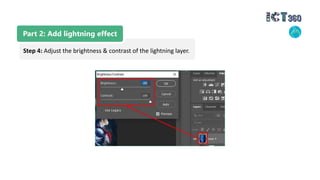
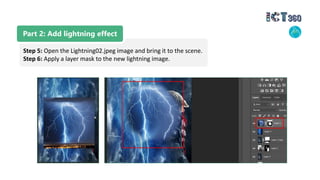
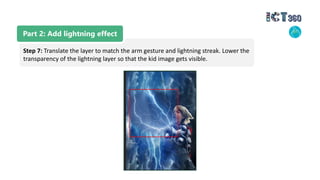
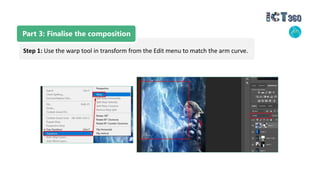
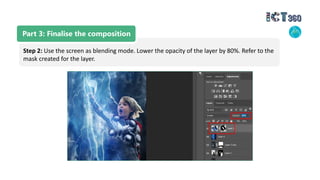
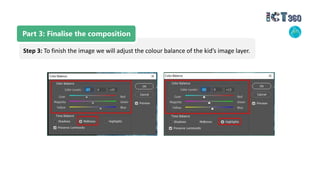
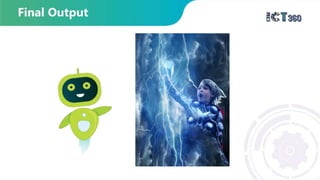
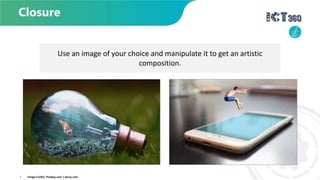
The document provides instructions for using Photoshop tools like the warp tool, clone stamp, and blending modes to manipulate images and create a composite resembling a superhero by hiding a parent's head behind clouds, adding lightning effects, and adjusting the color balance and lighting to finalize the composition. Key techniques discussed include warping images, adjusting color balance, using the clone stamp and healing brush, applying blending modes like screen, and utilizing layers and masks to composite multiple images.
Knowing how to sharpen a picture in Photoshop is helpful expertise for any photographic artist. Foggy pictures occur for various reasons. Perhaps you had your camera self-adjust and it set the center point in some unacceptable spot.
Do you need to change the backdrop for the model? It is now very simple to change the background, the sky, the eyes, the hair, and the skin color. Do you want to isolate the subject and sharpen just the person’s face while leaving the background alone? With Photoshop’s tools and plugins for image masking, editing photographs is simple.
Language has advanced to the point where we now refer to the act of modifying images using the verb “photoshop.” In reference to the workflow, we frequently hear expressions like “try photoshopping it out” or “photoshop something into the picture.” This mainly refers to modifying an image in photo Image Masking editing software utilizing masking tools and layers. The world has been handed a potent set of tools by the Photoshop software to radically alter photos. It has opened up a whole new universe of editing options for photographs.
But today, in addition to Photoshop, there are many more editing software programs that provide a variety of useful masking techniques, advancing the editing procedure even further. With its simple, uncluttered user interface and all the features you need, Luminar Neo achieves the same result and is a fantastic photo masking tool. It serves as an illustration of how, while masking photographs, you may go beyond the fundamentals and explore other realms.
In this Photoshop tutorial, I’m going to show you an easy, step-by-step process for creating a stunning photo collage in Photoshop.
Photo collages are unique art forms that can be used to show off a theme or concept! This kind of style was largely used on posters, record covers, etc…
As far as I know, by now in 2023, most of the techy dudes are familiar with the variety of collage apps on their smartphones.
But what if you want to make a collage in Photoshop? Don’t worry! I will make it easier than you think.
Let’s dive into the process. I hope you enjoy it.
How to Turn a Picture Into a Line Drawing in PhotoshopZenith Clipping
To transform a photograph into a line drawing in Photoshop, you don’t need it to appear as though you did it in Photoshop, you’ll need to focus on detail and set up your picture appropriately before you apply any channels.
This is a step-by-step guide to producing a magazine cover with a variety of effects designed to give students an overview of filters and blending options. All the assets are included and there is also a link to the completed .psd file. Please also see my Simple Magazine Cover Photoshop tutorial. Adapted from a tutorial I found online.
In photography, Blur refers to an image (or sections of an image) that are not sharp. This is frequently brought about by camera shake, and it’s a mix-up that you ordinarily need to stay away from.
Clipping Path Eu is a well reputed photo editing service company ,
Here you can find any type of photo editing service with affordable price and also high professional work
A layer style is one or more effects applied to a layer or layer group. You can apply one of the preset styles provided with Photoshop or create a custom style using the Layer Style dialog box. The layer effects icon appears to the right of the layer's name in the Layers panel.
App name: bopeep
What is bopeep? When parents hides their face one’s hand then we can see kid's expression(like laughing or crying). This app is for very young children, in which one hides (hiding one's face in one's hands) and reappears suddenly.
App name: Data Saver(diànhuàbù)
Because this app purpose is to collect the data from user. This (diànhuàbù) is pinyin from a Chinese character.
Adobe Premiere Pro: How to Use Drop Shadow Effect?
The Drop Shadow Effect in Adobe Premiere Pro is a useful tool that can add depth and dimension to your video clips. With this effect, you can create the illusion of a shadow behind an object or text, giving it a more realistic and three-dimensional appearance.
Mastering Premiere Pro: Tips and Tricks for Beginners (Youtube Channel)
In this article, we will discuss how to use the Drop Shadow Effect in Adobe Premiere Pro.
Step 1: Import your footage The first step is to import the footage that you want to use in your video. Make sure that the footage is selected.
Step 2: Create a new adjustment layer To apply the Drop Shadow Effect, you will need to create a new adjustment layer. To do this, go to the Project panel and click on the New Item icon. From the drop-down menu, select Adjustment Layer. This will create a new adjustment layer in your project.
Step 3: Apply the Drop Shadow Effect To apply the Drop Shadow Effect, drag the adjustment layer onto the timeline above the clip that you want to add the effect to. Then, go to the Effects panel and search for Drop Shadow. Drag the effect onto the adjustment layer.
Step 4: Adjust the settings After applying the Drop Shadow Effect, you can adjust the settings to achieve the desired effect. The settings that you can adjust include Distance, Angle, Opacity, Softness, and Color.
Distance: This setting controls how far the shadow is cast from the object. Increase the distance to make the shadow appear further away from the object.
Angle: This setting controls the angle of the shadow. You can adjust the angle to make the shadow appear to come from a different direction.
Opacity: This setting controls the opacity of the shadow. Increase the opacity to make the shadow more visible.
Softness: This setting controls the softness of the shadow. Increase the softness to make the shadow appear more diffuse and less defined.
Color: This setting controls the color of the shadow. You can choose a different color for the shadow, depending on the look that you want to achieve.
Step 5: Fine-tune the settings After adjusting the settings, you may need to fine-tune them to achieve the desired effect. You can preview the effect in the Program Monitor to see how it looks.
Step 6: Save your settings as a preset If you want to save your Drop Shadow settings as a preset, you can do so by clicking on the menu icon in the Effects Controls panel and selecting Save Preset. Give your preset a name and click OK. You can then apply the preset to other clips in your project.
In conclusion, the Drop Shadow Effect in Adobe Premiere Pro is a powerful tool that can add depth and dimension to your video clips. By following these steps, you can create realistic shadows behind objects or text, giving your videos a more professional look.
Top 5 Indian Style Modular Kitchen DesignsFinzo Kitchens
Get the perfect modular kitchen in Gurgaon at Finzo! We offer high-quality, custom-designed kitchens at the best prices. Wardrobes and home & office furniture are also available. Free consultation! Best Quality Luxury Modular kitchen in Gurgaon available at best price. All types of Modular Kitchens are available U Shaped Modular kitchens, L Shaped Modular Kitchen, G Shaped Modular Kitchens, Inline Modular Kitchens and Italian Modular Kitchen.
Can AI do good? at 'offtheCanvas' India HCI preludeAlan Dix
Invited talk at 'offtheCanvas' IndiaHCI prelude, 29th June 2024.
https://www.alandix.com/academic/talks/offtheCanvas-IndiaHCI2024/
The world is being changed fundamentally by AI and we are constantly faced with newspaper headlines about its harmful effects. However, there is also the potential to both ameliorate theses harms and use the new abilities of AI to transform society for the good. Can you make the difference?
Transforming Brand Perception and Boosting Profitabilityaaryangarg12
In today's digital era, the dynamics of brand perception, consumer behavior, and profitability have been profoundly reshaped by the synergy of branding, social media, and website design. This research paper investigates the transformative power of these elements in influencing how individuals perceive brands and products and how this transformation can be harnessed to drive sales and profitability for businesses.
Through an exploration of brand psychology and consumer behavior, this study sheds light on the intricate ways in which effective branding strategies, strategic social media engagement, and user-centric website design contribute to altering consumers' perceptions. We delve into the principles that underlie successful brand transformations, examining how visual identity, messaging, and storytelling can captivate and resonate with target audiences.
Methodologically, this research employs a comprehensive approach, combining qualitative and quantitative analyses. Real-world case studies illustrate the impact of branding, social media campaigns, and website redesigns on consumer perception, sales figures, and profitability. We assess the various metrics, including brand awareness, customer engagement, conversion rates, and revenue growth, to measure the effectiveness of these strategies.
The results underscore the pivotal role of cohesive branding, social media influence, and website usability in shaping positive brand perceptions, influencing consumer decisions, and ultimately bolstering sales and profitability. This paper provides actionable insights and strategic recommendations for businesses seeking to leverage branding, social media, and website design as potent tools to enhance their market position and financial success.
You could be a professional graphic designer and still make mistakes. There is always the possibility of human error. On the other hand if you’re not a designer, the chances of making some common graphic design mistakes are even higher. Because you don’t know what you don’t know. That’s where this blog comes in. To make your job easier and help you create better designs, we have put together a list of common graphic design mistakes that you need to avoid.
Between Filth and Fortune- Urban Cattle Foraging Realities by Devi S Nair, An...Mansi Shah
This study examines cattle rearing in urban and rural settings, focusing on milk production and consumption. By exploring a case in Ahmedabad, it highlights the challenges and processes in dairy farming across different environments, emphasising the need for sustainable practices and the essential role of milk in daily consumption.
Dive into the innovative world of smart garages with our insightful presentation, "Exploring the Future of Smart Garages." This comprehensive guide covers the latest advancements in garage technology, including automated systems, smart security features, energy efficiency solutions, and seamless integration with smart home ecosystems. Learn how these technologies are transforming traditional garages into high-tech, efficient spaces that enhance convenience, safety, and sustainability.
Ideal for homeowners, tech enthusiasts, and industry professionals, this presentation provides valuable insights into the trends, benefits, and future developments in smart garage technology. Stay ahead of the curve with our expert analysis and practical tips on implementing smart garage solutions.
Hello everyone! I am thrilled to present my latest portfolio on LinkedIn, marking the culmination of my architectural journey thus far. Over the span of five years, I've been fortunate to acquire a wealth of knowledge under the guidance of esteemed professors and industry mentors. From rigorous academic pursuits to practical engagements, each experience has contributed to my growth and refinement as an architecture student. This portfolio not only showcases my projects but also underscores my attention to detail and to innovative architecture as a profession.
2. The goal of this project is to manipulate different images in Adobe
Photoshop and create a composition that resembles a superhero.
This project focusses on using the photo manipulation techniques and
tools in Adobe Photoshop to create an image that showcases a
superhero.
3. • To adjust colour balance of the
images.
• To apply warp transformation.
• To clone the area of pixels in the
image.
• Image Credits: Marvel | Disney
4. • Layers
• Crop
• Image Adjustment
• Image Transformation
• Quick Actions
Let’s recall the tools that are often used in photo
manipulation.
• Warp Transformation
• Magic Wand
• Clone Stamp
• Healing brush
• Blending
5. Image warping is the process of
digitally manipulating an image so that
any shapes portrayed in the image
have been significantly distorted.
Warping may be used for correcting
image distortion as well as for creative
purposes like morphing.
In Adobe Photoshop, the Warp tool
allows us to quickly manipulate and
deform images via a grid-like system of
control points. In addition to images,
shapes and paths can also be warped.
6. In photography and image processing,
color balance is the global adjustment of
the intensities of the colours. An
important goal of this adjustment is to
render colours correctly. Hence, the
general method is sometimes called gray
balance, neutral balance, or white
balance.
Color balance can be used to create
dramatic effects by changing the overall
mixture of colours used in a composite.
Photo Filter is another option that lets us
apply a hue adjustment to an image.
7. The Clone Stamp tool paints one
part of an image over another part
of the same image or over another
part of any open document that has
the same colour mode. You can also
paint part of one layer over another
layer. The Clone Stamp tool is useful
for duplicating objects or removing a
defect from an image.
It is effective when you need to copy
exact detail and colour from one
part of an image to another area.
8. Blend Modes in Photoshop is a tool to blend the
pixels of two images to get different types of
effects. It helps correct the photos and convert
lighter images to darker or darker images to lighter.
Screen Blend Mode
With Screen blend mode, the values of the pixels in
the two layers are inverted, multiplied, and then
inverted again. The result is the opposite of
Multiply: wherever either layer was darker than
white, the composite is brighter.
9. Let us use the concepts we
learnt and apply them to
finish our composition.
10. Part 1: Hide the parent’s head
Step 1: Select the Cloud layer and press Ctrl + j to duplicate the layer and bring the new
cloud layer above the kid’s image.
11. Part 1: Hide the parent’s head
Step 2: Add a layer mask to the new cloud layer. Change the brush.
12. Part 1: Hide the parent’s head
Step 3: Paint the mask layer in a way that the parent is hidden behind the clouds.
13. Part 2: Add lightning effect
Step 1: Open the Lightning01.jpeg file. Unlock it and bring it to the document.
14. Part 2: Add lightning effect
Step 2: Keep the lightning layer at the top and change the blending mode to Screen.
Change the layer opacity to 80%.
15. Part 2: Add lightning effect
Step 3: Use the cloning tool to remove the lightning streaks from the face of the kid.
Lower the opacity of the kid layer and hide the base cloud layer. This will make it easy to clone
the lightning from surrounding areas.
16. Part 2: Add lightning effect
Step 4: Adjust the brightness & contrast of the lightning layer.
17. Part 2: Add lightning effect
Step 5: Open the Lightning02.jpeg image and bring it to the scene.
Step 6: Apply a layer mask to the new lightning image.
18. Part 2: Add lightning effect
Step 7: Translate the layer to match the arm gesture and lightning streak. Lower the
transparency of the lightning layer so that the kid image gets visible.
19. Part 3: Finalise the composition
Step 1: Use the warp tool in transform from the Edit menu to match the arm curve.
20. Part 3: Finalise the composition
Step 2: Use the screen as blending mode. Lower the opacity of the layer by 80%. Refer to the
mask created for the layer.
21. Part 3: Finalise the composition
Step 3: To finish the image we will adjust the colour balance of the kid’s image layer.
22.
23. What is the colour balance?
How does screen blending
mode work?
24. Use an image of your choice and manipulate it to get an artistic
composition.
• Image Credits: Pixabay.com | Ipiccy.com