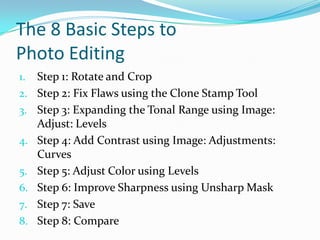
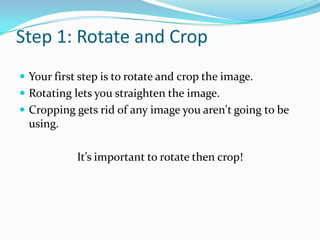
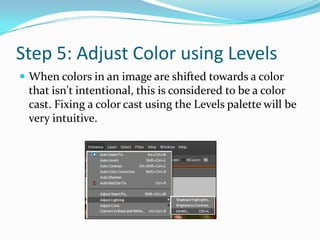
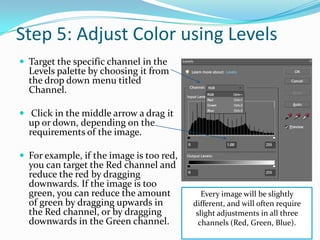
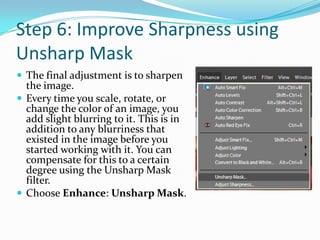
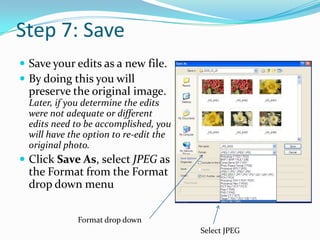
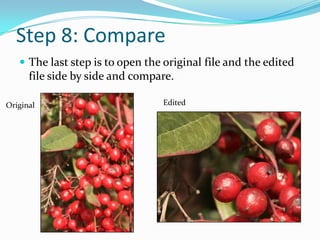
SlideShare a Scribd company logo
The 8 Basic Steps to Photo Editing Adobe Photoshop Elements 6 Editing an image can be looked at as a series of basic functions or steps that can be accomplished in any editing software program. This tutorial will focus on accomplishing these tasks in Adobe Photoshop Elements version 6.
The 8 Basic Steps to Photo Editing Step 1: Rotate and Crop Step 2: Fix Flaws using the Clone Stamp Tool Step 3: Expanding the Tonal Range using Image: Adjust: Levels Step 4: Add Contrast using Image: Adjustments: Curves Step 5: Adjust Color using Levels Step 6: Improve Sharpness using UnsharpMask Step 7: Save Step 8: Compare
Step 1: Rotate and Crop  Your first step is to rotate and crop the image.  Rotating lets you straighten the image.  Cropping gets rid of any image you aren't going to be using.  It’s important to rotate then crop!
Step 1: Rotate and Crop Crop Rotate Choose Image: Crop Selection area will appear Drag the crop tool to the new size you desire then double click area to crop Choose Image, Rotate: Free Rotate Layer Grab the small squares in the corners to rotate image Double click in this area to accept the rotation changes
[object Object],dragging on the control handles, the small squares located in the corners and on the sides of the crop box. ,[object Object]
 Reposition the crop box by dragging inside it.
To accept the changes click the green check mark at the bottom right.,[object Object]
Step 3: Expanding the Tonal Range using Image: Adjust: Levels Digital cameras are limited in the range of colors they can capture. This can be compensated for using the Levels command. Choose Enhance: Adjust: Lighting: Levels.  The mountain in the middle of the dialog box is actually called a Historgram.  Historgram
Step 3: Expanding the Tonal Range using Image: Adjust: Levels A histogram is a graph of all the tones in the image, ranging from the darkest to the lightest. The triangles beneath the histogram represent the range of colors that the output device is capable of reproducing.
Step 3: Expanding the Tonal Range using Image: Adjust: Levels In the histogram you typically see a gap in the lighter tones (on the right) and a gap in the dark tones (left). There is no information there for the printer or monitor to use to reproduce these tones. Drag the white triangle towards the left, Drag the black triangle towards the right. Leave the middle triangle alone. Watch the image carefully to see how the adjustment effects it. Light Tones Dark Tones
Step 4: Add Contrast using Image: Adjustments: Curves The Curves command is one of the most powerful features of Photoshop. It allows you to change specific ranges of colors while leaving others untouched. For example, in Step 3 we adjusted the shadows and highlights. They are as we want them to be and we don't want to change them.  In this step we will add contrast to the image by adjusting the shadow, highlight and mid tones.
Step 4: Add Contrast using Image: Adjustments: Curves Choose Enhance: Adjust Color: Adjust Color Curves… dialog box opens.  The Adjust Color Curves dialog box will appear Adjust Color Curves dialog box
Step 4: Add Contrast using Image: Adjustments: Curves Select the style of curve that works best from the Select a Style presets. Make additional adjustments by using Adjustment Sliders
Step 5: Adjust Color using Levels When colors in an image are shifted towards a color that isn't intentional, this is considered to be a color cast. Fixing a color cast using the Levels palette will be very intuitive.
Step 5: Adjust Color using Levels Target the specific channel in the Levels palette by choosing it from the drop down menu titled Channel. Click in the middle arrow a drag it up or down, depending on the requirements of the image.  For example, if the image is too red, you can target the Red channel and reduce the red by dragging downwards. If the image is too green, you can reduce the amount of green by dragging upwards in the Red channel, or by dragging downwards in the Green channel. Every image will be slightly different, and will often require slight adjustments in all three channels (Red, Green, Blue).
Step 6: Improve Sharpness using Unsharp Mask The final adjustment is to sharpen the image.  Every time you scale, rotate, or change the color of an image, you add slight blurring to it. This is in addition to any blurriness that existed in the image before you started working with it. You can compensate for this to a certain degree using the Unsharp Mask filter. Choose Enhance: Unsharp Mask.
Step 6: Improve Sharpness using Unsharp Mask The settings for each image will differ, but generally the Radius and the Threshold will be under 5 pixels, while the Amount will be greater than 50%. Move the sliders for each setting while watching the results in the image.  The goal is to make the image appear crisper and less blurry without over-sharpening. Oversharpening can appear as "haloing" or mottling near areas where colors contrast sharply, or as an overall "plasticy" appearance. Amount Threshold Radius
Step 7: Save Save your edits as a new file.  By doing this you will preserve the original image. Later, if you determine the edits were not adequate or different edits need to be accomplished, you will have the option to re-edit the original photo. Click Save As, select JPEG as the Format from the Format drop down menu Format drop down Select JPEG
Step 8: Compare The last step is to open the original file and the edited file side by side and compare. Edited Original

More Related Content

What's hot

Photo Editing Slideshow
Photo Editing SlideshowPhoto Editing Slideshow
Photo Editing Slideshow
Josh Self
 
Digital graphics
Digital graphicsDigital graphics
Digital graphics
Nicole Melia
 
Top 10 photo editing software
Top 10 photo editing softwareTop 10 photo editing software
Top 10 photo editing software
Drins Tech Limited
 
The Art of Photo Manipulation Technique
The Art of Photo Manipulation TechniqueThe Art of Photo Manipulation Technique
The Art of Photo Manipulation Technique
Image Clipping Path Services
 
Lesson 1 • Introduction to Photoshop
Lesson 1 • Introduction to PhotoshopLesson 1 • Introduction to Photoshop
Lesson 1 • Introduction to Photoshop
Marcio Sargento
 
Sesion 2.1 introduction to photoshop (basic)
Sesion 2.1   introduction to photoshop (basic)Sesion 2.1   introduction to photoshop (basic)
Sesion 2.1 introduction to photoshop (basic)
John Josef Jimenez
 
Adobe Photoshop
Adobe Photoshop Adobe Photoshop
Adobe Photoshop
Mujeeb Riaz
 
PPT on Photoshop
PPT on PhotoshopPPT on Photoshop
PPT on Photoshop
Paddy Lock
 
Photoshop graphic intro ppt by kartik mandothiya
Photoshop graphic intro ppt by kartik mandothiyaPhotoshop graphic intro ppt by kartik mandothiya
Photoshop graphic intro ppt by kartik mandothiya
Kartik Mandothiya
 
Basic tutorials
Basic tutorialsBasic tutorials
Basic tutorials
Jeffrey libarios
 
Resolution
ResolutionResolution
Resolution
FranJackson3
 
Introduction to Photoshop
Introduction to PhotoshopIntroduction to Photoshop
Introduction to Photoshop
Rhosebe Gaudia
 
Image Editing in ICT
Image Editing in ICT Image Editing in ICT
Image Editing in ICT
Kristina Kassandra Guardiario
 
Adobe Photoshop
Adobe PhotoshopAdobe Photoshop
Adobe Photoshop
Bui Huynh
 
DAY 1 - Introduction to Photo Editing and Photoshop CS6
DAY 1 - Introduction to Photo Editing and Photoshop CS6DAY 1 - Introduction to Photo Editing and Photoshop CS6
DAY 1 - Introduction to Photo Editing and Photoshop CS6
Sef Cambaliza
 
DUSPviz Intro to Photoshop - 2013
DUSPviz Intro to Photoshop - 2013DUSPviz Intro to Photoshop - 2013
DUSPviz Intro to Photoshop - 2013
DUSPviz
 
Photoshop Essentials Workshop
Photoshop Essentials WorkshopPhotoshop Essentials Workshop
Photoshop Essentials Workshop
Chuck Snyder
 
Photoshop Introduction
Photoshop IntroductionPhotoshop Introduction
Photoshop Introduction
Z Hoeben
 

What's hot (20)

Photo Editing Slideshow
Photo Editing SlideshowPhoto Editing Slideshow
Photo Editing Slideshow
 
Digital graphics
Digital graphicsDigital graphics
Digital graphics
 
Top 10 photo editing software
Top 10 photo editing softwareTop 10 photo editing software
Top 10 photo editing software
 
The Art of Photo Manipulation Technique
The Art of Photo Manipulation TechniqueThe Art of Photo Manipulation Technique
The Art of Photo Manipulation Technique
 
Lesson 1 • Introduction to Photoshop
Lesson 1 • Introduction to PhotoshopLesson 1 • Introduction to Photoshop
Lesson 1 • Introduction to Photoshop
 
Adobe Photoshop
Adobe PhotoshopAdobe Photoshop
Adobe Photoshop
 
Sesion 2.1 introduction to photoshop (basic)
Sesion 2.1   introduction to photoshop (basic)Sesion 2.1   introduction to photoshop (basic)
Sesion 2.1 introduction to photoshop (basic)
 
Adobe Photoshop
Adobe Photoshop Adobe Photoshop
Adobe Photoshop
 
Photoshop cs5
Photoshop cs5Photoshop cs5
Photoshop cs5
 
PPT on Photoshop
PPT on PhotoshopPPT on Photoshop
PPT on Photoshop
 
Photoshop graphic intro ppt by kartik mandothiya
Photoshop graphic intro ppt by kartik mandothiyaPhotoshop graphic intro ppt by kartik mandothiya
Photoshop graphic intro ppt by kartik mandothiya
 
Basic tutorials
Basic tutorialsBasic tutorials
Basic tutorials
 
Resolution
ResolutionResolution
Resolution
 
Introduction to Photoshop
Introduction to PhotoshopIntroduction to Photoshop
Introduction to Photoshop
 
Image Editing in ICT
Image Editing in ICT Image Editing in ICT
Image Editing in ICT
 
Adobe Photoshop
Adobe PhotoshopAdobe Photoshop
Adobe Photoshop
 
DAY 1 - Introduction to Photo Editing and Photoshop CS6
DAY 1 - Introduction to Photo Editing and Photoshop CS6DAY 1 - Introduction to Photo Editing and Photoshop CS6
DAY 1 - Introduction to Photo Editing and Photoshop CS6
 
DUSPviz Intro to Photoshop - 2013
DUSPviz Intro to Photoshop - 2013DUSPviz Intro to Photoshop - 2013
DUSPviz Intro to Photoshop - 2013
 
Photoshop Essentials Workshop
Photoshop Essentials WorkshopPhotoshop Essentials Workshop
Photoshop Essentials Workshop
 
Photoshop Introduction
Photoshop IntroductionPhotoshop Introduction
Photoshop Introduction
 

Similar to The 8 Basic Steps Elements 6

How to Turn a Picture Into a Line Drawing in Photoshop
How to Turn a Picture Into a Line Drawing in PhotoshopHow to Turn a Picture Into a Line Drawing in Photoshop
How to Turn a Picture Into a Line Drawing in Photoshop
Zenith Clipping
 
Writing de materials1
Writing de materials1Writing de materials1
Writing de materials1
Abir Almaqrashi
 
Cut out image with hard hair mask
Cut out image with hard hair maskCut out image with hard hair mask
Cut out image with hard hair mask
sujon hasan
 
217 quick guide to photoshop cs6
217 quick guide to photoshop cs6217 quick guide to photoshop cs6
217 quick guide to photoshop cs6
Rodel Morales
 
How to Sharpen an Image in Photoshop
How to Sharpen an Image in PhotoshopHow to Sharpen an Image in Photoshop
How to Sharpen an Image in Photoshop
Zenith Clipping
 
PaintShop Pro 7 Manual
PaintShop Pro 7 ManualPaintShop Pro 7 Manual
PaintShop Pro 7 ManualLaurel Eddy
 
Create a Photo Collage in Photoshop.pdf
Create a Photo Collage in Photoshop.pdfCreate a Photo Collage in Photoshop.pdf
Create a Photo Collage in Photoshop.pdf
Pinkverge
 
Paths, Masks And Blend Modes
Paths, Masks And Blend ModesPaths, Masks And Blend Modes
Paths, Masks And Blend ModesShan
 
Writing de materials11
Writing de materials11Writing de materials11
Writing de materials11
Abir Almaqrashi
 
Non Destructive Color Correction
Non Destructive Color CorrectionNon Destructive Color Correction
Non Destructive Color CorrectionAnn Elliott
 
quicktip_scanphotoshop
quicktip_scanphotoshopquicktip_scanphotoshop
quicktip_scanphotoshoptutorialsruby
 
quicktip_scanphotoshop
quicktip_scanphotoshopquicktip_scanphotoshop
quicktip_scanphotoshoptutorialsruby
 
adobephotoshop_frerking
adobephotoshop_frerking adobephotoshop_frerking
adobephotoshop_frerking
Agung Yuwono
 
Learning image retouch with Photoshop CS6 with 100 practical exercises
Learning image retouch with Photoshop CS6 with 100 practical exercisesLearning image retouch with Photoshop CS6 with 100 practical exercises
Learning image retouch with Photoshop CS6 with 100 practical exercises
MCB Press
 
Photoshop getting started part4
Photoshop getting started part4Photoshop getting started part4
Photoshop getting started part4Kermit Agbas
 
Edgy Colors
Edgy ColorsEdgy Colors
Edgy Colors
snshnangel04
 
Photo Editing: A Little Goes A Long Way
Photo Editing: A Little Goes A Long WayPhoto Editing: A Little Goes A Long Way
Photo Editing: A Little Goes A Long WayTREND MLS
 
Basic tutorials
Basic tutorialsBasic tutorials
Basic tutorials
Jeffrey libarios
 
Digital work station intro
Digital work station introDigital work station intro
Digital work station intro
Whitney Brooks
 
Photoshop How To
Photoshop How ToPhotoshop How To
Photoshop How To
waltersart1
 

Similar to The 8 Basic Steps Elements 6 (20)

How to Turn a Picture Into a Line Drawing in Photoshop
How to Turn a Picture Into a Line Drawing in PhotoshopHow to Turn a Picture Into a Line Drawing in Photoshop
How to Turn a Picture Into a Line Drawing in Photoshop
 
Writing de materials1
Writing de materials1Writing de materials1
Writing de materials1
 
Cut out image with hard hair mask
Cut out image with hard hair maskCut out image with hard hair mask
Cut out image with hard hair mask
 
217 quick guide to photoshop cs6
217 quick guide to photoshop cs6217 quick guide to photoshop cs6
217 quick guide to photoshop cs6
 
How to Sharpen an Image in Photoshop
How to Sharpen an Image in PhotoshopHow to Sharpen an Image in Photoshop
How to Sharpen an Image in Photoshop
 
PaintShop Pro 7 Manual
PaintShop Pro 7 ManualPaintShop Pro 7 Manual
PaintShop Pro 7 Manual
 
Create a Photo Collage in Photoshop.pdf
Create a Photo Collage in Photoshop.pdfCreate a Photo Collage in Photoshop.pdf
Create a Photo Collage in Photoshop.pdf
 
Paths, Masks And Blend Modes
Paths, Masks And Blend ModesPaths, Masks And Blend Modes
Paths, Masks And Blend Modes
 
Writing de materials11
Writing de materials11Writing de materials11
Writing de materials11
 
Non Destructive Color Correction
Non Destructive Color CorrectionNon Destructive Color Correction
Non Destructive Color Correction
 
quicktip_scanphotoshop
quicktip_scanphotoshopquicktip_scanphotoshop
quicktip_scanphotoshop
 
quicktip_scanphotoshop
quicktip_scanphotoshopquicktip_scanphotoshop
quicktip_scanphotoshop
 
adobephotoshop_frerking
adobephotoshop_frerking adobephotoshop_frerking
adobephotoshop_frerking
 
Learning image retouch with Photoshop CS6 with 100 practical exercises
Learning image retouch with Photoshop CS6 with 100 practical exercisesLearning image retouch with Photoshop CS6 with 100 practical exercises
Learning image retouch with Photoshop CS6 with 100 practical exercises
 
Photoshop getting started part4
Photoshop getting started part4Photoshop getting started part4
Photoshop getting started part4
 
Edgy Colors
Edgy ColorsEdgy Colors
Edgy Colors
 
Photo Editing: A Little Goes A Long Way
Photo Editing: A Little Goes A Long WayPhoto Editing: A Little Goes A Long Way
Photo Editing: A Little Goes A Long Way
 
Basic tutorials
Basic tutorialsBasic tutorials
Basic tutorials
 
Digital work station intro
Digital work station introDigital work station intro
Digital work station intro
 
Photoshop How To
Photoshop How ToPhotoshop How To
Photoshop How To
 

More from joelk

Future of rock
Future of rockFuture of rock
Future of rock
joelk
 
Getting wired at csm fall 2014
Getting wired at csm fall 2014Getting wired at csm fall 2014
Getting wired at csm fall 2014joelk
 
Getting wired at csm spring2013
Getting wired at csm spring2013Getting wired at csm spring2013
Getting wired at csm spring2013joelk
 
Ce building time lapse
Ce building time lapseCe building time lapse
Ce building time lapsejoelk
 
Middle states csm ver2
Middle states csm ver2Middle states csm ver2
Middle states csm ver2joelk
 
Self-Study Groups
Self-Study GroupsSelf-Study Groups
Self-Study Groupsjoelk
 
Turning response clickers
Turning response clickersTurning response clickers
Turning response clickersjoelk
 
Getting wired at CSM Spring 2011
Getting wired at CSM Spring 2011Getting wired at CSM Spring 2011
Getting wired at CSM Spring 2011joelk
 
Introduction to Blackboard 9.1
Introduction to Blackboard 9.1Introduction to Blackboard 9.1
Introduction to Blackboard 9.1joelk
 
Test a of audio in Slideshare
Test a of audio in SlideshareTest a of audio in Slideshare
Test a of audio in Slidesharejoelk
 
Video mania and dlf showcase
Video mania and dlf showcaseVideo mania and dlf showcase
Video mania and dlf showcasejoelk
 
Getting Wired Spring 2011
Getting Wired Spring 2011Getting Wired Spring 2011
Getting Wired Spring 2011joelk
 
Blackboard Mashups: Multimedia Just Got a Little Easier!
Blackboard Mashups: Multimedia Just Got a Little Easier!Blackboard Mashups: Multimedia Just Got a Little Easier!
Blackboard Mashups: Multimedia Just Got a Little Easier!
joelk
 
Week 1 intro to dp, history why digital, basic
Week 1 intro to dp, history why digital, basicWeek 1 intro to dp, history why digital, basic
Week 1 intro to dp, history why digital, basicjoelk
 
Week 2 aperture, shutter speed and iso
Week 2 aperture, shutter speed and isoWeek 2 aperture, shutter speed and iso
Week 2 aperture, shutter speed and isojoelk
 
Week 8 landscape pictures for slideshare
Week 8 landscape pictures for slideshareWeek 8 landscape pictures for slideshare
Week 8 landscape pictures for slidesharejoelk
 
Week 7 Portraits
Week 7  PortraitsWeek 7  Portraits
Week 7 Portraitsjoelk
 
The 8 Basic Steps Elements 6
The 8 Basic Steps  Elements 6The 8 Basic Steps  Elements 6
The 8 Basic Steps Elements 6
joelk
 
Faculty Web Pages At CSM
Faculty Web Pages At CSMFaculty Web Pages At CSM
Faculty Web Pages At CSMjoelk
 
Week 3 Lens And Focal Lenghts
Week 3 Lens And Focal LenghtsWeek 3 Lens And Focal Lenghts
Week 3 Lens And Focal Lenghtsjoelk
 

More from joelk (20)

Future of rock
Future of rockFuture of rock
Future of rock
 
Getting wired at csm fall 2014
Getting wired at csm fall 2014Getting wired at csm fall 2014
Getting wired at csm fall 2014
 
Getting wired at csm spring2013
Getting wired at csm spring2013Getting wired at csm spring2013
Getting wired at csm spring2013
 
Ce building time lapse
Ce building time lapseCe building time lapse
Ce building time lapse
 
Middle states csm ver2
Middle states csm ver2Middle states csm ver2
Middle states csm ver2
 
Self-Study Groups
Self-Study GroupsSelf-Study Groups
Self-Study Groups
 
Turning response clickers
Turning response clickersTurning response clickers
Turning response clickers
 
Getting wired at CSM Spring 2011
Getting wired at CSM Spring 2011Getting wired at CSM Spring 2011
Getting wired at CSM Spring 2011
 
Introduction to Blackboard 9.1
Introduction to Blackboard 9.1Introduction to Blackboard 9.1
Introduction to Blackboard 9.1
 
Test a of audio in Slideshare
Test a of audio in SlideshareTest a of audio in Slideshare
Test a of audio in Slideshare
 
Video mania and dlf showcase
Video mania and dlf showcaseVideo mania and dlf showcase
Video mania and dlf showcase
 
Getting Wired Spring 2011
Getting Wired Spring 2011Getting Wired Spring 2011
Getting Wired Spring 2011
 
Blackboard Mashups: Multimedia Just Got a Little Easier!
Blackboard Mashups: Multimedia Just Got a Little Easier!Blackboard Mashups: Multimedia Just Got a Little Easier!
Blackboard Mashups: Multimedia Just Got a Little Easier!
 
Week 1 intro to dp, history why digital, basic
Week 1 intro to dp, history why digital, basicWeek 1 intro to dp, history why digital, basic
Week 1 intro to dp, history why digital, basic
 
Week 2 aperture, shutter speed and iso
Week 2 aperture, shutter speed and isoWeek 2 aperture, shutter speed and iso
Week 2 aperture, shutter speed and iso
 
Week 8 landscape pictures for slideshare
Week 8 landscape pictures for slideshareWeek 8 landscape pictures for slideshare
Week 8 landscape pictures for slideshare
 
Week 7 Portraits
Week 7  PortraitsWeek 7  Portraits
Week 7 Portraits
 
The 8 Basic Steps Elements 6
The 8 Basic Steps  Elements 6The 8 Basic Steps  Elements 6
The 8 Basic Steps Elements 6
 
Faculty Web Pages At CSM
Faculty Web Pages At CSMFaculty Web Pages At CSM
Faculty Web Pages At CSM
 
Week 3 Lens And Focal Lenghts
Week 3 Lens And Focal LenghtsWeek 3 Lens And Focal Lenghts
Week 3 Lens And Focal Lenghts
 

The 8 Basic Steps Elements 6

  • 1. The 8 Basic Steps to Photo Editing Adobe Photoshop Elements 6 Editing an image can be looked at as a series of basic functions or steps that can be accomplished in any editing software program. This tutorial will focus on accomplishing these tasks in Adobe Photoshop Elements version 6.
  • 2. The 8 Basic Steps to Photo Editing Step 1: Rotate and Crop Step 2: Fix Flaws using the Clone Stamp Tool Step 3: Expanding the Tonal Range using Image: Adjust: Levels Step 4: Add Contrast using Image: Adjustments: Curves Step 5: Adjust Color using Levels Step 6: Improve Sharpness using UnsharpMask Step 7: Save Step 8: Compare
  • 3. Step 1: Rotate and Crop Your first step is to rotate and crop the image. Rotating lets you straighten the image. Cropping gets rid of any image you aren't going to be using. It’s important to rotate then crop!
  • 4. Step 1: Rotate and Crop Crop Rotate Choose Image: Crop Selection area will appear Drag the crop tool to the new size you desire then double click area to crop Choose Image, Rotate: Free Rotate Layer Grab the small squares in the corners to rotate image Double click in this area to accept the rotation changes
  • 5.
  • 6. Reposition the crop box by dragging inside it.
  • 7.
  • 8. Step 3: Expanding the Tonal Range using Image: Adjust: Levels Digital cameras are limited in the range of colors they can capture. This can be compensated for using the Levels command. Choose Enhance: Adjust: Lighting: Levels. The mountain in the middle of the dialog box is actually called a Historgram. Historgram
  • 9. Step 3: Expanding the Tonal Range using Image: Adjust: Levels A histogram is a graph of all the tones in the image, ranging from the darkest to the lightest. The triangles beneath the histogram represent the range of colors that the output device is capable of reproducing.
  • 10. Step 3: Expanding the Tonal Range using Image: Adjust: Levels In the histogram you typically see a gap in the lighter tones (on the right) and a gap in the dark tones (left). There is no information there for the printer or monitor to use to reproduce these tones. Drag the white triangle towards the left, Drag the black triangle towards the right. Leave the middle triangle alone. Watch the image carefully to see how the adjustment effects it. Light Tones Dark Tones
  • 11. Step 4: Add Contrast using Image: Adjustments: Curves The Curves command is one of the most powerful features of Photoshop. It allows you to change specific ranges of colors while leaving others untouched. For example, in Step 3 we adjusted the shadows and highlights. They are as we want them to be and we don't want to change them. In this step we will add contrast to the image by adjusting the shadow, highlight and mid tones.
  • 12. Step 4: Add Contrast using Image: Adjustments: Curves Choose Enhance: Adjust Color: Adjust Color Curves… dialog box opens. The Adjust Color Curves dialog box will appear Adjust Color Curves dialog box
  • 13. Step 4: Add Contrast using Image: Adjustments: Curves Select the style of curve that works best from the Select a Style presets. Make additional adjustments by using Adjustment Sliders
  • 14. Step 5: Adjust Color using Levels When colors in an image are shifted towards a color that isn't intentional, this is considered to be a color cast. Fixing a color cast using the Levels palette will be very intuitive.
  • 15. Step 5: Adjust Color using Levels Target the specific channel in the Levels palette by choosing it from the drop down menu titled Channel. Click in the middle arrow a drag it up or down, depending on the requirements of the image. For example, if the image is too red, you can target the Red channel and reduce the red by dragging downwards. If the image is too green, you can reduce the amount of green by dragging upwards in the Red channel, or by dragging downwards in the Green channel. Every image will be slightly different, and will often require slight adjustments in all three channels (Red, Green, Blue).
  • 16. Step 6: Improve Sharpness using Unsharp Mask The final adjustment is to sharpen the image. Every time you scale, rotate, or change the color of an image, you add slight blurring to it. This is in addition to any blurriness that existed in the image before you started working with it. You can compensate for this to a certain degree using the Unsharp Mask filter. Choose Enhance: Unsharp Mask.
  • 17. Step 6: Improve Sharpness using Unsharp Mask The settings for each image will differ, but generally the Radius and the Threshold will be under 5 pixels, while the Amount will be greater than 50%. Move the sliders for each setting while watching the results in the image. The goal is to make the image appear crisper and less blurry without over-sharpening. Oversharpening can appear as "haloing" or mottling near areas where colors contrast sharply, or as an overall "plasticy" appearance. Amount Threshold Radius
  • 18. Step 7: Save Save your edits as a new file. By doing this you will preserve the original image. Later, if you determine the edits were not adequate or different edits need to be accomplished, you will have the option to re-edit the original photo. Click Save As, select JPEG as the Format from the Format drop down menu Format drop down Select JPEG
  • 19. Step 8: Compare The last step is to open the original file and the edited file side by side and compare. Edited Original
  • 20. The 8 Basic Steps to Photo Editing REVIEW Rotate and Crop Fix Flaws Expanding the Tonal Range Add Contrast Adjust Color Improve Sharpness Save Compare