SlideShare a Scribd company logo
1 of 27
Download to read offline
The Ribbon
Microsoft®
Office 2010
Cheat Sheet
The File tab replaces the File menu and Office
Button found in previous versions of Microsoft
Office. Common file management commands–
Save, Save As, Open, and Close – appear at
the top of the menu.
 Ribbon: Displays the commands and tools you need to perform various
tasks. The ribbon can also be minimized and customized to fit your work
style.
 Tabs: Display the commands you can use in a Microsoft Office program.
Click a tab to view its commands.
 Contextual tabs: Display commands for a selected object.
 Dialog Box Launcher: Click to open a dialog box or task pane.
 Group: Related commands that appear under each tab.
 Gallery: A list of options and additional choices displayed as thumbnail
previews so you can see results before making a choice.
 Quick Access Toolbar: Provides quick access to the commands you use
most frequently. The Save, Undo, and Redo/Repeat buttons appear on the
Quick Access Toolbar by default.

 To Minimize the Ribbon: Click the Minimize Ribbon button on the Ribbon.
Or, press <Ctrl> + <F1>. Or, double-click a tab on the Ribbon. Or, right-click
a tab and select Minimize Ribbon from the contextual menu.
 To Customize the Ribbon: Right-click a tab and select Customize the
Ribbon from the contextual menu. Or, click the File tab, select Options, and
click Customize Ribbon. Use the controls in the dialog box to rename and
rearrange tabs, and to rearrange tab commands.
* Click the New Tab button to create a new tab on the Ribbon.
* Click the New Group button to create a new group in a tab on the Ribbon.
 To Add a Command to the Quick Access Toolbar: Click the Customize
Quick Access Toolbar button and select a command from the menu. Click
More Commands to select from a longer list of commands.
 Get Help: Click the Help button. Or, press <F1>. Or, click the File tab and
select Help from the menu.
 Info: Set permissions to control who can open or
change the document; prepare the file for sharing by
removing metadata and other personal information;
and view and manage autosaved versions of the
document.
 Recent: Displays documents most recently opened in
the program.
 New: Create a new blank document, or create a
document from a template. Browse templates with the
preview feature in Backstage view.
 Print: Preview the document and set print settings at
the same time. The right pane displays a preview of
the file; the center pane displays print options.
 Save & Send: Share the file, and change file type.
There are four ways to share a document:
1. Send Using E-mail: Send the document as an
attachment, a link, a PDF or XPS, or fax.
2. Save to Web: Save to a SkyDrive folder through
your Windows Live account.
3. Save to SharePoint: Saves to a list or library on
a SharePoint site.
4. Publish: Publish the document to a service or
blog.
 Help: Learn more about a task or the program.
Backstage view appears when you click the
File tab. The left panel displays commands in
the File tab menu.The center panel displays
options related to the selected command. The
right panel displays a preview or additional
options for a command.
File Tab and Backstage View Backstage View Commands
Dialog Box Launcher
HelpTabs
Group Gallery
Minimize
Ribbon
Contextual
tabQuick Access Toolbar
Free Cheat Sheets!
Visit: cheatsheets.customguide.com
© 2014 CustomGuide
Free Cheat
Learn by doing, not watching.
www.customguide.com
Insert Screenshots
A Screenshot is an image of any visible item displayed on your monitor, such
as a program window.
 To Insert a Screenshot: Click the Insert tab on the Ribbon and click the
Screenshot button in the Illustrations group (Word/Excel/Outlook) or the
Images group (PowerPoint), then click an available window.
 To Insert a Screen Clipping: Click the Insert tab on the Ribbon and click
the Screenshot button in the Illustrations group (Word/Excel/Outlook) or the
Images group (PowerPoint), then click Screen Clipping. Click and drag
your mouse across the area of the program window that you want to clip.
Picture Tools
Microsoft Office 2010 suite offers enhanced tools for editing and adjusting
pictures.
 To Remove Backgrounds: Click the Format tab on the Ribbon and click
the Remove Background button in the Adjust group. Refine the image and
click Keep Changes.
 To Correct Brightness and Contrast or to Sharpen or Soften a Picture:
Click the Format tab on the Ribbon, click the Corrections button in the
Adjust group, and select an option from the gallery.
 To Change the Color of a Picture: Click the Format tab on the Ribbon,
click the Color button in the Adjust group, and select an option from the
gallery.
 To Apply an Artistic Effect: Click the Format tab on the Ribbon, click the
Artistic Effects button in the Adjust group, and select an option from the
gallery.
SmartArt
SmartArt has a few improvements in Office 2010, offering a new picture
category for SmartArt graphics.
 To Insert Picture SmartArt: Click the SmartArt button on the Insert tab of
the Ribbon and click Picture in the Choose a SmartArt graphic dialog box.
Select the picture SmartArt graphic you wish to use and click OK.
 To Add a Picture to a SmartArt Graphic: Click the picture icon in the
SmartArt graphic, find and select a picture, and click OK.
Paste with Live Preview
WordArt
WordArt has received a huge facelift in Office 2010. New WordArt styles and
functionality make it easy to add and format WordArt. It is also treated as text
instead of a picture, so the text is searchable in the document.
 To Add WordArt: Click the Insert tab on the Ribbon and click the WordArt
button in the Text group. Click the WordArt style from the gallery and enter
the text in the text box.
 To Move WordArt: Click the WordArt object, drag it to the desired location,
and release the mouse button.
 To Format WordArt: Click the WordArt object, then click the Format tab
on the Ribbon under drawing tools. Select a formatting option in the
WordArt Styles group, or click a new Word Art style from the gallery.
File Management Tools
The Microsoft Office 2010 suite offers new and improved tools to help you
manage, protect, and share your content.
Autosaved Versions: This feature improves on the AutoRecover feature from
earlier versions of Office. The AutoRecover feature automatically saves
versions of your files at regular intervals to protect them if a program fails.
Now, you can access those versions whenever you want. This makes it easy
to revert to an earlier version of the file, or to recover changes when you forget
to save manually.
 To Recover Autosaved Versions: Click the File tab on the Ribbon and
select Info. Select an autosaved version from the Versions list. Or, click
the Manage Versions button and select Recover Draft Versions.
Protected view: The purpose of Protected View is to protect you from cyber-
attacks. When a file appears to be from a risky location, such as the Internet, it
is opened in Protected View, which is a read-only mode. If you trust the file,
you can then enable editing and work with the file as usual.
Trusted documents: Trusted documents now remembers the trust decisions
you make in a document so you don’t have to be asked if a document with
active content (e.g. Macros, ActiveX controls, etc.) is safe every time you open
it.
Accessibility Checker: Helps you identify and resolve problems in your files
that might keep someone with a disability from accessing your content.
 To Use the Accessibility Checker: Click the File tab on the Ribbon and
select Info. Click the Check for Issues button and select Check
Accessibility.
Live Preview now lets you preview and choose
from different formatting options that you can
apply to the content when it is pasted.
 Paste with Live Preview lets you preview
how something will look before it is pasted.
 To Paste with Live Preview: Cut or copy
content. Click the Paste button list arrow and
point to a paste option. Or, press <Ctrl> +
<V> and click the Paste Options button.
Point at a paste option to preview it.
A picture…
can be re-colored
in sepia…
or have an artistic effect
applied.
© 2014 CustomGuide
Free Cheat
Learn by doing, not watching.
www.customguide.com
Try
Interactive
Training
Learn by doing,
not watching.
Visit training.customguide.com
Interactive Training
Free Training
Course!
Short Interactive Fun
www.customguide.com
Microsoft
®
Word 2010
Quick Reference Card
The Word 2010 Screen Keyboard Shortcuts
General
Open a Document <Ctrl> + <O>
Create New <Ctrl> + <N>
Save a Document <Ctrl> + <S>
Print a Document <Ctrl> + <P>
Close a Document <Ctrl> + <W>
Help <F1>
Navigation:
Up One Screen <Page Up>
Down One Screen <Page Down>
Beginning of Line <Home>
End of Line <End>
Beginning of <Ctrl> + <Home>
Document
End of Document <Ctrl> + <End>
Open the Go To <F5>
dialog box
Editing
Cut <Ctrl> + <X>
Copy <Ctrl> + <C>
Paste <Ctrl> + <V>
Undo <Ctrl> + <Z>
Redo or Repeat <Ctrl> + <Y>
Formatting
Bold <Ctrl> + <B>
Italics <Ctrl> + <I>
Underline <Ctrl> + <U>
Align Left <Ctrl> + <L>
Center <Ctrl> + <E>
Align Right <Ctrl> + <R>
Justify <Ctrl> + <J>
Text Selection
To Select: Do This:
A Word Double-click the word
A Sentence Press and hold <Ctrl>
and click anywhere in the
sentence
A Line Click in the selection bar
next to the line
A Paragraph Triple-click the paragraph
Everything <Ctrl> + <A>
The Fundamentals
The File tab menu and Backstage view contain commands
for working with a program’s files, such as Open, Save,
Close, New, and Print.
• To Move Text with the Mouse: Select
the text you want to move, drag the text
to a new location, and release the mouse
button.
• To Replace Text: Click the Replace
button in the Editing group on the Home
tab. Or, press <Ctrl> + <H>.
• To Close a Document: Click the
Close button, or press <Ctrl> + <W>.
• To Correct a Spelling Error: Right-click
the error and select a correction from the
contextual menu. Or, press <F7> to run
the Spell Checker.
• To Use the Thesaurus: Right-click the
word you want to look up and select
Synonyms from the contextual menu.
Select a word or select Thesaurus to
search the Thesaurus.
• To Minimize the Ribbon: Click the
Minimize Ribbon button on the Ribbon.
Or, press <Ctrl> + <F1>. Or, double-click
a tab. Or, right-click a tab and select
Minimize the Ribbon from the contextual
menu.
• To Change Program Settings: Click the
File tab and click the Options button.
• To Get Help: Press <F1> to open the
Help window. Type your question and
press <Enter>.
• To Create a New Document: Click the
File tab, click the New tab, and click the
Create button. Or, press <Ctrl> + <N>.
• To Open a Document: Click the File tab
and click the Open button, or press
<Ctrl> + <O>.
• To Save a Document: Click the
Save button on the Quick Access
Toolbar, or press <Ctrl> + <S>.
• To Save a Document with a Different
Name: Click the File tab, click the Save
As button, and enter a new name for the
document.
To Preview a Document: Click the File
tab and click the Print tab, or press
<Ctrl> + <P>.
To Print a Document: Click the File tab
and click the Print tab, or press <Ctrl> +
<P>.
To View Advanced Printing Options:
Click the File tab and click the Print tab.
Select from the options under Settings.
• To Undo: Click the Undo button on
the Quick Access Toolbar, or press
<Ctrl> + <Z>.
File tab
Quick Access Toolbar
Title bar
Ruler
Zoom slider
Ribbon
View
buttons
Close
button
Insertion
point
Status bar
Document
window
Vertical
scroll bar
Horizontal
scroll bar
Minimize
Ribbon
Customizable Training Materials
Tel. (888) 903-2432 | www.customguide.com
Customizable Computer Training
 Courseware   Online Learning   Skills Assessments
Word Quick Reference © 2011 CustomGuide 
www.customguide.com | Phone 888.903.2432
Navigation Editing
To Open the Navigation Pane: Click the Find button in the Editing group on
the Home tab. Or, press <Ctrl> + <F>.
To Search for a Word or Phrase: Click the Search box, type the word or
phrase, and press <Enter>.
To Search for Graphics, Tables, Equations, or Comments: Click the
Magnifying Glass and select an option from the list. Click the Search box,
enter the information you are searching for, and press <Enter>.
To View Search Results: Click the Browse the results from your
current search tab of the Navigation Pane.
To View a Document’s Headings: Click the Browse the headings in
your document tab.
To View a Document’s Pages: Click the Browse the pages in your
document tab.
Styles
• To Apply a Style: Select the text to which you want to apply the style and
select the style you want to use from the Styles Gallery in the Styles group on
the Home tab.
• To Apply a Document Theme: Click the Themes button in the Themes
group on the Page Layout tab of the Ribbon and select a theme.
• To View All Available Styles: Click the Dialog Box Launcher in the Styles
group on the Home tab.
• To Change a Style Set: Click the Change Styles button in the Styles group
on the Home tab and select Style Set from the menu. Select the Style Set
you wish to use.
• To Create a Style: Select the text that contains the formatting of the new
style, right-click the text, and select Styles from the contextual menu. Select
Save Selection as a New Quick Style from the contextual menu, enter a
name for the style, and click OK.
• To Check Your Styles: Select the text you wish to check. Click the Dialog
Box Launcher in the Styles group on the Home tab of the Ribbon. Click the
Style Inspector button in the Styles task pane.
Formatting
• To Format Text: Use the commands in the Font group on the Home tab, or
click the Dialog Box Launcher in the Font group to open the Font dialog box.
• To Copy Formatting with the Format Painter: Select the text with the
formatting you want to copy and click the Format Painter button in the
Clipboard group on the Home tab. Then, select the text you want to apply the
copied formatting to.
• To Indent a Paragraph: Click the Increase Indent button in the
Paragraph group on the Home tab.
• To Decrease an Indent: Click the Decrease Indent button in the
Paragraph group on the Home tab.
• To Create a Bulleted or Numbered List: Select the paragraphs you want to
bullet or number and click the Bullets or Numbering button in the
Paragraph group on the Home tab.
• To Change Page Orientation: Click the Page Layout tab on the Ribbon,
click the Orientation button in the Page Setup group, and select an option
from the list.
• To Insert a Header or Footer: Click the Insert tab on the Ribbon and click
the Header or Footer button in the Header & Footer group.
• To Insert a Manual Page Break: Click the Insert tab on the Ribbon and click
the Page Break button in the Pages group.
• To Cut or Copy Text: Select the text you want to cut or copy and click the
Cut or Copy button in the Clipboard group on the Home tab.
• To Paste Text: Place the insertion point where you want to paste and click
the Paste button in the Clipboard group on the Home tab.
To Preview an Item Before Pasting: Place the insertion point where you
want to paste, click the Paste button list arrow in the Clipboard group on the
Home tab, and select a preview option to view the item.
• To Insert a Comment: Select the text where you want to insert a comment
and click the Review tab on the Ribbon. Click the New Comment button in
the Comments group. Type a comment, then click outside the comment text
box.
• To Delete a Comment: Select the comment, click the Review tab on the
Ribbon, and click the Delete Comment button in the Comments group.
Drawing and Graphics
• To Insert a Clip Art Graphic: Click the Insert tab on the Ribbon and click the
Clip Art button in the Illustrations group. Type the name of what you’re
looking for in the “Search for” box and press <Enter>.
• To Insert a Picture: Click the Insert tab on the Ribbon and click the Picture
button in the Illustrations group. Find and select the picture you want to insert
and click Insert.
To Insert a Screenshot: Click the Insert tab on the Ribbon and click the
Screenshot button in the Illustrations group. Select an available window from
the list, or select the Screen Clipping option to take a screen clip.
• To Draw a Shape: Click the Insert tab on the Ribbon, click the Shapes
button in the Shapes group, and select the shape you want to insert. Then,
click where you want to draw the shape and drag until the shape reaches the
desired size. Hold down the <Shift> key while you drag to draw a perfectly
proportioned shape or straight line.
To Insert WordArt: Click the Insert tab on the Ribbon, click the WordArt
button in the Text group, and select a design from the WordArt Gallery. Click
the text box and enter your text. If necessary, click the text box and drag it to
the desired position.
• To Insert SmartArt: Click the Insert tab on the Ribbon, click the SmartArt
button in the Illustrations group, select a layout, and click OK.
• To Adjust Text Wrapping: Double-click the object, click the Wrap Text
button in the Arrange group on the Format tab, and select an option from the
list.
• To Resize an Object: Click the object to select it, click and drag one of its
sizing handles ( ), and release the mouse button when the object reaches
the desired size. Hold down the <Shift> key while dragging to maintain the
object’s proportions while resizing it.
• To Format an Object: Double-click the object and use the commands located
on the Format tab.
• To Delete an Object: Select the object and press the <Delete> key
Tables
• To Insert a Table: Click the Insert tab on the Ribbon, click the Table button
in the Tables group, and select Insert Table from the menu.
• To Insert a Column or Row: Click the Layout tab under Table Tools on the
Ribbon and use the commands located in the Rows & Columns group.
• To Delete a Column or Row: Select the column or row you want to delete,
click the Layout tab under Table Tools on the Ribbon, click the Delete button
in the Rows & Columns group, and select an appropriate option from the
menu.
• To Adjust Column Width or Row Height: Select the column or row you want
to adjust, click the Layout tab under Table Tools on the Ribbon, and use the
commands located in the Cell Size group.
Customizable Computer Training
 Courseware   Online Learning   Skills Assessments
Word Quick Reference © 2011 CustomGuide 
www.customguide.com | Phone 888.903.2432 
Microsoft®
Excel 2010
Cheat Sheet
The Excel 2010 Screen Keyboard Shortcuts
General
Open a Workbook Ctrl + O
Create New Ctrl + N
Save Ctrl + S
Preview and Print Ctrl + P
Close a Workbook Ctrl + W
Help F1
Run Spelling Check F7
Calculate worksheets F9
Create an absolute, F4
normal, or mixed reference
Navigation:
Move Between Cells , ,
, 
Right One Cell Tab
Left One Cell Shift + Tab
Down One Cell Enter
Up One Cell Shift+Enter
Down One Screen Page Down
Up One Screen Page Up
To Cell A1 Ctrl + Home
To Last Cell Ctrl + End
Go To Dialog Box F5
Editing
Cut Ctrl + X
Copy Ctrl + C
Paste Ctrl + V
Undo Ctrl + Z
Redo Ctrl + Y
Find Ctrl + F
Replace Ctrl + H
Select All Ctrl + A
Edit active cell F2
Clear cell contents Delete
Formatting
Bold Ctrl + B
Italics Ctrl + I
Underline Ctrl + U
Open Format Cells Ctrl + Shift
Dialog Box + F
Select All Ctrl + A
Select entire row Shift+Space
Select entire column Ctrl + Space
Hide selected rows Ctrl + 9
Hide selected Ctrl + 0
columns
The Fundamentals
 The File tab menu and Backstage view contain commands
for working with a program’s files, such as Open, Save,
Close, New, and Print.
 Cell addresses: Cells are referenced by
addresses made from their column letter
and row number, such as cell A1, A2, B1,
B2, etc. You can find the address of a cell
by looking at the Name Box.
 To Select a Cell: Click a cell or use the
keyboard arrow keys to select it.
 To Select a Cell Range: Click and drag to
select a range of cells. Or, press and hold
down the Shift key while using the arrow
keys to move the mouse pointer to the
last cell of the range.
 To Select an Entire Worksheet: Click the
Select All button where column and row
headings meet. Or, press Ctrl + A.
 To Minimize the Ribbon: Click the
Minimize Ribbon button on the Ribbon.
Or, press Ctrl + F1. Or, right-click a tab
and select Minimize Ribbon from the
contextual menu.
 To Change Program Settings: Click the
File tab and select Options.
 To Use Zoom: Click and drag the zoom
slider to the left or right. Or, click the
Zoom Out and Zoom In buttons on
the slider.
 To Change Views: Click a View button in
the status bar. Or, click the View tab and
select a view.
File tab
Quick Access Toolbar Title bar
Scroll
bars
Zoom slider
Ribbon
View buttons
Close button
Name
box
Worksheet tabs
Formula Bar
Columns
Rows
Active cell
 To Create a New Workbook: Click
the File tab and select New, and
click Create, or press Ctrl + N.
 To Open a Workbook: Click the File
tab and select Open, or press
Ctrl + O.
 To Save a Workbook: Click the
Save button on the Quick Access
Toolbar, or press Ctrl + S.
 To Preview and Print a Workbook:
Click the File tab and select Print, or
press Ctrl + P.
 To Undo: Click the Undo button
on the Quick Access Toolbar, or
press Ctrl + Z.
 To Redo or Repeat: Click the
Redo button on the Quick Access
Toolbar, or press Ctrl + Y.
 To Close a Workbook: Click the
Close button, or press Ctrl + W.
 To Get Help: Press F1 to open the
Help window. Type your question
and press Enter.
Free Cheat Sheets!
Visit: cheatsheets.customguide.com
© 2014 CustomGuide
Free Cheat
Learn by doing, not watching.
www.customguide.com
Editing Formatting
 To Edit a Cell’s Contents: Select the cell and click the Formula Bar, or
double-click the cell. Edit the cell contents and press Enter.
 To Clear a Cell’s Contents: Select the cell(s) and press the Delete key.
 To Cut or Copy Data: Select cell(s) and click the Cut or Copy button
in the Clipboard group on the Home tab.
 To Paste Data: Place the insertion point where you want to paste and click
the Paste button in the Clipboard group on the Home tab.
 To Preview an Item Before Pasting: Place the insertion point where you
want to paste, click the Paste button list arrow in the Clipboard group on the
Home tab, and select a preview option to view the item.
 To Paste Special: Select the destination cell(s), click the Paste button list
arrow in the Clipboard group on the Home tab, and select Paste Special.
Select an option and click OK.
 To Copy Using Auto Fill: Point to the fill handle at the bottom-right corner of
the selected cell(s), then drag to the destination cell(s).
 To Complete a Series Using AutoFill: Select the cells that define the series.
Click and drag the fill handle to complete the series.
 To Move or Copy Cells Using Drag and Drop: Select the cell(s) you want to
move or copy, position the pointer over any border of the selected cell(s), then
drag to the destination cells. To copy, hold down Ctrl key while dragging.
 To Insert a Column or Row: Right-click to the right of the column, or below
the row you want to insert. Select Insert from the contextual menu, or click the
Insert button in the Cells group on the Home tab.
 To Delete a Column or Row: Select the row or column heading(s). Right-
click and select Delete from the contextual menu, or click the Delete button in
the Cells group on the Home tab.
 To Insert a Comment: Select the cell where you want to insert a comment
and click the Review tab on the Ribbon. Click the New Comment button in
the Comments group. Type a comment and click outside the comment box.
Formulas and Functions
 To Total a Cell Range: Click the cell where you want to insert the total and
click the Sum button in the Editing group on the Home tab. Verify the selected
cell range and click the Sum button again.
 To Enter a Formula: Select the cell where you want to insert the formula.
Type = and enter the formula using values, cell references, operators, and
functions. Press Enter when you’re finished.
 To Insert a Function: Select the cell where you want to enter the function
and click the Insert Function button on the Formula Bar.
 To Reference a Cell in a Formula: Type the cell reference (for example, B5)
in the formula or click the cell you want to reference.
 To Create an Absolute Cell Reference: Precede the cell references with a $
sign or press F4 after selecting cell(s) to make it absolute.
 To Use Several Operators or Cell Ranges: Enclose the part of a formula
you want to calculate first in parentheses.
Charts
 To Create a Chart: Select the cell range that contains the data you want to
chart and click the Insert tab on the Ribbon. Click a chart type button in the
Charts group and select the chart you want to use from the list.
 To Insert a Sparkline: Select the cell range that contains the data you want to
chart and click the Insert tab on the Ribbon. Select the sparkline you want to
insert from the Sparkline group. Select the cell or cell range where you want to
add the sparkline and click OK.
 To Format Text: Use the commands in the Font group on the Home tab, or
click the Dialog Box Launcher in the Font group to open the Format Cells
dialog box.
 To Format Values: Use the commands in the Number group on the Home
tab, or click the Dialog Box Launcher in the Number group to open the
Format Cells dialog box.
 To Copy Formatting with the Format Painter: Select the cell(s) with the
formatting you want to copy and click the Format Painter button in the
Clipboard group on the Home tab. Then, select the cell(s) you want to apply
the copied formatting to.
 To Apply a Cell Style: Select the cell(s) you want to apply a cell style to.
Click the Cell Styles button in the Styles group of the Home tab on the
Ribbon and select a style from the gallery.
 To Format a Cell Range as a Table: Select the cells you want to apply table
formatting to. Click the Format as Table button in the Styles group of the
Home tab on the Ribbon and select a table format from the gallery.
 To Apply a Document Theme: Click the Page Layout tab on the Ribbon,
click the Themes button in the Themes group, and select a theme from the
gallery.
 To Apply Conditional Formatting: Select the cells to which you want to
apply conditional formatting. Click the Conditional Formatting button in the
Styles group of the Home tab. Select the formatting scheme you wish to use,
then set the conditions in the dialog box.
 To Adjust Column Width or Row Height: Drag the right border of the
column header, or the bottom border of the row header. Double-click the
border to AutoFit the column or row according to its contents.
Workbook Management
 To Insert a New Worksheet: Click the Insert Worksheet tab next to the
sheet tabs at the bottom of the program screen. Or, press Shift + F11.
 To Delete a Worksheet: Select the sheet want to delete, click the Delete
button in the Cells group on the Home tab, and select Delete Sheet. Or, right-
click the sheet tab and select Delete from the contextual menu.
 To Rename a Worksheet: Double-click the sheet tab, enter a new name for
the worksheet, and press Enter.
 To Change a Worksheet’s Tab Color: Right-click the sheet tab, select Tab
Color, and choose the color you want to apply.
 To Move or Copy a Worksheet: Click and drag a tab to move a worksheet.
Hold down the Ctrl key while clicking and dragging to copy the worksheet.
 To Split a Window: Drag either the vertical or horizontal split bar (located
near the scroll bars) onto the worksheet.
 To Freeze Panes: Place the cell pointer where you want to freeze the
window, click the View tab on the Ribbon, click the Freeze Panes button in
the Window group, and select an option from the list.
 To Select a Print Area: Select the cell range you want to print, click the Page
Layout tab on the Ribbon, click the Print Area button in the Page Setup
group, and select Set Print Area.
 To Adjust Page Margins, Orientation, Size, and Breaks: Click the Page
Layout tab on the Ribbon and use the commands in the Page Setup group,
or click the Dialog Box Launcher in the Page Setup group to open the Page
Setup dialog box.
 To Protect or Share a Workbook: Click the Review tab on the Ribbon and
use the commands in the Changes group.
 To Recover Autosaved Versions: Click the File tab on the Ribbon and
select Info. Select an autosaved version from the Versions list. Or, click the
Manage Versions button and select Recover Draft Versions.
© 2014 CustomGuide
Free Cheat
Learn by doing, not watching.
www.customguide.com
Try
Interactive
Training
Learn by doing,
not watching.
Visit excel.customguide.com
Excel Training
Free Excel
Course!
Short Interactive Fun
www.customguide.com
Microsoft®
PowerPoint 2010
Cheat Sheet
PowerPoint 2010 Screen Keyboard Shortcuts
The Fundamentals
 To Create a New Presentation:
Click the File tab, click New, and click
Create. Or, press Ctrl + N.
 To Open a Presentation: Click the
File tab and click Open, or press Ctrl
+ O.
 To Save a Presentation: Click the
Save button on the Quick Access
Toolbar, or press Ctrl + S.
 To Save a Presentation with a
Different Name: Click the File tab,
click Save As, enter a new name for
the presentation, and click Save.
 To Preview and Print a
Presentation: Click the File tab and
click Print, or press Ctrl + P.
 To Close a Presentation: Click the
File tab and click Close, or press Ctrl
+ W.
 To Get Help: Press F1 to open the
Help window. Type your question and
press Enter.
 To Exit PowerPoint: Click the File
tab and click Exit.
Open a Presentation Ctrl + O
Create New Ctrl + N
Save a Presentation Ctrl + S
Print a Presentation Ctrl + P
Close a Presentation Ctrl + W
Insert a New Slide Ctrl + M
Help F1
General
Editing
Formatting
Bold Ctrl + B
Italics Ctrl + I
Align Left Ctrl + L
Center Ctrl + E
Justify Ctrl + J
Cut Ctrl + X
Copy Ctrl + C
Paste Ctrl + V
Undo Ctrl + Z
Redo or Repeat Ctrl + Y
Find Ctrl + F
Replace Ctrl + H
Select All Ctrl + A
Navigation—Go To:
The Next Slide Spacebar
The Previous Slide Backspace
Slide Show Delivery
Begin Slide Show F5
Resume Slide Show Shift + F5
End Slide Show Esc
Jump to Slide Slide # +
Enter
Toggle Screen Black B
Toggle Screen White W
Pause Show S
Show/Hide Pointer A
Change Arrow to Pen Ctrl + P
Change Pen to Arrow Ctrl + A
Erase Doodles E
 The File tab menu and Backstage view contain
commands for working with a program’s files,
including New, Open, Save, Print and Close.
Quick Access Toolbar Title bar
Slide
pane
Zoom slider
Ribbon
View buttons
Close button
Slides
tab
Status bar
Outline
tab
Notes
pane
 To Insert a New Slide: Click the Home tab
and click New Slide in the Slides group, or
press Ctrl + M.
 To Change the Slide Layout: Click the Home
tab, click the Layout button in the Slides
group, and select a layout.
 To Return a Slide to its Default Settings:
Click the Home tab and click the Reset button
in the Slides group.
 To Apply a Document Theme: Click the
Design tab on the Ribbon, click the More
button in the Themes group, and select a
theme from the gallery.
 To Change the Slide Background: Click the
Design tab on the Ribbon, click the
Background Styles button in the Background
group, and select a background.
 To View the Slide Master: Click the View tab
on the Ribbon, click the Slide Master button in
the Master Views group, and click the Slide
Master or the appropriate Layout Master in
the Outline pane.
 To Insert a Header or Footer: Click the Insert
tab on the Ribbon and click the Header &
Footer button in the Text group. Select the
option(s) that you want and click Apply or
Apply to All.
 To Add a Section: Click the Home tab on the
Ribbon, click the Section button in the Slides
group, and click Add Section.
Slides
Free Cheat Sheets!
Visit: cheatsheets.customguide.com
Learn by doing, not watching.
www.customguide.com
© 2014 CustomGuide
x XFormatting Images, Multimedia, and Objects
Views
 To Cut or Copy Text: Select the text you want to cut or copy and click the
Cut or Copy button in the Clipboard group on the Home tab.
 To Paste Text: Place the insertion point where you want to paste and click
the Paste button in the Clipboard group on the Home tab.
 To Format Selected Text: Use the commands in the Font group on the
Home tab, or click the Dialog Box Launcher in the Font group to open the
Font dialog box.
 To Copy Formatting with the Format Painter: Select the text with the
formatting you want to copy and click the Format Painter button in the
Clipboard group on the Home tab. Then, select the text you want to apply the
copied formatting to.
 To Change Paragraph Alignment: Select the paragraph(s) and click the
appropriate alignment button ( Align Left, Center, Align Right,
or Justify) in the Paragraph group on the Home tab.
 To Create a Bulleted or Numbered List: Select the paragraphs you want to
bullet or number and click the Bullets or Numbering button in the
Paragraph group on the Home tab.
 To Change Paragraph Line Spacing: Select the paragraph(s), click the
Line Spacing button in the Paragraph group on the Home tab, and
select an option from the list.
 To Correct a Spelling Error: Right-click the error and select a correction
from the contextual menu. Or, press F7 to run the Spell Checker.
 To Add a Slide Transition: Navigate to the slide you want to add a transition
to. Click the Transitions tab on the Ribbon, click the More button in the
Transition to This Slide group, and select a transition effect.
 To Add an Animation Effect to an Object: Select the object that you want to
animate, click the Animations tab on the Ribbon. Click the More button in
the Animation group, and select an animation effect.
 To Copy Animation Effects from One Object to Another: Select the object
with the animation effect you want to copy, click the Animations tab on the
Ribbon, and click the Animation Painter button in the Advanced Animation
group. Then, click the object you want to apply the copied animation effect to.
 To Insert a Picture: Click the Insert tab on the Ribbon and click the Picture
button in the Images group. Find the picture you want to insert and click
Insert.
 To Insert a Clip Art Graphic: Click the Insert tab on the Ribbon and click the
Clip Art button in the Images group. Type the name of what you’re looking for
in the “Search for” box and click Go.
 To Insert a Video file: Click the Insert tab on the Ribbon and click the Video
button in the Media group. Find the video you want to insert and click Insert.
 To Insert a Video from the Web: Click the Insert tab on the Ribbon, click the
Video button list arrow in the Media group, and select Video from Web Site.
Paste the video’s Embed code into the Insert Video from Web Site dialog box
and click Insert.
 To Insert an Audio clip: Click the Insert tab on the Ribbon, click the Audio
button list arrow in the Media group, and select Audio from File. Find the
audio clip that you want to insert and click Insert.
 To Draw a Shape: Click the Insert tab on the Ribbon, click the Shapes
button in the Illustrations group, and select the shape you want to insert.
Then, click where you want to draw the shape and drag until the shape
reaches the desired size. Hold down the Shift key while you drag to draw a
perfectly proportioned shape or straight line.
 To Insert SmartArt: Click the Insert tab on the Ribbon and click the
SmartArt button in the Illustrations group. Select the SmartArt you want to
insert and click OK.
 To Format an Object: Double-click the object and use the commands located
on the Format tab.
 To Move an Object: Click the object and drag it to a new location. Release
the mouse button when you’re finished.
 To Resize an Object: Click the object to select it, click and drag one of its
sizing handles ( ), and release the mouse button when the object reaches
the desired size. Hold down the Shift key while dragging to maintain the
object’s proportions while resizing it.
 To Delete an Object: Select the object and press the Delete key.
The Outline Pane
The Outline tab
focuses on the
content of the
presentation. Use
this tab when you
want to adjust the
textual structure
or add large
amounts of text.
The Slides tab
contains a
thumbnail image of
every slide in the
presentation; click a
thumbnail to jump to
that slide. You can
also rearrange, add,
or delete slides
here.
Transitions and Animation Effects
Normal view: This is the default view in
PowerPoint 2010. Normal view includes the
Outline pane, Slide pane, and Notes pane.
Slide Sorter view: Displays all the slides
in the presentation as thumbnails (tiny images).
Use Slide Sorter view when you want to
rearrange the order of slides or add transition
effects between slides.
Reading View: Similar to Slide Show
view, it displays the presentation in a window
with simple controls, making it easy to review.
Slide Show view: Displays the
presentation as an electronic slide show.
Whenever you deliver a presentation in front of
an audience, Slide Show view is definitely the
view you want to use.
Slide Show Delivery
 To Present a Slide Show: Click the Slide Show button on the status bar, or
press F5.
 To Use the Laser Pointer: In Slide Show view, press and hold down the Ctrl
key while clicking and holding the left mouse button.
 To Use the Pen: In Slide Show view, press Ctrl + P and then draw on the
screen. Press Ctrl + A to switch back to the arrow pointer. Press E to erase
your doodles.
 To Advance to the Next Slide: Press Spacebar. Or, click the left mouse
button.
 To Go Back to the Previous Slide: Press Backspace or Page Up.
 To Add Slide Timings: Click the Slide Show tab on the Ribbon and click the
Rehearse Timings button in the Set Up group. Navigate through the
presentation, pausing on each slide for the amount of time you wish to display it
during your show. Click Yes to save your timings.
 To End a Slide Show: Press Esc.
Learn by doing, not watching.
www.customguide.com
© 2014 CustomGuide
Try
Interactive
Training
Learn by doing,
not watching.
Visit powerpoint.customguide.com
PowerPoint Training
Free PowerPoint
Course!
Short Interactive Fun
www.customguide.com
Microsoft®
Access 2010
Cheat Sheet
Access 2010 Workspace Keyboard Shortcuts
General
Open a Database Ctrl + O
Close a Database Ctrl + W
Print Current View Ctrl + P
Delete Delete
Undo Ctrl + Z
Help F1
Delete Record Ctrl + -
Cancel Changes Esc
Insert Date Ctrl + ;
Insert Time Shift + Ctrl + :
Insert Value from Ctrl + ’
Same Field in (Apostrophe)
Previous Record
Check Spelling F7
Switch Applications Alt + Tab
Editing
Cut Ctrl + X
Copy Ctrl + C
Paste Ctrl + V
Find Ctrl + F
Replace Ctrl + H
Select All Ctrl + A
Design View
Properties Alt+Enter
Open object in Ctrl+Enter
Design View
Save Object Ctrl + S
Formatting Text
Bold Ctrl + B
Italics Ctrl + I
Underline Ctrl + U
Navigation
Next Field Tab
Previous Field Shift + Tab
Next Screen Page Down
Previous Screen Page Up
First Record Ctrl + ↑
Last Record Ctrl + ↓
Toggle Navigation Pane F11
Database Objects The Fundamentals
Tables store related data in
rows (records) and columns
(fields).
Queries view, filter, calculate,
change, sort, and examine the
data stored in tables.
Forms are custom screens
that provide an easy way to
enter and view data in a table.
Reports present data from a
table or query in a printed
format.
Macros automate common
tasks and can be run by
clicking a button or pressing a
shortcut key.
Modules are groups of
procedures written in Visual
Basic and used to automate
tasks.
 To Open an Object: Double-click
the object in the Navigation Pane.
 To Create a New Object: Click
the Create tab on the Ribbon and
click a button for the object or
wizard you want to use.
 To Delete an Object: Select the
object and press Delete. Click
Yes.
 The File tab menu and Backstage view contain commands for working
with a program’s files, such as Open, Save, Close, New, and Print.
 Access 2010 introduces Web
databases. Unlike other
databases, Web databases can be
published to a SharePoint site and
opened without Access.
 To Create a Blank Database:
Click the File tab and select New.
Click the Blank Database button
and click Create.
 To Create a Database from a
Template: Click the File tab and
select New. Select the template
category you wish to use, select
the template, and click Create.
 To Open an Existing Database:
Click the File tab and select Open.
 To Repair/Compress a
Database: Click the File tab and
select Info. Click the Compact &
Repair Database button.
 To Import Data from Another
Source: Click the External Data
tab on the Ribbon and click the
appropriate button in the Import
and Link group.
 To Export Data to Another Source: Click the External Data tab
on the Ribbon and click the appropriate button in the Export group.
 To Save a Database: Click the File tab and select Save.
 To Close a Database: Click the Close button, or press Ctrl + W.
View buttons
File tab
Quick Access Toolbar
Object tabs
Objects in
the
Navigation
Pane
Table open in
Datasheet view
Title bar
Ribbon
Status bar
Free Cheat Sheets!
Visit: cheatsheets.customguide.com
© 2014 CustomGuide
Free Cheat
Learn by doing, not watching.
www.customguide.com
Working with Tables
Creating Table Relationships
Linking Tables tells Access how two tables are related to each other. The fields
that you use to link two tables must contain the same concept in two different
tables. A primary key field from one table is often used when linking two tables.
1. Click the Table contextual tab on the Ribbon and click the Relationships
button in the Relationships group.
2. If necessary, click the Show Table button in the Relationships group on the
Design tab. In the Show Table window, select a table you want to link, click
the Add button, and repeat for each table. Click Close.
3. Drag a field from one table and drop it on the related field in the second table.
(Optional) Check the Enforce Referential Integrity box. Click Create.
Working with Table Data
 Database information can be directly added and modified from tables and
some queries and forms.
 To Add a Field to a Table: Enter data in the cell below the Add New Field
column header. Or, click the Fields tab on the Ribbon under Table Tools, and
click the button for the field you wish to add in the Add & Delete group.
 To Add a New Record: Enter data in the bottom row of the table.
 To Select a Record: Click the Record selector to the left of the record.
 To Delete a Record: Select the record, click the Home tab on the Ribbon,
and click the Delete button in the Records group. Click Yes.
 To Spell Check: Click the Home tab on the Ribbon and click the Spelling
button in the Records group.
 To Find Information: Place the cursor in the field that contains the value you
want to search for, click the Home tab on the Ribbon, and click the Find
button in the Find group. Or, press Ctrl + F. Type the value you want to
search for in the Find What box and click Find Next.
 To Replace Information: Place the cursor in the field that contains the value
you want to replace, click the Home tab on the Ribbon and click the Replace
button in the Find group. Or, press Ctrl + H. Type the value you want to
search for in the Find What box and the new value in the Replace With box.
Click Find Next until you’ve found what you’re looking for, then click Replace
or Replace All to replace every instance of the value.
 To Sort Information: Place the cursor in the field that you want to sort by,
click the Home tab on the Ribbon, and click either the Ascending
or Descending button in the Sort & Filter group.
 To Filter Information: Place the cursor in the field that contains the values
you want to filter by, click the Home tab on the Ribbon, and click the Filter
button in the Sort & Filter group. Check the boxes for the values you want to
filter for.
 To Remove a Filter: Click the Toggle Filter button in the Sort & Filter group.
 To Change a Field’s Data Type: Select the field you want to change, click the
Fields tab on the Ribbon under Table Tools, and click the Data Type list
arrow in the Data Type & Formatting group. Select a data type.
Field Data Types
Data Type Description
Text (Default) Stores text, numbers, or a combination of both, up to
255 characters long.
Number Stores numbers that can be used in calculations.
Currency Stores numbers and symbols that represent money.
Date & Time Stores dates, times, or both.
Yes/No Stores only one of two values, such as Yes or No.
Lookup &
Relationship
Stores values from a table, query, or value list. Can be
multivalued.
Rich Text Stores, text, numbers, or a combination of both that can
be formatted using color and font controls.
Memo Stores long text entries—up to 64,000 characters long.
Attachment Allows you to attach files and images to your database.
Hyperlink Stores clickable links to Web pages on the Internet or
files on a network.
Calculated Field Stores results of a calculation. The calculation must
refer to other fields in the same table.
Working with Queries and Reports
 To Create a Select Query: Click the Create tab on the Ribbon and click the
Query Wizard button in the Queries group. Click Simple Query Wizard and
click OK. Follow the instructions to select the fields you want to use from the
desired tables and create the query. If you want to filter records, view the
query in Design view and enter the criteria in the Criteria row.
 To Switch Views: Click the Home tab on the Ribbon and click the View
button in the Views group. Or, right-click the tab and select the view you want
to use in the contextual menu.
 To Summarize Values: Open the Query in Datasheet View, click the Home
tab on the Ribbon, and click the Totals button in the Records group. Click the
list arrow in a column in the Total row in the query select a calculation type
(Sum, Average, etc.).
Criteria Example Description
“London” Displays records where the field equals “London”.
Between 1/1/00 and
12/31/00
Displays records where the date is between 1/1/00
and 12/31/00.
NOT "USA" or
""
Displays records where the field does not contain
the text "USA" and is not blank.
Like “S*” Displays records where the field text starts with an
“S”.
IS NULL Displays records where the field is blank.
IS NOT NULL Displays records where the field is not blank.
100 Displays records whose field value is greater than
100.
 To Create a Report: Click the Create tab on the Ribbon and click the Report
Wizard button in the Reports group. Follow the instructions to select the fields
you want to use from the desired tables and create the report.
Start adding a new record here.
Record selector
© 2014 CustomGuide
Free Cheat
Learn by doing, not watching.
www.customguide.com
Try
Interactive
Training
Learn by doing,
not watching.
Visit training.customguide.com
Interactive Training
Free Training
Course!
Short Interactive Fun
www.customguide.com
Microsoft®
InfoPath 2010
Quick Reference Card
InfoPath 2010 Designer Keyboard Shortcuts
General
Design a New Form <Ctrl> + <Shift>
Template + <D>
Open the Open in design <Ctrl> + <O>
Mode dialog box
Create a Hyperlink <Ctrl> + <K>
Save <Ctrl> + <S>
Preview the form <Ctrl> + <Shift>
template + <B>
Print Preview the <Alt> + <F>, <V>
form template
Print <Ctrl> + <P>
Zoom in <Alt> + <=>
Help <F1>
Editing
Find word or phrase <Ctrl> + <F>
Replace <Ctrl> + <H>
Spelling <F7>
Zoom Out <Ctrl> + <Shift>
+ < * >
Undo <Ctrl> + <Z>
Redo <Ctrl> + <Y>
Copy <Ctrl> + <C>
Cut <Ctrl> + <X>
Paste <Ctrl> + <V>
Formatting
Bold <Ctrl> + <B>
Italics <Ctrl> + <I>
Underline <Ctrl> + <U>
Select All <Ctrl> + <A>
Font dialog box <Ctrl> + <D>
Remove all formatting <Ctrl> + <Spacebar>
Open the Font task pane <Ctrl> + <Shift>
<F>
Change text color <Ctrl> + <Shift>
<C>
Fill out forms
Go to the next control <Tab>
Go to the previous <Shift> + <Tab>
control
The Fundamentals
• To Design a New Form Template: Click the File
tab and select New. Choose a template on which to
base the form and click OK.
• To Open an Existing Form Template: Click the
File tab and select Open.
• To Save a Form: Click the Save button on the
Quick Access Toolbar, or click the File tab and
select Save, or press <Ctrl> + <S>.
• To Check Spelling: Click the Spelling button in the
Editing group of the Home tab on the Ribbon. Or,
press <F7>.
• To Find: Click the Find button in the Editing group
of the Home tab on the Ribbon, or press
<Ctrl> + <F>.
• To Find and Replace: Click the Find button list
arrow in the Editing group of the Home tab on the
Ribbon. Select Replace. Or, press <Ctrl> + <H>.
• To Insert a Hyperlink: Click the Hyperlink button
in the Links group of the Insert tab on the Ribbon.
Or, press <Ctrl> + <K>.
• To Customize the Quick Access Toolbar: Click
the Customize Quick Access Toolbar button at
the end of the toolbar and select the commands you
wish to appear.
• To Add a Submit Data Connection: Click the type
of data source you wish to add in the Submit Form
group of the Data tab on the Ribbon. Or, click the
Data Connections button in the Get External Data
group of the Data tab on the Ribbon. Then click the
Add button, click Submit data, click Next, select
the desired data source, and click Next. Proceed as
prompted in the Data Connection Wizard.
• To Preview a Form in InfoPath Filler: Click the
Preview button on the Quick Access Toolbar; or
click the Preview button in the Form group located
in the Home tab on the Ribbon; or press <F5>.
• To Print a Form: Click the File tab on the Ribbon.
Select Print and choose how you wish to print the
form. Or, press <Ctrl> + <P>.
• To Publish a Form: Click the Quick Publish
button on the Quick Access Toolbar. Or, click the
File tab on the Ribbon and select Publish. Choose
how you want to publish the form: to the current
location, to a SharePoint Library, to an e-mail
message, or to a network location.
• To Fill Out a Form: Open InfoPath Filler 2010.
Click the File tab on the Ribbon and select Open.
Navigate to the form you wish to fill out and click
Open. Fill out the form, and click the Submit button
on the Home tab of the Ribbon.
Quick Access Toolbar Title Bar
Help search box
Fields
task pane
Ribbon
File tab
Free Cheat Sheets!
Visit: cheatsheet.customguide.com
Interactive	
  Online	
  Learning	
  
ü	
  Courseware	
   ü	
  Online	
  Learning	
   ü	
  Skills	
  Assessments	
  
©	
  2012	
  CustomGuide	
  
cheatsheet.customguide.com	
  |	
  Phone	
  888.903.2432	
  
Design Elements Working with Tables
• To Format Font: Use the commands in the Format Text group of the Home
tab to change the appearance of text in the form.
• To Apply a Style: Select the text to which you want to apply the style and
click the Quick Styles button in the Home tab of the Ribbon. Select the style
you wish to apply from the list.
• To Apply or Change a Page Layout Template: Click the Page Layout
Templates button in the Page Layouts group of the Page Design tab on the
Ribbon.
• To Change the Color Theme: Select a theme from the Themes gallery in the
Page Design tab of the Ribbon.
• To Add a Horizontal Line: Click the Horizontal Line button in the Page
Format group of the Insert tab on the Ribbon.
• To Add a Header: Click the Header & Footer button in the Headers group of
the Page Design tab on the Ribbon. Click the Header button in the View
Properties dialog box. Enter the header text and formatting and click OK.
• To Add a Footer: Click the Header & Footer button in the Headers group of
the Page Design tab on the Ribbon. Click the Header button in the View
Properties dialog box. Enter the header text and formatting and click OK.
• To Add a Picture: Click the Picture button in the Illustrations group of the
Insert tab on the Ribbon.
• To Add Clip Art: Click the Clip Art button in the Illustrations group of the
Insert tab on the Ribbon.
• To Check for Design Incompatibilities: Click the File tab on the Ribbon and
select Info. Click the Design Checker button.
Controls, Rules, and Fields
• To Insert a Control: Select a control from the Controls gallery located in the
Home tab on the Ribbon. Or, select a control from the Controls task pane.
• To Display the Controls Task Pane: Click the Controls Pane launcher in
the Controls group of the Home tab on the Ribbon.
• To Change Control Properties: Select the control and click the Control
Properties button in the Properties group of the Control Tools tab. Or, right-
click the control and select Properties from the contextual menu.
• To Replace a Control: Right-click the control and select Change Control
from the contextual menu and select a new control.
• There are three types of rules you can add to controls in InfoPath:
Validation: Validation rules are used to indicate an error when the user
enters an invalid value into a control.
Formatting: Formatting rules are used to apply text formatting and
background shading to controls when a condition has been met.
Actions: Actions are the most varied type of rule. Use these to switch views,
set values in other fields, submit the form, or query for data.
• To Add a Rule: Select a control in the form, or a field in the Fields task pane.
Click the Add Rule button in the Rules group of the Home tab on the Ribbon.
Choose a rule from the menu. Choose the action you wish to apply for the
rule, and enter details for the rule in the Rule Details dialog box. Click OK.
• To Manage Rules: Select a control or form or a field in the Fields task pane.
Click the Add Rule button in the Rules group of the Home tab on the Ribbon.
• To Connect the Form to an External Data Source: Click the Data tab on
the Ribbon and select a data source from the Get External Data group.
• To Display the Fields Task Pane: Click the Show Fields button in the Form
Data group of the Data tab on the Ribbon.
• There are two types of tables in InfoPath:
Layout Table: The purpose of this table is to arrange and organize
elements of the form. It makes the form easy to follow and understand.
Tables are layout by default.
Repeating Table: The purpose of these tables is to provide more ways for
users to enter data in a form. Users can add rows or columns to the table
while filling out the form.
• To Insert a Table: Select a table from the Tables Gallery in the Insert tab of
the Ribbon. Or, click the Insert Layout Table button on the Standard toolbar.
• To Insert a Repeating Table: Select the table you wish to change into a
Repeating table and click the Change To button in the Table group of the
Layout tab on the Ribbon. Or, select Repeating Table from the Controls
Gallery.
• To Change Table Alignment: Click in the table. Click the Table Properties
button in the Table group of the Layout tab on the Ribbon. Or, right-click the
table and select Table Properties from the contextual menu and click the
Table tab. Choose the table alignment and click OK.
• To Change Column Width: Click and drag the column border left or right to
resize it. Or, click the Width button in the Cell group of the Layout tab on the
Ribbon. Or, click the Table Properties button in the Table group of the Layout
tab on the Ribbon and click the Column tab. Or, right-click the table and
select Table Properties from the contextual menu. Click the Column tab and
set the column width.
• To Change Row Height: Click and drag the row border up or down to resize
it. Or, click the Height button in the Cell group of the Layout tab on the
Ribbon. Or, click the Table Properties button in the Table group of the Layout
tab on the Ribbon and click the Row tab. Or, right-click the table and select
Table Properties from the contextual menu. Click the Column tab and set
the column width.
• To Change Cell Padding (space between boundary of cell and its
contents): Click the Table Properties button in the Table group of the Layout
tab on the Ribbon. Or, right-click the table and select Table Properties from
the contextual menu. Click the Cell tab and make changes in the Cell padding
section.
• To Change Table Border: Click the Borders button in the Color group of the
Layout tab on the Ribbon. Or, right-click the table and select Borders and
Shading from the contextual menu. Click the Borders tab and select the type
of border you want to use in the table.
• To Change Shading: Click the Shading button in the Color group of the
Layout tab on the Ribbon. Or, right-click the table and select Borders and
Shading from the contextual menu. Click the Shading tab and select a
shading color.
• To Delete a Column or Row: Right-click the column or row and select Delete
→ Columns or Rows from the contextual menu. Or, click the Delete button
in the Rows & Columns group of the Layout tab on the Ribbon button and
select Columns or Rows the menu.
• To Insert a Column or Row: Select the column or row where you want the
new column or row to be inserted. Click the button that corresponds to where
you want to add rows and columns in the Rows & Columns group of the
Layout tab on the Ribbon. Or, right-click a cell in the table, point to Insert and
select the insert option you wish to use from the contextual menu. Or, press
<Tab> in the last cell of a table to add a new row.
Interactive	
  Online	
  Learning	
  
ü	
  Courseware	
   ü	
  Online	
  Learning	
   ü	
  Skills	
  Assessments	
  
©	
  2012	
  CustomGuide	
  
cheatsheet.customguide.com|	
  Phone	
  888.903.2432	
  
Microsoft®
OneNote 2010
Quick Reference Card
OneNote 2010 Screen Keystroke Shortcuts
General
Open a Section <Ctrl> + <O>
Create a New Page <Ctrl> + <N>
Print a Page <Ctrl> + <P>
Undo <Ctrl> + <Z>
Redo <Ctrl> + <Y>
Help <F1>
Full Page View <F11>
Task Pane <Ctrl> + <F1>
Create Outlook <Ctrl>+ <Shift>
task <1> thru <5>
Insert Hyperlink <Ctrl> + <K>
E-mail Page <Ctrl> + <Shift>
+ <E>
Select Page <Ctrl> + <Shift>
+ <A>
Navigation
Next Section <Ctrl> + <Tab>
Previous Section <Ctrl> + <Shift>
+ <Tab>
Open New Window <Ctrl> + <M>
New Side Note <Ctrl> + <Shift>
Window + <M>
Text
Cut <Ctrl> + <X>
Copy <Ctrl> + <C>
Paste <Ctrl> + <V>
Bold <Ctrl> + <B>
Italics <Ctrl> + <I>
Underline <Ctrl> + <U>
Font Task Pane <Ctrl> + <D>
Check Spelling <F7>
Tag
To Do <Ctrl> + <1>
Important <Ctrl> + <2>
Question <Ctrl> + <3>
Remember for later <Ctrl> + <4>
Definition <Ctrl> + <5>
Highlight <Ctrl> + <6>
Contact <Ctrl> + <7>
Address <Ctrl> + <8>
Phone number <Ctrl> + <9>
The Fundamentals
Notebook Hierarchy:
Notebook: Notebooks are the largest
component; they store sections and pages.
Section: Sections store pages that are related
under a single topic.
Page: Pages contain specific notes and
information on a particular topic.
Subpage: Subpages can be used if a page
doesn’t have enough room, or to further organize
the content of a page.
• To Create a New Notebook: Click the File tab on
the Ribbon and select New. Choose where to store
the notebook (Web, Network, or My Computer),
name the notebook, and click Create Notebook.
• To Create a New Section: Click the Create a New
Section tab to the right of the other notebook tabs.
• To Create a New Page or Subpage: Click the
New Page button at the top of the Page Tabs
pane. Or, press <Ctrl> + <N>. Or, point where you
want to insert a new page in the Page Tabs pane
and click the New Page button that appears.
• To Open a Notebook: Click the notebook in the
Navigation Pane. Or, click the File tab on the
Ribbon and select Open, or press <Ctrl> + <O>.
• To View a Section: Click the section tab in the
Navigation Pane, or above the current page. Click
the Show the rest of the sections button,
which appears as a sack of section tabs, to view all
sections in the notebook.
• To Add a Note: Click where you want to insert the
note on the page and begin typing.
• To Move a Note: Click the top bar of the note and
drag the note. To move text within a note, click the
next to the text and drag the text.
• To Delete a Note: Select the note and press
<Delete> or right-click and select Delete.
• To Print a Page: Click the File tab on the Ribbon
and select Print. Or, press <Ctrl> + <P>.
• To Get Help: Press <F1> to open the Help window,
type your question and press <Enter>.
• To Cut or Copy: Select the text and click the Cut
button or Copy button in the Clipboard group of the
Home tab on the Ribbon, or press <Ctrl> + <X>
(cut) or <Ctrl> + <C> (copy).
• To Paste: Place the insertion point where you want
to paste the text, click the Paste button in the
Clipboard group of the Home tab on the Ribbon, or
press <Ctrl> + <V>.
• To Undo or Redo: Click the Undo button on the
Quick Access Toolbar or press <Ctrl> + <Z>. Click
the Redo button on the Quick Access Toolbar or
press <Ctrl> + <Y>.
• To Find Text: Press <Ctrl> + <F> or click the
Instant Search box.
• To Save a Page, Section, or Notebook in a
Different Format: Click the File tab on the Ribbon
and select Save As. Under Save Current, select
Page, Section, or Notebook. Under Select Format,
select the format (e.g. *.docx, *.doc, *.pdf, *.xps) in
which you want to save the selected item.
Ribbon
Quick Access Toolbar
Horizontal Scroll Bar
Unfiled
Notes
Vertical
Scroll Bar
Page Tabs
pane
Search box
Notebook
Section
tabs
Title Bar Create a New Section tab
Notebook
Navigation
Pane
New Page
button
Free Cheat Sheets!
Visit: cheatsheet.customguide.com
Interactive	
  Online	
  Learning	
  
ü	
  Courseware	
   ü	
  Online	
  Learning	
   ü	
  Skills	
  Assessments	
  
©	
  2012	
  CustomGuide	
  
cheatsheet.customguide.com	
  |	
  Phone	
  888.903.2432	
  
Notebook Tasks Sharing
• To Copy Part of the Screen into OneNote (Take a Screen Clipping): Click
the Insert tab on the Ribbon and click the Screen Clipping button in the
Images group and drag the pointer over the area of the screen you want to
copy. Or, press < > + <S>.
• To Create an Outlook Task from a Note: Click the Home tab on the Ribbon
and click the Outlook Tasks button in the Outlook group. Select the type of
task you want to create in Outlook. You may also press <Ctrl> + <Shift> +
<1-5> to create a task from a note.
• To Create a Link: Click the Insert tab on the Ribbon and click the Link
button in the Links group. Enter the link’s display text and enter the URL of the
web page to which you want to link. You can also link to another file or
OneNote notebook.
• To Create a Table: Click the Insert tab on the Ribbon. Click the Table button
and select the number of columns and rows from the grid.
• To View Full Page Mode: Click the View tab on the Ribbon and click the Full
Page View button in the Views group. Or, click the Full Page View button on
the Quick Access Toolbar. Or, press <F11>.
• To Dock OneNote to the Desktop: Click the View tab on the Ribbon and
click the Dock to Desktop button in the Views group. Or, click the Dock to
Desktop button on the Quick Access Toolbar.
• To Insert Date and Time: Click the Insert tab on the Ribbon and click the
Date, Time, or Date & Time button in the Time Stamp group.
• To Add Rule Lines to the Page: Click the View tab on the Ribbon and click
the Rule Lines button in the Page Setup group. Click the Rule Lines
button list arrow to choose from a selection of rule lines and grids.
• To Open a Side Note Window: Click the View tab on the Ribbon and click
the New Side Note button in the Window group.
• To Keep OneNote on Top of All Other Windows: Click the View tab on the
Ribbon and click the Keep on Top button in the Window group.
• To Move Sections: Click and drag the section to rearrange the order of
sections in the notebook. Or, click and drag the section into another open
notebook in the Navigation Bar to move it into another notebook.
• To Move Pages: Click and drag the page tab and drag it to rearrange it in the
section, or drag it to a section tab to move it into the section. Or, click and
drag the page into another open notebook in the Navigation Bar to move it
into another notebook.
• To View Unfiled Notes: Click the Unfiled Notes button at the bottom of the
Navigation Bar.
Tagging
• To Tag Text or a Note: Select the text or note you wish to tag. Click the
Home tab on the Ribbon and select a tag from the Tags group. You may also
press <Ctrl> + <1-9> to apply a tag.
• To View Tags: Click the Find Tags button in the Tags group. The Tags
Summary task pane appears, displaying tags in the current notebook.
• To Change How Tags Are Grouped: Click the Group tags by list arrow in
the Tags Summary task pane and select how you would like tags to be
grouped in the task pane.
• To Display Unchecked Tags Only: Click the show only unchecked items
check box in the Tags Summary task pane and select how you would like tags
to be grouped in the task pane.
• To Change Which Tags are Displayed: Click the Search list arrow in the
Tags Summary task pane and select which tags you would like to see.
• To Create a Summary of Tags: Click the Create Summary Page button. All
of the tags are compiled on a new page in the notebook.
• To E-mail Notes: Click the Home tab or the Share tab on the Ribbon and
click the E-mail Page button in the Outlook group.
• To Share a Notebook: Click the Share tab on the Ribbon and click the Share
This Notebook button in the Shared Notebook group. Or, click the File tab on
the Ribbon and select Share.
• To Share a Notebook: Click the Share tab on the Ribbon and click the Share
This Notebook button in the Shared Notebook group. Or, click the File tab on
the Ribbon and select Share. Select the notebook you wish to share, then
choose if you want to share over the Web or the Network or SharePoint. You
can also share over Windows Live SkyDrive with your Windows Live ID. Click
Share Notebook.
Drawing and Graphics
The Draw tab
• To Select Several Notes on a Page: Click the Lasso Select button in the
Tools group. Click and drag around the notes you want to select on the page.
• To Scroll Through the Page: Click the Panning Hand button in the Tools
group. Click and drag to move around the notes on the page.
• To Draw a Line or Shape: Click the shape you want to insert, or click the
More button to view a selection of shapes in the Insert Shapes group. Draw
the shape by clicking on the page with the pointer and dragging until the
shape reaches the desired size.
• To Erase a Line or Shape: Click the Eraser button in the Tools group. Click
and drag to erase content on the page.
• To Change the Eraser: Click the Eraser button list arrow and select an
eraser from the list.
• To Duplicate a Drawn Shape: Click the More button in the Insert Shapes
group and select Lock Drawing Mode from the list. Then click the button for
the shape you want to draw. Draw the shape on the page. Then click
anywhere on the page, and a duplicate of the previously drawn shape will
appear.
• To Change Shape Color and Thickness: Click the Color & Thickness
button in the Insert Shapes group and select the thickness and color you wish
to use for the shape. Then click the button for the shape you want to draw and
draw the shape on the page.
• To Draw a Multi-Dimensioned Line: Select the type of line you want to draw
from the Insert Shapes group: 2 dimensions, positive; 2 dimensions,
full; 3 dimensions. Then click and drag on the page to draw the line.
• To Use the Pen: Click a pen style from the Tools group, or click the More
button to view more pen styles. Begin writing on the page.
• To Change the Pen Mode: Click the More button of the Pen Tools gallery
and select Pen Mode, then select a mode from the list.
• To Rotate a Shape: Click the Rotate button in the Edit group and select an
option from the list.
• To Add Writing Space: Click the Insert Space button in the Edit group and
click where you want to add writing space to the page.
• To Insert a File Printout on a Page: Click the Insert tab on the Ribbon and
click the File Printout button in the Files group. Choose the document you
want to insert and click the Insert button.
• To Insert a Scanned Printout on a Page: Click the Insert tab on the Ribbon
and click the Scanner Printout button in the Files group. Choose the scanner
you want to use and click the Insert button.
Interactive	
  Online	
  Learning	
  
ü	
  Courseware	
   ü	
  Online	
  Learning	
   ü	
  Skills	
  Assessments	
  
©	
  2012	
  CustomGuide	
  
cheatsheet.customguide.com|	
  Phone	
  888.903.2432	
  
Microsoft®
Outlook 2010
Cheat Sheet
The Outlook 2010 Screen Navigation Pane
zas
Contains mail-related folders like your Inbox,
Sent Items, and Search Folders. Use the
Favorites section at the top of the pane for easy
access to frequently-used folders.
Enables you to view and schedule
appointments, event, and meetings. View
shared calendars and compare calendars by
viewing them side-by-side.
Store and keep track of addresses, phone
numbers, and e-mail addresses.
Organize to-do lists, track task progress, and
delegate tasks.
Notes: Use like electronic Post-It® Notes to write
down information.
Folder List: Displays a list of all your Outlook
folders.
Shortcuts: Add shortcuts to folders and
locations in Outlook for quick access.
Keyboard Shortcuts
Save Ctrl + S
Preview and Print Ctrl + P
Undo Ctrl + Z
Cut Ctrl + X
Copy Ctrl + C
Paste Ctrl + V
Check Spelling F7
Check for Mail F9
Save, Close, Alt + S
and Send
Reply Ctrl + R
Reply to All Alt + L
Address Book Ctrl + Shift + B
Help F1
Switch Between Alt + Tab
Applications
New Item Ctrl + N
Search Ctrl + E
The Fundamentals Mail: Basics
 The File tab menu and Backstage view contain commands for
working with a program’s files, such as Save As, Save
Attachments, Close, New, and Print.
 To Create a New Message:
1. Click the New E-mail button in the
New group of the Home tab on the
Ribbon. Or, press Ctrl + N.
2. Enter the e-mail address(es) in the To:
box, or click the To button to use the
Address Book.
3. Click the Cc: or Bcc: buttons and
enter the e-mail address(es) for whom
you want to send copies of the
message.
4. Enter the subject of the message in
the Subject box.
5. Enter the text of your message in the
text box.
6. Click the Send button.
 To Reply to a Message: Select/open the
message, click the Reply button, type
your reply, and click the Send button.
 To Forward a Message: Select/open the
message, click the Forward button, enter
the e-mail address(es) in the To field,
enter comments in the Body area, and
click the Send button.
 To Delete a Message: Select the
message and press the Delete key.
 To Open a Message: Click a message
to view it in the Reading Pane or double-
click the message to open it.
 To Check for New Messages: Click
the Send/Receive All Folders button
or press F9.
 To Preview and Print a Message:
Click the File tab and select Print, or
press Ctrl + P.
 Message Indicators:
Message has not been read.
Message has been read.
File is attached to the message.
Message has high or low
importance.
 To Minimize the Ribbon: Click the
Minimize Ribbon button on the
Ribbon. Or, press Ctrl + F1. Or, right-
click a tab and select Minimize
Ribbon from the contextual menu.
 To Change Account Settings: Click
the File tab and select Info. Click the
Account Settings button.
 To Change Program Settings: Click
the File tab and select Options.
 To Get Help: Press F1 to open the
Help window. Type your question and
press Enter.
Reading Pane
File tab
Quick Access Toolbar
Title bar
People
Pane
Ribbon
To Do Bar
Close button
Navigation
Pane
Status Bar
Messages
Zoom
© 2014 CustomGuide
Free Cheat
Learn by doing, not watching.
www.customguide.com
Free Cheat Sheets!
Visit: cheatsheets.customguide.com
Mail: Advanced Tasks
 To Attach a File to a Message: Click the Attach Item button in the Include
group of the Message tab in the Message window.
 To Preview an Attachment: Click the attachment in the message preview in
the Reading Pane.
 To Open an Attachment: Double-click the attachment in the Reading Pane.
The file opens in its default program.
 To Flag a Message as a To-Do Item: Right-click the message, select Follow
Up from the contextual menu, and select a flag. Or, click the flag icon on
the message. Or, select the message, click the Follow Up button on the
Standard toolbar and select a flag.
 To Categorize a Message by Color: Click the Quick Click icon on the
message. Or, right-click the message, select Categorize from the contextual
menu, and select a color category. Or, select the message, click the
Categorize button in the Tags group of the Home tab on the Ribbon, and
select a flag.
 To Recall a Message: Open the Sent Items folder. Double-click the
message, click the Actions button in the Move group of the Message tab on
the Ribbon, and select Recall This Message. Choose to delete the message
or replace the message with a new one in the dialog box and click OK. You
can only recall a message if you are using MS Exchange Server and the
recipient has not opened it.
 To Resend a Message: Open the Sent Items folder. Double-click the
message, click the Actions button in the Move group of the Message tab on
the Ribbon, and select Resend This Message. Edit the message and
recipients as necessary and click Send.
 To Create a Contact Group: Click the New Items button in the New group
on the Ribbon and select More Items Contact Group. Click the Add
Members button in the Members group on the Ribbon, select a name in the
list, click the Members button, and repeat for each name to be added. Click
OK, then click Save & Close in the Actions group of the Contact Group tab.
 To Create a Signature: In the message window, click the Signature button in
the Include group of the Message tab on the Ribbon, select Signatures, and
create the new signature.
 To Change a Message’s Options: In the message window, click the
Options tab on the Ribbon and click the More Options dialog box
Launcher. Here you can specify: if the message is important or sensitive; if
you want to add voting buttons to the message; where replies should be sent
to; if you want a read receipt; and if you want to encrypt the message or delay
its delivery.
 To Move a Message to a Different Folder: Select the item, click the Move
button in the Move group of the Home tab of the Ribbon, and select the
destination folder. Or, click and drag the item to a different folder in the
Navigation Pane.
 To Turn On the Out of Office Assistant: Click the File tab, select Info and
click the Automatic Replies button.
 To Save a Message as a Draft: Click the Save button on the Quick Access
Toolbar in the message window. The message appears in the Drafts folder.
 To Create a New Rule: Click the Rules button in the Move group of the
Home tab on the Ribbon and select Create Rule.
 To Manage Rules: Click the Rules button in the Move group of the Home tab
on the Ribbon and select Manage Rules and Alerts.
Calendar
 To Open the Calendar: Click the Calendar button in the Navigation Pane.
 To Change Views: Click a view option in the Arrange group on the Home
tab, or click the View tab and select an option there.
 To View a Specific Date: Click the date in the Date Navigator, or click and
drag to view a set of consecutive dates.
 To Schedule an Appointment: Click the New Appointment button in the
New group on the Home tab or press Ctrl + N.
 To Schedule a Recurring Appointment: Click the New Items button in the
New group on the Ribbon, and select More Items Recurring Appointment.
 To Schedule a Meeting: Click the New Meeting button in the New group on
the Ribbon. Add recipients and meeting details and click Send.
 To Schedule an All Day Event: Click the New Items button in the New group
on the Ribbon and select All Day Event.
 To Reschedule an Item: Click and drag the item to a new date and/or time
on the Calendar. Or, double-click the item to open it, make your changes, and
click the Save & Close button in the Actions group on the Ribbon.
 To Edit an Item: Click the item to view the Calendar Tools contextual tab. Or,
double-click the item, make your changes, and click the Save & Close button
in the Actions group on the Ribbon.
 To Delete an Item: Select the item and press Delete. Or, select the item and
click the Delete button in the Actions group of the Appointment tab on the
Ribbon.
 To Search the Calendar: Click in the Search box in the upper right corner, or
press Ctrl + E. Type search keywords and press Enter.
Contacts
 To Open Contacts: Click the Contacts button in the Navigation Pane.
 To Change Views: Click a view option in the Current View group on the
Home tab, or click the View tab and select an option there.
 To Create a New Contact: Click the New Contact button in the New group
on the Home tab or press Ctrl + N.
 To Create a New Contact Group: Click the New Contact Group button in
the New group of the Home tab on the Ribbon. Click the Add Members button
in the Members group on the Ribbon, select a name in the list, click the
Members button and repeat for each name to be added. Click OK, then click
Save & Close in the Actions group of the Contact Group tab.
 To Edit a Contact: Double-click the contact and make your changes.
 To Find a Contact: Type your search text in the Search Contacts field or
press Ctrl + E. Or, click the Find a Contact field in the Find group on the
Home tab, enter your search text and press Enter.
 To Delete a Contact: Select the contact and press Delete.
Tasks and To-Do Items
 To Open Tasks/To-Do List: Click the Tasks button in the Navigation Pane
and select To-Do List or Tasks in the Navigation Pane.
 To Create a New Task/To-Do Item: Click the New Task button in the New
group on the Home tab or press Ctrl + N.
 To Complete a Task: Click the Mark Complete button in the Manage Task
group on the Ribbon, or click the task’s check box in Simple List view.
 To Delete a Task: Select the task and press the Delete key. Or, click the
Delete button in the Delete group of the Home tab.
© 2014 CustomGuide
Free Cheat
Learn by doing, not watching.
www.customguide.com
Try
Interactive
Training
Learn by doing,
not watching.
Visit outlook.customguide.com
Outlook Training
Free Outlook
Course!
Short Interactive Fun
www.customguide.com
Microsoft®
Publisher 2010
Quick Reference Card
Publisher 2010 Screen Keystroke Shortcuts
The Fundamentals
• To Create a New Publication by Type: Click the
File tab on the Ribbon and select New. Select the
type of publication you want to create. Click the
desired publication and click Create.
• To Create a Blank Publication: Click the File tab on
the Ribbon and select New. Click a Blank option (8.5
X 11” or 11 x 8.5”). Or, click More Blank Page
Sizes, select the option you want to create and click
Create.
• To Open a Publication: Click the File tab and select
Open.
• To Save a Publication: Click the Save button on the
Quick Access Toolbar. Or, click the File tab and
select Save from the list. Or, press <Ctrl> + <S>.
• To Save a Publication with a Different Name: Click
the File tab, select Save As, type a new name for the
publication, select a new location, and click Save.
• To Preview a Publication: Click the File tab on the
Ribbon and select Print. The preview appears in the
right pane; use the Previous and Next buttons and
Zoom to preview pages.
• To Print a Publication: Click the File tab on the
Ribbon and select Print. Or, press <Ctrl> + <P>.
• To Close a Publication: Click the Close button in
the window. Or, press <Ctrl> + <W>. Or, click the
File tab on the Ribbon and select Close from the list.
Open a Publication <Ctrl> + <O>
Create New <Ctrl> + <N>
Save a Publication <Ctrl> + <S>
Print a Publication <Ctrl> + <P>
Close a Publication <Ctrl> + <W>
Help <F1>
General
Editing
Formatting
Bold <Ctrl> + <B>
Italics <Ctrl> + <I>
Underline <Ctrl> + <U>
Align Left <Ctrl> + <L>
Center <Ctrl> + <E>
Align Right <Ctrl> + <R>
Justify <Ctrl> + <J>
Increase Font Size <Ctrl> + < ] >
Decrease Font Size <Ctrl> + < [ >
Select All <Ctrl> + <A>
Cut <Ctrl> + <X>
Copy <Ctrl> + <C>
Paste <Ctrl> + <V>
Undo <Ctrl> + <Z>
Redo <Ctrl> + <Y>
Check Spelling <F7>
Navigation and Layout
Zoom to Full <Ctrl> + <Shift> +
Page <L>
Toggle Between <F9>
Current and Full
Page View
Go To Page <F5>
Next Page <Ctrl> + <Page
Down>
Previous Page <Ctrl>+<Page Up>
Insert New <Ctrl> + <Shift> +
Page <N>
Insert Duplicate <Ctrl> + <Shift> +
Page <U>
Show/Hide <Ctrl> + <Shift> +
Layout Guides <O>
Switch to Master <Ctrl> + <M>
Page
Beginning of Line <Home>
End of Line <End>
• To Get Help: Press the <F1> key to open the Help
task pane. Type your question and press <Enter>.
• To Undo/Redo: Click the Undo or Redo buttons on
the Quick Access toolbar.
• To Change the Color Scheme: Click the Page
Design tab on the Ribbon. Select a color scheme
from the Color Schemes gallery.
• To Change the Font Scheme: Click the Page
Design tab on the Ribbon. Click the Fonts button
and select a font scheme from the list.
• To Change the Background of a Publication: Click
the Page Design tab on the Ribbon. Click the Page
Background button and click the Background
button. Select a background from the list.
• To Adjust the Margins of a Publication: Click the
Page Design tab on the Ribbon and click the Margin
button. Select the margin setting you would like to
use, or select Custom Margins, make your
adjustments, and click OK.
• To Show or Hide Layout Guides: Click the View
tab on the Ribbon and click the Guides check box in
the Show group.
• To Change Page Orientation: Click the Page
Design tab on the Ribbon and click the Orientation
button. Select the orientation you wish to apply.
• To Change Page Size: Click the Page Design tab
on the Ribbon and click the Size button.
Customizable Training Materials
Tel. (888) 903-2432 | www.customguide.com
Title barQuick Access Toolbar Contextual tabs
Status bar Zoom
controls
Rulers
Horizontal
scroll bar
Task
pane
Workspace
page
Vertical
scroll bar
View
buttons
Ribbon
Customizable Computer Training
 Courseware   Online Learning   Skills Assessments
Publisher Quick Reference © 2011 CustomGuide 
www.customguide.com | Phone 888.903.2432 
Formatting
Text Boxes Drawing and Graphics
• To Format a Text Box: Click the text box you want to format and click the
Format tab under Text Box Tools. Use the controls on the Ribbon to format
the text box.
• To Link Text Boxes: Select the overflowing text box (marked with an
overflow indicator). Click the Create Link button on the Format tab under
Text Box Tools. Click inside an empty text box with the pointer.
• To Unlink Text Boxes: Select the linked text box that comes before the text
box(es) you want to unlink, and click the Break button on the Format tab
under Text Box Tools.
• To Move Between Text Boxes: Click the Previous or Next buttons,
or click the Previous or Next buttons on the Format tab under Text Box
Tools.
• To Add Columns to Text Boxes: Click the text box to which you want to
add columns and click the Format tab under Text Box Tools. Click the
Columns button. Select the number of columns you wish to apply.
• To Change Text Box Margins: Click the text box to which you want to add
columns and click the Columns button. Select the number of columns you
wish to apply.
• To Manage Typography: Click the text box in which you want to change
the typography and click the Format tab under Text Box Tools. Use the
buttons in the Typography group to change the appearance of text.
• To Insert a Text Box: Click the
Home tab on the Ribbon and click
the Draw Text Box button in the
Objects group. Position the mouse
pointer where you would like to
insert the text box and click and
drag until the text box reaches the
desired size. Release the mouse
button when you’re finished and
enter text.
• To Change Font Style: Click the text box, table, or shape with text. Select
the text you want to apply formatting to and click the Home tab on the
Ribbon. Click the Bold, Italic, or Underline button in the Font group.
• To Change Font Type: Select the text you want to apply formatting to and
click the Home tab on the Ribbon. Click the Font list arrow in the Font
group and select a font from the list.
• To Change Font Size: Select the text you want to apply formatting to and
click the Home tab on the Ribbon. Click the Font Size list arrow in the Font
group and select a size from the list.
• To Change Font Color: Select the text you want to apply formatting to and
click the Home tab on the Ribbon. Click the Font Color button list arrow in
the Font group and select a color from the list.
• To Open the Font Dialog Box: Click the Home tab on the Ribbon and click
the Dialog Box Launcher in the Font group.
• To Copy Formatting with the Format Painter: Select the text with the
formatting you want to copy. Click the Home tab on the Ribbon and click the
Format Painter button in the Clipboard group. Select the text to which you
want to apply the copied formatting with the pointer.
• To Create a Bulleted List: Select the paragraph(s) you want to bullet. Click
the Home tab on the Ribbon and click the Bullets button in the Paragraph
group.
• To Create a Numbered List: Select the paragraphs you want to number.
Click the Home tab and click the Numbering button in the Paragraph group.
• To Adjust Character Spacing: Click the paragraph to which you want to
apply the character spacing. Click the Home tab on the Ribbon, click the
Character Spacing button, and select a spacing option from the list.
• To Insert a Tab Stop: Click where you want to insert the tab stop on the ruler.
Or, click the Home tab on the Ribbon and click Dialog Box Launcher in the
Paragraph group. Click the Tabs tab and insert tabs in the dialog box.
• To Adjust or Remove a Tab Stop: Click and drag the tab stop to the
desired position on the ruler. Click and drag the tab stop off the ruler to
remove it.
• To Change Paragraph Alignment: Select the paragraph(s). Click the Home
tab on the Ribbon and click the appropriate alignment button (Align Left,
Center, Align Right, or Justify) in the Paragraph group.
• To Insert a Drop Cap: Click in the paragraph to which you want to apply a
drop cap. Click the Format tab under Text Box Tools on the Ribbon. Click the
Drop Cap button in the Typography group and select the drop cap style you
wish to apply.
• To Apply a Style: Click the paragraph to which you want to apply the style.
Click the Home tab on the Ribbon, click the Styles button, and select a style
from the list.
• To Create a Style: Click the Home tab on the Ribbon and click the Styles
button. Select New Style from the list, make your specifications for the new
style, and click OK.
• To Insert a Clip Art Graphic: Click the Insert tab on the Ribbon and click the
Clip Art button in the Illustrations group. Search for the clip art you’d like to
use and click to insert it.
• To Insert a Picture: Click the Insert tab on the Ribbon and click the Picture
button in the Illustrations group. Select the file location and name and click
Insert.
• To Adjust Text Wrapping: Double-click the object, click the Wrap Text
button in the Arrange group, and select a text wrapping option.
• To Draw an Object: Click the Insert tab on the Ribbon and click the Shapes
button in the Illustrations group. Select the shape you wish to use, click where
you want to draw the object, and drag until the object reaches the desired
size. Hold down the <Shift> key while you drag to draw a perfectly
proportioned shape or straight line.
• To Move an Object: Click the object and drag it to a new location. Release
the mouse button when you’re finished.
• To Resize an Object: Click the object to select it, click and drag one of its
sizing handles, and release the mouse button when the object reaches the
desired size. To maintain the object’s proportions, hold down the <Shift> key
while resizing it.
• To Insert a WordArt Object: Click the Insert tab on the Ribbon and click the
WordArt button in the Text group. Select a design from the list. Enter the text
you want WordArt to format and adjust the font type and size, if necessary.
Click OK.
• To Group Objects: Select the objects you want to group, click the Format tab
under Drawing Tools on the Ribbon, and click the Group Objects button.
• To Rotate an Object: Select the object and click and drag its rotation handle
( ). Release the mouse button when you’re finished rotating.
• To Insert a Building Block: Building Blocks are pre-made objects, such as
calendars, borders, pull quotes, sidebars, and headings, that can be added to
your publication to make it look more professional. Click the Insert tab on the
Ribbon, click a button in the Building Blocks group, and select the object you
would like to insert.
The Linking group
Previous
Text Box
Next Text
Box
Create
Text
Box
Link
Break Forward Link
Customizable Online Learning
 Courseware   Online Learning   Skills Assessments
Publisher Quick Reference © 2011 CustomGuide 
www.customguide.com | Phone 888.903.2432 
Microsoft®
SharePoint Foundation 2010
Cheat Sheets
SharePoint Team Site Quick Launch
Collaboration areas such as team sites,
workspaces and blog sites. Important subsites
may also appear in the Quick Launch.
Includes libraries that contain related files, such
as documents, wiki sites, and forms.
Store shared information here, such as events
on a calendar or project tasks.
Participate in group discussions using
discussion boards.
Deleted information is stored here.
View all sites, lists, and libraries in the site.
Create a new survey, or respond to a survey
and view its results.
Picture libraries are the best way to store shared
images. Include commands and options specific
to images.
People and groups with permission to view or
work with the site appear here.
Permission Levels
Full Control: All permissions are included. Users
with this permission level have complete control
over everything in the site. Site Owners are given
this permission level by default.
Design: Create many things, including lists and
document libraries. Also edit pages and change
the appearance of the site by applying themes or
style sheets.
Contribute: Add, edit, and delete items in
existing lists and document libraries. Site
Members are given this permission level by
default.
Read: Read-only access to the Web site. View
items and pages, open items and documents.
Site Visitors are given this permission level by
default.
Limited Access: This is a special permission
level that gives access to a specific list, item, or
document, without giving them access to the
entire site.
The Fundamentals
 There are four main tools for navigation in a
SharePoint site:
Link Bar: This includes the tabs that appear along
the top of the site. Subsites of the current site
usually appear as tabs on the link bar. To go to a
site, click its tab on the Link Bar.
Quick Launch Bar: Navigate to items on the
current site, such as shared documents, and
libraries, such as picture and slide libraries.
Breadcrumb Navigation: Breadcrumb navigation
displays links to where you have been, and where
the current page fits in the hierarchy of sites and
items in the site.
Navigate Up: Click this button to navigate back to
the Home page from any SharePoint subsite.
 To Navigate in a SharePoint Site: SharePoint
sites work just like any other site on the Internet:
click a hyperlink to view the page or item to which it
is connected.
 To View All Content in the Current Site: Click the
All Site Content link at bottom top of the Quick
Launch Bar.
 To Search: Click in the Search box at the top of the
page. Type your search word or term and press
Enter.
 To Change Views: You can change how items are
displayed in a library or list by changing views. Click
the Library, List, or Calendar tab on the Ribbon
and click the Current View list arrow in the Manage
Views group. Select the view you want to use.
 To Sign Out: Click the Welcome (User) menu at
the top of the screen and select Sign Out.
 To Sign In as a Different User: Click the Welcome
(User) menu at the top of the screen and select
Sign in as Different User. Enter the different user
information in the dialog box.
 To Change User Settings: Click the Welcome
(User) menu at the top of the screen and select My
Settings. Click the Edit Item link on the toolbar and
attach a file with updated user settings.
 To Get Help: Click the Help button in the top
right corner of the SharePoint site page.
 Understanding Permissions: Each user that has
access to a site is assigned a permissions level.
The permissions level limits the amount of control
the user has in the site. See the list on the right side
of the page for more information about the five
permission levels in SharePoint.
Link bar
Ribbon tabs
Search
box
Web
Part
Site
Actions
menu
Quick
Launch
Bar
This image displays the home page of the North Shore Travel team site as it appears
to a user with Full Control (a member of the Site Owner group). The Web page is
composed of Web Parts, which can be customized and changed as necessary by
users with the right permissions.
Welcome
user menuNavigate
Up
Edit
Free Cheat Sheets!
Visit: cheatsheets.customguide.com
© 2014 CustomGuide
Free Cheat
Learn by doing, not watching.
www.customguide.com
Microsoft Office 2010 Ribbon Cheat Sheet

More Related Content

What's hot

Microsoft word 2007 part 1
Microsoft word 2007 part 1Microsoft word 2007 part 1
Microsoft word 2007 part 1kenjaneredz
 
MICROSOFT WORD 2007 FULL PRESENTATION BY sarmad khosa
MICROSOFT WORD 2007 FULL PRESENTATION BY sarmad khosaMICROSOFT WORD 2007 FULL PRESENTATION BY sarmad khosa
MICROSOFT WORD 2007 FULL PRESENTATION BY sarmad khosaSarmad Baloch
 
Microsoft office word 2007
Microsoft office word 2007Microsoft office word 2007
Microsoft office word 2007Mukul Kumar
 
PC Literacy & E-learning Training workshop & presentation
PC Literacy & E-learning Training workshop & presentationPC Literacy & E-learning Training workshop & presentation
PC Literacy & E-learning Training workshop & presentationEdumax Solutions
 
Advanced Microsoft word seminar
Advanced Microsoft word seminarAdvanced Microsoft word seminar
Advanced Microsoft word seminarM'mama Sawaneh
 
An introduction to microsoft office 2007 lecture
An introduction to microsoft office 2007 lectureAn introduction to microsoft office 2007 lecture
An introduction to microsoft office 2007 lectureSukh Sandhu
 
Microsoft Word 2010
Microsoft Word 2010Microsoft Word 2010
Microsoft Word 2010Razif Rahman
 
Introduction to Microsoft Word 2007 (Tutrial and Tips)
Introduction to Microsoft Word 2007 (Tutrial and Tips)Introduction to Microsoft Word 2007 (Tutrial and Tips)
Introduction to Microsoft Word 2007 (Tutrial and Tips)Elyssa Marie Bulandan
 
MS Word Advanced Training
MS Word Advanced TrainingMS Word Advanced Training
MS Word Advanced Trainingguest99ab68
 
An introduction to microsoft_word
An introduction to microsoft_wordAn introduction to microsoft_word
An introduction to microsoft_worduzmabb12045
 

What's hot (20)

Microsoft word 2007 part 1
Microsoft word 2007 part 1Microsoft word 2007 part 1
Microsoft word 2007 part 1
 
MICROSOFT WORD 2007 FULL PRESENTATION BY sarmad khosa
MICROSOFT WORD 2007 FULL PRESENTATION BY sarmad khosaMICROSOFT WORD 2007 FULL PRESENTATION BY sarmad khosa
MICROSOFT WORD 2007 FULL PRESENTATION BY sarmad khosa
 
Introduction to microsoft word 2007
Introduction to microsoft word 2007Introduction to microsoft word 2007
Introduction to microsoft word 2007
 
Microsoft office word 2007
Microsoft office word 2007Microsoft office word 2007
Microsoft office word 2007
 
Ms powerpoint
Ms powerpointMs powerpoint
Ms powerpoint
 
7 features in word 2010 you need to know
7 features in word 2010 you need to know7 features in word 2010 you need to know
7 features in word 2010 you need to know
 
PC Literacy & E-learning Training workshop & presentation
PC Literacy & E-learning Training workshop & presentationPC Literacy & E-learning Training workshop & presentation
PC Literacy & E-learning Training workshop & presentation
 
Advanced Microsoft word seminar
Advanced Microsoft word seminarAdvanced Microsoft word seminar
Advanced Microsoft word seminar
 
Microsoft Word intermediate
Microsoft Word intermediateMicrosoft Word intermediate
Microsoft Word intermediate
 
An introduction to microsoft office 2007 lecture
An introduction to microsoft office 2007 lectureAn introduction to microsoft office 2007 lecture
An introduction to microsoft office 2007 lecture
 
Microsoft word basics
Microsoft word basicsMicrosoft word basics
Microsoft word basics
 
Chapter.10
Chapter.10Chapter.10
Chapter.10
 
MS Word Introduction and Tools.
MS Word Introduction and Tools.MS Word Introduction and Tools.
MS Word Introduction and Tools.
 
Microsoft Word 2010
Microsoft Word 2010Microsoft Word 2010
Microsoft Word 2010
 
Word 2007
Word 2007Word 2007
Word 2007
 
Introduction to Microsoft Word 2007 (Tutrial and Tips)
Introduction to Microsoft Word 2007 (Tutrial and Tips)Introduction to Microsoft Word 2007 (Tutrial and Tips)
Introduction to Microsoft Word 2007 (Tutrial and Tips)
 
MS Word Advanced Training
MS Word Advanced TrainingMS Word Advanced Training
MS Word Advanced Training
 
MS Word Basics Training
MS Word Basics TrainingMS Word Basics Training
MS Word Basics Training
 
An introduction to microsoft_word
An introduction to microsoft_wordAn introduction to microsoft_word
An introduction to microsoft_word
 
Chapter.09
Chapter.09Chapter.09
Chapter.09
 

Similar to Microsoft Office 2010 Ribbon Cheat Sheet

Ms Word 2010 Training In Ambala ! Batra Computer Centre
Ms Word 2010 Training In Ambala ! Batra Computer CentreMs Word 2010 Training In Ambala ! Batra Computer Centre
Ms Word 2010 Training In Ambala ! Batra Computer Centrejatin batra
 
In 2015 E. c Doyogena Higa Model Grade 9th Student 2nd Semester ICT Note.pdf
In 2015 E. c Doyogena Higa Model Grade 9th Student 2nd Semester ICT Note.pdfIn 2015 E. c Doyogena Higa Model Grade 9th Student 2nd Semester ICT Note.pdf
In 2015 E. c Doyogena Higa Model Grade 9th Student 2nd Semester ICT Note.pdfalazargirma2
 
Adobe Presentation for acrobat users.pptx
Adobe Presentation for acrobat users.pptxAdobe Presentation for acrobat users.pptx
Adobe Presentation for acrobat users.pptxDavidNtim
 
mspowerpoint-111212103552-phpapp01.pptx
mspowerpoint-111212103552-phpapp01.pptxmspowerpoint-111212103552-phpapp01.pptx
mspowerpoint-111212103552-phpapp01.pptxLadyChristianneBucsi
 
Microsoft word-getting-started-basics
Microsoft word-getting-started-basicsMicrosoft word-getting-started-basics
Microsoft word-getting-started-basicsPraveen Sudarsan
 

Similar to Microsoft Office 2010 Ribbon Cheat Sheet (20)

powerpoint10Basics.pdf
powerpoint10Basics.pdfpowerpoint10Basics.pdf
powerpoint10Basics.pdf
 
Getting
Getting Getting
Getting
 
Getting Started
Getting StartedGetting Started
Getting Started
 
Microsoft office word (part iii)
Microsoft office word (part iii)Microsoft office word (part iii)
Microsoft office word (part iii)
 
Microsoft word
Microsoft wordMicrosoft word
Microsoft word
 
Ms Word 2010 Training In Ambala ! Batra Computer Centre
Ms Word 2010 Training In Ambala ! Batra Computer CentreMs Word 2010 Training In Ambala ! Batra Computer Centre
Ms Word 2010 Training In Ambala ! Batra Computer Centre
 
Getting Started
Getting StartedGetting Started
Getting Started
 
Getting Started
Getting StartedGetting Started
Getting Started
 
Getting Started
Getting StartedGetting Started
Getting Started
 
Getting Started
Getting StartedGetting Started
Getting Started
 
Getting Started
Getting StartedGetting Started
Getting Started
 
In 2015 E. c Doyogena Higa Model Grade 9th Student 2nd Semester ICT Note.pdf
In 2015 E. c Doyogena Higa Model Grade 9th Student 2nd Semester ICT Note.pdfIn 2015 E. c Doyogena Higa Model Grade 9th Student 2nd Semester ICT Note.pdf
In 2015 E. c Doyogena Higa Model Grade 9th Student 2nd Semester ICT Note.pdf
 
Materials
MaterialsMaterials
Materials
 
Adobe Presentation for acrobat users.pptx
Adobe Presentation for acrobat users.pptxAdobe Presentation for acrobat users.pptx
Adobe Presentation for acrobat users.pptx
 
Unit4
Unit4Unit4
Unit4
 
Getting Started
Getting StartedGetting Started
Getting Started
 
Getting Started
Getting StartedGetting Started
Getting Started
 
Getting Started
Getting StartedGetting Started
Getting Started
 
mspowerpoint-111212103552-phpapp01.pptx
mspowerpoint-111212103552-phpapp01.pptxmspowerpoint-111212103552-phpapp01.pptx
mspowerpoint-111212103552-phpapp01.pptx
 
Microsoft word-getting-started-basics
Microsoft word-getting-started-basicsMicrosoft word-getting-started-basics
Microsoft word-getting-started-basics
 

More from Hastho Oke Sekali Jaya

Tugas pak hardi teori adm, oleh rosiana
Tugas pak hardi teori adm, oleh rosianaTugas pak hardi teori adm, oleh rosiana
Tugas pak hardi teori adm, oleh rosianaHastho Oke Sekali Jaya
 
4. review jurnal green attitude dwi hastho
4. review jurnal green attitude dwi hastho4. review jurnal green attitude dwi hastho
4. review jurnal green attitude dwi hasthoHastho Oke Sekali Jaya
 
3. review jurnal environmental dwi hastho
3. review jurnal environmental dwi hastho3. review jurnal environmental dwi hastho
3. review jurnal environmental dwi hasthoHastho Oke Sekali Jaya
 
6. review hotel environmental policies dwi hastho
6. review hotel environmental policies dwi hastho6. review hotel environmental policies dwi hastho
6. review hotel environmental policies dwi hasthoHastho Oke Sekali Jaya
 
Review jurnal Relationship Bonding Tactics, Personality Traits, Relationship ...
Review jurnal Relationship Bonding Tactics, Personality Traits, Relationship ...Review jurnal Relationship Bonding Tactics, Personality Traits, Relationship ...
Review jurnal Relationship Bonding Tactics, Personality Traits, Relationship ...Hastho Oke Sekali Jaya
 
Merancang program pemasaran untuk membangun ekuitas merek
Merancang program pemasaran untuk membangun ekuitas merekMerancang program pemasaran untuk membangun ekuitas merek
Merancang program pemasaran untuk membangun ekuitas merekHastho Oke Sekali Jaya
 
Bab 9 mengukur sumber ekuitas merek arinta
Bab 9 mengukur sumber ekuitas merek arintaBab 9 mengukur sumber ekuitas merek arinta
Bab 9 mengukur sumber ekuitas merek arintaHastho Oke Sekali Jaya
 

More from Hastho Oke Sekali Jaya (20)

Agility bab vi
Agility bab viAgility bab vi
Agility bab vi
 
Inovasi hastho
Inovasi hasthoInovasi hastho
Inovasi hastho
 
Analisa lingkungan titok widodo
Analisa lingkungan titok widodoAnalisa lingkungan titok widodo
Analisa lingkungan titok widodo
 
Tugas pak hardi teori adm, oleh rosiana
Tugas pak hardi teori adm, oleh rosianaTugas pak hardi teori adm, oleh rosiana
Tugas pak hardi teori adm, oleh rosiana
 
Analisa lingkungan dwi hastho
Analisa lingkungan dwi hasthoAnalisa lingkungan dwi hastho
Analisa lingkungan dwi hastho
 
Kesimpulan buku gilpin
Kesimpulan buku gilpinKesimpulan buku gilpin
Kesimpulan buku gilpin
 
4. review jurnal green attitude dwi hastho
4. review jurnal green attitude dwi hastho4. review jurnal green attitude dwi hastho
4. review jurnal green attitude dwi hastho
 
3. review jurnal environmental dwi hastho
3. review jurnal environmental dwi hastho3. review jurnal environmental dwi hastho
3. review jurnal environmental dwi hastho
 
2. review jurnal barrier dwi hastho
2. review jurnal barrier dwi hastho2. review jurnal barrier dwi hastho
2. review jurnal barrier dwi hastho
 
6. review hotel environmental policies dwi hastho
6. review hotel environmental policies dwi hastho6. review hotel environmental policies dwi hastho
6. review hotel environmental policies dwi hastho
 
1. review jurnal effect dwi hastho
1. review jurnal effect dwi hastho1. review jurnal effect dwi hastho
1. review jurnal effect dwi hastho
 
Ppt review tugas oleh rosiana r
Ppt review tugas oleh rosiana rPpt review tugas oleh rosiana r
Ppt review tugas oleh rosiana r
 
Jurnal sistem penilaian kinerja
Jurnal sistem penilaian kinerjaJurnal sistem penilaian kinerja
Jurnal sistem penilaian kinerja
 
Review jurnal Relationship Bonding Tactics, Personality Traits, Relationship ...
Review jurnal Relationship Bonding Tactics, Personality Traits, Relationship ...Review jurnal Relationship Bonding Tactics, Personality Traits, Relationship ...
Review jurnal Relationship Bonding Tactics, Personality Traits, Relationship ...
 
Agility, membuat keledai mengaum !!!
Agility, membuat keledai mengaum !!!Agility, membuat keledai mengaum !!!
Agility, membuat keledai mengaum !!!
 
Analisis swot oke
Analisis swot okeAnalisis swot oke
Analisis swot oke
 
Pembuatan ekuitas pengukuran
Pembuatan ekuitas pengukuranPembuatan ekuitas pengukuran
Pembuatan ekuitas pengukuran
 
Merancang program pemasaran untuk membangun ekuitas merek
Merancang program pemasaran untuk membangun ekuitas merekMerancang program pemasaran untuk membangun ekuitas merek
Merancang program pemasaran untuk membangun ekuitas merek
 
Bab 9 mengukur sumber ekuitas merek arinta
Bab 9 mengukur sumber ekuitas merek arintaBab 9 mengukur sumber ekuitas merek arinta
Bab 9 mengukur sumber ekuitas merek arinta
 
Presentasi merek hastho n titok
Presentasi merek hastho n titokPresentasi merek hastho n titok
Presentasi merek hastho n titok
 

Recently uploaded

Call Girls In Sikandarpur Gurgaon ❤️8860477959_Russian 100% Genuine Escorts I...
Call Girls In Sikandarpur Gurgaon ❤️8860477959_Russian 100% Genuine Escorts I...Call Girls In Sikandarpur Gurgaon ❤️8860477959_Russian 100% Genuine Escorts I...
Call Girls In Sikandarpur Gurgaon ❤️8860477959_Russian 100% Genuine Escorts I...lizamodels9
 
Call Girls Pune Just Call 9907093804 Top Class Call Girl Service Available
Call Girls Pune Just Call 9907093804 Top Class Call Girl Service AvailableCall Girls Pune Just Call 9907093804 Top Class Call Girl Service Available
Call Girls Pune Just Call 9907093804 Top Class Call Girl Service AvailableDipal Arora
 
Intro to BCG's Carbon Emissions Benchmark_vF.pdf
Intro to BCG's Carbon Emissions Benchmark_vF.pdfIntro to BCG's Carbon Emissions Benchmark_vF.pdf
Intro to BCG's Carbon Emissions Benchmark_vF.pdfpollardmorgan
 
Keppel Ltd. 1Q 2024 Business Update Presentation Slides
Keppel Ltd. 1Q 2024 Business Update  Presentation SlidesKeppel Ltd. 1Q 2024 Business Update  Presentation Slides
Keppel Ltd. 1Q 2024 Business Update Presentation SlidesKeppelCorporation
 
Call Girls in Mehrauli Delhi 💯Call Us 🔝8264348440🔝
Call Girls in Mehrauli Delhi 💯Call Us 🔝8264348440🔝Call Girls in Mehrauli Delhi 💯Call Us 🔝8264348440🔝
Call Girls in Mehrauli Delhi 💯Call Us 🔝8264348440🔝soniya singh
 
Monte Carlo simulation : Simulation using MCSM
Monte Carlo simulation : Simulation using MCSMMonte Carlo simulation : Simulation using MCSM
Monte Carlo simulation : Simulation using MCSMRavindra Nath Shukla
 
0183760ssssssssssssssssssssssssssss00101011 (27).pdf
0183760ssssssssssssssssssssssssssss00101011 (27).pdf0183760ssssssssssssssssssssssssssss00101011 (27).pdf
0183760ssssssssssssssssssssssssssss00101011 (27).pdfRenandantas16
 
VIP Call Girl Jamshedpur Aashi 8250192130 Independent Escort Service Jamshedpur
VIP Call Girl Jamshedpur Aashi 8250192130 Independent Escort Service JamshedpurVIP Call Girl Jamshedpur Aashi 8250192130 Independent Escort Service Jamshedpur
VIP Call Girl Jamshedpur Aashi 8250192130 Independent Escort Service JamshedpurSuhani Kapoor
 
Lowrate Call Girls In Sector 18 Noida ❤️8860477959 Escorts 100% Genuine Servi...
Lowrate Call Girls In Sector 18 Noida ❤️8860477959 Escorts 100% Genuine Servi...Lowrate Call Girls In Sector 18 Noida ❤️8860477959 Escorts 100% Genuine Servi...
Lowrate Call Girls In Sector 18 Noida ❤️8860477959 Escorts 100% Genuine Servi...lizamodels9
 
Vip Female Escorts Noida 9711199171 Greater Noida Escorts Service
Vip Female Escorts Noida 9711199171 Greater Noida Escorts ServiceVip Female Escorts Noida 9711199171 Greater Noida Escorts Service
Vip Female Escorts Noida 9711199171 Greater Noida Escorts Serviceankitnayak356677
 
Call Girls in Gomti Nagar - 7388211116 - With room Service
Call Girls in Gomti Nagar - 7388211116  - With room ServiceCall Girls in Gomti Nagar - 7388211116  - With room Service
Call Girls in Gomti Nagar - 7388211116 - With room Servicediscovermytutordmt
 
VIP Kolkata Call Girl Howrah 👉 8250192130 Available With Room
VIP Kolkata Call Girl Howrah 👉 8250192130  Available With RoomVIP Kolkata Call Girl Howrah 👉 8250192130  Available With Room
VIP Kolkata Call Girl Howrah 👉 8250192130 Available With Roomdivyansh0kumar0
 
Non Text Magic Studio Magic Design for Presentations L&P.pptx
Non Text Magic Studio Magic Design for Presentations L&P.pptxNon Text Magic Studio Magic Design for Presentations L&P.pptx
Non Text Magic Studio Magic Design for Presentations L&P.pptxAbhayThakur200703
 
VIP Call Girls Pune Kirti 8617697112 Independent Escort Service Pune
VIP Call Girls Pune Kirti 8617697112 Independent Escort Service PuneVIP Call Girls Pune Kirti 8617697112 Independent Escort Service Pune
VIP Call Girls Pune Kirti 8617697112 Independent Escort Service PuneCall girls in Ahmedabad High profile
 
Call Girls In Connaught Place Delhi ❤️88604**77959_Russian 100% Genuine Escor...
Call Girls In Connaught Place Delhi ❤️88604**77959_Russian 100% Genuine Escor...Call Girls In Connaught Place Delhi ❤️88604**77959_Russian 100% Genuine Escor...
Call Girls In Connaught Place Delhi ❤️88604**77959_Russian 100% Genuine Escor...lizamodels9
 
RE Capital's Visionary Leadership under Newman Leech
RE Capital's Visionary Leadership under Newman LeechRE Capital's Visionary Leadership under Newman Leech
RE Capital's Visionary Leadership under Newman LeechNewman George Leech
 
Call Girls In Panjim North Goa 9971646499 Genuine Service
Call Girls In Panjim North Goa 9971646499 Genuine ServiceCall Girls In Panjim North Goa 9971646499 Genuine Service
Call Girls In Panjim North Goa 9971646499 Genuine Serviceritikaroy0888
 
Progress Report - Oracle Database Analyst Summit
Progress  Report - Oracle Database Analyst SummitProgress  Report - Oracle Database Analyst Summit
Progress Report - Oracle Database Analyst SummitHolger Mueller
 
A DAY IN THE LIFE OF A SALESMAN / WOMAN
A DAY IN THE LIFE OF A  SALESMAN / WOMANA DAY IN THE LIFE OF A  SALESMAN / WOMAN
A DAY IN THE LIFE OF A SALESMAN / WOMANIlamathiKannappan
 

Recently uploaded (20)

Call Girls In Sikandarpur Gurgaon ❤️8860477959_Russian 100% Genuine Escorts I...
Call Girls In Sikandarpur Gurgaon ❤️8860477959_Russian 100% Genuine Escorts I...Call Girls In Sikandarpur Gurgaon ❤️8860477959_Russian 100% Genuine Escorts I...
Call Girls In Sikandarpur Gurgaon ❤️8860477959_Russian 100% Genuine Escorts I...
 
Call Girls Pune Just Call 9907093804 Top Class Call Girl Service Available
Call Girls Pune Just Call 9907093804 Top Class Call Girl Service AvailableCall Girls Pune Just Call 9907093804 Top Class Call Girl Service Available
Call Girls Pune Just Call 9907093804 Top Class Call Girl Service Available
 
Intro to BCG's Carbon Emissions Benchmark_vF.pdf
Intro to BCG's Carbon Emissions Benchmark_vF.pdfIntro to BCG's Carbon Emissions Benchmark_vF.pdf
Intro to BCG's Carbon Emissions Benchmark_vF.pdf
 
Keppel Ltd. 1Q 2024 Business Update Presentation Slides
Keppel Ltd. 1Q 2024 Business Update  Presentation SlidesKeppel Ltd. 1Q 2024 Business Update  Presentation Slides
Keppel Ltd. 1Q 2024 Business Update Presentation Slides
 
Call Girls in Mehrauli Delhi 💯Call Us 🔝8264348440🔝
Call Girls in Mehrauli Delhi 💯Call Us 🔝8264348440🔝Call Girls in Mehrauli Delhi 💯Call Us 🔝8264348440🔝
Call Girls in Mehrauli Delhi 💯Call Us 🔝8264348440🔝
 
Monte Carlo simulation : Simulation using MCSM
Monte Carlo simulation : Simulation using MCSMMonte Carlo simulation : Simulation using MCSM
Monte Carlo simulation : Simulation using MCSM
 
0183760ssssssssssssssssssssssssssss00101011 (27).pdf
0183760ssssssssssssssssssssssssssss00101011 (27).pdf0183760ssssssssssssssssssssssssssss00101011 (27).pdf
0183760ssssssssssssssssssssssssssss00101011 (27).pdf
 
VIP Call Girl Jamshedpur Aashi 8250192130 Independent Escort Service Jamshedpur
VIP Call Girl Jamshedpur Aashi 8250192130 Independent Escort Service JamshedpurVIP Call Girl Jamshedpur Aashi 8250192130 Independent Escort Service Jamshedpur
VIP Call Girl Jamshedpur Aashi 8250192130 Independent Escort Service Jamshedpur
 
Lowrate Call Girls In Sector 18 Noida ❤️8860477959 Escorts 100% Genuine Servi...
Lowrate Call Girls In Sector 18 Noida ❤️8860477959 Escorts 100% Genuine Servi...Lowrate Call Girls In Sector 18 Noida ❤️8860477959 Escorts 100% Genuine Servi...
Lowrate Call Girls In Sector 18 Noida ❤️8860477959 Escorts 100% Genuine Servi...
 
KestrelPro Flyer Japan IT Week 2024 (English)
KestrelPro Flyer Japan IT Week 2024 (English)KestrelPro Flyer Japan IT Week 2024 (English)
KestrelPro Flyer Japan IT Week 2024 (English)
 
Vip Female Escorts Noida 9711199171 Greater Noida Escorts Service
Vip Female Escorts Noida 9711199171 Greater Noida Escorts ServiceVip Female Escorts Noida 9711199171 Greater Noida Escorts Service
Vip Female Escorts Noida 9711199171 Greater Noida Escorts Service
 
Call Girls in Gomti Nagar - 7388211116 - With room Service
Call Girls in Gomti Nagar - 7388211116  - With room ServiceCall Girls in Gomti Nagar - 7388211116  - With room Service
Call Girls in Gomti Nagar - 7388211116 - With room Service
 
VIP Kolkata Call Girl Howrah 👉 8250192130 Available With Room
VIP Kolkata Call Girl Howrah 👉 8250192130  Available With RoomVIP Kolkata Call Girl Howrah 👉 8250192130  Available With Room
VIP Kolkata Call Girl Howrah 👉 8250192130 Available With Room
 
Non Text Magic Studio Magic Design for Presentations L&P.pptx
Non Text Magic Studio Magic Design for Presentations L&P.pptxNon Text Magic Studio Magic Design for Presentations L&P.pptx
Non Text Magic Studio Magic Design for Presentations L&P.pptx
 
VIP Call Girls Pune Kirti 8617697112 Independent Escort Service Pune
VIP Call Girls Pune Kirti 8617697112 Independent Escort Service PuneVIP Call Girls Pune Kirti 8617697112 Independent Escort Service Pune
VIP Call Girls Pune Kirti 8617697112 Independent Escort Service Pune
 
Call Girls In Connaught Place Delhi ❤️88604**77959_Russian 100% Genuine Escor...
Call Girls In Connaught Place Delhi ❤️88604**77959_Russian 100% Genuine Escor...Call Girls In Connaught Place Delhi ❤️88604**77959_Russian 100% Genuine Escor...
Call Girls In Connaught Place Delhi ❤️88604**77959_Russian 100% Genuine Escor...
 
RE Capital's Visionary Leadership under Newman Leech
RE Capital's Visionary Leadership under Newman LeechRE Capital's Visionary Leadership under Newman Leech
RE Capital's Visionary Leadership under Newman Leech
 
Call Girls In Panjim North Goa 9971646499 Genuine Service
Call Girls In Panjim North Goa 9971646499 Genuine ServiceCall Girls In Panjim North Goa 9971646499 Genuine Service
Call Girls In Panjim North Goa 9971646499 Genuine Service
 
Progress Report - Oracle Database Analyst Summit
Progress  Report - Oracle Database Analyst SummitProgress  Report - Oracle Database Analyst Summit
Progress Report - Oracle Database Analyst Summit
 
A DAY IN THE LIFE OF A SALESMAN / WOMAN
A DAY IN THE LIFE OF A  SALESMAN / WOMANA DAY IN THE LIFE OF A  SALESMAN / WOMAN
A DAY IN THE LIFE OF A SALESMAN / WOMAN
 

Microsoft Office 2010 Ribbon Cheat Sheet

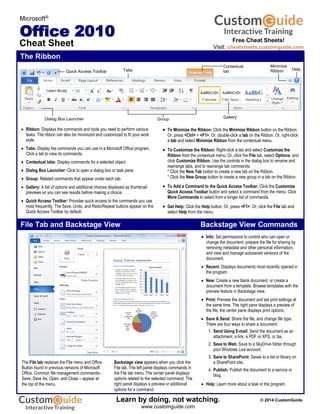
  • 1. The Ribbon Microsoft® Office 2010 Cheat Sheet The File tab replaces the File menu and Office Button found in previous versions of Microsoft Office. Common file management commands– Save, Save As, Open, and Close – appear at the top of the menu.  Ribbon: Displays the commands and tools you need to perform various tasks. The ribbon can also be minimized and customized to fit your work style.  Tabs: Display the commands you can use in a Microsoft Office program. Click a tab to view its commands.  Contextual tabs: Display commands for a selected object.  Dialog Box Launcher: Click to open a dialog box or task pane.  Group: Related commands that appear under each tab.  Gallery: A list of options and additional choices displayed as thumbnail previews so you can see results before making a choice.  Quick Access Toolbar: Provides quick access to the commands you use most frequently. The Save, Undo, and Redo/Repeat buttons appear on the Quick Access Toolbar by default.   To Minimize the Ribbon: Click the Minimize Ribbon button on the Ribbon. Or, press <Ctrl> + <F1>. Or, double-click a tab on the Ribbon. Or, right-click a tab and select Minimize Ribbon from the contextual menu.  To Customize the Ribbon: Right-click a tab and select Customize the Ribbon from the contextual menu. Or, click the File tab, select Options, and click Customize Ribbon. Use the controls in the dialog box to rename and rearrange tabs, and to rearrange tab commands. * Click the New Tab button to create a new tab on the Ribbon. * Click the New Group button to create a new group in a tab on the Ribbon.  To Add a Command to the Quick Access Toolbar: Click the Customize Quick Access Toolbar button and select a command from the menu. Click More Commands to select from a longer list of commands.  Get Help: Click the Help button. Or, press <F1>. Or, click the File tab and select Help from the menu.  Info: Set permissions to control who can open or change the document; prepare the file for sharing by removing metadata and other personal information; and view and manage autosaved versions of the document.  Recent: Displays documents most recently opened in the program.  New: Create a new blank document, or create a document from a template. Browse templates with the preview feature in Backstage view.  Print: Preview the document and set print settings at the same time. The right pane displays a preview of the file; the center pane displays print options.  Save & Send: Share the file, and change file type. There are four ways to share a document: 1. Send Using E-mail: Send the document as an attachment, a link, a PDF or XPS, or fax. 2. Save to Web: Save to a SkyDrive folder through your Windows Live account. 3. Save to SharePoint: Saves to a list or library on a SharePoint site. 4. Publish: Publish the document to a service or blog.  Help: Learn more about a task or the program. Backstage view appears when you click the File tab. The left panel displays commands in the File tab menu.The center panel displays options related to the selected command. The right panel displays a preview or additional options for a command. File Tab and Backstage View Backstage View Commands Dialog Box Launcher HelpTabs Group Gallery Minimize Ribbon Contextual tabQuick Access Toolbar Free Cheat Sheets! Visit: cheatsheets.customguide.com © 2014 CustomGuide Free Cheat Learn by doing, not watching. www.customguide.com
  • 2. Insert Screenshots A Screenshot is an image of any visible item displayed on your monitor, such as a program window.  To Insert a Screenshot: Click the Insert tab on the Ribbon and click the Screenshot button in the Illustrations group (Word/Excel/Outlook) or the Images group (PowerPoint), then click an available window.  To Insert a Screen Clipping: Click the Insert tab on the Ribbon and click the Screenshot button in the Illustrations group (Word/Excel/Outlook) or the Images group (PowerPoint), then click Screen Clipping. Click and drag your mouse across the area of the program window that you want to clip. Picture Tools Microsoft Office 2010 suite offers enhanced tools for editing and adjusting pictures.  To Remove Backgrounds: Click the Format tab on the Ribbon and click the Remove Background button in the Adjust group. Refine the image and click Keep Changes.  To Correct Brightness and Contrast or to Sharpen or Soften a Picture: Click the Format tab on the Ribbon, click the Corrections button in the Adjust group, and select an option from the gallery.  To Change the Color of a Picture: Click the Format tab on the Ribbon, click the Color button in the Adjust group, and select an option from the gallery.  To Apply an Artistic Effect: Click the Format tab on the Ribbon, click the Artistic Effects button in the Adjust group, and select an option from the gallery. SmartArt SmartArt has a few improvements in Office 2010, offering a new picture category for SmartArt graphics.  To Insert Picture SmartArt: Click the SmartArt button on the Insert tab of the Ribbon and click Picture in the Choose a SmartArt graphic dialog box. Select the picture SmartArt graphic you wish to use and click OK.  To Add a Picture to a SmartArt Graphic: Click the picture icon in the SmartArt graphic, find and select a picture, and click OK. Paste with Live Preview WordArt WordArt has received a huge facelift in Office 2010. New WordArt styles and functionality make it easy to add and format WordArt. It is also treated as text instead of a picture, so the text is searchable in the document.  To Add WordArt: Click the Insert tab on the Ribbon and click the WordArt button in the Text group. Click the WordArt style from the gallery and enter the text in the text box.  To Move WordArt: Click the WordArt object, drag it to the desired location, and release the mouse button.  To Format WordArt: Click the WordArt object, then click the Format tab on the Ribbon under drawing tools. Select a formatting option in the WordArt Styles group, or click a new Word Art style from the gallery. File Management Tools The Microsoft Office 2010 suite offers new and improved tools to help you manage, protect, and share your content. Autosaved Versions: This feature improves on the AutoRecover feature from earlier versions of Office. The AutoRecover feature automatically saves versions of your files at regular intervals to protect them if a program fails. Now, you can access those versions whenever you want. This makes it easy to revert to an earlier version of the file, or to recover changes when you forget to save manually.  To Recover Autosaved Versions: Click the File tab on the Ribbon and select Info. Select an autosaved version from the Versions list. Or, click the Manage Versions button and select Recover Draft Versions. Protected view: The purpose of Protected View is to protect you from cyber- attacks. When a file appears to be from a risky location, such as the Internet, it is opened in Protected View, which is a read-only mode. If you trust the file, you can then enable editing and work with the file as usual. Trusted documents: Trusted documents now remembers the trust decisions you make in a document so you don’t have to be asked if a document with active content (e.g. Macros, ActiveX controls, etc.) is safe every time you open it. Accessibility Checker: Helps you identify and resolve problems in your files that might keep someone with a disability from accessing your content.  To Use the Accessibility Checker: Click the File tab on the Ribbon and select Info. Click the Check for Issues button and select Check Accessibility. Live Preview now lets you preview and choose from different formatting options that you can apply to the content when it is pasted.  Paste with Live Preview lets you preview how something will look before it is pasted.  To Paste with Live Preview: Cut or copy content. Click the Paste button list arrow and point to a paste option. Or, press <Ctrl> + <V> and click the Paste Options button. Point at a paste option to preview it. A picture… can be re-colored in sepia… or have an artistic effect applied. © 2014 CustomGuide Free Cheat Learn by doing, not watching. www.customguide.com
  • 3. Try Interactive Training Learn by doing, not watching. Visit training.customguide.com Interactive Training Free Training Course! Short Interactive Fun www.customguide.com
  • 4. Microsoft ® Word 2010 Quick Reference Card The Word 2010 Screen Keyboard Shortcuts General Open a Document <Ctrl> + <O> Create New <Ctrl> + <N> Save a Document <Ctrl> + <S> Print a Document <Ctrl> + <P> Close a Document <Ctrl> + <W> Help <F1> Navigation: Up One Screen <Page Up> Down One Screen <Page Down> Beginning of Line <Home> End of Line <End> Beginning of <Ctrl> + <Home> Document End of Document <Ctrl> + <End> Open the Go To <F5> dialog box Editing Cut <Ctrl> + <X> Copy <Ctrl> + <C> Paste <Ctrl> + <V> Undo <Ctrl> + <Z> Redo or Repeat <Ctrl> + <Y> Formatting Bold <Ctrl> + <B> Italics <Ctrl> + <I> Underline <Ctrl> + <U> Align Left <Ctrl> + <L> Center <Ctrl> + <E> Align Right <Ctrl> + <R> Justify <Ctrl> + <J> Text Selection To Select: Do This: A Word Double-click the word A Sentence Press and hold <Ctrl> and click anywhere in the sentence A Line Click in the selection bar next to the line A Paragraph Triple-click the paragraph Everything <Ctrl> + <A> The Fundamentals The File tab menu and Backstage view contain commands for working with a program’s files, such as Open, Save, Close, New, and Print. • To Move Text with the Mouse: Select the text you want to move, drag the text to a new location, and release the mouse button. • To Replace Text: Click the Replace button in the Editing group on the Home tab. Or, press <Ctrl> + <H>. • To Close a Document: Click the Close button, or press <Ctrl> + <W>. • To Correct a Spelling Error: Right-click the error and select a correction from the contextual menu. Or, press <F7> to run the Spell Checker. • To Use the Thesaurus: Right-click the word you want to look up and select Synonyms from the contextual menu. Select a word or select Thesaurus to search the Thesaurus. • To Minimize the Ribbon: Click the Minimize Ribbon button on the Ribbon. Or, press <Ctrl> + <F1>. Or, double-click a tab. Or, right-click a tab and select Minimize the Ribbon from the contextual menu. • To Change Program Settings: Click the File tab and click the Options button. • To Get Help: Press <F1> to open the Help window. Type your question and press <Enter>. • To Create a New Document: Click the File tab, click the New tab, and click the Create button. Or, press <Ctrl> + <N>. • To Open a Document: Click the File tab and click the Open button, or press <Ctrl> + <O>. • To Save a Document: Click the Save button on the Quick Access Toolbar, or press <Ctrl> + <S>. • To Save a Document with a Different Name: Click the File tab, click the Save As button, and enter a new name for the document. To Preview a Document: Click the File tab and click the Print tab, or press <Ctrl> + <P>. To Print a Document: Click the File tab and click the Print tab, or press <Ctrl> + <P>. To View Advanced Printing Options: Click the File tab and click the Print tab. Select from the options under Settings. • To Undo: Click the Undo button on the Quick Access Toolbar, or press <Ctrl> + <Z>. File tab Quick Access Toolbar Title bar Ruler Zoom slider Ribbon View buttons Close button Insertion point Status bar Document window Vertical scroll bar Horizontal scroll bar Minimize Ribbon Customizable Training Materials Tel. (888) 903-2432 | www.customguide.com Customizable Computer Training  Courseware   Online Learning   Skills Assessments Word Quick Reference © 2011 CustomGuide  www.customguide.com | Phone 888.903.2432
  • 5. Navigation Editing To Open the Navigation Pane: Click the Find button in the Editing group on the Home tab. Or, press <Ctrl> + <F>. To Search for a Word or Phrase: Click the Search box, type the word or phrase, and press <Enter>. To Search for Graphics, Tables, Equations, or Comments: Click the Magnifying Glass and select an option from the list. Click the Search box, enter the information you are searching for, and press <Enter>. To View Search Results: Click the Browse the results from your current search tab of the Navigation Pane. To View a Document’s Headings: Click the Browse the headings in your document tab. To View a Document’s Pages: Click the Browse the pages in your document tab. Styles • To Apply a Style: Select the text to which you want to apply the style and select the style you want to use from the Styles Gallery in the Styles group on the Home tab. • To Apply a Document Theme: Click the Themes button in the Themes group on the Page Layout tab of the Ribbon and select a theme. • To View All Available Styles: Click the Dialog Box Launcher in the Styles group on the Home tab. • To Change a Style Set: Click the Change Styles button in the Styles group on the Home tab and select Style Set from the menu. Select the Style Set you wish to use. • To Create a Style: Select the text that contains the formatting of the new style, right-click the text, and select Styles from the contextual menu. Select Save Selection as a New Quick Style from the contextual menu, enter a name for the style, and click OK. • To Check Your Styles: Select the text you wish to check. Click the Dialog Box Launcher in the Styles group on the Home tab of the Ribbon. Click the Style Inspector button in the Styles task pane. Formatting • To Format Text: Use the commands in the Font group on the Home tab, or click the Dialog Box Launcher in the Font group to open the Font dialog box. • To Copy Formatting with the Format Painter: Select the text with the formatting you want to copy and click the Format Painter button in the Clipboard group on the Home tab. Then, select the text you want to apply the copied formatting to. • To Indent a Paragraph: Click the Increase Indent button in the Paragraph group on the Home tab. • To Decrease an Indent: Click the Decrease Indent button in the Paragraph group on the Home tab. • To Create a Bulleted or Numbered List: Select the paragraphs you want to bullet or number and click the Bullets or Numbering button in the Paragraph group on the Home tab. • To Change Page Orientation: Click the Page Layout tab on the Ribbon, click the Orientation button in the Page Setup group, and select an option from the list. • To Insert a Header or Footer: Click the Insert tab on the Ribbon and click the Header or Footer button in the Header & Footer group. • To Insert a Manual Page Break: Click the Insert tab on the Ribbon and click the Page Break button in the Pages group. • To Cut or Copy Text: Select the text you want to cut or copy and click the Cut or Copy button in the Clipboard group on the Home tab. • To Paste Text: Place the insertion point where you want to paste and click the Paste button in the Clipboard group on the Home tab. To Preview an Item Before Pasting: Place the insertion point where you want to paste, click the Paste button list arrow in the Clipboard group on the Home tab, and select a preview option to view the item. • To Insert a Comment: Select the text where you want to insert a comment and click the Review tab on the Ribbon. Click the New Comment button in the Comments group. Type a comment, then click outside the comment text box. • To Delete a Comment: Select the comment, click the Review tab on the Ribbon, and click the Delete Comment button in the Comments group. Drawing and Graphics • To Insert a Clip Art Graphic: Click the Insert tab on the Ribbon and click the Clip Art button in the Illustrations group. Type the name of what you’re looking for in the “Search for” box and press <Enter>. • To Insert a Picture: Click the Insert tab on the Ribbon and click the Picture button in the Illustrations group. Find and select the picture you want to insert and click Insert. To Insert a Screenshot: Click the Insert tab on the Ribbon and click the Screenshot button in the Illustrations group. Select an available window from the list, or select the Screen Clipping option to take a screen clip. • To Draw a Shape: Click the Insert tab on the Ribbon, click the Shapes button in the Shapes group, and select the shape you want to insert. Then, click where you want to draw the shape and drag until the shape reaches the desired size. Hold down the <Shift> key while you drag to draw a perfectly proportioned shape or straight line. To Insert WordArt: Click the Insert tab on the Ribbon, click the WordArt button in the Text group, and select a design from the WordArt Gallery. Click the text box and enter your text. If necessary, click the text box and drag it to the desired position. • To Insert SmartArt: Click the Insert tab on the Ribbon, click the SmartArt button in the Illustrations group, select a layout, and click OK. • To Adjust Text Wrapping: Double-click the object, click the Wrap Text button in the Arrange group on the Format tab, and select an option from the list. • To Resize an Object: Click the object to select it, click and drag one of its sizing handles ( ), and release the mouse button when the object reaches the desired size. Hold down the <Shift> key while dragging to maintain the object’s proportions while resizing it. • To Format an Object: Double-click the object and use the commands located on the Format tab. • To Delete an Object: Select the object and press the <Delete> key Tables • To Insert a Table: Click the Insert tab on the Ribbon, click the Table button in the Tables group, and select Insert Table from the menu. • To Insert a Column or Row: Click the Layout tab under Table Tools on the Ribbon and use the commands located in the Rows & Columns group. • To Delete a Column or Row: Select the column or row you want to delete, click the Layout tab under Table Tools on the Ribbon, click the Delete button in the Rows & Columns group, and select an appropriate option from the menu. • To Adjust Column Width or Row Height: Select the column or row you want to adjust, click the Layout tab under Table Tools on the Ribbon, and use the commands located in the Cell Size group. Customizable Computer Training  Courseware   Online Learning   Skills Assessments Word Quick Reference © 2011 CustomGuide  www.customguide.com | Phone 888.903.2432 
  • 6. Microsoft® Excel 2010 Cheat Sheet The Excel 2010 Screen Keyboard Shortcuts General Open a Workbook Ctrl + O Create New Ctrl + N Save Ctrl + S Preview and Print Ctrl + P Close a Workbook Ctrl + W Help F1 Run Spelling Check F7 Calculate worksheets F9 Create an absolute, F4 normal, or mixed reference Navigation: Move Between Cells , , ,  Right One Cell Tab Left One Cell Shift + Tab Down One Cell Enter Up One Cell Shift+Enter Down One Screen Page Down Up One Screen Page Up To Cell A1 Ctrl + Home To Last Cell Ctrl + End Go To Dialog Box F5 Editing Cut Ctrl + X Copy Ctrl + C Paste Ctrl + V Undo Ctrl + Z Redo Ctrl + Y Find Ctrl + F Replace Ctrl + H Select All Ctrl + A Edit active cell F2 Clear cell contents Delete Formatting Bold Ctrl + B Italics Ctrl + I Underline Ctrl + U Open Format Cells Ctrl + Shift Dialog Box + F Select All Ctrl + A Select entire row Shift+Space Select entire column Ctrl + Space Hide selected rows Ctrl + 9 Hide selected Ctrl + 0 columns The Fundamentals  The File tab menu and Backstage view contain commands for working with a program’s files, such as Open, Save, Close, New, and Print.  Cell addresses: Cells are referenced by addresses made from their column letter and row number, such as cell A1, A2, B1, B2, etc. You can find the address of a cell by looking at the Name Box.  To Select a Cell: Click a cell or use the keyboard arrow keys to select it.  To Select a Cell Range: Click and drag to select a range of cells. Or, press and hold down the Shift key while using the arrow keys to move the mouse pointer to the last cell of the range.  To Select an Entire Worksheet: Click the Select All button where column and row headings meet. Or, press Ctrl + A.  To Minimize the Ribbon: Click the Minimize Ribbon button on the Ribbon. Or, press Ctrl + F1. Or, right-click a tab and select Minimize Ribbon from the contextual menu.  To Change Program Settings: Click the File tab and select Options.  To Use Zoom: Click and drag the zoom slider to the left or right. Or, click the Zoom Out and Zoom In buttons on the slider.  To Change Views: Click a View button in the status bar. Or, click the View tab and select a view. File tab Quick Access Toolbar Title bar Scroll bars Zoom slider Ribbon View buttons Close button Name box Worksheet tabs Formula Bar Columns Rows Active cell  To Create a New Workbook: Click the File tab and select New, and click Create, or press Ctrl + N.  To Open a Workbook: Click the File tab and select Open, or press Ctrl + O.  To Save a Workbook: Click the Save button on the Quick Access Toolbar, or press Ctrl + S.  To Preview and Print a Workbook: Click the File tab and select Print, or press Ctrl + P.  To Undo: Click the Undo button on the Quick Access Toolbar, or press Ctrl + Z.  To Redo or Repeat: Click the Redo button on the Quick Access Toolbar, or press Ctrl + Y.  To Close a Workbook: Click the Close button, or press Ctrl + W.  To Get Help: Press F1 to open the Help window. Type your question and press Enter. Free Cheat Sheets! Visit: cheatsheets.customguide.com © 2014 CustomGuide Free Cheat Learn by doing, not watching. www.customguide.com
  • 7. Editing Formatting  To Edit a Cell’s Contents: Select the cell and click the Formula Bar, or double-click the cell. Edit the cell contents and press Enter.  To Clear a Cell’s Contents: Select the cell(s) and press the Delete key.  To Cut or Copy Data: Select cell(s) and click the Cut or Copy button in the Clipboard group on the Home tab.  To Paste Data: Place the insertion point where you want to paste and click the Paste button in the Clipboard group on the Home tab.  To Preview an Item Before Pasting: Place the insertion point where you want to paste, click the Paste button list arrow in the Clipboard group on the Home tab, and select a preview option to view the item.  To Paste Special: Select the destination cell(s), click the Paste button list arrow in the Clipboard group on the Home tab, and select Paste Special. Select an option and click OK.  To Copy Using Auto Fill: Point to the fill handle at the bottom-right corner of the selected cell(s), then drag to the destination cell(s).  To Complete a Series Using AutoFill: Select the cells that define the series. Click and drag the fill handle to complete the series.  To Move or Copy Cells Using Drag and Drop: Select the cell(s) you want to move or copy, position the pointer over any border of the selected cell(s), then drag to the destination cells. To copy, hold down Ctrl key while dragging.  To Insert a Column or Row: Right-click to the right of the column, or below the row you want to insert. Select Insert from the contextual menu, or click the Insert button in the Cells group on the Home tab.  To Delete a Column or Row: Select the row or column heading(s). Right- click and select Delete from the contextual menu, or click the Delete button in the Cells group on the Home tab.  To Insert a Comment: Select the cell where you want to insert a comment and click the Review tab on the Ribbon. Click the New Comment button in the Comments group. Type a comment and click outside the comment box. Formulas and Functions  To Total a Cell Range: Click the cell where you want to insert the total and click the Sum button in the Editing group on the Home tab. Verify the selected cell range and click the Sum button again.  To Enter a Formula: Select the cell where you want to insert the formula. Type = and enter the formula using values, cell references, operators, and functions. Press Enter when you’re finished.  To Insert a Function: Select the cell where you want to enter the function and click the Insert Function button on the Formula Bar.  To Reference a Cell in a Formula: Type the cell reference (for example, B5) in the formula or click the cell you want to reference.  To Create an Absolute Cell Reference: Precede the cell references with a $ sign or press F4 after selecting cell(s) to make it absolute.  To Use Several Operators or Cell Ranges: Enclose the part of a formula you want to calculate first in parentheses. Charts  To Create a Chart: Select the cell range that contains the data you want to chart and click the Insert tab on the Ribbon. Click a chart type button in the Charts group and select the chart you want to use from the list.  To Insert a Sparkline: Select the cell range that contains the data you want to chart and click the Insert tab on the Ribbon. Select the sparkline you want to insert from the Sparkline group. Select the cell or cell range where you want to add the sparkline and click OK.  To Format Text: Use the commands in the Font group on the Home tab, or click the Dialog Box Launcher in the Font group to open the Format Cells dialog box.  To Format Values: Use the commands in the Number group on the Home tab, or click the Dialog Box Launcher in the Number group to open the Format Cells dialog box.  To Copy Formatting with the Format Painter: Select the cell(s) with the formatting you want to copy and click the Format Painter button in the Clipboard group on the Home tab. Then, select the cell(s) you want to apply the copied formatting to.  To Apply a Cell Style: Select the cell(s) you want to apply a cell style to. Click the Cell Styles button in the Styles group of the Home tab on the Ribbon and select a style from the gallery.  To Format a Cell Range as a Table: Select the cells you want to apply table formatting to. Click the Format as Table button in the Styles group of the Home tab on the Ribbon and select a table format from the gallery.  To Apply a Document Theme: Click the Page Layout tab on the Ribbon, click the Themes button in the Themes group, and select a theme from the gallery.  To Apply Conditional Formatting: Select the cells to which you want to apply conditional formatting. Click the Conditional Formatting button in the Styles group of the Home tab. Select the formatting scheme you wish to use, then set the conditions in the dialog box.  To Adjust Column Width or Row Height: Drag the right border of the column header, or the bottom border of the row header. Double-click the border to AutoFit the column or row according to its contents. Workbook Management  To Insert a New Worksheet: Click the Insert Worksheet tab next to the sheet tabs at the bottom of the program screen. Or, press Shift + F11.  To Delete a Worksheet: Select the sheet want to delete, click the Delete button in the Cells group on the Home tab, and select Delete Sheet. Or, right- click the sheet tab and select Delete from the contextual menu.  To Rename a Worksheet: Double-click the sheet tab, enter a new name for the worksheet, and press Enter.  To Change a Worksheet’s Tab Color: Right-click the sheet tab, select Tab Color, and choose the color you want to apply.  To Move or Copy a Worksheet: Click and drag a tab to move a worksheet. Hold down the Ctrl key while clicking and dragging to copy the worksheet.  To Split a Window: Drag either the vertical or horizontal split bar (located near the scroll bars) onto the worksheet.  To Freeze Panes: Place the cell pointer where you want to freeze the window, click the View tab on the Ribbon, click the Freeze Panes button in the Window group, and select an option from the list.  To Select a Print Area: Select the cell range you want to print, click the Page Layout tab on the Ribbon, click the Print Area button in the Page Setup group, and select Set Print Area.  To Adjust Page Margins, Orientation, Size, and Breaks: Click the Page Layout tab on the Ribbon and use the commands in the Page Setup group, or click the Dialog Box Launcher in the Page Setup group to open the Page Setup dialog box.  To Protect or Share a Workbook: Click the Review tab on the Ribbon and use the commands in the Changes group.  To Recover Autosaved Versions: Click the File tab on the Ribbon and select Info. Select an autosaved version from the Versions list. Or, click the Manage Versions button and select Recover Draft Versions. © 2014 CustomGuide Free Cheat Learn by doing, not watching. www.customguide.com
  • 8. Try Interactive Training Learn by doing, not watching. Visit excel.customguide.com Excel Training Free Excel Course! Short Interactive Fun www.customguide.com
  • 9. Microsoft® PowerPoint 2010 Cheat Sheet PowerPoint 2010 Screen Keyboard Shortcuts The Fundamentals  To Create a New Presentation: Click the File tab, click New, and click Create. Or, press Ctrl + N.  To Open a Presentation: Click the File tab and click Open, or press Ctrl + O.  To Save a Presentation: Click the Save button on the Quick Access Toolbar, or press Ctrl + S.  To Save a Presentation with a Different Name: Click the File tab, click Save As, enter a new name for the presentation, and click Save.  To Preview and Print a Presentation: Click the File tab and click Print, or press Ctrl + P.  To Close a Presentation: Click the File tab and click Close, or press Ctrl + W.  To Get Help: Press F1 to open the Help window. Type your question and press Enter.  To Exit PowerPoint: Click the File tab and click Exit. Open a Presentation Ctrl + O Create New Ctrl + N Save a Presentation Ctrl + S Print a Presentation Ctrl + P Close a Presentation Ctrl + W Insert a New Slide Ctrl + M Help F1 General Editing Formatting Bold Ctrl + B Italics Ctrl + I Align Left Ctrl + L Center Ctrl + E Justify Ctrl + J Cut Ctrl + X Copy Ctrl + C Paste Ctrl + V Undo Ctrl + Z Redo or Repeat Ctrl + Y Find Ctrl + F Replace Ctrl + H Select All Ctrl + A Navigation—Go To: The Next Slide Spacebar The Previous Slide Backspace Slide Show Delivery Begin Slide Show F5 Resume Slide Show Shift + F5 End Slide Show Esc Jump to Slide Slide # + Enter Toggle Screen Black B Toggle Screen White W Pause Show S Show/Hide Pointer A Change Arrow to Pen Ctrl + P Change Pen to Arrow Ctrl + A Erase Doodles E  The File tab menu and Backstage view contain commands for working with a program’s files, including New, Open, Save, Print and Close. Quick Access Toolbar Title bar Slide pane Zoom slider Ribbon View buttons Close button Slides tab Status bar Outline tab Notes pane  To Insert a New Slide: Click the Home tab and click New Slide in the Slides group, or press Ctrl + M.  To Change the Slide Layout: Click the Home tab, click the Layout button in the Slides group, and select a layout.  To Return a Slide to its Default Settings: Click the Home tab and click the Reset button in the Slides group.  To Apply a Document Theme: Click the Design tab on the Ribbon, click the More button in the Themes group, and select a theme from the gallery.  To Change the Slide Background: Click the Design tab on the Ribbon, click the Background Styles button in the Background group, and select a background.  To View the Slide Master: Click the View tab on the Ribbon, click the Slide Master button in the Master Views group, and click the Slide Master or the appropriate Layout Master in the Outline pane.  To Insert a Header or Footer: Click the Insert tab on the Ribbon and click the Header & Footer button in the Text group. Select the option(s) that you want and click Apply or Apply to All.  To Add a Section: Click the Home tab on the Ribbon, click the Section button in the Slides group, and click Add Section. Slides Free Cheat Sheets! Visit: cheatsheets.customguide.com Learn by doing, not watching. www.customguide.com © 2014 CustomGuide
  • 10. x XFormatting Images, Multimedia, and Objects Views  To Cut or Copy Text: Select the text you want to cut or copy and click the Cut or Copy button in the Clipboard group on the Home tab.  To Paste Text: Place the insertion point where you want to paste and click the Paste button in the Clipboard group on the Home tab.  To Format Selected Text: Use the commands in the Font group on the Home tab, or click the Dialog Box Launcher in the Font group to open the Font dialog box.  To Copy Formatting with the Format Painter: Select the text with the formatting you want to copy and click the Format Painter button in the Clipboard group on the Home tab. Then, select the text you want to apply the copied formatting to.  To Change Paragraph Alignment: Select the paragraph(s) and click the appropriate alignment button ( Align Left, Center, Align Right, or Justify) in the Paragraph group on the Home tab.  To Create a Bulleted or Numbered List: Select the paragraphs you want to bullet or number and click the Bullets or Numbering button in the Paragraph group on the Home tab.  To Change Paragraph Line Spacing: Select the paragraph(s), click the Line Spacing button in the Paragraph group on the Home tab, and select an option from the list.  To Correct a Spelling Error: Right-click the error and select a correction from the contextual menu. Or, press F7 to run the Spell Checker.  To Add a Slide Transition: Navigate to the slide you want to add a transition to. Click the Transitions tab on the Ribbon, click the More button in the Transition to This Slide group, and select a transition effect.  To Add an Animation Effect to an Object: Select the object that you want to animate, click the Animations tab on the Ribbon. Click the More button in the Animation group, and select an animation effect.  To Copy Animation Effects from One Object to Another: Select the object with the animation effect you want to copy, click the Animations tab on the Ribbon, and click the Animation Painter button in the Advanced Animation group. Then, click the object you want to apply the copied animation effect to.  To Insert a Picture: Click the Insert tab on the Ribbon and click the Picture button in the Images group. Find the picture you want to insert and click Insert.  To Insert a Clip Art Graphic: Click the Insert tab on the Ribbon and click the Clip Art button in the Images group. Type the name of what you’re looking for in the “Search for” box and click Go.  To Insert a Video file: Click the Insert tab on the Ribbon and click the Video button in the Media group. Find the video you want to insert and click Insert.  To Insert a Video from the Web: Click the Insert tab on the Ribbon, click the Video button list arrow in the Media group, and select Video from Web Site. Paste the video’s Embed code into the Insert Video from Web Site dialog box and click Insert.  To Insert an Audio clip: Click the Insert tab on the Ribbon, click the Audio button list arrow in the Media group, and select Audio from File. Find the audio clip that you want to insert and click Insert.  To Draw a Shape: Click the Insert tab on the Ribbon, click the Shapes button in the Illustrations group, and select the shape you want to insert. Then, click where you want to draw the shape and drag until the shape reaches the desired size. Hold down the Shift key while you drag to draw a perfectly proportioned shape or straight line.  To Insert SmartArt: Click the Insert tab on the Ribbon and click the SmartArt button in the Illustrations group. Select the SmartArt you want to insert and click OK.  To Format an Object: Double-click the object and use the commands located on the Format tab.  To Move an Object: Click the object and drag it to a new location. Release the mouse button when you’re finished.  To Resize an Object: Click the object to select it, click and drag one of its sizing handles ( ), and release the mouse button when the object reaches the desired size. Hold down the Shift key while dragging to maintain the object’s proportions while resizing it.  To Delete an Object: Select the object and press the Delete key. The Outline Pane The Outline tab focuses on the content of the presentation. Use this tab when you want to adjust the textual structure or add large amounts of text. The Slides tab contains a thumbnail image of every slide in the presentation; click a thumbnail to jump to that slide. You can also rearrange, add, or delete slides here. Transitions and Animation Effects Normal view: This is the default view in PowerPoint 2010. Normal view includes the Outline pane, Slide pane, and Notes pane. Slide Sorter view: Displays all the slides in the presentation as thumbnails (tiny images). Use Slide Sorter view when you want to rearrange the order of slides or add transition effects between slides. Reading View: Similar to Slide Show view, it displays the presentation in a window with simple controls, making it easy to review. Slide Show view: Displays the presentation as an electronic slide show. Whenever you deliver a presentation in front of an audience, Slide Show view is definitely the view you want to use. Slide Show Delivery  To Present a Slide Show: Click the Slide Show button on the status bar, or press F5.  To Use the Laser Pointer: In Slide Show view, press and hold down the Ctrl key while clicking and holding the left mouse button.  To Use the Pen: In Slide Show view, press Ctrl + P and then draw on the screen. Press Ctrl + A to switch back to the arrow pointer. Press E to erase your doodles.  To Advance to the Next Slide: Press Spacebar. Or, click the left mouse button.  To Go Back to the Previous Slide: Press Backspace or Page Up.  To Add Slide Timings: Click the Slide Show tab on the Ribbon and click the Rehearse Timings button in the Set Up group. Navigate through the presentation, pausing on each slide for the amount of time you wish to display it during your show. Click Yes to save your timings.  To End a Slide Show: Press Esc. Learn by doing, not watching. www.customguide.com © 2014 CustomGuide
  • 11. Try Interactive Training Learn by doing, not watching. Visit powerpoint.customguide.com PowerPoint Training Free PowerPoint Course! Short Interactive Fun www.customguide.com
  • 12. Microsoft® Access 2010 Cheat Sheet Access 2010 Workspace Keyboard Shortcuts General Open a Database Ctrl + O Close a Database Ctrl + W Print Current View Ctrl + P Delete Delete Undo Ctrl + Z Help F1 Delete Record Ctrl + - Cancel Changes Esc Insert Date Ctrl + ; Insert Time Shift + Ctrl + : Insert Value from Ctrl + ’ Same Field in (Apostrophe) Previous Record Check Spelling F7 Switch Applications Alt + Tab Editing Cut Ctrl + X Copy Ctrl + C Paste Ctrl + V Find Ctrl + F Replace Ctrl + H Select All Ctrl + A Design View Properties Alt+Enter Open object in Ctrl+Enter Design View Save Object Ctrl + S Formatting Text Bold Ctrl + B Italics Ctrl + I Underline Ctrl + U Navigation Next Field Tab Previous Field Shift + Tab Next Screen Page Down Previous Screen Page Up First Record Ctrl + ↑ Last Record Ctrl + ↓ Toggle Navigation Pane F11 Database Objects The Fundamentals Tables store related data in rows (records) and columns (fields). Queries view, filter, calculate, change, sort, and examine the data stored in tables. Forms are custom screens that provide an easy way to enter and view data in a table. Reports present data from a table or query in a printed format. Macros automate common tasks and can be run by clicking a button or pressing a shortcut key. Modules are groups of procedures written in Visual Basic and used to automate tasks.  To Open an Object: Double-click the object in the Navigation Pane.  To Create a New Object: Click the Create tab on the Ribbon and click a button for the object or wizard you want to use.  To Delete an Object: Select the object and press Delete. Click Yes.  The File tab menu and Backstage view contain commands for working with a program’s files, such as Open, Save, Close, New, and Print.  Access 2010 introduces Web databases. Unlike other databases, Web databases can be published to a SharePoint site and opened without Access.  To Create a Blank Database: Click the File tab and select New. Click the Blank Database button and click Create.  To Create a Database from a Template: Click the File tab and select New. Select the template category you wish to use, select the template, and click Create.  To Open an Existing Database: Click the File tab and select Open.  To Repair/Compress a Database: Click the File tab and select Info. Click the Compact & Repair Database button.  To Import Data from Another Source: Click the External Data tab on the Ribbon and click the appropriate button in the Import and Link group.  To Export Data to Another Source: Click the External Data tab on the Ribbon and click the appropriate button in the Export group.  To Save a Database: Click the File tab and select Save.  To Close a Database: Click the Close button, or press Ctrl + W. View buttons File tab Quick Access Toolbar Object tabs Objects in the Navigation Pane Table open in Datasheet view Title bar Ribbon Status bar Free Cheat Sheets! Visit: cheatsheets.customguide.com © 2014 CustomGuide Free Cheat Learn by doing, not watching. www.customguide.com
  • 13. Working with Tables Creating Table Relationships Linking Tables tells Access how two tables are related to each other. The fields that you use to link two tables must contain the same concept in two different tables. A primary key field from one table is often used when linking two tables. 1. Click the Table contextual tab on the Ribbon and click the Relationships button in the Relationships group. 2. If necessary, click the Show Table button in the Relationships group on the Design tab. In the Show Table window, select a table you want to link, click the Add button, and repeat for each table. Click Close. 3. Drag a field from one table and drop it on the related field in the second table. (Optional) Check the Enforce Referential Integrity box. Click Create. Working with Table Data  Database information can be directly added and modified from tables and some queries and forms.  To Add a Field to a Table: Enter data in the cell below the Add New Field column header. Or, click the Fields tab on the Ribbon under Table Tools, and click the button for the field you wish to add in the Add & Delete group.  To Add a New Record: Enter data in the bottom row of the table.  To Select a Record: Click the Record selector to the left of the record.  To Delete a Record: Select the record, click the Home tab on the Ribbon, and click the Delete button in the Records group. Click Yes.  To Spell Check: Click the Home tab on the Ribbon and click the Spelling button in the Records group.  To Find Information: Place the cursor in the field that contains the value you want to search for, click the Home tab on the Ribbon, and click the Find button in the Find group. Or, press Ctrl + F. Type the value you want to search for in the Find What box and click Find Next.  To Replace Information: Place the cursor in the field that contains the value you want to replace, click the Home tab on the Ribbon and click the Replace button in the Find group. Or, press Ctrl + H. Type the value you want to search for in the Find What box and the new value in the Replace With box. Click Find Next until you’ve found what you’re looking for, then click Replace or Replace All to replace every instance of the value.  To Sort Information: Place the cursor in the field that you want to sort by, click the Home tab on the Ribbon, and click either the Ascending or Descending button in the Sort & Filter group.  To Filter Information: Place the cursor in the field that contains the values you want to filter by, click the Home tab on the Ribbon, and click the Filter button in the Sort & Filter group. Check the boxes for the values you want to filter for.  To Remove a Filter: Click the Toggle Filter button in the Sort & Filter group.  To Change a Field’s Data Type: Select the field you want to change, click the Fields tab on the Ribbon under Table Tools, and click the Data Type list arrow in the Data Type & Formatting group. Select a data type. Field Data Types Data Type Description Text (Default) Stores text, numbers, or a combination of both, up to 255 characters long. Number Stores numbers that can be used in calculations. Currency Stores numbers and symbols that represent money. Date & Time Stores dates, times, or both. Yes/No Stores only one of two values, such as Yes or No. Lookup & Relationship Stores values from a table, query, or value list. Can be multivalued. Rich Text Stores, text, numbers, or a combination of both that can be formatted using color and font controls. Memo Stores long text entries—up to 64,000 characters long. Attachment Allows you to attach files and images to your database. Hyperlink Stores clickable links to Web pages on the Internet or files on a network. Calculated Field Stores results of a calculation. The calculation must refer to other fields in the same table. Working with Queries and Reports  To Create a Select Query: Click the Create tab on the Ribbon and click the Query Wizard button in the Queries group. Click Simple Query Wizard and click OK. Follow the instructions to select the fields you want to use from the desired tables and create the query. If you want to filter records, view the query in Design view and enter the criteria in the Criteria row.  To Switch Views: Click the Home tab on the Ribbon and click the View button in the Views group. Or, right-click the tab and select the view you want to use in the contextual menu.  To Summarize Values: Open the Query in Datasheet View, click the Home tab on the Ribbon, and click the Totals button in the Records group. Click the list arrow in a column in the Total row in the query select a calculation type (Sum, Average, etc.). Criteria Example Description “London” Displays records where the field equals “London”. Between 1/1/00 and 12/31/00 Displays records where the date is between 1/1/00 and 12/31/00. NOT "USA" or "" Displays records where the field does not contain the text "USA" and is not blank. Like “S*” Displays records where the field text starts with an “S”. IS NULL Displays records where the field is blank. IS NOT NULL Displays records where the field is not blank. 100 Displays records whose field value is greater than 100.  To Create a Report: Click the Create tab on the Ribbon and click the Report Wizard button in the Reports group. Follow the instructions to select the fields you want to use from the desired tables and create the report. Start adding a new record here. Record selector © 2014 CustomGuide Free Cheat Learn by doing, not watching. www.customguide.com
  • 14. Try Interactive Training Learn by doing, not watching. Visit training.customguide.com Interactive Training Free Training Course! Short Interactive Fun www.customguide.com
  • 15. Microsoft® InfoPath 2010 Quick Reference Card InfoPath 2010 Designer Keyboard Shortcuts General Design a New Form <Ctrl> + <Shift> Template + <D> Open the Open in design <Ctrl> + <O> Mode dialog box Create a Hyperlink <Ctrl> + <K> Save <Ctrl> + <S> Preview the form <Ctrl> + <Shift> template + <B> Print Preview the <Alt> + <F>, <V> form template Print <Ctrl> + <P> Zoom in <Alt> + <=> Help <F1> Editing Find word or phrase <Ctrl> + <F> Replace <Ctrl> + <H> Spelling <F7> Zoom Out <Ctrl> + <Shift> + < * > Undo <Ctrl> + <Z> Redo <Ctrl> + <Y> Copy <Ctrl> + <C> Cut <Ctrl> + <X> Paste <Ctrl> + <V> Formatting Bold <Ctrl> + <B> Italics <Ctrl> + <I> Underline <Ctrl> + <U> Select All <Ctrl> + <A> Font dialog box <Ctrl> + <D> Remove all formatting <Ctrl> + <Spacebar> Open the Font task pane <Ctrl> + <Shift> <F> Change text color <Ctrl> + <Shift> <C> Fill out forms Go to the next control <Tab> Go to the previous <Shift> + <Tab> control The Fundamentals • To Design a New Form Template: Click the File tab and select New. Choose a template on which to base the form and click OK. • To Open an Existing Form Template: Click the File tab and select Open. • To Save a Form: Click the Save button on the Quick Access Toolbar, or click the File tab and select Save, or press <Ctrl> + <S>. • To Check Spelling: Click the Spelling button in the Editing group of the Home tab on the Ribbon. Or, press <F7>. • To Find: Click the Find button in the Editing group of the Home tab on the Ribbon, or press <Ctrl> + <F>. • To Find and Replace: Click the Find button list arrow in the Editing group of the Home tab on the Ribbon. Select Replace. Or, press <Ctrl> + <H>. • To Insert a Hyperlink: Click the Hyperlink button in the Links group of the Insert tab on the Ribbon. Or, press <Ctrl> + <K>. • To Customize the Quick Access Toolbar: Click the Customize Quick Access Toolbar button at the end of the toolbar and select the commands you wish to appear. • To Add a Submit Data Connection: Click the type of data source you wish to add in the Submit Form group of the Data tab on the Ribbon. Or, click the Data Connections button in the Get External Data group of the Data tab on the Ribbon. Then click the Add button, click Submit data, click Next, select the desired data source, and click Next. Proceed as prompted in the Data Connection Wizard. • To Preview a Form in InfoPath Filler: Click the Preview button on the Quick Access Toolbar; or click the Preview button in the Form group located in the Home tab on the Ribbon; or press <F5>. • To Print a Form: Click the File tab on the Ribbon. Select Print and choose how you wish to print the form. Or, press <Ctrl> + <P>. • To Publish a Form: Click the Quick Publish button on the Quick Access Toolbar. Or, click the File tab on the Ribbon and select Publish. Choose how you want to publish the form: to the current location, to a SharePoint Library, to an e-mail message, or to a network location. • To Fill Out a Form: Open InfoPath Filler 2010. Click the File tab on the Ribbon and select Open. Navigate to the form you wish to fill out and click Open. Fill out the form, and click the Submit button on the Home tab of the Ribbon. Quick Access Toolbar Title Bar Help search box Fields task pane Ribbon File tab Free Cheat Sheets! Visit: cheatsheet.customguide.com Interactive  Online  Learning   ü  Courseware   ü  Online  Learning   ü  Skills  Assessments   ©  2012  CustomGuide   cheatsheet.customguide.com  |  Phone  888.903.2432  
  • 16. Design Elements Working with Tables • To Format Font: Use the commands in the Format Text group of the Home tab to change the appearance of text in the form. • To Apply a Style: Select the text to which you want to apply the style and click the Quick Styles button in the Home tab of the Ribbon. Select the style you wish to apply from the list. • To Apply or Change a Page Layout Template: Click the Page Layout Templates button in the Page Layouts group of the Page Design tab on the Ribbon. • To Change the Color Theme: Select a theme from the Themes gallery in the Page Design tab of the Ribbon. • To Add a Horizontal Line: Click the Horizontal Line button in the Page Format group of the Insert tab on the Ribbon. • To Add a Header: Click the Header & Footer button in the Headers group of the Page Design tab on the Ribbon. Click the Header button in the View Properties dialog box. Enter the header text and formatting and click OK. • To Add a Footer: Click the Header & Footer button in the Headers group of the Page Design tab on the Ribbon. Click the Header button in the View Properties dialog box. Enter the header text and formatting and click OK. • To Add a Picture: Click the Picture button in the Illustrations group of the Insert tab on the Ribbon. • To Add Clip Art: Click the Clip Art button in the Illustrations group of the Insert tab on the Ribbon. • To Check for Design Incompatibilities: Click the File tab on the Ribbon and select Info. Click the Design Checker button. Controls, Rules, and Fields • To Insert a Control: Select a control from the Controls gallery located in the Home tab on the Ribbon. Or, select a control from the Controls task pane. • To Display the Controls Task Pane: Click the Controls Pane launcher in the Controls group of the Home tab on the Ribbon. • To Change Control Properties: Select the control and click the Control Properties button in the Properties group of the Control Tools tab. Or, right- click the control and select Properties from the contextual menu. • To Replace a Control: Right-click the control and select Change Control from the contextual menu and select a new control. • There are three types of rules you can add to controls in InfoPath: Validation: Validation rules are used to indicate an error when the user enters an invalid value into a control. Formatting: Formatting rules are used to apply text formatting and background shading to controls when a condition has been met. Actions: Actions are the most varied type of rule. Use these to switch views, set values in other fields, submit the form, or query for data. • To Add a Rule: Select a control in the form, or a field in the Fields task pane. Click the Add Rule button in the Rules group of the Home tab on the Ribbon. Choose a rule from the menu. Choose the action you wish to apply for the rule, and enter details for the rule in the Rule Details dialog box. Click OK. • To Manage Rules: Select a control or form or a field in the Fields task pane. Click the Add Rule button in the Rules group of the Home tab on the Ribbon. • To Connect the Form to an External Data Source: Click the Data tab on the Ribbon and select a data source from the Get External Data group. • To Display the Fields Task Pane: Click the Show Fields button in the Form Data group of the Data tab on the Ribbon. • There are two types of tables in InfoPath: Layout Table: The purpose of this table is to arrange and organize elements of the form. It makes the form easy to follow and understand. Tables are layout by default. Repeating Table: The purpose of these tables is to provide more ways for users to enter data in a form. Users can add rows or columns to the table while filling out the form. • To Insert a Table: Select a table from the Tables Gallery in the Insert tab of the Ribbon. Or, click the Insert Layout Table button on the Standard toolbar. • To Insert a Repeating Table: Select the table you wish to change into a Repeating table and click the Change To button in the Table group of the Layout tab on the Ribbon. Or, select Repeating Table from the Controls Gallery. • To Change Table Alignment: Click in the table. Click the Table Properties button in the Table group of the Layout tab on the Ribbon. Or, right-click the table and select Table Properties from the contextual menu and click the Table tab. Choose the table alignment and click OK. • To Change Column Width: Click and drag the column border left or right to resize it. Or, click the Width button in the Cell group of the Layout tab on the Ribbon. Or, click the Table Properties button in the Table group of the Layout tab on the Ribbon and click the Column tab. Or, right-click the table and select Table Properties from the contextual menu. Click the Column tab and set the column width. • To Change Row Height: Click and drag the row border up or down to resize it. Or, click the Height button in the Cell group of the Layout tab on the Ribbon. Or, click the Table Properties button in the Table group of the Layout tab on the Ribbon and click the Row tab. Or, right-click the table and select Table Properties from the contextual menu. Click the Column tab and set the column width. • To Change Cell Padding (space between boundary of cell and its contents): Click the Table Properties button in the Table group of the Layout tab on the Ribbon. Or, right-click the table and select Table Properties from the contextual menu. Click the Cell tab and make changes in the Cell padding section. • To Change Table Border: Click the Borders button in the Color group of the Layout tab on the Ribbon. Or, right-click the table and select Borders and Shading from the contextual menu. Click the Borders tab and select the type of border you want to use in the table. • To Change Shading: Click the Shading button in the Color group of the Layout tab on the Ribbon. Or, right-click the table and select Borders and Shading from the contextual menu. Click the Shading tab and select a shading color. • To Delete a Column or Row: Right-click the column or row and select Delete → Columns or Rows from the contextual menu. Or, click the Delete button in the Rows & Columns group of the Layout tab on the Ribbon button and select Columns or Rows the menu. • To Insert a Column or Row: Select the column or row where you want the new column or row to be inserted. Click the button that corresponds to where you want to add rows and columns in the Rows & Columns group of the Layout tab on the Ribbon. Or, right-click a cell in the table, point to Insert and select the insert option you wish to use from the contextual menu. Or, press <Tab> in the last cell of a table to add a new row. Interactive  Online  Learning   ü  Courseware   ü  Online  Learning   ü  Skills  Assessments   ©  2012  CustomGuide   cheatsheet.customguide.com|  Phone  888.903.2432  
  • 17. Microsoft® OneNote 2010 Quick Reference Card OneNote 2010 Screen Keystroke Shortcuts General Open a Section <Ctrl> + <O> Create a New Page <Ctrl> + <N> Print a Page <Ctrl> + <P> Undo <Ctrl> + <Z> Redo <Ctrl> + <Y> Help <F1> Full Page View <F11> Task Pane <Ctrl> + <F1> Create Outlook <Ctrl>+ <Shift> task <1> thru <5> Insert Hyperlink <Ctrl> + <K> E-mail Page <Ctrl> + <Shift> + <E> Select Page <Ctrl> + <Shift> + <A> Navigation Next Section <Ctrl> + <Tab> Previous Section <Ctrl> + <Shift> + <Tab> Open New Window <Ctrl> + <M> New Side Note <Ctrl> + <Shift> Window + <M> Text Cut <Ctrl> + <X> Copy <Ctrl> + <C> Paste <Ctrl> + <V> Bold <Ctrl> + <B> Italics <Ctrl> + <I> Underline <Ctrl> + <U> Font Task Pane <Ctrl> + <D> Check Spelling <F7> Tag To Do <Ctrl> + <1> Important <Ctrl> + <2> Question <Ctrl> + <3> Remember for later <Ctrl> + <4> Definition <Ctrl> + <5> Highlight <Ctrl> + <6> Contact <Ctrl> + <7> Address <Ctrl> + <8> Phone number <Ctrl> + <9> The Fundamentals Notebook Hierarchy: Notebook: Notebooks are the largest component; they store sections and pages. Section: Sections store pages that are related under a single topic. Page: Pages contain specific notes and information on a particular topic. Subpage: Subpages can be used if a page doesn’t have enough room, or to further organize the content of a page. • To Create a New Notebook: Click the File tab on the Ribbon and select New. Choose where to store the notebook (Web, Network, or My Computer), name the notebook, and click Create Notebook. • To Create a New Section: Click the Create a New Section tab to the right of the other notebook tabs. • To Create a New Page or Subpage: Click the New Page button at the top of the Page Tabs pane. Or, press <Ctrl> + <N>. Or, point where you want to insert a new page in the Page Tabs pane and click the New Page button that appears. • To Open a Notebook: Click the notebook in the Navigation Pane. Or, click the File tab on the Ribbon and select Open, or press <Ctrl> + <O>. • To View a Section: Click the section tab in the Navigation Pane, or above the current page. Click the Show the rest of the sections button, which appears as a sack of section tabs, to view all sections in the notebook. • To Add a Note: Click where you want to insert the note on the page and begin typing. • To Move a Note: Click the top bar of the note and drag the note. To move text within a note, click the next to the text and drag the text. • To Delete a Note: Select the note and press <Delete> or right-click and select Delete. • To Print a Page: Click the File tab on the Ribbon and select Print. Or, press <Ctrl> + <P>. • To Get Help: Press <F1> to open the Help window, type your question and press <Enter>. • To Cut or Copy: Select the text and click the Cut button or Copy button in the Clipboard group of the Home tab on the Ribbon, or press <Ctrl> + <X> (cut) or <Ctrl> + <C> (copy). • To Paste: Place the insertion point where you want to paste the text, click the Paste button in the Clipboard group of the Home tab on the Ribbon, or press <Ctrl> + <V>. • To Undo or Redo: Click the Undo button on the Quick Access Toolbar or press <Ctrl> + <Z>. Click the Redo button on the Quick Access Toolbar or press <Ctrl> + <Y>. • To Find Text: Press <Ctrl> + <F> or click the Instant Search box. • To Save a Page, Section, or Notebook in a Different Format: Click the File tab on the Ribbon and select Save As. Under Save Current, select Page, Section, or Notebook. Under Select Format, select the format (e.g. *.docx, *.doc, *.pdf, *.xps) in which you want to save the selected item. Ribbon Quick Access Toolbar Horizontal Scroll Bar Unfiled Notes Vertical Scroll Bar Page Tabs pane Search box Notebook Section tabs Title Bar Create a New Section tab Notebook Navigation Pane New Page button Free Cheat Sheets! Visit: cheatsheet.customguide.com Interactive  Online  Learning   ü  Courseware   ü  Online  Learning   ü  Skills  Assessments   ©  2012  CustomGuide   cheatsheet.customguide.com  |  Phone  888.903.2432  
  • 18. Notebook Tasks Sharing • To Copy Part of the Screen into OneNote (Take a Screen Clipping): Click the Insert tab on the Ribbon and click the Screen Clipping button in the Images group and drag the pointer over the area of the screen you want to copy. Or, press < > + <S>. • To Create an Outlook Task from a Note: Click the Home tab on the Ribbon and click the Outlook Tasks button in the Outlook group. Select the type of task you want to create in Outlook. You may also press <Ctrl> + <Shift> + <1-5> to create a task from a note. • To Create a Link: Click the Insert tab on the Ribbon and click the Link button in the Links group. Enter the link’s display text and enter the URL of the web page to which you want to link. You can also link to another file or OneNote notebook. • To Create a Table: Click the Insert tab on the Ribbon. Click the Table button and select the number of columns and rows from the grid. • To View Full Page Mode: Click the View tab on the Ribbon and click the Full Page View button in the Views group. Or, click the Full Page View button on the Quick Access Toolbar. Or, press <F11>. • To Dock OneNote to the Desktop: Click the View tab on the Ribbon and click the Dock to Desktop button in the Views group. Or, click the Dock to Desktop button on the Quick Access Toolbar. • To Insert Date and Time: Click the Insert tab on the Ribbon and click the Date, Time, or Date & Time button in the Time Stamp group. • To Add Rule Lines to the Page: Click the View tab on the Ribbon and click the Rule Lines button in the Page Setup group. Click the Rule Lines button list arrow to choose from a selection of rule lines and grids. • To Open a Side Note Window: Click the View tab on the Ribbon and click the New Side Note button in the Window group. • To Keep OneNote on Top of All Other Windows: Click the View tab on the Ribbon and click the Keep on Top button in the Window group. • To Move Sections: Click and drag the section to rearrange the order of sections in the notebook. Or, click and drag the section into another open notebook in the Navigation Bar to move it into another notebook. • To Move Pages: Click and drag the page tab and drag it to rearrange it in the section, or drag it to a section tab to move it into the section. Or, click and drag the page into another open notebook in the Navigation Bar to move it into another notebook. • To View Unfiled Notes: Click the Unfiled Notes button at the bottom of the Navigation Bar. Tagging • To Tag Text or a Note: Select the text or note you wish to tag. Click the Home tab on the Ribbon and select a tag from the Tags group. You may also press <Ctrl> + <1-9> to apply a tag. • To View Tags: Click the Find Tags button in the Tags group. The Tags Summary task pane appears, displaying tags in the current notebook. • To Change How Tags Are Grouped: Click the Group tags by list arrow in the Tags Summary task pane and select how you would like tags to be grouped in the task pane. • To Display Unchecked Tags Only: Click the show only unchecked items check box in the Tags Summary task pane and select how you would like tags to be grouped in the task pane. • To Change Which Tags are Displayed: Click the Search list arrow in the Tags Summary task pane and select which tags you would like to see. • To Create a Summary of Tags: Click the Create Summary Page button. All of the tags are compiled on a new page in the notebook. • To E-mail Notes: Click the Home tab or the Share tab on the Ribbon and click the E-mail Page button in the Outlook group. • To Share a Notebook: Click the Share tab on the Ribbon and click the Share This Notebook button in the Shared Notebook group. Or, click the File tab on the Ribbon and select Share. • To Share a Notebook: Click the Share tab on the Ribbon and click the Share This Notebook button in the Shared Notebook group. Or, click the File tab on the Ribbon and select Share. Select the notebook you wish to share, then choose if you want to share over the Web or the Network or SharePoint. You can also share over Windows Live SkyDrive with your Windows Live ID. Click Share Notebook. Drawing and Graphics The Draw tab • To Select Several Notes on a Page: Click the Lasso Select button in the Tools group. Click and drag around the notes you want to select on the page. • To Scroll Through the Page: Click the Panning Hand button in the Tools group. Click and drag to move around the notes on the page. • To Draw a Line or Shape: Click the shape you want to insert, or click the More button to view a selection of shapes in the Insert Shapes group. Draw the shape by clicking on the page with the pointer and dragging until the shape reaches the desired size. • To Erase a Line or Shape: Click the Eraser button in the Tools group. Click and drag to erase content on the page. • To Change the Eraser: Click the Eraser button list arrow and select an eraser from the list. • To Duplicate a Drawn Shape: Click the More button in the Insert Shapes group and select Lock Drawing Mode from the list. Then click the button for the shape you want to draw. Draw the shape on the page. Then click anywhere on the page, and a duplicate of the previously drawn shape will appear. • To Change Shape Color and Thickness: Click the Color & Thickness button in the Insert Shapes group and select the thickness and color you wish to use for the shape. Then click the button for the shape you want to draw and draw the shape on the page. • To Draw a Multi-Dimensioned Line: Select the type of line you want to draw from the Insert Shapes group: 2 dimensions, positive; 2 dimensions, full; 3 dimensions. Then click and drag on the page to draw the line. • To Use the Pen: Click a pen style from the Tools group, or click the More button to view more pen styles. Begin writing on the page. • To Change the Pen Mode: Click the More button of the Pen Tools gallery and select Pen Mode, then select a mode from the list. • To Rotate a Shape: Click the Rotate button in the Edit group and select an option from the list. • To Add Writing Space: Click the Insert Space button in the Edit group and click where you want to add writing space to the page. • To Insert a File Printout on a Page: Click the Insert tab on the Ribbon and click the File Printout button in the Files group. Choose the document you want to insert and click the Insert button. • To Insert a Scanned Printout on a Page: Click the Insert tab on the Ribbon and click the Scanner Printout button in the Files group. Choose the scanner you want to use and click the Insert button. Interactive  Online  Learning   ü  Courseware   ü  Online  Learning   ü  Skills  Assessments   ©  2012  CustomGuide   cheatsheet.customguide.com|  Phone  888.903.2432  
  • 19.
  • 20. Microsoft® Outlook 2010 Cheat Sheet The Outlook 2010 Screen Navigation Pane zas Contains mail-related folders like your Inbox, Sent Items, and Search Folders. Use the Favorites section at the top of the pane for easy access to frequently-used folders. Enables you to view and schedule appointments, event, and meetings. View shared calendars and compare calendars by viewing them side-by-side. Store and keep track of addresses, phone numbers, and e-mail addresses. Organize to-do lists, track task progress, and delegate tasks. Notes: Use like electronic Post-It® Notes to write down information. Folder List: Displays a list of all your Outlook folders. Shortcuts: Add shortcuts to folders and locations in Outlook for quick access. Keyboard Shortcuts Save Ctrl + S Preview and Print Ctrl + P Undo Ctrl + Z Cut Ctrl + X Copy Ctrl + C Paste Ctrl + V Check Spelling F7 Check for Mail F9 Save, Close, Alt + S and Send Reply Ctrl + R Reply to All Alt + L Address Book Ctrl + Shift + B Help F1 Switch Between Alt + Tab Applications New Item Ctrl + N Search Ctrl + E The Fundamentals Mail: Basics  The File tab menu and Backstage view contain commands for working with a program’s files, such as Save As, Save Attachments, Close, New, and Print.  To Create a New Message: 1. Click the New E-mail button in the New group of the Home tab on the Ribbon. Or, press Ctrl + N. 2. Enter the e-mail address(es) in the To: box, or click the To button to use the Address Book. 3. Click the Cc: or Bcc: buttons and enter the e-mail address(es) for whom you want to send copies of the message. 4. Enter the subject of the message in the Subject box. 5. Enter the text of your message in the text box. 6. Click the Send button.  To Reply to a Message: Select/open the message, click the Reply button, type your reply, and click the Send button.  To Forward a Message: Select/open the message, click the Forward button, enter the e-mail address(es) in the To field, enter comments in the Body area, and click the Send button.  To Delete a Message: Select the message and press the Delete key.  To Open a Message: Click a message to view it in the Reading Pane or double- click the message to open it.  To Check for New Messages: Click the Send/Receive All Folders button or press F9.  To Preview and Print a Message: Click the File tab and select Print, or press Ctrl + P.  Message Indicators: Message has not been read. Message has been read. File is attached to the message. Message has high or low importance.  To Minimize the Ribbon: Click the Minimize Ribbon button on the Ribbon. Or, press Ctrl + F1. Or, right- click a tab and select Minimize Ribbon from the contextual menu.  To Change Account Settings: Click the File tab and select Info. Click the Account Settings button.  To Change Program Settings: Click the File tab and select Options.  To Get Help: Press F1 to open the Help window. Type your question and press Enter. Reading Pane File tab Quick Access Toolbar Title bar People Pane Ribbon To Do Bar Close button Navigation Pane Status Bar Messages Zoom © 2014 CustomGuide Free Cheat Learn by doing, not watching. www.customguide.com Free Cheat Sheets! Visit: cheatsheets.customguide.com
  • 21. Mail: Advanced Tasks  To Attach a File to a Message: Click the Attach Item button in the Include group of the Message tab in the Message window.  To Preview an Attachment: Click the attachment in the message preview in the Reading Pane.  To Open an Attachment: Double-click the attachment in the Reading Pane. The file opens in its default program.  To Flag a Message as a To-Do Item: Right-click the message, select Follow Up from the contextual menu, and select a flag. Or, click the flag icon on the message. Or, select the message, click the Follow Up button on the Standard toolbar and select a flag.  To Categorize a Message by Color: Click the Quick Click icon on the message. Or, right-click the message, select Categorize from the contextual menu, and select a color category. Or, select the message, click the Categorize button in the Tags group of the Home tab on the Ribbon, and select a flag.  To Recall a Message: Open the Sent Items folder. Double-click the message, click the Actions button in the Move group of the Message tab on the Ribbon, and select Recall This Message. Choose to delete the message or replace the message with a new one in the dialog box and click OK. You can only recall a message if you are using MS Exchange Server and the recipient has not opened it.  To Resend a Message: Open the Sent Items folder. Double-click the message, click the Actions button in the Move group of the Message tab on the Ribbon, and select Resend This Message. Edit the message and recipients as necessary and click Send.  To Create a Contact Group: Click the New Items button in the New group on the Ribbon and select More Items Contact Group. Click the Add Members button in the Members group on the Ribbon, select a name in the list, click the Members button, and repeat for each name to be added. Click OK, then click Save & Close in the Actions group of the Contact Group tab.  To Create a Signature: In the message window, click the Signature button in the Include group of the Message tab on the Ribbon, select Signatures, and create the new signature.  To Change a Message’s Options: In the message window, click the Options tab on the Ribbon and click the More Options dialog box Launcher. Here you can specify: if the message is important or sensitive; if you want to add voting buttons to the message; where replies should be sent to; if you want a read receipt; and if you want to encrypt the message or delay its delivery.  To Move a Message to a Different Folder: Select the item, click the Move button in the Move group of the Home tab of the Ribbon, and select the destination folder. Or, click and drag the item to a different folder in the Navigation Pane.  To Turn On the Out of Office Assistant: Click the File tab, select Info and click the Automatic Replies button.  To Save a Message as a Draft: Click the Save button on the Quick Access Toolbar in the message window. The message appears in the Drafts folder.  To Create a New Rule: Click the Rules button in the Move group of the Home tab on the Ribbon and select Create Rule.  To Manage Rules: Click the Rules button in the Move group of the Home tab on the Ribbon and select Manage Rules and Alerts. Calendar  To Open the Calendar: Click the Calendar button in the Navigation Pane.  To Change Views: Click a view option in the Arrange group on the Home tab, or click the View tab and select an option there.  To View a Specific Date: Click the date in the Date Navigator, or click and drag to view a set of consecutive dates.  To Schedule an Appointment: Click the New Appointment button in the New group on the Home tab or press Ctrl + N.  To Schedule a Recurring Appointment: Click the New Items button in the New group on the Ribbon, and select More Items Recurring Appointment.  To Schedule a Meeting: Click the New Meeting button in the New group on the Ribbon. Add recipients and meeting details and click Send.  To Schedule an All Day Event: Click the New Items button in the New group on the Ribbon and select All Day Event.  To Reschedule an Item: Click and drag the item to a new date and/or time on the Calendar. Or, double-click the item to open it, make your changes, and click the Save & Close button in the Actions group on the Ribbon.  To Edit an Item: Click the item to view the Calendar Tools contextual tab. Or, double-click the item, make your changes, and click the Save & Close button in the Actions group on the Ribbon.  To Delete an Item: Select the item and press Delete. Or, select the item and click the Delete button in the Actions group of the Appointment tab on the Ribbon.  To Search the Calendar: Click in the Search box in the upper right corner, or press Ctrl + E. Type search keywords and press Enter. Contacts  To Open Contacts: Click the Contacts button in the Navigation Pane.  To Change Views: Click a view option in the Current View group on the Home tab, or click the View tab and select an option there.  To Create a New Contact: Click the New Contact button in the New group on the Home tab or press Ctrl + N.  To Create a New Contact Group: Click the New Contact Group button in the New group of the Home tab on the Ribbon. Click the Add Members button in the Members group on the Ribbon, select a name in the list, click the Members button and repeat for each name to be added. Click OK, then click Save & Close in the Actions group of the Contact Group tab.  To Edit a Contact: Double-click the contact and make your changes.  To Find a Contact: Type your search text in the Search Contacts field or press Ctrl + E. Or, click the Find a Contact field in the Find group on the Home tab, enter your search text and press Enter.  To Delete a Contact: Select the contact and press Delete. Tasks and To-Do Items  To Open Tasks/To-Do List: Click the Tasks button in the Navigation Pane and select To-Do List or Tasks in the Navigation Pane.  To Create a New Task/To-Do Item: Click the New Task button in the New group on the Home tab or press Ctrl + N.  To Complete a Task: Click the Mark Complete button in the Manage Task group on the Ribbon, or click the task’s check box in Simple List view.  To Delete a Task: Select the task and press the Delete key. Or, click the Delete button in the Delete group of the Home tab. © 2014 CustomGuide Free Cheat Learn by doing, not watching. www.customguide.com
  • 22. Try Interactive Training Learn by doing, not watching. Visit outlook.customguide.com Outlook Training Free Outlook Course! Short Interactive Fun www.customguide.com
  • 23. Microsoft® Publisher 2010 Quick Reference Card Publisher 2010 Screen Keystroke Shortcuts The Fundamentals • To Create a New Publication by Type: Click the File tab on the Ribbon and select New. Select the type of publication you want to create. Click the desired publication and click Create. • To Create a Blank Publication: Click the File tab on the Ribbon and select New. Click a Blank option (8.5 X 11” or 11 x 8.5”). Or, click More Blank Page Sizes, select the option you want to create and click Create. • To Open a Publication: Click the File tab and select Open. • To Save a Publication: Click the Save button on the Quick Access Toolbar. Or, click the File tab and select Save from the list. Or, press <Ctrl> + <S>. • To Save a Publication with a Different Name: Click the File tab, select Save As, type a new name for the publication, select a new location, and click Save. • To Preview a Publication: Click the File tab on the Ribbon and select Print. The preview appears in the right pane; use the Previous and Next buttons and Zoom to preview pages. • To Print a Publication: Click the File tab on the Ribbon and select Print. Or, press <Ctrl> + <P>. • To Close a Publication: Click the Close button in the window. Or, press <Ctrl> + <W>. Or, click the File tab on the Ribbon and select Close from the list. Open a Publication <Ctrl> + <O> Create New <Ctrl> + <N> Save a Publication <Ctrl> + <S> Print a Publication <Ctrl> + <P> Close a Publication <Ctrl> + <W> Help <F1> General Editing Formatting Bold <Ctrl> + <B> Italics <Ctrl> + <I> Underline <Ctrl> + <U> Align Left <Ctrl> + <L> Center <Ctrl> + <E> Align Right <Ctrl> + <R> Justify <Ctrl> + <J> Increase Font Size <Ctrl> + < ] > Decrease Font Size <Ctrl> + < [ > Select All <Ctrl> + <A> Cut <Ctrl> + <X> Copy <Ctrl> + <C> Paste <Ctrl> + <V> Undo <Ctrl> + <Z> Redo <Ctrl> + <Y> Check Spelling <F7> Navigation and Layout Zoom to Full <Ctrl> + <Shift> + Page <L> Toggle Between <F9> Current and Full Page View Go To Page <F5> Next Page <Ctrl> + <Page Down> Previous Page <Ctrl>+<Page Up> Insert New <Ctrl> + <Shift> + Page <N> Insert Duplicate <Ctrl> + <Shift> + Page <U> Show/Hide <Ctrl> + <Shift> + Layout Guides <O> Switch to Master <Ctrl> + <M> Page Beginning of Line <Home> End of Line <End> • To Get Help: Press the <F1> key to open the Help task pane. Type your question and press <Enter>. • To Undo/Redo: Click the Undo or Redo buttons on the Quick Access toolbar. • To Change the Color Scheme: Click the Page Design tab on the Ribbon. Select a color scheme from the Color Schemes gallery. • To Change the Font Scheme: Click the Page Design tab on the Ribbon. Click the Fonts button and select a font scheme from the list. • To Change the Background of a Publication: Click the Page Design tab on the Ribbon. Click the Page Background button and click the Background button. Select a background from the list. • To Adjust the Margins of a Publication: Click the Page Design tab on the Ribbon and click the Margin button. Select the margin setting you would like to use, or select Custom Margins, make your adjustments, and click OK. • To Show or Hide Layout Guides: Click the View tab on the Ribbon and click the Guides check box in the Show group. • To Change Page Orientation: Click the Page Design tab on the Ribbon and click the Orientation button. Select the orientation you wish to apply. • To Change Page Size: Click the Page Design tab on the Ribbon and click the Size button. Customizable Training Materials Tel. (888) 903-2432 | www.customguide.com Title barQuick Access Toolbar Contextual tabs Status bar Zoom controls Rulers Horizontal scroll bar Task pane Workspace page Vertical scroll bar View buttons Ribbon Customizable Computer Training  Courseware   Online Learning   Skills Assessments Publisher Quick Reference © 2011 CustomGuide  www.customguide.com | Phone 888.903.2432 
  • 24. Formatting Text Boxes Drawing and Graphics • To Format a Text Box: Click the text box you want to format and click the Format tab under Text Box Tools. Use the controls on the Ribbon to format the text box. • To Link Text Boxes: Select the overflowing text box (marked with an overflow indicator). Click the Create Link button on the Format tab under Text Box Tools. Click inside an empty text box with the pointer. • To Unlink Text Boxes: Select the linked text box that comes before the text box(es) you want to unlink, and click the Break button on the Format tab under Text Box Tools. • To Move Between Text Boxes: Click the Previous or Next buttons, or click the Previous or Next buttons on the Format tab under Text Box Tools. • To Add Columns to Text Boxes: Click the text box to which you want to add columns and click the Format tab under Text Box Tools. Click the Columns button. Select the number of columns you wish to apply. • To Change Text Box Margins: Click the text box to which you want to add columns and click the Columns button. Select the number of columns you wish to apply. • To Manage Typography: Click the text box in which you want to change the typography and click the Format tab under Text Box Tools. Use the buttons in the Typography group to change the appearance of text. • To Insert a Text Box: Click the Home tab on the Ribbon and click the Draw Text Box button in the Objects group. Position the mouse pointer where you would like to insert the text box and click and drag until the text box reaches the desired size. Release the mouse button when you’re finished and enter text. • To Change Font Style: Click the text box, table, or shape with text. Select the text you want to apply formatting to and click the Home tab on the Ribbon. Click the Bold, Italic, or Underline button in the Font group. • To Change Font Type: Select the text you want to apply formatting to and click the Home tab on the Ribbon. Click the Font list arrow in the Font group and select a font from the list. • To Change Font Size: Select the text you want to apply formatting to and click the Home tab on the Ribbon. Click the Font Size list arrow in the Font group and select a size from the list. • To Change Font Color: Select the text you want to apply formatting to and click the Home tab on the Ribbon. Click the Font Color button list arrow in the Font group and select a color from the list. • To Open the Font Dialog Box: Click the Home tab on the Ribbon and click the Dialog Box Launcher in the Font group. • To Copy Formatting with the Format Painter: Select the text with the formatting you want to copy. Click the Home tab on the Ribbon and click the Format Painter button in the Clipboard group. Select the text to which you want to apply the copied formatting with the pointer. • To Create a Bulleted List: Select the paragraph(s) you want to bullet. Click the Home tab on the Ribbon and click the Bullets button in the Paragraph group. • To Create a Numbered List: Select the paragraphs you want to number. Click the Home tab and click the Numbering button in the Paragraph group. • To Adjust Character Spacing: Click the paragraph to which you want to apply the character spacing. Click the Home tab on the Ribbon, click the Character Spacing button, and select a spacing option from the list. • To Insert a Tab Stop: Click where you want to insert the tab stop on the ruler. Or, click the Home tab on the Ribbon and click Dialog Box Launcher in the Paragraph group. Click the Tabs tab and insert tabs in the dialog box. • To Adjust or Remove a Tab Stop: Click and drag the tab stop to the desired position on the ruler. Click and drag the tab stop off the ruler to remove it. • To Change Paragraph Alignment: Select the paragraph(s). Click the Home tab on the Ribbon and click the appropriate alignment button (Align Left, Center, Align Right, or Justify) in the Paragraph group. • To Insert a Drop Cap: Click in the paragraph to which you want to apply a drop cap. Click the Format tab under Text Box Tools on the Ribbon. Click the Drop Cap button in the Typography group and select the drop cap style you wish to apply. • To Apply a Style: Click the paragraph to which you want to apply the style. Click the Home tab on the Ribbon, click the Styles button, and select a style from the list. • To Create a Style: Click the Home tab on the Ribbon and click the Styles button. Select New Style from the list, make your specifications for the new style, and click OK. • To Insert a Clip Art Graphic: Click the Insert tab on the Ribbon and click the Clip Art button in the Illustrations group. Search for the clip art you’d like to use and click to insert it. • To Insert a Picture: Click the Insert tab on the Ribbon and click the Picture button in the Illustrations group. Select the file location and name and click Insert. • To Adjust Text Wrapping: Double-click the object, click the Wrap Text button in the Arrange group, and select a text wrapping option. • To Draw an Object: Click the Insert tab on the Ribbon and click the Shapes button in the Illustrations group. Select the shape you wish to use, click where you want to draw the object, and drag until the object reaches the desired size. Hold down the <Shift> key while you drag to draw a perfectly proportioned shape or straight line. • To Move an Object: Click the object and drag it to a new location. Release the mouse button when you’re finished. • To Resize an Object: Click the object to select it, click and drag one of its sizing handles, and release the mouse button when the object reaches the desired size. To maintain the object’s proportions, hold down the <Shift> key while resizing it. • To Insert a WordArt Object: Click the Insert tab on the Ribbon and click the WordArt button in the Text group. Select a design from the list. Enter the text you want WordArt to format and adjust the font type and size, if necessary. Click OK. • To Group Objects: Select the objects you want to group, click the Format tab under Drawing Tools on the Ribbon, and click the Group Objects button. • To Rotate an Object: Select the object and click and drag its rotation handle ( ). Release the mouse button when you’re finished rotating. • To Insert a Building Block: Building Blocks are pre-made objects, such as calendars, borders, pull quotes, sidebars, and headings, that can be added to your publication to make it look more professional. Click the Insert tab on the Ribbon, click a button in the Building Blocks group, and select the object you would like to insert. The Linking group Previous Text Box Next Text Box Create Text Box Link Break Forward Link Customizable Online Learning  Courseware   Online Learning   Skills Assessments Publisher Quick Reference © 2011 CustomGuide  www.customguide.com | Phone 888.903.2432 
  • 25. Microsoft® SharePoint Foundation 2010 Cheat Sheets SharePoint Team Site Quick Launch Collaboration areas such as team sites, workspaces and blog sites. Important subsites may also appear in the Quick Launch. Includes libraries that contain related files, such as documents, wiki sites, and forms. Store shared information here, such as events on a calendar or project tasks. Participate in group discussions using discussion boards. Deleted information is stored here. View all sites, lists, and libraries in the site. Create a new survey, or respond to a survey and view its results. Picture libraries are the best way to store shared images. Include commands and options specific to images. People and groups with permission to view or work with the site appear here. Permission Levels Full Control: All permissions are included. Users with this permission level have complete control over everything in the site. Site Owners are given this permission level by default. Design: Create many things, including lists and document libraries. Also edit pages and change the appearance of the site by applying themes or style sheets. Contribute: Add, edit, and delete items in existing lists and document libraries. Site Members are given this permission level by default. Read: Read-only access to the Web site. View items and pages, open items and documents. Site Visitors are given this permission level by default. Limited Access: This is a special permission level that gives access to a specific list, item, or document, without giving them access to the entire site. The Fundamentals  There are four main tools for navigation in a SharePoint site: Link Bar: This includes the tabs that appear along the top of the site. Subsites of the current site usually appear as tabs on the link bar. To go to a site, click its tab on the Link Bar. Quick Launch Bar: Navigate to items on the current site, such as shared documents, and libraries, such as picture and slide libraries. Breadcrumb Navigation: Breadcrumb navigation displays links to where you have been, and where the current page fits in the hierarchy of sites and items in the site. Navigate Up: Click this button to navigate back to the Home page from any SharePoint subsite.  To Navigate in a SharePoint Site: SharePoint sites work just like any other site on the Internet: click a hyperlink to view the page or item to which it is connected.  To View All Content in the Current Site: Click the All Site Content link at bottom top of the Quick Launch Bar.  To Search: Click in the Search box at the top of the page. Type your search word or term and press Enter.  To Change Views: You can change how items are displayed in a library or list by changing views. Click the Library, List, or Calendar tab on the Ribbon and click the Current View list arrow in the Manage Views group. Select the view you want to use.  To Sign Out: Click the Welcome (User) menu at the top of the screen and select Sign Out.  To Sign In as a Different User: Click the Welcome (User) menu at the top of the screen and select Sign in as Different User. Enter the different user information in the dialog box.  To Change User Settings: Click the Welcome (User) menu at the top of the screen and select My Settings. Click the Edit Item link on the toolbar and attach a file with updated user settings.  To Get Help: Click the Help button in the top right corner of the SharePoint site page.  Understanding Permissions: Each user that has access to a site is assigned a permissions level. The permissions level limits the amount of control the user has in the site. See the list on the right side of the page for more information about the five permission levels in SharePoint. Link bar Ribbon tabs Search box Web Part Site Actions menu Quick Launch Bar This image displays the home page of the North Shore Travel team site as it appears to a user with Full Control (a member of the Site Owner group). The Web page is composed of Web Parts, which can be customized and changed as necessary by users with the right permissions. Welcome user menuNavigate Up Edit Free Cheat Sheets! Visit: cheatsheets.customguide.com © 2014 CustomGuide Free Cheat Learn by doing, not watching. www.customguide.com