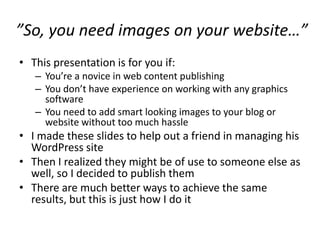
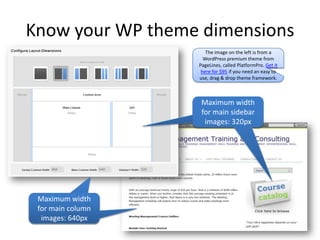
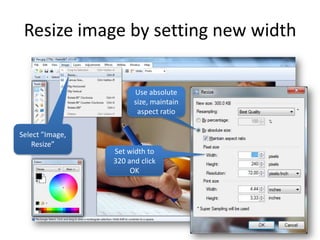
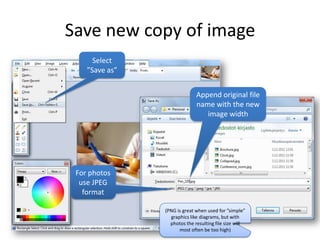
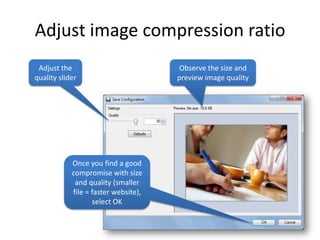
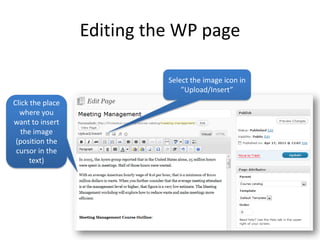
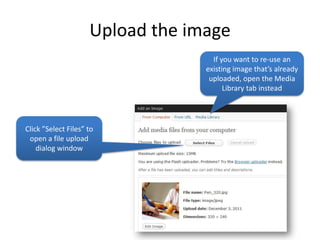
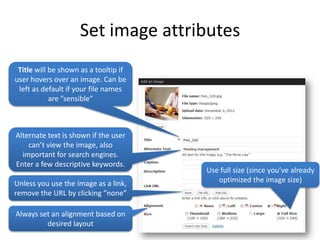
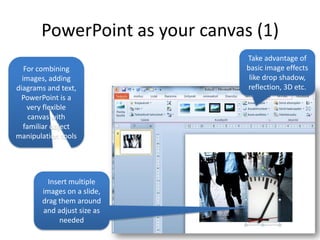
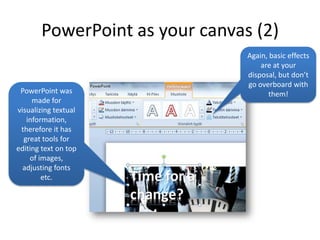
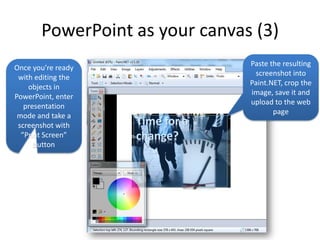
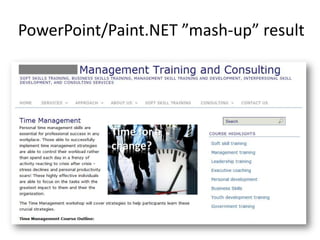
Website image editing tutorial:
 WordPress, Paint.NET and
        PowerPoint(!)
         Jukka Niiranen
           http://niiranen.info
”So, you need images on your website…”
• This presentation is for you if:
   – You’re a novice in web content publishing
   – You don’t have experience on working with any graphics
     software
   – You need to add smart looking images to your blog or
     website without too much hassle
• I made these slides to help out a friend in managing his
  WordPress site
• Then I realized they might be of use to someone else as
  well, so I decided to publish them
• There are much better ways to achieve the same
  results, but this is just how I do it
Objectives
• Resize large images to fit WordPress pages
  – Preserve image quality by performing scaling before
    inserting to page
  – Optimize page download times by reducing image size
• Perform basic image editing
  – Crop selected areas of an image
  – Adjust image ratio to fit banners, sidebars etc.
• Combine multiple objects
  – Images and text
Paint.NET
• Free image editor with
  all the tools needed for
  adjusting photos for
  publishing on
  WordPress
• Download from
  http://www.getpaint.ne
  t/download.html
Know your WP theme dimensions
                      The image on the left is from a
                     WordPress premium theme from
                   PageLines, called PlatformPro. Get it
                    here for $95 if you need an easy to
                   use, drag & drop theme framework.


                    Maximum width
                    for main sidebar
                     images: 320px


 Maximum width
 for main column
  images: 640px
Resize image by setting new width

                       Use absolute
                       size, maintain
                        aspect ratio

Select ”Image,
    Resize”
                 Set width to
                 320 and click
                      OK
Save new copy of image
      Select
    ”Save as”


                              Append original file
                              name with the new
                                 image width


 For photos
  use JPEG
   format

                (PNG is great when used for ”simple”
                  graphics like diagrams, but with
                  photos the resulting file size will
                      most often be too high)
Adjust image compression ratio
 Adjust the                           Observe the size and
quality slider                        preview image quality


            Once you find a good
            compromise with size
             and quality (smaller
            file = faster website),
                   select OK
Editing the WP page

                            Select the image icon in
                                ”Upload/Insert”
Click the place
  where you
want to insert
   the image
 (position the
 cursor in the
      text)
Upload the image
                                    If you want to re-use an
                                  existing image that’s already
                                   uploaded, open the Media
                                        Library tab instead


Click ”Select Files” to
 open a file upload
    dialog window
Set image attributes
 Title will be shown as a tooltip if
user hovers over an image. Can be
 left as default if your file names
            are ”sensible”


Alternate text is shown if the user
    can’t view the image, also
  important for search engines.
Enter a few descriptive keywords.
                                       Use full size (since you’ve already
Unless you use the image as a link,       optimized the image size)
remove the URL by clicking ”none”

Always set an alignment based on
         desired layout
Save and view results
Adjust image properties if needed
                              To change image
                            properties (alignment
                            etc.), click the image
                            and select Edit Image
                                    button


  To change image
postion, click and hold
the image to drag the
  cursor to the new
       position
Cropping a part of an image
                                                            Select ”Image –
 Select the                                                Crop to Selection
”Rectangle
Select” tool


                                     Drag and release to
                                       the corner you
                                       want to crop to
               Click and hold from
                  the corner you
               want to crop from
Example of a cropped image
Hiding image areas: copy & paste

       Use the             Paste the
     ”Rectangle          copied part
     Select” tool       back into the
    to select and         image and
        copy a          drag it on top
    suitable area        of the area
    of the image         you want to
                             hide
Hiding image areas: paintbrush

     Use the
      ”Color
   Picker” tool               Use the
                               Use the
    to select a            ”Paintbrush”
                           ”Paintbrush”
   color from              tool to draw
                            tool to draw
   next to the             over the area
                           over the area
       area                   with the
                              with the
                              selected
                              selected
                                color
                                color
PowerPoint as your canvas (1)
                                Take advantage of
   For combining                basic image effects
  images, adding                 like drop shadow,
diagrams and text,              reflection, 3D etc.
  PowerPoint is a
    very flexible
     canvas with
   familiar object
manipulation tools


         Insert multiple
       images on a slide,
       drag them around
       and adjust size as
             needed
PowerPoint as your canvas (2)
                                Again, basic effects
                                    are at your
                                disposal, but don’t
                                go overboard with
 PowerPoint was                       them!
     made for
visualizing textual
   information,
 therefore it has
  great tools for
editing text on top
    of images,
  adjusting fonts
        etc.
PowerPoint as your canvas (3)
                                Paste the resulting
Once you’re ready
                                 screenshot into
 with editing the
                                Paint.NET, crop the
    objects in
                                image, save it and
PowerPoint, enter
                                upload to the web
   presentation
                                       page
 mode and take a
 screenshot with
  ”Print Screen”
      button
PowerPoint/Paint.NET ”mash-up” result

Website image editing tutorial: WordPress, Paint.NET and PowerPoint(!)

  • 1.
    Website image editingtutorial: WordPress, Paint.NET and PowerPoint(!) Jukka Niiranen http://niiranen.info
  • 2.
    ”So, you needimages on your website…” • This presentation is for you if: – You’re a novice in web content publishing – You don’t have experience on working with any graphics software – You need to add smart looking images to your blog or website without too much hassle • I made these slides to help out a friend in managing his WordPress site • Then I realized they might be of use to someone else as well, so I decided to publish them • There are much better ways to achieve the same results, but this is just how I do it
  • 3.
    Objectives • Resize largeimages to fit WordPress pages – Preserve image quality by performing scaling before inserting to page – Optimize page download times by reducing image size • Perform basic image editing – Crop selected areas of an image – Adjust image ratio to fit banners, sidebars etc. • Combine multiple objects – Images and text
  • 4.
    Paint.NET • Free imageeditor with all the tools needed for adjusting photos for publishing on WordPress • Download from http://www.getpaint.ne t/download.html
  • 5.
    Know your WPtheme dimensions The image on the left is from a WordPress premium theme from PageLines, called PlatformPro. Get it here for $95 if you need an easy to use, drag & drop theme framework. Maximum width for main sidebar images: 320px Maximum width for main column images: 640px
  • 6.
    Resize image bysetting new width Use absolute size, maintain aspect ratio Select ”Image, Resize” Set width to 320 and click OK
  • 7.
    Save new copyof image Select ”Save as” Append original file name with the new image width For photos use JPEG format (PNG is great when used for ”simple” graphics like diagrams, but with photos the resulting file size will most often be too high)
  • 8.
    Adjust image compressionratio Adjust the Observe the size and quality slider preview image quality Once you find a good compromise with size and quality (smaller file = faster website), select OK
  • 9.
    Editing the WPpage Select the image icon in ”Upload/Insert” Click the place where you want to insert the image (position the cursor in the text)
  • 10.
    Upload the image If you want to re-use an existing image that’s already uploaded, open the Media Library tab instead Click ”Select Files” to open a file upload dialog window
  • 11.
    Set image attributes Title will be shown as a tooltip if user hovers over an image. Can be left as default if your file names are ”sensible” Alternate text is shown if the user can’t view the image, also important for search engines. Enter a few descriptive keywords. Use full size (since you’ve already Unless you use the image as a link, optimized the image size) remove the URL by clicking ”none” Always set an alignment based on desired layout
  • 12.
  • 13.
    Adjust image propertiesif needed To change image properties (alignment etc.), click the image and select Edit Image button To change image postion, click and hold the image to drag the cursor to the new position
  • 14.
    Cropping a partof an image Select ”Image – Select the Crop to Selection ”Rectangle Select” tool Drag and release to the corner you want to crop to Click and hold from the corner you want to crop from
  • 15.
    Example of acropped image
  • 16.
    Hiding image areas:copy & paste Use the Paste the ”Rectangle copied part Select” tool back into the to select and image and copy a drag it on top suitable area of the area of the image you want to hide
  • 17.
    Hiding image areas:paintbrush Use the ”Color Picker” tool Use the Use the to select a ”Paintbrush” ”Paintbrush” color from tool to draw tool to draw next to the over the area over the area area with the with the selected selected color color
  • 18.
    PowerPoint as yourcanvas (1) Take advantage of For combining basic image effects images, adding like drop shadow, diagrams and text, reflection, 3D etc. PowerPoint is a very flexible canvas with familiar object manipulation tools Insert multiple images on a slide, drag them around and adjust size as needed
  • 19.
    PowerPoint as yourcanvas (2) Again, basic effects are at your disposal, but don’t go overboard with PowerPoint was them! made for visualizing textual information, therefore it has great tools for editing text on top of images, adjusting fonts etc.
  • 20.
    PowerPoint as yourcanvas (3) Paste the resulting Once you’re ready screenshot into with editing the Paint.NET, crop the objects in image, save it and PowerPoint, enter upload to the web presentation page mode and take a screenshot with ”Print Screen” button
  • 21.