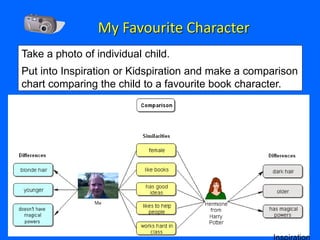
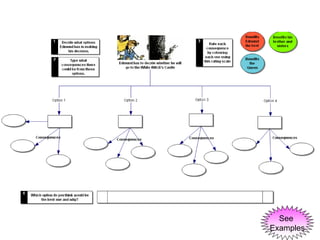
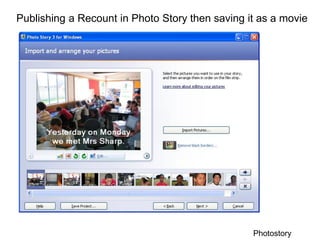
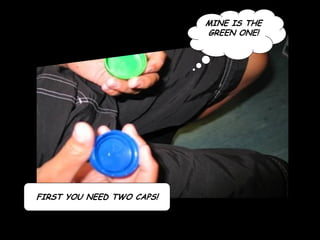
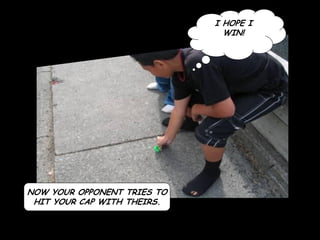
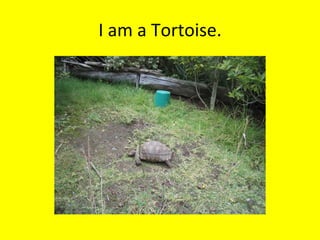
Digital Camera Ideas


http://www.jsharp.co.nz              Or near enough!
http://sharpjacqui.blogspot.com
http://jacquisharp.blogspot.com
http://delicious.com/sharpjacqui
info@jsharp.co.nz
                                     © Jacqui Sharp 2010
Please click on these links and update your software

Always make sure you have the latest
• Java (Windows only)
  http://java.com/en/download/manual.jsp click
  on Verify now
• Flash player
  http://www.adobe.com/products/flashplayer/
• Adobe Shockwave Player
  http://get.adobe.com/shockwave/
• Adobe Reader 9
  http://www.adobe.com/products/acrobat/readst
  ep2.html
Jacqui Sharp’s Weblinks
http://www.jsharp.co.nz Main website

http://sharpjacqui.blogspot.com ICT Teaching and Learning (integration of ICT into
curriculum areas)
http://jacquisharp.blogspot.com Web2.0 and Education (Web2.0 tools that can be
used in Education)
http://jacquiscourses.blogspot.com Course Support Blog

http://mimioiwb.blogspot.com/ Interactive Whiteboards and mimios
http://ipodsiphonesineducation.wikispaces.com/ How to use iPhones & iPods in the
classroom
http://wheretostartwithwikisandblogs.wikispaces.com/ help with wikis and blogs

http://delicious.com/sharpjacqui Delicious website bookmarks

http://schoolsandmacs.blogspot.com/ Hints and tips for Mac users

info@jsharp.co.nz Email address
Delicious
• If you do not have a Delicious
  Account go to
  http://wheretostartwithwikisandblo
  gs.wikispaces.com/Delicious
• follow the instructions
• Most internet tools can work with fairly large
  photos but it is a good idea to compress them
  to less than 500 kb (no smaller than 80kb)
• Use Microsoft Picture Manager (Win) or
  iPhoto (Mac)
How to compress photos
http://wheretostartwithwikisandblogs.
wikispaces.com/Photos+in+Blogs+and
+Wikis
Photofiltre (Win, free) http://photofiltre.free.fr/download_en.htm

Picasa (Win, free) http://picasa.google.com/download/thanks.html


                   Software that might be on your computer


Photo Editor
Picture manager

iPhoto

Microsoft Word or PowerPoint 2007 or 2008
Microsoft Word or PowerPoint 2004
• To Duplicate
   – Click on the photo so it is
     highlighted
   – Press Crtl D (Win) or
     Command D (Mac)
• To Flip (2003 & Mac)             • To Flip (2007)
   – Click on photo so it is          – Click on photo so it is
     highlighted                        highlighted
   – Go to Draw – Rotate and          – Click on Format Tab
     Flip
                                      – Click on
   – Click on Flip Horizontal           Rotate button
                                      – Click Flip Horizontal
• To Crop(2003 & Mac)
  – Click on photo so it is
    highlighted (Picture menu will
    appear)
  – Crop a photo or a graphic by
    clicking on the
    Crop button                       Mac crop button
  – When you click on the Crop
    button the Photo will have         • To Crop (2007)
    black Crop markers around it,           – Click on photo so it is
    click on one of the handles and           highlighted
    drag in towards the middle of           – Click on Format Tab
    the photo.                              – Click on the Crop button
Picture Styles
Click on a Photo, click
on Format and click on a
Picture style.
Click on the scroll arrow
to see more effects.
Add a Photo or a Graphic to an AutoShape:
1.   Select an AutoShape.
1.   Go to Paint can and then Fill Effects.
2.   Click on the Tab Picture.
3.   Click on Select Picture.
4.   Navigate to your My Picture Files.
5.   Select a Photo and click Insert and then OK.
Click on a photo, click
on Format, click on a
Picture Shape and it
will change the shape
of the photo.
Add borders and Shadows

1. Click on the Photo
2. Click on the Line Style button and
     select a style
3. Click on the Line Colour button and
   select a colour


1. Click on the shape to be
     altered.
2. Click on the Shadow Style
button .
3. Select a style.
Enhance your PowerPoint or Word Document by using
several different tools to set out your photos
Rotate a photo by clicking once on the photo and placing
your mouse over a green rotate circle that has appeared at
the top of the photo. Click and drag slightly to the left or
right.
While the photo is still selected click on the Line Colour
button      to select a line and colour. Click on the Line
Style button     and select a style thickness.


Click on the Shadow
Style button to add a drop
shadow to the photo
Click on a photo, click
   on Format, click on    Change the
   Picture Border           thickness
   and it will              of the
   add a border to the      borders
   photo. Select a        by clicking on Weight and
   colour                 choose a
                          Thickness.
2003 & Mac
Click on photo                  2007
Click on Draw – Order           Click on photo
Click on Move to Back (or       Click on Format tab
Front) or Move Backwards (or    Click on Bring to Front or Send
Forwards) or Move in front or   to Back drop down menu
back of text
Align Photos
Click on the Insert Picture button or go
to Insert – Picture – From File.

Click on the Text Wrapping button and
choose Tight

Click and drag on the circular white
handles to resize the photo.

Click on Colour button on Picture menu.


Click on Washout

Click on Automatic to change it back to
the Original.
Go to Insert – Picture .

Click on the Format tab, then Text
Wrapping button, choose Tight

Click and drag on the circular white
handles to resize the photo.

Click on the Recolor button

Click on the third button under Color
Modes

Click on No Recolor to change it back to
the Original.
Inserting Text
Use a photo of a child
for the background of
the story they write
about themselves. This
can be done in Word by
inserting the photo,
click on the Colour
button and select
Washout. Insert a text
box on top of the
photo, remove the
border and inside fill
colour by selecting No
Line and No Fill.
Whole page photos
Enlarge photos to fill the whole page, change the contrast and brightness if necessary.
Type in a textbox with a coloured font, make the textbox see through. Use WordArt for
interesting titles.
Abbie is drawing a picture of her house and her family
with chalk. She has added some flowers to the front of
her house because she likes flowers.
Comic Life
http://plasq.com/downloads/
Math ideas
Scavenger Hunt
Give the students a list of items that they should   Video students talking about
be able to find within the school grounds.           what they have found on their
The students take the photographs within a given     scavenger hunt. Edit them in
time. These can then be put into a slideshow or      Moviemaker or iMovie, save as
printed out and made into a booklet.                 Quicktimes and import into
     Certain colours                                PowerPoint.
     Geometric shapes
     Patterns
Finding shapes
Make a slideshow for children to    Video the shapes. Edit
find the shapes. The first slide
can show a picture titled “What     them in Moviemaker or
shape can you see?” The next        iMovie, save as
slide shows the outlined shape.
The shape can be outlined in
                                    Quicktimes and import into
Paint or KidPix or use the          PowerPoint.
Autoshapes.                         The first slide can show a
Or if you have a projector, the
children can draw around the        picture titled “What shape
shapes on the whiteboard.           can you see?” The next
Older children can take photos of
tessellation or reflective shapes
                                    slide can show a child
and draw using the whiteboard       drawing around it with
and projector.                      chalk.
What shape can you see?
I can see a Circle
Geometry in the School

Send students around the school to search for geometric shapes.
Use AutoShapes in Word or PowerPoint to display photos.
Insert an AutoShape, click on the triangle next to the Paint Can button, select Fill
Effects, Click on the Picture Tab, click on Select Picture, navigate to where your
pictures are stored, click on picture, and click OK.


                                                                           Autoshapes
Counting to ten
Take photos of                                   Create a video of
children, insert                                 children counting
into                                             to 10. Press
PowerPoint.                                      Pause after each
Use animation                                    child has placed
to show the                                      themselves in the
numbers. Add                                     clip. Edit in
sound by                                         Moviemaker or
recording                                        iMovie and add
children’s                                       text, voices and
voices.                                          music.


  Slideshow by Nathalie Strong, Brookby School
One


1
Add effects to Photos, Graphics or WordArt


Click on the photo, graphic or WordArt to select it
Select Custom Animation from the Dropdown menu on the
TaskPane
Click on Add Effect
      You have a choice what you would like the photo to do
      on Entrance, Exit and you can add an Emphasis. Click on
      More Effects in each of the menu choices to discover
      more effects. Each effect will appear in the side panel
      with icons itemizing what the effect is.
      To remove an effect, click on the Effect in the Side panel
      and click the Remove button
Photograph a toy or video it, stop the video and
place next object, record and repeat. Edit in
Moviemaker or iMovie and add text, voices and
music.
Photographed toys can be put into PowerPoint.


Dinosaur Doubles
           Photographs by Jeremy & Renee
                    Brookby School
1 and 1 is 2
3 and 3 is 6
Mathematical flash
                  cards
Take photos or videos of groups of familiar objects
to reinforce number or groups of numbers i.e. a
hand for the number 5, legs for 2.
Make a slideshow in PowerPoint, PhotoStory,
MovieMaker or iMovie with voice-overs saying the
numbers.
Make Flash cards.
Groups with 5

Created by Nathalie Strong and children of Brookby School
Reading Ideas
My Favourite Character
Take a photo of individual child.
Put into Inspiration or Kidspiration and make a comparison
chart comparing the child to a favourite book character.
I can read!
Take photos or video well known places (city
landmarks, favourite restaurants, local shopping
centre).
Prepare a book, SlideShow or Movie for children to
read along with.
If you do a SlideShow in PowerPoint you can add the
optional extra of inserting the voice reading the text as
a speaker button on the screen. Children can then click
on the speaker to hear the text read.
Go to Insert Movies and Sounds – Record a Sound.
Record the sound, rename the sound, and click OK.

                                             Record voices
I can see the
Sky Tower
Blue Fishy Socks
       and
Black Doggy Socks
Little Billy had blue fishy socks.
Big Billy had black doggy socks.
And he made people walk the
Plank – he said.
He was the terror of the seven
Seas.


Captain Teachum’s Buried
Treasure
Korky Paul and Peter Carter
Blooms Understanding Stage
Word Smart
Picture Smart


 He said he made
     them walk
        the…

          ship

         plank
                      See
                    Examples
He said he made
    them walk
       the…
     plank
Oops try again


Hint: what rhymes with ‘bank’?
What would make a ladybird bad
                  tempered?
                                          1.


                                          2.


                                          3.


Blooms Understanding and Applying Stage
White, Black and Red Hat
Word Smart
Picture Smart
Nature Smart
What environment would a ladybird
          need to be in to be happy?
                               1.


                               2.


                               3.


                               4.


                               5.
Blooms Analysing Stage
White, Yellow and Green Hat
Word Smart                    Click here to find out some information
Picture Smart
Nature Smart
See
Examples
Decision, Options and Consequences
                                                 Decision
                                   Edmund has to decide whether
                                 He will go to the White Witch’s Castle


Option 1:            Option 2:                    Option 3:


                                 Blooms Analysing Stage
                                 White, Black, Red, Blue, Yellow and Green Hat
                                 Word Smart
                                 Number Smart
See
Examples
Nana’s in the plum
       tree
      By Jan Cartwright
Drawings by Murray Grimsdale

You need 3 people to read this story.
• Nana
• Young girl
• Narrator
“What are you doing up in that tree,
 Nana?” Nana didn’t even hear me.
Then I saw the bees. I could hear them
buzzing. I could see them swarming in
 the tree, like a big football made of
  bees. Nana was right beside them
             holding a box.
I didn’t want to look. I didn’t want to
see my Nana eaten alive by thousands
                of bees.
I put the big box where Nana told me. I still
didn’t want to look. But somehow I couldn’t
help looking. Nana put her box on top of the big
box, right under the swarm of bees. She told me
to stand back.

I stood back, all right!
I hid.
I hid behind the shed and peeped out.
riting ideas
A-Z of Zoo Animals
      By room 2
The African lion is a carnivore that lives in the grasslands of
  Africa.. They live in prides. The females do most of the
  hunting but the males eat first. You can hear a lions roar 10
  kilometres away.
The Bornean Orang-utan is a mammal that lives in the
  Rain forests in Asia. They like to live by themselves.
  They are a highly endangered species.
Writing Prompt
Take photos of children participating in an activity
in the class or on a school trip. Insert the photo
into a Word document with a heading and a
starting prompt for writing.
Poetry or Writing

A rebus is where pictures represent
words.
Illustrate your writing or poems by
inserting photos in line with the text.
Take photos for a simulation illustrating
the poem using people objects or things.
Turn the writing into a Rebus
Rebus


Blooms Creating Stage
White, Blue and Green Hat
Word Smart                     See
Picture Smart                Examples
Nature Smart
Build a story

  Add a graphic of an animal. Add a text box and
type in a story about what is happening. Duplicate
  that slide and add another graphic or two and
  update the story. Repeat these steps until the
                   story is told.
It was a bright sunny day and Leo
the Lion was stuck in
Auckland Zoo. He was very
hungry.


                          Zoo 2.inl
Leo looked up and saw his
friend Ellie the Elephant
coming over to have a chat.


                      Zoo 2.inl
Ellie complained to Leo that the
Hyena family who had moved in
to the Zoo were keeping her
awake with their constant
laughing.


                           Zoo 2.inl
Build a story
Add your Wild animal. Add a text box and type in
 a story about what is happening. Duplicate that
   slide and add your friends Wild animals and
  update the story. Repeat these steps until the
                   story is told.
Elerhino was walking in
  the woods minding
  her own business
  when…
Mamatrunk suddenly
 appeared from
 behind a bush.
                      Hi Elerhino! I
                      haven’t seen
                     you in a while!
                      How are the
                         spots?
Elerhino didn’t get on
  very well with
  Mamatrunk as she
  was always teasing     Yeah hi! Got to
                          run as I am
  here about her red       meeting up
  spots.                  with Leolite,
                         and you know
                         how he gets if
                          you are late!
Publishing a Recount in Photo Story then saving it as a movie


                                                 Photostory
Comic Slideshow

 How to play caps
MINE IS THE
                           GREEN ONE!


FIRST YOU NEED TWO CAPS!
OUCH THIS
                            IS GOING TO
                                HURT!


YOU FLICK ONE OF THE CAPS
    ONTO THE GROUND!
I HOPE I
                               WIN!


NOW YOUR OPPONENT TRIES TO
 HIT YOUR CAP WITH THEIRS.
Who am I?

  Read the description, guess the
answer, click to see if you were right!
I have a hard shell.
     I am a herbivore.
        I am brown.
I carry my home with me!
I am a Tortoise.
Class Diary

Write about
•everyday events
•trips out of school
•visitors to school
•new children in the class
•world events that have happened that day.
16 May 2005


Today we went on a class trip to the top of
Mount Eden. We could see Auckland City, the
Harbour Bridge and the Sky Tower. We learnt
that we were standing on a Volcano.
rt ideas
Stained Glass Art
Take a photo of a student or scenery; use a photo filter or photo
effects on your photo editing software if it is available to turn the
photo into Stained Glass effect. Mac Users can do this in Word
from the Effects button on the Picture tool bar. Children can
recreate the Stained Glass effect using Black ink and Dye.
Stained glass pictures
Autoshapes
Ctrl D to duplicate.
Hold the Shift key down when clicking and dragging a shape
to get a symmetrical shape.
Hold down the Ctrl key to move the shape in small increments
Group the objects to move them as one graphic (select them
all and go to Draw - Group.


                                              Make a tessellation
Monet paintings
Take photos of gardens or flowers.
Open up a photo editing programme and play around with the effects or if you are a Mac user
open up Word or PowerPoint 2001,X or 2004 insert the photo, click on Special Effects (or
Effects) in the Picture toolbar and choose an effect for your photo.
Print out the photos. Children paint a picture using the photo as their motivation. This is a great
way to stop children from thinking that everything they draw or paint has to be real looking.
Me and ME
    Take a black-and-
    white headshot of
    each student,
    Insert it onto a page.
    Use the crop tool to
    halve the picture.
    Students draw the
    other half of the
    picture.
    To make it easier
    draw grid lines and
    children only draw
    what they see in
    each grid.
Or import this picture into
Kidpix and finish the
drawing
Jazzed up Portraits
Take photos of individuals, head and shoulder or whole body.
Transform those individuals by importing the photos into KidPix or a Paint
programme.
Use the draw tools to transform the photo.
Children take
a photo of
                 Distorted Faces
each other
and put into a
photo editing
programme
and change
the look of
the image.
Mac Users
can create
interesting
effects by
using Effects
button on the
Picture
Toolbar.
Windows
users can
use Photo
Editor in
Microsoft
Tools
Greeting Card
Take a photo of an individual piece of art work. Create a greeting card in Publisher,
The Print Shop or iPhoto
Tonal Drawings
Take a photo of a scene or use the Macro
function on the camera to take close up shots.
Change it to Grayscale by clicking on the Colour
button in the Picture toolbar.
Click on Washout.
Children draw the picture using pencil or ink wash
to show tonal areas.
Save the picture and then
Import into a drawing
programme like Artrage
or KidPix.


                            Artrage
Using the Macro feature


               MACRO


Look for this symbol on your camera
      and take close up shots
Disclosure
        What do you think this is?

Take a super close up of an object with a video camera
or a camera and children make predictions of what it is.
Could show it as a SlideShow with the first slide being
the close up, the next slide could show a little more and
so on until the children discover what it is.
This could be an introduction to a new topic.
Digital camera ideas

Digital camera ideas

  • 1.
    Digital Camera Ideas http://www.jsharp.co.nz Or near enough! http://sharpjacqui.blogspot.com http://jacquisharp.blogspot.com http://delicious.com/sharpjacqui info@jsharp.co.nz © Jacqui Sharp 2010
  • 2.
    Please click onthese links and update your software Always make sure you have the latest • Java (Windows only) http://java.com/en/download/manual.jsp click on Verify now • Flash player http://www.adobe.com/products/flashplayer/ • Adobe Shockwave Player http://get.adobe.com/shockwave/ • Adobe Reader 9 http://www.adobe.com/products/acrobat/readst ep2.html
  • 3.
    Jacqui Sharp’s Weblinks http://www.jsharp.co.nzMain website http://sharpjacqui.blogspot.com ICT Teaching and Learning (integration of ICT into curriculum areas) http://jacquisharp.blogspot.com Web2.0 and Education (Web2.0 tools that can be used in Education) http://jacquiscourses.blogspot.com Course Support Blog http://mimioiwb.blogspot.com/ Interactive Whiteboards and mimios http://ipodsiphonesineducation.wikispaces.com/ How to use iPhones & iPods in the classroom http://wheretostartwithwikisandblogs.wikispaces.com/ help with wikis and blogs http://delicious.com/sharpjacqui Delicious website bookmarks http://schoolsandmacs.blogspot.com/ Hints and tips for Mac users info@jsharp.co.nz Email address
  • 4.
    Delicious • If youdo not have a Delicious Account go to http://wheretostartwithwikisandblo gs.wikispaces.com/Delicious • follow the instructions
  • 5.
    • Most internettools can work with fairly large photos but it is a good idea to compress them to less than 500 kb (no smaller than 80kb) • Use Microsoft Picture Manager (Win) or iPhoto (Mac) How to compress photos http://wheretostartwithwikisandblogs. wikispaces.com/Photos+in+Blogs+and +Wikis
  • 6.
    Photofiltre (Win, free)http://photofiltre.free.fr/download_en.htm Picasa (Win, free) http://picasa.google.com/download/thanks.html Software that might be on your computer Photo Editor Picture manager iPhoto Microsoft Word or PowerPoint 2007 or 2008 Microsoft Word or PowerPoint 2004
  • 8.
    • To Duplicate – Click on the photo so it is highlighted – Press Crtl D (Win) or Command D (Mac) • To Flip (2003 & Mac) • To Flip (2007) – Click on photo so it is – Click on photo so it is highlighted highlighted – Go to Draw – Rotate and – Click on Format Tab Flip – Click on – Click on Flip Horizontal Rotate button – Click Flip Horizontal
  • 9.
    • To Crop(2003& Mac) – Click on photo so it is highlighted (Picture menu will appear) – Crop a photo or a graphic by clicking on the Crop button Mac crop button – When you click on the Crop button the Photo will have • To Crop (2007) black Crop markers around it, – Click on photo so it is click on one of the handles and highlighted drag in towards the middle of – Click on Format Tab the photo. – Click on the Crop button
  • 10.
    Picture Styles Click ona Photo, click on Format and click on a Picture style. Click on the scroll arrow to see more effects.
  • 11.
    Add a Photoor a Graphic to an AutoShape: 1. Select an AutoShape. 1. Go to Paint can and then Fill Effects. 2. Click on the Tab Picture. 3. Click on Select Picture. 4. Navigate to your My Picture Files. 5. Select a Photo and click Insert and then OK.
  • 12.
    Click on aphoto, click on Format, click on a Picture Shape and it will change the shape of the photo.
  • 13.
    Add borders andShadows 1. Click on the Photo 2. Click on the Line Style button and select a style 3. Click on the Line Colour button and select a colour 1. Click on the shape to be altered. 2. Click on the Shadow Style button . 3. Select a style.
  • 14.
    Enhance your PowerPointor Word Document by using several different tools to set out your photos Rotate a photo by clicking once on the photo and placing your mouse over a green rotate circle that has appeared at the top of the photo. Click and drag slightly to the left or right. While the photo is still selected click on the Line Colour button to select a line and colour. Click on the Line Style button and select a style thickness. Click on the Shadow Style button to add a drop shadow to the photo
  • 15.
    Click on aphoto, click on Format, click on Change the Picture Border thickness and it will of the add a border to the borders photo. Select a by clicking on Weight and colour choose a Thickness.
  • 16.
    2003 & Mac Clickon photo 2007 Click on Draw – Order Click on photo Click on Move to Back (or Click on Format tab Front) or Move Backwards (or Click on Bring to Front or Send Forwards) or Move in front or to Back drop down menu back of text
  • 17.
  • 18.
    Click on theInsert Picture button or go to Insert – Picture – From File. Click on the Text Wrapping button and choose Tight Click and drag on the circular white handles to resize the photo. Click on Colour button on Picture menu. Click on Washout Click on Automatic to change it back to the Original.
  • 19.
    Go to Insert– Picture . Click on the Format tab, then Text Wrapping button, choose Tight Click and drag on the circular white handles to resize the photo. Click on the Recolor button Click on the third button under Color Modes Click on No Recolor to change it back to the Original.
  • 20.
    Inserting Text Use aphoto of a child for the background of the story they write about themselves. This can be done in Word by inserting the photo, click on the Colour button and select Washout. Insert a text box on top of the photo, remove the border and inside fill colour by selecting No Line and No Fill.
  • 21.
    Whole page photos Enlargephotos to fill the whole page, change the contrast and brightness if necessary. Type in a textbox with a coloured font, make the textbox see through. Use WordArt for interesting titles.
  • 22.
    Abbie is drawinga picture of her house and her family with chalk. She has added some flowers to the front of her house because she likes flowers.
  • 23.
  • 24.
  • 25.
    Scavenger Hunt Give thestudents a list of items that they should Video students talking about be able to find within the school grounds. what they have found on their The students take the photographs within a given scavenger hunt. Edit them in time. These can then be put into a slideshow or Moviemaker or iMovie, save as printed out and made into a booklet. Quicktimes and import into Certain colours PowerPoint. Geometric shapes Patterns
  • 26.
    Finding shapes Make aslideshow for children to Video the shapes. Edit find the shapes. The first slide can show a picture titled “What them in Moviemaker or shape can you see?” The next iMovie, save as slide shows the outlined shape. The shape can be outlined in Quicktimes and import into Paint or KidPix or use the PowerPoint. Autoshapes. The first slide can show a Or if you have a projector, the children can draw around the picture titled “What shape shapes on the whiteboard. can you see?” The next Older children can take photos of tessellation or reflective shapes slide can show a child and draw using the whiteboard drawing around it with and projector. chalk.
  • 27.
  • 28.
    I can seea Circle
  • 29.
    Geometry in theSchool Send students around the school to search for geometric shapes. Use AutoShapes in Word or PowerPoint to display photos. Insert an AutoShape, click on the triangle next to the Paint Can button, select Fill Effects, Click on the Picture Tab, click on Select Picture, navigate to where your pictures are stored, click on picture, and click OK. Autoshapes
  • 30.
    Counting to ten Takephotos of Create a video of children, insert children counting into to 10. Press PowerPoint. Pause after each Use animation child has placed to show the themselves in the numbers. Add clip. Edit in sound by Moviemaker or recording iMovie and add children’s text, voices and voices. music. Slideshow by Nathalie Strong, Brookby School
  • 31.
  • 32.
    Add effects toPhotos, Graphics or WordArt Click on the photo, graphic or WordArt to select it Select Custom Animation from the Dropdown menu on the TaskPane Click on Add Effect You have a choice what you would like the photo to do on Entrance, Exit and you can add an Emphasis. Click on More Effects in each of the menu choices to discover more effects. Each effect will appear in the side panel with icons itemizing what the effect is. To remove an effect, click on the Effect in the Side panel and click the Remove button
  • 33.
    Photograph a toyor video it, stop the video and place next object, record and repeat. Edit in Moviemaker or iMovie and add text, voices and music. Photographed toys can be put into PowerPoint. Dinosaur Doubles Photographs by Jeremy & Renee Brookby School
  • 34.
    1 and 1is 2
  • 35.
    3 and 3is 6
  • 36.
    Mathematical flash cards Take photos or videos of groups of familiar objects to reinforce number or groups of numbers i.e. a hand for the number 5, legs for 2. Make a slideshow in PowerPoint, PhotoStory, MovieMaker or iMovie with voice-overs saying the numbers. Make Flash cards.
  • 37.
    Groups with 5 Createdby Nathalie Strong and children of Brookby School
  • 39.
  • 40.
    My Favourite Character Takea photo of individual child. Put into Inspiration or Kidspiration and make a comparison chart comparing the child to a favourite book character.
  • 41.
    I can read! Takephotos or video well known places (city landmarks, favourite restaurants, local shopping centre). Prepare a book, SlideShow or Movie for children to read along with. If you do a SlideShow in PowerPoint you can add the optional extra of inserting the voice reading the text as a speaker button on the screen. Children can then click on the speaker to hear the text read. Go to Insert Movies and Sounds – Record a Sound. Record the sound, rename the sound, and click OK. Record voices
  • 42.
    I can seethe Sky Tower
  • 43.
    Blue Fishy Socks and Black Doggy Socks
  • 44.
    Little Billy hadblue fishy socks. Big Billy had black doggy socks.
  • 45.
    And he madepeople walk the Plank – he said. He was the terror of the seven Seas. Captain Teachum’s Buried Treasure Korky Paul and Peter Carter
  • 46.
    Blooms Understanding Stage WordSmart Picture Smart He said he made them walk the… ship plank See Examples
  • 47.
    He said hemade them walk the… plank
  • 48.
    Oops try again Hint:what rhymes with ‘bank’?
  • 49.
    What would makea ladybird bad tempered? 1. 2. 3. Blooms Understanding and Applying Stage White, Black and Red Hat Word Smart Picture Smart Nature Smart
  • 50.
    What environment woulda ladybird need to be in to be happy? 1. 2. 3. 4. 5. Blooms Analysing Stage White, Yellow and Green Hat Word Smart Click here to find out some information Picture Smart Nature Smart
  • 51.
  • 52.
    Decision, Options andConsequences Decision Edmund has to decide whether He will go to the White Witch’s Castle Option 1: Option 2: Option 3: Blooms Analysing Stage White, Black, Red, Blue, Yellow and Green Hat Word Smart Number Smart
  • 53.
  • 54.
    Nana’s in theplum tree By Jan Cartwright Drawings by Murray Grimsdale You need 3 people to read this story. • Nana • Young girl • Narrator
  • 55.
    “What are youdoing up in that tree, Nana?” Nana didn’t even hear me.
  • 56.
    Then I sawthe bees. I could hear them buzzing. I could see them swarming in the tree, like a big football made of bees. Nana was right beside them holding a box.
  • 57.
    I didn’t wantto look. I didn’t want to see my Nana eaten alive by thousands of bees.
  • 58.
    I put thebig box where Nana told me. I still didn’t want to look. But somehow I couldn’t help looking. Nana put her box on top of the big box, right under the swarm of bees. She told me to stand back. I stood back, all right! I hid. I hid behind the shed and peeped out.
  • 59.
  • 60.
    A-Z of ZooAnimals By room 2
  • 61.
    The African lionis a carnivore that lives in the grasslands of Africa.. They live in prides. The females do most of the hunting but the males eat first. You can hear a lions roar 10 kilometres away.
  • 62.
    The Bornean Orang-utanis a mammal that lives in the Rain forests in Asia. They like to live by themselves. They are a highly endangered species.
  • 63.
    Writing Prompt Take photosof children participating in an activity in the class or on a school trip. Insert the photo into a Word document with a heading and a starting prompt for writing.
  • 64.
    Poetry or Writing Arebus is where pictures represent words. Illustrate your writing or poems by inserting photos in line with the text. Take photos for a simulation illustrating the poem using people objects or things. Turn the writing into a Rebus
  • 65.
    Rebus Blooms Creating Stage White,Blue and Green Hat Word Smart See Picture Smart Examples Nature Smart
  • 66.
    Build a story Add a graphic of an animal. Add a text box and type in a story about what is happening. Duplicate that slide and add another graphic or two and update the story. Repeat these steps until the story is told.
  • 67.
    It was abright sunny day and Leo the Lion was stuck in Auckland Zoo. He was very hungry. Zoo 2.inl
  • 68.
    Leo looked upand saw his friend Ellie the Elephant coming over to have a chat. Zoo 2.inl
  • 69.
    Ellie complained toLeo that the Hyena family who had moved in to the Zoo were keeping her awake with their constant laughing. Zoo 2.inl
  • 70.
    Build a story Addyour Wild animal. Add a text box and type in a story about what is happening. Duplicate that slide and add your friends Wild animals and update the story. Repeat these steps until the story is told.
  • 71.
    Elerhino was walkingin the woods minding her own business when…
  • 72.
    Mamatrunk suddenly appearedfrom behind a bush. Hi Elerhino! I haven’t seen you in a while! How are the spots?
  • 73.
    Elerhino didn’t geton very well with Mamatrunk as she was always teasing Yeah hi! Got to run as I am here about her red meeting up spots. with Leolite, and you know how he gets if you are late!
  • 74.
    Publishing a Recountin Photo Story then saving it as a movie Photostory
  • 75.
    Comic Slideshow Howto play caps
  • 76.
    MINE IS THE GREEN ONE! FIRST YOU NEED TWO CAPS!
  • 77.
    OUCH THIS IS GOING TO HURT! YOU FLICK ONE OF THE CAPS ONTO THE GROUND!
  • 78.
    I HOPE I WIN! NOW YOUR OPPONENT TRIES TO HIT YOUR CAP WITH THEIRS.
  • 79.
    Who am I? Read the description, guess the answer, click to see if you were right!
  • 80.
    I have ahard shell. I am a herbivore. I am brown. I carry my home with me!
  • 81.
    I am aTortoise.
  • 82.
    Class Diary Write about •everydayevents •trips out of school •visitors to school •new children in the class •world events that have happened that day.
  • 83.
    16 May 2005 Todaywe went on a class trip to the top of Mount Eden. We could see Auckland City, the Harbour Bridge and the Sky Tower. We learnt that we were standing on a Volcano.
  • 84.
  • 85.
    Stained Glass Art Takea photo of a student or scenery; use a photo filter or photo effects on your photo editing software if it is available to turn the photo into Stained Glass effect. Mac Users can do this in Word from the Effects button on the Picture tool bar. Children can recreate the Stained Glass effect using Black ink and Dye.
  • 86.
  • 87.
    Autoshapes Ctrl D toduplicate. Hold the Shift key down when clicking and dragging a shape to get a symmetrical shape. Hold down the Ctrl key to move the shape in small increments Group the objects to move them as one graphic (select them all and go to Draw - Group. Make a tessellation
  • 88.
    Monet paintings Take photosof gardens or flowers. Open up a photo editing programme and play around with the effects or if you are a Mac user open up Word or PowerPoint 2001,X or 2004 insert the photo, click on Special Effects (or Effects) in the Picture toolbar and choose an effect for your photo. Print out the photos. Children paint a picture using the photo as their motivation. This is a great way to stop children from thinking that everything they draw or paint has to be real looking.
  • 89.
    Me and ME Take a black-and- white headshot of each student, Insert it onto a page. Use the crop tool to halve the picture. Students draw the other half of the picture. To make it easier draw grid lines and children only draw what they see in each grid. Or import this picture into Kidpix and finish the drawing
  • 91.
    Jazzed up Portraits Takephotos of individuals, head and shoulder or whole body. Transform those individuals by importing the photos into KidPix or a Paint programme. Use the draw tools to transform the photo.
  • 92.
    Children take a photoof Distorted Faces each other and put into a photo editing programme and change the look of the image. Mac Users can create interesting effects by using Effects button on the Picture Toolbar. Windows users can use Photo Editor in Microsoft Tools
  • 93.
    Greeting Card Take aphoto of an individual piece of art work. Create a greeting card in Publisher, The Print Shop or iPhoto
  • 94.
    Tonal Drawings Take aphoto of a scene or use the Macro function on the camera to take close up shots. Change it to Grayscale by clicking on the Colour button in the Picture toolbar. Click on Washout. Children draw the picture using pencil or ink wash to show tonal areas.
  • 95.
    Save the pictureand then Import into a drawing programme like Artrage or KidPix. Artrage
  • 96.
    Using the Macrofeature MACRO Look for this symbol on your camera and take close up shots
  • 99.
    Disclosure What do you think this is? Take a super close up of an object with a video camera or a camera and children make predictions of what it is. Could show it as a SlideShow with the first slide being the close up, the next slide could show a little more and so on until the children discover what it is. This could be an introduction to a new topic.