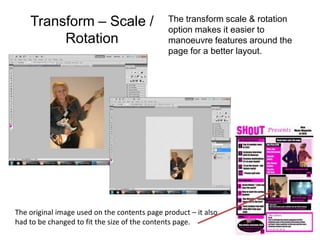
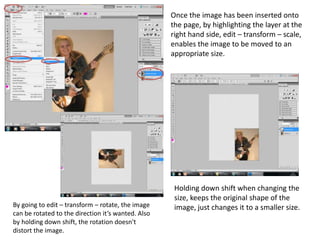
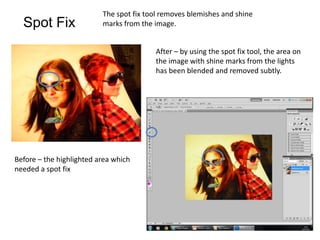
Photoshop was used to create and edit images, text, and other features for the front cover, contents page, and parts of a double page spread for a magazine. The quick selection tool allowed images to be cut out and placed on backgrounds of choice. Transform tools like scale and rotation helped maneuver elements on the page for better layout. Layering enabled text and images to be placed on top of backgrounds and color blocks. The spot fix tool removed blemishes from images.
Website image editing tutorial: WordPress, Paint.NET and PowerPoint(!)Jukka Niiranen
Don't know anything about editing images, but still need to produce web articles, blog posts and other online content with photos? Here's a tutorial for the absolute beginner on how to perform basic image editing with Paint.NET and upload images to WordPress. Also some tips on how you combine text and image content with PowerPoint, then export the results onto your website. Who needs Photoshop anyway?
The Art created from the manipulation of two or more photographic images combined in whole or in part to create something new. Photo manipulation is an excellent example of a mixture of a traditional art form with the latest technologies to create an illusion of two or more photographic images combined.There are several ways in which image manipulation services can be used to improve the quality of images.
ICPS offer Exclusive photo manipulation service for your company or business, we request you to have a free trial or contact us. We process images in 24 hours.
SnowFox Photo Collage Maker is a fun and easy-to-use program for making photo collages and digital pictures scrapbooks from your digital pictures to share with friends, family and website. This Photo Collage Maker provides different collage styles to make your own collage for desktop wallpapers, posters, wedding invitations, personalized avatar, making photo album, sharing them on facebook, flikr . Or print beautiful collages as a special gift.
E-LEARNING TECHNOLOGIES
Tutorial by Martin Ebner, Martin Schön and Sandra Schön
CC BY SA BIMS e.V. | Martin Ebner, Martin Schön, Sandra Schön | April 2014
URL: http://creativecommons.org/licenses/by-sa/2.0/de/
Photoshop is unlike other common software interfaces which emulate virtual typewriters or graphing paper. Photoshop creates an artist's virtual studio/darkroom. When you open the program you see a toolbox on the left with tools you will use to manipulate your images, and on the right, a white square which is your "canvas" or work area. The gray area surrounding the canvas is not part of your image, but only defines its edges.
1. Evaluation – Question 6
What have you learnt about
technologies from the process of
constructing this product?
2. What was Photoshop used for?
Photoshop was used for the front cover and
contents page of my media products and parts
of the double page spread although most was
constructed on Microsoft Publisher. It was
crucial to use Photoshop to create and edit
images, text and features within the products to
create a conventional and professional looking
magazine.
3. When using the quick selection tool on
Quick Selection Tool Photoshop, it allows the image to be cut
out of it’s background. The is easy to do
and helps create images that can be used
on background colours of choice.
Image used on final double
page spread.
Before After
4. It’s important to duplicate the
original image so if you go
wrong when editing there is a
back up. The quick selection
tool is located at the side of
the screen.
By clicking and slowly dragging
the mouse over the area you
want to remove, the area is
highlighted and then by clicking
delete, it shows a grey
chequered background.
5. Transform – Scale / The transform scale & rotation
option makes it easier to
Rotation manoeuvre features around the
page for a better layout.
The original image used on the contents page product – it also
had to be changed to fit the size of the contents page.
6. Once the image has been inserted onto
the page, by highlighting the layer at the
right hand side, edit – transform – scale,
enables the image to be moved to an
appropriate size.
Holding down shift when changing the
size, keeps the original shape of the
By going to edit – transform – rotate, the image image, just changes it to a smaller size.
can be rotated to the direction it’s wanted. Also
by holding down shift, the rotation doesn't
distort the image.
7. The character tool allows text to be placed onto the
Character page.
By using the character tool at the side
of the screen, text can be used and
edited. The colours, font and size are
all editable and can be changed each
time.
Text used on all of the media
products – shown here on the
contents page.
8. The spot fix tool removes blemishes and shine
Spot Fix marks from the image.
After – by using the spot fix tool, the area on
the image with shine marks from the lights
has been blended and removed subtly.
Before – the highlighted area which
needed a spot fix
9. Layering enables text/images to be placed on top of
Layering backgrounds and colour blocks.
After – the text has been layered on top of
the coloured blocks and background
image. It is easier to see and shows clearly
when alternating the colour scheme.
Before – the page before any text had been
placed on to it. The panel beside the page
shows the order in which features appear
on to the products. To get the layer on top
of another, it must be above the feature it
needs to be on top of