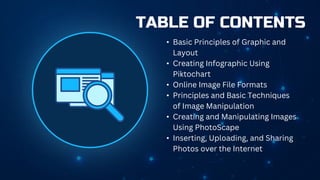
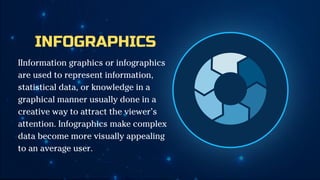
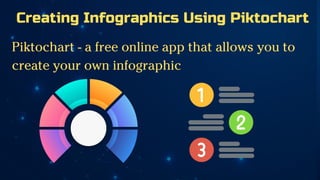
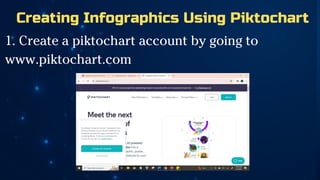
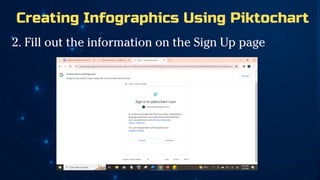
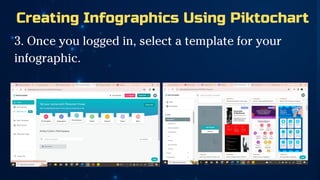
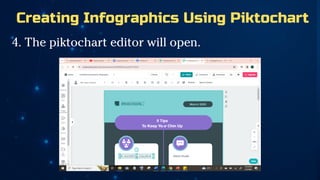
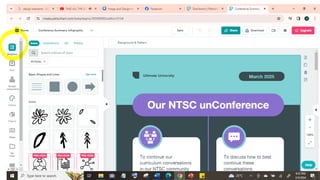
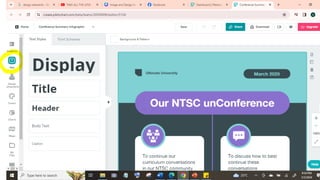
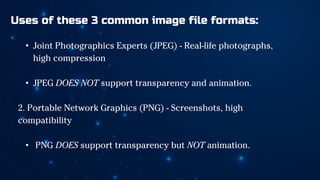
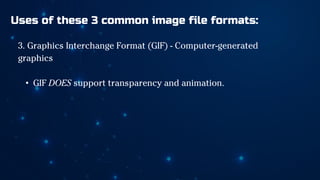
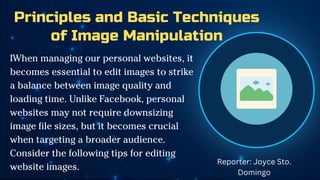
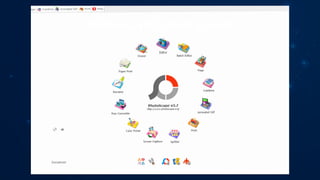
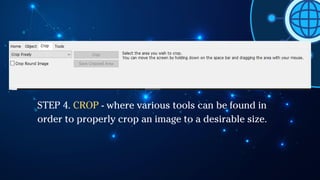
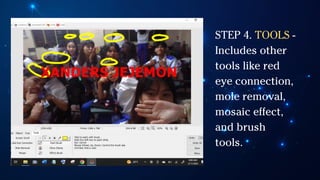
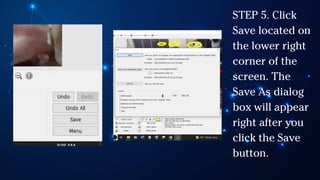
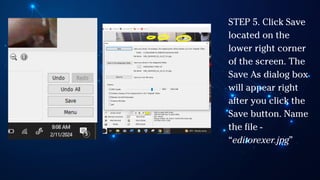
Image and Design for
Online Environment
EMPOWERMENT TECHNOLOGY
GROUP 6
TABLE OF CONTENTS
• Basic Principles of Graphic and
Layout
• Creating Infographic Using
Piktochart
• Online Image File Formats
• Principles and Basic Techniques
of Image Manipulation
• Creating and Manipulating Images
Using PhotoScape
• Inserting, Uploading, and Sharing
Photos over the Internet
6 Basic Principles of
Graphics and Layout
BASIC PRINCIPLES OF GRAPHICS AND LAYOUT
• Balance - The
visual weight of
objects, texture,
colors, and space
is EVENLY
distributed on the
screen.
SOURCE: AMELIA BOOK
PLUGIN
BASIC PRINCIPLES OF GRAPHICS AND LAYOUT
2. Emphasis - An area
in the design that
may appear different
in size, texture, shape
or color to attract the
viewer’s attention.
SOURCE: EMPOWERMENT TECHNOLOGY -
WORDPRESS
BASIC PRINCIPLES OF GRAPHICS AND LAYOUT
3. Movement - Visual elements guide the viewer’s eyes
around the screen.
SOURCE:
BASIC PRINCIPLES OF GRAPHICS AND LAYOUT
4. Pattern, Repetition,
Rhythm - These are
the repeating visual
element on an image
or layout to create
unity in the layout or
image.
SOURCE: MEDIUM
SOURCE: JULIANA KUNSTLER
BASIC PRINCIPLES OF GRAPHICS AND LAYOUT
5. Proportion - Visual
elements create a
sense of unity where
they relate well with
one another.
SOURCE: Design & Illusration
BASIC PRINCIPLES OF GRAPHICS AND LAYOUT
6. Variety - This uses
several design
elements to draw a
viewer’s attention.
SOURCE: Cedar Bluff Graphics Web & Layout
INFOGRAPHICS
IInformation graphics or infographics
are used to represent information,
statistical data, or knowledge in a
graphical manner usually done in a
creative way to attract the viewer’s
attention. Infographics make complex
data become more visually appealing
to an average user.
Creating Infographics Using Piktochart
Piktochart - a free online app that allows you to
create your own infographic
Creating Infographics Using Piktochart
1. Create a piktochart account by going to
www.piktochart.com
Creating Infographics Using Piktochart
2. Fill out the information on the Sign Up page
Creating Infographics Using Piktochart
3. Once you logged in, select a template for your
infographic.
Creating Infographics Using Piktochart
4. The piktochart editor will open.
Creating Infographics Using Piktochart
4. On the left side of the screen you will see these
components:
Online Image File
Format
Unlike images that are found in our
computer, you have to consider that
website images should be more
compressed because data travels over
the internet and not everyone has a
fast internet connection.
Reporter: Vince
Ferrer
Common Image File Formats:
• Joint Photographics Experts Group (JPEG) - is a widely used
web image format, employing lossy compression to reduce file
sizes while retaining acceptable image quality, ideal for
photographs and intricate images.
Common Image File Formats:
2. Portable Network Graphics (PNG) - a versatile image format,
supports lossless compression and transparency, making it
suitable for sharp-edged images, text, and solid colors, albeit at
larger file sizes compared to JPEG.
Common Image File Formats:
3. GIF (Graphics Interchange Format) - known for its support of
animations and simple graphics, utilizes lossless compression and
transparency, rendering it suitable for short animations, logos, and
graphics with limited colors.
Uses of these 3 common image file formats:
• Joint Photographics Experts (JPEG) - Real-life photographs,
high compression
• JPEG DOES NOT support transparency and animation.
2. Portable Network Graphics (PNG) - Screenshots, high
compatibility
• PNG DOES support transparency but NOT animation.
Uses of these 3 common image file formats:
3. Graphics Interchange Format (GIF) - Computer-generated
graphics
• GIF DOES support transparency and animation.
Principles and Basic Techniques
of Image Manipulation
IWhen managing our personal websites, it
becomes essential to edit images to strike
a balance between image quality and
loading time. Unlike Facebook, personal
websites may not require downsizing
image file sizes, but it becomes crucial
when targeting a broader audience.
Consider the following tips for editing
website images.
Reporter: Joyce Sto.
Domingo
• Choose the right file format.
-- Try to make a real-life photograph into GIF to
see the difference between PNG and JPEG.
Knowing the purpose is the key to finding out
the best file format.
2. Choose the right Image size
• A camera with a higher megapixel count produces larger
image sizes. However, monitors have resolution limits, so
having a high number of megapixels doesn't necessarily
display everything. Therefore, it's not always advisable to
have large images on a website. It's important to determine
how much space you want the image to take up.
Alternatively, you can provide a "preview" image with the
option for the audience to view the full size.
3. Caption it
• -remember to put a caption on images
whenever possible. If its not related to
the web page, then remove it.
Creating and
Manipulating
Images Using
Photoscape
Photoscape is a good tool because it is
feasible for beginners and advanced
users alike.
Photoscape’s main screen
it is a picture viewer with features the
same with most image viewers like
changing image orientation.
VIEWER
It alters the appearance of a SINGLE
IMAGE.
EDITOR
Alters the appearance of MULTIPLE
IMAGES
BATCH EDITOR
Arranges several photos to create a
single one; similar to a MOSAIC.
PAGE
links several images together to form
a bigger image.
COMBINE
Allows you to create an animated GIF
from several pictures.
ANIMATED GIF
readies pictures for printing
PRINT
divides a single photo into multiple
parts
SPLITTER
Captures the screen and saves it.
SCREEN CAPTURE
Grabs a pixel from your screen to be
used in editing
Color Picker
Converts RAW images (uncompressed
images usually from digital camera) to JPEG
Raw Converter
Allows you to rename a batch of
photos
RENAME
Useful tool for printing your own calendars,
sheets, lied paper, graph paper, etc.
PAPER PRINT
EDITOR EDIT
STEP 1. Enter
“EDITOR” Icon
and choose a
picture from
your file on your
left side of the
screen.
STEP 2. HOME TAB -
This is where you can
add a frame, resize,
sharpen, and add
filters or effects.
Resize the image. The
recommended size is
1366 x 768.
STEP 3.
OBJECTS TAB -
where you can
place a wide
variety of
images like
texts, shapes,
and symbols.
STEP 4. CROP - where various tools can be found in
order to properly crop an image to a desirable size.
STEP 4. TOOLS -
Includes other
tools like red
eye connection,
mole removal,
mosaic effect,
and brush
tools.
STEP 5. Click
Save located on
the lower right
corner of the
screen. The
Save As dialog
box will appear
right after you
click the Save
button.
STEP 5. Click Save
located on the
lower right corner
of the screen. The
Save As dialog box
will appear right
after you click the
Save button. Name
the file -
“editorexer.jpg”
STEP 6.
Check the
file size and
see how
much
space you
saved.
BATCH EDIT
After editing, click
Convert All located on the
upper right corner of the
screen. The Save dialog
box will appear after. Save
the batch images in a new
folder labeled as “BATCH”
inside your resources
folder.
INSERTING, UPLOADING, AND SHARING
PHOTOS OVER THE INTERNET
Image hosts are websites specializing in
storing photographs. These photographs can
easily be embedded to a web page or website.
Reporter: Genevieve
Estingor
There are plenty of free image
hosting sites out there, and
Photobucket is one of the
oldest.
SHARING PHOTOS WITH
PHOTOBUCKET
1. First, sign up for a
Photobucket account
on photobucket.com,
just like piktochart or
you may use your
Google or Facebook
account to
automatically sign up.
2. Once your
account is set up
and you are already
logged in, click the
upload button to
start Uploading.
3. A new page will load
allowing you to drag and
drop your photos or to
choose them manually or
the entire folder to upload.
Select a folder, add a
password (optional), then
feel free to upload any
photos you have right
then.
4. Once selected, a
progress bar will
appear indicating
that the image is
uploading. This
may take a moment
and will depend on
your Internet
connection.
5. Once you are done you will see these indicators:
a. View Uploads - views photos you just uploaded
which also grants you options to share and edit
them individually.
b. Share Album - shares everything you just
uploaded plus the other contents of your specified
folders.
c. Edit Photos - use Photobucket's photo editing
tools to manipulate your image.
6. Let us assume you will share a photo
individually. To do this, click on view uploads
then once the page loads, click the photo you
want to share.
7. On the top of the image, you will see the following
options:
A
C B
A
C B
A - shares your photo
directly to social media and
blogging platforms:
Facebook, Twitter Google+,
Tumblr, and Pinterest,
respectively.
B- gives you a variety of
link codes for HTML,
Forums, Emails, Instant
Messaging, and a direct
link.
C- shares your image via
email
8. You may choose to share your
photos to your friends on Facebook.
If you are done sharing you may
now log off and close the browser.
SOURCE:
https://e-group2consolidatedblogprojects.blogspot.com/
Thank You

Image-and-Design-for-Online-Environment-1.pdf

  • 1.
    Image and Designfor Online Environment EMPOWERMENT TECHNOLOGY GROUP 6
  • 2.
    TABLE OF CONTENTS •Basic Principles of Graphic and Layout • Creating Infographic Using Piktochart • Online Image File Formats • Principles and Basic Techniques of Image Manipulation • Creating and Manipulating Images Using PhotoScape • Inserting, Uploading, and Sharing Photos over the Internet
  • 3.
    6 Basic Principlesof Graphics and Layout
  • 4.
    BASIC PRINCIPLES OFGRAPHICS AND LAYOUT • Balance - The visual weight of objects, texture, colors, and space is EVENLY distributed on the screen. SOURCE: AMELIA BOOK PLUGIN
  • 5.
    BASIC PRINCIPLES OFGRAPHICS AND LAYOUT 2. Emphasis - An area in the design that may appear different in size, texture, shape or color to attract the viewer’s attention. SOURCE: EMPOWERMENT TECHNOLOGY - WORDPRESS
  • 6.
    BASIC PRINCIPLES OFGRAPHICS AND LAYOUT 3. Movement - Visual elements guide the viewer’s eyes around the screen.
  • 7.
  • 9.
    BASIC PRINCIPLES OFGRAPHICS AND LAYOUT 4. Pattern, Repetition, Rhythm - These are the repeating visual element on an image or layout to create unity in the layout or image. SOURCE: MEDIUM
  • 10.
  • 11.
    BASIC PRINCIPLES OFGRAPHICS AND LAYOUT 5. Proportion - Visual elements create a sense of unity where they relate well with one another. SOURCE: Design & Illusration
  • 13.
    BASIC PRINCIPLES OFGRAPHICS AND LAYOUT 6. Variety - This uses several design elements to draw a viewer’s attention. SOURCE: Cedar Bluff Graphics Web & Layout
  • 15.
    INFOGRAPHICS IInformation graphics orinfographics are used to represent information, statistical data, or knowledge in a graphical manner usually done in a creative way to attract the viewer’s attention. Infographics make complex data become more visually appealing to an average user.
  • 16.
    Creating Infographics UsingPiktochart Piktochart - a free online app that allows you to create your own infographic
  • 17.
    Creating Infographics UsingPiktochart 1. Create a piktochart account by going to www.piktochart.com
  • 18.
    Creating Infographics UsingPiktochart 2. Fill out the information on the Sign Up page
  • 19.
    Creating Infographics UsingPiktochart 3. Once you logged in, select a template for your infographic.
  • 20.
    Creating Infographics UsingPiktochart 4. The piktochart editor will open.
  • 21.
    Creating Infographics UsingPiktochart 4. On the left side of the screen you will see these components:
  • 33.
    Online Image File Format Unlikeimages that are found in our computer, you have to consider that website images should be more compressed because data travels over the internet and not everyone has a fast internet connection. Reporter: Vince Ferrer
  • 34.
    Common Image FileFormats: • Joint Photographics Experts Group (JPEG) - is a widely used web image format, employing lossy compression to reduce file sizes while retaining acceptable image quality, ideal for photographs and intricate images.
  • 35.
    Common Image FileFormats: 2. Portable Network Graphics (PNG) - a versatile image format, supports lossless compression and transparency, making it suitable for sharp-edged images, text, and solid colors, albeit at larger file sizes compared to JPEG.
  • 36.
    Common Image FileFormats: 3. GIF (Graphics Interchange Format) - known for its support of animations and simple graphics, utilizes lossless compression and transparency, rendering it suitable for short animations, logos, and graphics with limited colors.
  • 37.
    Uses of these3 common image file formats: • Joint Photographics Experts (JPEG) - Real-life photographs, high compression • JPEG DOES NOT support transparency and animation. 2. Portable Network Graphics (PNG) - Screenshots, high compatibility • PNG DOES support transparency but NOT animation.
  • 38.
    Uses of these3 common image file formats: 3. Graphics Interchange Format (GIF) - Computer-generated graphics • GIF DOES support transparency and animation.
  • 39.
    Principles and BasicTechniques of Image Manipulation IWhen managing our personal websites, it becomes essential to edit images to strike a balance between image quality and loading time. Unlike Facebook, personal websites may not require downsizing image file sizes, but it becomes crucial when targeting a broader audience. Consider the following tips for editing website images. Reporter: Joyce Sto. Domingo
  • 40.
    • Choose theright file format. -- Try to make a real-life photograph into GIF to see the difference between PNG and JPEG. Knowing the purpose is the key to finding out the best file format.
  • 41.
    2. Choose theright Image size • A camera with a higher megapixel count produces larger image sizes. However, monitors have resolution limits, so having a high number of megapixels doesn't necessarily display everything. Therefore, it's not always advisable to have large images on a website. It's important to determine how much space you want the image to take up. Alternatively, you can provide a "preview" image with the option for the audience to view the full size.
  • 42.
    3. Caption it •-remember to put a caption on images whenever possible. If its not related to the web page, then remove it.
  • 43.
    Creating and Manipulating Images Using Photoscape Photoscapeis a good tool because it is feasible for beginners and advanced users alike.
  • 44.
  • 45.
    it is apicture viewer with features the same with most image viewers like changing image orientation. VIEWER
  • 46.
    It alters theappearance of a SINGLE IMAGE. EDITOR
  • 47.
    Alters the appearanceof MULTIPLE IMAGES BATCH EDITOR
  • 48.
    Arranges several photosto create a single one; similar to a MOSAIC. PAGE
  • 49.
    links several imagestogether to form a bigger image. COMBINE
  • 50.
    Allows you tocreate an animated GIF from several pictures. ANIMATED GIF
  • 51.
    readies pictures forprinting PRINT
  • 52.
    divides a singlephoto into multiple parts SPLITTER
  • 53.
    Captures the screenand saves it. SCREEN CAPTURE
  • 54.
    Grabs a pixelfrom your screen to be used in editing Color Picker
  • 55.
    Converts RAW images(uncompressed images usually from digital camera) to JPEG Raw Converter
  • 56.
    Allows you torename a batch of photos RENAME
  • 57.
    Useful tool forprinting your own calendars, sheets, lied paper, graph paper, etc. PAPER PRINT
  • 58.
  • 59.
    STEP 1. Enter “EDITOR”Icon and choose a picture from your file on your left side of the screen.
  • 60.
    STEP 2. HOMETAB - This is where you can add a frame, resize, sharpen, and add filters or effects. Resize the image. The recommended size is 1366 x 768.
  • 61.
    STEP 3. OBJECTS TAB- where you can place a wide variety of images like texts, shapes, and symbols.
  • 62.
    STEP 4. CROP- where various tools can be found in order to properly crop an image to a desirable size.
  • 63.
    STEP 4. TOOLS- Includes other tools like red eye connection, mole removal, mosaic effect, and brush tools.
  • 64.
    STEP 5. Click Savelocated on the lower right corner of the screen. The Save As dialog box will appear right after you click the Save button.
  • 65.
    STEP 5. ClickSave located on the lower right corner of the screen. The Save As dialog box will appear right after you click the Save button. Name the file - “editorexer.jpg”
  • 66.
    STEP 6. Check the filesize and see how much space you saved.
  • 67.
  • 69.
    After editing, click ConvertAll located on the upper right corner of the screen. The Save dialog box will appear after. Save the batch images in a new folder labeled as “BATCH” inside your resources folder.
  • 71.
    INSERTING, UPLOADING, ANDSHARING PHOTOS OVER THE INTERNET Image hosts are websites specializing in storing photographs. These photographs can easily be embedded to a web page or website. Reporter: Genevieve Estingor
  • 72.
    There are plentyof free image hosting sites out there, and Photobucket is one of the oldest. SHARING PHOTOS WITH PHOTOBUCKET
  • 73.
    1. First, signup for a Photobucket account on photobucket.com, just like piktochart or you may use your Google or Facebook account to automatically sign up.
  • 74.
    2. Once your accountis set up and you are already logged in, click the upload button to start Uploading.
  • 75.
    3. A newpage will load allowing you to drag and drop your photos or to choose them manually or the entire folder to upload. Select a folder, add a password (optional), then feel free to upload any photos you have right then.
  • 76.
    4. Once selected,a progress bar will appear indicating that the image is uploading. This may take a moment and will depend on your Internet connection.
  • 77.
    5. Once youare done you will see these indicators: a. View Uploads - views photos you just uploaded which also grants you options to share and edit them individually. b. Share Album - shares everything you just uploaded plus the other contents of your specified folders. c. Edit Photos - use Photobucket's photo editing tools to manipulate your image.
  • 79.
    6. Let usassume you will share a photo individually. To do this, click on view uploads then once the page loads, click the photo you want to share.
  • 80.
    7. On thetop of the image, you will see the following options: A C B
  • 81.
    A C B A -shares your photo directly to social media and blogging platforms: Facebook, Twitter Google+, Tumblr, and Pinterest, respectively. B- gives you a variety of link codes for HTML, Forums, Emails, Instant Messaging, and a direct link. C- shares your image via email
  • 82.
    8. You maychoose to share your photos to your friends on Facebook. If you are done sharing you may now log off and close the browser. SOURCE: https://e-group2consolidatedblogprojects.blogspot.com/
  • 83.