1
Mobile Editing with Snapseed
(Assembled by Jonathan Bacon for SIDLIT 2019)
All tools are listed in alphabetical order, after the Tune Image tool description.
Tune Image – enables you to make a variety of color and exposure
adjustments to your image. Tune image will automatically adjust the
tonality of your image.
Note: For all tools you can make more precise adjustments, just swipe
vertically on the image to access available options. Once an option has
been selected, swipe horizontally (top of the screen) to adjust the
setting. The Tune Image edit menu includes the following options:
• Brightness- darkens or lightens the entire image.
• Contrast - increases or decreases the overall difference between lights
and darks in your image. Adds depth to your images.
• Saturation – deals with the intensity or vibrancy of the colors in your
image.
• Ambiance - a variation of contrast; adjusts the balance of light in the
entire image. A catchall that combines Brightness, Saturation (color) and
Contrast settings. Drag  less light, color and more contrast, → adds
brightness, color, less contrast.
• Highlights - darkens or lightens only the bright spots (illuminated areas) in
your image.
• Shadows - darkens or lightens only the dark areas in your image.
• Warmth - adds a warm cast (orange, red) or cool color cast (blue, purple,
green) to your entire image.
Black & White (filter) – converts color images to black and white. Presets
include Neutral, Contrast, Bright, Dark, Film and Darken Sky. Once
Preset is applied, you can adjust Brightness, Contrast, and Grain. The
Color Filter option simulates shooting with a colored glass filter over
the lens.
Brush – enables your fingertip to become a brush for advanced editing. You
change the size of the brush by pinching-in or pinching-out (zooming
in and out) on the image. Tap to access the menu of brush
effects:
• Dodge & Burn - subtly and selectively lightens (Dodge) or darkens (Burn)
areas of your image (+10 dodges, -10 burns, 0 erases changes previously
made to the image).
• Exposure - increases or decreases the exposure of (amount of light)
selected areas in your image (+1.0 adds exposure, -1.0 darkens and 0
erases changes).
2
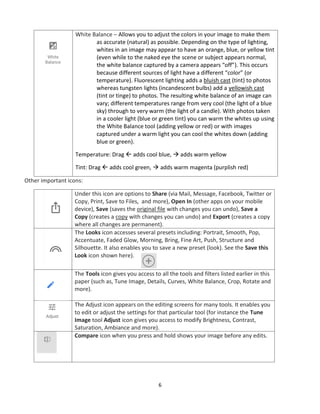
• [Brush continued] Temperature - paints cool or warm tones on selected
areas of your image (+10 warms - adds yellow tint, -10 cools – adds blue
tint, 0 erases changes).
• Saturation - increases or decreases the intensity or vibrancy of color for an
area of your image (+10 saturates the color, -10 desaturates and 0 erases
changes).
Note: when using each brush, select or to change the opacity of the
brush, or select the Eraser (0 value) to erase previously brushed areas.
Tap to view a preview of the brush strokes in orange.
Crop – enables you to recompose an image by trimming the edges to change
its size, shape and dimensions. Often used to remove distractions or
unwanted areas from the edges of an image and so improve the
overall composition of the image. Preset options include 4:3 for
standard PowerPoint slides, 16:9 for widescreen PowerPoint slides
and 4:5 for Instagram posts.
Curves – the Curves tool displays (by default) a straight, diagonal line. The left
side of the grid represents the shadow tones in the image, the center
represents the midtones, and the right represents the highlights. You
can add anchor points to the line and then drag the anchor points up
or down to force adjustments into gradual, curvy transitions from
light to dark. Curves tries to avoid sharp angles, which produce harsh
steps in brightness across the tones of your image.
Details - enhances details to make the subject pop. Swipe vertically on the
image to select between Structure or Sharpening; then, swipe
horizontally to enhance.
• Structure - increases the amount of details in the image. Structure
brings out the texture of objects in the photo, without affecting the
edges of the objects.
• Sharpening - increases the amount of sharpness in the details (edges)
of your image.
Double Exposure – enables you to work with two images, one on top of the
other. With an image open in Snapseed, select the Double Exposure
tool, and tap the Open Image icon to select the second image. You
can drag the second image around to position it or pinch-in or pinch-
out to adjust the second image’s size, as desired. Then select the
desired Style for the second image (Default, Lighten, Darken, Add,
Subtract or Overlay). There’s also a Transparency slider to adjust the
second image’s visibility.
3
Drama (filter) – adds dramatic style instantly using several presets (Drama 1,
Drama 2, Bright 1, Bright 2, Dark 1 and Dark 2). The results can be
subtle enhancements to wildly artistic effects. After applying the
filter, you can adjust it using these options:
• Filter Strength - increases or decreases the effect of the selected style.
• Saturation - adds or removes vibrancy to the colors in the image.
Expand – expands the dimensions of your canvas. The expanded area can be
filled (Fill Mode options) with White or Black or you can use the
Smart (content-aware) option to fill the area with pixels blended into
the surrounding portions of the image.
Frames (filter) – this filter adds stylized borders as the finishing touch for any
image. Tap to select the border style you want from the Frame
options (see frame thumbnails at the bottom of the screen). Tap the
Frame option again to see additional variations. You can also swipe
horizontally on an image to increase or decrease the border size.
Note: always apply frames last after all edits.
Glamour Glow (filter) – Adds a soft, glamorous glow. Includes several preset
glow effects. For more precise adjustments, swipe vertically on the
image to access the edit menu. Once an option has been selected,
swipe horizontally to enhance. The menu options include:
• Glow - swipe to the right to increase the degree of softening.
• Saturation - adds or removes vibrancy to the colors in the image.
• Warmth - adds a warm or cool color cast to the image.
Grainy Film (filter) – replicates shooting on color film with a realistic grain
engine. Tap to select the Style you want. You can adjust the Style
using options to add Grain or adjust Style Strength.
Grunge (filter) – adds a grungy look utilizing color and texture. Tap the Shuffle
icon to randomly add a grunge texture. Once you select a Texture tap
the icon again to randomize the placement of the texture. Additional
options (swipe vertical to see) include Style (over 1500 variations of
color and tonality), Brightness, Contrast, Texture Strength and
Saturation.
HDR Scape (filter) – applies the look of high dynamic range (HDR)
photography automatically. Includes four presets: Nature, People,
Fine and Strong. Adjust options include:
• Filter Strength - increases or decreases the effect of the chosen style.
• Brightness - darkens or lightens the entire image.
• Saturation – adds or removes vibrancy to the colors in the image.
4
Head Pose – enables you to adjust the pupil size, adjust the smile and adjust
the focal length of the head (enlarges the facial feature area). Only
works with photos with one clearly identifiable face.
Healing - enables you to fix image imperfections (scratches, blemishes) by
sampling (touching or painting with your finger across an area) that
you want to blend into the rest of your image. You can pinch out
(using two fingers) to zoom into the image for greater control.
Lens Blur (filter) – Adds blur to draw attention toward a subject by blurring
background images. You can toggle between a linear or elliptical
focus and use a pinching gesture to alter the size, shape, or rotation
of the focus. Several preset styles are available. After applying a Style,
you can adjust it using options for Blur Strength, Transition and
Vignette Strength.
Noir (filter) – creates moody, cinematic black and white images with
darkroom-inspired toning and wash effects. Once you select a Style,
you can select options to adjust Brightness, Wash, Grain and Filter
Strength.
Perspective – enables you to adjust any perspective distortion intuitively with
standard pinch, zoom, and drag gestures. The best choice is to first
try the Auto setting. You can then, tap Fill Mode to turn edge
healing on or to turn edge healing off. With edge healing turned
on, Perspective will automatically fill any blank edges to eliminate the
need for cropping. With edge healing turned off, any blank edges
(after the adjustment of perspective) will be solid black. You can then
crop in a separate step. Perspective has four options: Tilt, Rotate,
Scale and Free.
Portrait (filter) – enables you to adjust Skin Tone and includes several Presets
(Spotlight 1, Spotlight 2, Smooth 1, Smooth 2, Eyes 1, Eyes 2, Combo
1, Combo 2 and Combo 3). Once you select a Preset, there are
options to adjust the Face Spotlight, Skin Smoothing, and Eye Clarity.
These options are described below:
• Face Spotlight - brightens up faces and darkens the surroundings to
draw attention to the most important features of the shot - the
people.
• Skin Smoothing - smooths the texture of the skin while retaining an
overall natural appearance.
5
• [Portrait continued] Eye Clarity - sharpens the eyes while brightening
the whites of the eyes and enhancing the irises.
Retrolux (filter) – creates retro style images with light leaks, scratches, film
styles, and more. You can select the Shuffle icon to randomly apply a
Style. Once you select a Style, you can adjust it using the following
options: Brightness, Saturation, Contrast, Style Strength, Scratches
and Light Leaks.
Rotate – enables you to rotate (turn) an image clockwise or counterclockwise
90 degrees or to free-rotate your image.
Selective – enables you to select one or more areas of the image and adjust
Brightness (B), Contrast (C) or Saturation (S) of each area
(independent of the other areas).
Text – enables you to add text to your image. Text can be edited and by using
pinching motions you can change size and location of the text.
Options enable you to select a Style (sticker, badge or line art), select
the Color of the text and its Transparency.
Tonal Contrast (filter) – emphasizes the fine contrasts across shadows and
highlights, with precise exposure control. Swipe vertically on the
image to access the edit menu which includes these options:
• High Tones - adds contrast to the highlights of the image.
• Mid Tones - adds contrast to the middle gray tones of the image.
• Low Tones - adds contrast to the shadows of the image.
• Protect Shadows - prevents detail in the shadows from being lost after
contrast in the Low Tones is increased.
• Protect Highlights - prevents detail in the highlights from being lost
after contrast in the High tones is increased.
Vignette – creates an illustration or portrait photograph that fades at the
edges into its background without a definite border; that is, there’s a
loss of clarity at the edges and sides of the image.
Vintage (filter) – Evokes feelings of nostalgia by making any image look like
the color film photos of the 50's, 60's, and 70's. Can also add vignette
blur. Includes the standard options to adjust Brightness, Saturation,
Style Strength and Vignette Strength.
6
White Balance – Allows you to adjust the colors in your image to make them
as accurate (natural) as possible. Depending on the type of lighting,
whites in an image may appear to have an orange, blue, or yellow tint
(even while to the naked eye the scene or subject appears normal,
the white balance captured by a camera appears “off”). This occurs
because different sources of light have a different “color” (or
temperature). Fluorescent lighting adds a bluish cast (tint) to photos
whereas tungsten lights (incandescent bulbs) add a yellowish cast
(tint or tinge) to photos. The resulting white balance of an image can
vary; different temperatures range from very cool (the light of a blue
sky) through to very warm (the light of a candle). With photos taken
in a cooler light (blue or green tint) you can warm the whites up using
the White Balance tool (adding yellow or red) or with images
captured under a warm light you can cool the whites down (adding
blue or green).
Temperature: Drag  adds cool blue, → adds warm yellow
Tint: Drag  adds cool green, → adds warm magenta (purplish red)
Other important icons:
Under this icon are options to Share (via Mail, Message, Facebook, Twitter or
Copy, Print, Save to Files, and more), Open In (other apps on your mobile
device), Save (saves the original file with changes you can undo), Save a
Copy (creates a copy with changes you can undo) and Export (creates a copy
where all changes are permanent).
The Looks icon accesses several presets including: Portrait, Smooth, Pop,
Accentuate, Faded Glow, Morning, Bring, Fine Art, Push, Structure and
Silhouette. It also enables you to save a new preset (look). See the Save this
Look icon shown here).
The Tools icon gives you access to all the tools and filters listed earlier in this
paper (such as, Tune Image, Details, Curves, White Balance, Crop, Rotate and
more).
The Adjust icon appears on the editing screens for many tools. It enables you
to edit or adjust the settings for that particular tool (for instance the Tune
Image tool Adjust icon gives you access to modify Brightness, Contrast,
Saturation, Ambiance and more).
Compare icon when you press and hold shows your image before any edits.

Mobile Photo Editing with Snapseed

  • 1.
    1 Mobile Editing withSnapseed (Assembled by Jonathan Bacon for SIDLIT 2019) All tools are listed in alphabetical order, after the Tune Image tool description. Tune Image – enables you to make a variety of color and exposure adjustments to your image. Tune image will automatically adjust the tonality of your image. Note: For all tools you can make more precise adjustments, just swipe vertically on the image to access available options. Once an option has been selected, swipe horizontally (top of the screen) to adjust the setting. The Tune Image edit menu includes the following options: • Brightness- darkens or lightens the entire image. • Contrast - increases or decreases the overall difference between lights and darks in your image. Adds depth to your images. • Saturation – deals with the intensity or vibrancy of the colors in your image. • Ambiance - a variation of contrast; adjusts the balance of light in the entire image. A catchall that combines Brightness, Saturation (color) and Contrast settings. Drag  less light, color and more contrast, → adds brightness, color, less contrast. • Highlights - darkens or lightens only the bright spots (illuminated areas) in your image. • Shadows - darkens or lightens only the dark areas in your image. • Warmth - adds a warm cast (orange, red) or cool color cast (blue, purple, green) to your entire image. Black & White (filter) – converts color images to black and white. Presets include Neutral, Contrast, Bright, Dark, Film and Darken Sky. Once Preset is applied, you can adjust Brightness, Contrast, and Grain. The Color Filter option simulates shooting with a colored glass filter over the lens. Brush – enables your fingertip to become a brush for advanced editing. You change the size of the brush by pinching-in or pinching-out (zooming in and out) on the image. Tap to access the menu of brush effects: • Dodge & Burn - subtly and selectively lightens (Dodge) or darkens (Burn) areas of your image (+10 dodges, -10 burns, 0 erases changes previously made to the image). • Exposure - increases or decreases the exposure of (amount of light) selected areas in your image (+1.0 adds exposure, -1.0 darkens and 0 erases changes).
  • 2.
    2 • [Brush continued]Temperature - paints cool or warm tones on selected areas of your image (+10 warms - adds yellow tint, -10 cools – adds blue tint, 0 erases changes). • Saturation - increases or decreases the intensity or vibrancy of color for an area of your image (+10 saturates the color, -10 desaturates and 0 erases changes). Note: when using each brush, select or to change the opacity of the brush, or select the Eraser (0 value) to erase previously brushed areas. Tap to view a preview of the brush strokes in orange. Crop – enables you to recompose an image by trimming the edges to change its size, shape and dimensions. Often used to remove distractions or unwanted areas from the edges of an image and so improve the overall composition of the image. Preset options include 4:3 for standard PowerPoint slides, 16:9 for widescreen PowerPoint slides and 4:5 for Instagram posts. Curves – the Curves tool displays (by default) a straight, diagonal line. The left side of the grid represents the shadow tones in the image, the center represents the midtones, and the right represents the highlights. You can add anchor points to the line and then drag the anchor points up or down to force adjustments into gradual, curvy transitions from light to dark. Curves tries to avoid sharp angles, which produce harsh steps in brightness across the tones of your image. Details - enhances details to make the subject pop. Swipe vertically on the image to select between Structure or Sharpening; then, swipe horizontally to enhance. • Structure - increases the amount of details in the image. Structure brings out the texture of objects in the photo, without affecting the edges of the objects. • Sharpening - increases the amount of sharpness in the details (edges) of your image. Double Exposure – enables you to work with two images, one on top of the other. With an image open in Snapseed, select the Double Exposure tool, and tap the Open Image icon to select the second image. You can drag the second image around to position it or pinch-in or pinch- out to adjust the second image’s size, as desired. Then select the desired Style for the second image (Default, Lighten, Darken, Add, Subtract or Overlay). There’s also a Transparency slider to adjust the second image’s visibility.
  • 3.
    3 Drama (filter) –adds dramatic style instantly using several presets (Drama 1, Drama 2, Bright 1, Bright 2, Dark 1 and Dark 2). The results can be subtle enhancements to wildly artistic effects. After applying the filter, you can adjust it using these options: • Filter Strength - increases or decreases the effect of the selected style. • Saturation - adds or removes vibrancy to the colors in the image. Expand – expands the dimensions of your canvas. The expanded area can be filled (Fill Mode options) with White or Black or you can use the Smart (content-aware) option to fill the area with pixels blended into the surrounding portions of the image. Frames (filter) – this filter adds stylized borders as the finishing touch for any image. Tap to select the border style you want from the Frame options (see frame thumbnails at the bottom of the screen). Tap the Frame option again to see additional variations. You can also swipe horizontally on an image to increase or decrease the border size. Note: always apply frames last after all edits. Glamour Glow (filter) – Adds a soft, glamorous glow. Includes several preset glow effects. For more precise adjustments, swipe vertically on the image to access the edit menu. Once an option has been selected, swipe horizontally to enhance. The menu options include: • Glow - swipe to the right to increase the degree of softening. • Saturation - adds or removes vibrancy to the colors in the image. • Warmth - adds a warm or cool color cast to the image. Grainy Film (filter) – replicates shooting on color film with a realistic grain engine. Tap to select the Style you want. You can adjust the Style using options to add Grain or adjust Style Strength. Grunge (filter) – adds a grungy look utilizing color and texture. Tap the Shuffle icon to randomly add a grunge texture. Once you select a Texture tap the icon again to randomize the placement of the texture. Additional options (swipe vertical to see) include Style (over 1500 variations of color and tonality), Brightness, Contrast, Texture Strength and Saturation. HDR Scape (filter) – applies the look of high dynamic range (HDR) photography automatically. Includes four presets: Nature, People, Fine and Strong. Adjust options include: • Filter Strength - increases or decreases the effect of the chosen style. • Brightness - darkens or lightens the entire image. • Saturation – adds or removes vibrancy to the colors in the image.
  • 4.
    4 Head Pose –enables you to adjust the pupil size, adjust the smile and adjust the focal length of the head (enlarges the facial feature area). Only works with photos with one clearly identifiable face. Healing - enables you to fix image imperfections (scratches, blemishes) by sampling (touching or painting with your finger across an area) that you want to blend into the rest of your image. You can pinch out (using two fingers) to zoom into the image for greater control. Lens Blur (filter) – Adds blur to draw attention toward a subject by blurring background images. You can toggle between a linear or elliptical focus and use a pinching gesture to alter the size, shape, or rotation of the focus. Several preset styles are available. After applying a Style, you can adjust it using options for Blur Strength, Transition and Vignette Strength. Noir (filter) – creates moody, cinematic black and white images with darkroom-inspired toning and wash effects. Once you select a Style, you can select options to adjust Brightness, Wash, Grain and Filter Strength. Perspective – enables you to adjust any perspective distortion intuitively with standard pinch, zoom, and drag gestures. The best choice is to first try the Auto setting. You can then, tap Fill Mode to turn edge healing on or to turn edge healing off. With edge healing turned on, Perspective will automatically fill any blank edges to eliminate the need for cropping. With edge healing turned off, any blank edges (after the adjustment of perspective) will be solid black. You can then crop in a separate step. Perspective has four options: Tilt, Rotate, Scale and Free. Portrait (filter) – enables you to adjust Skin Tone and includes several Presets (Spotlight 1, Spotlight 2, Smooth 1, Smooth 2, Eyes 1, Eyes 2, Combo 1, Combo 2 and Combo 3). Once you select a Preset, there are options to adjust the Face Spotlight, Skin Smoothing, and Eye Clarity. These options are described below: • Face Spotlight - brightens up faces and darkens the surroundings to draw attention to the most important features of the shot - the people. • Skin Smoothing - smooths the texture of the skin while retaining an overall natural appearance.
  • 5.
    5 • [Portrait continued]Eye Clarity - sharpens the eyes while brightening the whites of the eyes and enhancing the irises. Retrolux (filter) – creates retro style images with light leaks, scratches, film styles, and more. You can select the Shuffle icon to randomly apply a Style. Once you select a Style, you can adjust it using the following options: Brightness, Saturation, Contrast, Style Strength, Scratches and Light Leaks. Rotate – enables you to rotate (turn) an image clockwise or counterclockwise 90 degrees or to free-rotate your image. Selective – enables you to select one or more areas of the image and adjust Brightness (B), Contrast (C) or Saturation (S) of each area (independent of the other areas). Text – enables you to add text to your image. Text can be edited and by using pinching motions you can change size and location of the text. Options enable you to select a Style (sticker, badge or line art), select the Color of the text and its Transparency. Tonal Contrast (filter) – emphasizes the fine contrasts across shadows and highlights, with precise exposure control. Swipe vertically on the image to access the edit menu which includes these options: • High Tones - adds contrast to the highlights of the image. • Mid Tones - adds contrast to the middle gray tones of the image. • Low Tones - adds contrast to the shadows of the image. • Protect Shadows - prevents detail in the shadows from being lost after contrast in the Low Tones is increased. • Protect Highlights - prevents detail in the highlights from being lost after contrast in the High tones is increased. Vignette – creates an illustration or portrait photograph that fades at the edges into its background without a definite border; that is, there’s a loss of clarity at the edges and sides of the image. Vintage (filter) – Evokes feelings of nostalgia by making any image look like the color film photos of the 50's, 60's, and 70's. Can also add vignette blur. Includes the standard options to adjust Brightness, Saturation, Style Strength and Vignette Strength.
  • 6.
    6 White Balance –Allows you to adjust the colors in your image to make them as accurate (natural) as possible. Depending on the type of lighting, whites in an image may appear to have an orange, blue, or yellow tint (even while to the naked eye the scene or subject appears normal, the white balance captured by a camera appears “off”). This occurs because different sources of light have a different “color” (or temperature). Fluorescent lighting adds a bluish cast (tint) to photos whereas tungsten lights (incandescent bulbs) add a yellowish cast (tint or tinge) to photos. The resulting white balance of an image can vary; different temperatures range from very cool (the light of a blue sky) through to very warm (the light of a candle). With photos taken in a cooler light (blue or green tint) you can warm the whites up using the White Balance tool (adding yellow or red) or with images captured under a warm light you can cool the whites down (adding blue or green). Temperature: Drag  adds cool blue, → adds warm yellow Tint: Drag  adds cool green, → adds warm magenta (purplish red) Other important icons: Under this icon are options to Share (via Mail, Message, Facebook, Twitter or Copy, Print, Save to Files, and more), Open In (other apps on your mobile device), Save (saves the original file with changes you can undo), Save a Copy (creates a copy with changes you can undo) and Export (creates a copy where all changes are permanent). The Looks icon accesses several presets including: Portrait, Smooth, Pop, Accentuate, Faded Glow, Morning, Bring, Fine Art, Push, Structure and Silhouette. It also enables you to save a new preset (look). See the Save this Look icon shown here). The Tools icon gives you access to all the tools and filters listed earlier in this paper (such as, Tune Image, Details, Curves, White Balance, Crop, Rotate and more). The Adjust icon appears on the editing screens for many tools. It enables you to edit or adjust the settings for that particular tool (for instance the Tune Image tool Adjust icon gives you access to modify Brightness, Contrast, Saturation, Ambiance and more). Compare icon when you press and hold shows your image before any edits.