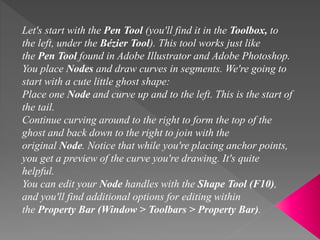
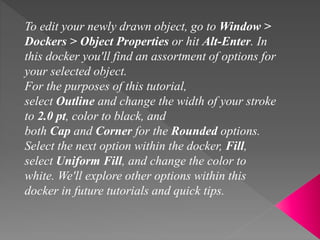
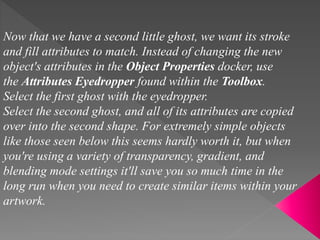
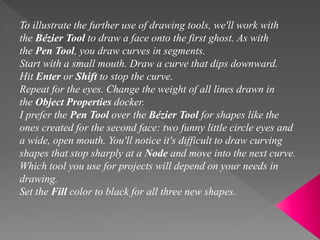
The Pen Tool
Start by creating a New Document (Control-N) at
your preferred work size (you can change this any
time while working), in RGB color mode, and
at 300 dpi. These are my preferred settings, but if
you'd rather work in CMYK for printing purposes,
do so (while remembering to switch to RGB when
exporting for web use).
Let's start with the Pen Tool (you'll find it in the Toolbox, to
the left, under the Bézier Tool). This tool works just like
the Pen Tool found in Adobe Illustrator and Adobe Photoshop.
You place Nodes and draw curves in segments. We're going to
start with a cute little ghost shape:
Place one Node and curve up and to the left. This is the start of
the tail.
Continue curving around to the right to form the top of the
ghost and back down to the right to join with the
original Node. Notice that while you're placing anchor points,
you get a preview of the curve you're drawing. It's quite
helpful.
You can edit your Node handles with the Shape Tool (F10),
and you'll find additional options for editing within
the Property Bar (Window > Toolbars > Property Bar).
To edit your newly drawn object, go to Window >
Dockers > Object Properties or hit Alt-Enter. In
this docker you'll find an assortment of options for
your selected object.
For the purposes of this tutorial,
select Outline and change the width of your stroke
to 2.0 pt, color to black, and
both Cap and Corner for the Rounded options.
Select the next option within the docker, Fill,
select Uniform Fill, and change the color to
white. We'll explore other options within this
docker in future tutorials and quick tips.
Freehand and Bézier Tools
Using the Freehand Tool (F5) is fairly simple if you're drawing
with a graphics tablet. Draw an additional ghost shape. Instead
of choosing where your Nodes appear, they'll be added
automatically depending on what level of Freehand
Smoothing you've set in the Property Bar.
I started with a low setting of 12 for Freehand Smoothing. This
example was quickly drawn with a mouse. Note how it has an
abundance of Nodes and is quite choppy in shape.
I changed the Freehand Smoothing setting to 97. Again, this
was drawn quickly with my mouse. It has 3 Nodes in total.
Note how smooth the second, object is compared to the first.
Your settings in the Property Bar matter quite a bit when using
drawing tools in this program.
Now that we have a second little ghost, we want its stroke
and fill attributes to match. Instead of changing the new
object's attributes in the Object Properties docker, use
the Attributes Eyedropper found within the Toolbox.
Select the first ghost with the eyedropper.
Select the second ghost, and all of its attributes are copied
over into the second shape. For extremely simple objects
like those seen below this seems hardly worth it, but when
you're using a variety of transparency, gradient, and
blending mode settings it'll save you so much time in the
long run when you need to create similar items within your
artwork.
To illustrate the further use of drawing tools, we'll work with
the Bézier Tool to draw a face onto the first ghost. As with
the Pen Tool, you draw curves in segments.
Start with a small mouth. Draw a curve that dips downward.
Hit Enter or Shift to stop the curve.
Repeat for the eyes. Change the weight of all lines drawn in
the Object Properties docker.
I prefer the Pen Tool over the Bézier Tool for shapes like the
ones created for the second face: two funny little circle eyes and
a wide, open mouth. You'll notice it's difficult to draw curving
shapes that stop sharply at a Node and move into the next curve.
Which tool you use for projects will depend on your needs in
drawing.
Set the Fill color to black for all three new shapes.
To illustrate the further use of drawing tools, we'll work with
the Bézier Tool to draw a face onto the first ghost. As with
the Pen Tool, you draw curves in segments.
Start with a small mouth. Draw a curve that dips downward.
Hit Enter or Shift to stop the curve.
Repeat for the eyes. Change the weight of all lines drawn in
the Object Properties docker.
I prefer the Pen Tool over the Bézier Tool for shapes like the
ones created for the second face: two funny little circle eyes and
a wide, open mouth. You'll notice it's difficult to draw curving
shapes that stop sharply at a Node and move into the next
curve. Which tool you use for projects will depend on your
needs in drawing.
Set the Fill color to black for all three new shapes.
B-Spline and Smart Drawing Tools
These little ghosts need crowns. Using the B-Spline
Tool, start with a line that curves to the right and up.
Notice that the further inward to the center you
place your Nodes, the more curved your edges and
corners become.
The shape drawn below has 7 Nodes in total. Set
the Fill color to bright orange in the Object
Properties docker.
The Smart Drawing Tool (Shift-S) is quite similar to
the Freehand Smoothing options of the Freehand Tool.
In the Property Bar, you'll find two options with drop-
down menus: Shape Recognition Level and Smart
Smoothing Level. To start, set both to None.
With both level options set to None, I've drawn another
simple and quick ghost-like shape with my mouse. It takes
a moment for the smart drawing to load. Note how
choppy and Node-filled it is.
Set both level options to Highest and redraw the same
shape. Note how smooth and simple it is with
only 2 Nodes.
See the difference between the two shapes and the
extremes of their settings below.
2-Point Line and 3-Point Curve Tools
We're going to give the ghosts a long overdue rest and draw a
spider web with the final two tools we'll review in this tutorial.
Start with the 2-Point Line Tool and draw a long vertical line. In
the Object Properties docker, change the line weight to 3.0 pt, color
to black, and Cap and Corner to Rounded.
Keep the vertical line selected and start the horizontal line at the
top Node. This will continue the object without having to draw a
new one.
Draw four thinner, diagonal lines radiating outward from the
corner of the previous object. Group (Control-G) your objects
together.

Unit2

  • 1.
    The Pen Tool Startby creating a New Document (Control-N) at your preferred work size (you can change this any time while working), in RGB color mode, and at 300 dpi. These are my preferred settings, but if you'd rather work in CMYK for printing purposes, do so (while remembering to switch to RGB when exporting for web use).
  • 2.
    Let's start withthe Pen Tool (you'll find it in the Toolbox, to the left, under the Bézier Tool). This tool works just like the Pen Tool found in Adobe Illustrator and Adobe Photoshop. You place Nodes and draw curves in segments. We're going to start with a cute little ghost shape: Place one Node and curve up and to the left. This is the start of the tail. Continue curving around to the right to form the top of the ghost and back down to the right to join with the original Node. Notice that while you're placing anchor points, you get a preview of the curve you're drawing. It's quite helpful. You can edit your Node handles with the Shape Tool (F10), and you'll find additional options for editing within the Property Bar (Window > Toolbars > Property Bar).
  • 3.
    To edit yournewly drawn object, go to Window > Dockers > Object Properties or hit Alt-Enter. In this docker you'll find an assortment of options for your selected object. For the purposes of this tutorial, select Outline and change the width of your stroke to 2.0 pt, color to black, and both Cap and Corner for the Rounded options. Select the next option within the docker, Fill, select Uniform Fill, and change the color to white. We'll explore other options within this docker in future tutorials and quick tips.
  • 4.
    Freehand and BézierTools Using the Freehand Tool (F5) is fairly simple if you're drawing with a graphics tablet. Draw an additional ghost shape. Instead of choosing where your Nodes appear, they'll be added automatically depending on what level of Freehand Smoothing you've set in the Property Bar. I started with a low setting of 12 for Freehand Smoothing. This example was quickly drawn with a mouse. Note how it has an abundance of Nodes and is quite choppy in shape. I changed the Freehand Smoothing setting to 97. Again, this was drawn quickly with my mouse. It has 3 Nodes in total. Note how smooth the second, object is compared to the first. Your settings in the Property Bar matter quite a bit when using drawing tools in this program.
  • 5.
    Now that wehave a second little ghost, we want its stroke and fill attributes to match. Instead of changing the new object's attributes in the Object Properties docker, use the Attributes Eyedropper found within the Toolbox. Select the first ghost with the eyedropper. Select the second ghost, and all of its attributes are copied over into the second shape. For extremely simple objects like those seen below this seems hardly worth it, but when you're using a variety of transparency, gradient, and blending mode settings it'll save you so much time in the long run when you need to create similar items within your artwork.
  • 6.
    To illustrate thefurther use of drawing tools, we'll work with the Bézier Tool to draw a face onto the first ghost. As with the Pen Tool, you draw curves in segments. Start with a small mouth. Draw a curve that dips downward. Hit Enter or Shift to stop the curve. Repeat for the eyes. Change the weight of all lines drawn in the Object Properties docker. I prefer the Pen Tool over the Bézier Tool for shapes like the ones created for the second face: two funny little circle eyes and a wide, open mouth. You'll notice it's difficult to draw curving shapes that stop sharply at a Node and move into the next curve. Which tool you use for projects will depend on your needs in drawing. Set the Fill color to black for all three new shapes.
  • 7.
    To illustrate thefurther use of drawing tools, we'll work with the Bézier Tool to draw a face onto the first ghost. As with the Pen Tool, you draw curves in segments. Start with a small mouth. Draw a curve that dips downward. Hit Enter or Shift to stop the curve. Repeat for the eyes. Change the weight of all lines drawn in the Object Properties docker. I prefer the Pen Tool over the Bézier Tool for shapes like the ones created for the second face: two funny little circle eyes and a wide, open mouth. You'll notice it's difficult to draw curving shapes that stop sharply at a Node and move into the next curve. Which tool you use for projects will depend on your needs in drawing. Set the Fill color to black for all three new shapes.
  • 8.
    B-Spline and SmartDrawing Tools These little ghosts need crowns. Using the B-Spline Tool, start with a line that curves to the right and up. Notice that the further inward to the center you place your Nodes, the more curved your edges and corners become. The shape drawn below has 7 Nodes in total. Set the Fill color to bright orange in the Object Properties docker.
  • 9.
    The Smart DrawingTool (Shift-S) is quite similar to the Freehand Smoothing options of the Freehand Tool. In the Property Bar, you'll find two options with drop- down menus: Shape Recognition Level and Smart Smoothing Level. To start, set both to None. With both level options set to None, I've drawn another simple and quick ghost-like shape with my mouse. It takes a moment for the smart drawing to load. Note how choppy and Node-filled it is. Set both level options to Highest and redraw the same shape. Note how smooth and simple it is with only 2 Nodes. See the difference between the two shapes and the extremes of their settings below.
  • 10.
    2-Point Line and3-Point Curve Tools We're going to give the ghosts a long overdue rest and draw a spider web with the final two tools we'll review in this tutorial. Start with the 2-Point Line Tool and draw a long vertical line. In the Object Properties docker, change the line weight to 3.0 pt, color to black, and Cap and Corner to Rounded. Keep the vertical line selected and start the horizontal line at the top Node. This will continue the object without having to draw a new one. Draw four thinner, diagonal lines radiating outward from the corner of the previous object. Group (Control-G) your objects together.