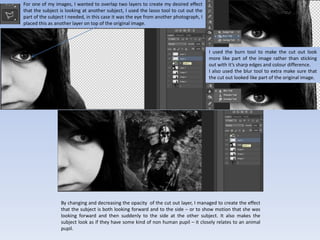
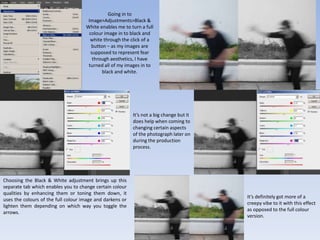
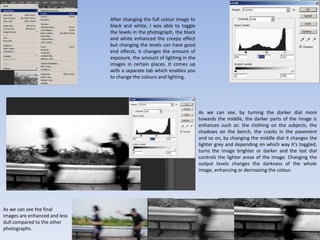
Techniques Used
Aby Jones
For one of my images, I wanted to overlap two layers to create my desired effect
that the subject is looking at another subject, I used the lasso tool to cut out the
part of the subject I needed, in this case it was the eye from another photograph, I
placed this as another layer on top of the original image.
I used the burn tool to make the cut out look
more like part of the image rather than sticking
out with it’s sharp edges and colour difference.
I also used the blur tool to extra make sure that
the cut out looked like part of the original image.
By changing and decreasing the opacity of the cut out layer, I managed to create the effect
that the subject is both looking forward and to the side – or to show motion that she was
looking forward and then suddenly to the side at the other subject. It also makes the
subject look as if they have some kind of non human pupil – it closely relates to an animal
pupil.
For this image I used curves to get the final
look on my photograph, I began by
changing the image to black and white, I
then went in to
Image>Adjustments>Curves which brings
up a separate tab with a graph in it, the
graph allows you to drag a flexible line
around which changes certain aspects of
the image, this includes the lighting,
shadows and highlights to get a desired
end result.
As we can see, dragging the line even slightly can
cause a drastic change, it accentuates shadows and
highlights which creates a perfectly creepy effect
such as this on.
Dragging the line far can have a
very drastic effect such as this
one, being careful and only
moving it slightly each time will
bring greater results.
Going in to
Image>Adjustments>Black &
White enables me to turn a full
colour image in to black and
white through the click of a
button – as my images are
supposed to represent fear
through aesthetics, I have
turned all of my images in to
black and white.
Choosing the Black & White adjustment brings up this
separate tab which enables you to change certain colour
qualities by enhancing them or toning them down, it
uses the colours of the full colour image and darkens or
lighten them depending on which way you toggle the
arrows.
It’s not a big change but it
does help when coming to
changing certain aspects
of the photograph later on
during the production
process.
It’s definitely got more of a
creepy vibe to it with this effect
as opposed to the full colour
version.
After changing the full colour image to
black and white, I was able to toggle
the levels in the photograph, the black
and white enhanced the creepy effect
but changing the levels can have good
end effects, it changes the amount of
exposure, the amount of lighting in the
images in certain places. It comes up
with a separate tab which enables you
to change the colours and lighting.
As we can see, by turning the darker dial more
towards the middle, the darker parts of the image is
enhances such as: the clothing on the subjects, the
shadows on the bench, the cracks in the pavement
and so on, by changing the middle dial it changes the
lighter grey and depending on which way it’s toggled,
turns the image brighter or darker and the last dial
controls the lighter areas of the image. Changing the
output levels changes the darkness of the whole
image, enhancing or decreasing the colour.
As we can see the final
images are enhanced and less
dull compared to the other
photographs.

Techniques Used in Photography

  • 1.
  • 2.
    For one ofmy images, I wanted to overlap two layers to create my desired effect that the subject is looking at another subject, I used the lasso tool to cut out the part of the subject I needed, in this case it was the eye from another photograph, I placed this as another layer on top of the original image. I used the burn tool to make the cut out look more like part of the image rather than sticking out with it’s sharp edges and colour difference. I also used the blur tool to extra make sure that the cut out looked like part of the original image. By changing and decreasing the opacity of the cut out layer, I managed to create the effect that the subject is both looking forward and to the side – or to show motion that she was looking forward and then suddenly to the side at the other subject. It also makes the subject look as if they have some kind of non human pupil – it closely relates to an animal pupil.
  • 3.
    For this imageI used curves to get the final look on my photograph, I began by changing the image to black and white, I then went in to Image>Adjustments>Curves which brings up a separate tab with a graph in it, the graph allows you to drag a flexible line around which changes certain aspects of the image, this includes the lighting, shadows and highlights to get a desired end result. As we can see, dragging the line even slightly can cause a drastic change, it accentuates shadows and highlights which creates a perfectly creepy effect such as this on. Dragging the line far can have a very drastic effect such as this one, being careful and only moving it slightly each time will bring greater results.
  • 4.
    Going in to Image>Adjustments>Black& White enables me to turn a full colour image in to black and white through the click of a button – as my images are supposed to represent fear through aesthetics, I have turned all of my images in to black and white. Choosing the Black & White adjustment brings up this separate tab which enables you to change certain colour qualities by enhancing them or toning them down, it uses the colours of the full colour image and darkens or lighten them depending on which way you toggle the arrows. It’s not a big change but it does help when coming to changing certain aspects of the photograph later on during the production process. It’s definitely got more of a creepy vibe to it with this effect as opposed to the full colour version.
  • 5.
    After changing thefull colour image to black and white, I was able to toggle the levels in the photograph, the black and white enhanced the creepy effect but changing the levels can have good end effects, it changes the amount of exposure, the amount of lighting in the images in certain places. It comes up with a separate tab which enables you to change the colours and lighting. As we can see, by turning the darker dial more towards the middle, the darker parts of the image is enhances such as: the clothing on the subjects, the shadows on the bench, the cracks in the pavement and so on, by changing the middle dial it changes the lighter grey and depending on which way it’s toggled, turns the image brighter or darker and the last dial controls the lighter areas of the image. Changing the output levels changes the darkness of the whole image, enhancing or decreasing the colour. As we can see the final images are enhanced and less dull compared to the other photographs.