The document provides information about various camera settings that impact photographs, including aperture, shutter speed, ISO, white balance, and post-processing techniques. It includes sample photographs demonstrating the effects of different settings.
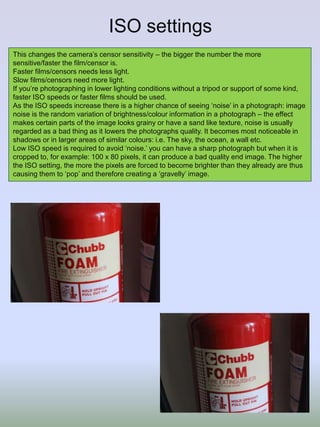
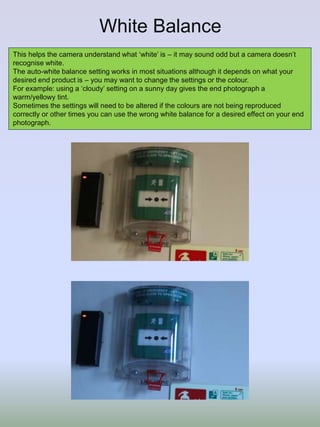
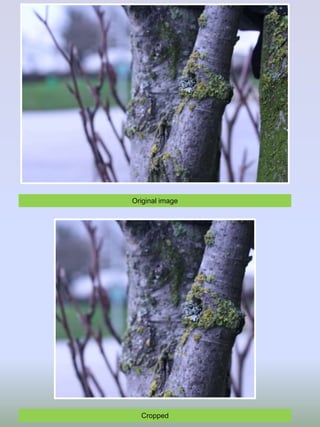
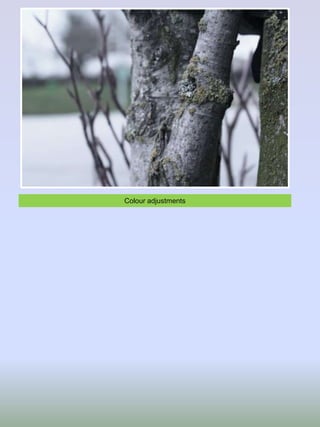
The aperture setting controls depth of field and is used in landscape and portrait photography. Shutter speed can freeze or blur motion, with faster speeds freezing action and slower speeds showing movement. ISO adjusts the camera's light sensitivity, with higher ISO allowing less light but risking more noise. White balance helps the camera understand color temperatures to accurately reproduce colors. Post-processing can refine images through cropping, levels/tones adjustments, dodging and burning, and modifying colors.
2. Aperture (AV mode)
First of all, ‘Aperture’ is the technical name for the hole in the lens of the camera, this setting
is key in landscape photography as it controls the depth of field in a photograph: depth of field
is the definition of how blurred/focused the background of an image is.
This setting is controlled by switching the camera settings to Aperture Priority (AV) – this lets
you manually control the aperture whilst letting the rest of the setting are adjusted by the
camera to get the right end product – the camera does this using a complex system –
sometimes the ISO is also adjusted during this process.
This setting is also useful in portraiture as photographers use the advantages of Aperture to
blur the background of an image so that the central focus is on the main subject at hand. The
sizes of the lens’ are measured and known as F-numbers.
The lower the F-number – the bigger the aperture, this reduces the depth of field and lets
more light in to the photograph.
Wider settings let more light in, this is useful in low light conditions and will reduce the depth
of field in the picture.
The higher the F-number – the smaller the aperture, this increases the depth of field and
reduces the amount of light being let in to the final image.
Using this setting often requires a tripod as the camera needs a longer exposure time to
avoid camera shake or movement.
The correct exposure or the desired effect is achieved by balancing out the settings.
3. This photograph was taken with the
Aperture setting of F4.5 – this has
focused on the background more than
it’s focused on the foreground, giving
more attention to detail to the main
subject of the photograph, which in this
case, is the clay. This proves that the
lower the F number (Aperture) the higher
depth of field, it’s focused on the table at
the back rather than the table right in
front of the camera.
This photograph was taken with the
Aperture setting of F13 – the difference
between this image and the first one with
the setting of F4.5 is that the table all
around the clay sculpture is more in
focus than it was in the first image –
looking at the first photograph and then
this one it’s easy to see that there is an
obvious difference, although the
foreground is sharper, it still isn’t as
sharp as the table right in front of the
camera – this is still noticeable at first
glance.
For this image, I changed the Aperture
settings to F22, in this image the clay
sculpture and the table surrounding it is
sharper and in focus – if you put the
images beside each other you can
definitely tell the difference. This proves
that the higher the Aperture setting, the
smaller the hole, the more light is let in
and the whole image in turn becomes
more focused in every aspect.
F4.5
F13
F22
4. Shutter Speed (TV mode)
This is the length of time the shutter on a camera is open for when taking photographs.
Shutter Priority mode (S or TV) should be enabled – this lets you manually choose how long
the shutter will be open for, the camera will adjust other settings to get the right exposure.
Shutter speed is presented in fractions of a second such as: 1/30.
Bigger numbers = faster the shutter opens and closes – the shutter speed is measured in
whole seconds as exposure gets longer.
Slower speeds are used to show movement and when they are used there is a longer pause
between the shutter opening and closing – this allows a longer time for movement to be
captured. This also allows more light in and is also good in dark conditions - using a tripod to
avoid camera shake, because more light hits the censor in the camera aperture settings are
often adjusted to increase the depth of field.
A faster shutter speed enables a photographer to essentially freeze a moment in time – it
means that there is a shorter capture time and less time to capture movement so taking these
photographs often require a quick snap of a particular scene, it also ensures a sharp, focused
image that captures moments that human eyes can not, however, these images require a lot
of either ambient or artificial lighting.
5. The first shutter speed is 1/250 of a
second – we can observe that the
camera has not picked up a mass
majority of movement here – the camera
has taken the image at a very fast pace
and captured a very sharp, focused
image of the subject walking by – there
is only a slight blur to show that it has
picked up at least a little bit of the
movement – although the image appears
to be darker – as the ISO settings have
altered to get the right exposure, there is
a considerable amount of detail.
The second shutter speed was 1/30 of a
second – we can see that the camera
has picked up some form of movement
but it is not as clear as the first image –
the person walking by is slightly blurred
but not very – this has shown an obvious
difference in camera settings - it’s also
quite easy to distinguish what is what in
this image: i.e. their face. We can also
see that the ISO settings have been
altered to get the right exposure as the
wall in the background is slightly different
in colour as opposed to the first image.
The last shutter speed is 1 / 5 of a
second – as we can observe, from a first
glance, it’s very obvious it the camera
and setting has picked up the movement
of the person walking past easily by
blurring any part of the subject that is
moving – in this case their whole body –
it’s hard to distinguish exactly what is
what in this image – i.e. where her head
is etc. The ISO has clearly changed as
the entire image is brighter in
comparison to the other two
photographs.
1/250
1/30
1 / 5
6. ISO settings
This changes the camera’s censor sensitivity – the bigger the number the more
sensitive/faster the film/censor is.
Faster films/censors needs less light.
Slow films/censors need more light.
If you’re photographing in lower lighting conditions without a tripod or support of some kind,
faster ISO speeds or faster films should be used.
As the ISO speeds increase there is a higher chance of seeing ‘noise’ in a photograph: image
noise is the random variation of brightness/colour information in a photograph – the effect
makes certain parts of the image looks grainy or have a sand like texture, noise is usually
regarded as a bad thing as it lowers the photographs quality. It becomes most noticeable in
shadows or in larger areas of similar colours: i.e. The sky, the ocean, a wall etc.
Low ISO speed is required to avoid ‘noise.’ you can have a sharp photograph but when it is
cropped to, for example: 100 x 80 pixels, it can produce a bad quality end image. The higher
the ISO setting, the more the pixels are forced to become brighter than they already are thus
causing them to ‘pop’ and therefore creating a ‘gravelly’ image.
7. The ISO setting for this first image was
1600 – we can see that in the middle of
the photograph it’s light and clear – there
is a slight darkness around the edges of
the image that shows the censors
sensitivity to the light although it’s not
extremely obvious when you first glance
at the image.
This second image has the ISO setting
of 800 – we can see that there is still a
lot of light in this image however, the
slight darkness that was around the
edges in the first photograph with ISO
1600 has darkened considerably and
become more blatantly obvious so that at
first glance – you can see it.
The last image has the ISO setting of
100 – from the first glance we can tell
that there is not a lot of light in this image
– it’s almost pitch black apart from the
centre of the photograph which still
allows some light in and makes the fire
extinguishers still visible – it is very
obvious when you look at it that the
censor has not picked up a lot of light.
6400
800
100
8. White Balance
This helps the camera understand what ‘white’ is – it may sound odd but a camera doesn’t
recognise white.
The auto-white balance setting works in most situations although it depends on what your
desired end product is – you may want to change the settings or the colour.
For example: using a ‘cloudy’ setting on a sunny day gives the end photograph a
warm/yellowy tint.
Sometimes the settings will need to be altered if the colours are not being reproduced
correctly or other times you can use the wrong white balance for a desired effect on your end
photograph.
9. The first image has been taken with the white balance setting of: White Fluorescent – this
allows the image to come out bright, with a hint of blue in parts – it makes the white of the
walls look extremely bright in comparison to the other object in the image.
The second image was taken with the white balance setting of: Tungsten light – this has
turned any white in the image in to a shade of blue, it’s definitely changed the shadows to
a darker blue.
The third image has been taken with the white balance setting of: Daylight – this has made
the white of the walls become a darker and made the overall image look borderline black
and white, it has kept the other object to it’s original colour and made the lights in the
reflection of the object more vivid.
The last photograph has been taken with the white balance setting of: Shade – this has
enhanced the darker, yellow colour that we observed in the third photograph and made it
darker and more eye catching – the TV has become darker and so has the reflections in
the TV – although the only thing brighter in this image seems to be the lights in the
reflection.
Tungsten LightWhite Fluorescent
ShadeDaylight