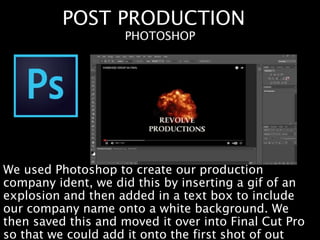
WHAT HAVE YOU LEARNT
ABOUT TECHNOLOGIES
FROM THE PROCESS OF
CONSTRUCTING THIS
PRODUCT?
TASK 6 – NATALIE ROCKALL
MEDIA EVALUATION
CAMERA
We used a Canon Legria HFR56 to film our opening
sequence. It’s an easy to use video recorder which, as a
group, we were all familiar with from having used them
for our preliminary task. The main functions of the
camera in which we needed to know is how to start and
stop recording, how to watch back recorded footage and
how to change the detachable battery packs in the back
in case we ran out of charge. There was zoom function,
however we didn’t use this, as it reduces the quality of
CANON LEGRIA HFR56
TRIPOD
The tripod we used was a
Videomate 638. It was
extremely helpful in terms of
keeping all the desired shots
steady, for example the
panoramic shots, used to help
establish the setting. Having
never used a tripod before, it
was helpful as I learnt how to
adjust the height, move the
legs outwards and how to
attach the camera onto the top.
A disadvantage to using the
tripod was that we sometimes
found it challenging and time
consuming to have to reattach
VELBON – VIDEOMATE 638
APPLE iMac
We used a desktop iMac in order to edit our opening
sequence. The Mac’s had all the needed software
such as Final Cut Pro and GarageBand already on
them, which then made convenient when it came to
putting our opening sequence together, as we had
everything we needed. A new function I learnt was
how to selectively screenshot by pressing
DESKTOP iMac
SOUND RECORDER
To re-record some of our dialogue and for recreating
sounds using Foley which featured in our opening
sequence, we used a sound recorder. This was used
in our group to help emphasise sounds which may
have not been clear when initially recording it with
the video camera. The process of re-recording
sounds was hard especially for the diegetic sounds as
VOICE MICROPHONE
To record the non-diegetic news report off
which was coming from the television, we had
to use a voice microphone. Our teacher helped
us record this once we had written out a script,
and then to add a sense of realism, we slightly
edited the sound clip to make it sound like it
was coming from a TV rather than it being
POST PRODUCTION
We edited our opening title sequence using Apple’s
professional-level video editing software, Final Cut
Pro X. I had previously learnt how to use some
editing software’s such as Final Cut during my work
experience placement, so I was therefore familiar
with it. However, some skills had been forgotten so I
had to quickly pick them back up again during
editing process for both the prelim and main task.
Difficulties we faced were that the programme was
FINAL CUT PRO
Here is where all of our
imported sounds go, where
we can then drag and drop
into our timeline if we
wanted it.
This is the viewer window,
where you playback clips and
what you have edited together. It
has a simple rewind, play/pause
and fast forward beneath it.
This is
where you
can change
your text in
terms of
size, font
and colour.
In this section you can add in
the effects for the titles, we
used mainly the fade transition,
we also used an effect to
darken the lighting of our
montage shots in order to
create a more sinister
This big section at the bottom of the interface is
called the timeline. Here you can add in the shots,
audio clips and effects which you can then crop and
layer to create your final piece. It has a toolbar which
lets you perform editing tasks.
This is the
event
library in
which you
can select
clips from
the events
browser.
ZOOMING IN
ONTO THE
TIMELINE:
The indigo coloured boxes
are the titles in which we
added in to make a
conventional looking
opening sequence.
The green boxes are audio clips, ‘Ross
Bugden's’ is the backing track to the
montage and the wind audio clip
underneath it was to add the sense of
realism to our piece. More towards the
left of the timeline all the smaller green
clips are separate audio shots we
This small grey box
between the video clips
indicates the use of a
transition in which we
used to switch from the
montage to the
continuity editing.
These boxes with the
images are the induvial
shots which make up our
opening. This have all been
cropped down from the
original shots using the
cropping tool.
As you can see on these two audio
clips, the sound curves down as it
fades in and out, we did this but
simply dragging the audio clips down,
the point of this was so that there was
a fade in the change of background
music to make our piece seem more
SOFTWARE PROGRAMMES
We used a software programme called Mahara to
document our progress both in class as well and
producing our opening sequence. As you can see
from the screenshot taken from above I created
two journals, one for my research leading up to the
final cut which includes a copy of our final piece, as
MAHARAHere you can see all
your different
journals.
You can create
new journals
by clicking
here.
Here you can
create new
journal
entries.
You click the
pencil icon to
edit pre-
existing
entries.
POST PRODUCTION
We used Photoshop to create our production
company ident, we did this by inserting a gif of an
explosion and then added in a text box to include
our company name onto a white background. We
then saved this and moved it over into Final Cut Pro
so that we could add it onto the first shot of out
PHOTOSHOP
RESEARCH
We used a website called Art of the Title to get inspiration
for our opening sequence. This is a website where you can
watch any film opening sequence by a wide variety of
genres. We used this as a source of gaining in research
when it came to planning. Our inspiration was an opening
sequence to a series called ‘The Night Of’, due to their
ART OF THE TITLE
RESEARCH
I used websites such as Pearl & Dean to gather
audience demographic figures, which became
useful when establishing who our target audience
was going to be for our film. We also used IMDb
which is useful when we needed to research into
PEARL & DEAN, IMDb
I used software's such as Prezi
and slideshare to change the
format of the way in which I
present my work. I used Prezi to
create an interactive mind map
of a target audience member,
and slideshare for
presentations. This then
provided with me with more
creative options of displaying
either my research, planning or
evaluation tasks.
As a group we kept in contact
through iMessage as a group
chat, but sent each other
pictures and files through
Outlook. The group chat came
especially in handy as we led up
to filming day and had to keep
in contact.
I also used a
software called
OneDrive, which
became essential
once I had ran out
of storage space
on mahara and
couldn’t upload
images directly
onto there. We
also used this to
share files we
needed access to
We uploaded our Rough Cut and Final Piece onto YouTube,
this then made it easy for audience feedback.

Task 6

  • 1.
    WHAT HAVE YOULEARNT ABOUT TECHNOLOGIES FROM THE PROCESS OF CONSTRUCTING THIS PRODUCT? TASK 6 – NATALIE ROCKALL MEDIA EVALUATION
  • 2.
    CAMERA We used aCanon Legria HFR56 to film our opening sequence. It’s an easy to use video recorder which, as a group, we were all familiar with from having used them for our preliminary task. The main functions of the camera in which we needed to know is how to start and stop recording, how to watch back recorded footage and how to change the detachable battery packs in the back in case we ran out of charge. There was zoom function, however we didn’t use this, as it reduces the quality of CANON LEGRIA HFR56
  • 3.
    TRIPOD The tripod weused was a Videomate 638. It was extremely helpful in terms of keeping all the desired shots steady, for example the panoramic shots, used to help establish the setting. Having never used a tripod before, it was helpful as I learnt how to adjust the height, move the legs outwards and how to attach the camera onto the top. A disadvantage to using the tripod was that we sometimes found it challenging and time consuming to have to reattach VELBON – VIDEOMATE 638
  • 4.
    APPLE iMac We useda desktop iMac in order to edit our opening sequence. The Mac’s had all the needed software such as Final Cut Pro and GarageBand already on them, which then made convenient when it came to putting our opening sequence together, as we had everything we needed. A new function I learnt was how to selectively screenshot by pressing DESKTOP iMac
  • 5.
    SOUND RECORDER To re-recordsome of our dialogue and for recreating sounds using Foley which featured in our opening sequence, we used a sound recorder. This was used in our group to help emphasise sounds which may have not been clear when initially recording it with the video camera. The process of re-recording sounds was hard especially for the diegetic sounds as
  • 6.
    VOICE MICROPHONE To recordthe non-diegetic news report off which was coming from the television, we had to use a voice microphone. Our teacher helped us record this once we had written out a script, and then to add a sense of realism, we slightly edited the sound clip to make it sound like it was coming from a TV rather than it being
  • 7.
    POST PRODUCTION We editedour opening title sequence using Apple’s professional-level video editing software, Final Cut Pro X. I had previously learnt how to use some editing software’s such as Final Cut during my work experience placement, so I was therefore familiar with it. However, some skills had been forgotten so I had to quickly pick them back up again during editing process for both the prelim and main task. Difficulties we faced were that the programme was FINAL CUT PRO
  • 8.
    Here is whereall of our imported sounds go, where we can then drag and drop into our timeline if we wanted it. This is the viewer window, where you playback clips and what you have edited together. It has a simple rewind, play/pause and fast forward beneath it. This is where you can change your text in terms of size, font and colour. In this section you can add in the effects for the titles, we used mainly the fade transition, we also used an effect to darken the lighting of our montage shots in order to create a more sinister This big section at the bottom of the interface is called the timeline. Here you can add in the shots, audio clips and effects which you can then crop and layer to create your final piece. It has a toolbar which lets you perform editing tasks. This is the event library in which you can select clips from the events browser.
  • 9.
    ZOOMING IN ONTO THE TIMELINE: Theindigo coloured boxes are the titles in which we added in to make a conventional looking opening sequence. The green boxes are audio clips, ‘Ross Bugden's’ is the backing track to the montage and the wind audio clip underneath it was to add the sense of realism to our piece. More towards the left of the timeline all the smaller green clips are separate audio shots we This small grey box between the video clips indicates the use of a transition in which we used to switch from the montage to the continuity editing. These boxes with the images are the induvial shots which make up our opening. This have all been cropped down from the original shots using the cropping tool. As you can see on these two audio clips, the sound curves down as it fades in and out, we did this but simply dragging the audio clips down, the point of this was so that there was a fade in the change of background music to make our piece seem more
  • 10.
    SOFTWARE PROGRAMMES We useda software programme called Mahara to document our progress both in class as well and producing our opening sequence. As you can see from the screenshot taken from above I created two journals, one for my research leading up to the final cut which includes a copy of our final piece, as MAHARAHere you can see all your different journals. You can create new journals by clicking here. Here you can create new journal entries. You click the pencil icon to edit pre- existing entries.
  • 11.
    POST PRODUCTION We usedPhotoshop to create our production company ident, we did this by inserting a gif of an explosion and then added in a text box to include our company name onto a white background. We then saved this and moved it over into Final Cut Pro so that we could add it onto the first shot of out PHOTOSHOP
  • 12.
    RESEARCH We used awebsite called Art of the Title to get inspiration for our opening sequence. This is a website where you can watch any film opening sequence by a wide variety of genres. We used this as a source of gaining in research when it came to planning. Our inspiration was an opening sequence to a series called ‘The Night Of’, due to their ART OF THE TITLE
  • 13.
    RESEARCH I used websitessuch as Pearl & Dean to gather audience demographic figures, which became useful when establishing who our target audience was going to be for our film. We also used IMDb which is useful when we needed to research into PEARL & DEAN, IMDb
  • 14.
    I used software'ssuch as Prezi and slideshare to change the format of the way in which I present my work. I used Prezi to create an interactive mind map of a target audience member, and slideshare for presentations. This then provided with me with more creative options of displaying either my research, planning or evaluation tasks. As a group we kept in contact through iMessage as a group chat, but sent each other pictures and files through Outlook. The group chat came especially in handy as we led up to filming day and had to keep in contact. I also used a software called OneDrive, which became essential once I had ran out of storage space on mahara and couldn’t upload images directly onto there. We also used this to share files we needed access to We uploaded our Rough Cut and Final Piece onto YouTube, this then made it easy for audience feedback.