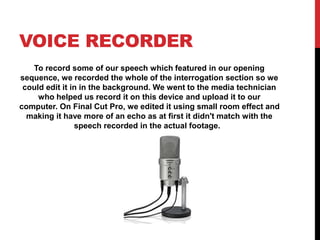
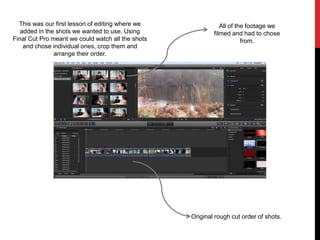
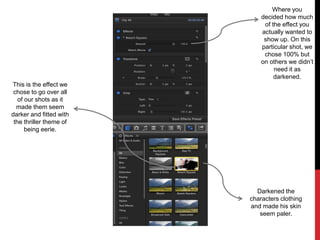
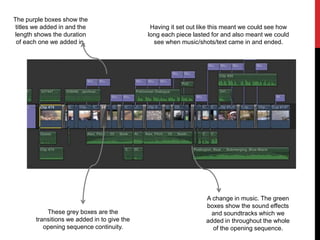
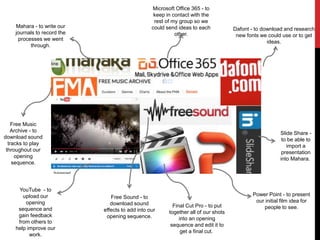
WHAT HAVE YOU LEARNT
ABOUT TECHNOLOGIES
FROM THE PROCESS OF
CONSTRUCTING THIS
PRODUCT?
CAMERA
CANON LEGRIA HFR56
This is the video camera we used to film our opening sequences.
The camera itself was fairly simple to use by pressing record to
start and stop, but making sure the shots were what we wanted was
harder. When filming, we had to make sure the lighting was very
bright as although it may look too bright when were filming, the
camera doesn't take in as much light as there actually is. Also, when
I wasn't using the tripod, keeping my hand still to film was
sometimes challenging so it was always helpful when I could look
back to watch footage, although that wasted battery. We didn't use
the zoom button as that made the shots less focused and
unprofessional so when we wanted to go closer in on a shot, we
just changed the type of shot and moved the camera itself.
TRIPOD
VELBON - VIDEOMATE 638
The tripod was very helpful to keep all the shots steady. When we
were doing panoramic shots, we could stand the camera in the
tripod on the ground and take a smooth shot of the setting. It also
meant that when taking footage of shots which stayed in the same
place for a while then swapped to the other side, the camera
wouldn't move level as you could keep it at exactly the same angle.
As I'd never used a tripod before, it was helpful as I learnt how to
adjust the height, move the legs outwards and attach the camera
onto it. It was important I learnt this as I was one of the people that
did the most filming as I didn't feature in our opening sequence.
MAC DESKTOP
Having never used a Mac Desktop, I had to learn from scratch as it's
a lot different to a Windows Computer. The main programme we
used which was installed onto the Mac already was Final Cut Pro.
VOICE RECORDER
To record some of our speech which featured in our opening
sequence, we recorded the whole of the interrogation section so we
could edit it in in the background. We went to the media technician
who helped us record it on this device and upload it to our
computer. On Final Cut Pro, we edited it using small room effect and
making it have more of an echo as at first it didn't match with the
speech recorded in the actual footage.
This was our first lesson of editing where we
added in the shots we wanted to use. Using
Final Cut Pro meant we could watch all the shots
and chose individual ones, crop them and
arrange their order.
Original rough cut order of shots.
All of the footage we
filmed and had to chose
from.
Where you
decided how much
of the effect you
actually wanted to
show up. On this
particular shot, we
chose 100% but
on others we didn’t
need it as
darkened.
This is the effect we
chose to go over all
of our shots as it
made them seem
darker and fitted with
the thriller theme of
being eerie.
Darkened the
characters clothing
and made his skin
seem paler.
The purple boxes show the
titles we added in and the
length shows the duration
of each one we added in.
These grey boxes are the
transitions we added in to give the
opening sequence continuity.
A change in music. The green
boxes show the sound effects
and soundtracks which we
added in throughout the whole
of the opening sequence.
Having it set out like this meant we could see how
long each piece lasted for and also meant we could
see when music/shots/text came in and ended.
Mahara - to write our
journals to record the
processes we went
through.
Slide Share -
to be able to
import a
presentation
into Mahara.
Microsoft Office 365 - to
keep in contact with the
rest of my group so we
could send ideas to each
other.
Dafont - to download and research
new fonts we could use or to get
ideas.
Free Music
Archive - to
download sound
tracks to play
throughout our
opening
sequence.
YouTube - to
upload our
opening
sequence and
gain feedback
from others to
help improve our
work.
Free Sound - to
download sound
effects to add into our
opening sequence.
Final Cut Pro - to put
together all of our shots
into an opening
sequence and edit it to
get a final cut.
Power Point - to present
our initial film idea for
people to see.

Lucy cotter technologies

  • 1.
    WHAT HAVE YOULEARNT ABOUT TECHNOLOGIES FROM THE PROCESS OF CONSTRUCTING THIS PRODUCT?
  • 2.
    CAMERA CANON LEGRIA HFR56 Thisis the video camera we used to film our opening sequences. The camera itself was fairly simple to use by pressing record to start and stop, but making sure the shots were what we wanted was harder. When filming, we had to make sure the lighting was very bright as although it may look too bright when were filming, the camera doesn't take in as much light as there actually is. Also, when I wasn't using the tripod, keeping my hand still to film was sometimes challenging so it was always helpful when I could look back to watch footage, although that wasted battery. We didn't use the zoom button as that made the shots less focused and unprofessional so when we wanted to go closer in on a shot, we just changed the type of shot and moved the camera itself.
  • 3.
    TRIPOD VELBON - VIDEOMATE638 The tripod was very helpful to keep all the shots steady. When we were doing panoramic shots, we could stand the camera in the tripod on the ground and take a smooth shot of the setting. It also meant that when taking footage of shots which stayed in the same place for a while then swapped to the other side, the camera wouldn't move level as you could keep it at exactly the same angle. As I'd never used a tripod before, it was helpful as I learnt how to adjust the height, move the legs outwards and attach the camera onto it. It was important I learnt this as I was one of the people that did the most filming as I didn't feature in our opening sequence.
  • 4.
    MAC DESKTOP Having neverused a Mac Desktop, I had to learn from scratch as it's a lot different to a Windows Computer. The main programme we used which was installed onto the Mac already was Final Cut Pro.
  • 5.
    VOICE RECORDER To recordsome of our speech which featured in our opening sequence, we recorded the whole of the interrogation section so we could edit it in in the background. We went to the media technician who helped us record it on this device and upload it to our computer. On Final Cut Pro, we edited it using small room effect and making it have more of an echo as at first it didn't match with the speech recorded in the actual footage.
  • 6.
    This was ourfirst lesson of editing where we added in the shots we wanted to use. Using Final Cut Pro meant we could watch all the shots and chose individual ones, crop them and arrange their order. Original rough cut order of shots. All of the footage we filmed and had to chose from.
  • 7.
    Where you decided howmuch of the effect you actually wanted to show up. On this particular shot, we chose 100% but on others we didn’t need it as darkened. This is the effect we chose to go over all of our shots as it made them seem darker and fitted with the thriller theme of being eerie. Darkened the characters clothing and made his skin seem paler.
  • 8.
    The purple boxesshow the titles we added in and the length shows the duration of each one we added in. These grey boxes are the transitions we added in to give the opening sequence continuity. A change in music. The green boxes show the sound effects and soundtracks which we added in throughout the whole of the opening sequence. Having it set out like this meant we could see how long each piece lasted for and also meant we could see when music/shots/text came in and ended.
  • 9.
    Mahara - towrite our journals to record the processes we went through. Slide Share - to be able to import a presentation into Mahara. Microsoft Office 365 - to keep in contact with the rest of my group so we could send ideas to each other. Dafont - to download and research new fonts we could use or to get ideas. Free Music Archive - to download sound tracks to play throughout our opening sequence. YouTube - to upload our opening sequence and gain feedback from others to help improve our work. Free Sound - to download sound effects to add into our opening sequence. Final Cut Pro - to put together all of our shots into an opening sequence and edit it to get a final cut. Power Point - to present our initial film idea for people to see.